Silex technology SX-NEWAH-EVK User guide

SX-NEWAH-EVK Start-UP Guide
silex Technology, Inc.


1. Outline
SX-NEWAH is a wireless LAN module that complies with the 915MHz band standard IEEE
802.11ah. Transmission of over 1 Mbps of 1km wireless distance (*).
By connecting this product to Raspberry Pi, the functions of SX-NEWAH can be used.
(*) The wireless distance and throughput vary depending on your environment.
2. Feature
✓IEEE 802.11ah support
✓NEWRACOM’ NRC7292 chipset
✓1/2/4MHz bandwidth
✓MCS0-7, MCS10 transfer rate (MCS10 can be used only when the bandwidth is 1MHz.)
✓WPA3(SAE/OWE)
✓The wireless setting can be retrieved and configured using a special utility.
✓MHF1 connector installed for external antennas
✓SPI host interface support

3. Notifications
✓This equipment uses 915MHz band radio.
✓As this product communicates by radio wave, it is strongly recommended to use
some security system to prevent unexpected information leakage to others.
✓This product will effect to some other device or be affected by the some other device
using the same frequency band. Please investigate the environment to use this
product beforehand.
✓Disassembling or modifying the radio module leads to punishment based on radio
law.
✓This equipment t has the exposed connectors or some devices. Please be careful for
electro static, condensing, and other dusts.
✓In the case using the other wireless devices using same frequency band around this
product, please take care below.(See IEEE802.11-2012)
✓The module is possibly interfered when strong signal is input. The other wireless
system should be enough far from this product.
✓Input level from the opponent device must be -10dBm or less with including antenna
gain.
✓Firmware of this product shall be updated without the advance notice.

4. Specifications
Evaluation KIT
Model number
SX-NEWAH-EVK
Wireless module
SX-NEWAH
Operating voltage
5.0V
Dimensions
90mm×80mm×25mm
Wireless LAN Module
Chipset
NRC7292
Wireless LAN standard
IEEE 802.11ah
Wireless mode
AP, STA
Frequency (*1)
1MHz
903.5, 904.5, 905.5, 906.5, 907.5, 908.5, 909.5, 910.5, 911.5,
912.5, 913.5, 914.5, 915.5, 916.5, 917.5, 918.5, 919.5, 920.5,
921.5, 922.5, 923.5, 924.5, 925.5(*2), 926.5(*2)
2MHz
905, 907, 909, 911, 913, 915, 917, 919, 921, 923, 925
4Mhz
910, 914, 918, 922
Modulation
OFDM
Transmission rate (MCS)
MCS0-7, MCS10 (MCS10 can be used only when the bandwidth is 1MHz.)
Transmission rate (Kbps)
150Kbps - 15Mbps
Encryption method
WPA2-PSK, WPA3 (SAE/OWE)
Antenna connector
MHF1 connector x 1
Host interface
SPI
Operating voltage
VDD33: 3.3V VDDFEM: 3.3V or 4.0V
Consumption current
(peak value)
Transmission: VDD33 98mA, VDDFEM 570mA
Reception: VDD33 55mA, VDDFEM 28mA
Operating conditions
Temperature: -40℃to 85℃
Humidity: 15 to 95%RH (no condensing)
Storage conditions
Temperature: -40℃to 85℃
Humidity: 15 to 95%RH (no condensing)
Dimensions
20.5mm×27.0mm×3.1mm
Weight
3.0g
Connector type
68 pin Surface mount
Certification standard
US(FCC), Canada (IC)
*1 This product can be used in US and Canada only.
*2 When AP mode, STA can connect to AP about 60 seconds after AP starts.

5. Before You Begin
□SX-NEWAH-EVK (SX-NEWAH (IEEE 802.11ah wireless module) is installed)
□Antenna for SX-NEWAH
□AC adaptor for SX-NEWAH-EVK
□Raspberry Pi 3 Model B (hereinafter, “Raspberry Pi”)
□AC adaptor for Raspberry Pi (5V/3A or higher)
- Recommended for the radio to operate properly in accordance to the module
specification
□Micro SD card (8GB or higher・UHS-I / Class 10 or higher)
The following items are necessary to use SX-NEWAH-EVK:
□PC (Windows 10 or higher is recommended)
(Optional. Please prepare as necessary.)
□Ethernet cable
□HDMI compatible monitor
□HDMI cable
□USB keyboard/mouse
□micro SD card reader/writer
□Terminal software (e.g. Tera Term, etc.)
➢In this document, Tera Term (Version 4.102) is used.
□Software to write an SD card image (e.g. Win32 Disk Imager, etc.)
➢In this document, Win32 Disk Imager (Version 1.0) is used.
(Refer to 7.2.2 for how to write an image using this software.)
* To use Raspberry Pi with other devices (e.g. sensor, etc.), prepare the necessary items for
it.
* This product uses the 920MHz. Recommend that prepare two of EVK in total for AP and
STA mode.

6. EVK Composition
⚫Outline

7. Environment Setup
⚫Before turning on SX-NEWAH-EVK, turn on/off the SW1 according to the below image.
(1) Connect SX-NEWAH-EVK and Raspberry Pi according to the image below.
(2) Connect the antenna of SX-NEWAH to the SMA connector.
(3) Connect the AC adaptor of SX-NEWAH-EVK to the power connector.
(4) Connect the AC adaptor of Raspberry Pi.
Before turning on SX-NEWAH-EVK, prepare a micro SD card to which an OS image is written.
To use SX-NEWAH-EVK via SSH, install the terminal software on your PC.
In this document, Tera Term is used as an example.
Following explains how to write an image using Win32 Disk Imager to the Windows
environment.
Download Win32 Disk Imager from the URL below.
https://sourceforge.net/projects/win32diskimager/
Execute the installer you have downloaded, and install it according to the instructions.
When the installation is completed, insert the micro SD card into your PC (when your PC does
not support direct connection of a micro SD card, use a micro SD card reader).
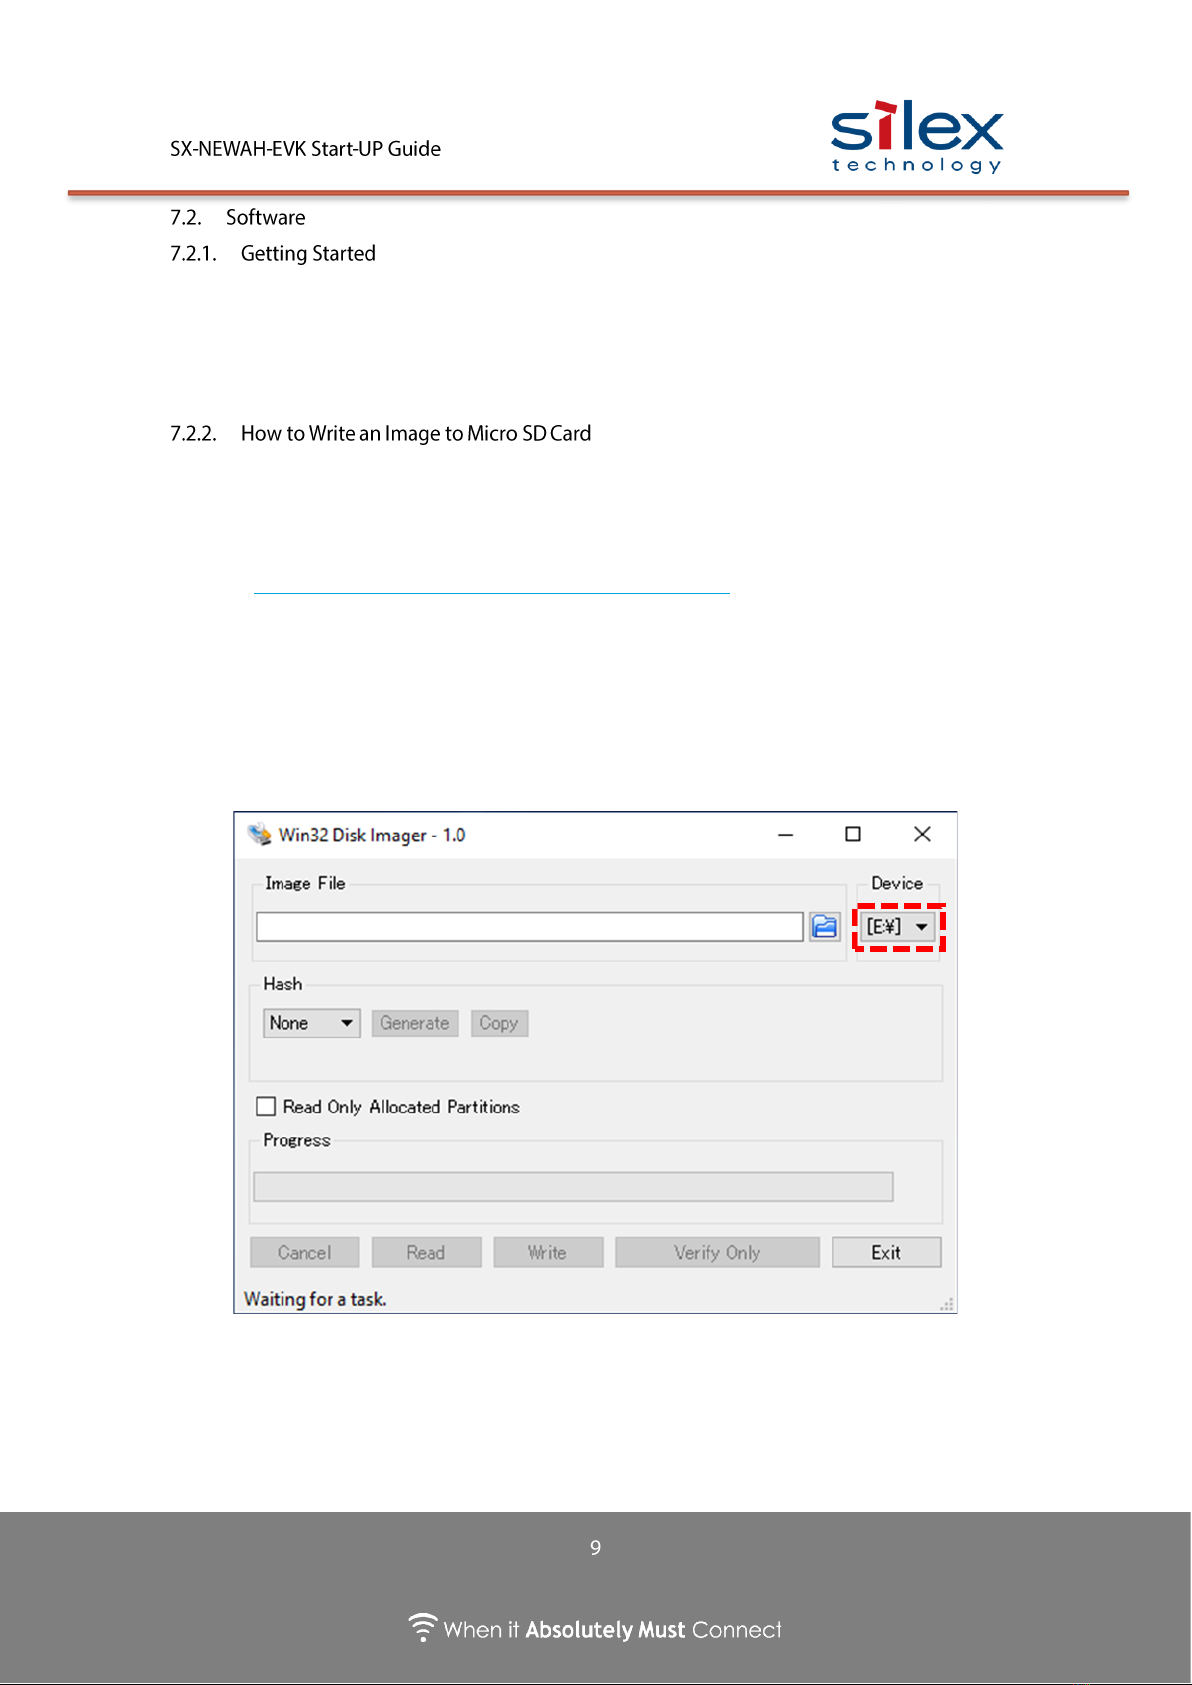
(1) When the Win32 Disk Imager is started, the below window will appear.
Click the pull-down menu to select the drive to write the image into.

Click the button to show the file selection window.
Select the image file to write.
* The file name will vary depending on the version.
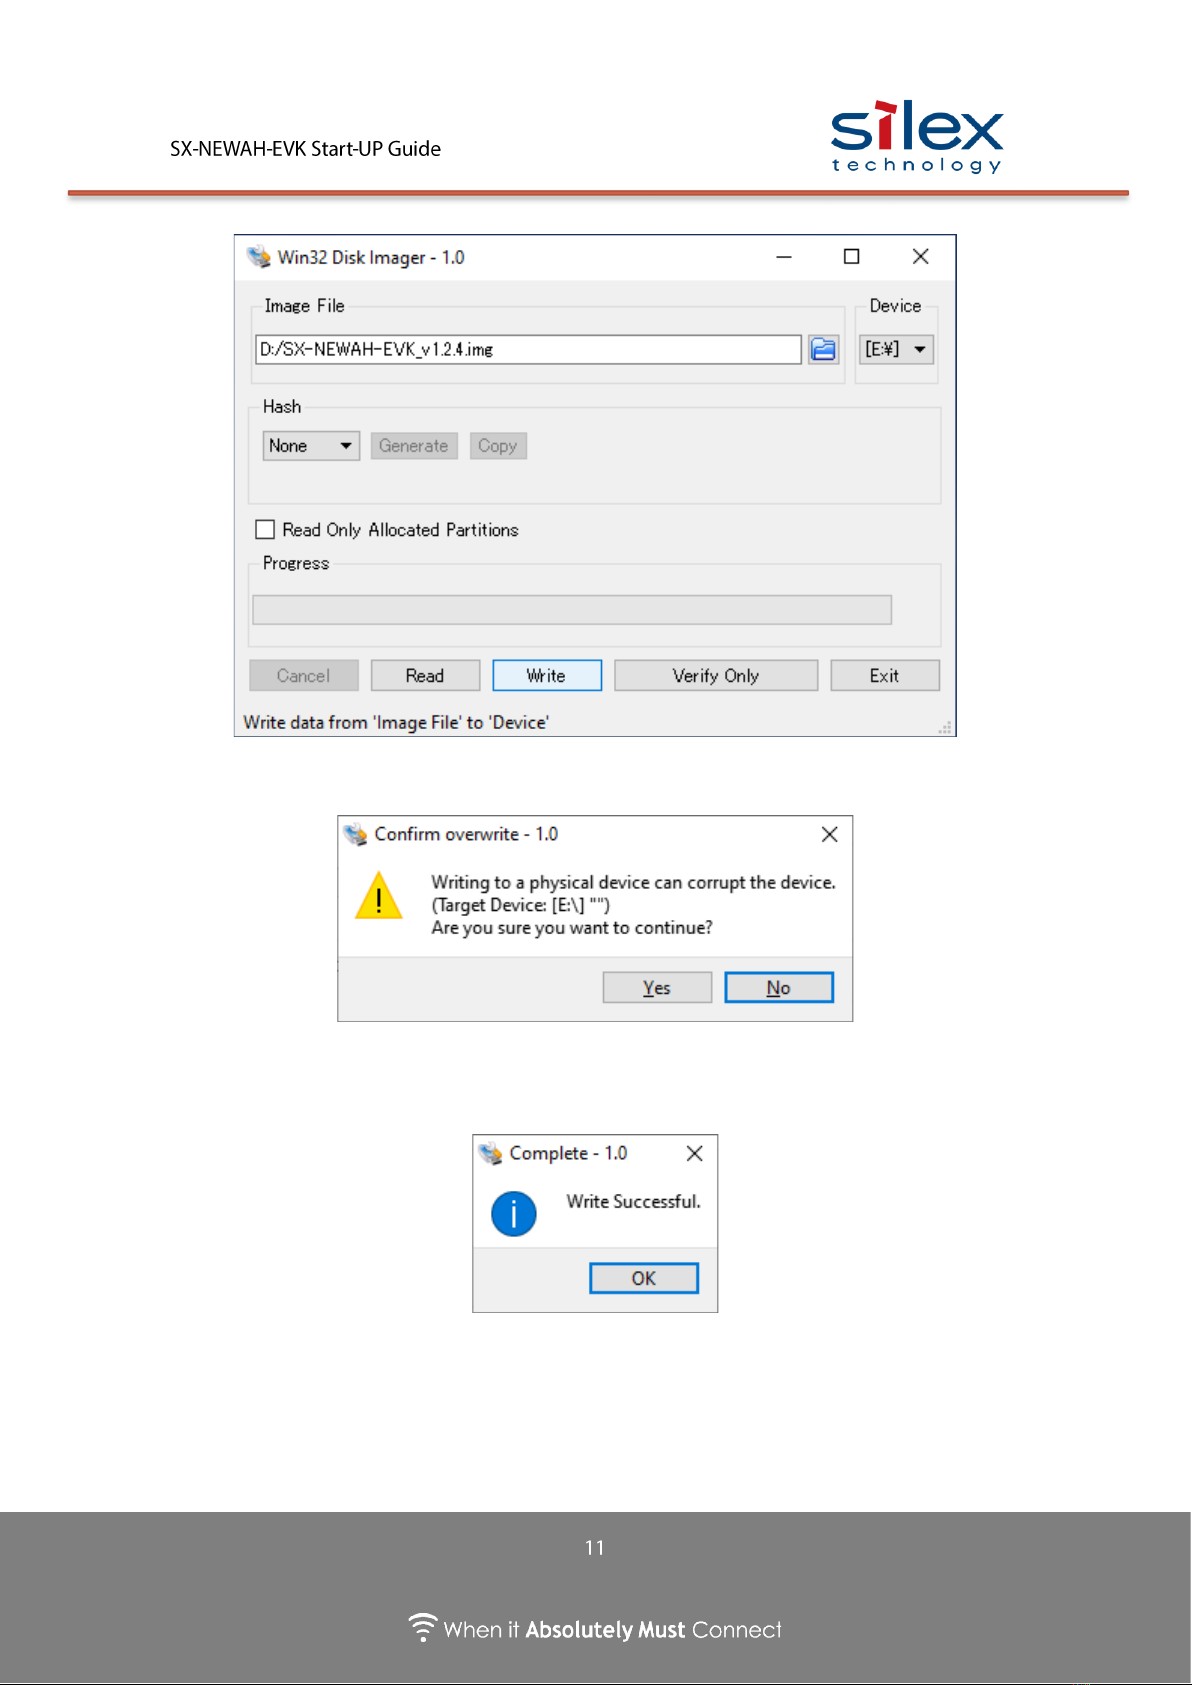
(4) Select the image to write and then click “Write”.
(5) When the confirmation message appears, check the drive and click “Yes”.
(6) When the write process is completed successfully, the message below appears. Click
“OK”.
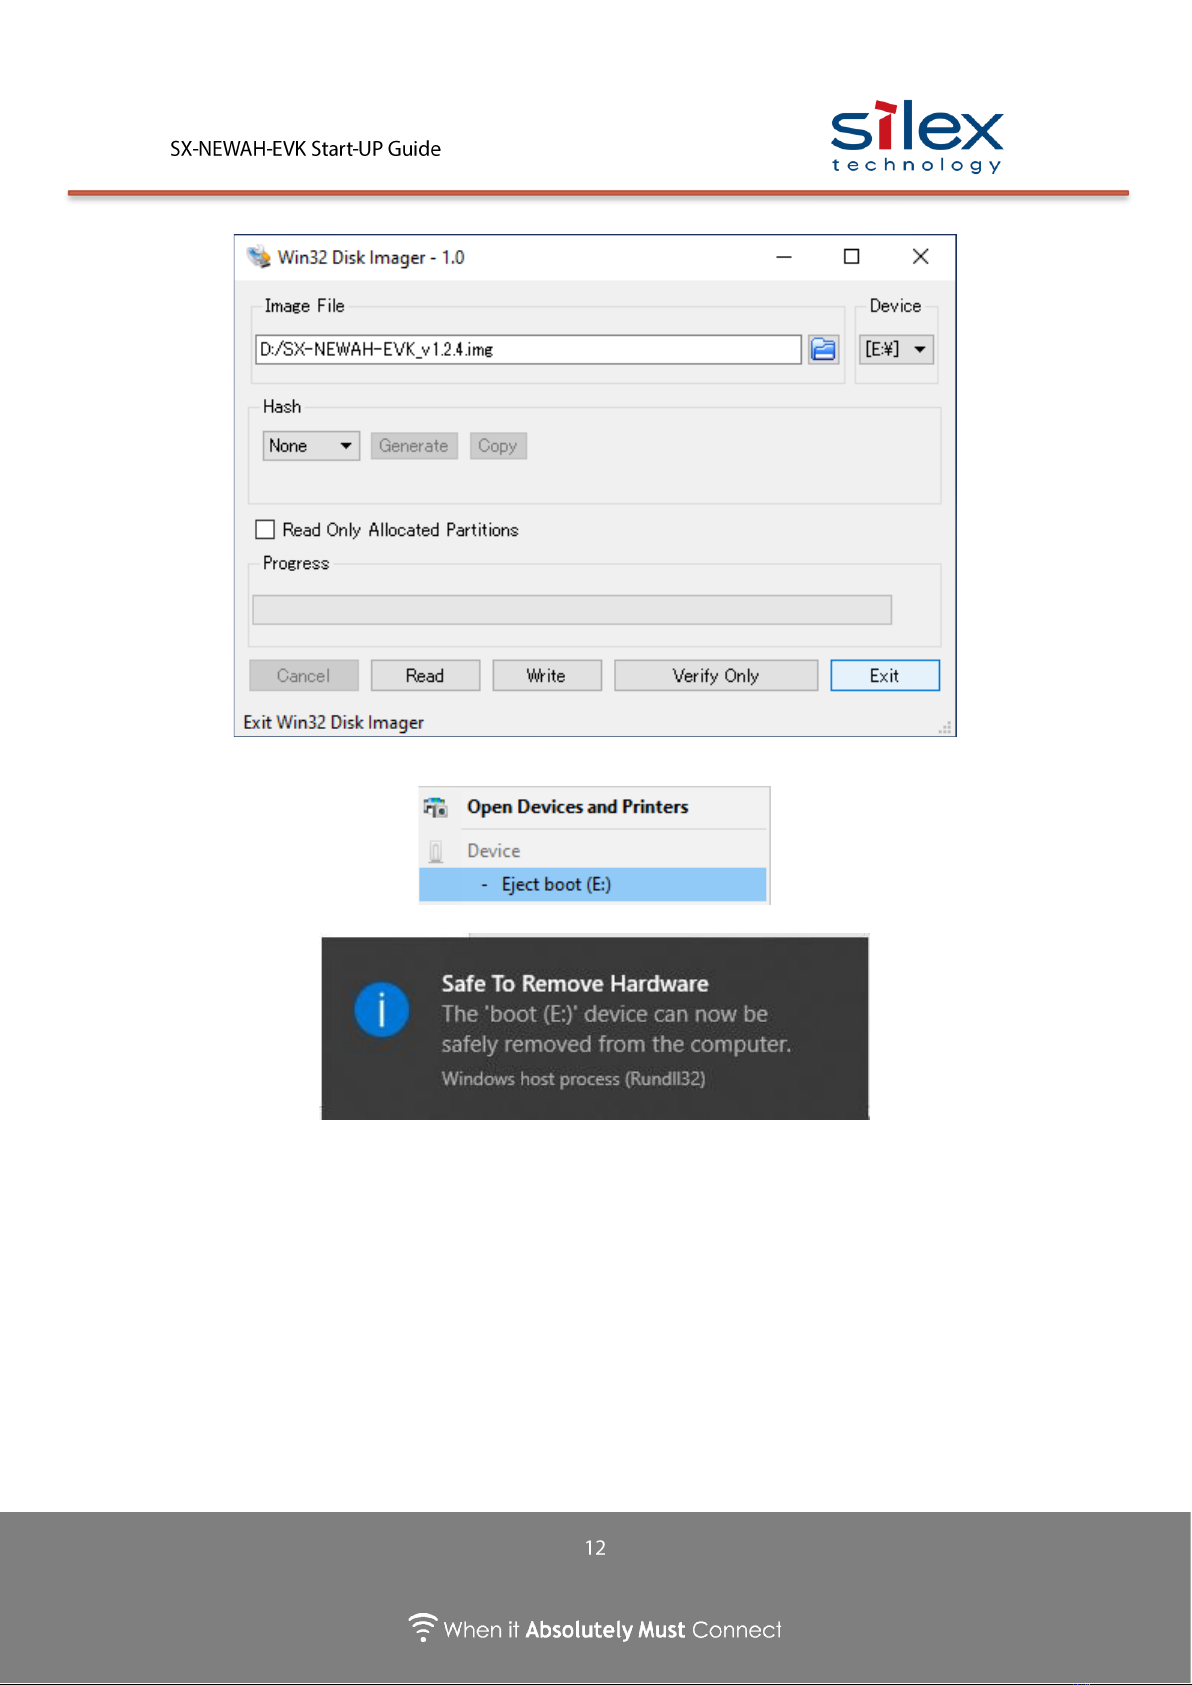
(7) Click "Exit".
(8) Remove a micro SD card from the PC.
(9) Insert the micro SD card to Raspberry Pi.
8. Device Connection
There are two methods for console connection; one is the connection using HDMI(GUI) of
Raspberry Pi, and the other is the connection using a network access (SSH) from a PC.
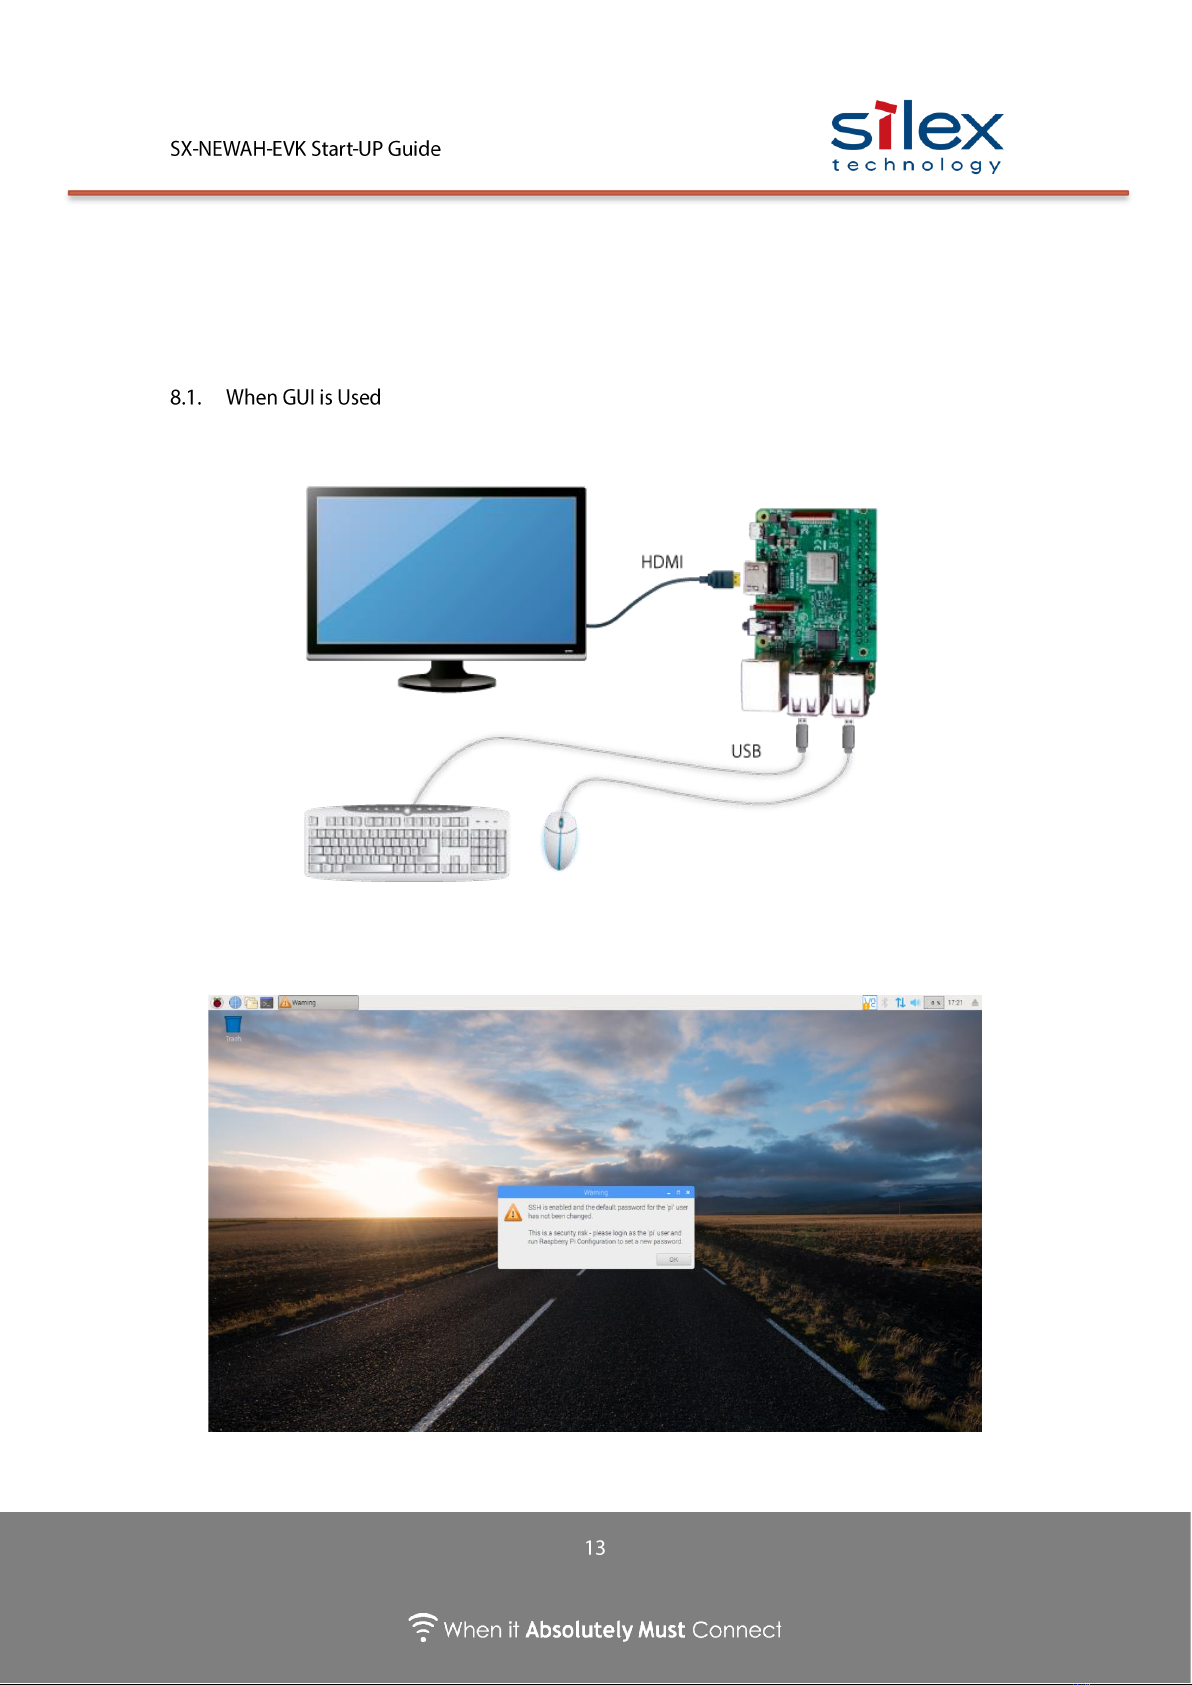
Connect a monitor, mouse and keyboard to Raspberry Pi.
(1) When Raspberry Pi is turned on, the login performs automatically and the desktop screen
appears.

(2) Start Terminal (LXTerminal) from the menu.

* It is necessary to set the static IP address of the wired LAN adaptor of the PC to the same
segment as the Raspberry Pi.
Setting example:
IP address: 192.168.0.1
Subnet mask: 255.255.255.0
Connect a PC and Raspberry Pi using an Ethernet cable.
(1) Start the terminal software.
(2) Enter "192.168.0.10" for the host and "22" for the TCP port#.
(3) Select “SSH” for Service, and click "OK".

(4) If the below window is displayed, click “Continue”
(5) Enter "User name" and "Passphrase" and click "OK".
➢User name : pi
➢Passphrase : raspberry
(6) When the below screen appears, the login is completed.


9. Wireless Communication Check
Following explains how to check IP communication for a wireless connection after SX-
NEWAH-EVK is turned on in AP/STA mode.
* Before using this product, make sure that a specific low-power radio station is not operating
nearby. If a specific low-power radio station is operated, interference may occur.
Necessary Items
Prepare two SX-NEWAH-EVK units to which the configuration has been made according to
Chapter 7. For the IP address of eth0 (Ethernet I/F) of Raspberry Pi, configure the appropriate
one.
* For the IP address configuration method, refer to “11.2 How to Change IP Address of
Raspberry Pi’s eth0 (Ethernet I/F)”.

⚫Sample command to start in AP mode
①
sudo insmod /lib/modules/$(uname -r)/nrc.ko fw_name=nrc7292_cspi.bin hifspeed=16000000
②
sudo ifconfig wlan0 up
③
cli_app set txpwr 23
④
cli_app set maxagg 1 8
⑤
cli_app set gi short
⑥
sudo hostapd -B ~/sx-newah/conf/US/ap_halow_sae.conf
⑦
sudo ifconfig wlan0 192.168.200.1
⚫Explanations of commands and parameters above
(For details, refer to “Driver Load Parameter” and “Command List” of the specification
document[SC111270].)
①Driver load
* Be sure to wait for 5 or more seconds before starting ②after finishing ①.
②Active a wireless interface
③Tx power setting
Command
txpwr <value>
Command
sample
set txpwr 23
Command
argument
value
1-30(1dB step)
Default value
10
④Maximum aggregation size
Command
maxagg <ac> <max num> {size}
Command
sample
set maxagg 0 8
Command
argument
ac
Access Category
0:BK, 1:BE, 2:VI, 3:VO
max_num (*)
1-13: Aggregation size
0: Aggregation disabled
Size
Data size threshold for aggregation (option)
(*) 0 is set when not specified.
(*) The data frame is aggregated when the total size of the MAC
layer is larger than the threshold. When 0 is set, all data frames
are aggregated.
Default value
Aggregation is disabled for all access categories.
Note
* Set the aggregation size 8 or lower, or otherwise, the communication becomes unstable.
⑤Guard interval
Command
gi <short|long|auto>
Command
sample
set gi short
Command
argument
short
Fixed to Short Guard Interval
long
Fixed to Long Guard Interval
auto
Short/Long Guard Interval switches automatically according to
the wireless environment.
* This setting is valid only when the station mode is on.
Default value
long
This manual suits for next models
1
Table of contents
Other Silex technology Wireless Module manuals


