Silver Spring SFPAS User manual

1-888-651-3431
17592 REV 07-19-2021
Patented.
All text and images contained in this document are
copyrighted, proprietary, and may not be shared, modified,
distributed, reproduced, or reused without the express
written permission from the manufacturer.
Single-fold Ramp
Portable ramp for temporary or semi-permanent use.
Instructions for Part #SFPAS
GENERAL GUIDELINES & SAFETY
•It is the user’s responsibility to read and follow all instructions
•Keep these instructions with the product at all times and review before each use
•It is the responsibility of this product’s owner to furnish the instructions to any person that borrows or
purchases the product
•Inspect the product before use to ensure it is assembled properly and all parts are in safe working
order and free of defects
•Never modify this product in any way
•All circumstances cannot be addressed in these instructions
•Please use common sense and practice general safety measures when using this product
•Parts and/or instructions are subject to change without notice

1-888-651-3431
Page 2
SYMBOLS
The WARNING symbol indicates a potentially hazardous condition/situation. The warnings throughout this
document, and on your equipment, if any, are for the protection of people and property. Failure to abide by
warnings will result in a waiver of all liabilities, loss of your warranty, and could result in equipment damage and
or failure, property damage, risk of serious bodily injury, and or death to operators, riders, and those nearby. The
symbol may appear in various colors and in conjunction with other symbols.
The NOTE symbol indicates important information. Failure to obey all notes could result in improper operation,
less-than-optimum equipment performance, and at the sole discretion of the equipment manufacturer, may void
your warranty. The symbol may appear in various colors and in conjunction with other symbols.
WARNINGS
Maximum weight capacity is 700 lbs.; never exceed weight capacity.
Prior to assembly and use, read and follow all instructions, warnings, and labels. Following all instructions and
obeying all warnings before and during use is necessary for safe operation. For additional information or to obtain
replacement copies of instructions or labels, call 1-888-651-3431.
For wheelchairs and scooters only; not for commercial use.
Before use, refer to your mobility equipment's owner guide for acceptable ramp usage, including proper
slope/incline, chair direction, etc.; never exceed its recommendations.
Only use the ramp with a qualified helper and always use a lap belt.
Before each use, check the ramp for worn, loose, or damaged parts. If you find any of these conditions, do not use
the ramp. Call 1-888-651-3431 for service or repairs; failure to do so may cause injury.
Do not use the ramp if it is damaged or unstable.
Do not tamper with, attempt to repair, or modify any portion of the ramp.
Use caution when folding and unfolding the ramp to avoid all potential pinch points.
Ensure that the landings the ramp will be placed on are substantial and of sound construction.
Use only if the secure, unobstructed, level landings can support, at minimum, the same weight capacity as the
ramp (700 lbs.).
Ensure that the surface area of both top lip transition plates fully overlaps a secure, unobstructed, level landing
enough to safely install provided clevis pins or other non-provided anchoring hardware, and rests firmly against
the upper landing. If a secure, unobstructed, level landing cannot be attained, do not use the ramp.
Ensure that the ramp is securely anchored before each use.
Use only if sufficient maneuvering room is available at both ends of the ramp to assure safe travel when
entering and exiting the ramp.
The ramp surface may be slippery in wet conditions; use caution if the surface is wet as traction may be reduced.
Do not use the ramp if its surface is covered with ice, snow, dirt, leaves, or other debris. Remove all accumulations
and sweep the surface clean before use.
Improper use of the ramp could result in serious injury.
Always exercise caution when handling, installing, and or using the ramp.
1-888-651-3431
Page 3
GETTING STARTED
1. Read this instruction manual in its entirety before use and follow all instructions before and during use.
2. Before use, refer to your mobility equipment's owner guide for acceptable ramp usage, including proper
slope/incline, chair direction, etc.; never exceed its recommendations.
3. Before each use, check the ramp for worn, loose, or damaged parts. If you find any of these conditions, do not
use the ramp.
4. Confirm that all package contents are present. Open the shipping box and inspect for damaged or missing
parts. If damaged or missing parts are noted, do not use the ramp.
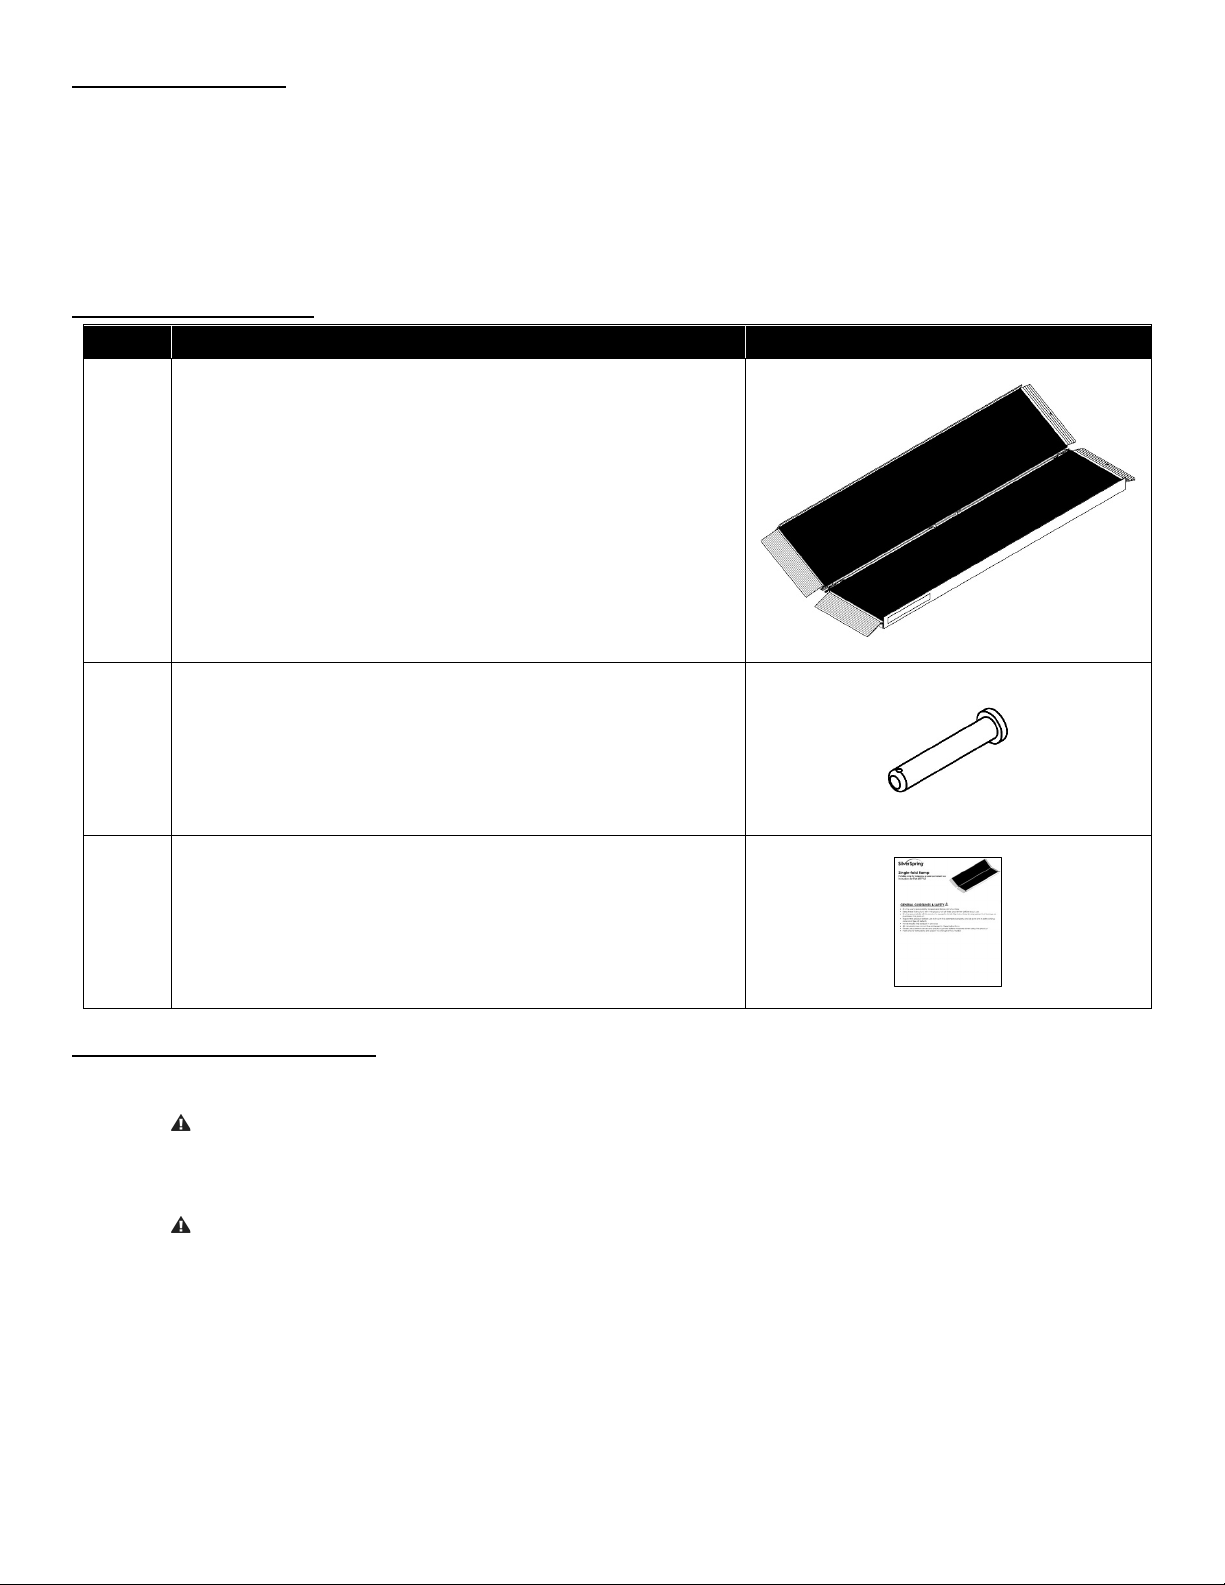
PACKAGE CONTENTS
QTY DESCRIPTION IMAGE (NOT SHOWN TO ACTUAL SIZE)
1 SILVERSPRING® SINGLE-FOLD RAMP
2 CLEVIS PIN
1 INSTRUCTIONS
CARE AND MAINTENANCE
1. Before each use, check the ramp for worn, loose, or damaged parts. If you find any of these conditions, do not
use the ramp.
Do not tamper with, attempt to repair, or modify any portion of the ramp.
2. Keep the ramp surface clear of ice, snow, dirt, leaves, and other debris. For ice and or snow, remove all
accumulations and sweep surface clean. For dirt, leaves, and other debris, sweep surface or wash with a soft
bristle brush and non-alkaline detergent; rinse well.
The ramp surface may be slippery in wet conditions. Use caution if surface is wet as traction may be
reduced.
3. Store the ramp in a cool, dry place when not in use.

1-888-651-3431
Page 4
SET UP AND USE
1. The ramp is shipped fully assembled. To unfold for use, position the folded ramp so that the top lip transition
plate (located on the end of the ramp that is labeled TOP) fully overlaps a secure, unobstructed, level landing
and is securely supporting the ramp (FIG. 1).
2. Unfold the ramp, exposing the applied slip-resistant tread surface, then center the ramp on the upper landing
(FIG. 2).
3. Ensure that the surface area of both top lip transition plates fully overlaps a secure, unobstructed, level landing
enough to safely install provided clevis pins or other non-provided anchoring hardware, and rests firmly against
the upper landing (FIG. 3).
a. If the top lip transition plates are not long enough to fully overlap a secure, unobstructed, level landing,
a SUITCASE® Top Lip Extension (‘TLE’) is an available option (sold separately). See ‘OPTIONAL
ACCESSORY’ section for more information.
4. Securely anchor the ramp to the upper landing (FIG. 2).
Ensure that the ramp is securely anchored before each use.
a. TEMPORARILY: To attach temporarily using the provided clevis pins, position the ramp securely and
use the hole in each top lip transition plate as a template to drill corresponding ¼” holes into the
upper landing (ensure drilled holes are deep enough to fully seat each clevis pin). Fully insert a clevis
pin (FIG. 3) through the pre-drilled hole in each top lip transition plate and into the corresponding
drilled holes in the landing.
b. SEMI-PERMANENTLY: To attach semi-permanently using non-provided anchoring hardware, position
the ramp securely and use the hole in each top lip transition plate as a template to identify anchor
locations. Install non-provided anchoring hardware flush with the surface of each top lip transition
plate and ensure that it does not create a hazard.
Semi-permanent anchoring hardware is not provided.
When using non-provided anchoring hardware, follow hardware manufacturer’s installation
instructions, ensuring that hardware is of sufficient type and size to prevent ramp slippage or
undo movement.
FIG. 1
FIG. 2
FIG. 3

1-888-651-3431
Page 5
5. For stowage and transportation, or for loading unoccupied mobility equipment with a wider wheelbase, the
ramp can be separated into two halves (FIG. 4) by removing (2 ea.) hinge pins.
The ramp may be separated for use when loading or unloading unoccupied mobility equipment
only. When the ramp is used with occupied mobility equipment, ensure that the ramp halves are
rejoined as described in ‘STEP 9’.
6. Place the two ramp halves in a position that facilitates the load being centered on each half (FIG. 4).
Always keep ramp loads on the centerlines (FIG. 4).
7. Ensure that the surface area of both top lip transition plates fully overlaps a secure, unobstructed, level
landing enough to safely install provided clevis pins or other non-provided anchoring hardware, and rests
firmly against the upper landing (FIG. 3).
8. Securely anchor each ramp half before use (FIG. 4); refer back to ‘STEP 4’ for anchoring procedures.
9. The ramp halves can be rejoined using (2 ea.) hinge pins by positioning the ramp as shown (FIG. 5).
a. Align hinges, then insert a hinge pin into each hinge assembly.
b. Ensure that the pins are closed and that the spring section of the pin is on the underside (non-
treaded side) of the ramp.
When hinge pins are not in use, store in one side of the hinge.
Be sure to always rejoin the ramp halves using (2 ea.) hinge pins.
FIG. 4
FIG. 5
USE THIS
CONFIGURATION
WITH
UNOCCUPIED
MOBILITY
EQUIPMENT
ONLY!

1-888-651-3431
Page 6
OPTIONAL ACCESSORY
1. If the ramp’s top lip transition plates are not long enough to fully overlap a secure, unobstructed, level
landing, a SUITCASE® Top Lip Extension (‘TLE’) is an available option that increases the standard 3” reach of
the top lip transition plates to 9”, in many cases, allowing the ramp to clear an obstruction to create a
smooth transition. Visit www.DiscountRamps.com or call 1-888-651-3431 for more information.
Use of the TLE reduces overall ramp weight capacity to 500 lbs.; never exceed weight capacity.
If a secure, unobstructed, level landing cannot be attained, do not use the ramp.
INCLINE CHART
An incline chart is provided below, however, it is intended only as a guideline. Before use, refer to your mobility
equipment's owner guide for acceptable ramp usage, including proper slope/incline, chair direction, etc.; never
exceed its recommendations.
TO ESTABLISH THE PROPER RAMP LENGTH
1. Determine the incline that your chair is designed to climb.
2. Measure the rise (distance from top step, porch, van, etc. to the
ground).
3. Refer to Incline Chart to find proper ramp length.
At any incline, use ramp only with a qualified helper and
always use a lap belt.

1-888-651-3431
Page 7
PRODUCT WARRANTY & LIABILITY
GENERAL PRODUCT WARRANTY: Products purchased from the Authorized Dealer (original place of
purchase) or Merchant (“Dealer”) will be free of defects in material and workmanship at the time of
receipt, and will meet the specifications stated at the place of purchase transaction or online at the
Dealer’s website, under normal use and service when correctly installed, operated and maintained.
This product warranty is effective for the period of time stated below, unless otherwise stated in the
product instructions or depicted in the product advertisement. All Authorized Dealer warranties are
NON-TRANSFERABLE and cover only the original end purchaser. This limited warranty does not cover
products purchased through non-authorized dealers. Non-authorized dealer receipts are not
accepted for warranty verification.
***WARRANTY CLAIMS MUST BE MADE DIRECTLY TO THE ORIGINAL PLACE OF PURCHASE.***
WARRANTY PERIOD: This warranty remains in force for one year from the date of the product’s
accepted delivery. The Authorized Dealer offers a one year manufacturer’s warranty for most
products unless otherwise specified on the product advertisement.
WARRANTY SERVICE: The Authorized Dealer will replace any defective or malfunctioning part at no
charge, including payment of the shipping costs of parts or replacement product to and from the
manufacturer. The purchaser is responsible for labor charges. If the product does not meet
specifications as depicted in the advertisement, the Authorized Dealer will refund the full purchase
price of the product.
Questions regarding the warranty on a specific product and warranty claims should be directed to
the Authorized Dealer with whom the purchase transaction was made.
WARRANTY LIMITATIONS: The above warranty does not apply to products that are repaired, modified
or altered by any party other than the Authorized Dealer; are subjected to unusual physical stress or
conditions (such as overloaded ramps or corrosion), natural disaster, governmental actions, wars,
strikes, labor disputes, riots, theft, vandalism, terrorism or any reason beyond reasonable control; are
damaged due to improper installation, misuse, abuse, accident or negligence in use, storage,
transportation or handling, or tampering; or to products that are considered consumable items or
items requiring repair or replacement due to normal wear and tear.
Product should be inspected prior to signing for delivery. Product damage incurred during shipping,
unless noted on the Bill of Lading at the time of delivery, renders this warranty void.
LIMITED LIABILITY: In no event shall THE AUTHORIZED DEALER be liable to the purchaser or any third party
for any indirect, incidental, consequential, special, exemplary or punitive damages arising out of the
use of the product, including, without limitation, property damage, loss of value of the product or any
third party products that are used in or with the product, or loss of use of the product or any third party
products that are used in or with the product.
Table of contents
Other Silver Spring Automobile Accessories manuals


Popular Automobile Accessories manuals by other brands

Malone
Malone SaddleUp PRO Installation & Loading Instructions

Kayline
Kayline 442-210 installation instructions

AUSTLEN
AUSTLEN ENTOURAGE user manual

Metra Electronics
Metra Electronics 99-5807 installation instructions

Phonocar
Phonocar VM 022 instruction manual

ROSCO HVAC
ROSCO HVAC SkelStart Installation guide and user's manual


