Silverline PLASMA FILTER User manual

User Guide PLASMA FILTER

•Only use the plasma filters with a commercially available extraction unit with grease
filters in combination with fire-retardant properties.
•If the line is damaged, return the device to the dealer/manufacturer for scrapping.
•There should always be good ventilation to ensure that there is sufficient oxygen in
the room air. Commercial branded hoods also point this out!
•Please do not put any objects into the plasma module! There is a risk of electric
shock! ALWAYS work on the module with the mains plug unplugged!
•Touching with wet hands or objects also implies a risk of electric shock.
Always work on the module with the mains plug unplugged!
•The blocking of the air inlet or outlet is to be avoided in any case. If necessary,
unplug the mains plug!
•If the module shows damage, it must not be used!
•Persons with reduced physical, sensory or mental abilities or the lack of experience,
such as children from the age of 8 may use this module only under the supervision of a
competent person. Further warnings can be found in the following chapters.
•The module is not to be used as a toy for children!
•Cleaning or maintenance work must not be carried out by children without a
competent person!
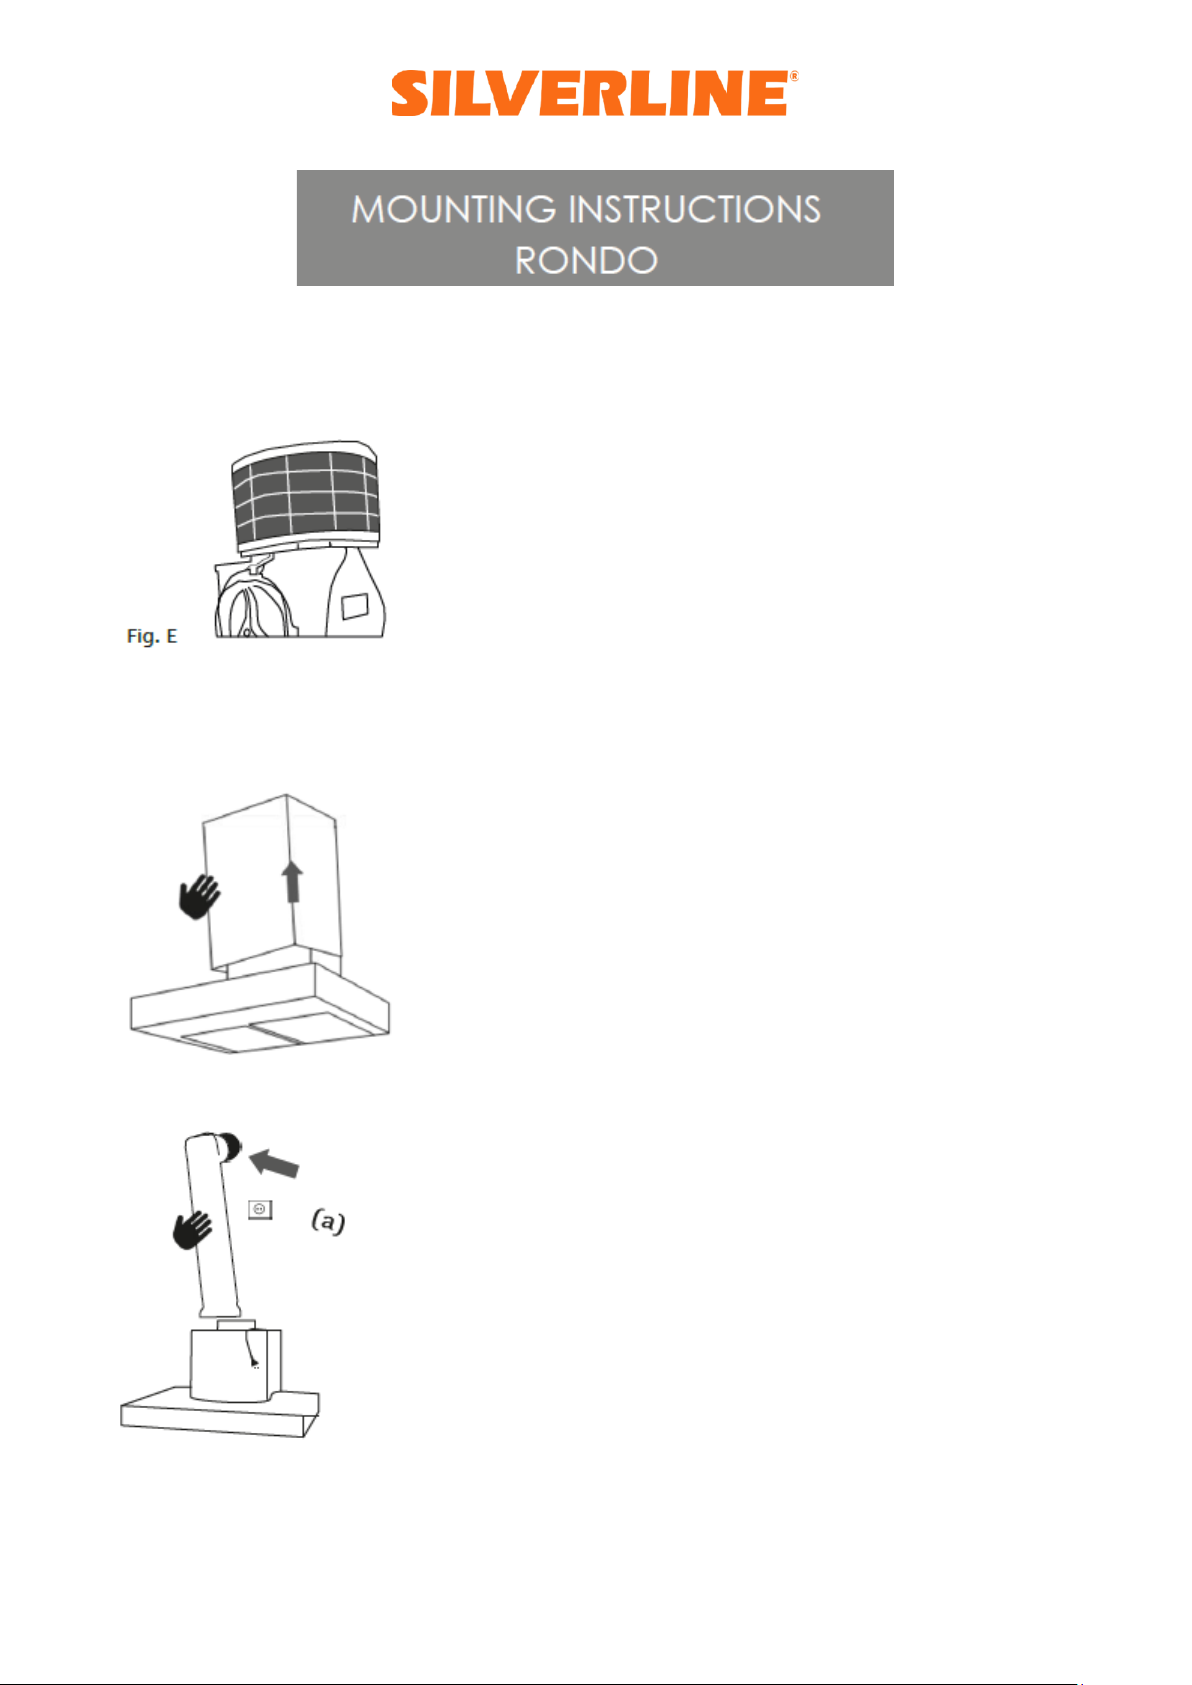
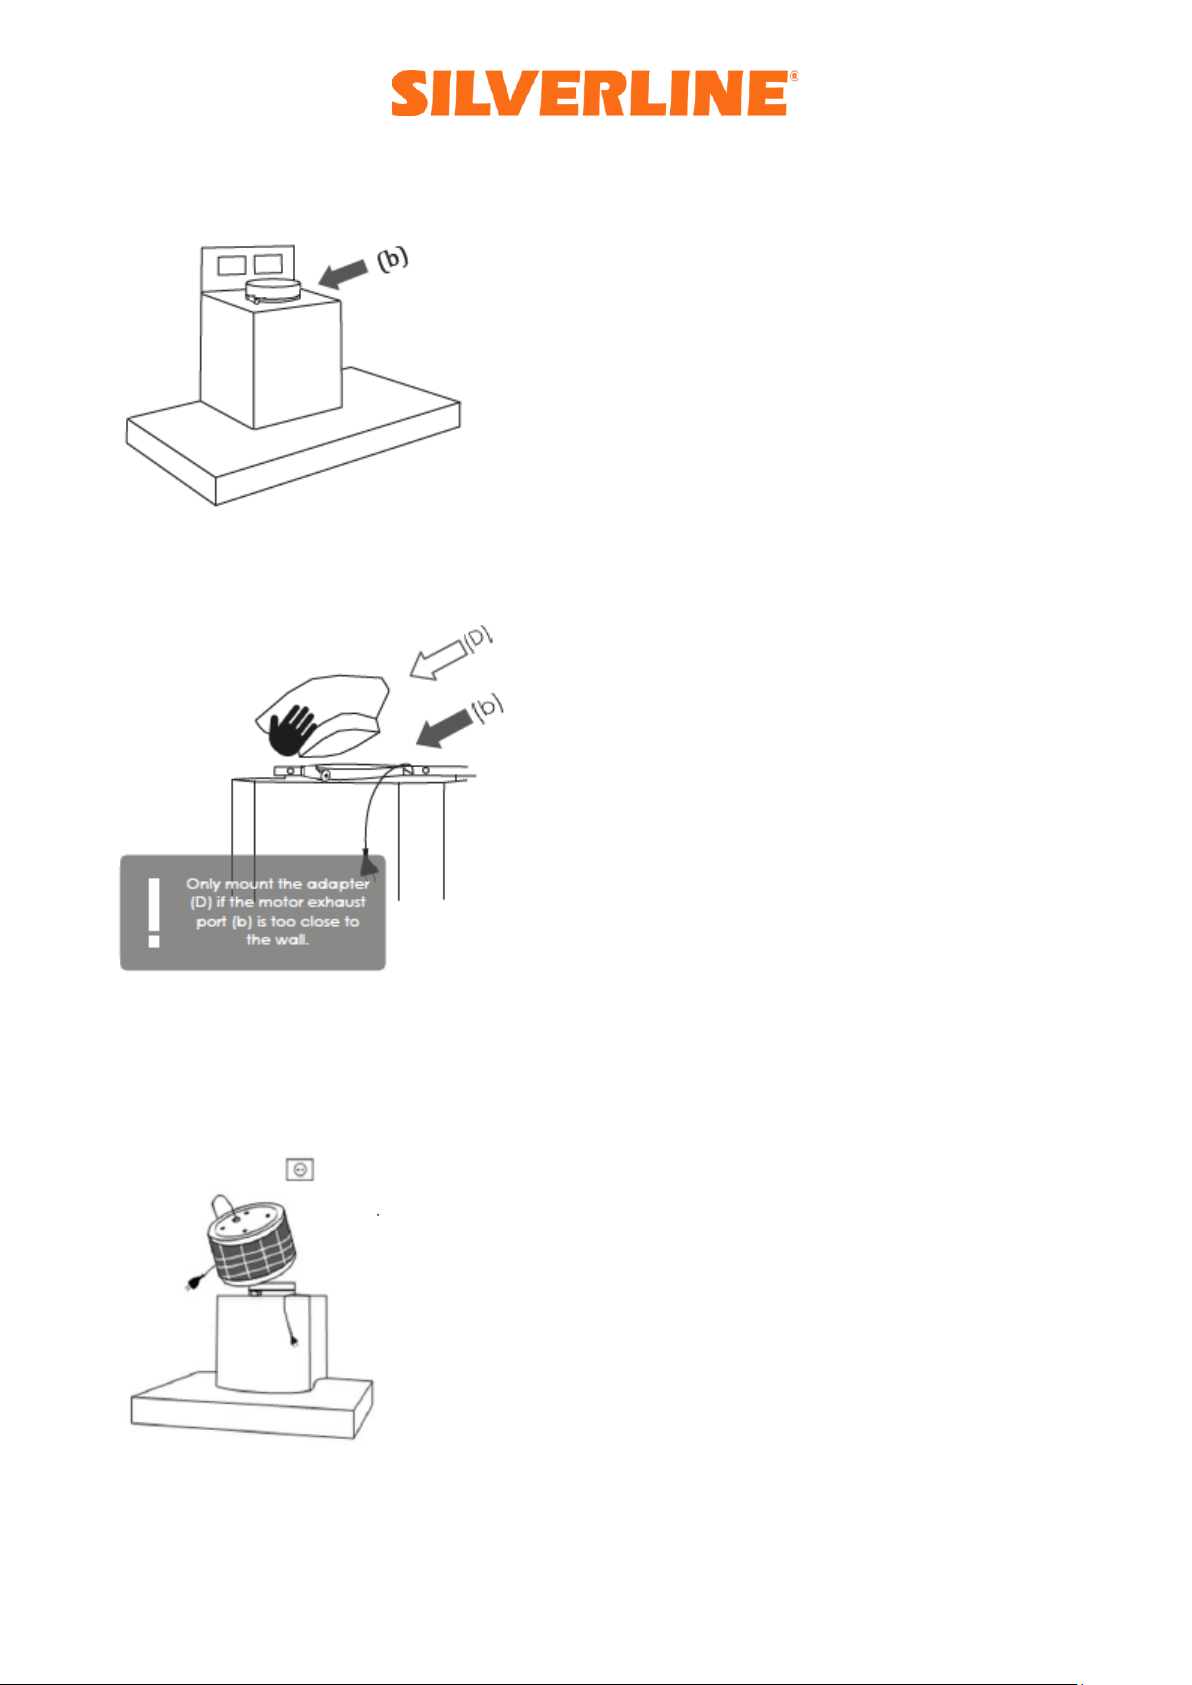
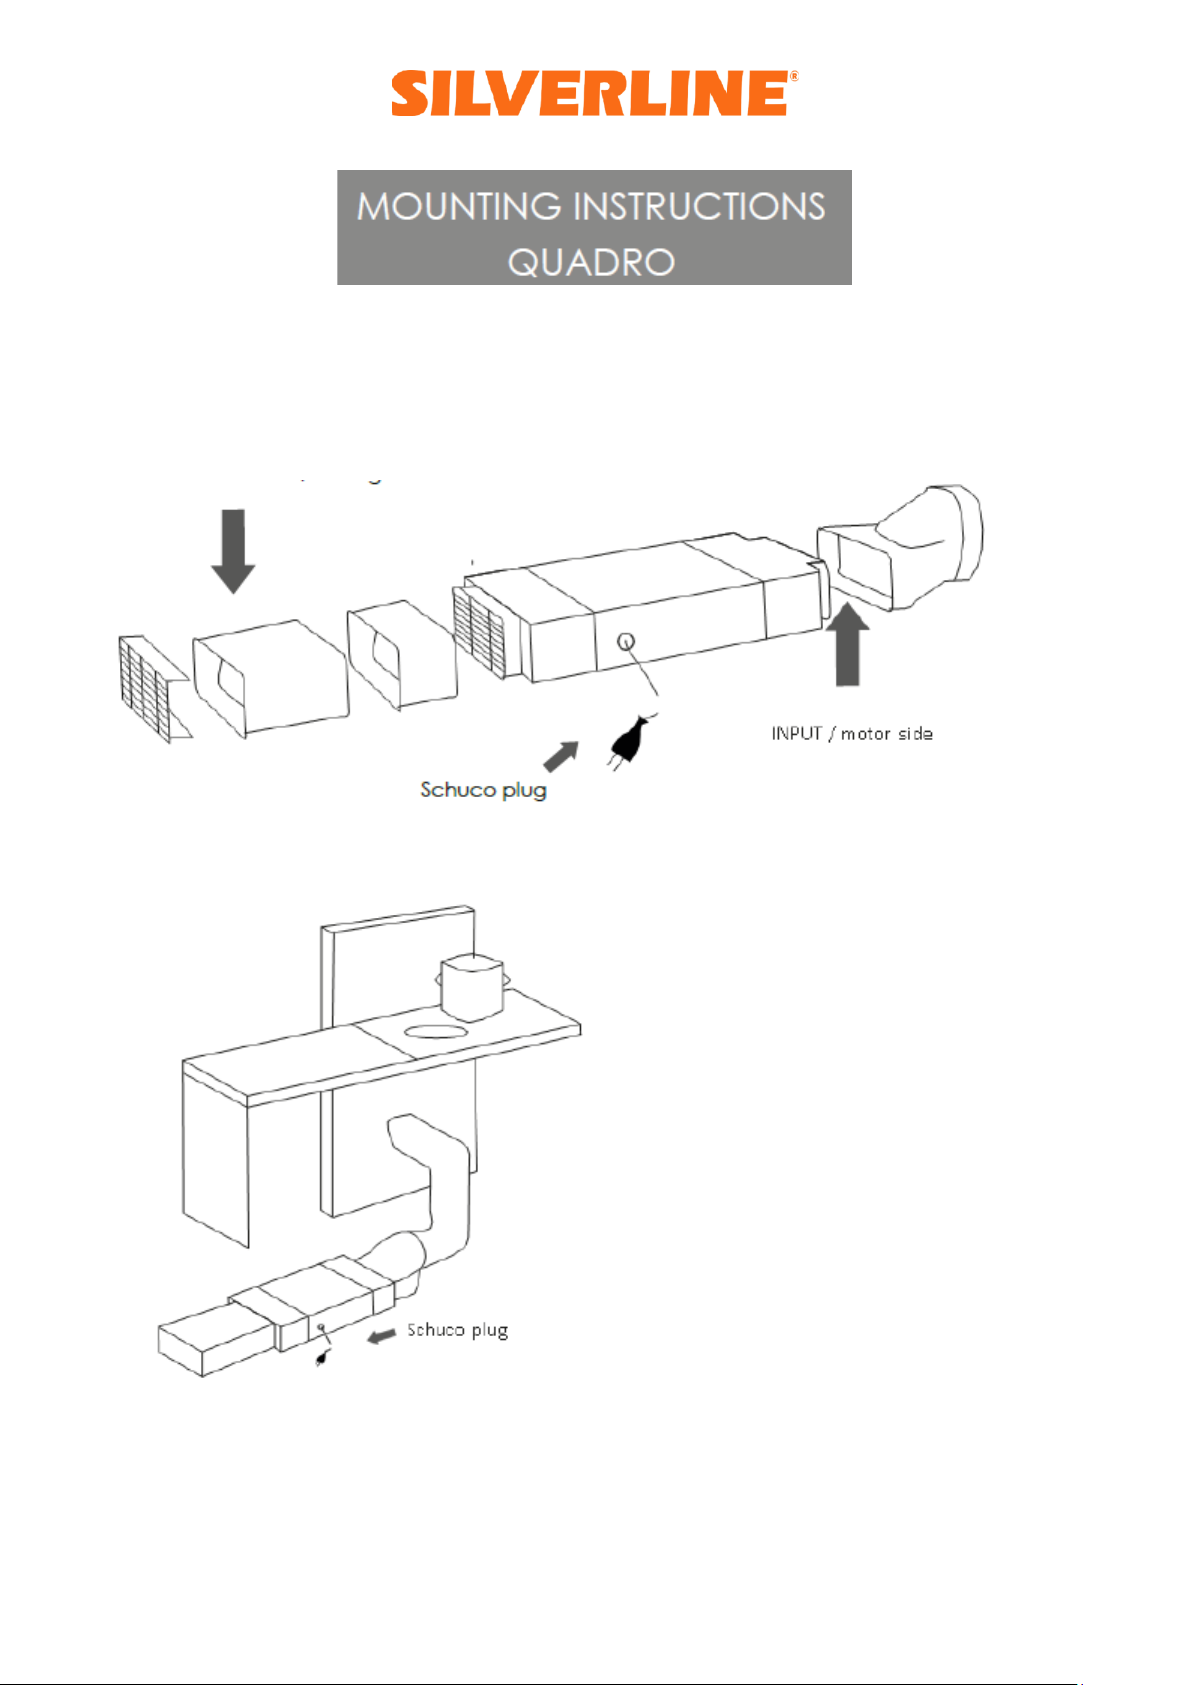
•Please follow the installation instructions and warnings of your extractor hood.
•This Plasma was designed exclusively for use in private households!
•As in the manual of your extractor hood, we would also like to point out that you
should never allow high flames to develop under the hood! Also do not flambé under
fume hoods, as both can lead to a fire hazard and cause considerable consequential
damage!
•Likewise, overheated oil poses a potential fire hazard. Never extinguish with water!
•Carbon monoxide or other chemical gases cannot be removed with the plasma
filter!

•The plasma filter module should only be connected with the cable connector
belonging to the unit! (Warranty)
•Carefully open the packaging, remove the Plasmafilter module and check the
packing unit for completeness!
Keep the packaging in a safe place until the functional test has been carried out to
ensure correct operation and, if necessary, use it for return shipments. Otherwise,
please dispose of in an environmentally friendly manner. Thank you!
•Please refer to the illustrated installation instructions below and follow them step-by-
step. Check the connection between the Plasmafilter module and the motor outlet for
strength to prevent air leakage for the system to operate properly.
•Check whether the mains plug is freely accessible after installation of the module!
The integrated mains connection cable cannot and must not be replaced.
•NOTE: Failure to install the Plasmafilter in accordance with these instructions will void
the warranty on the plasma filter with immediate effect!
•All Plasmafilter modules listed in this manual are plug-in products. For details, please
refer to the installation instructions and the following pages.
•The mains supply should be provided by a nearby socket (210-250 V / 50 Hz).
•Potential small black spherical particles in the packaging may have originated from
the high-performance carbon filter and released during transport. These particles are
harmless and can be disposed of with household waste. Please do not use them for
consumption! The functionality of the Plasmafilter will not be affected!
•The device may only be operated with the supplied power line.

The plasma filter is placed on the cooker hood motor (Fig. E). With this plasma filter system,
you transform your cooker hood into an air purification unit with an absorption of all
odours, viruses and bacteria up to 98%.
To install the filter, proceed as follows:
1. Remove the chimney shaft and disconnect the hood from the mains.
2. Remove the exhaust hose or carbon filter and, if present, close the exhaust hole (a).

3. Place an O-ring (B) over the connecting piece (b) and tighten the hose clamp.
3. If the adapter (D) is used, place it on the connecting piece (b) and slide the second O-
ring (B) on top over the adapter.
4.
Place the filter (A) on the adapter (D) or directly on the exhaust port (b) with the O-rings
already installed.

5. Connect the hood and filter plug with the triple plug adapter (C) (not included in all
models).
6. Put the chimney shaft back on the hood.
7. There must be sufficient ventilation slots in the chimney shaft from which the
circulating air can escape:

1. The AVITANA® aira Quadro can be mounted in almost any position (transverse, vertical,
upright, etc.). The only decisive factor is the correct positioning of the motor side and the
resulting output.
OUTPUT / skirting
2. Depending on the components used, the connections must be sealed.

For optimal room air cleaning, it is imperative for your extractor hood to be adequately
ventilated and adapted to the respective steam development:
•Start your extractor hood at level 1 or 2 10 minutes before cooking
•After completing the cooking process, the extractor hood must run for at least 10
minutes at level 1 or 2
•If the volume of the room exceeds 50m³ (width x length x height = room volume), the
follow-up time should be at least 15 minutes
•The distance between the filter and the furnishings should be at least 10 mm.
•If grills or deep fryers are used, double the time required for post-ventilation.
The plasma module acts as an air purifier even at low speed, clearing the air not only
from kitchen fumes and odours, but also all sorts of allergens, bacteria, pollen and
viruses, ensuring healthy indoor air!
CARE AND MAINTENANCE
If the AVITANA® aira filter module is installed according to the installation instructions, it
requires no maintenance. The AVITANA® aira filter module starts the automated cleaning
process as soon as it is in operation.
The AVITANA® aira filter module is maintenance-free. Make sure, however, that the fat
filter of your cooker hood is cleaned regularly and is free from grease.

We are extremely happy about your purchase of one of our high-tech modules and are
convinced that your living comfort will be enhanced by fresh and purified air.
We grant a 60-month warranty on our products, provided that they are installed correctly
and professionally. It is essential to observe the pre- and post-run times of the cooker hood
(see page 10 Warnings for operation).
If you still have reasons to complain, please contact your dealer, who will then contact us.
Together we will find a solution.

The operating instructions of the manufacturer must be read carefully before
installation!
If there is no function, please check first:
a) whether the power supply is guaranteed (check socket / possibly connect another
device)
b) whether the appliance plug is faulty or firmly plugged into the socket.
The INSTALLATION OF this plasma filter!
This Plasma filter is relatively easy to install. The installation of this plasma filter is
intended as retrofitting or conversion of an already existing extractor hood unit or its
use in circulating air operation.
The step-by-step procedure is described in this installation description.
Please dispose of it in an environmentally friendly way. Thank you!
This plasma filter module complies with the requirements of the EU regulations and the
WEEE (Waste Electrical and Electronic Equipment) Directives! All components of the
plasma module are recyclable!
The packaging materials can be environmentally friendly recycled.
This installation instruction has been prepared by our technicians with all due care. No
legal claims can be derived from printing or spelling mistakes!
The manufacturer of the product(s) described herein, to which this
declaration refers, hereby declares under his sole responsibility
that these product(s) comply with the relevant, basic safety,
health and protection requirements of the existing EC Directives
and that the corresponding test control, in particular the CE
Declaration of Conformity duly issued by the manufacturer or his
authorised representative, is available for inspection by the
competent authorities and can be requested via the equipment
vendor.
Popular Water Filtration System manuals by other brands

Hahn
Hahn HF-RO3-RO Replacement instructions

KENT
KENT MAXX Instruction handbook for installation, operation and maintenance

Acqua Brevetti
Acqua Brevetti PuliFIL FT010 Installation and operating manual

BWT
BWT E1 NEU HWS Installation and operating instructions

KENT
KENT PRIME TC Instruction handbook

3P Technik
3P Technik VF1 Operating and assembly instruction