SIM SIM2W-FLOOD-I User manual

1
2
3
SIM2W-FLOOD-I
TWO WAY WIRELESS FLOOD DETECTOR
INSTALLATION INSTRUCTIONS
P/N 710XXXX Rev A D.Z
INTRODUCTION
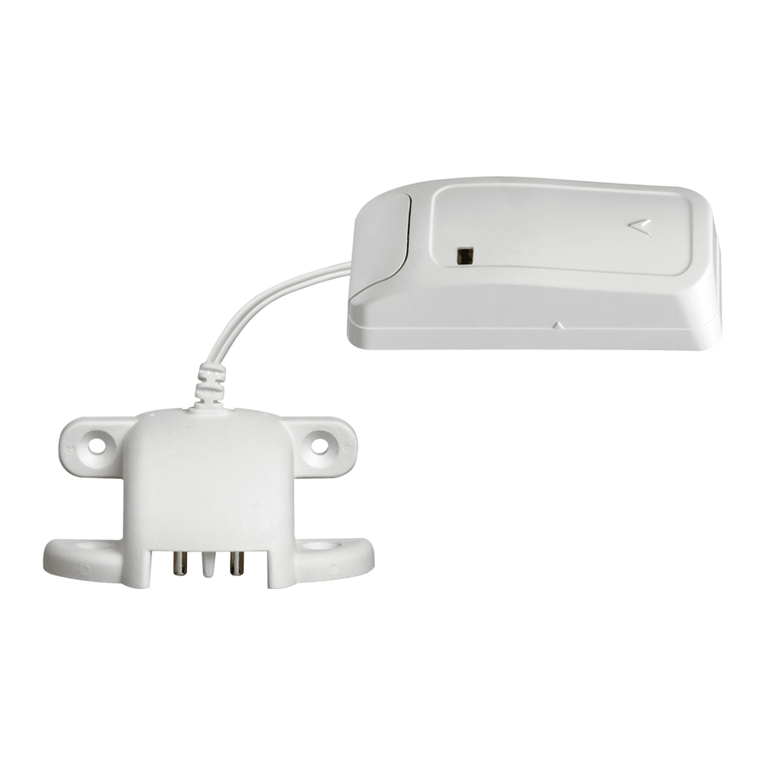
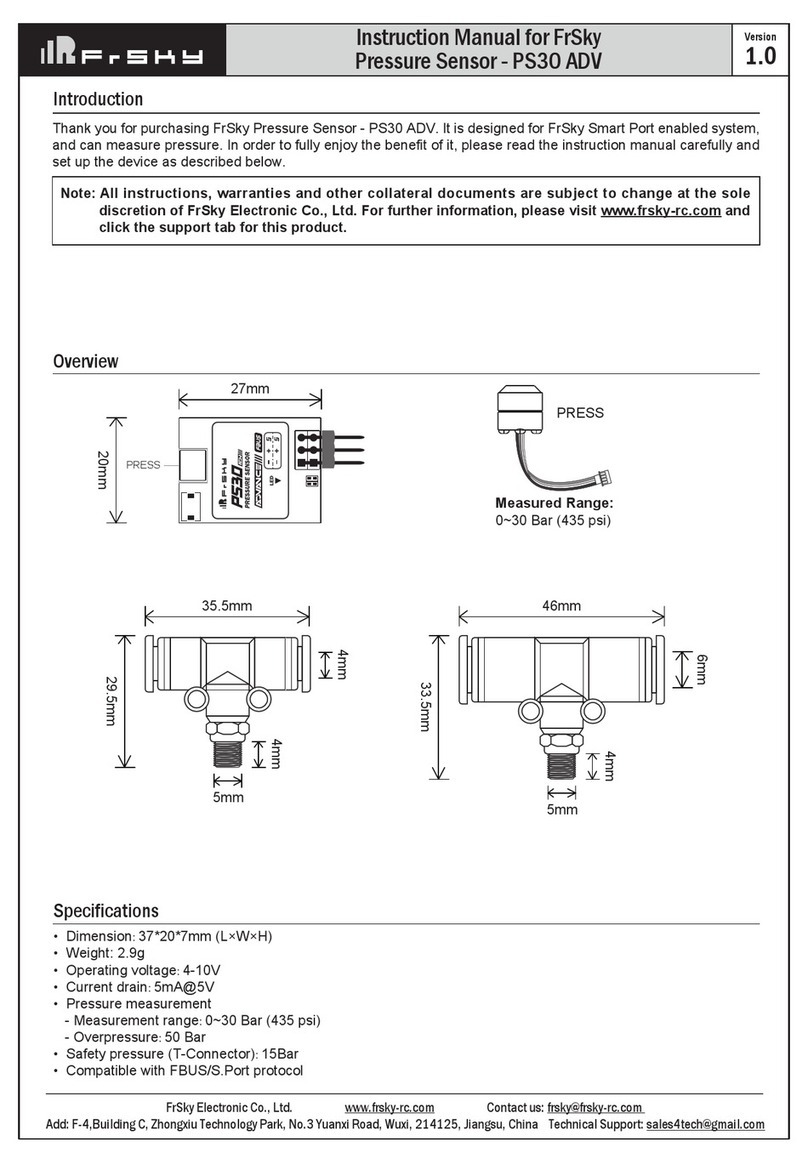
The SIM2W-FLOOD-I is an advanced flood
detector with integrated RF transceiver designed
to be a fully supervised low-current device
FEATURES
Two Way Wireless secured RF protocol
Low current Technology
Powered bya single 3V Lithium battery
Battery life: more than 5 years
Tamper Open/Close transmission
Supervision transmission
Battery status send on every transmission
Range up to 500m on open space.
Unique ID number
Front and back tamper.
Alarm trigger by the wired contact sensor which
is located at the end of the wired cable
4
5
6
OPERATION
The SIM2W-FLOOD-I detector transmits the
following events data:
SUPERVISION - a periodical transmission time
which is configurable indicates detector’s
presence.
ALARM - Alarm transmission triggered by Golden
contacts pins located at the end of the external
cable , The fluid has to reach the two exposed
golden contacts
LOW BAT –Whenever the battery reaches a pre-
set low level (~2.4V) Battery Low signal will be
sent with the next scheduled message
(Supervisor, Alarm, etc.).
TAMPER –Whenever the FW2-TEMP cover is
removed or tore off wall, a message will be
transmitted with “Tamper” signal.
FIG. 1 - REMOVAL OF FRONT COVER
FIG. 2 - BATTERY PLACEMENT
7
8
9
Fig. 3 - CIRCUIT LAYOUT
FIG. 4 –MOUNT FORM
Fig. 5 - KNOCKOUT HOLES
10
11
12
MOUNTING THE DETECTOR
A. Mount the SIM2W-FLOOD-I sensor unit.
B. To remove the front cover, unscrew the holding
screw (Fig.1), insert a flat screwdriver in the
slot between the front and the bottom while
pushing and twisting it gently until the front
cover is disengaged. (Fig. 1)
C.Remove Printed Circuit board from the unit base
D.Mount the base at 60cm above the sensor (Fig. 4),
E. place all 3 screws (Fig.5) and make sure you tighten the
tamper screw (the middle screw) easily, so the back
tamper switch will press the switch successfully when
PCB is placed back - over winding may result in false
mechanical adaptation and lack of tamper press
MOUNTING THE DETECTOR
F. Install the Printed Circuit board back into the base of
the wireless unit.
G.Connect the two wires coming form the sensor to the
Terminal block (Fig 4). The fluid has to reach the two
exposed Golden contacts at the bottom side of the
sensor in order to give an alarm
Use only the supplied screws and plugs.
H. Install battery (Fig.2) according to the polarity (-) (+)
indications.
Risk of explosion if battery is replaced by an incorrect
type.
Use only batteries delivered by the supplier.
I. Place the cover by inserting it back in the appropriate
closing pin and screw the holding screw.
ID REGISTRATION
Refer to the system transceiver’s installation instructions
and follow the “learning” detector IDs.
Place battery as instructed & wait until LED stops blinking.
Make sure that the transceiver is on learning mode.
Generate a transmission by pressing and releasing tamper
switch of the SIM2W-FLOOD-I.
Note the LED indications on the device:
Green/Red LED flashes alternately –for 5 sec
TEMP was registered successfully.
Green LED blinks periodically –
Device was not sighed into panel.
Repeat registration process
Red LED blinks –for over 20sec
Battery voltage is critically low. Replace battery
Antenna
Contacts
wire cable
Input
Battery
Tamper
Use for flat wall
mounting
Place the Flood
unit near this
marking
(Do not over tighten)

13
14
15
ALARM TRANSMISSION TEST
Shorting and disconnecting of SIM2W-FLOOD-I
sensor contacts pins unit enables the alarm
transmission test feature.
Check that the transceiver unit indicates at least 2
events –one for shorting and one for
disconnecting the SIM2W-FLOOD-I sensor
contacts.
To check this function it is necessary to verify that
the control panel displays the following message:
TESTING THE DETECTOR
Walk Test
A. Set the control panel to "Walk Test Mode" as described
in the Installer Manual. B. Make a momentary short
between the two golden contacts pins of the sensor C. the
alarm should appear on the control panel display.
Tamper Transmission Test
Pressing and releasing the tamper (push button) enables
the TAMPER transmission test feature.
Verify the Control Panel indicates "Zone Tamper open"
and TROUBLE LED is ON.
Close the Tamper and verify the Control Panel Indicates
ZONE TAMPER OPEN is restored and TROUBLE LED is
OFF.
In some control panels READY LED will turn OFF when
tamper is open and ON when closed.
Transmission can also be reviewed on the transceiver unit
as a rapid Red-Green-LED blink.
BATTERY REPLACEMENT
Remove the front cover.
Pull out the old battery.
Install a new battery according to polarity marking.
After assembling the battery the LED will flash
Green then Red alternately for 45 seconds.
During this time the detector does not function,
wait until the LED stop flashing.
Press tamper for 2 sec and then release it.
Note: LED indications
Green/Red LED flashes 6 times alternately:
The detector was successfully registered in system.
The cover may be placed back and closed.
Green LED blinks 20 times:
No response from Transceiver / device was not
assigned on CP - Repeat installation procedure.
Red LED blinks continually (over 20 sec):
Battery voltage is critical low device won't
function - Replace battery.
16
17
18
TECHNICAL SPECIFICATIONS
Data Protocol
Two Way Wireless
Frequency
868.35MHz
Identification
Unique ID serial number
–24 bit
Event Transmission
Alarm, Tamper,
Supervision, Low Bat,
Supervision
Detection Method
External golden
contacts pins device
Range in open space
500m
Battery
Lithium. 3V Type:
CR123A Size: 2/3AA
Battery life
>5 years
( 10 activation per day)
Current Consumptions
Standby ~3 A
Receive mode ~29 mA
Transmit mode~38 mA
Low Battery
~2.4Vdc
Transmit power
~10dBm
Tamper Switch
Front Cover Removal;
Back Tamper
Operating temperature
10C to +50C
Dimensions
97mm x 22mm x 21mm
Weight (inc. battery)
40 gr.
CAUTION !!!
RISK OF EXPLOSION IF BATTERY IS REPLACED BY DIFFERENT TYPE / MODEL.
DISPOSE USED BATTERIES ACCORDING TO ITS INSTRUCTIONS
19
www.sim-security.net
Zone # X Open
The battery must be replaced by 3V
Lithium battery Size 2/3A
Models such as:
1. VARTA CR123A
2. GP CR123A
Other SIM Security Sensor manuals

