SIMS Deltec CADD Prizm 6100 User manual
PowerDataIn/Out
START
STOP
Y
N
LOCK
DOSE
NEXT
ENTEROPTIONS
?
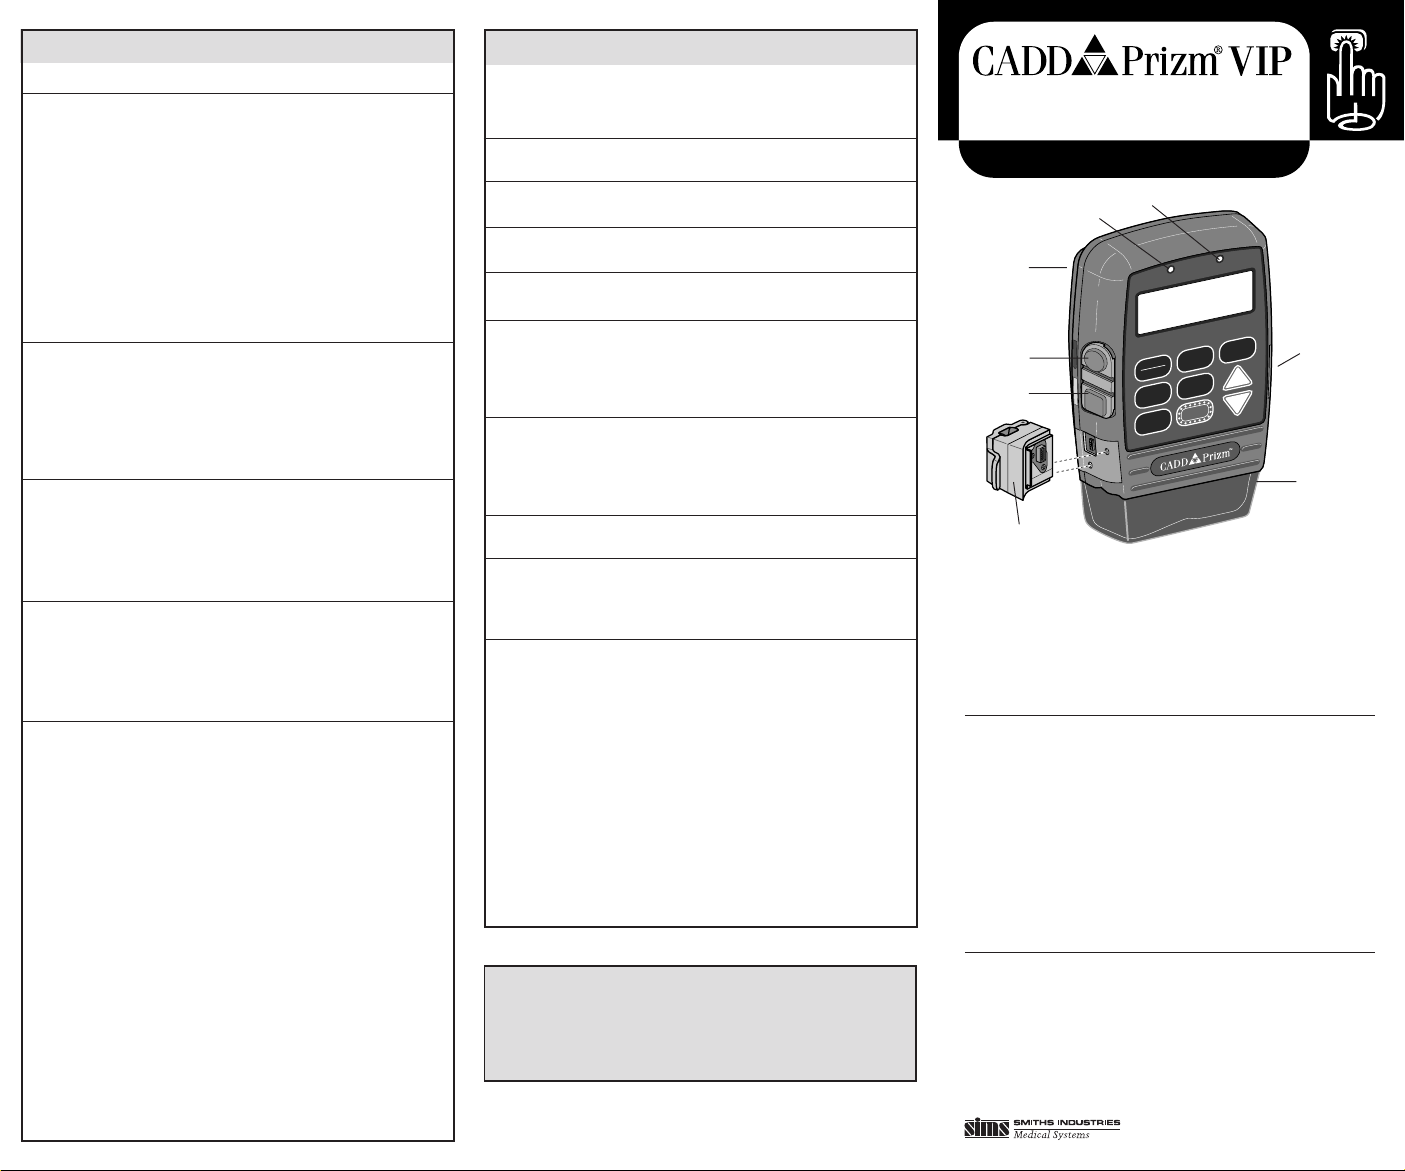
AGreen indicator light: blinks when pump is running
BAmber indicator light: blinks when pump is stopped or alarming
CPolemount bracket recess (back of pump)
DPower jack (for power pack or AC adapter)
EData in/out jack (for remote dose cord, modem cable or printer cable)
FBattery compartment (side of pump)
GCassette (part of reservoir or administration set that attaches to pump)
HAir Detector
Keypad
STOP/START Stops and starts the pump
LOCK Displays or changes lock level (security level)
? Help key: displays more information about a screen
ENTER Sets new value; selects choice from menu; clears screen
NEXT Advances to next programming screen; backs out of an
option or menu
DOSE Delivers a demand dose
OPTIONS Displays the Options Menu, pages through options
´Answers yes; increases values on programming screen;
pages through menus; pages through history screens
ÎAnswers no; decreases values on programming screen;
pages through menus; pages through history screens
Using the ÅÅ
ÅÅ
Å(Help) Key
1. For information about screen or alarm, press ? key.
2. If ?→appears in lower right corner, press ? to see more help.
3. Press NEXT to exit help.
ALARMS & TROUBLESHOOTING
The CADD-Prizm pump signals with audible alarms and messages on
the display when a condition requires your attention. In addition to
referring to this table, use the ? key while the alarm is occurring for
information about the alarm and corrective action.
Reservoir
Volume Low
Reservoir
Volume Zero
9-volt
Battery Low
9-volt Battery
Depleted
High Pressure
Upstream
Occlusion
(Model 6101 only)
Error Detected
Air In Line
Detected
3 Beeps Every
5 Minutes;
Stopped on
Main Screen
Level of fluid in the reservoir is low. Prepare to
install a new reservoir.
Reservoir volume is 0.0 ml. Press NEXT to stop
alarm. Install new reservoir if appropriate.
9-volt battery is low but pump is operable.
Change battery soon.
9-volt battery is depleted and cannot operate
pump; install fresh battery immediately.
Possible blockage downstream (between pump
and patient), clamp or kink in fluid path. Find
cause and remove blockage to continue. Or,
press STOP/START to stop pump and silence
alarm; remove blockage and restart pump.
Fluid is not flowing from the reservoir to the
pump. Check for a kink, a closed clamp or an air
bubble in tubing between reservoir and pump.
Press STOP/START to silence alarm for two
minutes; remove obstruction and restart pump.
Pump fault occurred. Close tubing clamp,
remove pump from service.
Air in fluid path. Press NEXT to silence alarm.
Make sure tubing is threaded in Air Detector
properly. If fluid path contains air, close clamps,
disconnect from patient and prime fluid path.
Pump is stopped. Start pump if appropriate.
HISTORY AND RECORDKEEPING FUNCTIONS
Extended History will appear in Options only if
it is turned on in the Biomed Toolbox.
1. Press OPTIONS.
2. Press ´or Îuntil Extended History
option appears.
3. Press ENTER to display Extended History.
4. Press ´or Îto choose Patient Review
or Doses Hour by Hour.
5. Press ENTER.
6. If required, use ´or Îto select review
start time and date, then press ENTER.
7. Press ´or Îto page through history.
8. When finished, press NEXT.
1. Press OPTIONS.
2. Press ´or Îuntil Event Log option
appears.
3. Press ENTER to display Event Log.
4. Press Îto page back through Event Log
entries or ´to page forward.
5. When finished, press NEXT.
A demand dose must be programmed.
1. Stop the pump.
2. Press NEXT repeatedly until Dose Counters
screen appears.
3. Press ENTER to clear and update date and
time.
1. Stop the pump.
2. Press NEXT repeatedly until Milliliters
Given, Milligrams Given, or Micrograms
Given screen appears.
3. Press ENTER to clear and update date and
time.
1. If applicable, detach remote dose cord
from data in/out jack.
2. Turn printer on.
3. Connect printer cable to data in/out jack
and to back of printer.
4. If necessary, press ´until Printing
appears.
5. Press ENTER.
6. Press ´or Îto select desired report.
7. Press ENTER.
8. If required, use ´or Îto select desired
start time and date for report, then press
ENTER.
9. When report is finished, detach printer
cable from pump.
To View Extended
History
To View Event Log
To Clear
Dose Counters
To Clear
Units Given
To Print Reports
• Rx Settings
• Extended History
• Event Log
The pump may be running or stopped to view functions or to print.
Deltec®, CADD®and CADD-Prizm®are registered trademarks in the U.S.A. by
SIMS Deltec, Inc. and are registered in certain other countries by SIMS companies.
©1998 SIMS Deltec, Inc. All rights reserved. Printed in U.S.A. 3/98 19806
Deltec
SIMS Deltec, Inc.
St. Paul, MN, 55112 U.S.A.
PCA • Lock Level 1
Quick Reference Card for Clinicians
Model 6100 and 6101 Ambulatory Infusion Pump
Thispublicationisintendedasanoperatingreferenceonly.Fordetailed
instructions, specifications, warnings, warranty, and additional infor-
mation on operating the model 6100 and 6101 CADD-Prizm pump,
pleaserefer to theOperator’s Manualsuppliedwith theproduct.Assis-
tancewith the CADD-Prizm pump isavailable24hours a day by call-
ing 800-426-2448 in the U.S.A. and Canada.
D
E
C
F
G
A
B
H

PUMP OPERATIONS
ADJUSTING THE PROGRAM
The Continuous Rate and Demand Dose amount may be adjusted
within the limits programmed in Lock Level 0.
To View Current
Lock Level
To Start or Stop
Pump
To Start Demand
Dose
To Start Clinician
Bolus
To Stop Clinician
Bolus or Demand
Dose in Progress
To Change Battery
1. Stop the pump.
2. Press LOCK.
3. Press NEXT to return to original screen.
1. Press STOP/START.
2. Press ´.
Pump must be running.
1. Press DOSE or Remote Dose Cord Button.
Pump must be running.
1. Press LOCK.
2. Press ´or Îuntil Clinician Bolus Code
appears.
3. Press LOCK.
4. Press ´or Îto select desired amount.
5. Press ENTER or DOSE to start bolus.
1. Press STOP/START.
2. When Stop Demand Dose? or Stop
Clinician Bolus? appears, press ´.
3. When Stop the Pump? appears, press ´
to stop or press Îto remain running.
1. Stop the pump.
2. Press button on the battery door and slide
battery door forward.
3. Remove and discard used battery.
4. Match + and - markings on new battery
with markings on pump.
5. Insert battery; the pump should beep.
6. Replace the battery door.
7. The pump will power up.
Pump must be in LL1.
1. Stop the pump.
2. Press NEXT repeatedly to display
Continuous Rate screen.
3. Press ´or Îto select desired new
rate.*
4. Press ENTER to save new rate.
5. Press NEXT repeatedly to review the
program.
6. Restart the pump.
Pump must be in LL1.
1. Stop the pump.
2. Press NEXT repeatedly to display Demand
Dose screen.
3. Press ´or Îto select desired new
demand dose amount.*
4. Press ENTER to save new amount.
5. Press NEXT repeatedly to review the
program.
6. Restart the pump.
To Adjust the
Continuous Rate
To Adjust the
Demand Dose
PROGRAMMING SCREENS
Reservoir Volume Volume of fluid in filled reservoir
Units Programming units (ml, mg, mcg)
Concentration Concentration of drug (appears if units are
mg or mcg)
Continuous Rate Continuous rate of drug delivery
Demand Dose Amount delivered when patient presses the
DOSE key
Demand Dose Lockout Amount of time that must elapse between
demand doses (appears if demand dose is
programmed)
Max Doses Per Hour Maximum number of demand doses
allowed in any one hour period (appears if
demand dose is programmed and demand
dose lockout is less than one hour)
Dose Counters Displays number of demand doses given
and attempted since date and time shown
(appears if demand dose is programmed)
Units Given Displays total amount delivered since date
and time shown
Air Detector Status Shows whether Air Detector is required,
turned on or off (appears if Air Detector is
attached)
New Patient Marker Allows you to add a New Patient Marker to
the Event Log and clear Extended History
(appears if Extended History is turned on)
*If you cannot increase the setting, it may already be at the maximum.
CHANGING THE CASSETTE
1. Stop the pump.
2. Close all tubing clamps.
3. Use key to unlock used cassette.
4. Use side of key or coin to unlatch used
cassette.
5. Disconnect tubing from patient.
6. Remove and discard used cassette.
1. Close tubing clamp.
2. Insert new cassette hooks into pump’s
hinge pins.
3. Place pump with cassette on firm surface
and push down on top of pump.
4. Use coin or side of key to latch cassette.
5. Use key to lock cassette.
WARNING:
The marks on latching button and lock must line
up with solid dots on side of pump. If you do not
attach the cassette properly, unregulated gravity
infusion of fluid from reservoir or reflux of blood
may result, which could result in death or serious
injury to the patient. To protect against unregu-
lated gravity infusion that can result from an im-
properly attached reservoir, a CADD®extension
set with anti-siphon valve or a CADD administra-
tion set with either an integral or an add-on anti-
siphon valve must be used.
6. Gently twist and pull on cassette to make
sure it is attached properly.
7. When Cassette Locked appears, press
NEXT.
8. If Reset Reservoir to —ml? appears,
press ´if appropriate.
9. When Prime Tubing? appears, open tubing
clamp and press ´if appropriate. Follow
priming instructions on pump’s screen.
When primed, close tubing clamp.
10. If applicable, thread tubing through Air
Detector.
11. When Start the Pump? appears, connect
new tubing to patient’s access site, open
tubing clamp, and press ´.
To Remove Used
Cassette
To Attach New
Cassette
D. Zurn 02/27/95
Prizm Latched & Locked
atch
e
ry»
Open
t
on»
Priming the
Fluid Path Using
the Prime
Option
The priming feature is available either:
a) when you attach a cassette (above), or
b) in the Options Menu. To access the Prime
option in the Options Menu:
Pump must be in LL0 or LL1.
1. Stop the pump.
2. Press OPTIONS.
3. Prime should be displayed; press ENTER.
4. Follow priming instructions on pump’s
screen.
To Reset
Reservoir
Volume Without
Changing
Cassette
1. Stop the pump.
2. Press NEXT to display Reservoir Volume
screen.
3. Press ENTER.
4. If message appears asking you to reset the
Reservoir Volume, press ´.
This manual suits for next models
1
Other SIMS Deltec Medical Equipment manuals


