SIMS Deltec CADD-PCA 5800R User manual
i
Deltec
SIM S D elt ec, In c ., St . Pau l, M N 55112 U .S.A.
CADD-PCA
®
Ambulatory Infusion Pump
Model 5800R
Operator’s Manual
This online version differs
from the printed version.
Certain information that
is not intended for patients
has been removed.

ii
This manual pertains only to the Deltec CADD-PCA®, Model 5800R, infusion
pump.
The issue date of this Operator’s Manual is included for the clinician’s information.
In the event one year has elapsed between the issue date and product use, the
clinician should contact SIMS Deltec, Inc. to see if a later revision of this manual is
available.
WARNING:
It is intended that this Operator’s Manual only be utilized by clinicians.
Do not permit patients to have access to this manual or otherwise disclose
to the patient the security code of the pump or any information which
would allow the patient to have complete access to all programming and
operating functions.
CADD, CADD-PCA, Medication Cassette Reservoir and Medication Cassette Reservoir
design are SIMS trademarks.
U. S. Patent Nos. 4,559,038; 4,565,542; 4,650,469 and D294,733; other patents pending.
DURACELL®is a registered trademark of Duracell Inc. EVEREADY®ENERGIZER®
is a
registered trademark of Union Carbide Corp. ULTRALIFE®is a registered trademark of
Ultralife Batteries, Inc.

iii
TECHNICAL ASSISTANCE
If you have comments or questions concerning the operation of the CADD-PCA®
pump, please call this number: 800-426-2448.
Our staff is available to help clinicians twenty-four hours a day with the program-
ming and operation of the CADD-PCA infusion pump.
SIMS Deltec, Inc.
1265 Grey Fox Road
St. Paul, Minnesota 55112 U.S.A.

iv
CONTENTS
1.0 INTRODUCTION ................................................................................... 1
2.0 GENERAL DESCRIPTION OF CADD-PCA®Pump Operations ........ 1
2.1 WARNINGS and CAUTIONS ....................................................... 2
2.1.1 WARNINGS ....................................................................... 2
2.1.2 CAUTIONS ........................................................................ 3
2.2 Physical Description of the Pump and Accessories ..................... 5
2.2.1 Items Packaged with the Pump ........................................ 6
2.2.2 Description of the Function Keys and Display Panel ........ 6
2.2.3 Description of the Reservoir or Administration Set ........... 8
2.3 Understanding the Delivery Modes .............................................. 9
2.3.1 Continuous Rate Delivery ................................................. 9
2.3.2 Patient-Activated Dose Delivery ....................................... 10
2.3.3 Clinician-Activated Bolus Delivery (Optional) ................... 10
3.0 OPERATOR INSTRUCTIONS .............................................................. 11
3.1 Installing or Replacing the Battery ................................................ 12
3.2 Preparing to Program the CADD-PCA®Pump ............................. 15
3.3 Programming the CADD-PCA®Pump .......................................... 18
3.3.1 Setting the Reservoir-Residual Volume (RES VOL) ......... 18
3.3.2 Changing the Units of Measure (MG or ML) ..................... 19
3.3.3 Setting the Concentration (MG/ML) .................................. 20
3.3.4 Setting the Continuous Rate (MG/HR or ML/HR) ............. 20
3.3.5 Setting the Patient-Activated Dose (MG or ML) ................ 21
3.3.6 Setting the Dose Minutes .................................................. 22
3.3.7 Setting the Doses per Hour .............................................. 23
3.3.8 Reviewing the Number of Doses Given (DOSE GIVEN)
and the Number of Doses Attempted (DOSE) .................. 23
3.3.9 Reviewing the MG GIVEN or ML GIVEN .......................... 24
3.4 Attaching and Removing the Cassette .......................................... 26
3.4.1 Removing a Used Cassette .............................................. 26
3.4.2 Attaching the Cassette ....................................................... 27
3.5 Priming the CADD-PCA®Pump Tubing ........................................ 28

v
3.6 Programming the Patient Lock Levels (LL0, LL1, and LL2) ......... 29
3.7 Starting and Stopping the Pump .................................................. 33
3.8 Reviewing the Automatic Display ................................................. 34
3.9 Using the Optional Clinician-Activated Bolus (MG or ML) ............ 34
3.10 Attaching, Using, and Detaching the Remote DOSE
Cord/Button .................................................................................. 36
3.10.1 Attaching the Remote DOSE Cord to the Pump .......... 36
3.10.2 Using the Remote DOSE Button to Deliver a Dose or
Bolus ................................................................................. 36
3.10.3 Detaching the Remote DOSE Cord from the Pump ..... 37
4.0 Reference Section ............................................................................... 38
4.1 Glossary ....................................................................................... 38
4.2 Pump Maintenance and Cleaning ............................................. 40
4.3 Equipment Exposure to Radiation or Magnetic Resonance
Imaging (MRI) ............................................................................... 41
4.4 Alarms and Troubleshooting Chart ............................................... 42
4.4.1 The Reservoir-Residual (RES VOL) Volume Alarm ......... 44
4.4.2 The High Pressure (HI P) Alarm ....................................... 44
4.5 Specifications (Nominal) ............................................................... 45
4.5.1 Parameter Settings Table ................................................. 45
4.5.2 Programming Specifications ............................................. 46
4.5.3 General Specifications ...................................................... 47
4.6 Limited Warranty .......................................................................... 48

vi

1
Description
1.0 INTRODUCTION
The Deltec CADD-PCA®pump provides measured drug therapy to
patients in hospital or outpatient settings. Healthcare professionals
should use this manual to learn how to operate the pump.
The purpose of this manual is to familiarize you with the CADD-PCA®
pump’s functions, which are described in Section 2; and to instruct you
in how to use those functions, which are outlined in detail in Section 3.
Section 4 is a reference.
2.0 GENERAL DESCRIPTION OF CADD-PCA®
PUMP OPERATIONS
The Deltec CADD-PCA®pump is indicated for intravenous, subcuta-
neous, epidural space, or subarachnoid space infusion.
Therapy should always be overseen by a physician or a certified,
licensed healthcare professional. The patient should be instructed in
using and troubleshooting the pump.
Epidural/Subarachnoid Administration
The selected drug must be used in accordance with the indications
included in the package insert accompanying the drug. Administration
of any drug by this pump is limited by any warnings, precautions, or
contraindications in the drug labeling.
Analgesics Administration of analgesics to the epidural space is
limited to use with indwelling catheters specifically indi-
cated for either short-or long-term drug delivery.
Administration of analgesics to the subarachnoid space is
limited to use with indwelling catheters specifically indi-
cated for short-term drug delivery.
Anesthetics Administration of anesthetics to the epidural space is
limited to use with indwelling catheters specifically indi-
cated for short-term drug delivery.
WARNING:
Administration of drugs to the epidural space or subarachnoid
space other than those indicated for administration to the epidu-

2
Description
ral space or subarachnoid space could result in death or serious
injury to the patient.
To prevent the infusion of drugs that are not indicated for
epidural space or subarachnoid space infusion, DO NOT use
administration sets that incorporate injection sites. The inadvert-
ent use of injection sites for infusion of such drugs may cause
death or serious injury to the patient.
If a Medication Cassette™Reservoir, CADD®Extension Set or
CADD®Administration Set is used for epidural space or sub-
arachnoid space drug delivery, it is strongly recommended that it
be clearly differentiated from reservoirs, cassettes or administra-
tion sets used for other routes of infusion, for example, by color
coding, or other means of identification.
2.1 WARNINGS and CAUTIONS
Read this entire Operator’s Manual before operating the CADD-PCA®
ambulatory infusion pump.
Failure to properly follow warnings, cautions, and instructions could
result in death or serious injury to the patient.
2.1.1 WARNINGS
•Do not use a pump that appears to have been damaged or tampered
with, or is not functioning properly.
•Use only drugs and solutions which are stable under delivery condi-
tions experienced during use in the pump. Observe warnings pack-
aged with the Medication Cassette™Reservoir or CADD®Adminis-
tration Set.
•Do not use the pump in the presence of flammable anesthetics or
explosive gases.
•The pump does not have an air-in-line alarm, an air entrapment
mechanism, or an upstream occlusion detector mechanism. Periodic
visual inspection is therefore recommended.
•Back-pressure or fluid resistance, which depends upon drug viscosity
and catheter size, may result in system delivery inaccuracies.
•Only the CADD®Extension Set with Anti-Siphon Valve must be used
with this pump; other extension sets will result in system delivery
inaccuracies.
•This pump is capable of being set at a residual volume higher than the
capacity of the fluid container. The reservoir-residual volume value

3
Description
should be programmed to reflect the actual volume of the medication being used.
•Avoid dropping the pump or hitting the pump against a hard surface, as this could
cause the cassette to become detached and the battery cover to become detached
or loose. If the cassette becomes detached, an uncontrolled flow of medication
from the fluid container or a reflux of blood may result, which could result in
death or serious injury to the patient. If the battery door becomes detached or
loose, the battery will not be properly secured; this may result in loss of power,
nondelivery of drug, and, depending on the type of drug being administered,
death or serious injury.
•If the pump is dropped or hit, inspect the pump to ensure that the cassette did not
become detached and the battery cover did not become dislodged. Inspection
should include closing the clamp on the tubing, detaching the pump and inspect-
ing the hinges, and checking the clips on the battery door to ensure they are not
broken. If there appears to be damage, the patient should be instructed to
immediately contact his or her health care provider, the pump should be taken out
of service, and Deltec’s Customer Service department should be contacted for
return authorization. If there appears to be no damage, reattach the cassette
following the instructions in the Operator’s Manual.
•To prevent the uncontrolled flow of medication, use a CADD®Extension Set with
Anti-Siphon Valve, a CADD®Administration Set with integrated anti-siphon
valve, or a CADD®Administration Set with an attached Add On Anti-Siphon
Valve.
•Use of a syringe with the CADD®Administration Set may result in UNDER-
DELIVERY of medication. Syringe function can be adversely affected by varia-
tions in plunger dimension and lubricity, which can result in greater force being
required to move the plunger. A syringe will lose plunger lubrication as it ages
and, as a result, the amount of under-delivery will increase which could, on
occasion, be significant. Therefore, the type of medication therapy and delivery
accuracy required must be considered when using a syringe with the CADD®
pump.
Clinicians must regularly compare the volume remaining in the syringe to the
pump’s displayed values such as RES VOL and GIVEN in order to determine
whether under-delivery of medication is occurring and, if necessary, take appro-
priate action.
2.1.2 CAUTIONS
•This device is not intended to be used for delivery of blood or cellular blood
products.
•This device may interfere with ECG equipment. Monitor ECG equipment care-
fully when using this device.

4
Description
•The pump is not sterile. It is not designed to be sterilized. Sterilization could
damage the microcomputer and other pump parts.
•The pump should be routinely cleaned and kept free of dirt, liquids, and foreign
objects.
•Do not store the pump at temperatures below -40°C (-40°F ) or above 55°C
(131°F).
•Do not operate the pump at temperatures below +2°C (35°F) or above 40°C
(104°F).
•Do not expose the pump to humidity levels above 90% R. H.
•The pump is water resistant. However, total immersion is not recommended
because moisture build-up within the case may damage the parts. Do not use
pump in the shower, sauna, or steam bath.
•Do not store the pump for prolonged periods with a battery; the battery could
leak and damage the pump.
•Avoid using the pump in close proximity to sources of strong static electricity or
strong electromagnetic fields.
•The use of a Deltec Pump Pouch is recommended. If the pump is dropped or
inadvertently hit against a hard surface, the pump pouch is designed to minimize
the need for servicing.
5
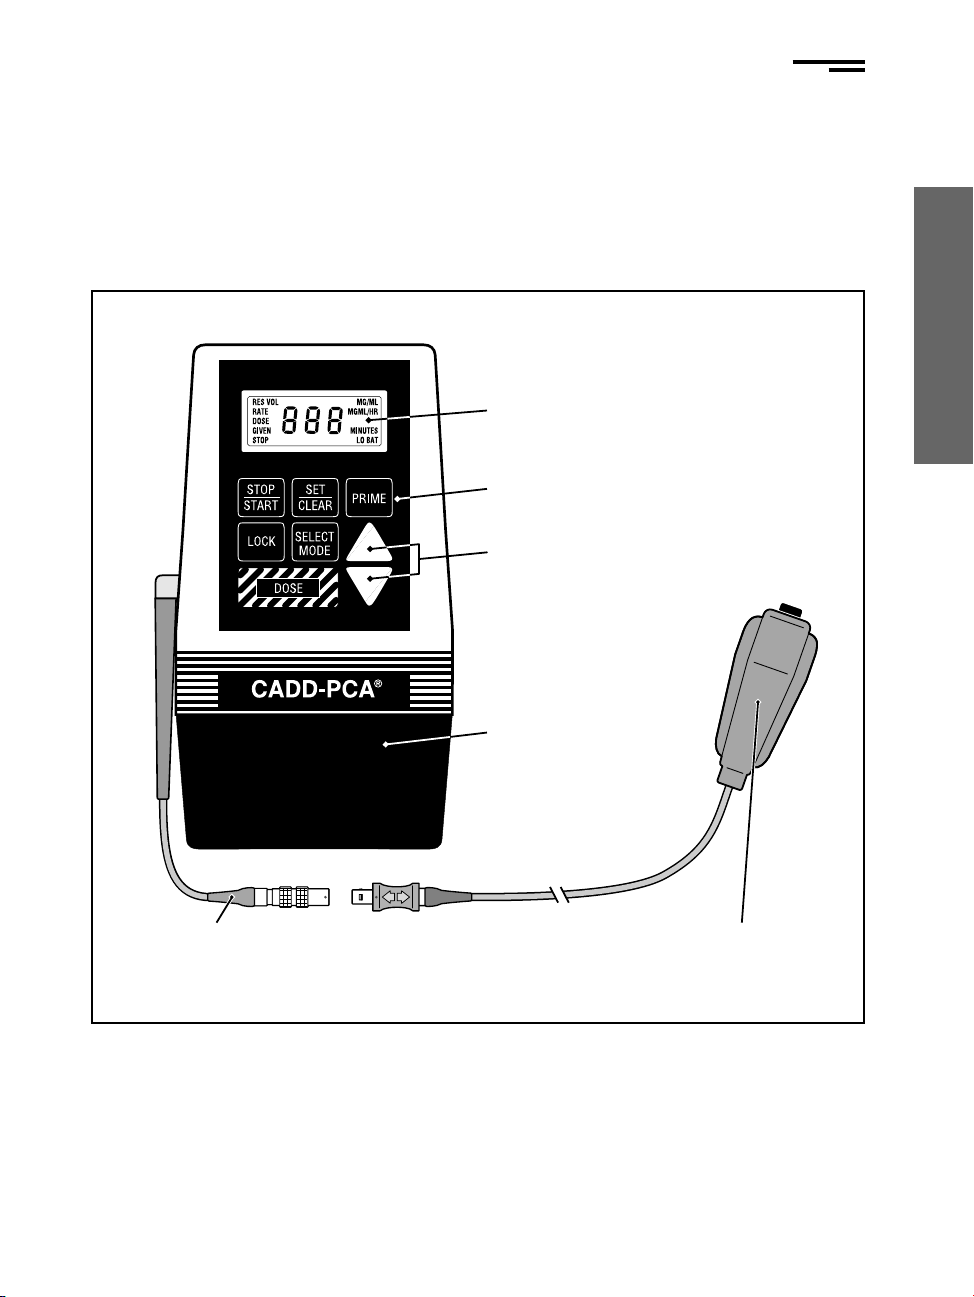
Description
2.2 Physical Description of the Pump and
Accessories
The following diagram, Figure 1, illustrates the CADD-PCA®
pump and
its major functions; and the Remote DOSE cord/button.
Figure 1. The CADD-PCA®Model 5800R pump with a Remote DOSE
cord.
Remote DOSE Cord
Adaptor
Remote DOSE Cord/
Button
07/17/97 D. Zurn
PCA 5800R, plain RD w/grip 7/97»
Disp ay (LCD)
Keyboard
Scro Keys
Cassette (the part of
the Medication
Cassette™ Reservoir or
CADD®
Administration
Set that attaches to the
pump)
®

6
Description
2.2.1 Items Packaged with the Pump
Packaged with the pump are the following accessories:
1 Alkaline battery (9-volt)
1 50 ml Medication Cassette™Reservoir (nonsterile, for
demonstration only)
1 Key
1 Carrying case
1 Carrying pouch
1 Operator’s Manual with warranty information
1 Remote DOSE cord/button with attached clip
The following products are also compatible with the CADD-PCA®
pump:
•Medication Cassette™Reservoir (50- or 100-ml), to be used
with the Extension Set with Anti-Siphon Valve
•CADD®Administration Set with integrated or Add On Anti-
Siphon Valve
•Pump Pouches
2.2.2 Description of the Function Keys and Display
Panel
Liquid Crystal Display (LCD). This is the pump’s display panel; the
screen which shows the pump’s various functions or modes and the
values you program for them. In this manual, the term “display”is
synonymous with display panel or LCD.
STOP/START Key. Press and hold the STOP/START key to start or
stop pump delivery.
SET/CLEAR Key. Use the SET/CLEAR key for programming, setting or
resetting, and clearing numbers in the computer’s memory. The SET/
CLEAR key is also used to initiate clinician-activated bolus delivery.
PRIME Key. Use the PRIME key to fill the tubing and to remove air
bubbles from the fluid path.

7
Description
LOCK Key. Use the LOCK key to lock out or limit the patient’s
operation of the pump. In the Start mode, the LOCK key is also used to
access the Clinician-Activated Bolus mode.
SELECT MODE Key. Use the SELECT MODE key to view the various
modes, such as the Continuous Rate, Dose, Concentration, and RES
VOL modes. When the pump is in the Start mode, and you press the
SELECT MODE key, the pump will automatically display each mode in
succession. (See Section 3.8, “Reviewing the Automatic Display.”) If the
pump is in the Stop mode, and you press the SELECT MODE key, the
pump will display the next mode. You will then have to press the
SELECT MODE key again to access another mode.
NOTE:
If you set the concentration or rate to “00.0,” neither mode will
appear on the display in the automatic display mode. If you set the
dose to “00.0,” the dose amount, dose minutes, doses per hour,
and doses given will not appear on the display.
SCROLL Keys. Use the up or down SCROLL keys to increase or
decrease the numeric value shown on the pump’s display. In the Stop
mode, these keys are also used to review the total number of doses the
patient attempted to deliver.
DOSE Key. Press the DOSE key to deliver a preprogrammed amount of
medication. In the Start mode, this key can be used to initiate the
Clinician-Activated Bolus or Patient-Activated Dose. This key is easily
identified because it is larger than the others, is colored, and has ridges.
Remote DOSE Cord/Button. Press the Remote DOSE button when the
cord is attached to the CADD-PCA®pump to deliver a preprogrammed
amount of medication. In the Start mode, this button can be used in place
of the DOSE key to initiate the Clinician-Activated Bolus or Patient-
Activated Dose.

8
Description
2.2.3 Description of the Medication Cassette™Reservoir
or CADD®Administration Set
The CADD-PCA®pump may use a detachable, single use Medication
Cassette™Reservoir for holding the drug. They are available in 50 ml and
100 ml sizes.
A CADD®Administration Set may also be used to deliver medication
from IV bags of various sizes.
The procedures for attaching and removing the cassette (the part of the
Medication Cassette™Reservoir or CADD®Administration Set that
attaches to the pump) are located in Section 3.4.
Figure 2. Discard a used Medication Cassette™Reservoir or CADD®
Administration Set immediately.
LOCKED
®

9
Description
2.3 Understanding the Delivery Modes
The CADD-PCA®pump has three methods, or modes, of delivery: (1)
Continuous Rate mode (rate); (2) Patient-Activated Dose mode (dose);
and (3) Clinician-Activated Bolus mode (bolus). You may program each
of the modes individually or in combination with each other. The
following graph, Figure 3, illustrates the combined delivery modes.
Further details concerning these delivery modes are introduced in Sec-
tion 3.3, “Programming the CADD-PCA®Pump.”and Section 3.9,
“Using the Optional Clinician-Activated Bolus (MG or ML).”
2.3.1 Continuous Rate Delivery
In the Continuous Rate mode, you program the pump to deliver medica-
tion at a constant rate in your choice of either milligrams per hour or
milliliters per hour. You will find the maximum continuous rates and
increments listed in the Parameter Settings Table (Section 4.5.1). If you do
not wish to deliver medication continuously, you may set the continuous
rate to 00.0. The pump may then be programmed to deliver only patient-
activated doses or clinician-activated boluses. [See Section 3.3.4, “Setting
the Continuous Rate (MG/HR or ML/HR).”]
Figure 3. Combined delivery modes. You may program each mode
individually or in combination with each other.
Clinician-Activated Bolus
(used here as a loading dose)
Patient-Activated Doses
Continuous Rate
Time
Dosage

10
Description
2.3.2 Patient-Activated Dose Delivery
In the Patient-Activated Dose mode, you can program the pump to deliver
a quantity of medication when the patient presses the DOSE key or the
Remote DOSE button. You must program the minimum time period
between dose activations and the maximum number of doses per hour. You
must also program the quantity of the dose. In Lock Level 2, this quantity
is fixed. In Lock Level 1, you may adjust the quantity, depending upon the
limit set in Lock Level 0. The clinician may set a maximum dose in Lock
Level 0 and then reset the pump to Lock Level 1. This will permit the patient
to reduce the dose but not to exceed the maximum dose programmed in
Lock Level 0. Or, the clinician may set a maximum dose in Lock Level 0,
reset the pump to Lock Level 1, and reduce the dose before giving the pump
to the patient. The patient can then increase or decrease the dose but cannot
exceed the maximum dose programmed in Lock Level 0. You will find the
maximum patient-activated dose values and increments listed in the Param-
eter Settings Table (Section 4.5.1). The amount of medication which the
patient-activated delivery provides is in addition to the amount provided by
the continuous rate delivery. [See Section 3.3.5, “Setting the Patient-
Activated Dose (MG or ML).”]
NOTE:
The clinician determines the amount of the patient-activated dose.
When the patient presses the DOSE key or the Remote DOSE button,
and delivery occurs, two beeps will confirm delivery.
2.3.3 Clinician-Activated Bolus Delivery (Optional)
In the Clinician-Activated Bolus mode, you can program the pump to
deliver a quantity of medication immediately. There is no minimum time
between boluses, since the amount of medication is not preprogrammed.
Each time you use the bolus function, you must select the quantity again.
The amount of medication which the clinician-activated bolus delivery
provides is in addition to the amount provided by the continuous rate
delivery. [See Section 3.9, “Using the Optional Clinician-Activated Bolus
(MG or ML).”]
WARNING:
Exercise extreme care when using this function. Since there are no
limits on the frequency of delivering the bolus, and since the amount of
the bolus can be set as high as 20 ml, you should not permit the patient
to become familiar with the programming. Improper programming
could result in death or serious injury to the patient.

11
Operating Instructions
3.0 OPERATOR INSTRUCTIONS
This section describes how to operate the CADD-PCA®pump. It con-
tains detailed, step-by-step instructions that will enable you to perform
the following tasks in either the Continuous Rate mode, Patient-Acti-
vated Dose mode, or the Clinician-Activated Bolus mode:
•Installing a battery and observing the Power-up
Test .............................................................................. (Section 3.1)
•Preparing to program the pump ....................................(Section 3.2)
•Programming the desired value for each of the
pump’s functions ........................................................ (Section 3.3)
•Attaching the cassette ................................................ (Section 3.4.2)
•Priming the tubing ..........................................................(Section 3.5)
•Setting the lock levels (LL0, LL1, or LL2) .................... (Section 3.6)
•Starting and stopping the pump ....................................(Section 3.7)
•Reviewing the automatic display ................................ (Section 3.8)
•Using the clinician-activated bolus ................................(Section 3.9)
•Attaching, using, and detaching the
Remote DOSE cord/button ..................................... (Section 3.10)

12
Operating Instructions
3.1 Installing or Replacing the Battery
Use a new, 9-volt alkaline or lithium battery to power the pump. (See
Section 4.5.3, “General Specifications,”for further information re-
garding batteries.)
NOTES:
(1) In LL1 or LL2, removing the battery resets the patient-activated
dose lockout time (which is determined by the programmed DOSE
MINUTES or DOSE/HR). After reinserting the battery, the patient
must wait the full lockout time before receiving a patient-activated
dose. For example, DOSE MINUTES may be programmed to 30
minutes and the patient may request a dose. If the patient removes
the battery 15 minutes later and reinserts a battery, he or she must
wait another 30 minutes before receiving a patient-activated dose.
(2) In LL0, removing the battery clears the patient-activated dose
lockout time. This allows the delivery of a patient-activated dose
immediately upon inserting a battery and restarting the pump,
regardless of when the previous dose was given.
WARNING:
•Do not use rechargeable NiCad or nickel metal hydride (NiMH)
batteries. Do not use carbon zinc (“heavy duty”) batteries. They do
not provide sufficient power for the pump to operate properly,
which could result in death or serious injury to the patient.
•Always have new batteries available for replacement. If power is
lost, non-delivery of drug, and, depending on the type of drug
being administered, death or serious injury to the patient could
result.
•There is no pump alarm to alert users that the battery has not been
properly installed or has become dislodged. An im-
properly installed or dislodged battery could result
in loss of power and non-delivery of drug and,
depending on the drug being administered, could
result in death or serious injury to the patient.
•If the pump is dropped or hit, the battery door or tabs
may break. Do not use the pump if the battery door
or tabs are damaged because the batteries will not be
properly secured; this may result in loss of power, non-delivery of
drug, and, depending on the type of drug being administered,
death or serious injury to the patient.
11/04/96 D. Zurn
«Batt Compart Tabs 11/96»

13
Operating Instructions
As soon as you install the battery, the pump will be on; there is no On/
Off switch. In order to install or replace a battery, be sure to place the
pump in the Stop mode. Then, follow these steps:
STEP 1: Push down and hold the battery door release
button while sliding the door off.
STEP 2: Remove the used battery.
STEP 3: Install the battery in the compartment (bot-
tom-end first).
NOTE:
Be sure to match the polarity markings of the new
battery (+and –) with those on the battery compart-
ment. If you put the battery in backwards, the
display panel will be blank, and you will not hear a
beeping sound.
Use a new, 9-volt alkaline or lithium battery to power
the pump. You may use any alkaline battery, including
DURACELL®Alkaline MN 1604 and EVEREADY®
ENERGIZER®Alkaline #522, for example; or, use the
ULTRALIFE®Lithium U9VL battery.
STEP 4: Place the battery door halfway over the bat-
tery compartment and press the battery into
the compartment by pushing down on top of
the door with your thumb.
STEP 5: Slide the door closed. Ensure that the door is
latched by trying to remove the door without
pressing the release button.
11/04/96 D. Zurn
«Remove Batt 11/96»
11/04/96 D. Zurn
«Match Batt 11/96»
11/26/96
D. Zurn
Close
Locking
Door
11/96
11/26/96
D. Zurn
«Open
Locking
Door
11/96»

14
Operating Instructions
WARNING:
If a gap is present anywhere between the battery door and the
pump housing, the door is not properly latched. If the battery door
becomes detached or loose, the batteries will not be properly
secured; this could result in loss of power, nondelivery of drug,
and, depending on the type of drug being administered, death or
serious injury to the patient.
The power-up sequence will start, and the pump will go through an
electronic self-test. All of the display indicators, the software revision
level, and each parameter will appear briefly.
STEP 6: Resume operation of the current program by pressing and
holding the STOP/START key to enter the Start mode or
proceed to Section 3.2 to prepare to program the pump.
The battery’s life is dependent on the amount of medication delivered
and the temperature. At the rate of one 50 ml Medication Cassette™
Reservoir per day, an alkaline battery will usually last about seven
days. If you use an ULTRALIFE®lithium battery, you will have power
for approximately ten days. A battery’s power will be quickly depleted
at temperatures below +10°C (50°F).
CAUTION:
Do not store the pump for prolonged periods of time with the
battery installed. Battery leakage could damage the pump.
Table of contents
Other SIMS Deltec Medical Equipment manuals


