SImx ECO SPOT SELECT LHT1054 User manual

INSTALLATION INSTRUCTIONS
This product is suitable for use only with a supply voltage of 220-240V AC 50Hz.
All electrical work must be carried out in accordance with local and national electrical codes as applicable.
We strongly recommend that this light fitting is installed by a registered electrician.
Always switch power off prior to installation. A means of mains power isolation must be installed in the circuit
for the purpose of safe access for any internal cleaning, recalibration, or maintenance.
This light fitting is not intended for use by persons (including children) with reduced physical, sensory or
mental capabilities, or lack of experience and knowledge, unless they have been given supervision or
instruction concerning use of the appliance by a person responsible for their safety. Young children should be
supervised to ensure that they do not play with the appliance.
Any changes or modifications made or attempted to this product, without the prior written approval of the
manufacturer, will void any and all stated warranties.
IMPORTANT
!
ECO SPOT SELECT
LHT1054 BLACK / LHT1055 WHITE
Twin 10W LED Sensor Light
The Simx Eco Spot Select incorporates a PIR (Passive Infra Red) motion sensing device
which continuously scans a preset operating zone and immediately switches the light on
when it detects movement in that area. This product is suitable for sheltered exterior
locations. It requires a 230V AC power supply to operate and should be installed by a
registered electrician.
TECHNICAL SPECIFICATIONS
Power Source 220-240V AC Class II
Detection Range 10 metres max, 150°
Time Setting Min: 10sec ± 5sec
Max: 4min ± 1min
Dusk Control Day to Night (adjustable)
PIR Aiming adjustment Pan/Tilt
Sensitivity Control Yes
Manual Override Yes
Standby Power <1W (sensor head only)
Rated Load 20 Watts
Lumens 3000K, 1800 lumens
snemul0002,K0004
snemul0002,K0005
Protection Rating IP54
Mounting Ceiling or wall
Construction Polycarbonate UV stabilised

We strongly recommend this light fitting is installed by a registered electrician
Switch off the power supply before commencing any electrical work.
Unscrew the fixing cover screws and remove the rear cover.
Use the rear cover to mark the position of screw holes onto mounting surface.
Drill the wall to depth of about 4 cm and fit the wall plugs (supplied).
Care should be taken to avoid drilling or screwing into concealed electrical wiring/plumbing.
Push the cable through the cable gland. Affix the back of the housing to the mounting surface with
mounting wall screws.
Connect the power cables to the terminal block securely (refer to Fig. 1). Refit the terminal block and
cable anchorage. Select lamp colour from internal dip switch (refer to Fig. 2).
Reattach and screw securely the cover to the base. Ensure cables are not pinched in closing the unit.
Reconnect mains power.
Test circuit and setup PIR settings (see below).
The Eco Spot Select should be wired to its own light switch. Do not interconnect with other lights on
the same switch. An earth connection must be used for electrical safety.
To achieve best results, please consider the following points:
Eco Spot Select should be mounted 1.8 to 2.5 metres above the ground.
To avoid false triggering, the sensor should be directed away from heat sources such as barbecues, air
con, flue vents etc.
Do not aim towards reflective surfaces such as smooth white walls, swimming pools, etc.
Before selecting a place to install your Eco Spot Select, note that movement across the scan area
is more effective than movement directly toward or away from the sensor.
BEFORE YOU START
INSTALLATION
Please read all the instructions prior to installation.
Fig. 1

morf
de
tsujdaebnacn
oitavitca
retfa
nodehcti
wssniamertceleS
t
opS
ocEehtemitfoht
gnel
eh
T
e
mit
noitarudeh
ttsujdalli
w)-(r
o)+(otbonkEMI
T
ehtgnitat
oR.setunim)
1±4(otsdnoces
)5±01(
.yl
gni
d
rocca
:et
o
Neh
t
tratserlliw
noitcete
dtneu
qesbus
ynar
osnes
RIPeht
y
bdereggi
rtne
eb
sahthgil
eh
tec
nO
.doi
repde
mit
ehtgni
tsuj
d
A.noito
myb
dereg
girtebnac
rosneSRIPhcihwecnatsi
dmumixamehtsnae
m
ytivi
tisnesehT
.ytivi
tisnesehttsuj
dalliw)-(ot)+(
mor
f
bonkS
NES
.ssenkraddna
thgilya
ds
tceted
tah
t)llecot
oh
p(ecivedgnisnes
ni-tliu
b
a
saheludo
m
lortnocXULehT
(
ehT (
ehtni
dna,thgindnayadta
krow
lliwti
se
taci
dninoi
tisop) otlaidteS.th
gin
tayln
o
-noitisop)
ttaetarep
oh b
levelderisedetsuj
dayLehtgni XU .bonk
snes
eht
pu
gnitteSro)2.giFotrefer(
(thgilot
bonklortnocXUL
ehtnru
Thcti
wsllawehtnru
t
,noitisop)n
oces03
tiawdnano d
lortnocehtro
f
s
.esilibatsottiucric.mu
min
imta
tessi
lortnoc
EMIT
ehttahterusnE
ttceriDh d
rawot
r
osnes
e nnacs
e
botae
raderisedeht ehtnotni
ojl
evi
wsdnatnioj
woble
eht
gni
tsujdaybde
mra
rosnes
dna
dennacsebot
aeraehtfoe
rtnecehtssorcaev
o
menoemos
evaH uj
dayl
wols na
eh
ttsrosneseht
fo
elg
uehtlitnu
mraNEStsu
jdA.derisedsasreggirtdna
tnemev
o
m
eht
sesnes
tin .ecna
tsidre
tlaot
laidS
.gnittesderiuqer
otlortn
ocEMI
Tehttsuj
dA
qerera
sthgilehtfIu t
iaw
,ksudmor
fe
t
are
po
otderi f ,level
th
gil
derisedeht
r
onoc
XUL
ehtnru
t
ylwolsneht tlo
r
deht
foertnecehtssorca
sklawen
oemoselihwth
g
ilya
d
sdrawot
b
onk hcti
ws
sthgil
ehtnehW.ae
ranoi
tcete
n
ocXULehtesaeler,not tius
otl
ortnocXUL
teS
.bonklor.noi
tacilpparuoy
:etoN taewre
mra
w
naht
r
ehtaewyrdroredloc
nievitisneseromerasr
osnesRIPllA h.
re
n
ya
muoYu
j
dareht
ru
fekamotdee dliubt
suddiovaoT.
gnittesle
vel
thgillaediru
oyeveihca
otstnemtspu-
p
orperusnednaninoitcnu
f
rea
hti
w
y
l
thgilsnel
r
osnesehtepiw,tceleS
t
o
pSoc
Eehtfog yrevehtolc
pmad
.shtnom3
tsuj
dagnimiayna
erof
eBtopS
ocEhctiws
,stnemnisu
ohpmal
toheh
twolla
dnaffotceleS
g.lo
ocots
nirognihcuotton
era
y
eh
t
eru
sne,sgnisuoh
pmal
gnitsujdanehW n(ytim
ixorpesolc toot)mm
04naht
ssel
daehrosnestmorftaehsa
,h .rosneS
RIPehtfonoitare
p
o
tcapmiyamgnisu
ohpmale
Fig. 2
CALIBRATION
Selecting lamp colour with power supply connected
may cause irrepairable damage. Always disconnect
at mains before making any colour seletion.
10 Sec 4 Min 3 mtr 10 mtr
Night
Day

This product is guaranteed by SIMX Ltd for 3 years from the date of purchase against faulty materials or
workmanship which affects its designed ability to detect or switch. During this period if the product has a
defect of this nature it will be repaired or replaced free of charge by SIMX with the same item, or a similar
one of higher specification. ON CONDITION THAT:
The buyer returns it to the seller from whom it was bought, freight paid.
The product has been bought by the user. ie a receipt/sales invoice is produced as proof of purchase.
The product has not been misused or handled carelessly, installed in anyway contrary to the installation
instructions, used on a supply voltage other than that indicated in the product specifications, or installed
in any unusually exposed or harsh environmental conditions.
This guarantee excludes liability for discolouration of paint or plastic, or any user serviceable parts. It
does not confer any rights other than those expressly set out above and does not cover any claims for
consequential loss or damage.
Our Goods come with guarantees that cannot be excluded under the New Zealand Consumer Law. You
are entitled to a replacement or refund for a major failure and for compensation for any other reasonably
foreseeable loss or damage. You are also entitled to have the Goods repaired or replaced if the Goods fail
to be of acceptable quality and the failure does not amount to a major failure.
Distributed by: Simx Limited
Ph: +64 9 259 1660 | Technical Support Ph: +64 9 259 1662
MANUFACTURERS EXTENDED WARRANTY
PRODUCT COMPLIANCES
Product complies with:
AS/NZS 60598.1:2017 AS/NZS 60598.2.1:2014 AS/NZS CISPR15:2017
EN61000.3.2:2014 EN61000.3.3:2013 EN55015.2013 EN62031.2015 EN62473.2015
AS/NZS 61347.1:2016 AS/NZS 61058.1:2008 and relevant amendments
PUB1498 1903
Specications are subject to change without notice
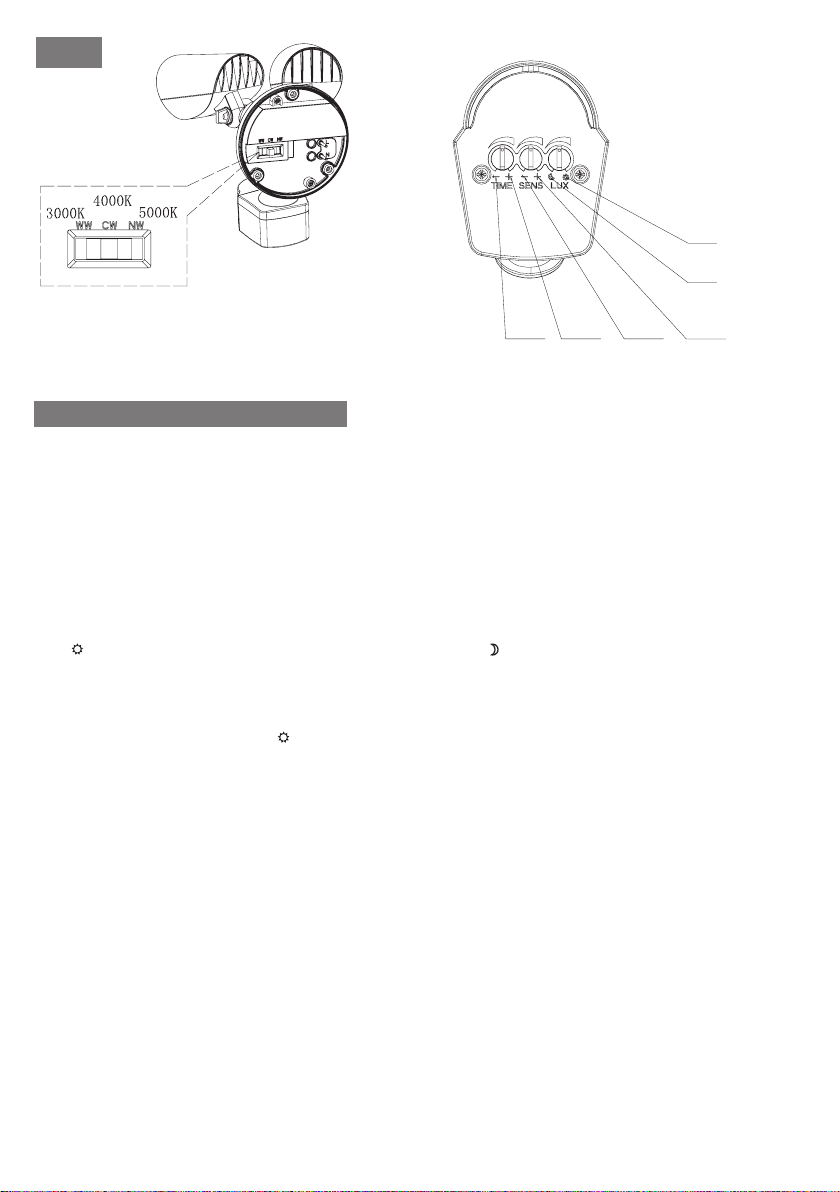
MANUAL CONTROL (Override Function)
When power is first switched on, the PIR detector enters into the “WARM-UP” period for about 1 minute,
then automatically switches into AUTO MODE.
Turning the wall switch off and on twice, within 3 seconds, will change from Auto Mode to Manual Mode. In
MANUAL MODE, the Lamp(s) will remain ON, not affected by duration time and Lux control settings, after
8 hours, the lamp will change to AUTO MODE again.
To change it back to AUTO MODE, prior to this, turn the wall switch off and on twice in about 3 seconds
(the same override used to go from AUTO to MANUAL mode).
During MANUAL MODE or AUTO MODE, by switching off the ON/OFF main switch within 6 seconds and
then on again, the PIR detector will reset to WARM-UP period.
This manual suits for next models
1
Table of contents
Other SImx Floodlight manuals

SImx
SImx LHT1083 User manual

SImx
SImx TUTOKO LHT1146 User manual

SImx
SImx LHT0214 User manual

SImx
SImx LHT0192 User manual

SImx
SImx LHT0331 User manual

SImx
SImx CHAMELEON LHT1096 User manual

SImx
SImx LHT0346 User manual

SImx
SImx LHT 0271 User manual

SImx
SImx Mightylite LHT0230 User manual

SImx
SImx Mightylite LHT0237 User manual