Sinbo SVC 3459 User manual

SVC 3459 VACUUM CLEANER
INSTRUCTION MANUAL
TR
EN
www.sinbo.com

- 1 -
ENGLISH
SINBO SVC 3459 1400W BAGLESS VACUUM CLEANER
INSTRUCTION MANUAL
IMPORTANT SAFETY INSTRUCTIONS
READ CAREFULLY AND KEEP FOR FUTURE REFERENCE
Carefully read this manual before using this appliance.
Ensure that you know how the appliance functions and how to operate it.
Maintain the appliance in accordance with the instructions to ensure that it functions
properly.
Keep this manual with the appliance. If the appliance is to be used by a third party, this
instruction manual must be supplied with it.
The safety instructions do not by themselves eliminate any danger completely and proper
accident prevention measures must always be used.
No liability can be accepted for any damage caused by non-compliance with these
instructions or any other improper use or mishandling.
Do not use this appliance if it has been dropped or damaged in any way, or if the supply
cord is damaged.
PACKAGE CONTENTS
1 x 1400W Bagless Vacuum Cleaner
1 x Stainless Steel Tube
1 x Flexible Hose
1 x Floor Brush
1 X Crevice Nozzle
1 x Instruction Manual
Confirm all parts before disposing of carton. Safely dispose of all plastic bags and other
packaging components. They may be potentially dangerous to children.
IMPORTANT SAFETY INSTRUCTIONS
When using an electrical appliance, basic precaution should always be followed.
READ ALL INSTRUCTIONS BEFORE USING THIS APPLIANCE
WARNING - To reduce the risk of fire, electric shock, or injury:
1. Do not leave vacuum cleaner when plugged in. Unplug from outlet when not in use
and before servicing.
2. To reduce the risk of electric shock, do not use outdoors or on wet surfaces.
3. If the vacuum cleaner is not working as it should, has been dropped, damaged, left
outdoors, or dropped into water, take it to a service centre.
4. Do not use with damaged supply cord or plug. If the supply cord is damaged, the
manufacturer or its service agent or a similarly qualified person must replace it in order
to avoid a hazard.
5. This appliance is not intended for use by persons (including children) with reduced
physical, sensory or mental capabilities, or lack of experience and knowledge, unless
they have been given supervision or instruction concerning use of the appliance by a

- 2 -
IMPORTANT SAFETY INSTRUCTIONS
person responsible for their safety.
6. Children should be supervised to ensure that they do not play with the appliance.
7. Do not carry by the cord, use cord as a handle, close door on cord, or pull cord around
sharp edges or corners. Do not run vacuum cleaner over cord. Keep cord away from
heated surfaces.
8. Do not unplug by pulling on cord. To unplug, grasp the plug, not the cord.
9. Do not handle plug or vacuum cleaner with wet hands.
10. Do not put any object into openings. Do not use with any opening or outlet blocked.
Keep free of dust, lint, hair and anything that may reduce airflow.
11. Keep hair, loose clothing, fingers and all parts of the body away from openings and
moving parts.
12. Turn all controls off before unplugging.
13. Use extra care when cleaning on stairs.
14. Do not use to pick up flammable or combustible liquids, such as gasoline, or use in
areas where they may be present
15. Hold plug when rewinding onto cord reel. Do not allow plug to whip when rewinding.
16. Unplug before connecting the hose.
17. Do not pick up anything that is burning or smoking, such as cigarettes, matches, or
hot ashes.
18. Do not use without filters in place.
19. This appliance is double insulated for your protection. Do not attempt to repair a
double insulated appliance.
NAME OF PARTS
1. Large rubber wheels
2. Power cord storage
3. Filter cannister
4. Crevice nozzle
5. Dual purpose floor brush
6. Dust barrel release button
7. On/Off button
8. Rewind button

- 3 -
USING
ASSEMBLING THE VACUUM CLEANER
Always remove the plug from the power socket before fitting or removing accessories!
1. Fitting the flexible hose
Insert the flexible hose into the air intake duct at the front of the appliance. Press until
it clicks into position.
2. Removing the flexible hose
Remove the plug from the power socket. To release the flexible hose, firmly squeeze the
release buttons on both side and pull out from the air intake duct.
3. Fitting the extension tube and floor brush
Simply insert the tube into the available end of the flexible hose and insert the floor brush
to the other end of the tube.
USING THE VACUUM CLEANER
1. Assemble the vacuum cleaner as described above.
2. Before using the appliance, unwind a sufficient length of cable and insert the plug into
a suitable 230V ~ 50Hz power socket. A yellow mark on the power cable shows the ideal
cable length.
CAUTION: Do not extend the cable beyond the red mark and never pull out or retract the
cord while the machine is running.
3. Press the ON/OFF button to switch the appliance on.
4. Choose a suitable adjustable floor brush position for surface to be cleaned:
a) Carpets – The bristles should be in (retracted) to enable the floor head to glide on the
carpet.
b) Hard Floors – The Bristles should be out (extended).
5. Keep an eye on the dust barrel and when it is half full, it is time to empty it
6. To rewind the power cord, turn off the vacuum cleaner and unplug from the power
socket. Press down on the cord rewind button with one hand and guide the power cord
with the other hand to ensure that it does not whip causing damage or injury.
EMPTYING THE VACUUM CLEANER
Emptying the dust barrel
Always unplug the unit from electrical outlet before removing the dust barrel.
1. Press the knob on the top of the dust barrel.
2. Lift dust barrel back and up.
3. Hold the barrel over a rubbish bin or other suitable area for collecting the contents
of the barrel.
4. Press the knob at the bottom end of dust barrel to open the dust barrel cover. The
contents are emptied from the bottom of the barrel.
5. Refit the dust barrel to the vacuum cleaner

- 4 -
CLEANING THE FILTERS
The sponge filter needs to be cleaned regularly; the frequency will depend entirely on
the environment it is used in. If you notice a lack of suction the filter should be removed
and thoroughly washed under a mains pressure tap. Always ensure the filter is completely
dry before refitting to the dust barrel.
Removing & Cleaning the Dust Barrel Filter
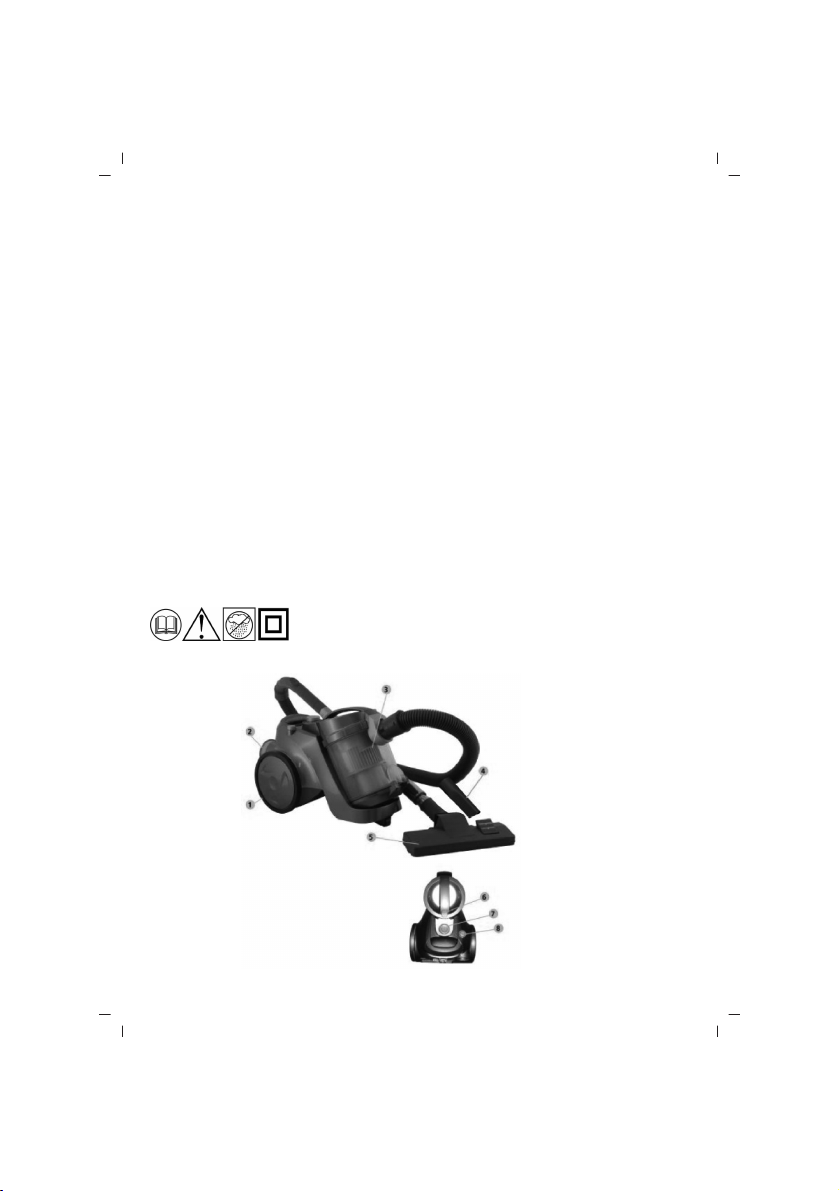
1. Remove the dust barrel as described above.
2. Open the top of the dust barrel by holding the dust barrel and turning the top of the
dust barrel anticlockwise approx 20mm till it unclips.
3. Lift off the top of the barrel and remove the foam filter and orange coloured filter
canister, taking note of how the parts are assembled.
4. Thoroughly wash the foam filter and orange coloured filter canister under a mains
pressure tap and allow to air dry for 24 hours.
5. Replace the parts back to the dust barrel making sure they are positioned correctly.
It is imperative that after the dust barrel has been disassembled, it is reassembled
correctly.
Make sure the tab at the top of the orange coloured filter canister is slotted into the
receptacle in the barrel and the sponge filter is the right way up (the word UP & an arrow
is moulded in the top of the plastic sponge filter housing).
Removing & Cleaning the Air Outlet Filter
1. Remove the air outlet grill located at the rear of the vacuum cleaner by pressing the
tab at the top of the grill and lift away.
2. Remove the air outlet filter for cleaning or changing.
PRECAUTIONARY MEASURES
All filters should be checked regularly for signs of damage, preferably after each use.
The filters must be replaced immediately if they become damaged. Always disconnect
the vacuum from the electrical outlet when checking the filters.
This vacuum cleaner is equipped with a plug and a cord, which rolls up automatically.
If any of these parts get damaged, it must be repaired by a qualified repairman or
electrician.
IMPORTANT: The motor is equipped with a protective thermostat. If for some reason the
vacuum cleaner should overheat, the thermostat will automatically turn the unit off.
Should this occur unplug the vacuum cleaner from the wall outlet and turn off switch.
Remover dust canister, empty contents and clean the filter. Allow the unit to cool for
approximately 1 hour. To restart, re-plug into wall outlet and turn switch back on.
TO PREVENT DAMAGE TO YOUR VACUUM CLEANER
1. Never unwind or rewind the cord while the vacuum cleaner is turned on or plugged
in, this may produce arcing of the terminals in the cord rewind mechanism and cause
an open circuit. Do not extend the cable beyond the red mark.

2. Be sure to check that parts are correctly in place, if not, then damage to the vacuum
cleaner motor can occur.
3. If the hose inlet, the hose, tube or nozzle attachments are blocked, switch off the
vacuum cleaner. Clear the blockage before you attempt to start the vacuum cleaner
again.
4. Do not obstruct the air outlet. Do not operate this vacuum cleaner with it standing on
its back side i.e. air outlet sitting on the ground. Only operate this unit when all 3 wheels
are on the ground.
5. Do not operate the vacuum cleaner too close to heat sources such as heaters, open
fires, cigarette butts etc
6. Never run the vacuum cleaner without all the filters and parts correctly in place.
7. Before you start using the vacuum cleaner, remove any large or sharp objects from
the floor in order to prevent damage to the floor brush, tube, hose, and filters.
Failure to observe the above precautions may void any warranty
TECHNICAL SPECIFICATIONS
Model: SVC3459
AC220-240V, 50/60Hz,1400W
- 5 -
CLEANING THE FILTERS

- 6 -

ÇÄÜçõÖ àçëíêìäñàà èé íÖïçàäÖ ÅÖáéèÄëçéëíà
- 7 -

- 8 -

- 9 -

- 10 -

- 11 -

- 12 -

- 13 -
03-2019
Other manuals for SVC 3459
2
Table of contents
Other Sinbo Vacuum Cleaner manuals

Sinbo
Sinbo SVC 3449 User manual

Sinbo
Sinbo SVC 3457 User manual

Sinbo
Sinbo SVC 3493 User manual

Sinbo
Sinbo SVC 3471 User manual

Sinbo
Sinbo SVC 3446 User manual

Sinbo
Sinbo SVC 3480Z User manual

Sinbo
Sinbo SVC 3466 User manual

Sinbo
Sinbo SVC 3455WD User manual

Sinbo
Sinbo SVC 3454 User manual

Sinbo
Sinbo SVC 3458 User manual

Sinbo
Sinbo SVC 3463 User manual

Sinbo
Sinbo SVC 3459 User manual

Sinbo
Sinbo SVC 3455 User manual

Sinbo
Sinbo SVC 3495 User manual

Sinbo
Sinbo SVC 3472 User manual

Sinbo
Sinbo SVC 3446 User manual

Sinbo
Sinbo SVC 3468 User manual

Sinbo
Sinbo SVC 3467 User manual

Sinbo
Sinbo SVC 3449 User manual

Sinbo
Sinbo SVC 3438 User manual