Sincro RD1 User manual

1
SINCRO® is a brand of Soga Energy Team ITALY | sogaenergyteam.com | info.sincro@sogaenergyteam.com
REV01 07/2019
RD1
Digital AVR
Automatic Voltage Regulator
OPERATION MANUAL

2
INDEX
GENERAL FEATURES _ _ _ _ _ _ _ _ _ _ _ _ _ _ _
ELECTRICAL SPECIFICATIONS_ _ _ _ _ _ _ _ _ _
ADJUSTMENTS_ _ _ _ _ _ _ _ _ _ _ _ _ _ _ _ _ _ _
WIRING DIAGRAM _ _ _ _ _ _ _ _ _ _ _ _ _ _ _ _ _
STARTING UP_ _ _ _ _ _ _ _ _ _ _ _ _ _ _ _ _ _ _
MAINTENANCE AND TROUBLE-SHOOTING _ _ _
page 3
page 4
page 6
page 10
page 11
page 12

3
GENERAL FEATURES
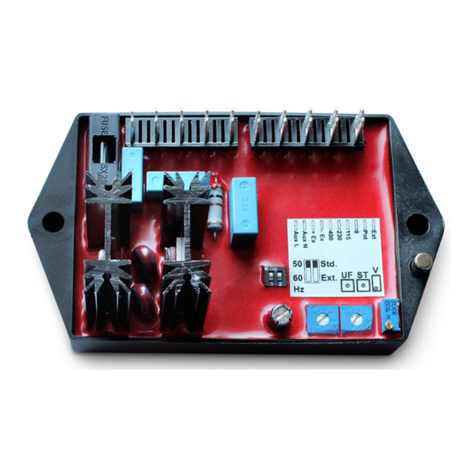
SINCRO RD1 is a digital voltage regulator designed for 50/60 Hz brushes generators.
It regulates the output voltage of a generator by controlling the field current.
It has single and three phase sensing.
RD1 is powered by an auxiliary circuit on the main stator.
The RD1 controls and keeps constant the average value of the 3RMS phase voltages.
A frequency measuring circuit continually monitors the alternator output and provides output under-
speed protection of the excitation system, by reducing the output voltage proportionally with speed
below a pre-settable threshold. A manual adjustment is provided for factory setting of the under
frequency roll off point, (UF). This can easily be changed to 50 or 60 Hz with two dip switches.

4
ELECTRICAL SPECIFICATIONS
RD1 AVR includes:
- a terminal strip (9 terminals)
- a voltage trimmer
- a stability trimmer
- an under frequency trimmer
- a range sensing selection DIP switches
- a frequency selection DIP switch
- a stability selection DIP switch
- a sensing selection DIP switch (single/three-phase)
- an external pot setting output selection DIP switch
- an external voltage setting output selection DIP switch
- electric protection with fuse.
The electronic is sealed with resin (it is a perfect protection against vibration and humidity).

5
DIP SWITCHES CONFIGURATION
RD1 AVR has two groups of DIP switches:
The first group (group 1) of DIP switches selects the nominal voltage of sensing.
- 115 Vac
- 230 Vac
- 400 Vac
- 480 Vac
- the working frequency 50 Hz or 60 Hz
- single phase or 3 phases sensing
The second group (group 2) of DIP switches selects:
- The possibility to set generator output by External voltage (Ext V, ON)
- The possibility to set generator output by External Potentiometer (Ext P, ON)

6
ADJUSTMENTS
VOLTAGE ADJUSTMENT
Adjusting the trimmer “V” changes the output voltage.
Take the generating set to its nominal speed and turn until the required voltage is obtained.
If a small variation in speed causes a voltage variation, then the underspeed protection trimmer
“UF” should first be calibrated.
Adjusting the “V” trimmer, the ranges are the following:
- DIP-switch on 115 V position, range 100÷130 V
- DIP-switch on 230 V position, range 185÷245 V
- DIP-switch on 400 V position, range 340÷460 V
- DIP-switch on 480 V position, range 440÷520 V.
STABILITY ADJUSTMENT
If there are voltage fluctuations, adjust the potentiometer “ST”, which modulates the reaction time
of the regulator to external inputs, thereby eliminating any instability in the alternator-load system.
UNDER FREQUENCY KNEE ADJUSTMENT
AVR RD1 incorporates an underspeed protection circuit (UF) which gives a volts/Hz characteristic
when the alternator speed falls below a presettable threshold known as the "knee" point.
The UF knee adjustment is preset at factory at the 47Hz on a 50Hz system or 57Hz on a 60Hz
system. Selection of 50 / 60Hz can be made using the DIP-Switches.
The figures below show the curves for voltage variation as a function of frequency variation.
For nominal frequency operation, UF is disabled. When rotation decreases (e.g. when shutting
down), excitation decreases, reducing the output voltage of the alternator.
The pre-set "knee" point can be altered, by UF trimmer, according to the needs of each application.
Under frequency “knee”: a) 50 Hz system, b) 60 Hz system

7
UF trimmer is a single potentiometer turn.
The adjustment range is:
- DIP switch on 50 Hz position, range 42÷50 Hz
- DIP switch on 60 Hz position, range 52÷60 Hz
CONNECTING AN EXTERNAL POTENTIOMETER (5 kOhm)
Remote voltages adjustment:
put the DIP switch “Ext pot” in ON position and “Ext voltage” in OFF position (they are in the group
2 of DIP switches). Connect the external potentiometer (5kOhm, ½W) to the free terminals “EXT
POT”.
The external potentiometer can only reduce the original set point of the AVR.
To increase the voltage setting it is necessary to turn the external potentiometer completely
anticlockwise (min. resistance) and than to adjust the max limit with “V” potentiometer.
CONNECTING AN EXTERNAL VOLTAGE (0-10 Vdc) FOR PARALLEL DEVICE
Remote voltage adjustment:
put the DIP switch “Ext voltage” in ON position and “Ext pot” in OFF position (they are in the group
2 of DIP switches). Connect the minus voltage (-) to the free terminal “EXT” and the plus voltage (+)
to the free terminal “POT”. Connect half voltage range (5 Vdc) on “EXT” “POT” input.With V trimmer
adjust alternator voltage to nominal value for that range.

8
SINCRO® is a brand of Soga Energy Team ITALY | sogaenergyteam.com | info.sincro@sogaenergyteam.com
CONNECTIONS
Output (DC field connection):
- At terminals “+Ex” (red wire) and “-Ex” (black wire).
The power supply has to be connected:
- At terminals “AuxN” (neutral) and “AuxL” (line/phase).
The power can be supplied by using an independent auxiliary winding, integrated in the alternator
stator, or the phase of sensing.
The terminal L is internally (in the AVR) connected with A terminals.
The L line is protected by fuse (type F8 A, 250 V, T 5x20).
For the three phases alternator the voltage reference must be connected as follows:
U-V-W are the three phases of the alternator. N is the neutral

9
SINCRO® is a brand of Soga Energy Team ITALY | sogaenergyteam.com | info.sincro@sogaenergyteam.com
For the single phase alternator the voltage reference must be connected as follows:
U1-V1 are the output of the alternator (230 V).
U1-U2 is half phase (115 V).
The external voltage potentiometer:
- At terminals “Ext” and “Pot”.

10
SINCRO® is a brand of Soga Energy Team ITALY | sogaenergyteam.com | info.sincro@sogaenergyteam.com
WIRING DIAGRAM

11
SINCRO® is a brand of Soga Energy Team ITALY | sogaenergyteam.com | info.sincro@sogaenergyteam.com
STARTING UP
If a replacement AVR has been fitted, or the re-setting of the voltage adjustment is required, please
proceed as follows:
1. Connect the wires coming from the alternator according to the description in the
CONNECTION DIAGRAM and the type of alternator to be used.
2. Check that the DIP switches group 2 and group 1 are consistent with the characteristics of
the machine (voltage, frequency, remote control)
3. Before running alternator, turn the volts trimmer “V” anti-clockwise
4. Turn stability trimmer “ST” to midway position
5. Start alternator set, and run on no load at nominal frequency e.g. 50-53 Hz or 60-63 Hz
6. Carefully turn volts trimmer “V” (or external pot, if fitted) clockwise until rated voltage is
reached
7. If instability ispresent at rated voltage, refer to stability adjustment, and then re-adjust voltage
if necessary

12
SINCRO® is a brand of Soga Energy Team ITALY | sogaenergyteam.com | info.sincro@sogaenergyteam.com
MAINTENANCE AND TROUBLE-SHOOTING
PREVENTIVE MAINTENANCE
Periodical inspections of the equipment are required to ensure they are clean, dust and moisture
free. It is essential that all terminals and connections are kept free from corrosion.
TROUBLE-SHOOTING
Trouble Possible
causes Solutions
NO OUTPUT VOLTAGE
-
Demagnetized machine
-
Wrong connection of the AVR
-
Loose terminals/connections
-
External potentiometer doesn’t
work (if present)
-
Burnt fuse
-
Faulty AVR
-
Connect (for a while) an external
battery (12Vdc) to the exciter
(respecting the polarities)
-
Check as per wiring diagram
-
Check if all terminals/connections are
well tightened
-
Change external potentiometer (if
present)
-
Check and replace
-
Replace the AVR
LOW OUTPUT VOLTAGE
-
Voltage potentiometer wrongly
adjusted
-
Sensing wrongly connected
-
Dip-switch wrongly positioned
-
Low frequency (under the UF limit)
-
Under-Frequency protection is not
properly adjusted
-
Faulty AVR
-
Check and adjust
-
Check the sensing connections
-
Check and fix
-
Increase the engine speed
-
Check and adjust
-
Replace the AVR
HIGH OUTPUT VOLTAGE
-
Voltage potentiometer wrongly
adjusted
-
Sensing wrongly connected
-
Dip-switch wrongly positioned
-
Missing sensing
-
Faulty AVR
-
Check and adjust
-
Check the sensing connections
-
Check and fix
-
Check if sensing is interrupted
-
Replace the AVR
UNSTABLE VOLTAGE
-
Stability response incorrectly
adjusted
-
Unstable engine speed
-
Loose terminals/connections
-
Faulty AVR
-
Adjust trimmer “ST”
-
Check the frequency/engine speed
-
Check if all terminals/connections
are well tightened
-
Replace the AVR
FUSE BLOWS
CONTINUOUSLY
- UF protection adjusted for a very
low frequency (so the fuse burn during
the turn-off procedure)
- Faulty AVR
-
Adjust UF limit to a value close to
the nominal frequency
-
Replace the AVR

13
SINCRO® is a brand of Soga Energy Team ITALY | sogaenergyteam.com | info.sincro@sogaenergyteam.com
Table of contents
Other Sincro Controllers manuals
Popular Controllers manuals by other brands
Nedap
Nedap Smart Deactivator manual

Minebea
Minebea Sartorius Intec Maxxis 4 PR 5500 Instrument manual

industrie technik
industrie technik SE10F24 Instruction

Avipas
Avipas AV-3106 user manual

Neptronic
Neptronic TSUB00 Series Specification and installation instructions

Unitronics
Unitronics UniStream USC-B5-TA32 user guide