Sinfonia Technology DP-1045 User manual

First edition : Aug 8, 2011
Latest edition : -
Revision : -
Digital Photo Printer
DP-1045
Operation anual
http://www.sinfo-t.jp

Handling of this anual
1. All rights reserved. No part of this operation manual covered
by the copyright herein maybe reproduced or copied in any form
or by any means, including translation, without the written
permission of SINFONIA TECHNOLOGY Co., Ltd.
2. The specifications in this operation manual are subject to
change without prior notice.
2. In case of having any difficulties or finding the fault in This
manual, your information to SINFONIATECHNOLOGY will
be highly appreciated.

FCC WARNING
FCC WARNINGFCC WARNING
FCC WARNING
Changes or modifications not expressly approved by the party responsible for
compliance could void the user’s authority to operate the equipment.
Note:
Note:Note:
Note:
This equipment has been tested and found to comply
with the limits for a Class
A digital device, pursuant to part 15 of the FCC Rules. These limits are designed to
provide reasonable protection against harmful interference when the equipment is
operated in a commercial environment. This equipment generates, uses, and can
radiate radio frequency energy and, if not installed and used in accordance with the
instruction manual, may cause harmful interference to radio communications.
Operation of this equipment in a residential area is likely to cause harmful
interference in which case the user will be required to correct the interference at his
own expense.
This device complies with Industry Canada licence-exempt RSS standard(s). Operation
is subject to the following two conditions: (1) this device may not cause interference,
and (2) this device must accept any interference, including interference that may cause
undesired operation of the device.
Le présent appareil est conforme aux CNR d'Industrie Canada applicables aux
appareils radio exempts de licence.
L'exploitation est autorisée aux deux conditions suivantes : (1) l'appareil ne doit pas
produire de brouillage, et (2) l'utilisateur de l'appareil doit accepter tout brouillage
radioélectrique subi, même si le brouillage est susceptible d'en compromettre le
fonctionnement.
Introduction
This manual describes detailed instructions for handling of and
basic operation of Digital Photo Printer DP-1045.
We will describe this product as “the printer” in the manual.
Read this manual thoroughly to understand how to install and
operate the printer before using it.
● Keep this manual near the printer and operators can refer
to this manual periodically.
● In case, lost or damaged this manual, contact your
dealers.
● In the case of transfer, do not forget to put this manual
together with the printer.
Notice

CONTENTS
PREFACE
Chapter 1. Important Safety Instruction
Chapter 1. Important Safety InstructionChapter 1. Important Safety Instruction
Chapter 1. Important Safety Instruction····················································· 1-1
Environments·······················································································1-2
Handling Instruction·············································································1-3
Handling Instruction - Continued from previous page································1-4
Handling Instruction for Consumable and Printed Output ·························1-5
Chapter 2. Installing and Set Up
Chapter 2. Installing and Set UpChapter 2. Installing and Set Up
Chapter 2. Installing and Set Up ······························································· 2-1
Unpacking and checking the accessories ··················································2-1
Parts Name and Function ······································································2-3
Connecting Power Cord ·········································································2-4
Connecting USB Cable ··········································································2-5
Installing Dust Box ···············································································2-5
Loading Paper ······················································································2-6
Loading Ink Ribbon···············································································2-7
Transporting the Printer········································································2-9
Chapter 3. Operation Panel
Chapter 3. Operation PanelChapter 3. Operation Panel
Chapter 3. Operation Panel ······································································ 3-1
Operation Panel····················································································3-1
LCD Display ························································································3-2
User Set Up ode·················································································3-3
Chapter 4. Routine aintenance
Chapter 4. Routine aintenanceChapter 4. Routine aintenance
Chapter 4. Routine aintenance ·······························································4-1
Cleaning of Thermal Head, Platen Roller, Pinch Roller,Cleaning Roller ·······4-1
Cleaning of Outer Cabinet······································································4-4
Cleaning of Filter··················································································4-4
Chapter 5. Error Handling
Chapter 5. Error HandlingChapter 5. Error Handling
Chapter 5. Error Handling········································································ 5-1
Error essage and Corrective Action·······················································5-1
Failure Symptoms·················································································5-3
Upper (R/L) Jam
·······················································································5-4
Lower Jam
······························································································5-6
Power Supply Interrupted during Printing ···············································5-8
When the ribbon is snapped ···································································5-8
Chapter 6. After
Chapter 6. AfterChapter 6. After
Chapter 6. After-
--
-sales Service
sales Service sales Service
sales Service ·································································· 6-1
Chapter 1. Important Safety Instruction
1-1
This manual provides detailed instructions for the safety use of the printer.
Read this manual before operating the printer to ensure to have proper use.
◆ In this manual, there are notes that require special attention.
For your safety operation, Safety notices are separated as follows;
◆ It is difficult to forecast all the danger in setting and use of the printer.
Therefore, warnings in this Operation anual, in the other documents on the
printer cannot cover all the cases.
In case of performing the operation or maintenance which are not described in
this manual, all the concern for the safety have to be taken care of at the
customer side.
◆ Operations and the notification for the maintenance described in this manual
and other documents are for the proper use of the printer.
In case of using the printer for the other purpose, all the concern for the safety
has to be taken care of at the customer side.
◆ Do not perform the operation which are prohibited in this manual and other
documents.
◆ The contents that cannot be printed due to a failure while using the use of this
printer are not guaranteed.
Attention: Explanation about the cause of the trouble and the environmental
condition.
Caution: Inappropriate handling can cause the wound for the users and/or
cause the physical damage.
Warning:
Inappropriate handling can cause the death or serious wound.

Chapter 1. Important Safety Instruction
1-2
Environments
To use the printer safety, please pay attention to the followings:
Caution: Do not let children to touch the printer or the cables.
It can cause accidents or electric shock.
Attention: Do not place the printer under the low temperature such as ski gelande,
skating rink or open-air with direct sunlight.
Warning: Do not block the openings of the printer. In case, the opening
blocked, the heat will remain inside and it can cause the fire.
Caution: Do not place the printer on rickety place and/or inclined place.
Printer may fall down or tumble and it can cause injury.
Caution: Do not place the printer under humid or dusty place.
It can cause a fire, electric shock or printer problem.
Do not place the printer with dust, sand and high humidity such
as bathing place, bathroom, hot spring, on the street.
Warning: Do not put vase, flowerpot, and cup with water inside or metric
items.
In case the water spilt or metric items fall into the printer, it can
cause the fire and electric shock.
Warning: Do not insert or fall the metallic items or flammable items into
the printer through the openings of the printer, it can cause the
fire and electric shock.
Chapter 1. Important Safety Instruction
1-3
Handling Instruction
In handling the printer, please pay attention to the followings;
Warning:
Lift t
he printer from its box and put it onto a fla
t
floor
.
..
.
Warning: The printer is heavier at front side than rear side so that please be
careful in transportation.
When moving the printer, hold the handles provided at the front
and the rear.
The printer must be handled by more than two persons during the
transportation.
Warning:
Be careful when you transport the printer on the slippery floor.
Warning: In case the printer was damaged, firstly turn off the power of the
printer and remove the power cord, then contact the dealers or
service center. To use the printer without any checking, can cause
the fire or electric shock.
Attention: At installation, appropriate interface cable will be required with your
computer.
Warning: At nearly 70Kg, the printer is too heavy to be lifted by one person.
Also please take a good care of your hands and fingers when lifting
the printer from the box.
Warning: Do not dismantle or remodel the printer.
Some sections of the printer contain a high voltage or become very
hot. Ignoring this warning may cause electric shock, fire, or burns.

Chapter 1. Important Safety Instruction
1-4
Handling Instruction - Continued from previous page
Warning:
Secure the power cable firmly.
Warning: The thermal head reaches high temperature during operation but
this is normal. Do not touch the thermal head.
Attention: Touching the surface of the thermal directly can cause the damage to
thermal head. When a hard object get into the printer, it can cause the
damage to the printer mechanism. In such case, please do not use the
printer.
Warning: Do not attempt to service the printer beyond the instruction
specified in this document. In case, impossible to recover from the
problem, please contact to the dealers or service center.
Warning: This product must be grounded, and always used with only the
specified power cable or the power cable accompanying this product.
If the product is used without ground, and current leakage occurs,
fire or electrical shock is most likely to result, and also cause
signal-receiving interference to a radio, a television receiver, and
other similar electric appliances.
If the proper grounding connection is not possible, please contact to
the dealers or service center.
Chapter 1. Important Safety Instruction
1-5
Handling Instruction for Consumable and Printed Output
In handling the ink ribbon, paper and printed output, please pay attention to
the followings;
Attention: Paper Handling
Use the paper specified by Shinko Electric.
Store the paper flat.
Store the paper in a dry and dark place to avoid the direct Sunlight.
(Temperature less than 30℃, Humidity: lass than 60%).
Do not touch the paper surface before printing to avoid the fingerprints.
Attention: Ink Ribbon Handling
Use the ink ribbon specified by Shinko Electric.
Store the ink ribbon in cool place to avoid the direct sunlight.
(Temperature less than 30°C, Humidity: lass than 60%)
Attention: Printed Output Handling
Store the printed output in a dark place to avoid the direct sunlight.
Store the printed output away from the organic fluid such as benzine,
thinner and alcohol which may change or deteriorate the colors.
Caution: When abandon the ink ribbon, please handle it as harmful
industrial waste.
Caution: Be careful not to injure your hands with the paper edge when
handling paper.

Chapter 1. Important Safety Instruction
1-6
<MEMO>

Chapter 2. Installing and Set Up
2-1
This chapter explains the unpacking and set up of the printer.
Before proceeding to this chapter, please make sure to read Chapter 1. Important Safety
Instruction.
Unpacking and checking the accessories
1. Cut the straps and remove Outer Box (Top). Remove Accessory
Box and Cushion (Top).
2. Remove Outer Box( iddle). And remove slope cardboard and
cushion (Lower Front).
Attention: Keep the packaging materi
als.
The box and protection
materials are necessary when
moving or transporting the
printer. ake sure that they
are retained.
Strap
Accessory box
Slope
Cardboard
Cushion (Lower Front)
Outer
Box (
Top)
Cushion
(Top)
Outer Box
(
iddle
)
Outer
Box (
Bottom)
Palette(Linked with Outer Box(Bottom))

Chapter 2. Installing and Set Up
2-2
3.Pull down the Outer Box (Bottom) like left side picture.
4.Insert removed Slope Cardboard between Outer Box (Bottom) to
Caster of Printer Unit bottom.
5.
Pull and slide the printer on the slope slowly to unload it with
holding handles on both side of printer unit.
6. Take out the accessories from the box. Check that the following items,
as illustrated below, are present.
Dust box Tray Paper flange (Black)
Paper flange (blue) Operation anua Power cable
Caution: ake sure to install slope cardboard until contact of
Stopper.
Slope
Cardboard
Stopper
Cushion(Lower Front
)
Cushion
(Lower Center)
Slope Cardboard
Stopper
Caster
Caster
Outer Box
(Bottom)
Handl
e
Handle
Caution: Please handle it carefully, because the weight of
this printer is around 70Kg. And please make sure
to use handles.

Chapter 2. Installing and Set Up
2-3
Parts Name and Function
N
o.
Name Function
①
Operation Panel Control buttons, LCD and printer status display lamps are
located on the panel.
②
Front Cover Open the front cover when replacing an ink ribbon or paper, or
when performing maintenance.
③
Handle (R) When moving the printer, hold this handle and the rear handle.
④
Side Upper Cover (R)
Open this cover when inspecting and cleaning the thermal head
and cleaning roller and when removing a jamming paper portion.
⑤
Side Upper Cover (L)
Open this cover when inspecting and cleaning the thermal head
and cleaning roller and when removing a jamming paper portion.
⑥
Power Switch
This switch turns on/off the power of the printer. When the “|”
marked side of the switch is pressed, the power is turned on.
When the “○” marked side of the switch is pressed, the power is
turned off.
<Caution> Once the printer is turned off, wait at least 3 seconds
before turning it on again.
⑦
Handle (L) When moving the printer, hold this handle and the rear handle.
⑧
Power Connector To be used to connect the power cord.
⑨
USB Connector To be used to connect the USB cable.
⑩
Tray To be used to catch printed papers.
⑪
Dust box
To be used to keep trimmed papers.
⑧
⑨
⑥
⑦
⑤
⑩
⑪
①
②
③
④
Chapter 2. Installing and Set Up
2-4
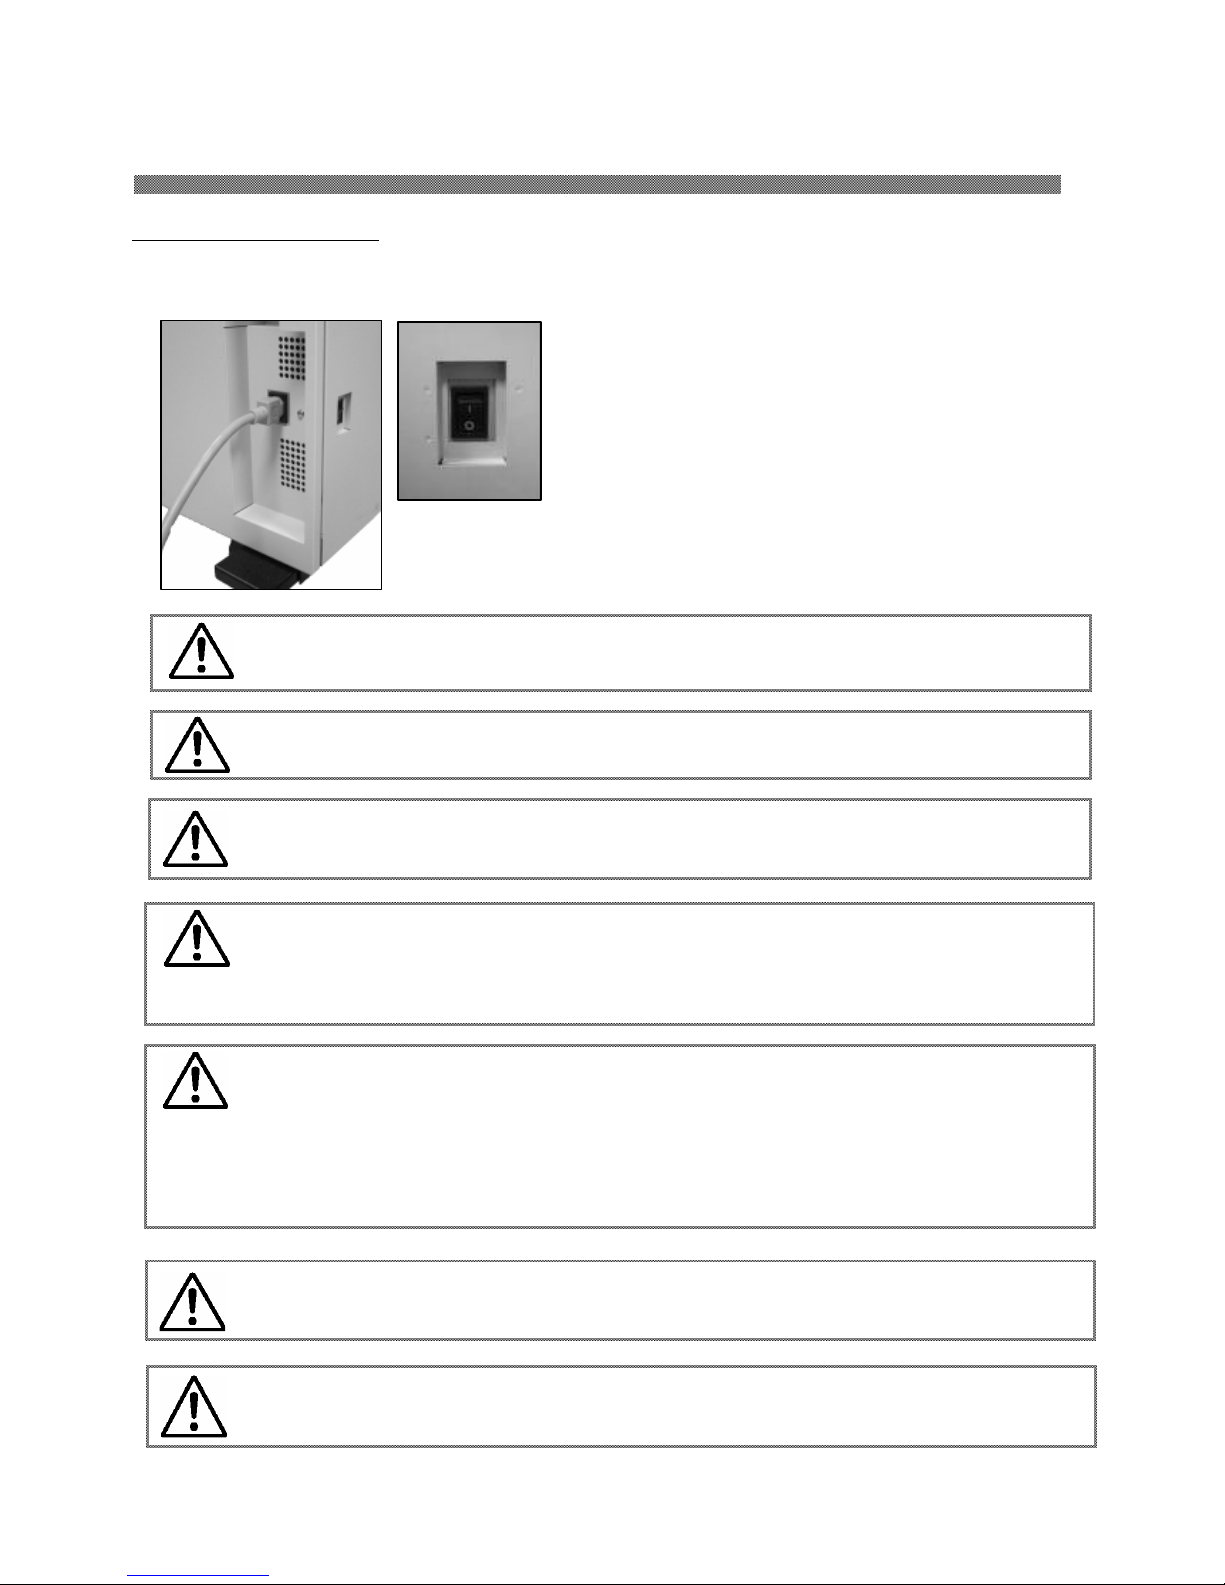
Connecting Power Cord
Connect the power cord according to the safety instructions below.
1. Insert the power cord attached to the
printer into the power connector located on
the rear of the printer.
Warning: When moving the printer, make sure to turn off the power of the
printer, remove the power cord in order to have no connection with
other devices. Otherwise, the power cord might be damaged and it
can cause the fire and electric shock.
Also there is a possibility to fall down caught by the cord.
Warning:
Avoid “pi
led up” connection. It can cause the fire and electric shock.
Warning: In case of not using the printer for a long time, remove the power cord
for safety.
Warning: ake sure to turn off the power of the printer before inserting the
power cord.
Warning: ake sure to insert the power cord correctly. If not, it can cause the
fire or the printer problem.
Warning: Do not insert or remove the power cord with wet hands.
It can cause the electric leakage.
Warning: Do not make any damage or any modification to the power cord. Put
the heavy items on the power cord, give a strong pull to the power
cord and twist the power cord can cause the fire and electric shock.

Chapter 2. Installing and Set Up
2-5
Connecting USB Cable
1. Connect the USB cable from the personal
computer to the USB connector located on the
left rear side of the printer.
Be sure to insert the USB cable all the way.
Installing Dust Box and Tray
1. Insert the exit tray. Slide it
downward into the four slots on the
printer.
2. Insert the dust box. Align it with the
rail on the side of the printer.
If the tray is not inserted properly, a
paper jam can occur.
Dust Box
Tray
Attention: To remove the USB cable, make sure that the printer is in
the waiting status.
Removing the USB cable during data transfer may not be
able to print data correctly.

Chapter 2. Installing and Set Up
2-6
Loading Paper
1. After confirm Front Cover is closed, push
“|” side of Power Switch to turn on the
power of printer.
2 Check the setting.
●In case paper set is first time.(Step6)
●In case paper is replaced, go to next step.
3. Push the button of PAPER REWIND button
① on control panel.
4. When “Roll Back OK?” is displayed, push
the button of ENTER button②.
5. When “Load Paper” is displayed, open the
Front Cover.
6. Hold up the lever to release the lock, and
open Paper Unit.
7. Check the setting.
●In case paper set is first time.(Step10)
●In case paper is replaced, go to next step.
8. Remove used paper for replacement.
9. Remove Paper Flanges from used paper roll.
10. Install Paper Flange(Blue) and Paper
Flange(Black) to new paper roll.
11. The paper is not set correctly if there is a
gap of around 10mm between the paper
flange and paper. atch the notch of the
paper flange and the notch of the paper
core by rotating the paper flange.
Do not remove the seal attached to the paper
until the paper is set in the printer.
12. Set the paper in the printer.
Set the paper by matching the color of the
paper flange and the cover of the holder.
After setting the paper, remove the seal
from the paper.
13. Close the Paper Unit.
①
②
Caution: Paper feed part carefully
so as not to catch your
fingers.
Chapter 2. Installing and Set Up
2-7
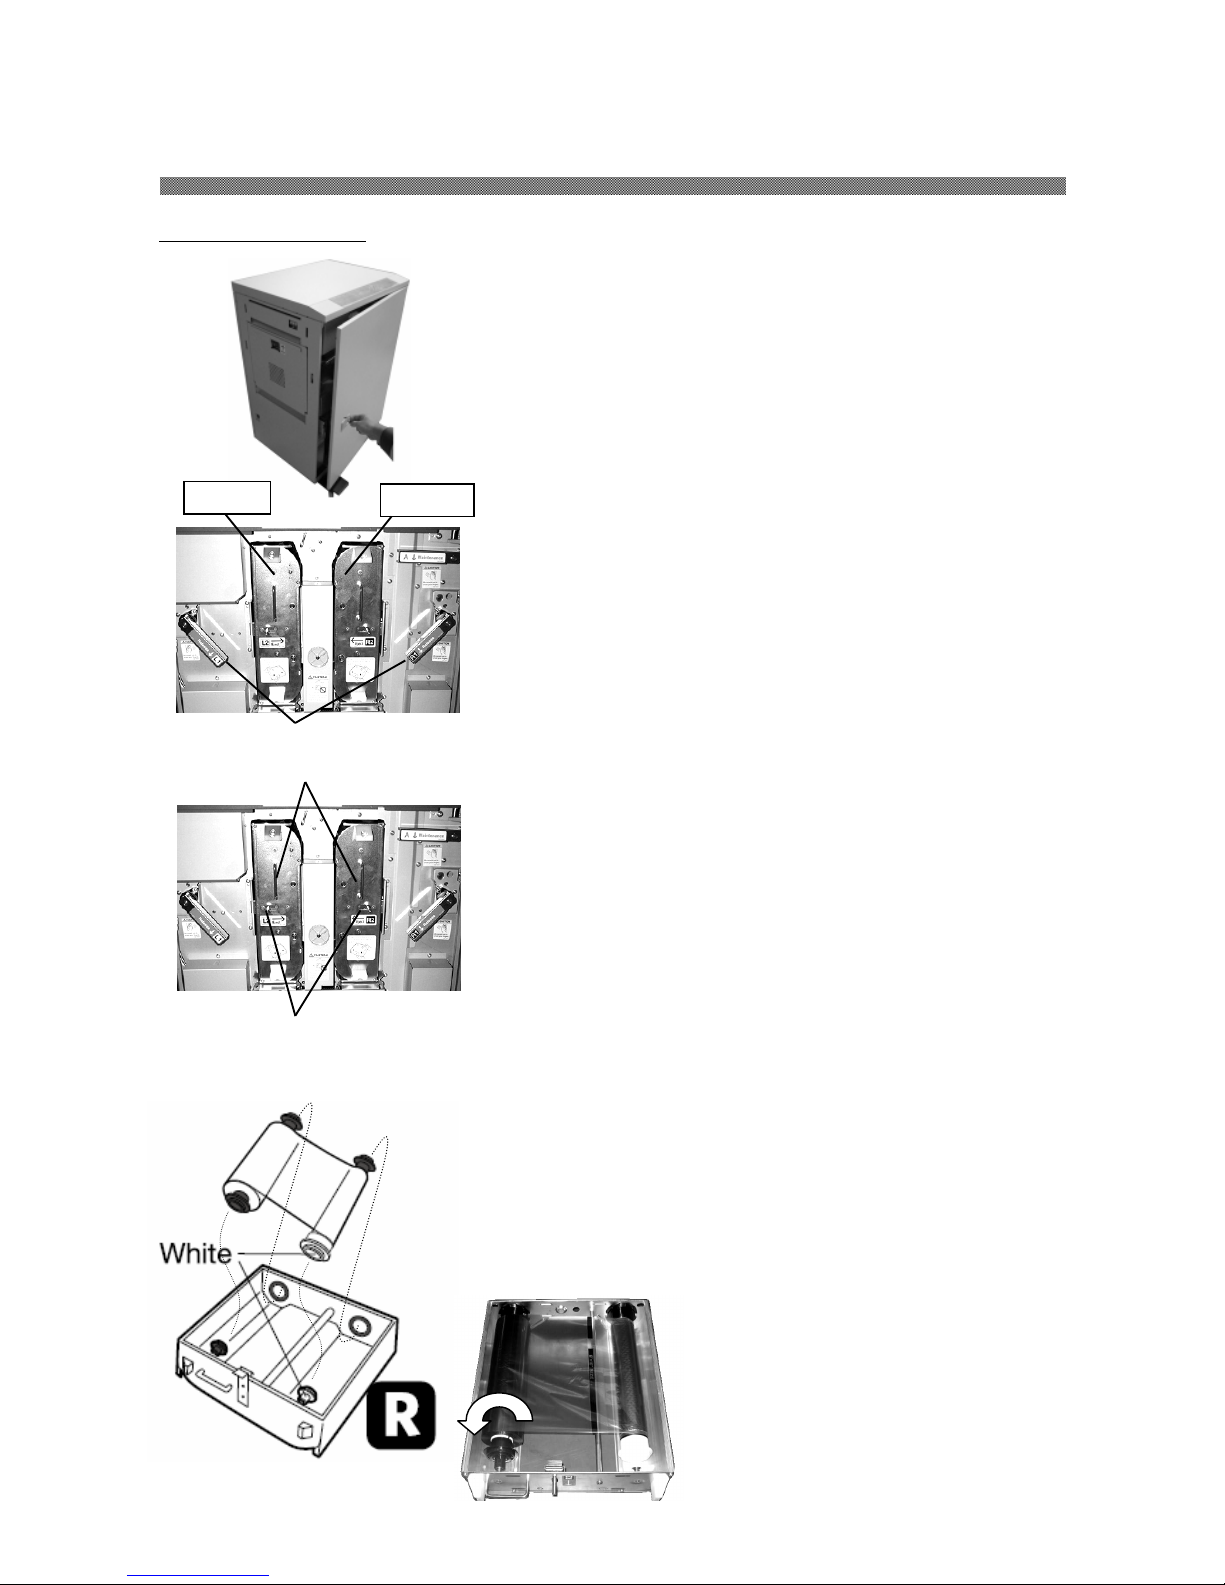
Loading Ink Ribbon
1. Open the front cover.
2. Open Upper Unit by operating Upper unit
open
Lever
. (
Lever
L1 and R1)
3. ove Cassette Eject Lever in a transverse
direction to release the lock, and pull out
knob of Ribbon Cassette.
Be careful and operate this step with both
hands not to drop the cassette after
pullout, (
Lever
L2and R2)
4. Put the cassette on flat table with handle
side to the short direction.
5. atch the color of ribbon core for one point
and attach the ribbon.
6. Stretch the ink ribbon by turning the core
on the ink ribbon feed side.
Upper Unit Open
Lever
Knob
Cassette Eject Lever
L Side
R Side
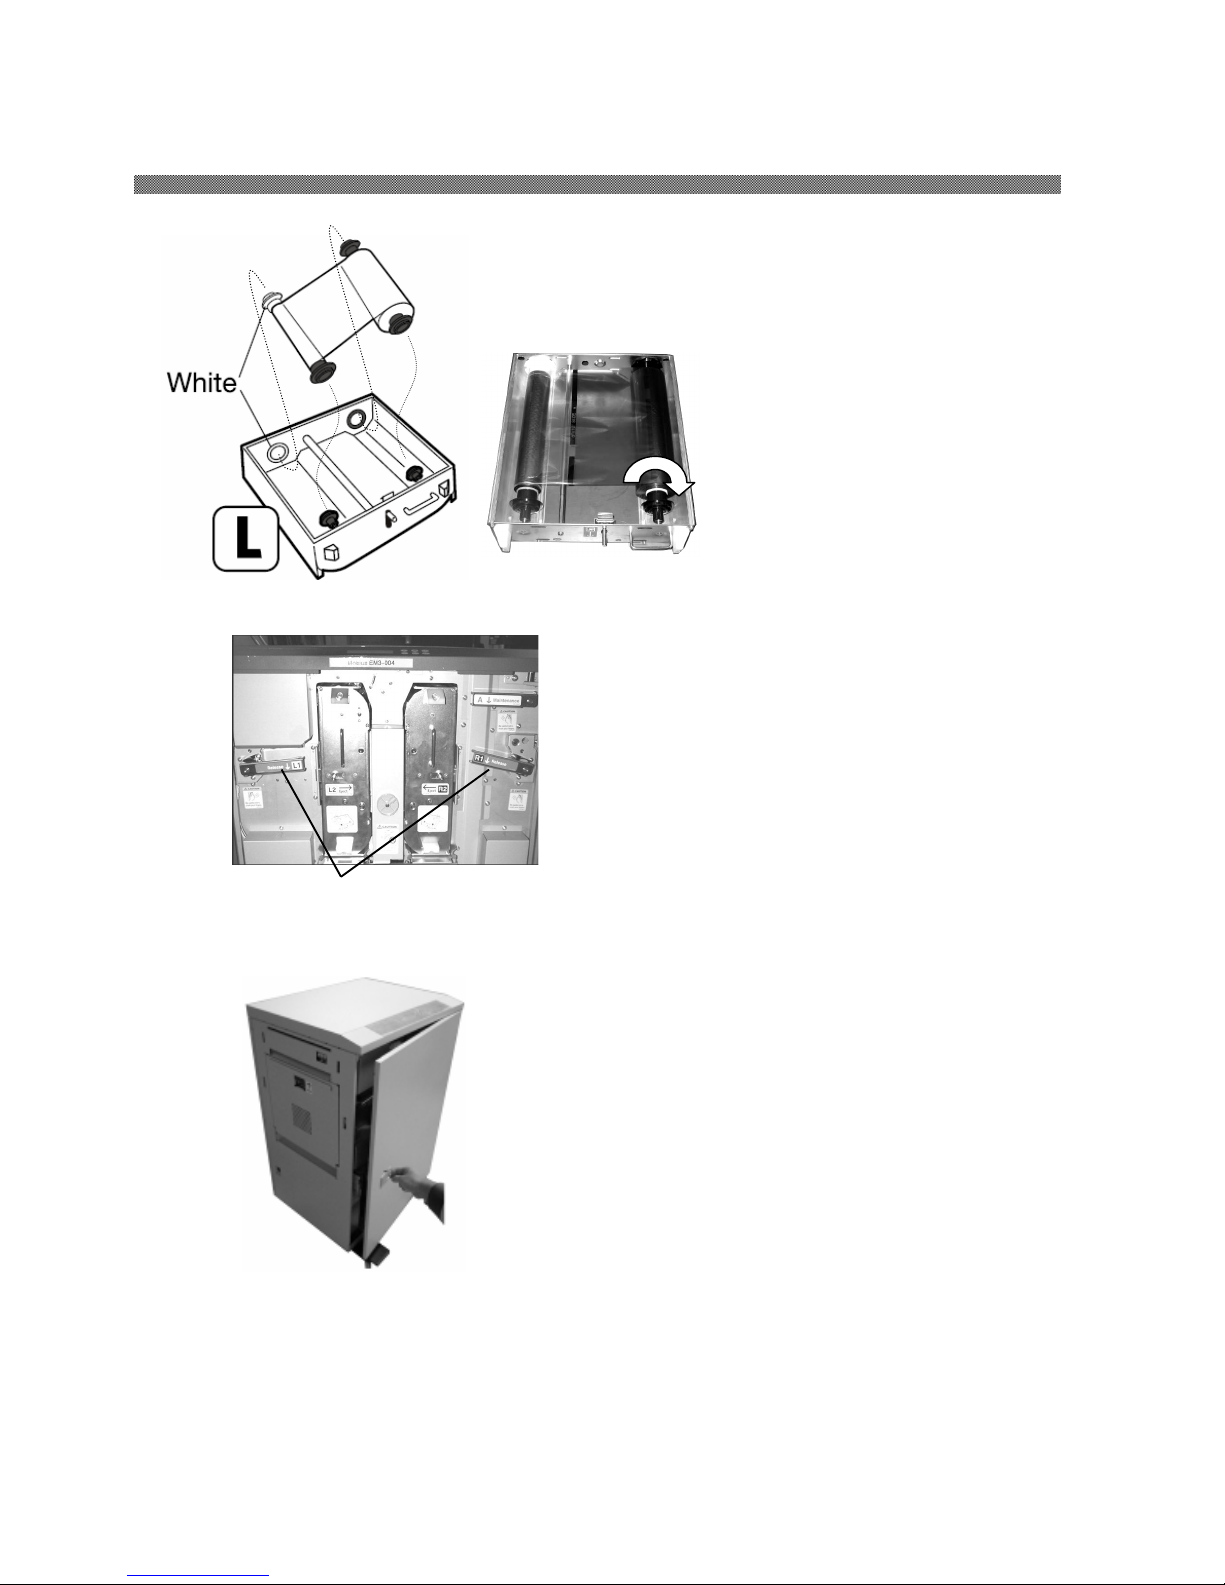
Chapter 2. Installing and Set Up
2-8
7.Replace the ink ribbon for L side same
procedures as R side.
8. Insert the cassette to the original position, and
confirm the Eject Lever is locked,
9. Return the position of Upper unit open
Lever
to
the locked position.
10. Close the front cover.
In case Paper and Ribbon are set and the
front cover is closed, initial operation is to be
started automatically. And printer becomes
ready status to print.
Upper Unit Open Handle

Chapter 2. Installing and Set Up
2-9
Transporting the Printer
The following cautions are necessary in transportation of the printer.
Since an incorrect transportation method causes a printer fault, follow the correct
method.
1. Remove the ink ribbon and paper from the printer before transporting the printer.
If the ink ribbon or paper cannot be removed due to a fault, consult with the
distributor.
2. Use a genuine box.
If the box used at the purchase cannot be used, consult with your distributor and
purchase a new box.
Chapter 2. Installing and Set Up
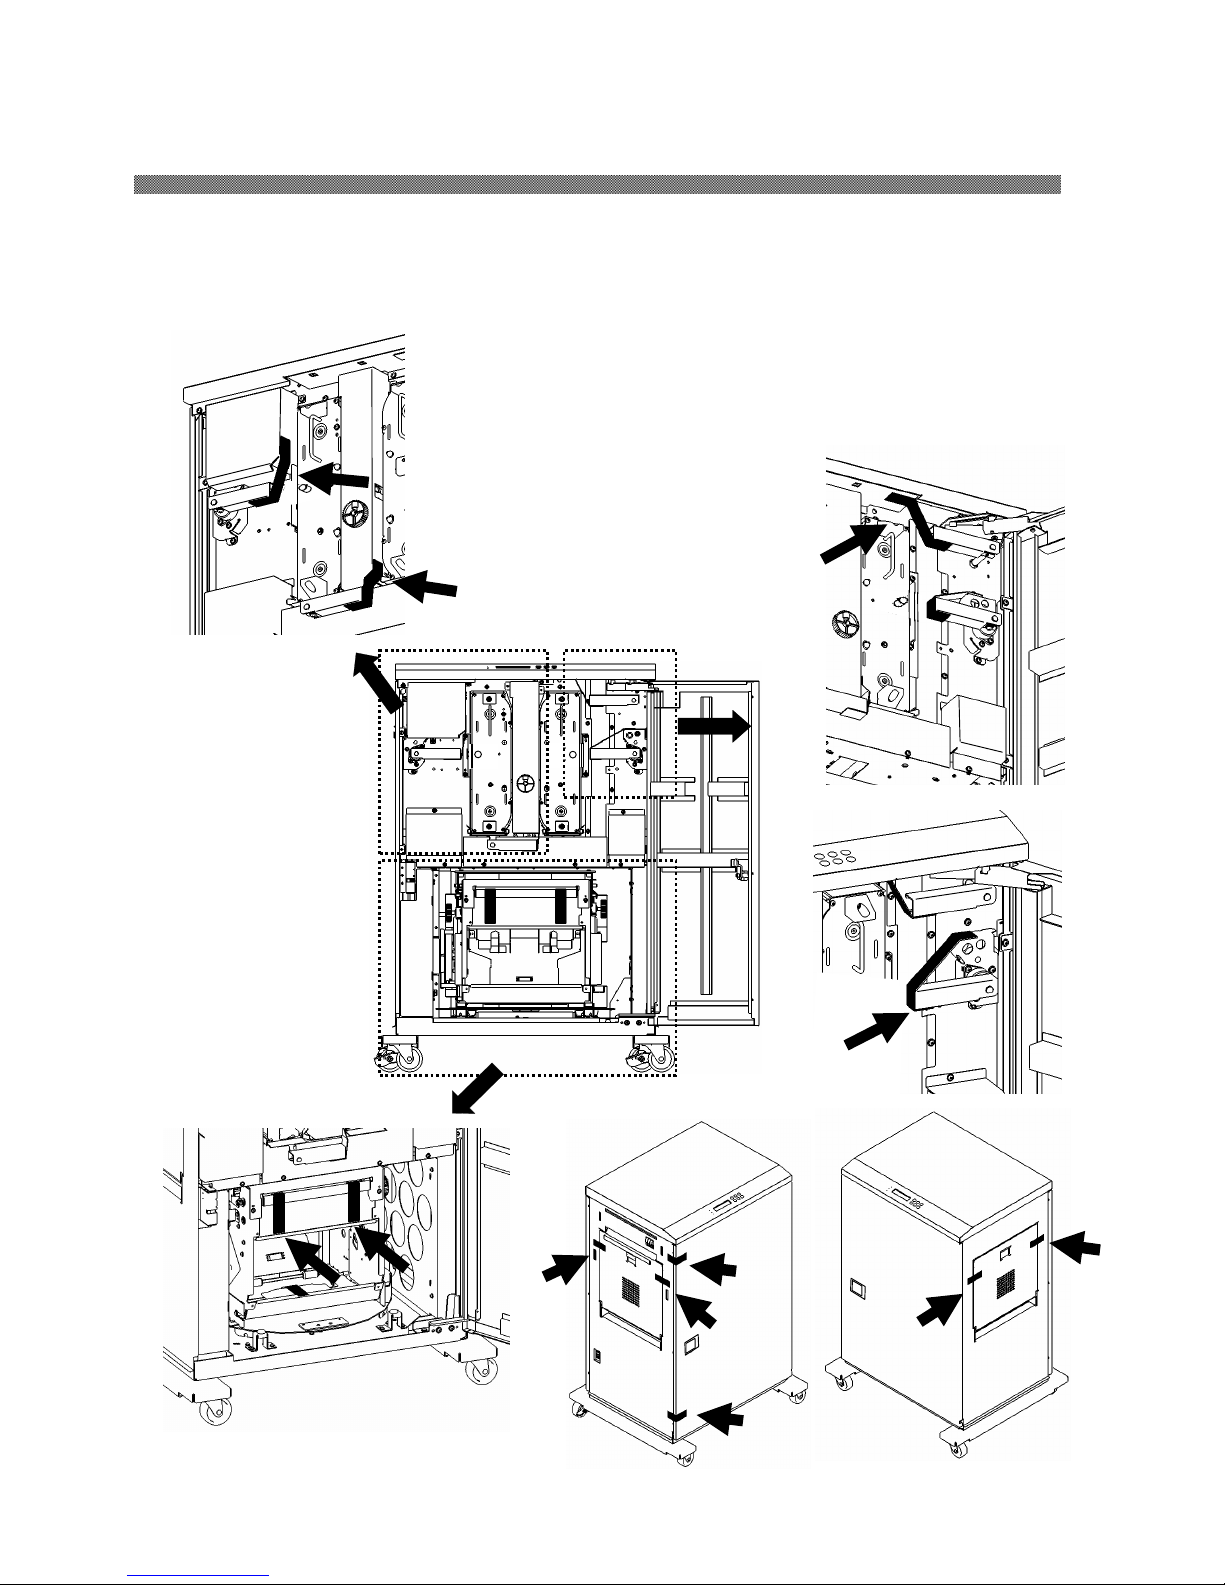
2-10
(Repacking Procedure)
1. Fix each operation lever of printer and Open and Close Parts of Printer Unit by tapes like below pictures not
to open by vibration or shock during transportation. (Use temporary tape like filament tape.).
Table of contents
Other Sinfonia Technology Printer manuals

Sinfonia Technology
Sinfonia Technology CHC-S6145 User manual

Sinfonia Technology
Sinfonia Technology CHC-C320-5 User manual

Sinfonia Technology
Sinfonia Technology CHC-S2245 Installation guide

Sinfonia Technology
Sinfonia Technology CHC-C320 User manual

Sinfonia Technology
Sinfonia Technology Color Stream S3 CHC-S2245-5 User manual


