SINNOR S500 User manual

Handheld Pulse Oximeter
SINNOR Instruments, Inc.
S500 HANDHELD PULSE OXIMETER
UER’S MANUAL
VER 1.0 2013/8
Copy right reserved by SINNOR Instruments, Inc.

S500 Handheld Pulse Oximeter
SINNOR Instruments, Inc.
Instructions
This manual provides the instructions necessary to operate Pulse Oximeter (hereinafter called as the
Oximeter) in accordance with its function and intended use. Observance of this manual is a prerequisite
and correct operation, and ensures patient and operator safety.
This manual is an integral part of and should always be kept close to the Oximeter, so that it can be
obtained conveniently when necessary.
Content of this manual is subject to change without prior notice.
Issued date: 2014.09.08
Version: 1.0
Statement
The manufacturer is responsible for safety, reliability and performance of this product only in that:
All installation operations, expansions, changes, modifications and repairs of this product are
conducted by manufacturer authorized personnel; and
The electrical installation of the relevant room complies with the applicable national and local
requirements; and
This product is operated under strict observance of this manual.
Guarantee
Free service scope
The manufacturer provides free service to any product which conforms to the warranty regulations.
Chargeable service scope
The manufacturer charges customers for service to any product which is outside warranty
regulations’ range.
The manufacturer’s obligation or liability under his warranty does not include the service of any
factitious damage. Or the voltage of power supply network beyond the product’s specification, or
irresistible natural disaster, or delay resulting from the improper use or application of the product, or
the use of parts or accessories not approved by the manufacturer, or repairs by people other than
the manufacturer authorized personnel.
Return Policy
In the event that it becomes necessary to return to the manufacturer, please obtain a return
authorization first. Please contact the manufacturer’s Service Department and provides the model
number, serial number, and a brief description of the reason for return. Return shipments will not be
accepted if the serial number is not clearly visible.
The customer is responsible for freight charges when this product is shipped to the manufacturer for
service (including any relevant customs fees or other freight related charges).

S500 Handheld Pulse Oximeter
SINNOR Instruments, Inc.
Chapter 1 Safety Information
The safety statements presented in this chapter refer to the basic safety information that the operator
of the oximeter shall pay attention to and abide by, There are additional safety statements in other
chapters or sections, which may be the same as or similar to the followings, or specific to the
operations.
The following safety terms warning and caution are used throughout this manual to point out hazards
and to designate a degree or level or seriousness.
WARNING
Indicates a potential hazard situation or unsafe practice that, if not avoided, could result in
death or serious injury.
CAUTION
Indicates a potential hazard or unsafe practice that, if not avoided, could result in minor
personal injury or product/property damage.
NOTE
Provides application tips or other useful information to that you get the most from your
product.
1.1 Warnings
WARNING
The oximeter is intended only as an adjunct in patient assessment. It is not intended as a device
used for treatment purposes.
The oximeter is intended for use only by qualified clinical physicians or well-trained nurses.
To ensure patient safety, verify this device and accessories can function safely and normally before
use.
When using the oximeter together with the electrical surgery equipment, the user should pay
attention to and guarantee safety of the patient being measured.
EXPLOSION HAZARD: Do not use the oximeter in the presence of flammable anesthetics,
explosive substances, vapors or liquids.
Do not pull or lift the oximeter by its connection cable. That may lead to falling and consequent
patient injuries.
It is not recommended to hang the oximeter when transporting patients. Safety hazards may arise
from the large amplitude swing during the transportation.
Make sure not to use the oximeter and it’s transducer during MRI (magnetic resonance imaging)
scanning because induced current could potentially cause burns. The oximeter is capable of
interfering with the proper performance of MRI, and MRI is capable of interfering with the
measurement accuracy of the oximeter.
The oximeter and its accessories may be contaminated by microorganism during transporting, use
and storage. Use the recommended methods to sterilize and disinfect the oximeter or its
accessories when the packing material is damaged, or it has not been used for a long time.

S500 Handheld Pulse Oximeter
SINNOR Instruments, Inc.
1.2 Cautions
CAUTION
The oximeter is a commonly sealed device. Keep its surface dry and clean, and prevent any liquid
from infiltrating it.
The device should be appropriately placed. Keep it from falling, strong vibration or other
mechanical damage.
The oximeter should only be maintained by personnel approved by our company.
Before using the oximeter on patients, the user should be familiar with its operation.
1.3 Notes
NOTE
Important! Before use, carefully read this manual, all safety information and specifications.

S500 Handheld Pulse Oximeter
SINNOR Instruments, Inc.
Chapter 2 General
2.1 Introduction
The oximeter is a non-invasive, handheld patient Oximeter. It operates on alkaline or
rechargeable battery power supply. It is compact, small, light, and easy for learning and handling.
It is suitable for monitoring adult and child patients. It is widely used in the hospital’s operation
room, ICU, clinic section office, out-patient department, sickroom, emergency treatment, and the
recovery and health care organizations, or in the family nursing and in the process of transporting
patients.
Parameters measured by the oximeter include: arterial oxygen saturation (SpO2), pulse rate
(PR), bargraph and plethysmogram. The oximeter measures these parameters through a SpO2
sensor and displays them on the color TFT LCD screen after certain further processing.
The oximeter is operated and controlled by the buttons on the front panel. It adopts a 2.8 inch
color TFT LCD screen in displaying measurements and in supplementary status indication.
2.2 Features
Lightweight for carrying and Easy-To-Use.
Silicon rubber shell protection and stable bracket for table usage.
Using DB9 type connector compatible with Nellcor Spo2 Sensor.
Support the oximeter probe for adult, neonate and infant.
Big size 2.8 inch color TFT LCD display for SPO2/PR/Pulse bargraph/plethysmogram.
Visual and sound alarm function.
Adjust the parameters in friendly menu.
Low Battery voltage indicator.
Automatically switch off within 3minutes when no signal.
Inner Flash memory can store testing result up to 360 hours.
USB interface support upload the data to computer and review the history data with software
in PC.
Standard 4×AAA 1.5V Alkaline bаttеrу or rechargeable Li battery is available for power
supply
2.3 Appearance

S500 Handheld Pulse Oximeter
SINNOR Instruments, Inc.
Figure 2-1 Front Panel Figure 2-2 Back Panel
Figure 2-3 Top Side Panel Figure 2-4 Right Side Panel
Table 2-1 Appearance description
No.
Description
Remarks
1
LCD display
It displays test result& information, as described in chapter 4.
2
Power on indicator
It displays the power on situation of the machine.
3
Power button
It turns on or off the device power.
4
Menu button
It turns on the menu setting and act as confirm function in the
menu.
5
Battery charger Light
It displays the charge situation of the battery. Green light for on
charge, Red light for charging full.
6
Mute Button
It turns on or off the sound of alarm and beep of pulse sound.
1
4
2
5
6
7
1
14
13
8
9
10
11
12
15
3

S500 Handheld Pulse Oximeter
SINNOR Instruments, Inc.
7
UP button
It changes the parameter along up direction.
8
EXIT button
It confirms the selection parameter and exit the submenu.
9
DOWN button
It changes the parameter along down direction.
10
Speaker
It ring the alarm sound when the test value beyond the limit
and the
11
Bracket socket
It can install a steel bracket
12
Battery compartment
It use 4AAAAlkaline battery or 3.6V Li battery
13
SpO2 probe socket
It connects SpO2 sensor.
14
Temperature sensor socket
It connects temperature sensor.
15
USB port
It connects the computer for data transfer.
Chapter 3 Installation
3.1 Unpacking and Inspection
Please open the package and remove the instrument and accessories carefully. Check all materials
against the packing list.
Check the oximeter for any mechanical damage.
Check exposed wires, sockets and the accessories.
Contact supplier immediately in case of any problem.
WARNING
Be sure to keep the packaging materials from children’s reach.
Disposal of the packaging materials shall comply with your local requirements.
NOTE
Please save the packing case and packaging material for future transport and storage.
3.2 Connect SpO2 Sensor
You can connect the SpO2 sensor to the oximeter by simply inserting their connectors to the SpO2
socket on the Oximeter’s top side panel as shown in figure 2-3.
3.3 Connect temperature sensor. (Optional)
You can connect the temperature sensor to the Oximeter by simply inserting their connectors to the
temperature sensor socket on the Oximeter’s top side panel as shown in figure 2-3.
3.4 power-on
Press the power button and hold for more than 1 second to turn on the Oximeter, the LCD display
lights up on the front panel and the screen displays SpO2 and PR parameter monitoring interface.
S500 Handheld Pulse Oximeter
SINNOR Instruments, Inc.
Chapter 4 Display and Operation
The screen of the Oximeter (DisplayArea) can display the monitoring parameters. The buttons on the
front panel operate the Oximeter below this screen. For button details, please refer to figure 2-1 and
table 2-1.
4.1 Power-on and Power-off
Press the power button and hold for more than 1 second to turn on the oximeter. The LCD
lights up on the front panel and the screen appear display. When the oximeter is on, press the power
button to turn off the oximeter.
Note
The oximeter is powered by the 4 AAA alkaline batteries or 3.6V Li recharge battery. If the battery
power is not enough, the Oximeter may fail to be turned on. It should replace the new battery and
the machine will be work.
In case the SpO2 sensor becomes disconnected, or the SpO2 sensor is connected, but the finger
moves away from the sensor, the oximeter will automatically enter the standby mode. Under this
mode, when the SpO2 sensor is connected and a finger is inserted into the sensor, the oximeter
will automatically resume the operation mode. Otherwise the oximeter will automatically shut
down in 3 minutes.
4.2 Monitoring Screen Display and Operation
4.2.1 Parameter Screen Display
The screen will displays the monitoring parameters when the oximeter is turned on.
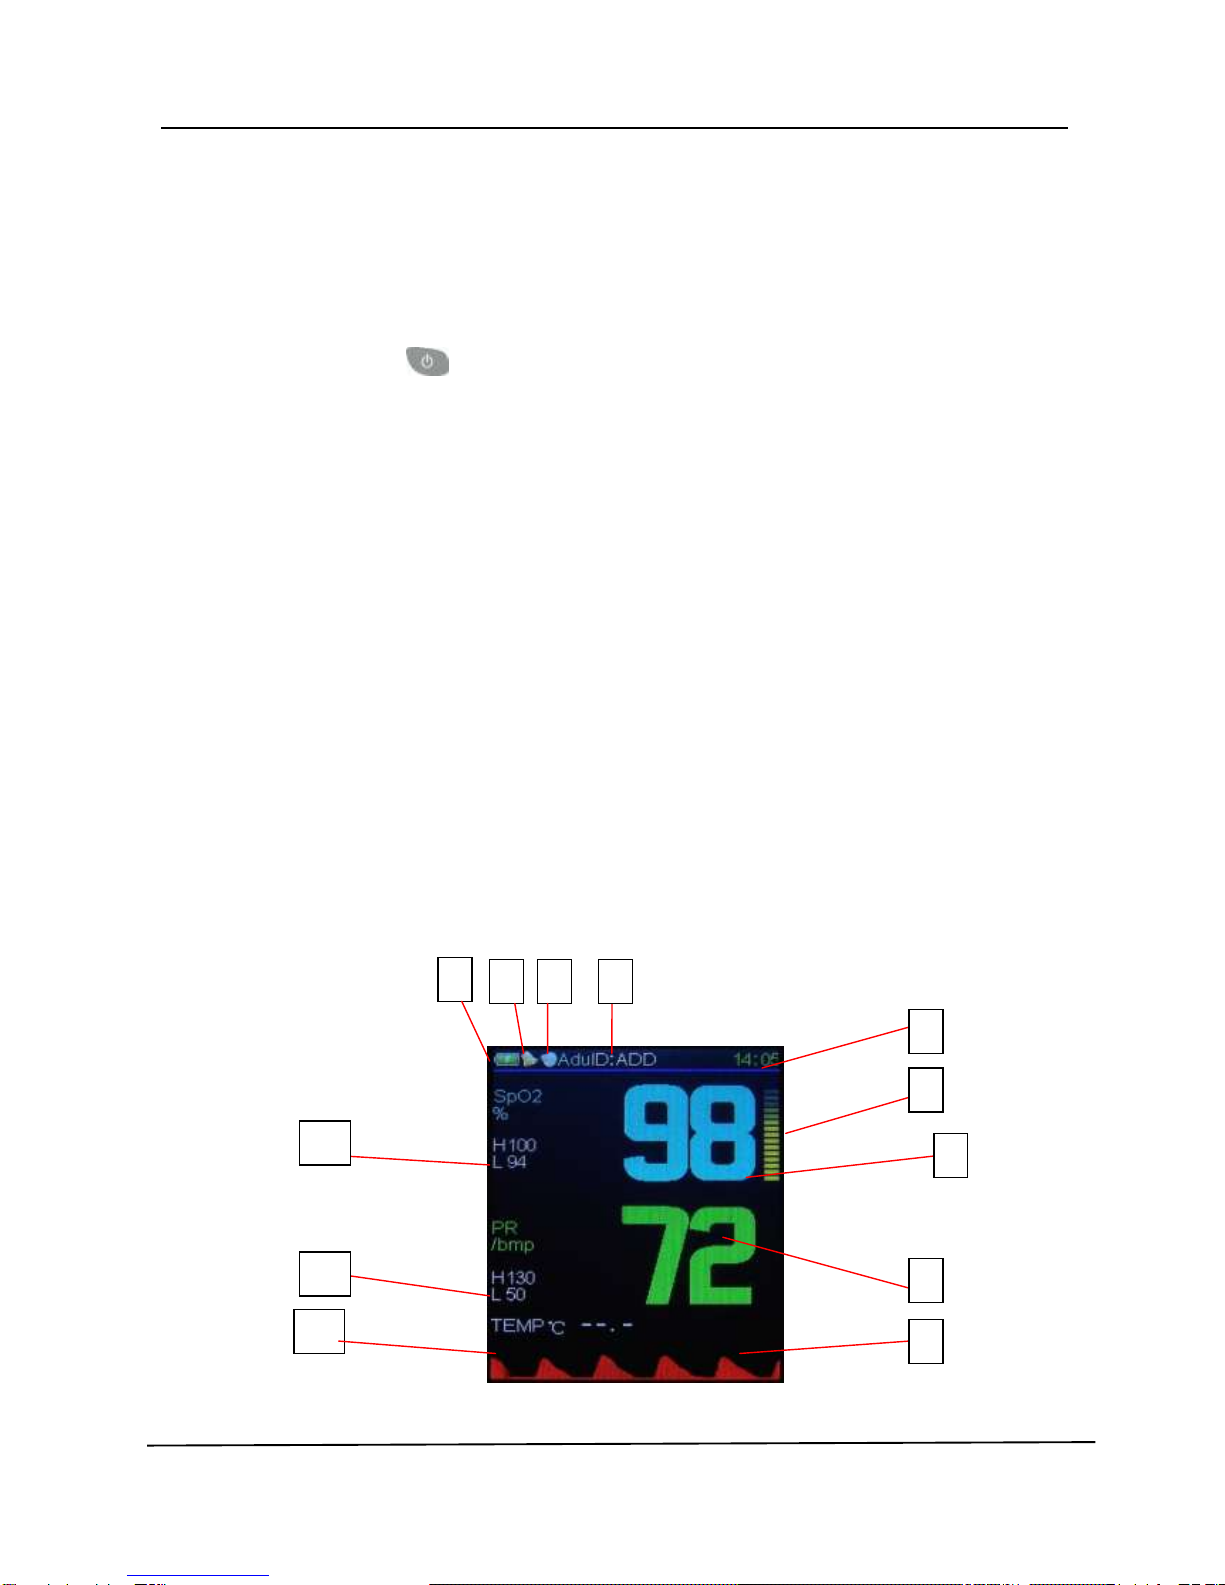
If the SpO2 sensor and temperature sensor is connected to monitor a patient’s SpO2, the LCD screen
displays the measurements of SpO2, PR, bargraph, plethysmogram, body temperature and system
information, as shown in figure 4-1.
3
10
0
11
0
8
5
4
2
6
9
1
12
0
7

S500 Handheld Pulse Oximeter
SINNOR Instruments, Inc.
Figure 4-1 Parameter monitoring interface
4.2.2 Description of Displayed Information
Table 4-1 Description of displayed information on the monitoring screen
No.
Description
Remarks
1
Plethysmogram
It displays plethysmogram of pulse rate
2
SpO2
It displays SpO2 value and is refreshed every second
3
Pulse rate
It displays PR value and is refreshed every second
4
Bargraph
If with SpO2 Sensor, it can indicate real-time pulse strength. It
shows the pulse rate of patient is weak when the bargraph is
lower.。
5
Time
It displays the present time.
6
Patient Type
It displays the patient type (Adu/Neo/Ped)
7
Sound indicator
It displays the situation of sound.
8
Alarm indicator
It displays the situation ofAlarm
9
Battery indicator
It displays the battery capacity.
10
SPO2 Alarm limits
Alarm limit value of SPO2,It will alarm if the test result beyond
these values.
11
PRAlarm limits
Alarm limit value of PR,It will alarm if the test result beyond
these values.
12
Temperature(optional)
It displays body temperature value
4.3 Alarm Monitoring Function
When a parameter’s measurement exceeds its alarm limit, the oximeter can give audio and visual
alarms simultaneously. The speaker sounds the alarm and the parameter’s measurement flashes on the
screen. If the speaker sound is turned off, the parameter’s alarm sound will be silenced, but the
parameter’s measurement still flashes to prompt the alarm.
The alarm sound has top priority when the speaker is not mute. When there is an alarm, the speaker
sound the alarm sound but not the pulse sound. Only when there is measurement exceeding its alarm
limit, the speaker sounds the pulse sound.
4.4 Parameter setting:
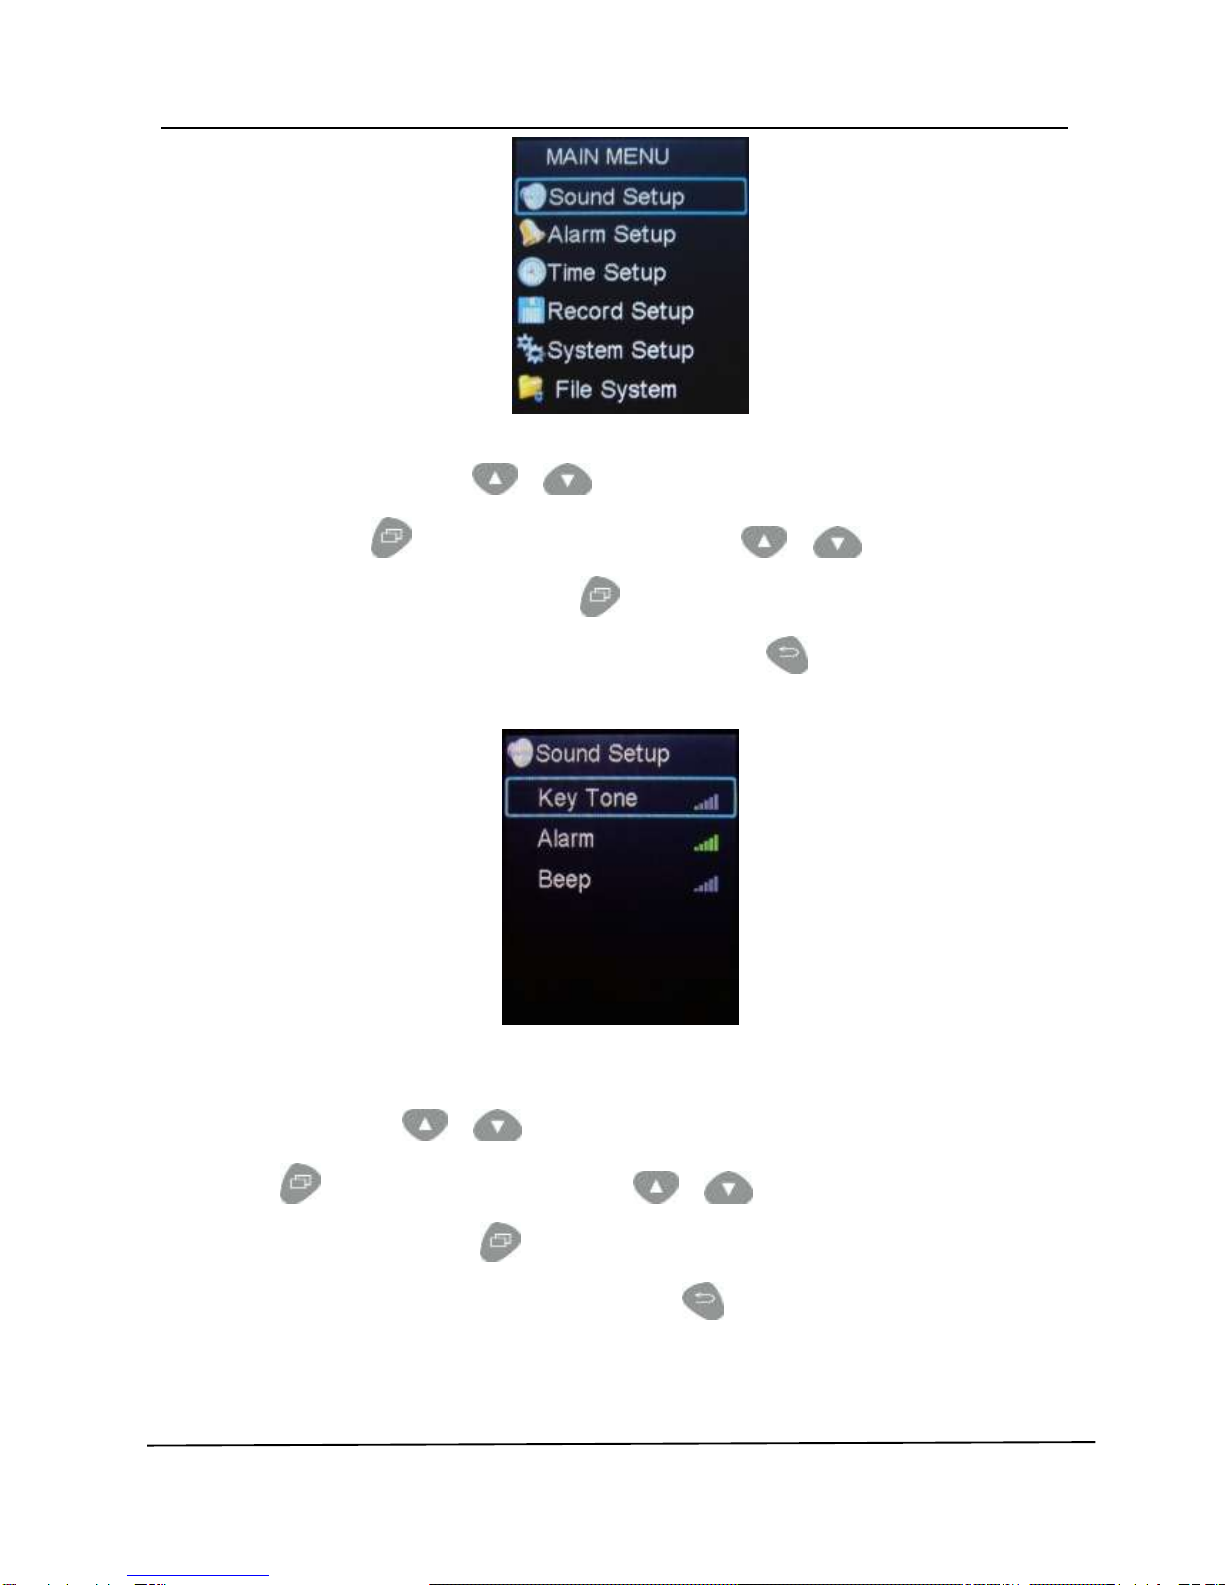
4.4.1 Press the button during the testing situation and it will enter into main menu. The user can
use up button & down button to change the setting item.And press the button to enter
into the selected submenu.
S500 Handheld Pulse Oximeter
SINNOR Instruments, Inc.
Figure 4.4.1 main menu
4.4.2 The user can use direction & button to change the setting item in this sound setup
submenu, Press the button for parameter setting. Use & button to increase or
decrease the value of parameter. Then press button to confirm the parameter setting and return
to the submenu. And return the main menu with pressing the exit button.
Figure 4.4.2 Sound setup menu
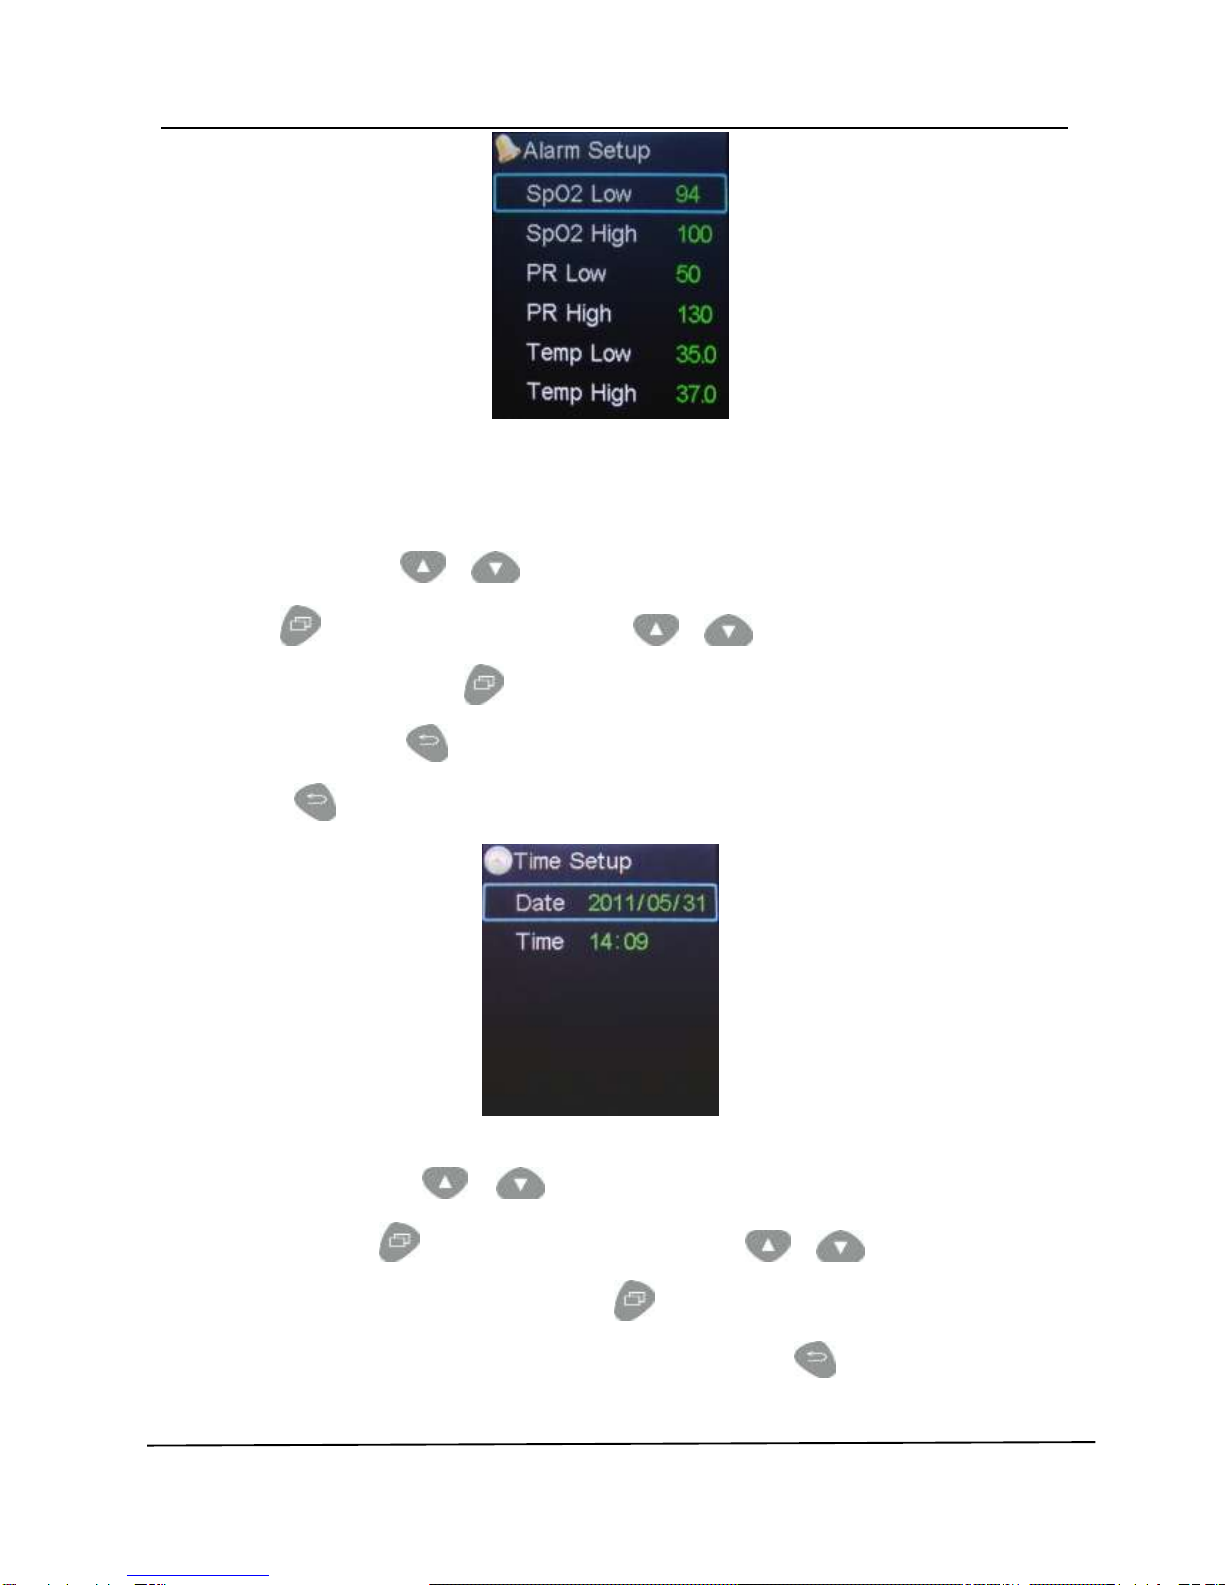
4.4.3 .The user can use & button to change the setting item in this alarm setup submenu,
Press the button for parameter setting. Use & button to increase or decrease the
value of parameter. Then press button to confirm the parameter setting and return to the
submenu. Finally return the main menu with pressing the button.
S500 Handheld Pulse Oximeter
SINNOR Instruments, Inc.
Figure 4.4.3 Alarm setup menu
Note: When you select the different patient type, The alarm limit value will change according to patient
type.
4.4.4 The user can use & button to change the setting item in this time setup submenu,
Press the button for parameter setting. Use & button to increase or decrease the
value of parameter. Then press button to confirm the parameter setting and change to another
parameter. Pressing the button to return the submenu. Finally return the main menu with
pressing the button when finishing time setting.
Figure 4.4.4 Time setup menu
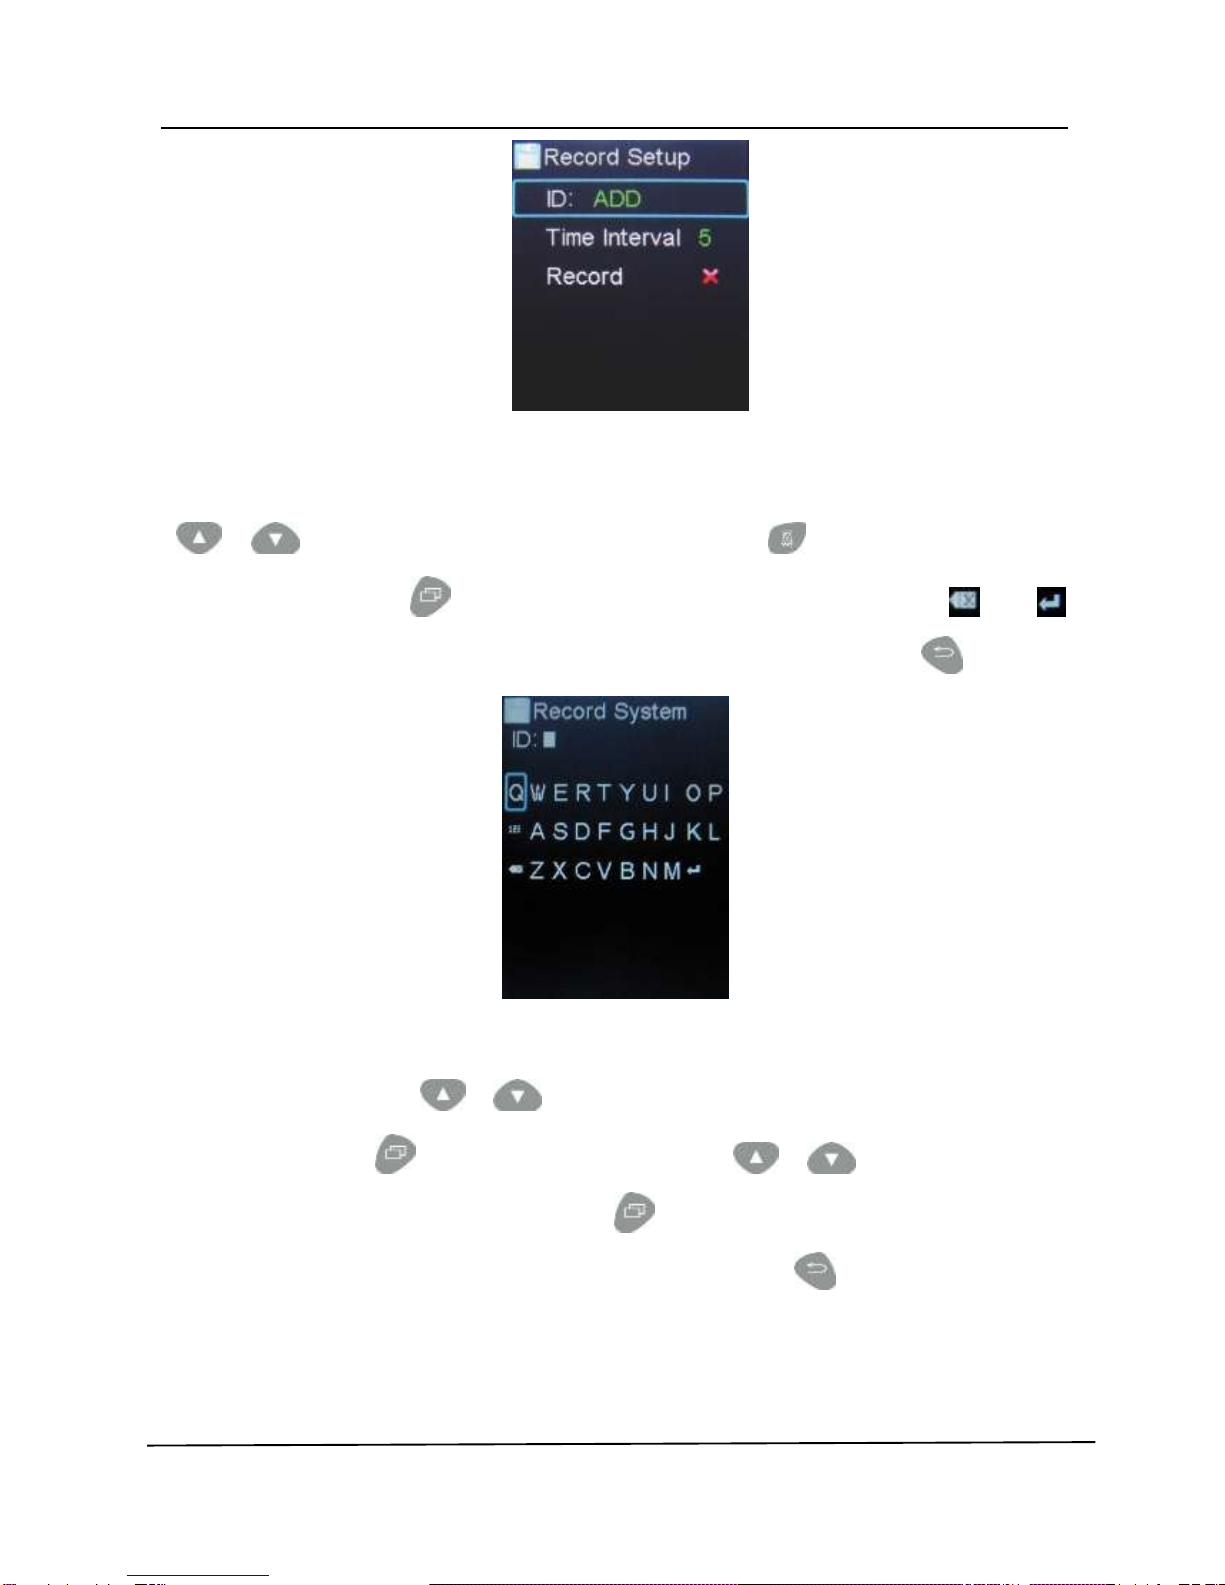
4.4.5 The user can use & button to change the setting item in this record setup
submenu, Press the button for parameter setting. Use & button to increase or
decrease the value of parameter. Then Press button to confirm the parameter setting and
return to the submenu. Finally return the main menu with pressing the button.
S500 Handheld Pulse Oximeter
SINNOR Instruments, Inc.
Figure 4.4.5.1 Record setup menu
If the user selects the new item at the ID submenu, you can see the interface as figure 4.4.5.2. Use
& button to move the cursor crosswise, also use button to move the cursor
lengthwise. Then press button to confirm the choice of letter. The signal and
stand for delete and confirm function. Finally return the main menu with pressing the button.
Figure 4.4.5.2 Record ID input menu
4.4.6 The user can use & button to change the setting item in this system setup
submenu, Press the button for parameter setting. Use & button to increase or
decrease the value of parameter. Then Press button to confirm the parameter setting and
return to the submenu. Finally return the main menu with pressing the button.
.

S500 Handheld Pulse Oximeter
SINNOR Instruments, Inc.
Figure 4.4.6 System setup menu
4.4.7 The user can use & button to change the setting item in this file system setup
submenu, Press the button for parameter setting. Use & button to increase or
decrease the value of parameter. Then Press button to confirm the parameter setting.
Figure 4.4.7.1 File system setup menu
If the user selects the view item at file submenu, you can see the interface as figure4.4.7.1. Press
the button change items among List /Serial No/Page icon. Use & button to select
the optional parameter, Then Press button to confirm the parameter setting. Finally return the
main menu with pressing the button.

S500 Handheld Pulse Oximeter
SINNOR Instruments, Inc.
Figure 4.4.7.1 File system View interface
Note:
1. When the record is setting to on situation, the oximeter begins to record the testing result
(SpO2&PR), the maximum record will up to 360 hours.
2. The user also can upload the storage data through USB port to the computer, and it also can review
the data with software in PC.

S500 Handheld Pulse Oximeter
SINNOR Instruments, Inc.
Chapter 5 SpO2 Monitoring
5.1 Measurement principle
SpO2 plethysmogram measurement is employed to determine the oxygen saturation of hemoglobin
in the arterial blood. The SpO2 parameter can also provide a pulse rate signal and pulse strength.
How the SpO2 parameter works
SpO2 is a non-invasive measurement of the functional oxygen saturation.
Arterial oxygen saturation is measured by a method called pulse oximetery. It is a continuous,
non-invasive method based on the different spectra absorption of hemoglobin and oxyhemoglobin
(called spectrophotometer principle). It measures how much light, sent from light sources on one
side of the sensor, is transmitted through patient tissue (such as a finger or a toe), to a receiver on
the other side.
The sensor measurement wavelengths are nominally 660nm for the red LED and 940nm for
infrared LED. Maximum optical power output for LED is 4mw.
The amount of light transmitted depends on many factors, most of which are constant. However,
one of these factors, the blood flow in the arteries, varies with time, because it is pulsating. By
measuring the light absorption during a pulsation, it is possible to derive the oxygen saturation of
the arterial blood. Detecting the pulsation gives a PLETH waveform, pulse rate signal and pulse
strength.
The SpO2 value, PR value, pulse strength and the PLETH waveform can be displayed on the
main screen.
5.2 Measurement Steps
Sensor selection for SpO2 measurement depends on the patient’s age. For an adult patient, you can
choose an adult finger sensor; for a child patient, you can choose a child hand or toe sensor. The finger
SpO2 sensor is a finger clip consisting of two parts. The LEDs are placed in one part and the
photodetector is placed in another part.
Please follow the steps and figure 5-1 below to use the adult finger SpO2 sensor:
Insert the sensor’s connector to the Oximeter’s SpO2 socket.
Turn on the monition. The LCD screen will display the parameter monitoring screen.
Attach the sensor to an appropriate site of the patient’s finger.
The readings will be displayed on the LED screen a moment later.
Figure 5-1 Placing the Adult SpO2 Sensor
NOTE
Make sure to place the SpO2 sensor oh the finger in a correct direction. The LED part of the
sensor should be at the backside of the patient hand and the photodetector part at the inside.

S500 Handheld Pulse Oximeter
SINNOR Instruments, Inc.
Make sure to insert the finger to a suitable depth into the sensor so that the fingernail is just
opposite to the light emitted from the sensor.
To acquire accurate results, please read data until the sensor is steadily placed.
Readings may not be accurate when either the sensor or the patient is moving.
5.3 Measurement Limitations
If the accuracy of any measurement does not seem reasonable, first check the patient’s vital signs
by an alternate method. Then check the instrument for proper function.
Inaccurate measurements may be caused by:
Incorrect sensor application or use;
High-frequency electrical noise, such as noise from electrosurgical apparatus connected to the
system;
Significant levels of dysfunctional hemoglobins (e.g.,carboxyhemoglobin or methemoglobin);
Significant concentrations of dysfunctional hemoglobin, such as carboxyhemoglobin and
methemoglobin;
Intravascular dyes such as indocyanine green or methylene blue;
Exposure to excessive illumination, such as surgical lamps (especially ones with a xenon light
source), bilirubin lamps, fluorescent lights, infrared heating lamps, or direct sunlight (exposure to
excessive illumination can be corrected by covering the sensor with a dark material);
Excessive patient motion;
Venous pulsations;
SpO2 is too low;
Improper sensor installation or incorrect contact position of the patient;
Placement of a sensor on the same extremity with a blood pressure cuff, arterial catheter, or
intravascular line.
Polluted fingernail or fingernail polish or artificial fingernail.
Loss of pulse signal can occur in the following situation:
The sensor is too tight;
There is excessive illumination from light sources such as a surgical lamp, a bilirubin lamp, or
sunlight;
A blood pressure cuff is inflated on the same extremity as the one with a SpO2 sensor attached;
The patient has hypotension, severe vasoconstriction, severe anemia, or hypothermia;
There is arterial occlusion proximal to the sensor;
The patient is in cardiac arrest or in shock.
5.4 Precautions
NOTE
Do not perform SpO2 monitoring and NIBP measurements on the same arm simultaneously.
Obstruction of blood flow during NIBP measurements may adversely affect the reading of the
SpO2 value.
WARNING
Check if the sensor cable is in normal condition before monitoring. Do not use the SpO2 sensor
once the package or the sensor is found damaged.
Remove the SpO2 sensor from the patient after measurement.

S500 Handheld Pulse Oximeter
SINNOR Instruments, Inc.
As with any medical equipment, carefully route patient cabling to reduce the possibility of patient
entanglement or strangulation. Cables of electrical surgical equipment should not be winded
around that of the SpO2 sensor.
Do not put the sensor on extremities with arterial catheter or venous syringe.
If no pulse is found or the reading is unreasonable, first check the patient’s condition, and then
check the sensor installation and connection with the oximeter, finally ask the qualified engineer to
check the device and the SpO2 sensor for proper functions.
Don’t use the oximeter to measure patients whose pulse rate is lower than 30 bpm, which may
cause incorrect results.
Prolonged and continuous monitoring may increase jeopardy of unexpected change of dermal
condition such as abnormal sensitivity, rubescence, vesicle, repressive putrescence, and so on. It
is especially important to check more frequently the sensor placement of child and patient of poor
perfusion or immature dermographia by light collimation and proper attaching strictly according to
changes of the skin. Check per 2-3 hours the sensor placement and move it when the skin
deteriorates.
Make sure no contamination or scar exists in the site where the sensor is placed. Otherwise, the
measured result may be incorrect because the signal received by the sensor is affected.
Please use the SpO2 sensor supplied by the Oximeter.
When used on different patients, the Oximeter is prone to crossed contamination, which should be
prevented and controlled by the user. Disinfection is recommended before using the SpO2 sensor
on other patients.
CAUTION
SpO2 sensors are precision and fragile. Avoid pressure and knock. Hold the probe and cable
carefully and lightly. If not use it, you should coil up the probe and cable into a loose circle. If the
wire inside the cable is tensely pulled, it may cause mechanical damage to the probe and the
cable.

S500 Handheld Pulse Oximeter
SINNOR Instruments, Inc.
Chapter 6 Body Temperature Monitoring (Optional)
Measurement Steps
You can plug the probe directly into the monitor with a reusable TEMP probe and apply the TEMP
probe securely to the patient. Then switch on the machine and make testament.
WARNING: The calibration of the temperature measurement is necessary for every two years (or as frequently
as dictated by your Hospital Procedures Policy). When you need calibrate the temperature measurement,
contact the manufacture please.
.
.
WARNING: Verify probe cables fault detection before beginning of monitoring phase. Unplug the temperature
probe cable from the socket, the screen will display the error message “TEMP SENSOR OFF” and the audible
alarm is activated.
.
.

S500 Handheld Pulse Oximeter
SINNOR Instruments, Inc.
Chapter 7 Data Transfer Procedure:
Connecting the USB line from the machine to the computer after switching off the pulse oximeter.
It will enter into transfer mode after switching on the machine again. The signal of USB will show in the
LCD display, but not measure the data. It will transfer the data from pulse oximeter to the computer
through the USB data line.As shown in figure 7-1.
The computer will indicate the information of finding a new disk driver. Then you can find a file
named oxmieter.bin in the removable disk. You can use software oximeter-viewer in the CD to view the
measured result at your computer.
Figure 7-1 Data Transfer Interface
Chapter 8 Maintenance
8.1 System Check
8.1.1 Check before Using
Before using the oximeter, perform the following steps:
Check if there is any mechanical damage;
Check if all the outer cables and accessories are in good condition;
Check if all the monitoring functions of the oximeter can work normally so as to make sure that the
oximeter is in proper working condition.
In case of any damage, abnormal function, hidden safety danger or exception, do not use the device
on patient, contact the technician in your hospital or the manufacture immediately.
Notes: The TEMP probe should not be heated above 100℃(212℉). It should only be subjected
briefly to temperatures between 80℃(176℉) and 100℃(212℉).
8.1.2 Routine Check
Make sure the qualified service personnel have implemented a complete inspection, including the
functional safety check, after the oximeter has been used for 6-12 consecutive months, or after oximeter
servicing or system upgrading. This is to ensure the normal operation of the system.
Store the device without battery if unused for a long time. Otherwise the battery may be damaged
because of being thoroughly exhausted.
WARNING

S500 Handheld Pulse Oximeter
SINNOR Instruments, Inc.
Failure on the part of the responsible hospital or institution employing the use of the monitoring
equipment to implement a satisfactory maintenance schedule may cause undue equipment failure
and possible health hazard.
The safety inspection or maintenance, which requires opening the oximeter housing, must be
performed by trained and authorized personnel only. Otherwise. Equipment failure and possible
health hazard may be caused.
8.2 General Cleaning
Your equipment should be cleaned on a regular basis. When it is polluted by dust, oil, sweat or blood
etc, it should be cleaned at once. If there is heavy pollution or lots of dust and sand in your place, the
equipment should be cleaned more frequently. Before cleaning the equipment, consult your hospital’s
regulations for cleaning, disinfecting and sterilizing equipment.
The exterior surfaces of the equipment may be cleaned gently with a clean and soft cloth, sponge or
cotton swap, dampened with a non-erosive cleaning solution. Drying off excess cleaning solution before
cleaning the equipment is recommended.
WARNING
1. Power off the oximeter and stop charging the battery before cleaning.
2. The surface temperature probes should be used.
3. The temperature probe must not be sterilized in steam.
Following are examples of cleaning solutions:
Diluted soap water
Diluted formaldehyde (35%-37%)
Diluted ammonia water
Hydrogen peroxide(3%)
Alcohol
Ethanol(70%)
Isopropanol (70%)
Diluted sodium hypochlorite solution(bleaching agent)
NOTE
Sodium hypochlorite solution with a concentration of 500ppm (1:100diluted bleacher solution used
in family) -5000ppm (1:10diluted bleacher solution used in family) is very effective. How much
ppm depends on how much organic matter (blood, propagation grume etc.)Existing on the
surface.
CAUTION
NEVER use strong solvent, such as acetone.
ALWAYS dilute the solutions according to the manufacturer’s suggestions.
NEVER use abrasive, erosive cleaners, or cleaners containing acetone
NEVER permit fluids run into the casing, switches, connectors, or any ventilation openings in the
equipment.
NEVER submerge the equipment into water or any cleaning solution, or pour or spray water or
any cleaning solution on the equipment.
Table of contents
Popular Measuring Instrument manuals by other brands

PCB Piezotronics
PCB Piezotronics 003C30 Installation and operating manual

Datacolor
Datacolor ColorReader DC10-2 user guide

Afriso EURO-INDEX
Afriso EURO-INDEX DIT 10 operating instructions

Milwaukee
Milwaukee 2280-20 Operator's manual

AccuFitness
AccuFitness FatTrack II user manual

Savant
Savant DigiFlow 6000R quick start guide


Thermometer
Thermometer 8000 operating instructions

SMC Networks
SMC Networks PPA100 Series instruction manual

biochrom
biochrom Novaspec III Plus manual

Ambient Weather
Ambient Weather Fischer 1434B-22-B user manual

Welch Allyn
Welch Allyn Audioscope 3 operating instructions

Ninglu
Ninglu AM706 Operation & installation manual