Sino Instruments HS602 User manual

User manual
HS602
Intelligent Pressure Calibrator

2
The operating instructions are parts of the products and must be kept in
the immediate vicinity of the instrument and readily accessible to skilled
personnel at any time.
Skilled personnel must have carefully read and understood the operating
instructions prior to beginning any work.
The manufacturer's liability is void in the case of any damage caused
by using the product contrary to its intended use,non-compliance with
these operating instructions,assignment of insufciently qualied skilled
personnel or unauthorised modications to the instrument.
HUAXIN reserve the rights to change the contents or form of these
operating instructions at any time without prior notice having been
given.
Claim
In order to protect your ordering products,your own and others safety,Please
read this manual carefully before your operation. And pls place this manual
near the operation site for the operator reference.The consequence would be
incurred by the non-observance are marked.
Disassembling the inner components may take toll or completely
damage the equipment.Only the qualified technician could make a
repairment. Any abnormal happened to the equipment,pls call our
service staff to make a repairment under their instruction.
Please don't disassemble & repair the equipment by yourself.
Safety information
Warning
1
To avoid over pressure damges,don't apply pressure that exceeds the
limits listed in the pressure specication table.
This action might injure the product and inuce the performance.
Pay attention to the range
Don't beat and shock
2
3

3
Other power supply will damage to the product, and even may cause
the re or an electric shock.
The calibration should be carried out under a standard calibration
condition,such as the standard gauge must be accuracy 3 times of
HS602,ambient temperature (20±2)℃.
Only use the special adapter or battery
The calibration should be carried out under a standard calibration condition
Symbols
Labelling,Safety Marks
Symbols used on the product and in the menu
Symbol Meaning Symbol Meaning
Indicates warning Conforms to European
Union directives
Indicates important
information
Conforms to standard of
PCEC
Intelligent Pressure Calibrator
Model:HS602 NO.1401118104
Voltage:8.4DCV Range:(0-10)bar
Date:2014.1 Accuracy:±0.5%F.S
Huaxin Instrument(Beijing)Co.,Ltd
Product name
Model
Voltage
Date of manufacture Accuracy
Manufacturer
Pressure range
No.
6
7
That will damage the item by using the wrong medium.
Pay attention to the medium of the item
That will damage the item,and even may cause the re or an electric
shock.
Don't immersed in water or exposed to water or getting wet
5
4

4
Claim
Safety information
1. Summary - 1 -
2. Technical Spec - 2 -
3. Working Principle - 4 -
4. Install Operation - 4 -
4.1. Basic structure - 4 -
4.2. Button& terminal Introduction - 5 -
4.3. Display - 6 -
4.4. Installation method - 6 -
4.5. The gauge type - 6 -
4.6. Change the original pressure unit - 7 -
4.7. Temperature modication display - 8 -
4.8. DC24V output setting - 10 -
4.9. COM Communication setting - 10 -
4.10. Digital display setting - 11 -
4.11. Factory reset - 12 -
5. Calibration step - 12 -
5.1. Pressure Low point, High Point Calibration - 12 -
5.2. Clear two point modication value - 14 -
5.3. Clearing clear zero value - 15 -
5.4. Current measurement calibration - 15 -
5.5. Voltage measurement calibration - 17 -
6. HART - 18 -
6.1. Using HS602 Calibrated HART Pressure transmitter - 18 -
6.2. Connection - 19 -
6.3. Operation step - 19 -
7. Field instrument testing - 21 -
7.1. Using storing function calibrate pressure transmitter in the eld - 21 -
7.2. Basic Setting - 21 -

5
7.3. Starting testing - 22 -
7.4. Data browsing - 22 -
8. Maintenance - 23 -
8.1. Maintenance and instruments - 23 -
8.2. Attention items - 23 -
9. Accessories List - 24 -
10. Standard - 24 -
11. Support - 24 -

1
1.Summary
Pressure range up to 2500bar
High accuracy up to 0.025%F.S
Current measurement (0-25)mA
Accuracy ±(0.02%RD+0.005%F.S)
Voltage measurement (0-25)V
Accuracy ±(0.02%RD+0.005%F.S)
Pressure switch test
HART Communication capability
Advanced temperature compensating
24vdc power for Pressure transimtter testing
Large,easy to read display with 6-digit resolution
RS232 communication with PC
With Max and mix values function
Zero point,full scale calibration function
Nine pressure units selectable
Equipment with rugged ABS plastic
Rechargeable lithium battery or charger
Data storing function
Large LCD with white backlight,dual readout
Light weight,small size,easy operation
HS602 Intelligent pressure calibrator is a high-precision single-range
digital pressure gauge with hart function. it is composed of high-precision
measurement chips,DC24V power supply,rechargeable battery protection
circuit,hart communication modules and intelligent digital pressure module
and so on.
This unit can be used for real-time measurement of pressure value and the
calibration of the pressure transmitters,differential pressure transmitters,
pressure transducers and pressure gauges,etc.
Characteristics

2
Model
HS602 Intelligent Pressure
Calibrator
Accuracy
±0.025% F.S, ±0.05% F.S
Electric signal
Current measurement:(0-25)mA
Accuracy:±(0.02%RD+ 0.005%F.S)
Voltage measurement:(0-25)V
Accuracy:±(0.02%RD+ 0.005%F.S)
DC output:DC24V(≤30mA)
Accuracy:±1%F.S
Gauge types
Gauge pressure
Compound pressure
Absolute pressure
Differential pressure
Work medium
Oil, water&noncorrosive gases
Over pressure alarm
120%Full Scale
Display
Description:6 digits big LCD
with blacklight
Display rate:Less than 0.025%
of full scale is 150ms,more than
0.025% of full scale is 1s
Numeral display height:16.5mm
(0.65")
Pressure unit
psi,bar, mbar,kgf/cm2,Pa,kPa,
MPa,mmH2O,mmHg
Temperature
Compensated temperature:
-10°C to 50°C
Operating temperature:
-10°C to 50°C
Humidity:<95%
Storing temperature:-20°C to 70°C
Pressure connection
1/4NPT male,M20×1.5 male
Other connections customized
Power
Battery:One piece 7.4Vdc
rechargeable lithium battery&charger
Battery life:80 hours
Housing
Case material:Plastic
Wetted parts:316 stainless steel
Dimension:Φ95mmx49mm
Total height:166(mm)
Weight:0.75kg
Data storing
Storage capacity:calibration record
of 30pcs gauge under test
Communication
RS232
Certicate
CE .....................
EX .....................
ISO 17025 lab calibration
certicate(optional)
2.Technical Specication
3
Pressure ranges selection sheet
Compound pressure
Gauge pressure
No. Range (bar) Accuracy ( % FS) Media Pressure Type
HS602-1 (-1-0) 0.025,0.05 G G
HS602-2 (0-0.4) 0.025,0.05 G G
HS602-3 (0-0.6) 0.025,0.05 G G
HS602-4 (0-0.7) 0.025,0.05 G G,A
HS602-5 (0-1) 0.025,0.05 G G,A
HS602-6 (0-1.6) 0.025,0.05 G,L G,A
HS602-7 (0-2) 0.025,0.05 G,L G,A
HS602-8 (0-2.5) 0.025,0.05 G,L G,A
HS602-9 (0-3.5) 0.025,0.05 G,L G,A
HS602-10 (0-4) 0.025,0.05 G,L G,A
HS602-11 (0-6) 0.025,0.05 G,L G,A
HS602-12 (0-7) 0.025,0.05 G,L G,A
HS602-13 (0-10) 0.025,0.05 G,L G,A
HS602-14 (0-16) 0.025,0.05 G,L G,A
HS602-15 (0-20) 0.025,0.05 G,L G,A
HS602-16 (0-25) 0.025,0.05 G,L G,A
HS602-17 (0-35) 0.025,0.05 G,L G,A
HS602-18 (0-40) 0.025,0.05 G,L G
HS602-19 (0-60) 0.025,0.05 G,L G
HS602-20 (0-70) 0.025,0.05 G,L G
HS602-21 (0-100) 0.025,0.05 G,L G
HS602-22 (0-160) 0.025,0.05 G,L G
HS602-23 (0-200) 0.025,0.05 G,L G
HS602-24 (0-250) 0.025,0.05 G,L G
HS602-25 (0-350) 0.025,0.05 G,L G
HS602-26 (0-400) 0.025,0.05 G,L G
HS602-27 (0-600) 0.025,0.05 G,L G
HS602-28 (0-700) 0.025,0.05 G,L G
HS602-29 (0-1000) 0.025,0.05 G,L G
HS602-30 (0-1600) 0.1,0.2 G,L G
HS602-31 (0-2500) 0.1,0.2 G,L G
No. Range Accuracy Media Pressure Type
HS602-32 (-0.025-0.025)0.05 G D,G
HS602-33 (-0.05-0.05)0.025,0.05 G D,G
HS602-34 (-0.1-0.1) 0.025,0.05 G D,G
HS602-35 (-0.25-0.25)0.025,0.05 G D,G
HS602-36 (-1-1) 0.025,0.05 G D,G
HS602-37 (-1-6) 0.025,0.05 G,L G
HS602-38 (-1-10) 0.025,0.05 G,L G
HS602-39 (-1-25)0.025,0.05 G,L G
Remark:G=Gauge pressure A=Absolute pressure D=Differential pressure

4
3.Working Principle
4.Install Operation
The tested pressure signal acts on the pressure sensor,the signal of pressure
sensor change into electrical signal.the current and voltage measurement
signal will be led into via the terminal on the panel,after the A/D conversion
and the sampling-processing by microprocessor,the final result would be
displayed on the LCD screen.
4.1 Basic structure
Current,Voltage,Double
Switching Value Input
Battery&Charging protecting
DC+5V,3.3V
DC24V Output
Display Button
LCD display
A/D Converter
HART
RS232
Pressure Sensor
CPU
Model
Screen
Buttons
Pressure range
Male thead
RS232 port
Adapter
socket
Label
1/4 NPT(or customized)
(X-XX)bar

5
1.Back cover insert 13.Cover battery plate
2.Front cover 14.Lock nut
3.Key-press panel 15.Press cover
4.Button switch 16.Hole press cover
5.Power strip 17.Support pad for sensor
6.Front view window 18.Reinforcing pad for sensor
7.LCD 19.Sensor
8.PCB 20.O-ring 9×1.8
9.Plugging terminal panel 21.High pressure sealing
10.Terminal board 22.Check ring 19
11.Back cover 23.O-ring 16×1.8
12.Li-ion battery pack 24.Sensor connector
4.2 Button&terminal Introduction
Connection terminals:
Including terminals for current measurement,voltage measurement,
DC24V output, pressure switch value measurement and a public terminal.
Connect terminals as below;
Light up the display screen.
Starting unit is kPa, press this key to switch unit circularly among
mmHg、mmH2O、bar、mbar、psi、kgf/cm2、MPa and Pa.
Press this key to clear current value as zero drift value.then this gauge
would be already in a clearing zero status when you start it up again.
Press this key for zero point and full scale calibration and linear
revision to insure the accuracy.( Do not use the key if there is no
necessary calibration equipments available)
Starting function is measurement for press,current, temperature.
press this key to switch circularly and then choose the measuring
function your demand.
MEASURE
CAL
ZERO
UNIT
LIGHT
1
2
3
4
5
6
7
8
9
10
11
12
13
14
15
16
17
18
19
20
21
22
23
24

6
4.5 The gauge type
4.3 Display
1
2
Connect gauge under test and HS602
on the pressure comparator.
According to calibration regulation,
make HS602 as standard gauge to
nish the whole calibration process.
4.4 Installation method
SW1:Measuring Pressure switch.
SW2:Measuring Pressure switch.
GND:This is a public terminal.
V:(0 ~25)V,Accuracy:±(0.02%RD+0.005%FS).
mA:(0 ~25)mA,Accuracy:±(0.02%RD+0.005%FS).
24V:DC24V output(≤30mA) accuracy:±1%FS.
RS232 communication port.
DC8.4V Charging inputDC8.4V.
The HS602 screen denitions:
PC icon:the mark of PC connection
Battery icon:indicates state of charge.
Only be seen when there is low power
Pressure display:displays measuring
pressure value
Pressure units:displays selected
pressure units
Electricity reading:displays measuring
electricity value,sw1 value,and menu
Electricity units:displays measuring
current/voltage units
Menu reading:displays measuring sw2
value and menu
HART :shows the communication status

7
4.6 Changing the original pressure unit
(1) In Measuring interface,Press CAL;enter into basic setting interface.
No.1:Gauge pressure No.2:Gauge pressure
Rang: ≤±
100kPa
No.3:Differential pressure
2
3
1
4
5
Connecting pressure generator
Open to air
Connecting pressure generator
High pressure
Low pressure
1
3
2
4
5
(2) Press CAL,enter into the Unit interface.
(3) Press CAL,enter into the Unit choose interface(Unit ashing).
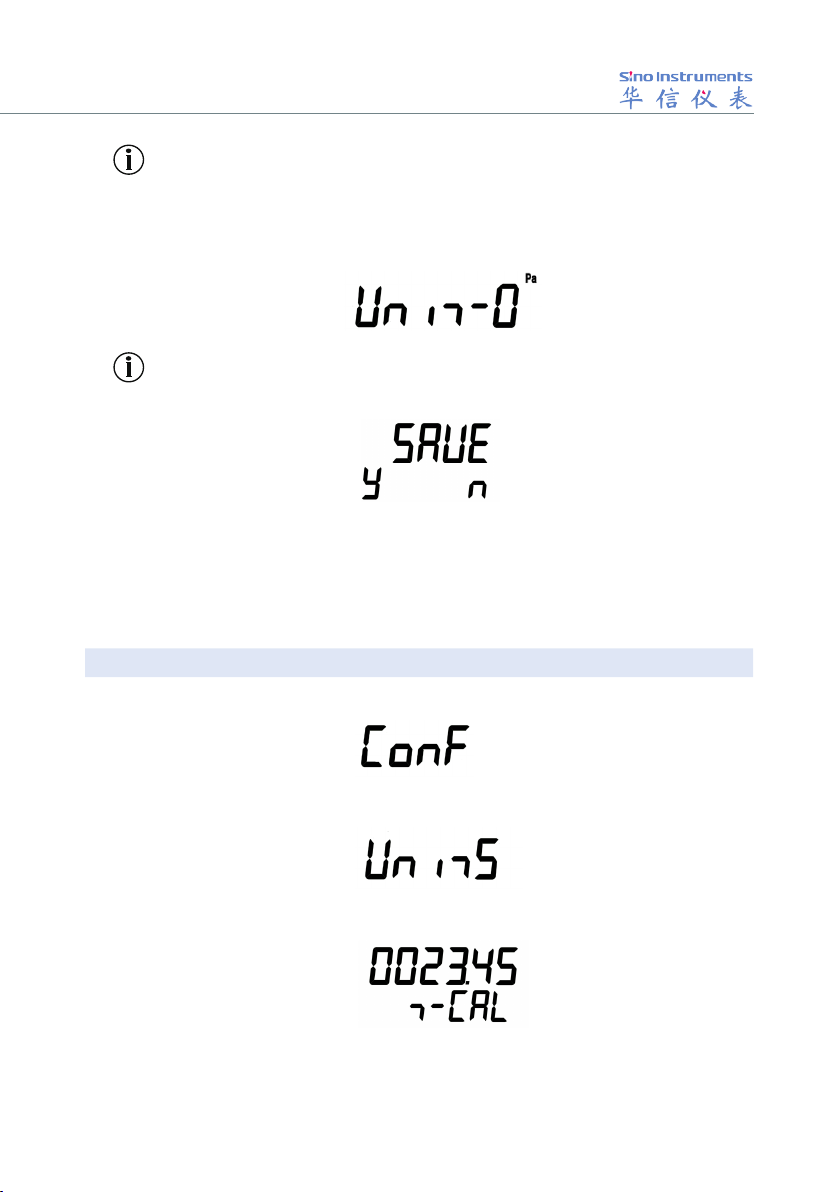
8
At this time, the unit displayed is client measuring interface unit.maybe
that is not match with the unit kPa in above pic.
Remark:The displayed unit:Pa,kPa,MPa.
Remark
(4) Press Zero and choose the Unit you need (if you choose the unit Pa).
(5) Press CAL,enter into the save interface.
(1) In Measuring interface,press CAL,enter into basic setting interface.
(6) If press LIGHT,save the setting,and then return unit selectable
interface. that means the pressure unit modied well.
(7) Press LIGHT three times continuously.then back to the measuring
interface.
4.7 Temperature modication display
(2) Press CAL,enter into the Unit interface.
(3) Press ZERO three times enter into temperature interface below.
(4) Press CAL,enter into data modied interface.
The rst character(“-”)located in activated interface (No ashing).

9
(6) Press CAL,next character located in activated interface(Flashing).
When decimal point bit ashing, press ZERO for setting decimal point.
When the number ashing,press LIGHT for decreasing number from 9 to
0,press ZERO for increasing number from 0 to 9.
After selecting your number, repeat step(6).
(7) Repeat step(6),until the last bit.
(5) If you want to modify the activated value,press ZERO and display“-
”(ashing),if you don't need modify activated values,pls enter into next
step directly.
(Minus)
(8) Press CAL, enter into the save selecting interface.
(9) Press LIGHT twice continuously and back to the measuring interface.
Press LIGHT for save the settings,if not,press ZERO.

10
4.8 DC24V output setting
(1) In measuring interface,press CAL,enter into basic setting interface.
(3) Press ZERO continuously until it get into “DC 24V” measurement
interface below.
(2) Press CAL,enter into the Unit interface.
(4) Press CAL,switching ON/OFF.
(5) Press LIGHT twice continuously and back to the measuring interface.
4.9 COM Communication setting
(1) In measuring interface,press CAL enter into basic setting interface.
(2) Press CAL,enter into the Unit interface.

11
4.10 Digital display setting
(1) In measuring interface,press CAL,enter into basic setting interface.
(3) Press ZERO,and select the menu,enter into setting interface below.
(3) Press ZERO,and select the menu,enter into setting interface below.
(2) Press CAL,enter into the Unit interface.
(4) Press CAL,switching ON/OFF.
ON-1 (Automatic)and ON-2 (Semi-automatic),OFF means to close.
(5) Press LIGHT twice continuously,and back to the measuring interface.
(4) Press CAL,switching circularly4、5、6 bit.

12
(1) In measuring interface,press CAL,enter into basic setting interface.
(2) Press CAL,enter into the Unit interface.
(3) Press ZERO continuously and then enter into factory reset interface.
(4) Press CAL,enter into the Save interface.
If press LIGHT,it can resume to default setting. It will get back to
factory reset interface and cancel the operation if you press ZERO.
If the item could not work by error operation,that could restore factory
reset.
(5) Press LIGHT twice continuously.and back to the measuring interface.
4.11 Factory reset
(5) Press LIGHT twice continuously.and then enter into measuring interface.
The calibration should be carried out under a standard calibration
condition,such as the standard source must be accuracy 3 times,ambient
temperature (20±2)℃.
5.1 Pressure Low point, High Point Calibration
(1) Pressure input add low point standard pressure.
(2) Waitting for pressure stability.
(3) In measuring interface,press CAL,enter into basic setting interface.
5.Calibration step

13
(4) Press ZERO,enter into pressure low point, high point calibration
interface.
(5) Press CAL,enter into pressure low point calibration(Press CAL,
enter into pressure high point calibration) interface.
(6) Press CAL,enter into low point calibration data modify interface.
(7) Refer "4.7(7) step of Temperature displaying modied".and amend low
point pressure data(If the gauge had stored data,that do not nead amend,then
press CAL directly).
(8) Press CAL input the last a character,waiting for standard pressure
stability and then press CAL,enter into save interface.
(9) Press LIGHT,save low point calibration data and return low point
calibration interface.

14
(12) Waitting for pressure stability.
(14) Refer"4.7(7) step of Temperature displaying modified".and amend
high point pressure data(If the gauge had stored data,that do not need
amend,then press CAL directly).
(13) Press CAL,enter into high point calibration data modify interface.
(15) Press CAL input the last a character,waiting for standard pressure
stability and then press CAL,enter into save interface.
Press LIGHT,save high point calibration data and return high point
calibration interface.
(16) Press LIGHT twice continuously.and then back to measuring interface.
(1) In measuring interface,press CAL once time,and then press ZERO
once time,that will display below.
5.2 Clear two point modication value
(10) Press ZERO,enter high point calibration interface.
(11) Pressure input add high point standard pressure.

15
(1) In measuring interface,press CAL once time,and then press zero
twice,that will display below.
(2) Press CAL once time,and then press ZERO twice,that will display
below.
(2) Press CAL once time,that will display below.
(3) Press CAL once time,that will display below.
(3) Press CAL once time,that will display below.
(4) Press LIGHT three times,saving and returning measuring interface.
(4) Press LIGHT three times,saving and returning measuring interface.
5.3 Clearing clear zero value
5.4 Current measurement calibration
(2) In the measuring interface,press CAL, enter into the setting interface.
(1) Contacting the standard current with current input circuit.
(3) Press ZERO continuously for four times,until entering into current
measurement calibration menu.
Table of contents


