SINTERIT SANDBLASTER SLS Operation instructions
Sinterit SANDBLASTER SLS
ORIGINAL MANUAL
Please read the instruction manual before using the device.
Version 7/2021

2 | Sinterit SANDBLASTER SLS User Manual
Table of contents
1. Marking text conventions used in a document .......................................................................................................3
2. Safety Information..................................................................................................................................................4
2.1 Environment and place of installation ......................................................................................................................... 4
2.2 General safety rules....................................................................................................................................................... 4
2.3 Personal protection....................................................................................................................................................... 4
2.4 Power supply ................................................................................................................................................................. 5
2.5 Safety during sandblasting, repair and maintenance.................................................................................................. 5
2.6 Scrapping ....................................................................................................................................................................... 5
3. Contents of the Sinterit SANDBLASTER SLS pack...................................................................................................6
3.1 Accessories box ............................................................................................................................................................ 6
3.2 Others accessories ....................................................................................................................................................... 6
4. Sinterit SANDBLASTER SLS....................................................................................................................................7
4.1 Description..................................................................................................................................................................... 7
4.2 Specication .................................................................................................................................................................. 8
4.3 Safety plate.................................................................................................................................................................... 9
5. Initial startup of the Sinterit SANDBLASTER SLS after delivery .................................................................................
6. Sandblasting the printouts....................................................................................................................................12
7. Maintenance of the Sinterit SANDBLASTER SLS ..................................................................................................14
7.1 Replacement of the Abrasive material....................................................................................................................... 14
7.1.1 Exchange of Abrasive material with Sinterit ATEX Vacuum Cleaner............................................................. 15
7.1.2 Standard exchange of Abrasive Material......................................................................................................... 15
7.2 Replacement of the ceramic nozzle from the inner air blow gun............................................................................. 16
7.3 Replacement of protective rubber gloves.................................................................................................................. 16
7.4 Maintenance of the Viewing window ......................................................................................................................... 16
9. General legal information .....................................................................................................................................18
10. Disclaimer ..........................................................................................................................................................18
11. Trademarks ........................................................................................................................................................18
12. Terms of warranty...............................................................................................................................................19
13. Technical support ...............................................................................................................................................19
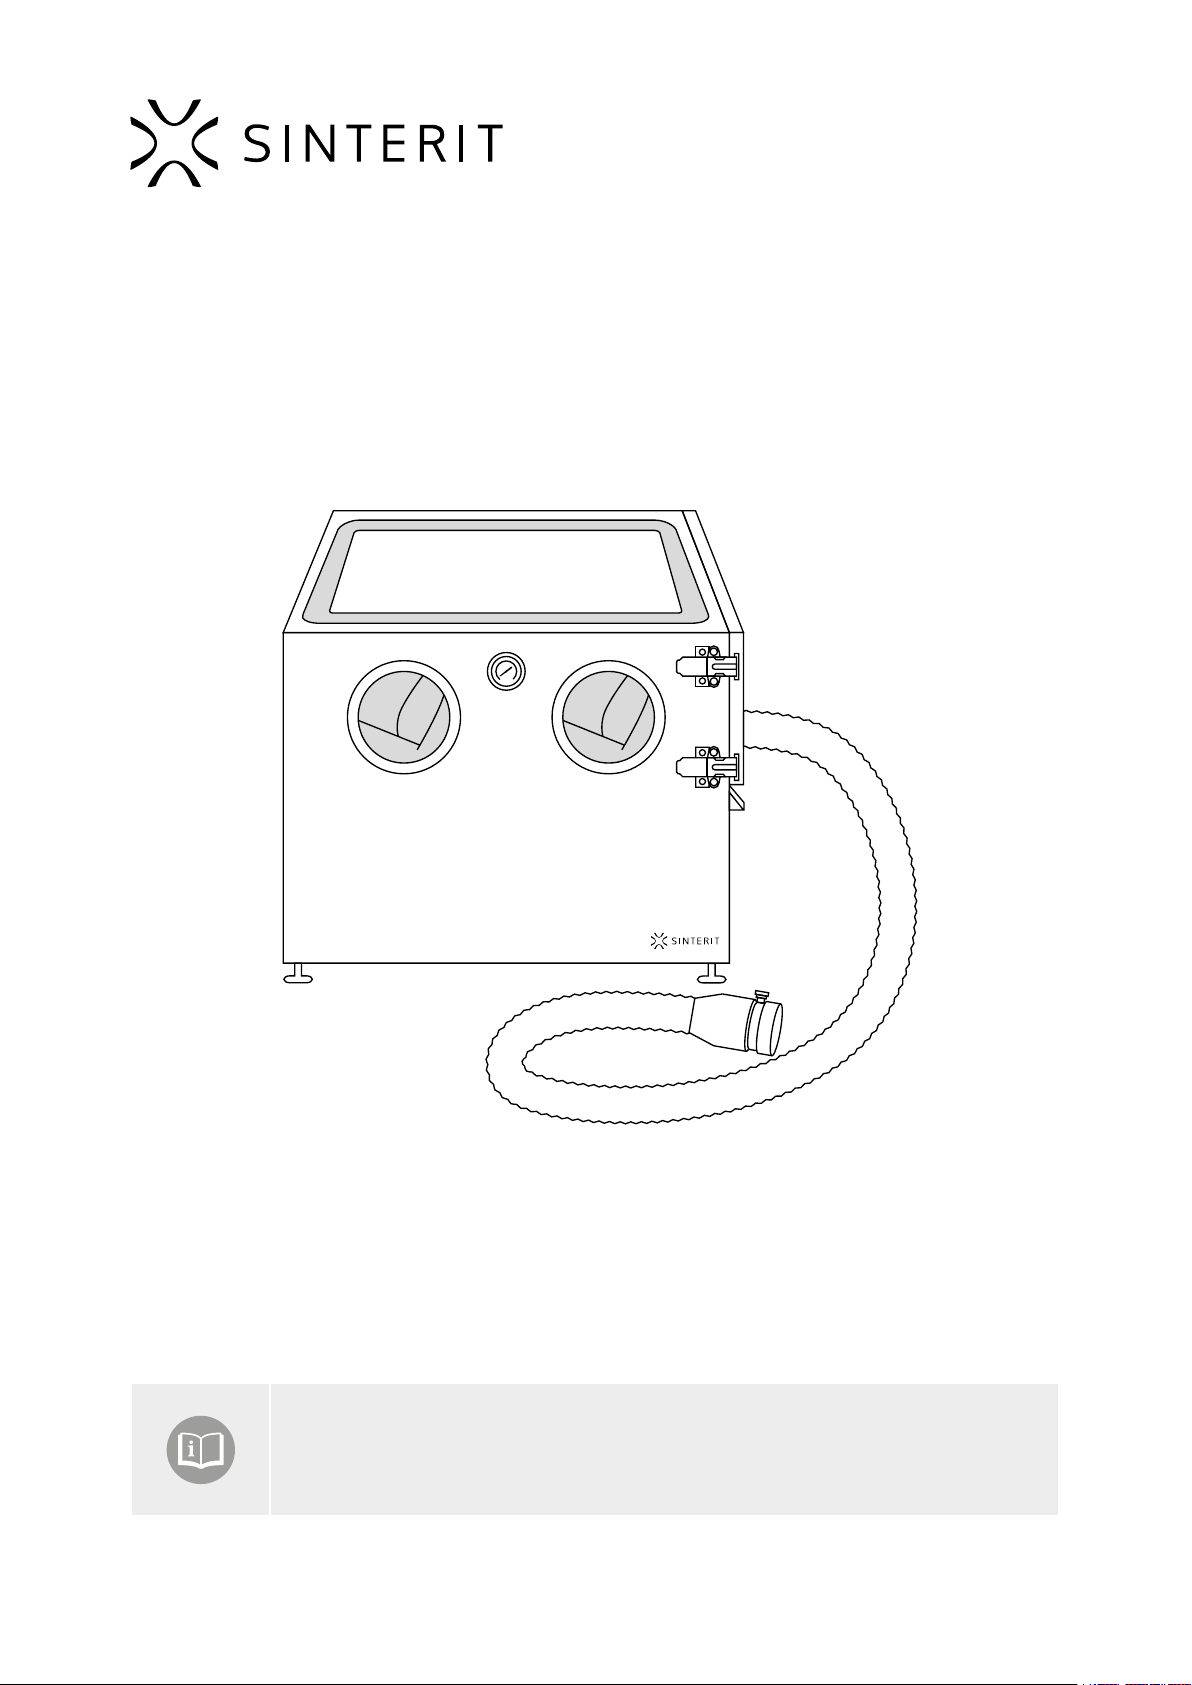
The SANDBLASTER SLS is designed for cleaning, polishing and nishing of printouts, using dry abrasive material only.
IMPORTANT!
Sandblaster does not include an air compressor.

Sinterit SANDBLASTER SLS User Manual | 3
1. Marking text conventions used in a document
Listed below are descriptions of symbols used on the device. They constitute a warning or convey the information to
protect the user, other individuals or surrounding objects and ensure the correct and safe use of the device.
WARNING!
An inevitably dangerous situation which can result in serious injury or even death. Initiation
or omission of a specic procedure or inattention can cause severe physical injury to the
user.
ATTENTION!
Initiation or omission of a specic procedure can cause physical damage to the equipment
or the user.
ATTENTION!
Risk of electric shock which can be fatal or cause severe burns. An inevitably dangerous
situation which can result in serious injury or even death, if not mitigated. Before working
with any equipment, you should be aware of the dangers associated with the ow of
electric current, and become familiar with the standard procedures to prevent accidents.
CAUTION!
Beware of moving parts which can crush hands.
WARNING!
Risk of re and explosion!
Avoid re! Powder dust is ammable.
STOP!
Action prohibited.
ATTENTION!
It is necessary to wear protective gloves and a face mask. Mandatory action when working
with powder.
ATTENTION!
It is necessary to wash hands after each use of the SANDBLASTER SLS.
IMPORTANT!
Information essential to correctly perform a specic task.
IMPORTANT!
You must read the instructions before taking action.

4 | Sinterit SANDBLASTER SLS User Manual
2. Safety Information
The Sinterit SANDBLASTER SLS may create a powerful stream of abrasive particles. To avoid injuries and/or property
damage, carefully read the instruction manual before assembling, operating or performing maintenance of the sandblaster.
While operating the machine, please exercise your common sense at all times.
2.1 Environment and place of installation
WARNING!
• The sandblaster must be positioned protected against atmospheric agents (rain, hail, snow,
fog, dust in suspension, etc.) with an environmental running temperature between 5°C and
45°C and relative humidity not above 70%.
• The work environment must be clean, well-enough lit and devoid of an explosive atmosphere.
• Debris and bad lighting are factors that can cause dangerous situations.
• Never operate this machine in a dangerous working environment. The use of power
equipment in moist environments or rain can cause electrocution.
• Place the unit on a solid and level surface.
2.2 General safety rules
WARNING!
• Only adults should use the sandblaster.
• When using the machine, mind other people, especially children. Keep kids and visitors at a
safe distance.
WARNING!
• Fire and explosion hazard! The sandblaster must not be operated in a
corrosive or explosive environment.
• Avoid prolonged contact with solvents and inhaling their vapours.
• Avoid using the device near open ames.
• Never use this machine near ammable liquids and/or gases.
2.3 Personal protection
WARNING!
• The operator must always wear antistatic clothes and shoes.
• Workplace ooring must be anti-static.
WARNING!
• During operation, do not expose your skin or hands directly to the line of
operation of the Sinterit SANDBLASTER SLS Static nozzle 20 and Air blow
guns L, 22 .
• Wear a protective mask when working with the sandblaster.
• Breathing in particulate matter causes serious lung problems.
• Wear Protective Glasses when opening the door after using the machine.
ATTENTION!
After each use of the Sinterit SANDBLASTER SLS, wash your hands.

Sinterit SANDBLASTER SLS User Manual | 5
2.4 Power supply
WARNING!
• Before plugging in, make sure the power voltage and frequency match those
shown on the machine safety plate.
• Make sure the machine is properly grounded. In case you are using an
extension, check if it is grounded and if the capacity is sucient.
• During use, mind the power supply cables and avoid crushing or pulling them.
• Periodically check the mains power cable to ensure it is not damaged.
• In the event of the cable, plugs or couplings being replaced, make sure these
are protected against water spray and check mechanical strength.
STOP!
• Never touch electric cables, switches, buttons, etc. with wet hands.
• In the event of the cable being damaged, the machine must not be used.
• Never pull the on the power cable to move the machine around.
2.5 Safety during sandblasting, repair and maintenance
ATTENTION!
• Check the quality of all hoses and pneumatic tubing before each use. Check that all
connections are secured.
• Check the machine previous to each use for damaged and/or defect parts. Pay special
attention if all seals are still good and check all tubings for leakages.
• Check that all components of the Sinterit SANDBLASTER SLS are properly sealed.
• Check the machine for defects previous to each use, in case of a defect, or when the machine
does not function properly, rst have it repaired by a specialized person/company.
• Failure to heed these instructions may cause damage to materials and/or injures!
ATTENTION!
• Do not direct the Air Blow Guns L, 22 at people or objects.
• Do not exceed the maximum operating pressure of the Sinterit SANDBLASTER SLS.
2.6 Scrapping
IMPORTANT!
In case of scrapping, all the component parts of the sandblaster will have to be
disposed of through adequate disposal channels in accordance with applicable
legislation. Before scrapping, all plastic and rubber parts will have to be separated
from the electrical material. Parts made of plastic, aluminium and steel only may
be recycled if collected by special centres.
6 | Sinterit SANDBLASTER SLS User Manual
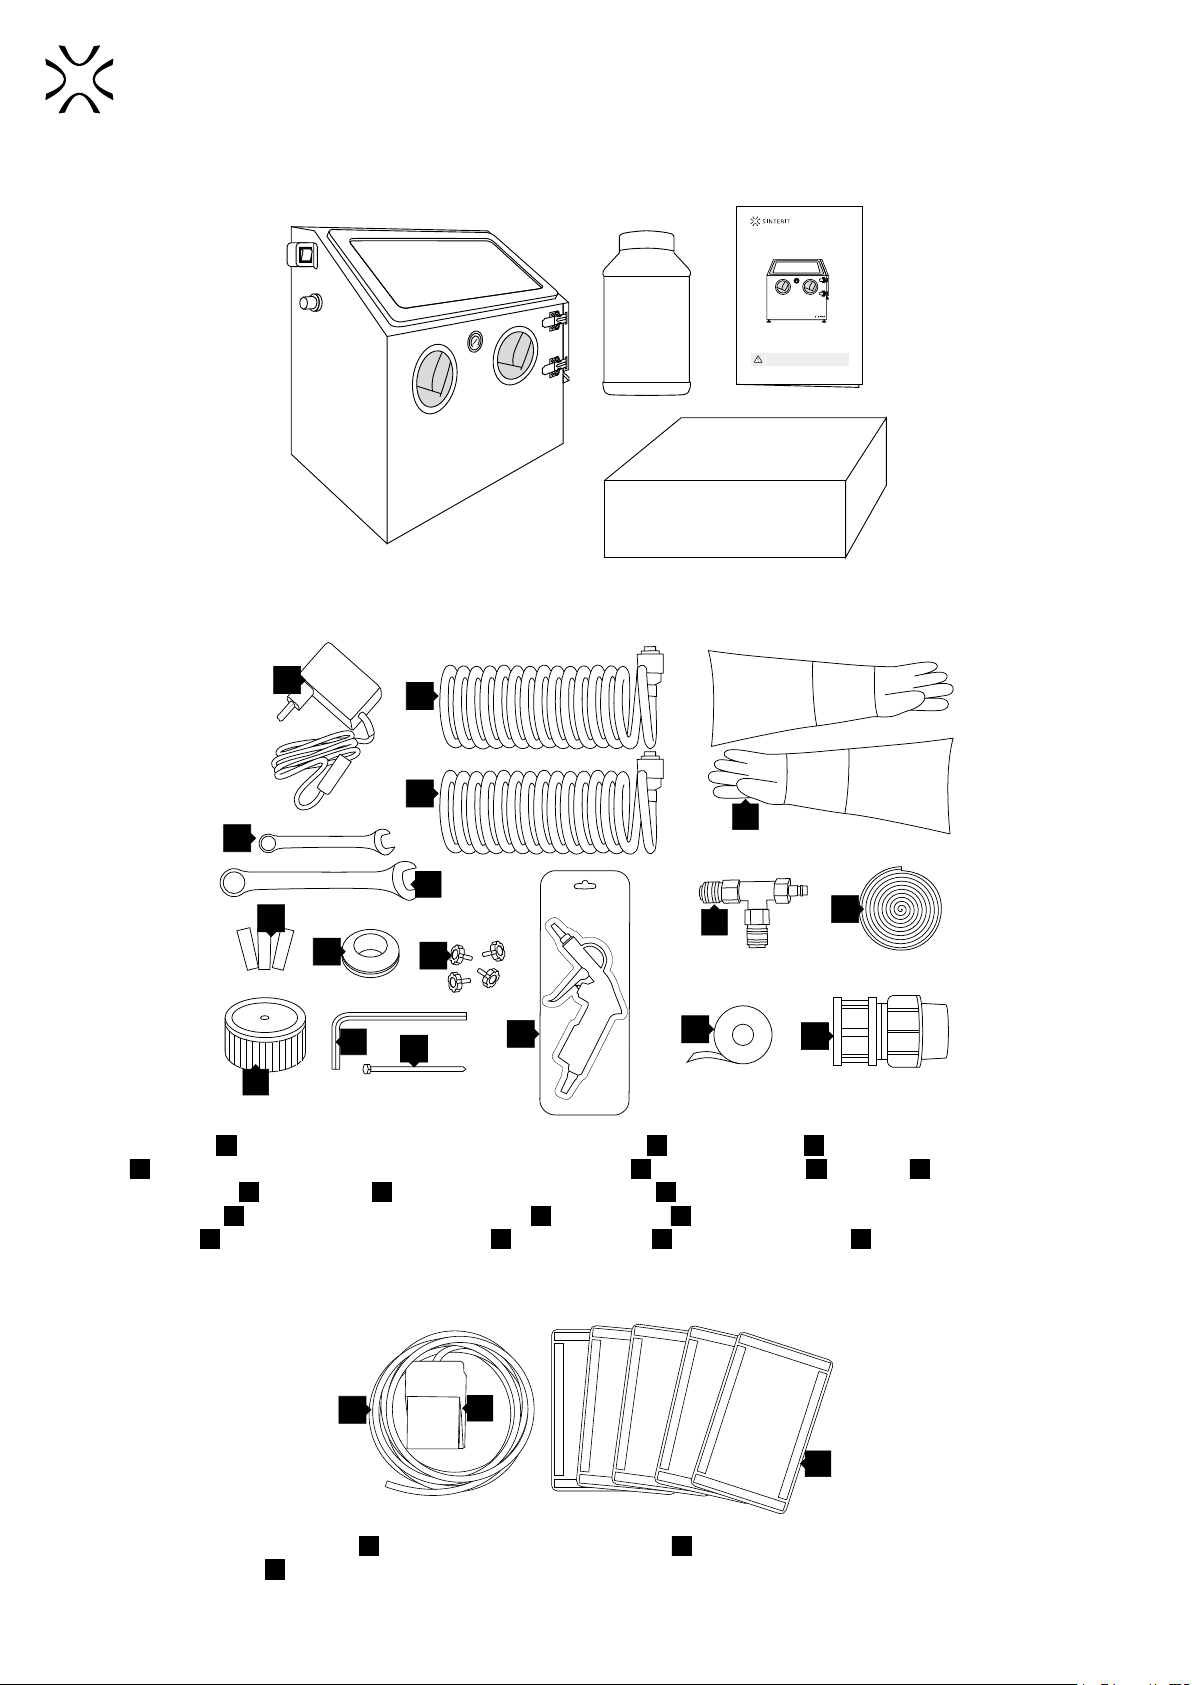
3. Contents of the Sinterit SANDBLASTER SLS pack
ABRASIVE
MATERIAL
8 kg
ACCESSORIES
Sinterit SANDBLASTER SLS
ORIGINAL MANUAL
Readthe instruction manual before using the device.
Version 7/2021
3.1 Accessories box
D
H
A
E
L
I
J
B
O
PR
K
G
C
F
M
N
APower supply (US or EU version with proper plug) / BWrench 10mm / CWrench 14mm /
DReplaceable ceramic nozzle for Inner air blow gun (3 pcs.) / ERubber grommet / F Air lter / GAllen wrench /
HFilter screw / IAir blow gun pneumatic tubing / JCompressor pneumatic tubing /
KAdjustable mounting feet (4 pcs.) / LAir blow gun / MSpare protective rubber gloves /
NT-type push-in pneumatic tting / OPVC foam tape / PPVC protective tape / RPipe end cap
3.2 Others accessories
ST
U
SControl pedal’s pneumatic tubings / TControl pedal /
UReplaceable PE protective foil for SANDBLASTER SLS viewing window (5 pcs.)
Sinterit SANDBLASTER SLS User Manual | 7
4. Sinterit SANDBLASTER SLS
4.1 Description
6
13
2
4
5
46
Front and left side view
1Power switch
2Pneumatic pressure regulator
3Viewing window
4Protective rubber gloves
5Pressure gauge
6Door locks
Front and right side view
7Door gasket
8Door
9Sandblaster chamber
10 Gutter
8
10
9
7
12
14
17
16
17
17
15
11
13 Rear and left side view
11 Air lter
12 Pneumatic nipple
13 Antistatic hose socket
14 Antistatic hose
15 Control pedal jack port
16 Power socket
17 Adjustable mounting feet (4 pcs.)
Chamber view
18 LED light
19 PE protective foils for the viewing
window (5 pcs.)
20 Static nozzle
21 Static nozzle pneumatic tubings
22 Inner air blow gun
23 Inner air blow gun pneumatic tubings
24 Inner chamber grid
25 Inner T-type push-in pneumatic tting
(for Inner air blow gun)
6
24
4
23
23
21
25
22
19 18
20

8 | Sinterit SANDBLASTER SLS User Manual
4.2 Specification
GENERAL
Category Cabinet Sandblaster
Type Stationary, operated via a foot pedal
Warranty One-year limited warranty
Dimensions 700 x 550 x 720 [mm] (27.6 x 21.7 x 28.3 [in])
Size of internal mesh 6 x 6 [mm] (0.2 x 0.2 [in])
Weight 30.5 [kg] (67.1 [lbs])
TECHNICAL DATA
Working Area 675 x 450 x 415 [mm] (26.6 x 17.7 x 16.3 [in])
Capacity of Abrasive material 10 [kg] (22 [lbs])
Operating Voltage 110 / 230 [V] AC, 50/60 [Hz]
Maximum power consumption 8 [W]
Working pressure 5.0 – 8.6 [bar] / 72.5 – 125.0 [psi]
Min. ow 290 [l/min]
Filter type HEPA
SAFETY
Certicates CE
PACKAGING
Size 790 x 545 x 765 [mm] (31.1 x 21.5 x 30.1 [in])
Weight 45 [kg] (99.0 [lbs])
Package contains Sandblaster, 8 [kg] (17.6 [lbs]) of abrasive material, manual and accessories

Sinterit SANDBLASTER SLS User Manual | 9
4.3 Safety plate
DO NOT REMOVE THIS LABEL!
Manufacturer:
Sinterit sp. z o.o. ul. Nad Drwiną 10 bud. B3, 30-741 Kraków,
Poland
www.sinterit.com [email protected]
Name: Sinterit SANDBLASTER SLS
Serial number:
Manufactured: Made in: EU, POLAND
Class 2
IP60
Machine type: ABRASIVE PRESSURE BLAST CABINET 110 [L]
Dimensions: 700 x 550 x 720 [mm] 27.6 x 21.7 x 28.3 [in]
Total weight: 30.5 [kg] 67.1 [lb]
Rated voltage: 230 [V] AC, 50 [Hz] 120 [V] AC, 60 [Hz]
Power consumption: 8 [W]
Ceramic nozzle diameter: 4, 5, 6, 7 [mm] 0.15, 0.19, 0.23, 0.27 [in]
Abrasive material loading capacity: 10 [kg] 22 [lb]
Max. ow rate: 420 [l/min]
Working pressure: 5.0 – 8.6 [bar] 72.5 – 125.0 [psi]
Working area: 675 x 450 x 415 [mm] 26.6 x 17.7 x 16.3 [in]
WARNING! Read and understand operator’s manual and all other safety instructions before using this
machine. Failure to follow operating instructions could result in serious injury.
5. Initial startup of the Sinterit SANDBLASTER SLS after delivery
1. Remove the protective packaging.
2. Gently pull out the contents of the packaging.
3. Remove the bubble wrap and place the machine on a stable surface.
4. Screw the Adjustable mounting feet K, 17 onto the sandblaster.
5. Take out accessories from the box.
6. Unlock both door locks 6and open the door 8.
Remove from inside:
• Transport protection
• Contol pedal’s pneumatic tubings J
• Control pedal K
• Replaceable PE protective foils N
• Accessories box
Check the tting and tightness of:
• Protective Rubber Gloves 6
• Inner Pneumatic tubings 21 , 23
• Static Nozzle 19
• Door gasket 11
7. Screw on the Air lter Fusing the
Filter screw H. Use the allen wrench G
included in the accessories box.
H E F
8. You can use Sandblaster SLS with or without Sinterit ATEX Vacuum Cleaner.
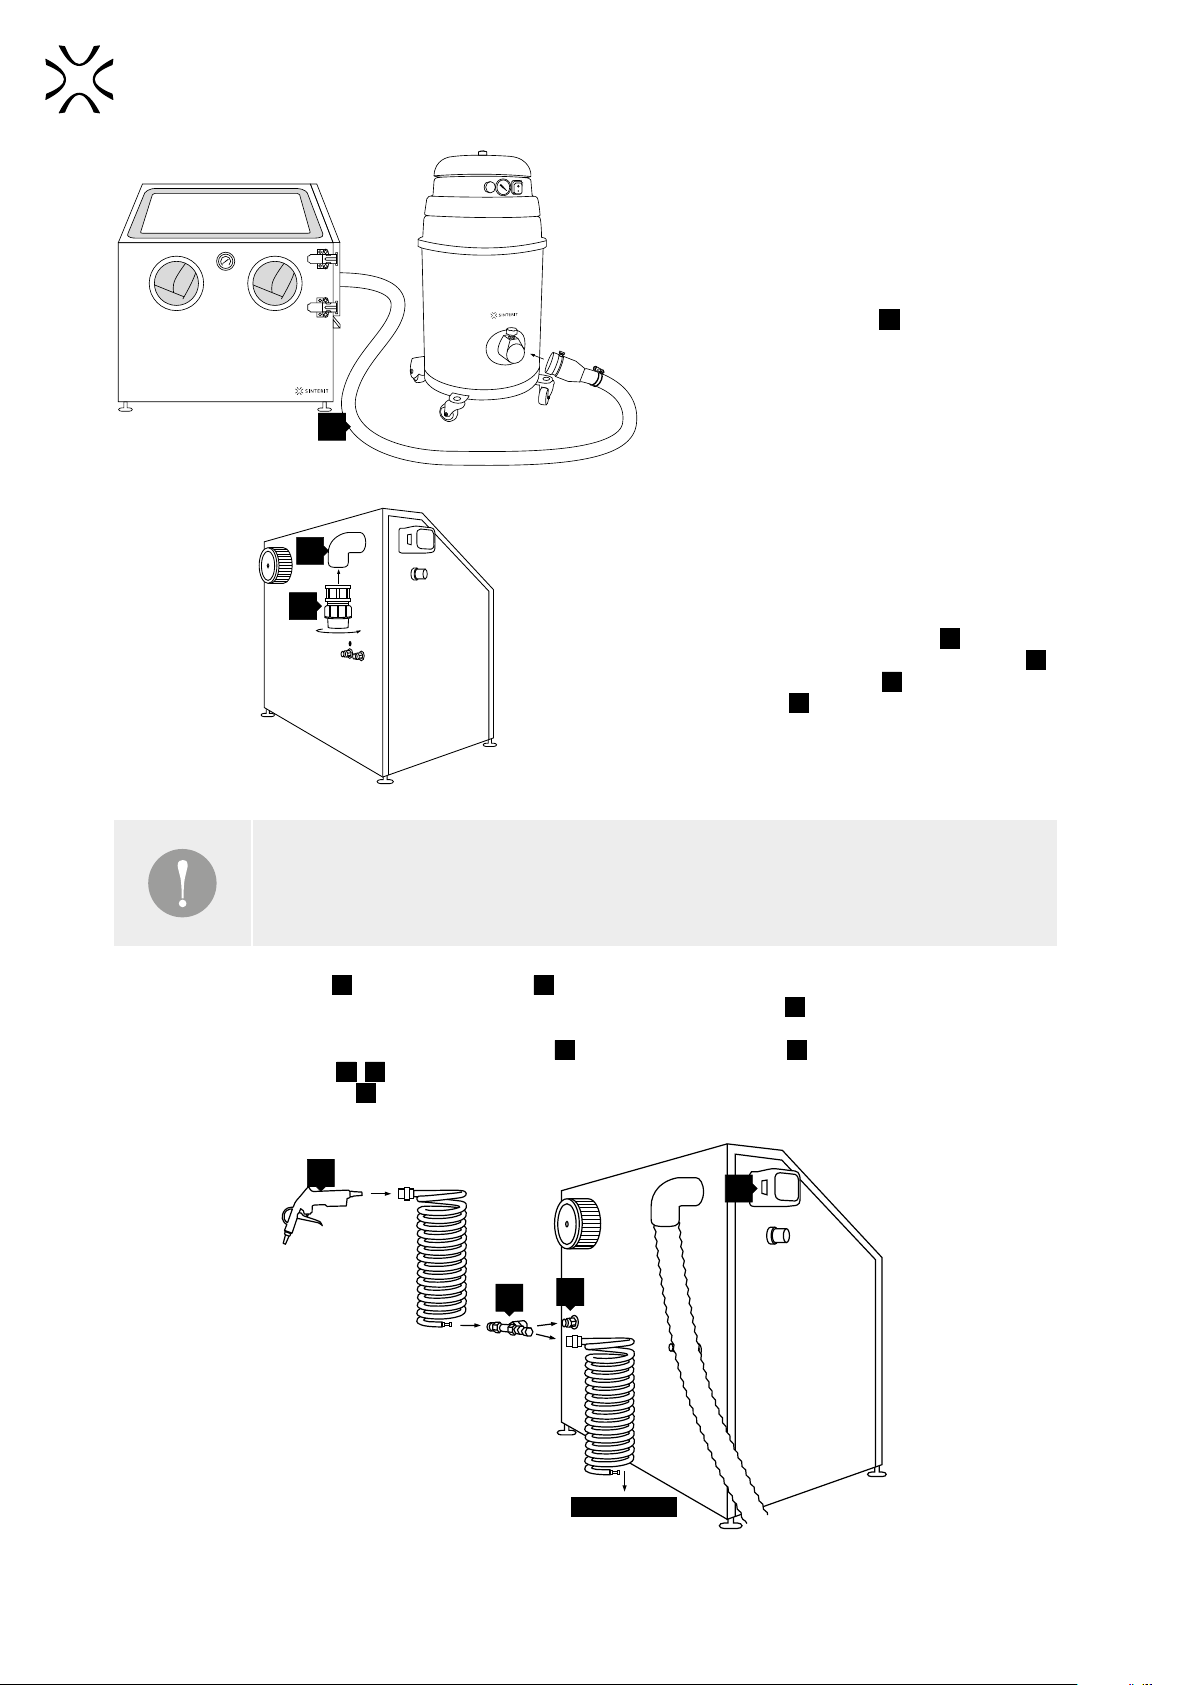
10 | Sinterit SANDBLASTER SLS User Manual
14
• Sandblasting with Sinterit ATEX Vacuum
Cleaner
Insert Antistatic hose 14 into the Vacuum
Cleaners Suction hose connector.
13
R• Sandblasting without Sinterit ATEX Vacuum
Cleaner
Detach the Antistatic hose 14 from the
Sandblaster SLS using a 10 mm Wrench B.
Insert the Pipe end cap Rinto the Antistatic
hose socket 13 .
IMPORTANT!
Sandblasting with ATEX Vacuum Cleaner to provide a dustless environment around and inside
the Sandblaster. Please check our website or contact our distributors for more information.
9. Plug the Power supply Ainto the Power socket 16 .
10. Remove the transport protection (plastic cable ties) from the Inner Air blow gun 22 .
11. Connect the compressor and external Air blow gun (Image 5):
a. Connect the T-type push-in pneumatic tting Nto the Pneumatic nipple 12 , and then, on both sides, the
Pneumatic tubings I,J.
b. Plug the Air blow gun Linto the left tubing and the compressor into the right tubing.
COMPRESSOR
L
N14
16
Image 5. Correct connection of the compressor and external Air blow gun.

Sinterit SANDBLASTER SLS User Manual | 11
12. Connect the Control Pedal (Image 6):
a. Connect the Control pedal pneumatic tubings Sto the jack ports:
• black tubing to the left port
• red tubing to the right port
b. Connect the Control pedal pneumatic tubings Sto the control pedal T:
• black tubing to the unmarked port
• red tubing to the port with red collar
black tubing
red tubing
P A
NO COLLAR (A) - BLACK TUBING
RED COLLAR (P) - RED TUBING
15
S
T
Image 6. Correct connection of the Control pedal pneumatic tubings to the Sinterit SANDBLASTER SLS.
ATTENTION!
• Before starting any work with an Abrasive material, always wear Protective Glasses,
Protective dust mask, and optional gloves.
• You can use use the Personal protection set included in the Dedicated powder tools.
Please check our website or contact our distributors for more information.
CAUTION!
• The Inner chamber grid 24 is heavy!
• Danger of crushing upper limbs when rising the Inner chamber grid.
13. Open the container with the Abrasive material. Gently pour it into the hole in the corner of the grid 24 . Add not more
than 10 kg / 22 lbs.
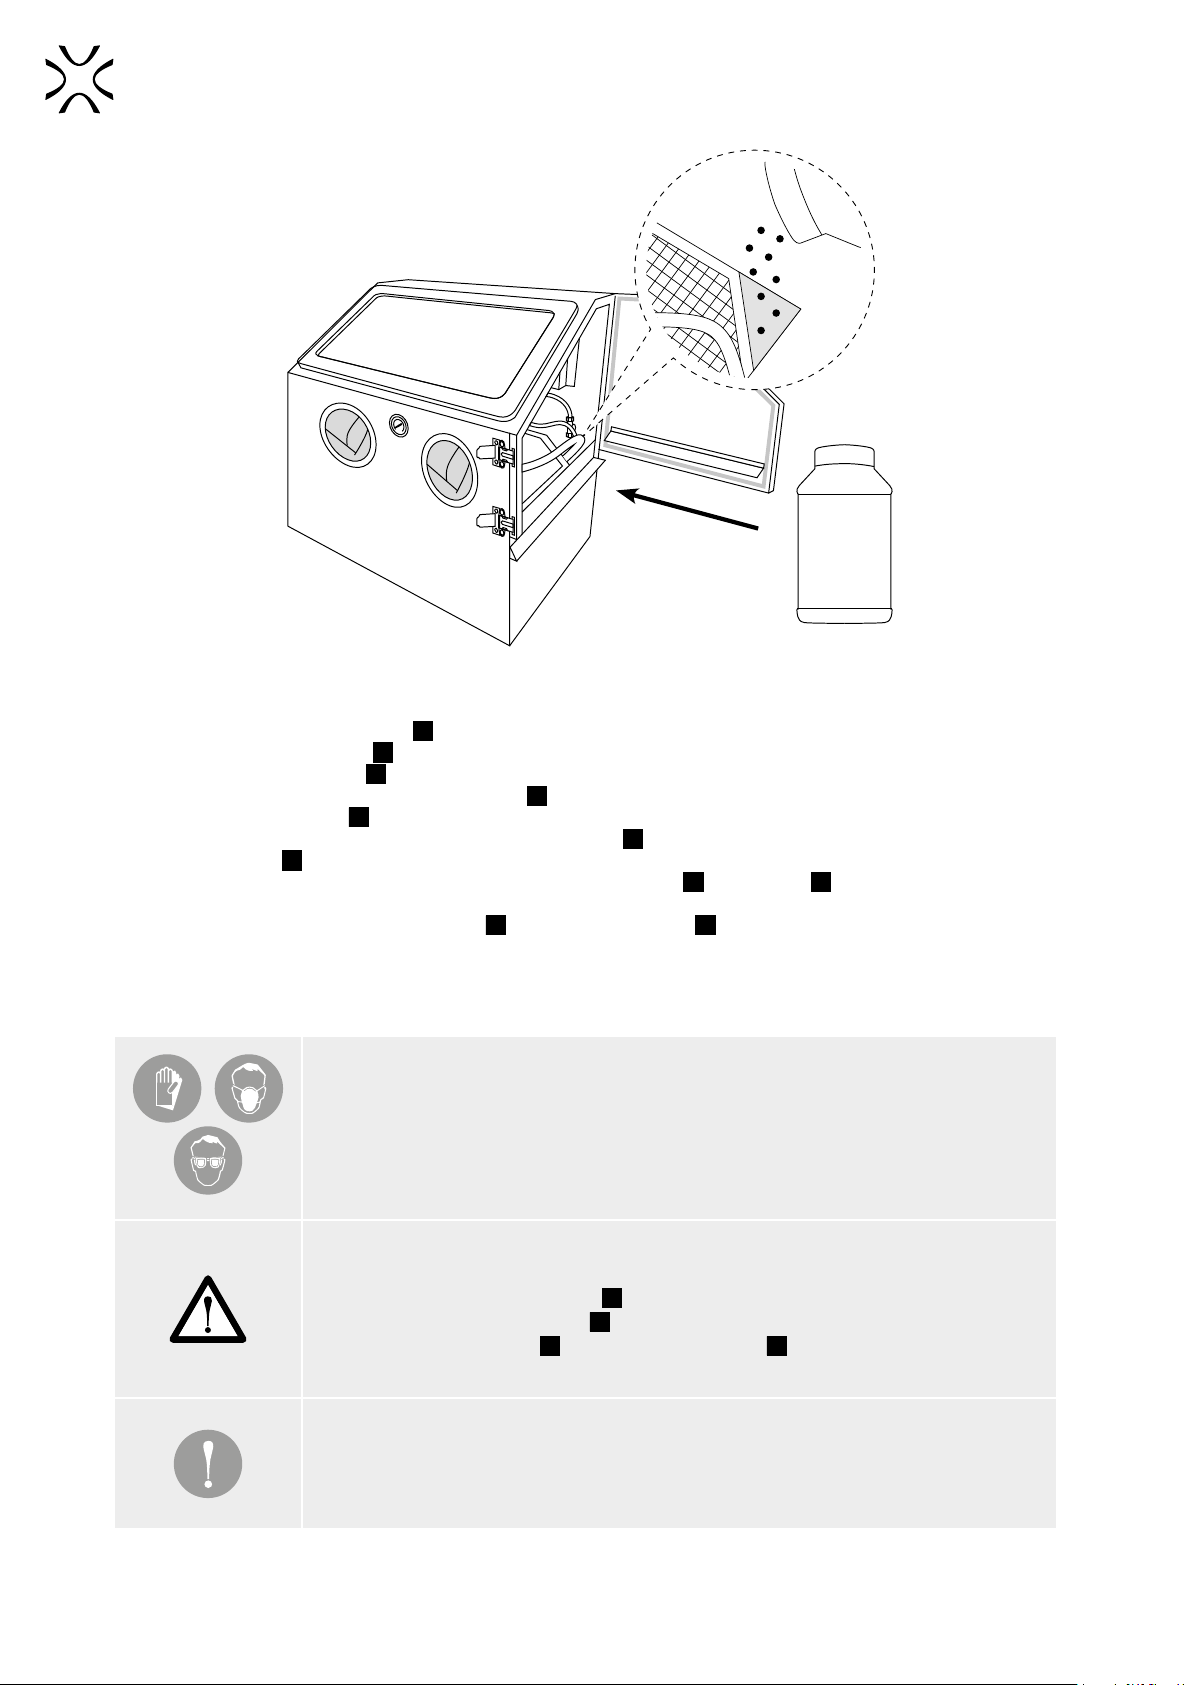
12 | Sinterit SANDBLASTER SLS User Manual
ABRASIVE
MATERIAL
8 kg
Image 6. Location of the hole in the grid for the Abrasive Material.
14. Check that the PE protective foil 25 adheres to the Viewing window. Clean it with a soft cloth if necessary.
15. Close the sandblaster door 10
rmly.
16. Connect the Power supply Ato the power source.
17. Turn on the sandblaster with the Power switch 1 .
18. Check that the LED light 18
is working.
19. Turn on the compressor. Press Foot-operated Control pedal T and check all pneumatic tubings and joints for leaks
in Static Nozzle 20
.
20. Check the tightness of connections in both Air blow guns (internal 20
and external L ) – press the handle of each
gun.
21. If there are any leaks, use 14 mm Wrench C or PVC protection tape Pto resolve the problem.
6. Sandblasting the printouts
ATTENTION!
• Before starting any work with Sinterit SANDBLASTER SLS, always wear Protective
glasses, Protective dust mask, and optional gloves.
• You can use use the “PERSONAL PROTECTION” set included with Sinterit Lisa printers.
ATTENTION!
• It is strongly forbidden to start sandblasting when the sandblaster is not fully closed
(open door) or when LED light 18
is not on.
• Make sure the Power switch 1 is OFF before plugging in the machine.
• The Inner Air blow gun 22 and external Air blow gun L should always point away from
the operator to the workpiece.
IMPORTANT!
• Before sandblasting make sure the printout is free from oil, water and moisture.
• The Abrasive material should be moist free. Moist grit clutters, which causes a bad
ow and clogging.
Sinterit SANDBLASTER SLS User Manual | 13
1. Turn on the compressor and the Sinterit SANDBLASTER SLS.
2. If you are working with Sinterit ATEX Vacuum Cleaner, turn it on.
3. Check all the pneumatic tubings and joints for leaks. If they appear, replace the element or seal it with PVC tape E
or Teon tape (not available in the set).
4. Open the sandblaster door 8 and insert the printout into the chamber 9.
5. Place the printout on the grid 24 under the Static nozzle 20
.
6. Close the sandblaster door 8 rmly.
IMPORTANT!
• Use the Inner Air Blow Gun 20 only for large and solid prints.
• The Static nozzle 20
is ideal for small and fragile prints.
• By default, ceramic nozzle no. 5 is installed in the Inner Air Blow Gun. You can also choose
to use a larger or smaller ceramic nozzle (available in the Accessory box).
• Nozzles smaller than No. 5 do not work precisely with the Sinterit Abrasive material.
• A bigger size ceramic nozzle gets the job done faster because it can blast a larger surface,
this also causes a higher air consumption. Make sure you have the appropriate compressor.
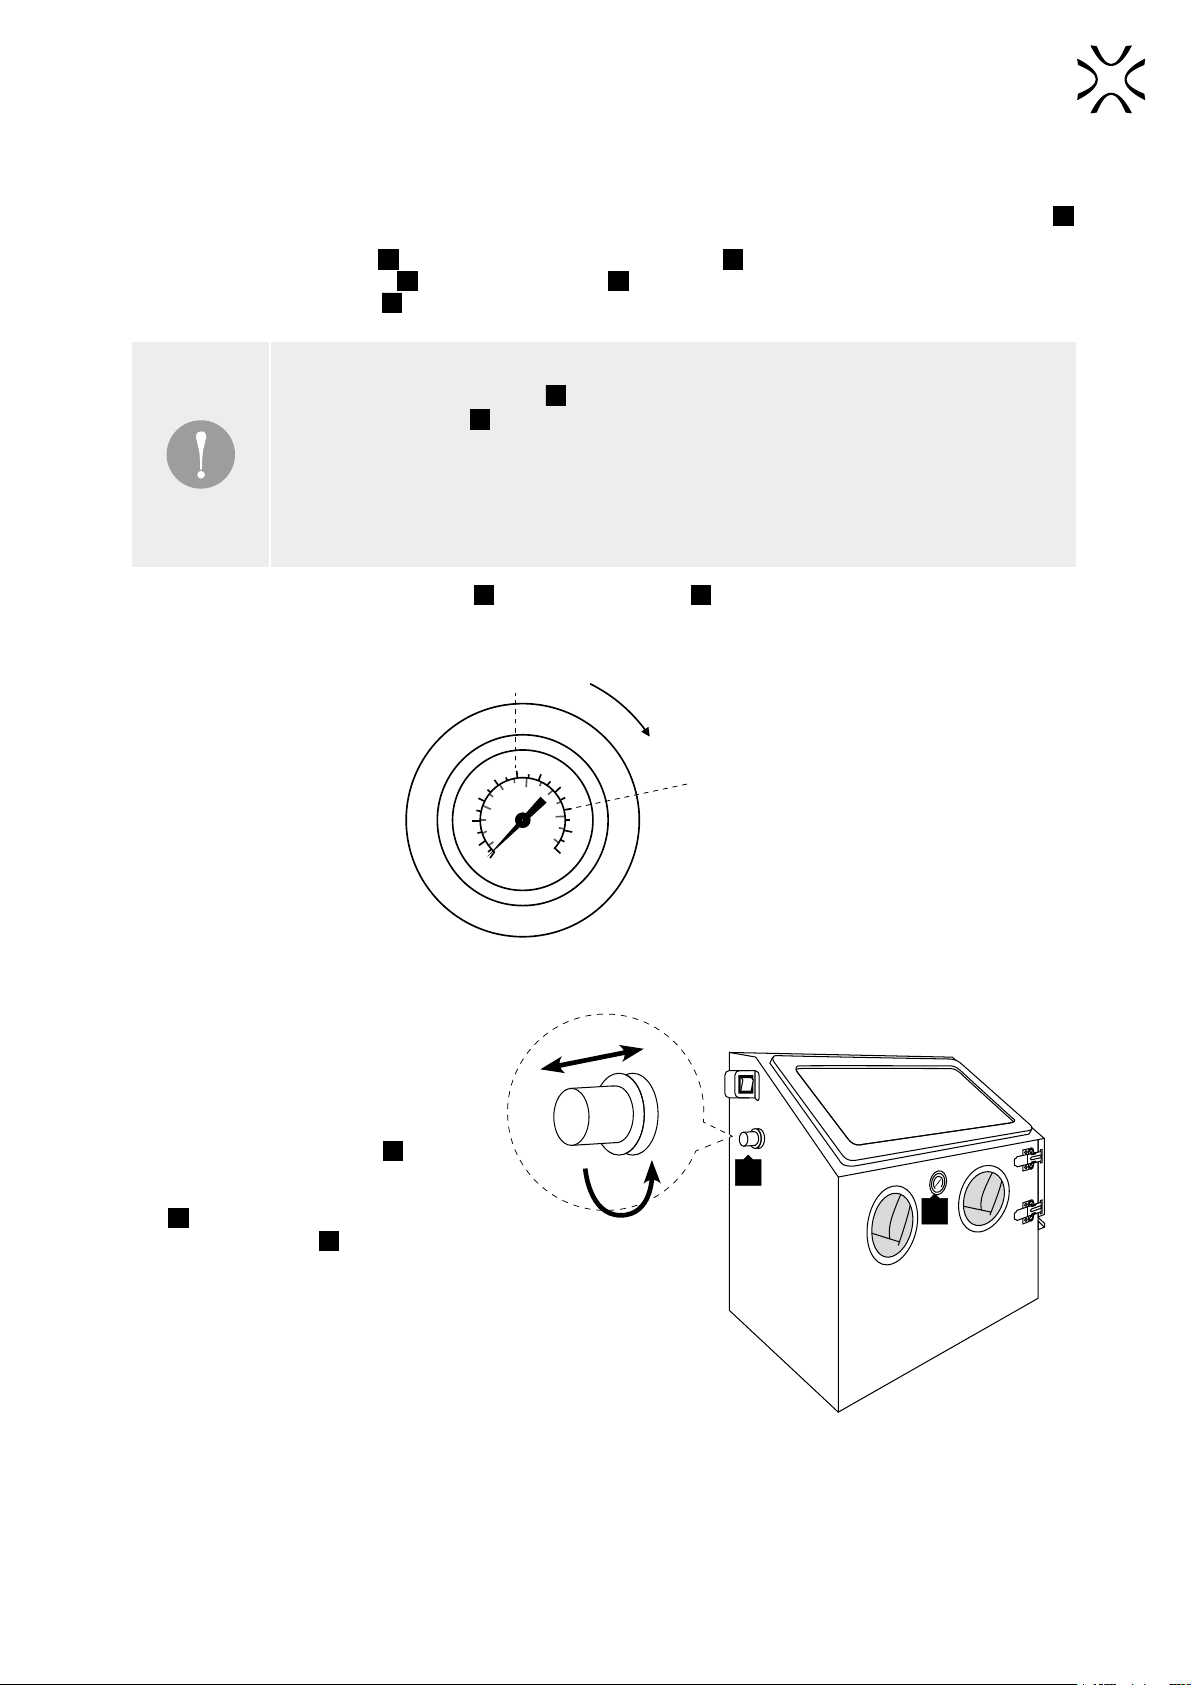
7. Use the Pneumatic pressure regulator 3 and the Pressure gauge 5 and set the work pressure.
46
8
10
0
2
40
80
120
EN 337
psi
bar
5 bar (72.5 psi)
open work structure,
fragile objects
8 bar (124.7 psi)
solid, thick-walled
objects
Image 7. Setting the appropriate pressure depending on the type of object.
8. In order to adjust the cleaning
intensity in Static nozzle 20 , unlock
the regulating device by pulling
the Pneumatic pressure regulator
2 and use the indications of the
Pressure gauge 5 to select an
appropriate value. After performing
the adjustment, lock the Pneumatic
pressure regulator by pressing the
knob (Image 8).
2
5
Image 8. Unblocking the pneumatic pressure regulator.

14 | Sinterit SANDBLASTER SLS User Manual
IMPORTANT!
• The Inner Air blow gun 20
has no pressure adjustment - it is used to sandblast larger surfaces
and elements.
9. Put your hands in the Protective rubber gloves 4 , grab the printout and start cleaning by pressing the Control
pedal T .
• When using the Inner Air Blow Gun: do the same, but instead of using the Control pedal, press the handle of
the Inner Air blow gun and start sandblasting.
10. Sandblast the printout with a continuous stream of air, moving the printout in circular motions until all unnecessary
powder is removed.
• Keep the Inner air blow gun 20
at an angle of 45-60 degree towards the work piece at a distance of 10-15 cm
with the nozzle pointing towards the backside of the sandblaster.
• Never hold the Inner Air Blow Gun in a 90 degrees toward the workpiece. This causes the grit to rebound back
into a spray, which causes a less effective spray. This also causes extra wear to the gun and PE protective foil
19
.
11. After cleaning the printout, wait a moment for the dust to fall down. Open the door and remove the sandblasted
object.
12. Close the door.
13. All remaining powder and abrasive material can be blown out of the printout with an external Air blow gun L .
14. After nishing work, turn off the pressure to 0 bar (0 psi) and turn off the sandblaster.
7. Maintenance of the Sinterit SANDBLASTER SLS
WARNING!
Before replacing the accessories or beginning the assembly, repair, transport, or
any form of maintenance, disconnect the Sinterit SANDBLASTER SLS from the
compressor, turn off the machine and unplug it from the power source.
Check before each use:
1. Check the sandblaster chamber 9 before every use for damaged and/or deformed parts.
2. Check all pneumatic tubings for wear and tear and check if the Static nozzle 19
and Inner air blow gun’s nozzle 20
are not too worn.
3. Check if the Air lter 11
works well, clean it if necessary if the door 10
closes properly (check the door gasket 7 ).
4. Clean the window (outside and inside) and the parts of the sandblaster with a soft cloth. Do not use any solvents
for cleaning!
5. Prevent moisture from getting into the Abrasive material as it may clog the nozzles.
6. In case of a malfunction/defect, do not use the sandblaster until it has been repaired.
7.1 Replacement of the Abrasive material
If the Abrasive material is clotting, that means there is moisture in the compressed air or there is moisture/oil in the
system. This leads to clogging and an uneven spray.
It could also be that there is too much debris in the Abrasive material. This can be solved by ltering/replacing it.
When the spray is often disrupted, place a thumb (WITH PROTECTIVE RUBBER GLOVES ON) over the Static Nozzle
20
and (press rmly) and depress the Control pedal K for a few seconds. Now the air blows back into the suction
pneumatic tubing, which can dissolve possible obstructions.
STOP!
The user is responsible for disposing of used Abrasive material in accordance with
applicable laws.
Sinterit SANDBLASTER SLS User Manual | 15
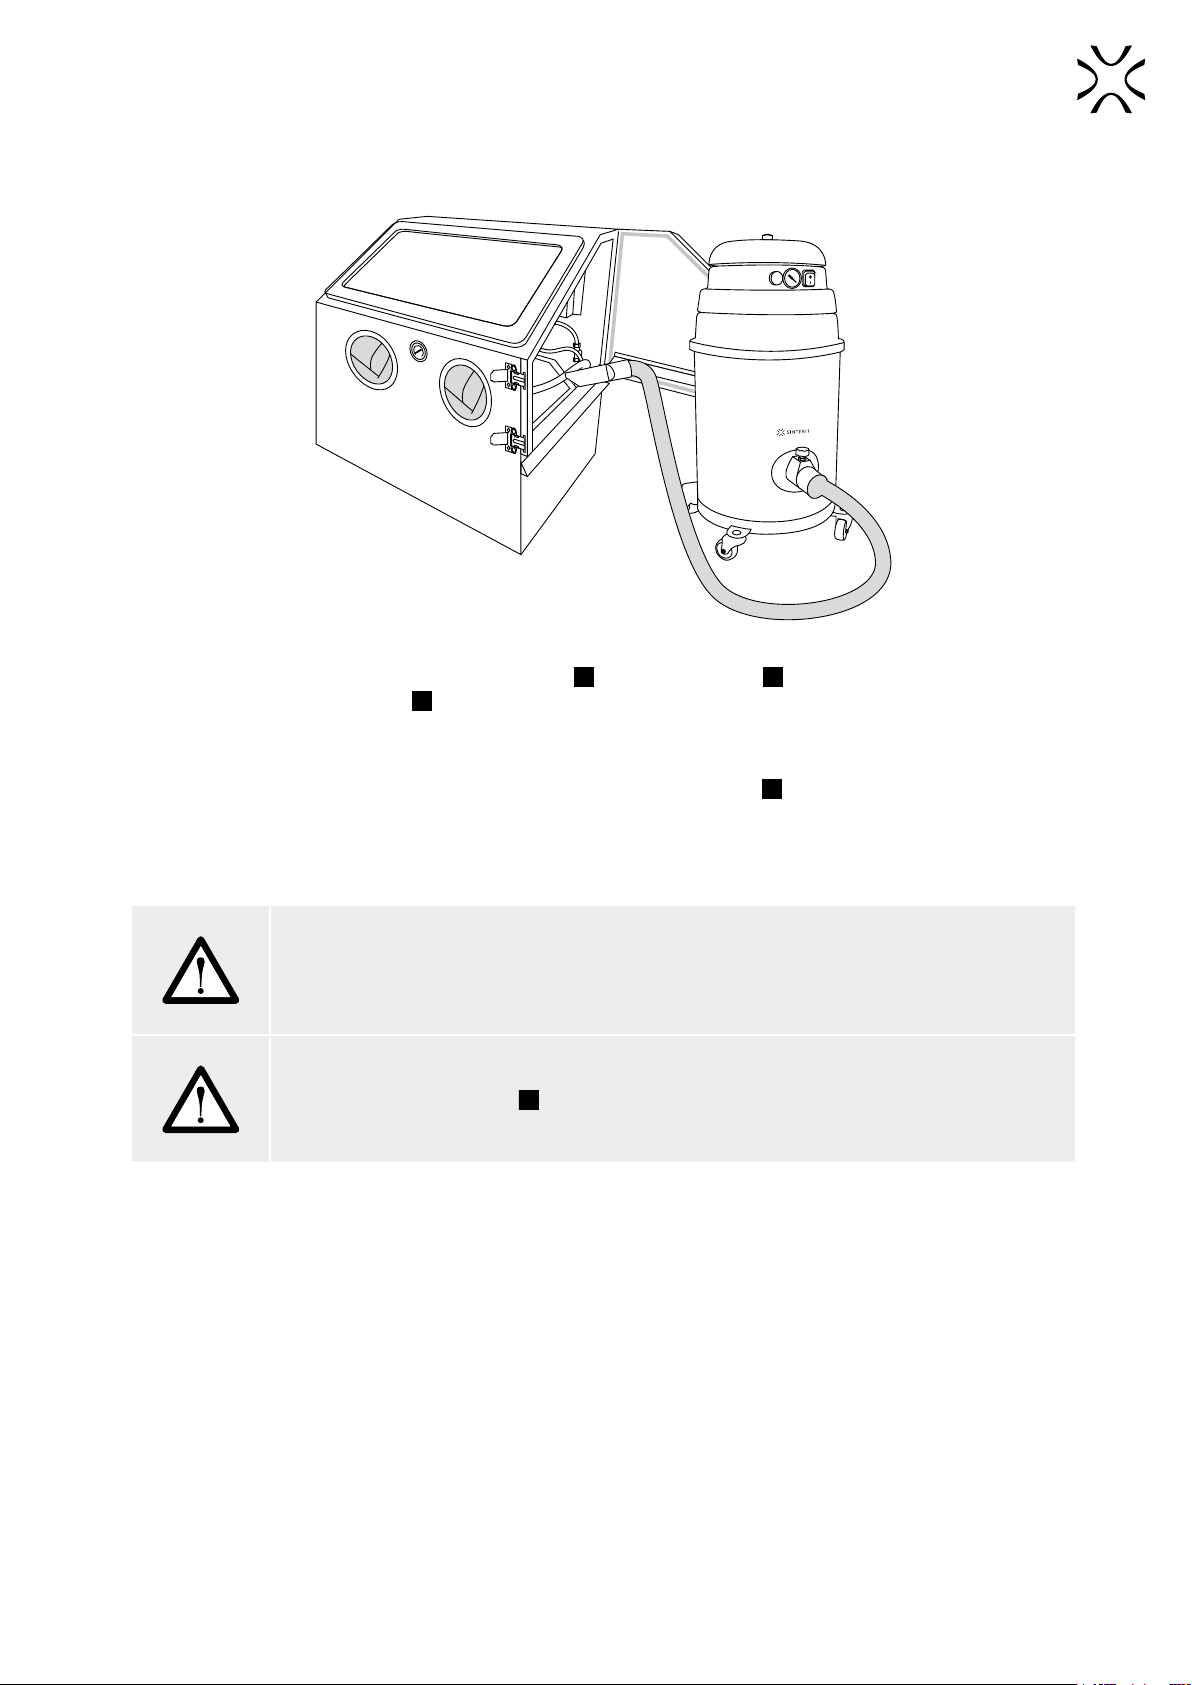
7.1.1 Exchange of Abrasive material with Sinterit ATEX Vacuum Cleaner
To remove the used Abrasive material from the chamber we recommend using Sinterit ATEX Vacuum Cleaner.
Image 9. Remowing used Abrasive material with ATEX Vacuum Cleaner.
1. Disconnect the sandblaster from the power supply 12
and the compressor 14
.
2. Gently lift the sandblaster grid 24
and insert the rubber nozzle of the vacuum cleaner into the chamber.
3. Turn on the vacuum cleaner and remove all used Abrasive material, also clean the remaining parts in the chamber
(Air lter, pneumatic tubes, housing, Protective rubber gloves).
4. Gently transfer the whole contents of the vacuum cleaner into the sealed container. Treat it as industrial waste.
5. Pour new Abrasive material into the hole in the corner of the Chamber grid 24
.
6. Connect the Power supply, compressor and vacuum cleaner.
7.1.2 Standard exchange of Abrasive Material
WARNING!
A second person is required to help with the standard Abrasive material change. The Sinterit
SANDBLASTER SLS with the Abrasive weighs approx. 40 kg – improper maintenance (without
the help of a second person) may cause injury.
CAUTION!
• The Inner chamber grid 24 is heavy!
• Danger of crushing upper limbs when rising the Inner chamber grid.

16 | Sinterit SANDBLASTER SLS User Manual
1. Disconnect the sandblaster from the Power supply
and the compressor.
2. Remove the grid 24
carefully from the chamber 9 .
Put it on the work tray (so as not to contaminate the
workplace).
3. Prepare a container for used Abrasive material.
4. The plastic cork for removing the Abrasive material
from the chamber is located iat the bottom. (Image
10).
5. With the help of another person, slide half of the
sandblaster out of the worktop.
6. When one person is holding the sandblaster, the other
person must place the container under the bottom of
the sandblaster and unscrew the cork.
7. When the chamber of the sandblaster is empty, insert
the cork in place and move the sandblaster to the
workplace. Treat used Abrasive material as industrial
waste.
8. Pour new Abrasive Material into the hole in the corner
of the Chamber grid 24
. Add not more than 10 kg/22
lbs.
9. Put the grid in place. Be careful not to damage the
components inside the sandblaster chamber.
10. Connect the Power supply and the compressor.
Image 10. Removing used Abrasive material.
7.2 Replacement of the ceramic nozzle from the inner air blow gun
1. Disconnect the sandblaster from the Power supply 12
and the compressor 14
.
2. Unlock the door locks 6 and open the Door 8 .
3. Remove the Inner air blow gun 22 .
4. Unscrew the nozzle lock and pull the ceramic nozzle out of it.
5. Clean the Inner air blow gun of any possible dirt and powder.
6. Insert the new ceramic nozzle Dinto the nozzle lock nut (remember, that they have different dimensions).
7. Tighten using the supplied wrench F . Put the Inner air blow gun back into the sandblaster.
7.3 Replacement of protective rubber gloves
1. Disconnect the sandblaster from the power supply and the compressor.
2. Unlock the door locks 6 and open the Door 8 .
3. To loosen the metal clamp around Protective rubber glove 6 , twist off the clamping screw.
4. Gently remove used Protective rubber gloves.
5. Clean the surface thoroughly from dirt.
6. Fit the Spare Protective Rubber Gloves M.
7. Mount the metal clamp back in place and tighten the clamping screw.
7.4 Maintenance of the Viewing window
1. Use a soft cloth or paper towels to clean the sandblaster Viewing window 3 .
2. When the Viewing window 3 itself is damaged, replace it by safety glass with the same thickness and
measurements. Contact with Sinterit Support.
3. Poor visibility inside the sandblaster can be caused by damaged PE protective foil 19 , which is placed on the
Viewing window 3 (inside the chamber). This can easily be replaced by new foil (the ve spare PE protective foils
Uare available in additional accessories of the Sinterit SANDBLASTER SLS).
• Remove the old PE protective foil 19
.
• Clean the inside of the Viewing window 3 with a soft cloth (it is best to soak it with alcohol).
• Wait until all it dries and carefully place the new PE protective foil U .

Sinterit SANDBLASTER SLS User Manual | 17
30
34
23
23
29
27
28
31
32
33
Image. 11. Detailed cross-section through the Static nozzle 19 .
27.Static Nozzle seat / 28.G1/4-45 degree bend / 29.Rubber gasket / 30.Venturi tube / 31.Static Nozzle body /
32.Ceramic nozzle / 33.Nozzle lock nut / 34.Pneumatic tubing connector / 23.Static Nozzle Pnaumatic tubing
8. Troubleshooting
Fault symptoms Possible Causes Remedial actions
Excessive dust in the Sinterit
SANDBLASTER SLS.
Blocked vent or airow. Clean the vent and keep it away from the wall.
Leakage at the pneumatic
connections.
Tighten up the connections and check that they
are all correct.
Too much Abrasive material in
the sandblaster. Remove the excessive Abrasive material.
Inconsistent effects of the
Abrasive material. Moisture in the sandblaster. Replace the Abrasive material.
Incorrect speed or inecient
sandblasting.
Abrasive material running out. Replace the Abrasive material.
Pressure too low. Increase the inlet pressure and check that the air
regulator is fully open.
The nozzle does not turn off.
Incorrectly connected control
pneumatic tubings. Connect the control pneumatic tubings properly.
Lack of integrity in the control
tubings.
A ow of abrasive is too weak. The Static Nozzle is clogged.
1. Remove the ceramic nozzle and clean it with
compressed air.
2. Install it back.
A ow of abrasive is weak and
the nozzle has been cleaned.
1. Remove the ceramic nozzle, close the
sandblaster and start the abrasive ow.
2. This process should remove every object that
is in the air owing duct.
3. Install the ceramic nozzle back.
Check if the Venturi tube 31
is correctly installed
in the Static Nozzle or if it is not clogged.
Check if the Venturi tube is correctly installed in the Static Nozzle or if it is not clogged.

18 | Sinterit SANDBLASTER SLS User Manual
ATTENTION!
Any other problems not described in this manual should be reported to Sinterit Support by
contacting through:
• email: [email protected]
• www: sinterit.com/support-page/
• phone: +48 570 702 886.
9. General legal information
Where this manual refers to Sinterit or the Company, this means Sinterit sp. z o.o. with its legal seat in Krakow, registered
by the District Court for Kraków-Śródmieście in Krakow, XI Commercial Division of the National Court Register under
number: 535095, NIP (tax number): 6793106416, with the share capital for a date of publication of this manual of PLN
102,050 (say: one hundred and two thousand and fty).
This document contains material protected under copyright and industrial property laws. This means that the document
may not be, including but not limited to, reproduced or modied without the consent of Sinterit.
This manual serves to assist you in the correct use of the device, perform basic maintenance and, if necessary, to solve
simple problems, allowing you to maintain the device in a good condition.
This manual contains content exclusively for the provision of information and the use by individuals professionally
trained and engaged in the operation and maintenance of the equipment described below.
The information contained in this document is intended for use only with the product called Sinterit SANDBLASTER SLS.
Due to the constant development of Sinterit’s products the information contained in this manual, specications and
markings are subject to change without notice.
10. Disclaimer
Sinterit is not responsible for any use of this information in relation to other products.
Sinterit is not liable for any damages, including but not limited to losses or lost prots, resulting from the use of any
materials (consumables) other than those provided to the purchaser by Sinterit.
Sinterit is not liable to the purchaser of the product or any third party for any damages, including but not limited to
losses or lost prots resulting from improper use of the product, particularly not in accordance with this manual, or
modications or repairs unauthorised by Sinterit or improper maintenance.
Although every effort has been taken to provide accurate information about the product, Sinterit assumes no responsibility
for any incorrect information or omission. Sinterit reserves the right to correct any errors and disclaims any liability in
situations resulting from these errors.
Further limitations or exclusions of Sinterit`s liability may result from the applicable laws or agreements entered into with
the purchaser of the products.
11. Trademarks
Sinterit logo is a registered trademark of the Company.

Sinterit SANDBLASTER SLS User Manual | 19
12. Terms of warranty
The terms of the warranty are set forth in the agreement between the buyer and the Company.
In case of a purchase made in the Sinterit online shop, the terms of the guarantee are specied in the Terms and
Conditions, subject to the acceptance of the Customer before placing an order.
In case of purchases made outside the Sinterit online store, the warranty terms may be specied in the offer, or in another
form chosen by the Company to provide the customer with relevant information before making a purchase decision.
Sinterit’s warranty does not cover including but not limited to:
• damages, abnormalities or malfunction caused by a client or any third party,
• damages, abnormalities or malfunction caused by inappropriate use, effects of force, insucient or inappropriate
maintenance, abnormal operating conditions, incorrect installation or inadequate servicing,
• damages, abnormalities or malfunction caused by dismantling, alterations, tuning or other changes of the product
by a client or any third party made without written consent of Sinterit,
• damages, abnormalities or malfunction caused by or related to use of consumables other than those being supplied
by Sinterit,
• damages, abnormalities or malfunction caused by or related to use of product against instructions/manuals or
safety regulations,
• damages or abnormalities Sinterit is not liable for, according to the applicable law,
• damages exceeding the price paid by the client,
• costs incurred by the client in connection with the conclusion of the product sale agreement as well as storage and/
or insurance of products,
• damages of property caused by the defect of the product,
• loss of prots,
• incidental, indirect, consequential damages.
The warranty does not cover any cleaning of working parts
13. Technical support
The latest information, technical support and versions of the manual are available by contacting us through:
• email: www.sinterit.com/support-page
• phone: +48 570 702 886
The list of distributors and technical support in specic countries can be found at www.sinterit.com/contact

SINTERIT Sp. z o.o.
ul. Nad Drwina 10 bud. B3, 30-741 Krakow, Poland
www.sinterit.com
Contact: +48 570 967 854
Table of contents
Other SINTERIT Industrial Equipment manuals


Popular Industrial Equipment manuals by other brands

Zimmer
Zimmer GEP2000IL-43 Series Installation and operating instructions

Siemens
Siemens Power M12 Plug PRO Compact operating instructions

Flexco
Flexco XP Series Safety, operation and maintenance manual

SCHUNK
SCHUNK EOA-UR3510-EGL90 Assembly and operating manual

ABB
ABB HT576822 Operation manual

Multi-Mover
Multi-Mover 3XL 40TO User manual and parts list


Siemens
Siemens Gigaset S2 Professional operating instructions

Lippert
Lippert Curt 16564 installation manual

Sino Instruments
Sino Instruments HS711A user manual

Ebinger
Ebinger SM 700-230 User instructions

HYTROL
HYTROL HSQ Installation and maintenance manual

Siemens
Siemens SIMATIC ET 200SP HA Equipment manual