Sirona NITRASEAL User manual

båÖäáëÜ
kfqo^pb^i
qÜÉêã~ä=ëÉ~äÉê
léÉê~íáåÖ=fåëíêìÅíáçåë
5
NITRASEAL

General information Sirona Dental Systems GmbH
Operating Instructions NITRASEAL
61 79 761 D 3367
2D 3367.201.02.01.02
General information
Dear customer, We thank you for purchasing your NITRASEAL Thermal
sealer from the Sirona company.
The technical documentation supplied is also part of the
product. You should always keep this documentation
within reach.
These Operating Instructions describe your Thermal
sealer with maximum possible equipment.
Prior to start-up, you must read all Operating Instructions
to familiarize yourself with theThermal sealer.
To prevent any personal injury or material damage,
pay special attention to any notes printed in bold type or
marked in one of the ways indicated below:
Additional information, explanation or supplement
The information provided under this keyword directly
concerns the functioning of the product and/or warns
against possible operating errors.
This warning symbol warns against possible hazards for
the product or the user.
In case you get stuck despite having thoroughly studied
the Operating Instructions, please contact your dental
depot.
Your Hygiene Team
NOTICE
i
CAUTION
WARNING

Sirona Dental Systems GmbH Contents
Operating Instructions NITRASEAL
61 79 761 D 3367
D 3367.201.02.01.02 3
båÖäáëÜ
Contents
1Warning and safety information ................................................................................ 4
2Technical data ............................................................................................................. 6
3Familiarisation ............................................................................................................. 7
3.1 Devices used in the NITRASEAL Thermal Sealer
Model provided with digital adjustment............................................................................................. 7
3.2 Dimensions ....................................................................................................................................... 8
4Installation ................................................................................................................... 10
4.1 Preliminary information ..................................................................................................................... 10
4.2 To install the equipment follow these Instructions ............................................................................ 10
5Operation ..................................................................................................................... 11
6Adjustments................................................................................................................. 13
7Troubleshooting .......................................................................................................... 14
8Alarms .......................................................................................................................... 15
9Maintenance................................................................................................................. 15

1 Warning and safety information Sirona Dental Systems GmbH
Operating Instructions NITRASEAL
61 79 761 D 3367
4D 3367.201.02.01.02
1 Warning and safety information
Intended use Even when it is not strictly necessary, the instrument
wrapping indicates a special care paid to the hygiene
and sterilisation and it is especially effective for a proper
infection safety.
Wrapping the instruments means to preserve their ste-
rile condition also during the period following the sterili-
sation and until their use on the patient.
A properly sealed envelope makes up a protection bar-
rier that prevents contamination from the external envi-
ronment.
For this to be true, it is necessary to use envelopes that
have been properly sealed.
The NITRASEAL Thermal Sealer guarantees the best
efficiency and reliability for the sealing system, avoiding
the risk of overheating and burning.
Inexperienced staff can easily use this equipment with a
quick training.
General recommendations In order to maintain the instruments for a long time and
avoid problems it is recommended to read the following
instruction carefully.
1. Wrap the instruments one by one.
2. If more instruments must be wrapped together make
sure to place instruments of same material (on the
contrary, dark spots could appear at the contact
point due to electrolysis).
3. It is recommended to use good quality paper and
propylene material. The paper surface (more po-
rous) must allow the vapour exit. The NITRASEAL
envelopes has been widely tested in order to give
the best results both for quality and durability.
4. For the sterilisation of wrapped instruments, it is ne-
cessary to use longer sterilisation times. The vapour
must actually filter within the envelopes and this re-
quires longer times.
5. Most autoclaves normally require a time of 12 minu-
tes at a temperature of 134 °C and 30 minutes at
121 °C.
6. The envelopes should be placed inside the autocla-
ve with the paper surface up. This allows the vapour
exit easier during the drying phase.
7. Do not overload the sterilisation chamber! Leave a
space for steam circulation.
8. In case of sterilisation of wrapped hand pieces and
turbines, try to arrange the envelopes so that the
head of the hand piece is turned towards the upper

Sirona Dental Systems GmbH 1 Warning and safety information
Operating Instructions NITRASEAL
61 79 761 D 3367
D 3367.201.02.01.02 5
båÖäáëÜ
surface of the chamber. This will allow the lubricant
in excess to filter out protecting the life of the instru-
ments.
9. If the autoclave does not have an efficient drying
system, the envelopes could remain damp. In this
case, it is recommended not to use the wrapping
technique, since there is a risk of damaging the ins-
truments. Consult your supplier to work out this pro-
blem.
Safety information Before using Your NITRASEAL Thermal Sealer, read
these safety instructions carefully. Non-compliance with
these standards could cause incidents or damage to the
appliance.
• Do not introduce fingers in the sealing area when the
machine is on.
• Do not introduce fingers under the protection cover
of the sealing area when the pressure lever is
lowered.
• Do not insert your fingers in the sliding surface of the
cutter.
• Keep the area around the sealer clean and dry.
• Never disassemble the NITRASEAL thermal sealer
when it is powered, since the high internal voltage
could be dangerous.
• In case of impossibility for disconnecting the power,
turn to OFF the breaker of the electrical switchboard
and place a sign Work in Progress on the breaker if
this is far and not visible by the person that is carry-
ing out the maintenance.
• Clean the appliance with a soft damp cloth after un-
plugging the power supply cable. Do not use sol-
vents on the product label.
• Check that the machine is electrically grounded in
compliance with the standard of the country of instal-
lation.
• Do not remove the back label and check that the
sealer is supplied with proper voltage value.
Electrical connection
Check that the power data indicated on the label on the
rear side of the sealer corresponds to the values availa-
ble in the place of installation.
The equipment must be connected through the mains
cable to a socket provided with a ground connection in
compliance with the standard of the country of installa-
tion.
CAUTION
Do not bend the cable and do not place any object on it.
2 Technical data Sirona Dental Systems GmbH
Operating Instructions NITRASEAL
61 79 761 D 3367
6D 3367.201.02.01.02
2 Technical data
Net weight 10 kg
Power supply 230 V/50 Hz
Power 200 W
Fuse 5 x 20 4A T
CE mark
Sirona Dental Systems GmbH 3 Familiarisation
Operating Instructions NITRASEAL 3.1 Devices used in the NITRASEAL Thermal Sealer Model provided with digital adjustment
61 79 761 D 3367
D 3367.201.02.01.02 7
båÖäáëÜ
3 Familiarisation
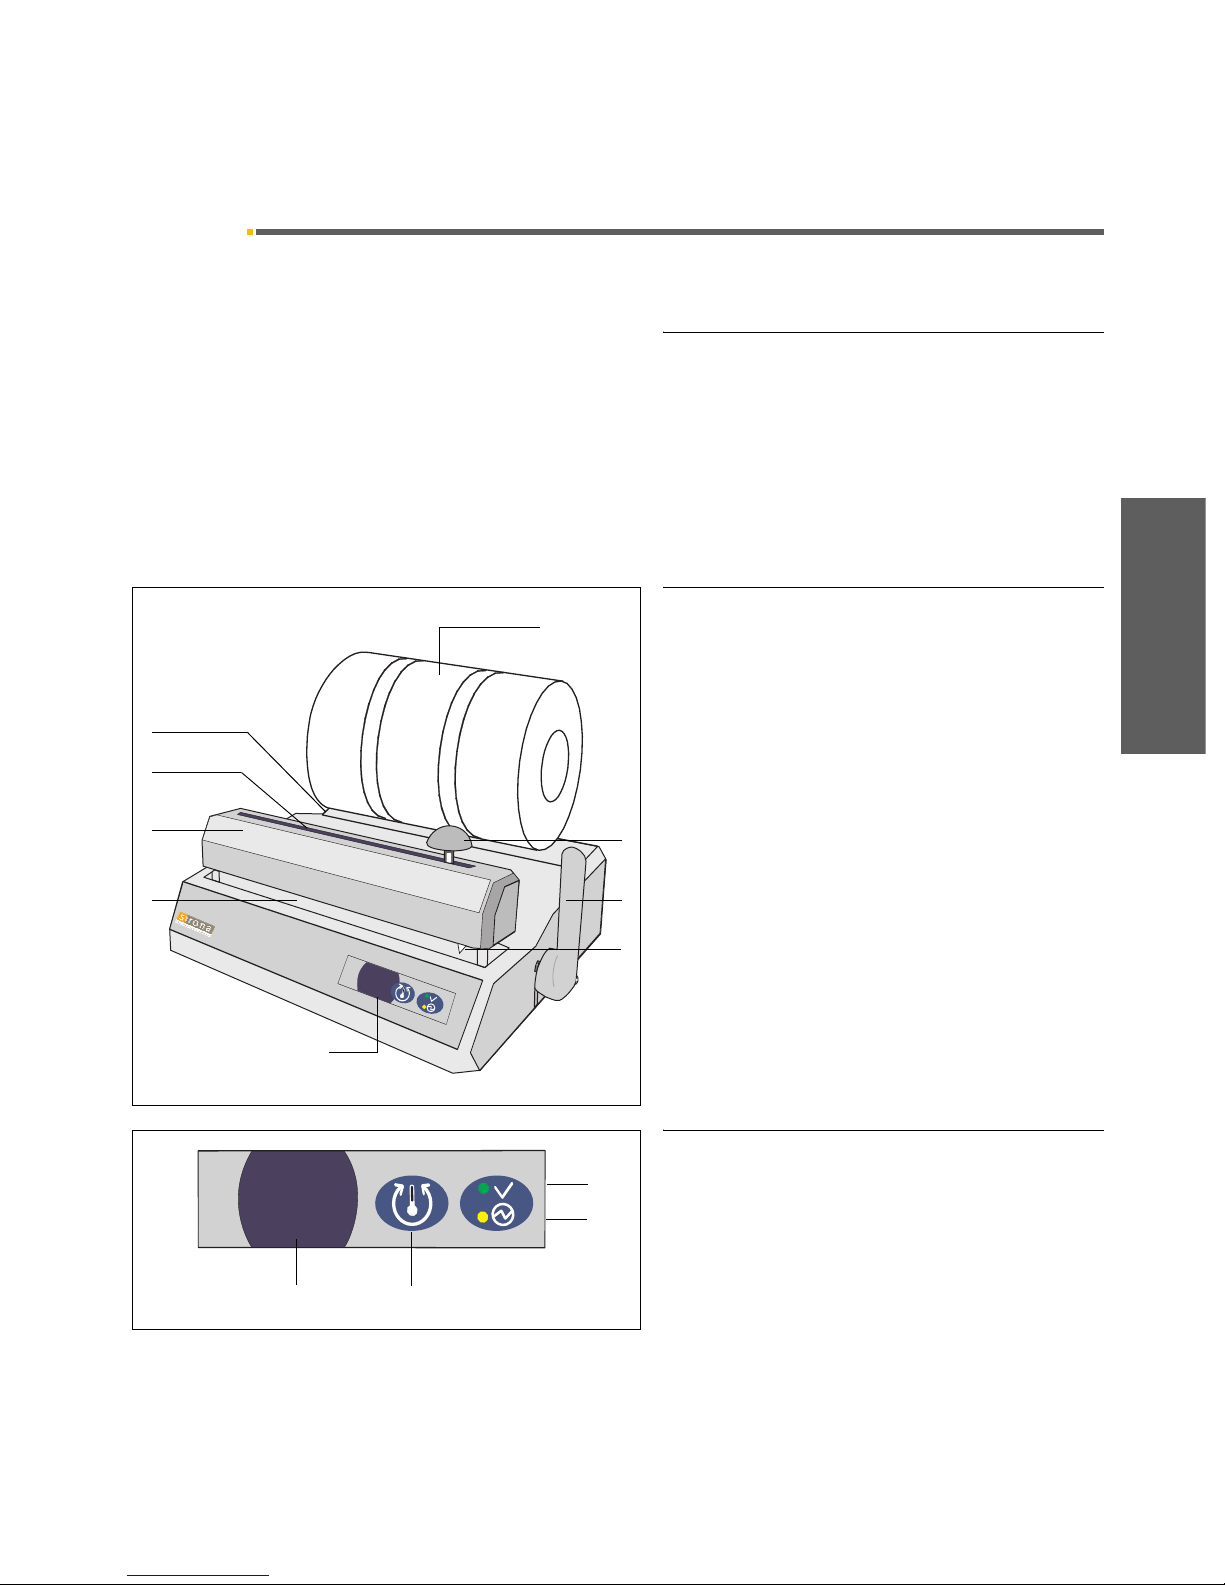
3.1 Devices used in the NITRASEAL Thermal Sealer
Model provided with digital adjustment
Main features
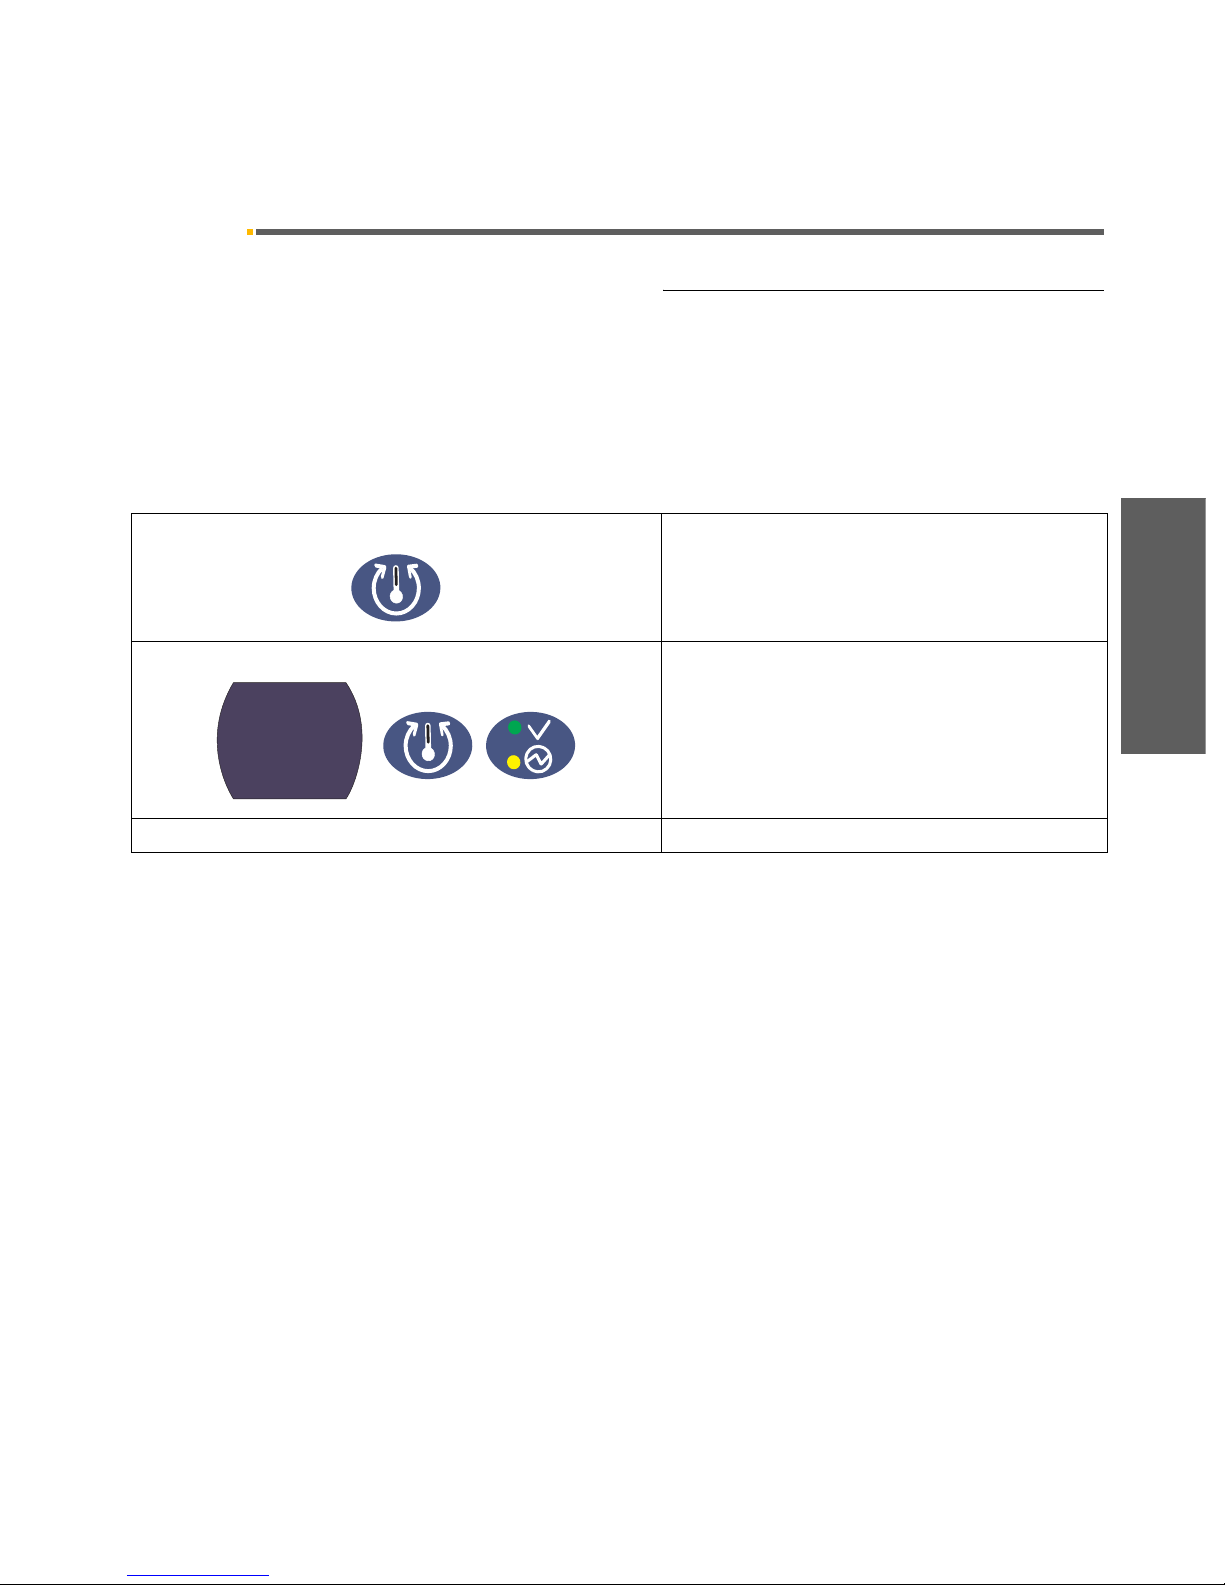
• 12 mm sealing, standard-compliant
• Automatic control heating resistance
• Return of the blade after cutting
• Automatic sealing start by pulling down the lever,
and with acoustic and visual indication (flashing of
the yellow Led)
• Automatic sealing stop, with acoustic and visual indi-
cation
Overview NITRASEAL
Digital control panel
5
NITRASEAL
NITRASEAL
5
6
72
3
8
4
9
11Rolls
2 Cutter knob
3 Sealing lever
4 Retractable cutter
5 Roll holder
6 Soldering movable block
7 Cutter sliding guide
8 Heating resistance
9 Digital control panel
5
NITRASEAL
10 11
12
13
10 Temperature display
11 Key for soldering temperature adjustment
12 Mains on green LED
13 Soldering yellow LED
3 Familiarisation Sirona Dental Systems GmbH
3.2 Dimensions Operating Instructions NITRASEAL
61 79 761 D 3367
8D 3367.201.02.01.02
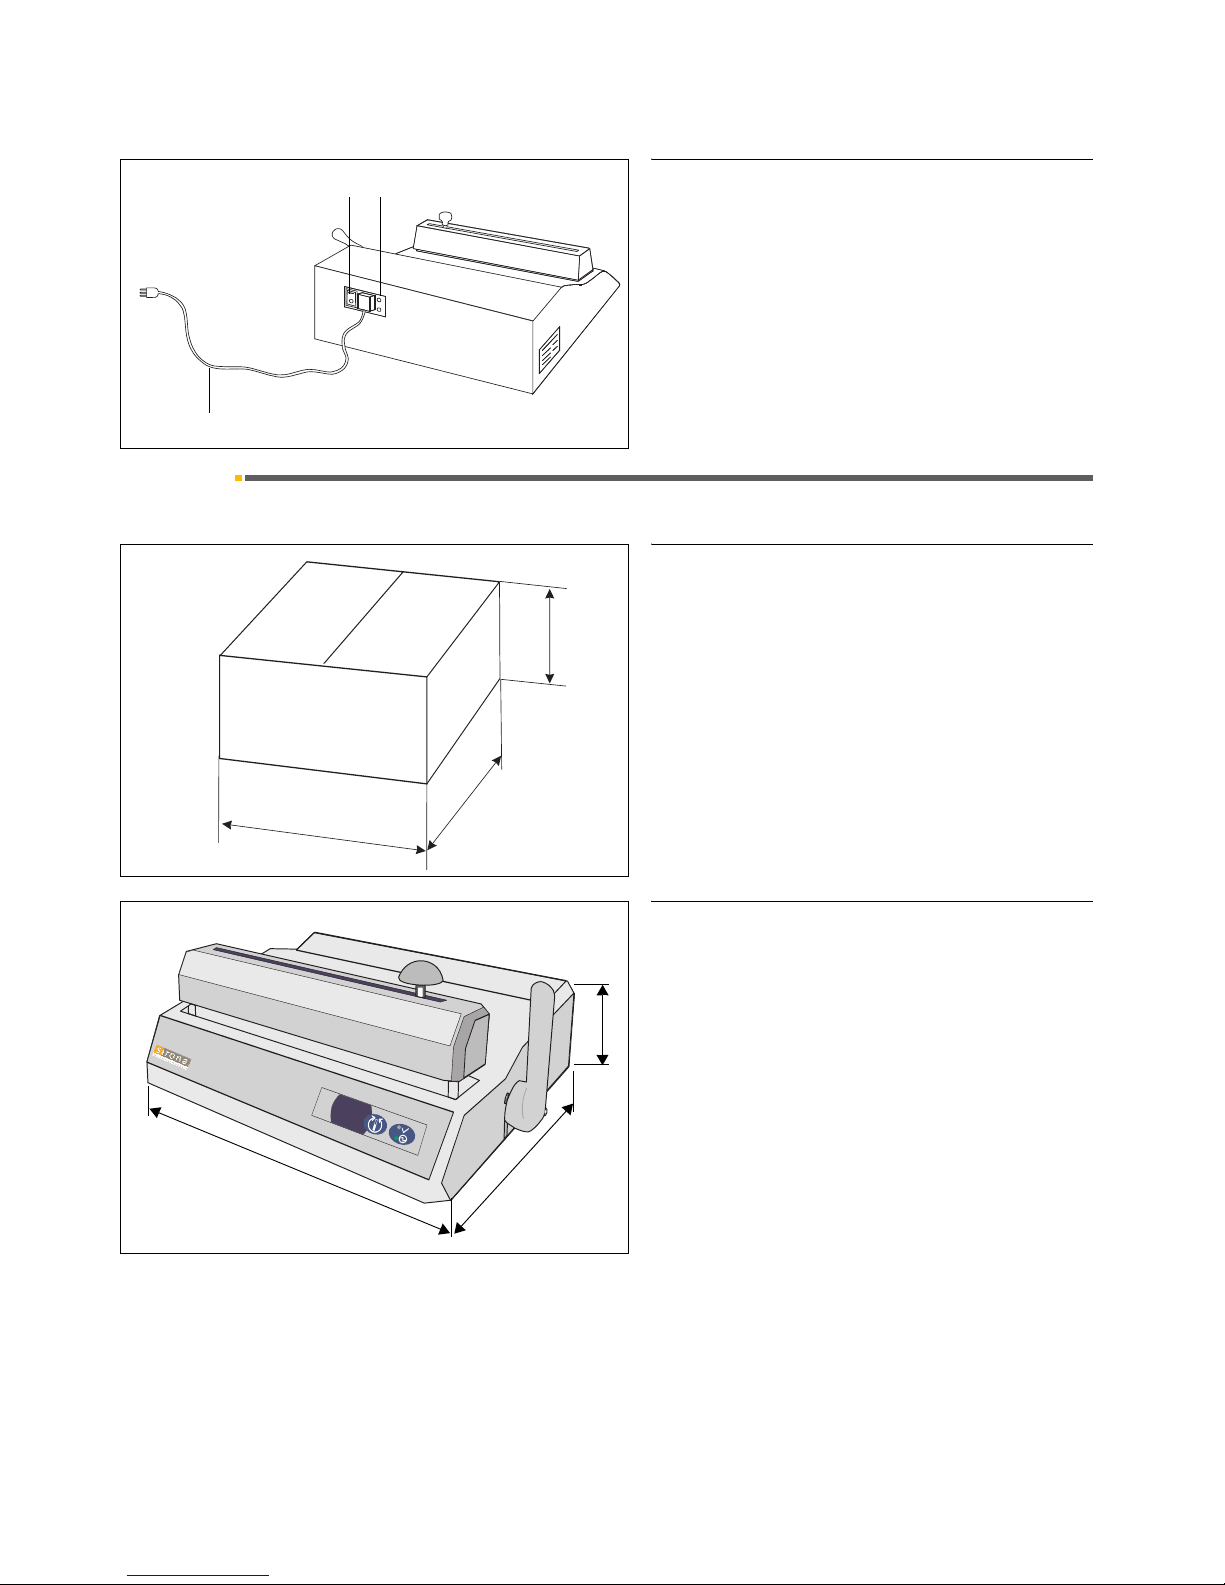
Back NITRASEAL
3.2 Dimensions
Package dimensions and weight
External dimensions
14 15
16
14 ON/OFF switch
15 Fuse holder
16 Power cable
500
400
250
Width 400 mm
Depth 500 mm
Height 250 mm
Gross weight 10,7 kg
5
NITRASEAL
Width 435 mm
Depth 310 mm
Height 160 mm (ohne Rolle)

Sirona Dental Systems GmbH 3 Familiarisation
Operating Instructions NITRASEAL 3.2 Dimensions
61 79 761 D 3367
D 3367.201.02.01.02 9
båÖäáëÜ
Dimensions of the model complete with
roll-holder and roll
5
NITRASEAL
Width 435 mm
Depth 310 mm
Height with roll-
holder and roll
330 ÷ 430 mm

4 Installation Sirona Dental Systems GmbH
4.1 Preliminary information Operating Instructions NITRASEAL
61 79 761 D 3367
10 D 3367.201.02.01.02
4 Installation
4.1 Preliminary information
The NITRASEAL thermal sealer has been tested at the
factory.
On receiving the sealer control that the packing is whole
and keep it in case it should be shipped.
Open the packing and control that the delivery cor-
responds exactly to the technical specifications and that
no apparent damage is present.
In case of damage or missing parts inform the forwarder,
Sirona Dental Systems GmbH and its area agent imme-
diately.
4.2 To install the equipment follow these Instructions
1. Place the sealer on a flat surface and with enough
room around to be ergonomically operative.
2. Do not install the sealer next to sinks or the like, to
avoid contact with water and a consequent short-cir-
cuit of the electrical part.
3. Do not place the appliance near heat sources.
4. Install the machine in a room with normal air circula-
tion.
5. Check that the power supply cable is not bent and is
free up to the plug.
6. In case of model provided with roll-holder, insert the
supports of the roll-holder into their slots, then fit in
the roll on the supports.
7. Insert the power plug, and the sealer is ready.
NOTICE
i
The first sealing operations could produce a slight smoke
and an unpleasant smell. This fact, due to substances
used on assembling the machine, is temporary and will
disappear after a few sealing operations.
5
NITRASEAL
NITRASEAL
Sirona Dental Systems GmbH 5 Operation
Operating Instructions NITRASEAL
61 79 761 D 3367
D 3367.201.02.01.02 11
båÖäáëÜ
5 Operation
1. Connect the power supply cable of the NITRASEAL
Thermal Sealer to a mains socket after having che-
cked the electrical requirements reported on the la-
bel.
2. Turn on the equipment by the power switch placed
on the back side; the green and the yellow light indi-
cators will turn on; after a few seconds the yellow in-
dicator will switch off and only the green one will stay
on to signal that the appliance is ready.
3. Place a sterilisation roll on the special stand. In case
of model with a roll-holder, place the rolls in the rod
and put it on the supports.
4. Set the potentiometer to a middle position. For the
adjustment see the paragraph ADJUSTMENTS.
5. Insert the envelope under the roll behind the heating
element and push it until it goes beyond the heating
element and appears on the front side.
CAUTION
The envelope must have the transparent (polypropylene)
side up.
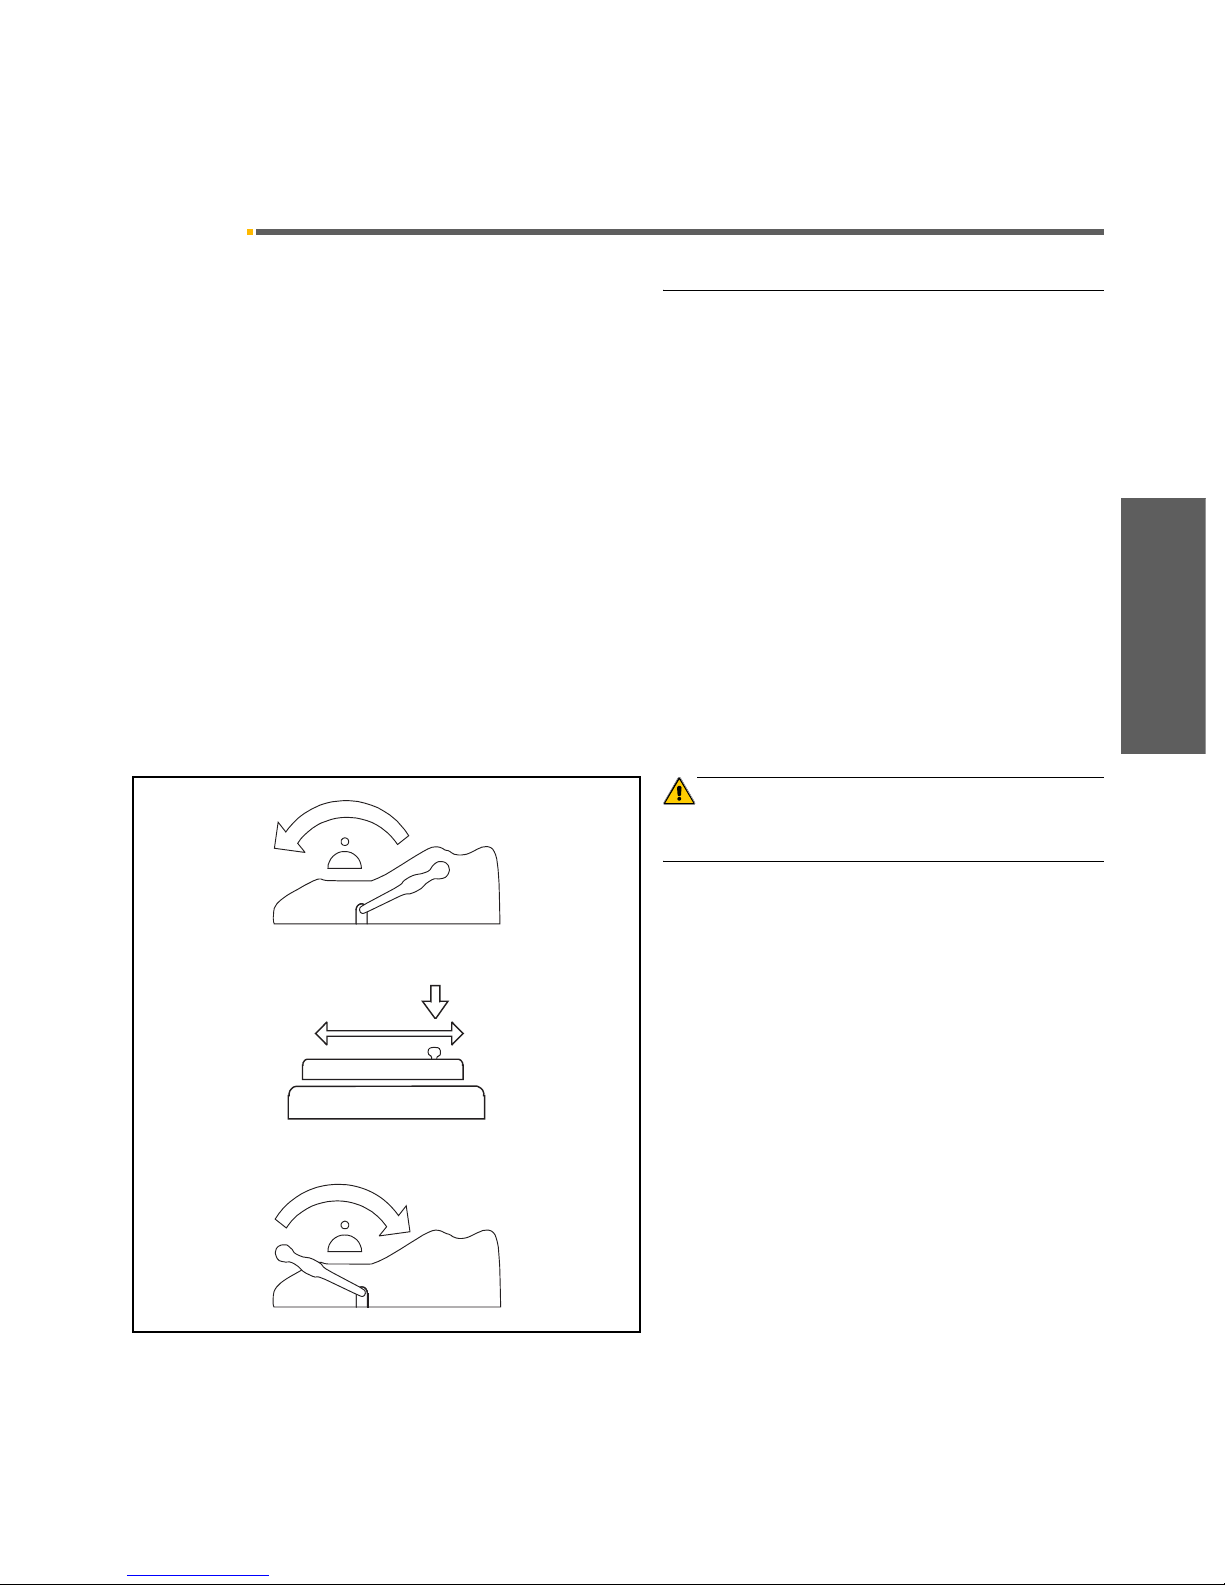
6. Advance the envelope for all the length of the instru-
ment to be enveloped.
7. To seal the envelope grasp the lever and pull it for-
wards and down. In this way the sealing element is
lowered and presses the envelope against the hea-
ting element.
8. On complete run of the lever the green indication will
start to flash to signal that the sealing is in progress
(this phase lasts 9 and 4 seconds depending on the
machine is cold and hot respectively).
9. When sealing is over the yellow light switches on
and an acoustic message is played.
10. Cut the envelope before releasing the lever. To do
this push the knob placed over the sealing element
and move it firmly along the sliding track of the cutter
both rightwards and leftwards.
11. Return the lever to rest position to lift the sealing ele-
ment and free the envelope just cut.

5 Operation Sirona Dental Systems GmbH
Operating Instructions NITRASEAL
61 79 761 D 3367
12 D 3367.201.02.01.02
CAUTION
the yellow indication will stay on for about 3 or 4 seconds
at the end of the sealing. This pause is necessary to avo-
id overheating: during this time it is not possible to carry
out another sealing.
12. In order to seal the opposite side of the envelope
and so block the instrument within its protective co-
ver, the envelope must now be turned and inserted
under the sealing element from the front; then carry
out a new sealing.
CAUTION
In order to avoid the sealing operations along the outer
margins of the heating element, place the sterilisation roll
on its special stand, so that the envelope may slide along
the middle part of the heating element.
Sirona Dental Systems GmbH 6 Adjustments
Operating Instructions NITRASEAL
61 79 761 D 3367
D 3367.201.02.01.02 13
båÖäáëÜ
6 Adjustments
The NITRASEAL Thermal Sealer does not usually
require any adjustment.
Because of variety of envelopes and bags on the mar-
ket, the equipment is provided with a device for the tem-
perature adjustment.
Digital Adjustments
For the models equipped with digital potentiometer, the
temperature adjustment of the sealing operation is car-
ried out by pushing the centre key in the control front
panel.
For models with seven-segments display, the tempera-
ture value corresponds to a number from 1 to 8, where
(1) corresponds a temperature of 160 °C and (8) a
temperature of 180 °C.
The normal setting value is 5
5

7 Troubleshooting Sirona Dental Systems GmbH
Operating Instructions NITRASEAL
61 79 761 D 3367
14 D 3367.201.02.01.02
7 Troubleshooting
The sealer is provided with a device for temperature
control and a safety thermal fuse.
In case of mains voltage surge or improper use, the fuse
will burn or wear off so that it has to be replaced.
If the fuse is burnt, call the service for a replacement or
send the appliance directly to the nearest service centre.
We mark that the function of the fuse is for protecting the
thermal sealer from possible worse and more expensive
damage and that the fuse is a specific element required
by the safety standards.
NOTICE
i
Use only and exclusively original sare parts and apply to
an authorised technical service centre
Sirona Dental Systems GmbH is not responsible for any
faults or damage caused by appliances tampered with
by non authorised personnel or in case of fault of parts
that are not original.
Problem Solution
The power green light stays off. Check the electrical plug
Check the fuses
Call the service
The protection canvas on the resistor is burnished or burnt Call the service for the replacement
The paper is nor clearly cut Replace the cutter or call the service
The Sealer seals but the yellow light stays off Call the service for the LED replacement
The heating element smokes or sends out a bad smell If the problem persists after the first few sealing operations,
call the service
The envelope sealing is not satisfactory Increase the temperature by turning the adjustment key
The envelope sealing is burnished (or burnt) Decrease the temperature by turning the adjustment key

Sirona Dental Systems GmbH 8Alarms
Operating Instructions NITRASEAL
61 79 761 D 3367
D 3367.201.02.01.02 15
båÖäáëÜ
8 Alarms
NITRASEAL Thermal Sealer is equipped with a signal-
ling system that uses acoustic and visual indications to
alert the operator and simplify the service activity.
In case of alarm both the yellow and green indicators will
flash.
In case of alarms call the Service.
9 Maintenance
The appliance does not require any ordinary mainte-
nance.
To wash the outside of the appliance, use a damp cloth
after making sure that the power supply cable has been
unplugged.
For an extra maintenance call the Service.
Table of Alarms
Alarm code Cause
1 flash Break of the probe
2 flashes Short circuit of the probe
3 flashes after 10 seconds from START The resistance does not heat up
4 flashes Fault in the double safety circuit (it appears at the start of
the cycle)
5
NITRASEAL

tÉ=êÉëÉêîÉ=íÜÉ=êáÖÜí=íç=ã~âÉ=~åó=~äíÉê~íáçåë=ïÜáÅÜ=ã~ó=ÄÉ=êÉèìáêÉÇ=ÇìÉ=íç=íÉÅÜåáÅ~ä=áãéêçîÉãÉåíëK
«=páêçå~=aÉåí~ä=póëíÉãë=dãÄe=OMMTJOMMV péê~ÅÜÉW=ÉåÖäáëÅÜ= mêáåíÉÇ=áå=dÉêã~åó
a=PPSTKOMNKMOKMNKMO===MPKOMMV ûKJkêKW= MMM=MMM fãéêáã¨=Éå=^ääÉã~ÖåÉ
páêçå~=aÉåí~ä=póëíÉãë=dãÄe
áå=íÜÉ=rp^W áå=`~å~Ç~W
c~Äêáâëíê~≈É=PN
SQSOR=_ÉåëÜÉáã
dÉêã~åó
ïïïKëáêçå~KÅçã
páêçå~=aÉåí~ä=póëíÉãë=ii`
QUPR=páêçå~=aêáîÉI=pìáíÉ=NMM
`Ü~êäçííÉI=k`=OUOTP
rp^
páêçå~=`~å~Ç~
PORM=oáÇÖÉï~ó=aêáîÉ=J=råáí=R
jáëëáëë~ìÖ~I=låí~êáç=iRi=RvS
`~å~Ç~
lêÇÉê=kç SN=TV=TSN=a=PPST
Table of contents


