SIRUI ST-20 User manual

360°底座
360°底座 360°底座锁紧旋钮
作用:锁紧底座
低重心云台参数
ST-20 低重心云台
40 90 0.55 35
a
b
c
步骤a:
步骤b:
步骤c:
ST-P026 ST-20 Ball Head V2.0_20220510
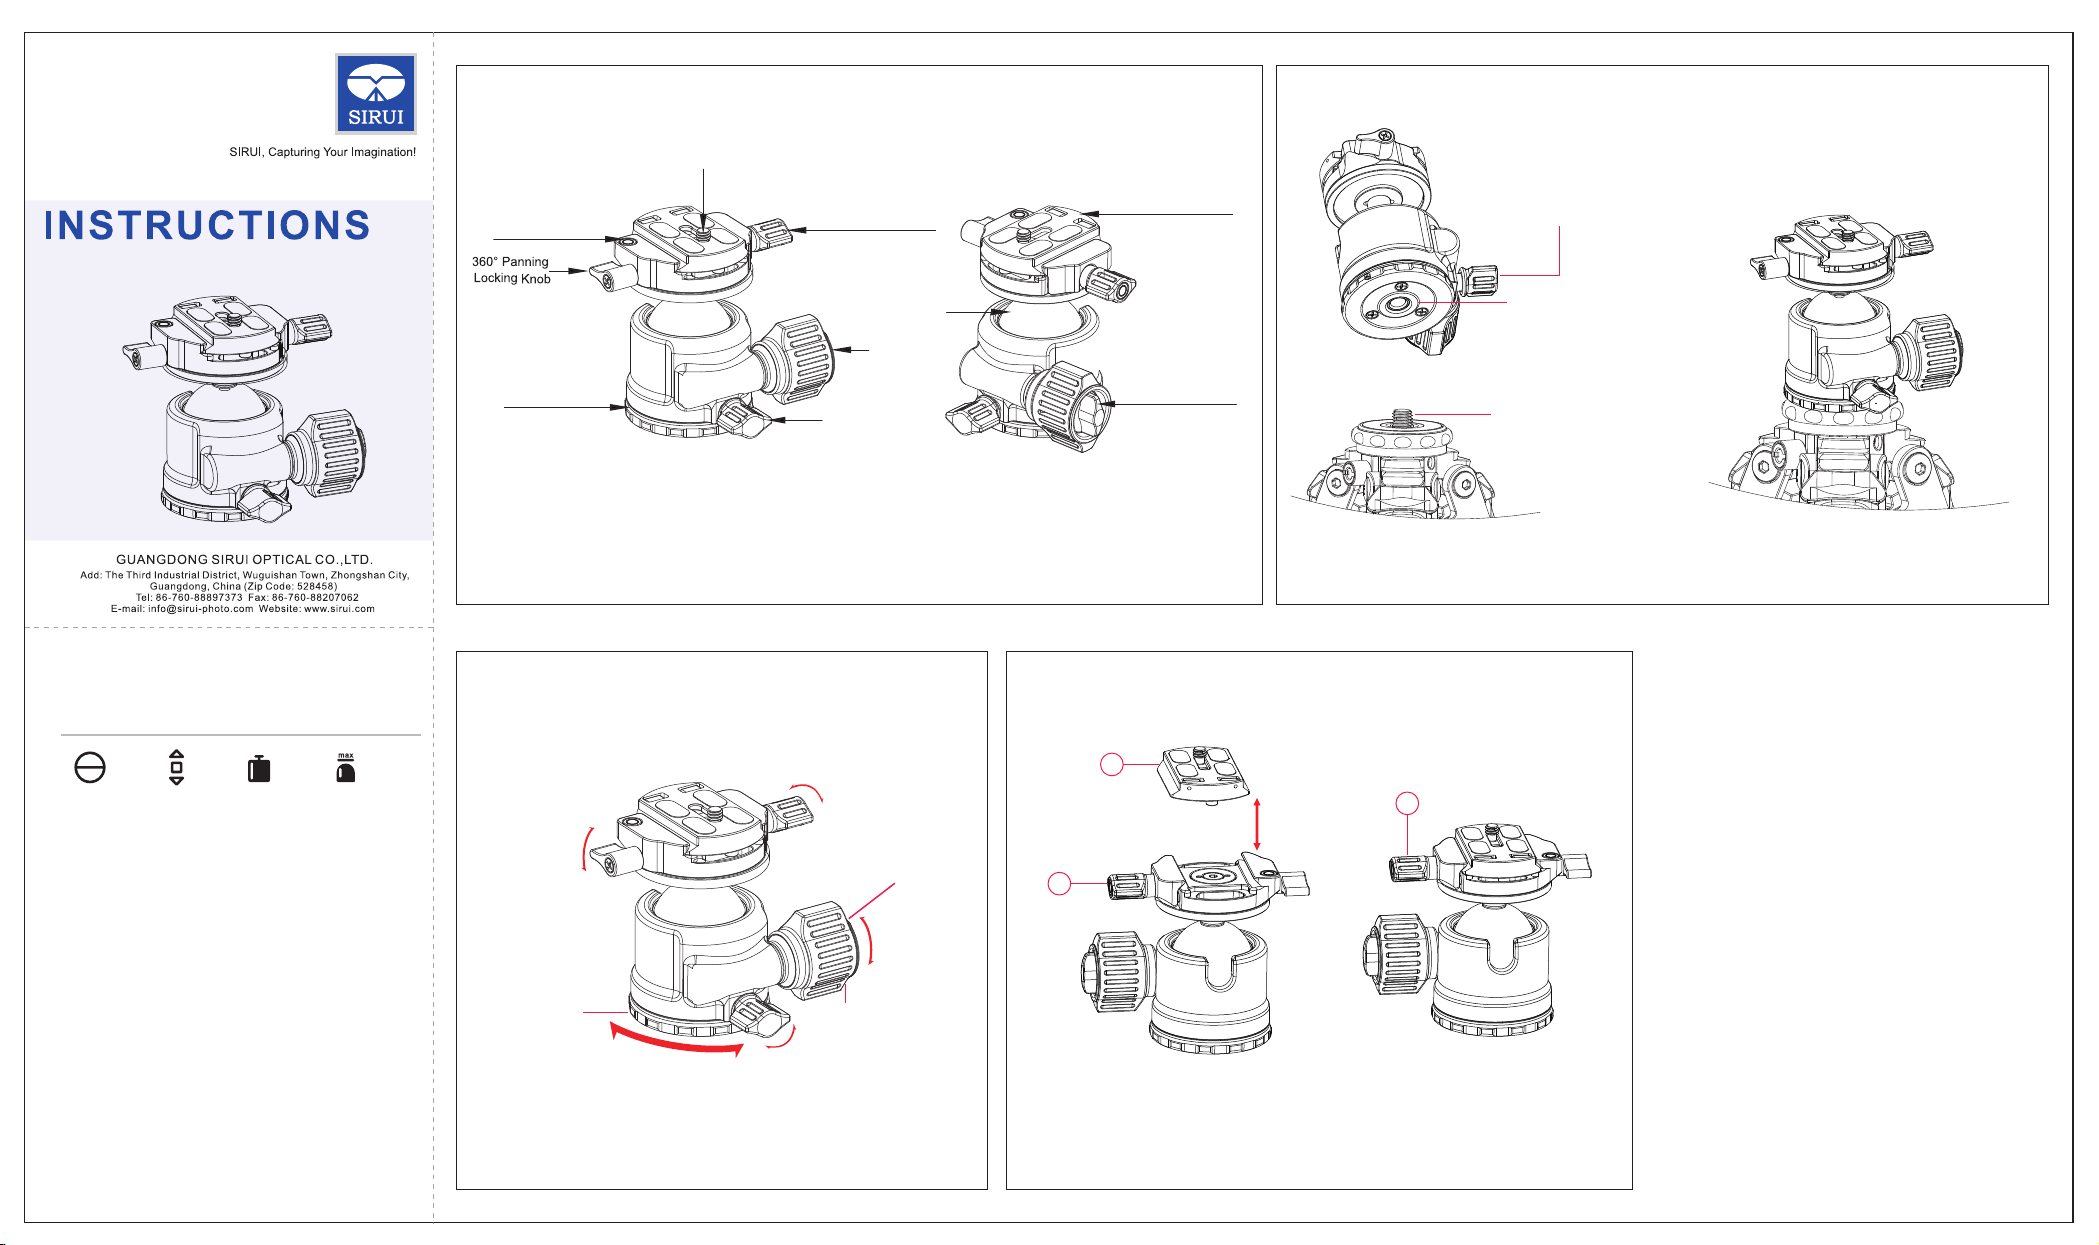
360° Panning Base Base Locking
Knob
ST-20 Low Gravity Center Ball Head
1.Know the Ball Head
3.Description of Knobs 4.Quick Release Plate Installation
2.Ball Head Installation
1. Know the Head
2. Ball Head Installation
a. At the bottom of the ball head is a 3/8"-16 screw hole,
so a 3/8"-16 screw is required for attaching the head
onto the tripod.
b. Align the 3/8"-16 screw hole at the bottom of the ball
head with the 3/8"-16 mounting screw on the tripod.
When aligned, hold and turn the ball head clockwise
to fix it onto the tripod.
3. Description of Knobs
As shown in Fig.3.
4. Quick Release Plate Installation
As shown in Fig.4.
5. Notes
a. Please hold the camera gear with your hands when
mounting it to the ball head.
b. The vertical angle of view of the ball head will vary
due to the length, size and position of the lens and
camera. So please make sure the camera gear is
mounted properly.
Specs for the ST-20
Diameter
mm/inches
40/1.57 90/3.54 0.55/1.21 35/77.16
Height
mm/inches
Weight
kg/lbs
Maximum Load
kg/lbs
1/4"-20 Mounting Screw
Bubble Level
QR Plate Locking
Knob
Ball
Ball Locking
Knob
QR Plate Clamp a. Turn the base locking knob
clockwise to tighten the panning
base
3/8"-16 Screw Hole
b. Align the screw hole on the ball head
with the mounting screw on the tripod
3/8"-16 Mounting Screw
c. Twist left the ball head to fix it on the tripod
Friction Control
Knob
QR Plate Locking Knob
Secure: Turn clockwise
Unlock: Turn counterclockwise
Panning Locking Knob
Secure: Turn clockwise
Unlock: Turn counterclockwise
Ball Locking Knob
Secure: Turn clockwise
Unlock: Turn counterclockwise
a. Fully loosen the locking knob (Stop twisting the knob when it hits the end)
b. Push the plate onto the base
c. Twist the locking knob clockwise
Lift up
Put down
Friction control knob allows for
easy friction adjustment of the
ball
b
a
c
360° Base Locking Knob
Secure: Turn clockwise
Unlock: Turn counterclockwise
360° Panning Base
Other SIRUI Camera Accessories manuals

SIRUI
SIRUI EF-E User manual

SIRUI
SIRUI 135mm T2.9 1.8x Full-Frame Anamorphic Lens User manual

SIRUI
SIRUI GX Series User manual

SIRUI
SIRUI PL-E User manual

SIRUI
SIRUI TSH-01X User manual

SIRUI
SIRUI A100B User manual

SIRUI
SIRUI Blaze C150 User manual

SIRUI
SIRUI KX Series User manual

SIRUI
SIRUI P-424FS User manual


