Skyman Blizzard User manual
Owners Manual
Blizzard
Version 1.0 Stand 02.08.2019
Fly market GmbH & Co. KG
Am Schönebach 3
D-87637 Eisenberg
Tel.: +49 (0) 8364 9833-0
Fax: +49 (0) 8364 9833-33
Email: [email protected]
2
Technical Drawing:
3
1. Dear Skyman Pilot
We are pleased to welcome you to the world of Skyman paragliders. The Blizzard was developed for those mini
wings pilots who enjoy dynamic flying on the local mountain or on hike & fly tours. The Blizzard impresses with its
small area, very high speed and high maneuverability.
Like every paraglider, the Blizzard also has its own character and wants to be flown in its own way. In order to provide
you with the greatest possible flying pleasure, we have compiled the following owner´s manual.
2. Important Notes:
Reading this owner´s manual is mandatory!
The paraglider must not be put into use without careful study of this manual in order to avoid operating errors. We
hereby explicitly point out that no liability can be accepted for possible consequences of improper handling.
This paraglider is a "light air sports glider with an empty mass of less than 120 kg" in the paragliding sector. At the time
of delivery, it complies with the provisions of the German Airworthiness Requirement (LTF) and the European
Standard EN 926-2, Category C.
New gliders must be flown in by the seller. This flight has to be confirmed with date and signature on the attached
measurement protocol and on the type label of the paraglider.
Any unauthorized modification to the paraglider will invalidate the operating license!
The pilot is responsible of the airworthiness of his glider! It is also the pilot's responsibility to ensure that all legal
regulations necessary for the operation of this glider are met (e.g. pilot license, insurance, etc.).
It is presupposed that the abilities of the user correspond to the requirements of the device!
The use of the paraglider is at your own risk! The liability of the manufacturer or distributor is excluded!
The following owner's manual has been compiled to the best of our knowledge and belief. However, it is quite
possible that different aspects may change in the course of time due to (flight) technical innovations or changed
approval tests and/or teaching methods. Therefore it is advisable in any case to obtain "updates" in suitable form
about possible changed opinions and tests either from us or from the appropriate authorities.
3. Target group:
The Blizzard is classified in category C according to LTF (German airworthiness requirements) and EN 926-2 at
the same time. After both tests, the Blizzard is only certified as a single-seater. EN 926-2 describes the flight
characteristics of this category with "Paragliders with moderate passive safety and with potentially dynamic
reactions to turbulence and pilot errors. Recovery to normal flight may require precise pilot input."
The required pilot skills is described as: „Designed for pilots familiar with recovery techniques, who fly “actively”
and regularly, and understand the implications of flying a glider with reduced passive safety."
Whether the Blizzard is finally suitable for the pilot's own flying purpose and ability should always be discussed
personally with the dealer.
We recommend every pilot to do a safety training and to play as much as possible with his glider on the ground.
Perfect control of the glider on the ground and in the air is the key to maximum flying fun and the best insurance for
accident-free flying.
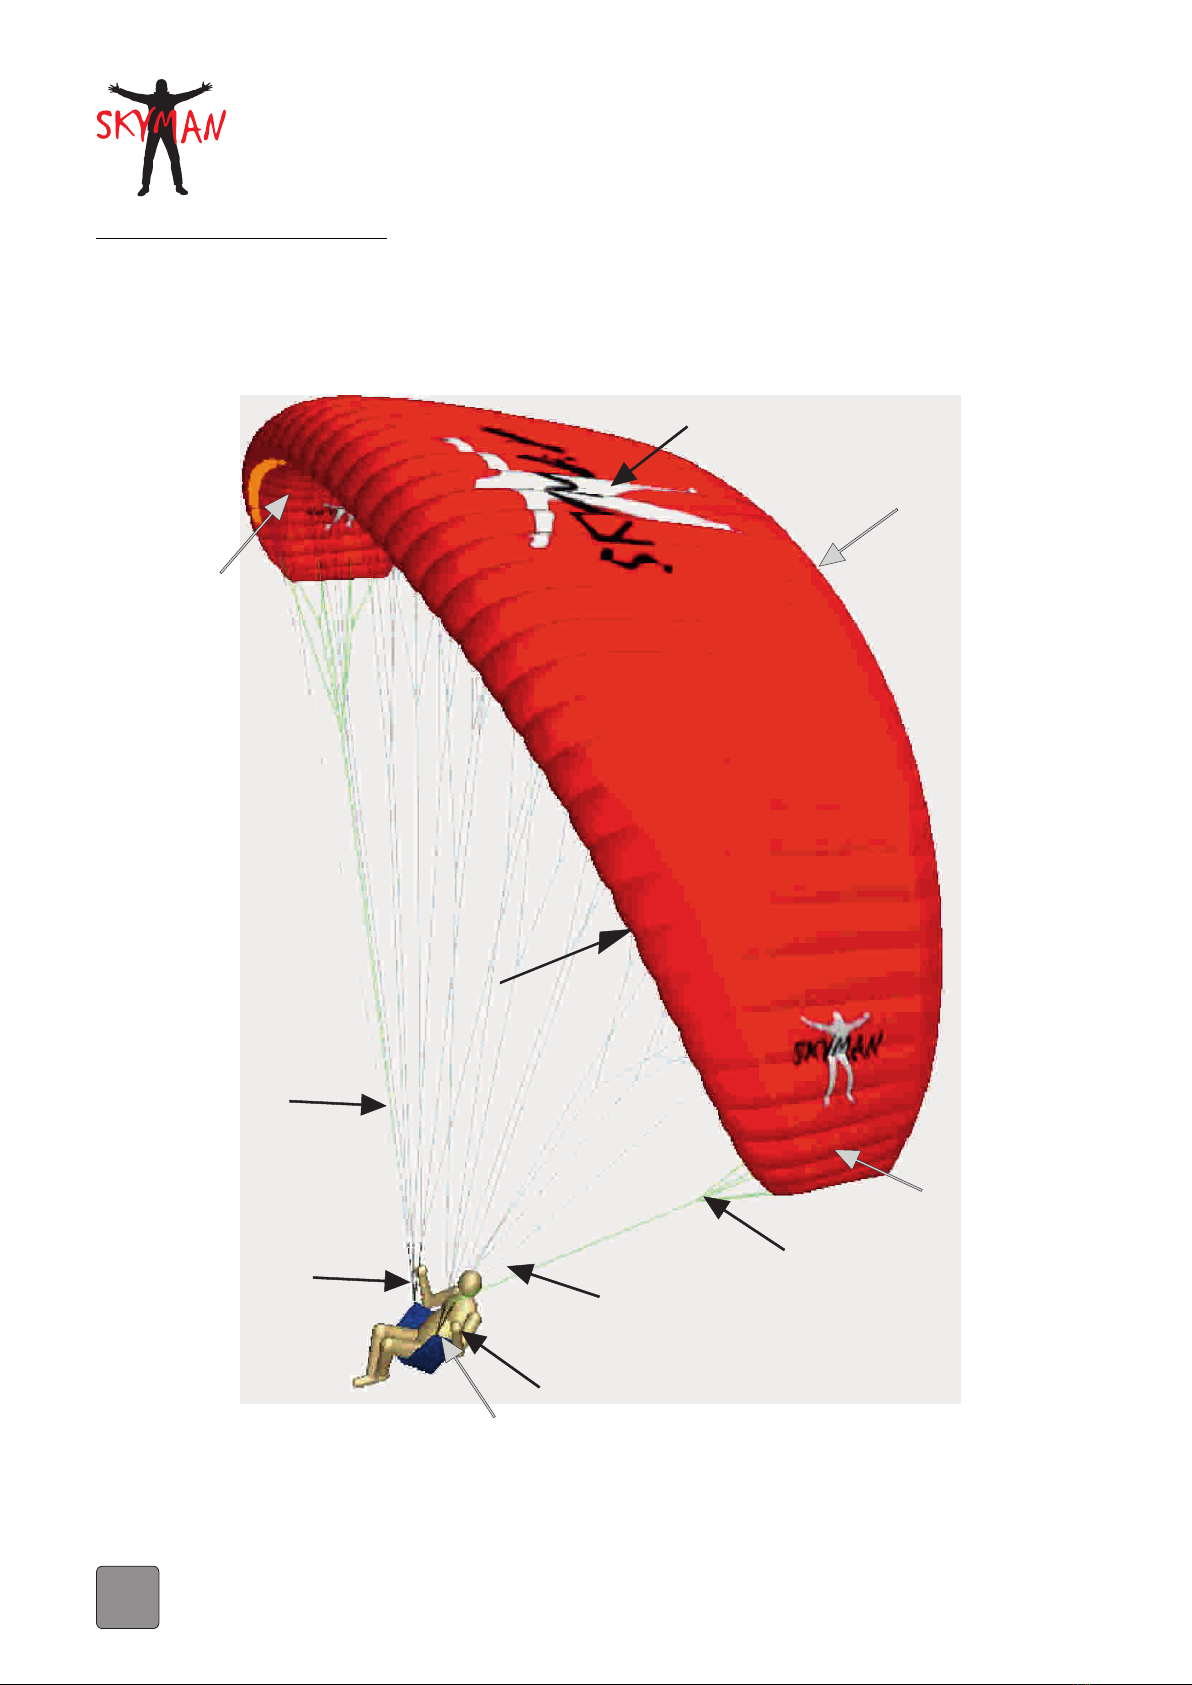
Stabilo Line
Upper Surface
Riser Lines
Riser
Brake Handle
Wingtip
Main Hangpoint to
Harness Carabiner
Main Brake Line
Trailing Edge
Lower Surface
Leading Edge

2
Technical Drawing:
3
1. Dear Skyman Pilot
We are pleased to welcome you to the world of Skyman paragliders. The Blizzard was developed for those mini
wings pilots who enjoy dynamic flying on the local mountain or on hike & fly tours. The Blizzard impresses with its
small area, very high speed and high maneuverability.
Like every paraglider, the Blizzard also has its own character and wants to be flown in its own way. In order to provide
you with the greatest possible flying pleasure, we have compiled the following owner´s manual.
2. Important Notes:
Reading this owner´s manual is mandatory!
The paraglider must not be put into use without careful study of this manual in order to avoid operating errors. We
hereby explicitly point out that no liability can be accepted for possible consequences of improper handling.
This paraglider is a "light air sports glider with an empty mass of less than 120 kg" in the paragliding sector. At the time
of delivery, it complies with the provisions of the German Airworthiness Requirement (LTF) and the European
Standard EN 926-2, Category C.
New gliders must be flown in by the seller. This flight has to be confirmed with date and signature on the attached
measurement protocol and on the type label of the paraglider.
Any unauthorized modification to the paraglider will invalidate the operating license!
The pilot is responsible of the airworthiness of his glider! It is also the pilot's responsibility to ensure that all legal
regulations necessary for the operation of this glider are met (e.g. pilot license, insurance, etc.).
It is presupposed that the abilities of the user correspond to the requirements of the device!
The use of the paraglider is at your own risk! The liability of the manufacturer or distributor is excluded!
The following owner's manual has been compiled to the best of our knowledge and belief. However, it is quite
possible that different aspects may change in the course of time due to (flight) technical innovations or changed
approval tests and/or teaching methods. Therefore it is advisable in any case to obtain "updates" in suitable form
about possible changed opinions and tests either from us or from the appropriate authorities.
3. Target group:
The Blizzard is classified in category C according to LTF (German airworthiness requirements) and EN 926-2 at
the same time. After both tests, the Blizzard is only certified as a single-seater. EN 926-2 describes the flight
characteristics of this category with "Paragliders with moderate passive safety and with potentially dynamic
reactions to turbulence and pilot errors. Recovery to normal flight may require precise pilot input."
The required pilot skills is described as: „Designed for pilots familiar with recovery techniques, who fly “actively”
and regularly, and understand the implications of flying a glider with reduced passive safety."
Whether the Blizzard is finally suitable for the pilot's own flying purpose and ability should always be discussed
personally with the dealer.
We recommend every pilot to do a safety training and to play as much as possible with his glider on the ground.
Perfect control of the glider on the ground and in the air is the key to maximum flying fun and the best insurance for
accident-free flying.
Stabilo Line
Upper Surface
Riser Lines
Riser
Brake Handle
Wingtip
Main Hangpoint to
Harness Carabiner
Main Brake Line
Trailing Edge
Lower Surface
Leading Edge

4
4. Technical Describtion:
Canopy construction:
The canopy of the Blizzard is made of nylon fabric by Dominico Tex Corp. and NCV Industries. This synthetically
manufactured fabric is woven with a reinforcing mesh to prevent tearing and increase tensile strength at the seams.
The coating makes the fabric water repellent, UV resistant and air impermeable.
The Blizzard consists of 40 cells. The wing tip (stabilizer) is pulled down and is integrated seamlessly into the canopy.
The canopy is ventilated through openings on the underside of the profile nose. Cross ventilation is provided by
precisely dimensioned holes (cross ports) in the profile rib.
Each main profile rib is suspended from a line connection. They are reinforced in the profile.
Tensioning straps are sewn in between the groups of main lines to regulate the sail tension.
Reinforcements are sewn into the profile nose to ensure high shape retention and stability.
A low-stretch tape is sewn into the leading and trailing edges, which provides a sophisticated tension distribution
across the canopy calculated by our construction software
Suspension System:
The lines of the Blizzard consist of polyester-coated and uncoated aramid and polyester-coated PES / Dyneema,
depending on the location. The strength of the individual lines varies from 65 to 280 daN depending on the location.
The riser of the Blizzard has 3 risers on each side.
The line names are differentiated according to the place of installation:
The lines are divided from front to rear into A / B / C / D - level and brake.
From top to bottom there are different floors: Gallery lines (top floor at the canopy), middle lines (intermediate floor),
riser lines (bottom floor at the riser).
From the inside to the outside, the lines on each floor are numbered starting with 1.
Within the levels, several gallery lines are grouped together into middle lines. The middle lines are again grouped
into riser lines. The middle lines of the D level are integrated into the C riser lines.
All levels are colored separately for easier control. Stabilizer lines are colour-coded separately.
The brake or steering lines are combined into the main brake line according to the same principle.
The A, B and C risers have 3 main lines on each side and 1 stabilizer line additional on the B riser.
The main brake line is guided to the brake handle via a pulley on the C-riser.
The line connectors are made of stainless steel and are secured with a plastic insert against unintentional opening
and slipping of the lines.
There are no adjustable devices available.
The line arrangement is shown in the individual line plan.
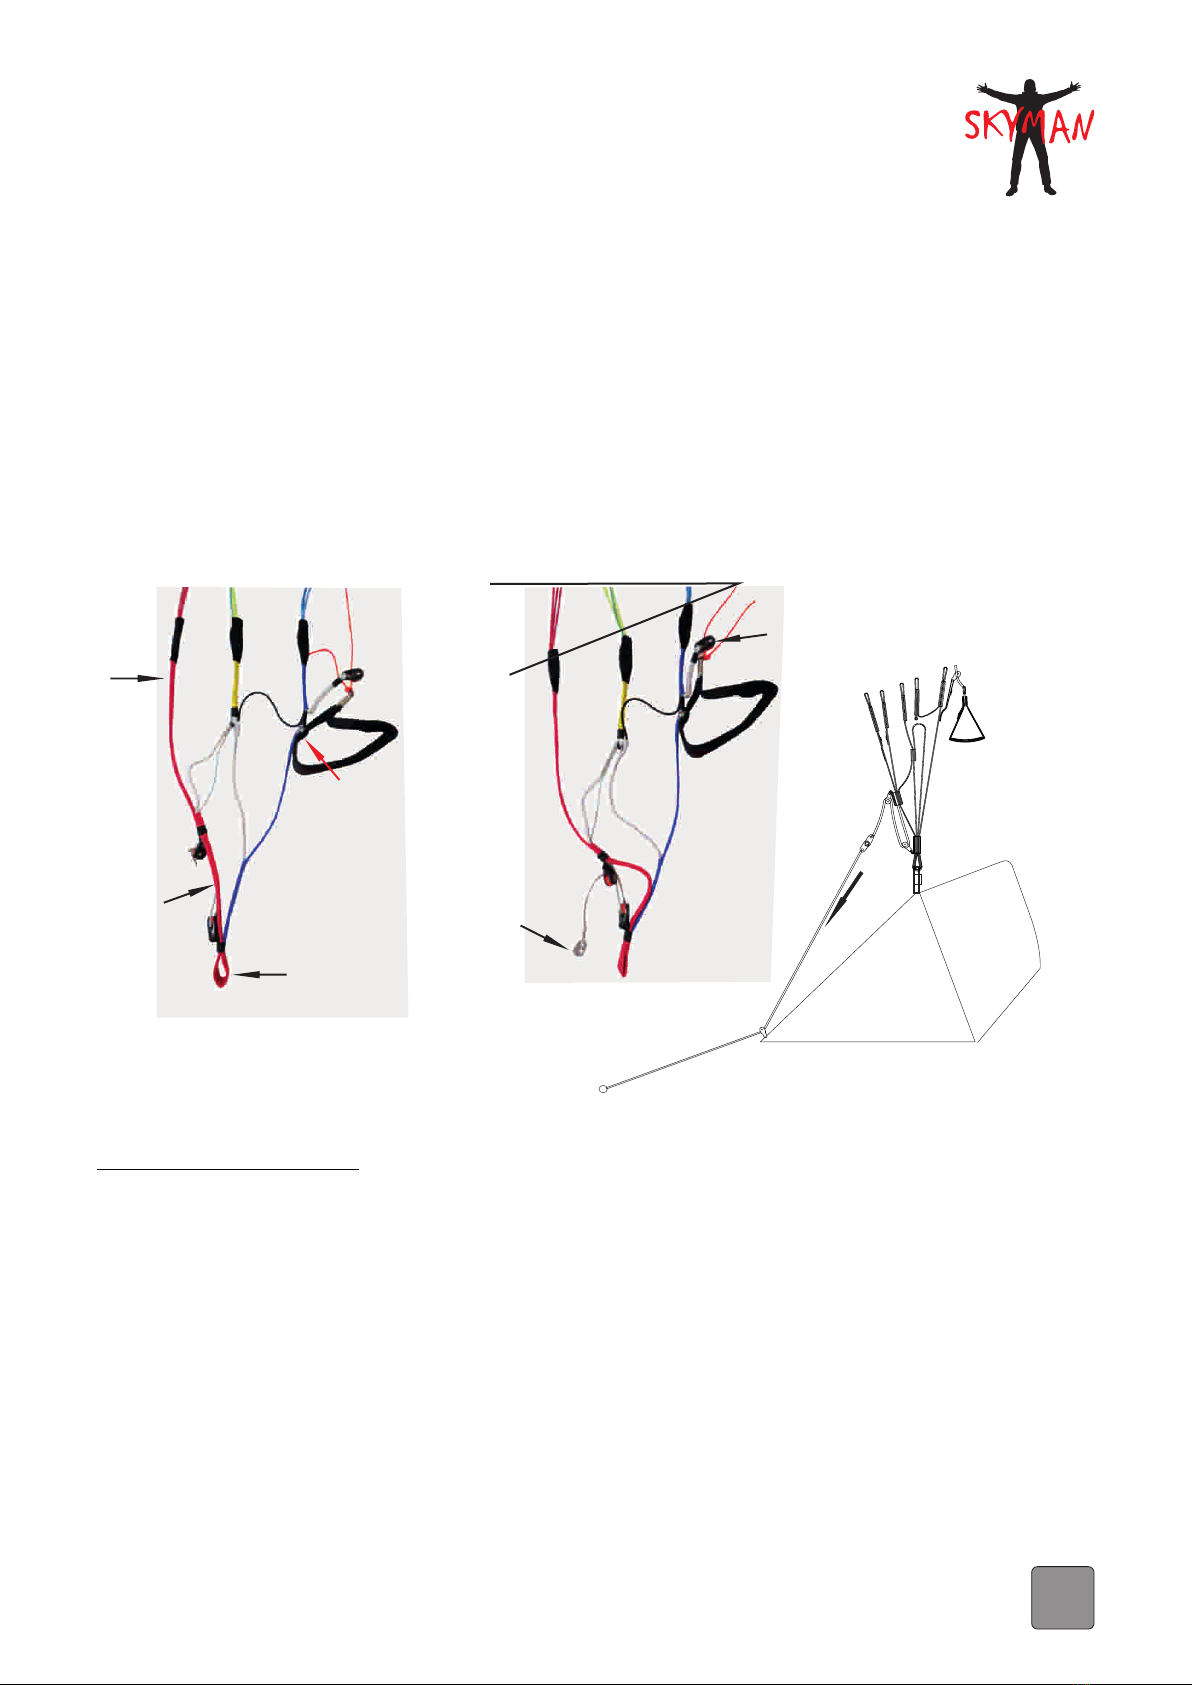
Acceleration system:
The Blizzard has a foot acceleration system that automatically returns to the original position after use. The riser
does not have a lockable trimmer.
The acceleration system shortens the A and B risers and reduces the angle of attack of the canopy.In normal flight all
risers have the same length (53 cm with link). The A-risers are shortened by up to 9,5 cm and the B-risers by up to 6
cm when the acceleration system is operated. The C-risers are not shortened.
suspension point
harness
Accelerator brommel hook
accelerator
Coloured
marking
Brake handle
attachment
5
Functionality and handling:
Before take-off, the brummel hooks are hooked into the brummel hook of the acceleration system of the harness's
foot accelerator. Make sure that the suspended accelerator is running freely.The length of the foot accelerator must
be set correctly before using it for the first time. This is done best in the simulator. The length is set correctly if the
accelerator rope still has some slack and is not under tension when the accelerator is not in use.
By operating the foot accelerator the pilot shortens the A/B belts by a pulley system which reduces the force.
Overview risers:
trim flight position
5. Technical Data:
size 16
Flat surface m² 16
Flat span m 8,66
Flat aspect ratio A/R 4,69
Projected surface m² 13,55
Projected span m 6,87
Projected aspect ratio A/R 3,45
Min take off weight Kg 60
Max take off weight Kg 90
V-Trim Km/h 42
V-Max. Km/h 59
LTF / EN Category C
Changes of these data are possible!
accelerated flight position
Schematic view harness
- Accelerator arrangement on harness -
Foot pedal
pulley
of harness
B
AC
angle change
accelerator
Harness
B
AA’
C
D
pulley
Brake line
B
AC
4
4. Technical Describtion:
Canopy construction:
The canopy of the Blizzard is made of nylon fabric by Dominico Tex Corp. and NCV Industries. This synthetically
manufactured fabric is woven with a reinforcing mesh to prevent tearing and increase tensile strength at the seams.
The coating makes the fabric water repellent, UV resistant and air impermeable.
The Blizzard consists of 40 cells. The wing tip (stabilizer) is pulled down and is integrated seamlessly into the canopy.
The canopy is ventilated through openings on the underside of the profile nose. Cross ventilation is provided by
precisely dimensioned holes (cross ports) in the profile rib.
Each main profile rib is suspended from a line connection. They are reinforced in the profile.
Tensioning straps are sewn in between the groups of main lines to regulate the sail tension.
Reinforcements are sewn into the profile nose to ensure high shape retention and stability.
A low-stretch tape is sewn into the leading and trailing edges, which provides a sophisticated tension distribution
across the canopy calculated by our construction software
Suspension System:
The lines of the Blizzard consist of polyester-coated and uncoated aramid and polyester-coated PES / Dyneema,
depending on the location. The strength of the individual lines varies from 65 to 280 daN depending on the location.
The riser of the Blizzard has 3 risers on each side.
The line names are differentiated according to the place of installation:
The lines are divided from front to rear into A / B / C / D - level and brake.
From top to bottom there are different floors: Gallery lines (top floor at the canopy), middle lines (intermediate floor),
riser lines (bottom floor at the riser).
From the inside to the outside, the lines on each floor are numbered starting with 1.
Within the levels, several gallery lines are grouped together into middle lines. The middle lines are again grouped
into riser lines. The middle lines of the D level are integrated into the C riser lines.
All levels are colored separately for easier control. Stabilizer lines are colour-coded separately.
The brake or steering lines are combined into the main brake line according to the same principle.
The A, B and C risers have 3 main lines on each side and 1 stabilizer line additional on the B riser.
The main brake line is guided to the brake handle via a pulley on the C-riser.
The line connectors are made of stainless steel and are secured with a plastic insert against unintentional opening
and slipping of the lines.
There are no adjustable devices available.
The line arrangement is shown in the individual line plan.
Acceleration system:
The Blizzard has a foot acceleration system that automatically returns to the original position after use. The riser
does not have a lockable trimmer.
The acceleration system shortens the A and B risers and reduces the angle of attack of the canopy.In normal flight all
risers have the same length (53 cm with link). The A-risers are shortened by up to 9,5 cm and the B-risers by up to 6
cm when the acceleration system is operated. The C-risers are not shortened.
suspension point
harness
Accelerator brommel hook
accelerator
Coloured
marking
Brake handle
attachment
5
Functionality and handling:
Before take-off, the brummel hooks are hooked into the brummel hook of the acceleration system of the harness's
foot accelerator. Make sure that the suspended accelerator is running freely.The length of the foot accelerator must
be set correctly before using it for the first time. This is done best in the simulator. The length is set correctly if the
accelerator rope still has some slack and is not under tension when the accelerator is not in use.
By operating the foot accelerator the pilot shortens the A/B belts by a pulley system which reduces the force.
Overview risers:
trim flight position
5. Technical Data:
size 16
Flat surface m² 16
Flat span m 8,66
Flat aspect ratio A/R 4,69
Projected surface m² 13,55
Projected span m 6,87
Projected aspect ratio A/R 3,45
Min take off weight Kg 60
Max take off weight Kg 90
V-Trim Km/h 42
V-Max. Km/h 59
LTF / EN Category C
Changes of these data are possible!
accelerated flight position
Schematic view harness
- Accelerator arrangement on harness -
Foot pedal
pulley
of harness
B
AC
angle change
accelerator
Harness
B
AA’
C
D
pulley
Brake line
B
AC
6. Harness
The Blizzard has been tested and approved in the weight range up to 80 kg with harnesses of the LTF type GH with
42 cm chest strap width and > 80 kg with 46 cm chest strap width. Almost all harnesses available on the market are
"GH" harnesses and suitable for the Blizzard. These differ from GX harnesses by a lower suspension and not very
effective (if any) cross straps.
7. Checking the paraglider:
Every paraglider delivered is checked and measured several times by us before delivery. Nevertheless, we
recommend that you check the new paraglider thoroughly according to the following points.
These instructions should also be followed if the paraglider has to be checked after intensive flight, hard manoeuvres
or tree landings.
! The seams on the line suspension loops, on the risers and on the canopy must be checked for damage.
! Are all lines free of damage and correctly sewn?
! Are all line locks correctly screwed and the plastic inserts fastened?
! All the panels, including the ribs and V-tapes, must be inspected for cracks.
Any damage, however inconspicuous, must be inspected and repaired by an expert. A damaged paraglider is not
airworthy!
8. Adjusting the steering lines:
The two main steering lines lead to a multiple line branching, which are fixed at the trailing edge. At the risers the
steering lines run through a guide pulley and each is connected with a handle. These control handles are
attached to the risers with two snap fasteners during transport. The steering line length is set correctly at the
manufacturer and normally does not have to be changed. The setting point is permanently marked on the main
steering line with an additional sheath. It must have at least 5 cm freewheel in flight (before the brakes take hold)
and should not be changed. The improper change of the steering line length changes the flight behaviour and
impairs the safety of the glider.
9. Flight operation:
The following pages are not intended to be a guide for paragliding. Rather, we want to introduce you to the special
features of the Blizzard and give you some important information for flight and safety. Other special flight
manoeuvres or configurations of the glider are not recommended.
9.1. Take-off preparations:
A careful pre-flight check must be carried out before each take-off. The risers, lines and canopy must be checked for
wear. It also must be ensured that the line links are tightly closed and secured against twisting with a plastic clip.
The harness must be put on with the greatest care. After putting on all buckles have to be checked again if they are
closed correctly. The correct closure of the rescue system container and the correct fit of the rescue system handle
must also be checked (see harness manual).
If a defect is found, do not take off under any circumstances!
The Blizzard can best be started if it is laid out in an arch. When laying out, the canopy must be laid out against the
wind.
Separate the lines and brake lines carefully and sort the risers. All lines must be free and without entangling or knots.
There must be no lines under the canopy.
Once all preparations have been completed, the main carabiners of the harness are connected to the risers. Make
sure that the carabiners are closed. When using a foot accelerator, the two brummel hooks are also to be connected.
Make sure that the acceleration system is free and untwisted.
6
7
Checklist:
Paraglider:
- Canopy without damage?
- Risers without damage
- Line links tightly closed?
- Lines without damage?
- all lines free and without entanglement and knots? Also brake lines?
Harness:
- Rescue system container closed?
- Rescue system handle correctly attached?
- all buckles and main carabiners closed?
Take-off:
- Risers not attached twisted?
- Speedsystem not attached twisted?
- Brake handle and correct riser taken up?
- Is the pilots position in the middle so that all lines are symmetrically tensioned?
- Is the wind direction okay?
- Obstacles on the ground?
- Air space free?
9.2. Take-off:
For better identification, the different riser levels are colour-coded and labelled.
The pilot, who is ready for take-off, holds the A-risers and brake handles in his hands on each side and pulls the A-
lines slightly. If the take-off area is flat and there is little wind, you can alternatively take a step back towards the
canopy and pull up the paraglider with more impulse. During the take-off run, the arms are first stretched sideways to
the rear in line with the A-risers and are guided upwards as the paraglider rises.
As with all gliders, the most important thing when launching is not the force but the constancy of the tension. As the
Blizzard is very easy to inflate, it needs to be braked on steep take-off areas or in strong winds to avoid overtaking the
canopy.
When launching the glider backwards in strong wind, it is easy to prevent premature take-off by following the glider
while it is being pulled up. The best preparation for perfect strong wind launches is still playing on the ground for
hours in the wind.
9.3. Straight flight:
The Blizzard has a trim speed of 41 to 44 km/h depending on the wing load with fully released steering lines. In calm
air the Blizzard reaches the minimum flying speed (depending on the wing load) with about 35 to 40cm brake line
pull. In turbulent air we recommend to fly with 5 to 15 cm pulled steering lines. The current angle of attack of the
canopy is then higher and it is more difficult to undercut the air at the profile nose.
According to EN 926-2, the maximum symmetrical control travel is at least 40 cm up to 80 kg take-off weight, at least
45 cm from 80 kg to 100 kg take-off weight and at least 50 cm for 100 kg take-off weight and above.
We understand all indicated cm values from the point where the trailing edge is pulled down, i.e. without the
freewheel.
8
9.4. Accelerated flight:
When the acceleration system is operated by the feet, the angle of attack of the canopy changes and the Blizzard
flies up to 16 km/h faster. Due to the higher speed the glider is more unstable and collapses more easily.
For safety reasons you should only fly accelerated in calm air with sufficient distance to the ground. Never let go of
the brake handles during accelerated flying!
When flying into turbulence, the acceleration system must be deactivated immediately!
Pulling the steering lines during accelerated flight should also be avoided, as the nose will nod even more
downwards for a short time due to the increased air resistance at the trailing edge and the danger of "undercutting"
will increase and the glider can collapse violently.
If the glider collapses, the acceleration system must be deactivated immediately, then the canopy is first stabilized by
the steering lines and then reopened.
9.5. Turns:
The high agility of the Blizzard is due to its special steering characteristics: It reacts very directly and without delay to
control impulses.
By shifting the weight (the pilot leans on the inside of the curve), very flat curves can be flown with minimal loss of
altitude.
Weight shifting and pulling on the inner steering line is suitable for fast changes of direction.
For thermal flying, the combination of weight shift, braking on the inside of the curve and controlled additional braking
on the outside of the wing is best recommended. By pulling in the opposite direction and releasing (active flying) with
the inner and outer brake, the curve radius and lateral position can be changed and the centering of the thermals can
be optimised.
Attention: if the steering lines are pulled too far or too fast, there is a risk of stall!
A one-sided stall is clearly announced: the inner side of the wing curve becomes soft and the inner third of the wing
almost "stops". If this flight condition has occurred, the inner brake must be released immediately.
9.6. Active flying:
Active flying can prevent many collapses in advance!
Active flying means to fly the paraglider as stable and efficient as possible by shifting weight and steering impulses.
In turbulences and rough thermals the glider should always be held vertically above you by active flying with
controlled brake inputs.
When flying into strong thermals, the angle of attack of the paraglider increases. If the brakes are released while
flying into the thermals, the canopy can accelerate and remains almost above the pilot's head. The situation is
different when flying into down winds: here the brakes are applied in a controlled manner.
9.7. Landing:
The Blizzard is easy to land. In the final glide against the wind the wing can be let out slightly braked. At a height of
approx. 1 m above ground, the angle of attack is raised and intercepted by an increased braking level. The time of
landing should coincide with the full use of the brakes.
If there is a strong headwind, the use of the brakes should only be very controlled in order to avoid a stall before
landing!
On this occasion we would like to suggest not to reduce the altitude by the risky bad habit of "pumping" if the
approach is too high.
Also landings with steep curves or turns in the final approach are to be avoided absolutely.
After the landing the wing should not fall on the ground with the nose first. This can destroy the profiles and impair the
material in the leading edge area on the long run!
9
10. Winch towing:
The Blizzard is suitable for winch towing. We generally recommend using a towing aid for all paragliders, which
activates the acceleration system during the towing process.
This towing aid accelerates the paraglider during the towing process and thus not only simplifies the take-off
procedure but also reduces the risk of deep stall and enables higher release heights.
Attention: Paragliders which are damp and/or whose line lengths/air permeability values are no longer within the
permitted tolerance have a significantly increased risk of deep stall when towing with a winch!
Winch towing is only permitted with a valid winch towing licence. The special features of a towing site and the
equipment used (winch, towing release, etc.) should always be discussed with the winch operator and the take-off
officer first.
We expressly point out that the equipment required for towing must also be certified in any case.
11. Powered flight:
The Blizzard is currently not certified for flying with a paramotor.
12. Extreme flight situations:
12.1. Side collapse:
A side collapse is probably the most common malfunction in paragliding. If the Blizzard collapses in turbulent air, this
usually only occurs in the outer wing area.
In order to maintain the flight direction in this flight condition, the opposite, open wing side has to be braked.
If the canopy collapses very hard, the braking of the open side may only be very dosed to avoid a stall.
After the turning away has been prevented by counter-steering, the canopy can be opened again at the same time by
pumping on the folded side.
If the side collapse is not actively counteracted, the Blizzard usually opens automatically within less than half a turn.
If the canopy does not open automatically due to the strong turbulence or other influences (entangled lines), the
paraglider will turn into a spiral dive.
12.2. Entangled lines:
In the event of large collapses or other extreme situations, any paraglider may become tangled. The collapsed
sections of the wing tip will get caught in the lines. Without pilot reaction the glider turns into a very strong spiral.
Once this has happened, the turning of the wing must be stopped first by a sensible counter-brake.
If the rotation speed should continue to increase despite counter-action, the rescue parachute must be released
immediately at low altitudes.
If the height is sufficient, the following possibilities can be used to try to release the entangled wing tip:
- Try a sensitive counter-braking and a very fast, resolute and deep pulling of the steering line at the entangled side.
- Pull the coloured Stabilo line.
If these measures are not successful, you can try to release the entangled wingtip with a full stall if the height is
sufficient.
Attention:
The flight manoeuvres mentioned above are very demanding and can cause high altitude loss! If the pilot feels
overstrained or if there is not enough altitude, the rescue system must be activated immediately!
10
12.3. Front stall:
The collapse of the entire leading edge is usually caused by strong pulling on the A-belts, accelerated flying or
sudden strong turbulence. Although this flight disorder looks spectacular, it is often not dangerous if the collapse
depth is low. Often there are no turning movements, the glider usually opens quickly by itself and quickly picks up
speed again. The opening can be accelerated by braking in a controlled manner on both sides.
Timely recognition of the situation and quick reaction by braking on both sides helps to keep the loss of altitude as low
as possible and not to lose control of the malfunction.
12.4. Deep stall:
During a deep stall, the paraglider has no forward speed and at the same time significantly increased sink rates. The
deep stall is caused, among other things, by releasing the B-risers too slowly when the glider is in a B-stall, by an old
and porous cloth, by damage to the lines or ribs, by pulling the C- or D-risers or by an inadmissible take-off weight.
Even if the canopy is wet or the air temperature is very low, the tendency to stall increases.
Flying in the rain should be avoided as far as possible, as the raindrops on the canopy increase the Vmin and thus the
tendency to stall increases. Also very low temperatures can be problematic. In both cases, especially when the
brakes are applied and/or the line geometry is no longer trimmed correctly.
If the glider is in a deep stall, you can recognize this by the fact that the noise is very low and the glider is in an unusual
position above the pilot. In this case it is absolutely necessary to release the steering lines!
If the canopy and lines are in good condition, the Blizzard will automatically pick up speed again within 2 to 3 seconds.
If, for whatever reason, this is not the case, the A-risers must be pushed forward or the acceleration system must be
activated.
If a glider has been in a continuous stall for no apparent reason (e.g. wet glider, flight in rain or inadmissible take-off
weight), it must be checked before the next flight.
Attention: The brakes must not be applied in deep stall flight, as the paraglider immediately enters the full stall. A
stable stall may no longer be released near the ground due to a possible pendulum movement. Instead, the pilot
prepares himself for a hard landing, if possible with a landing fall.
12.5. Full stall:
To initiate a full stall, both brake lines must be pulled through completely. When the stall speed is reached, the canopy
empties abruptly and suddenly tilts backwards.
It is very important, despite the unpleasant reaction of the glider in a full stall, to keep the steering lines pulled through
until the empty glider comes back over the pilot (approx. 3 to 6 seconds) and stabilizes in this position.
Only now the steering lines are reasonably fast (switching time >=2 sec) and symmetrically released. The optimal
recovery should take place in 2 phases: 1. prefilling of the canopy (slow release of the brakes up to shoulder height)
until the canopy is fully open again; 2. recovery (braking to 0%).
If the canopy is released too quickly or asymmetrically, the result may be a large collapse or front stall.
Attention: A wrong, too early, asymmetrical or too fast released full stall can result in an extremely wide forward
movement of the canopy! In extreme cases under the pilot!
12.6. Spin:
By stalling one side, the flow can break off at half of the wing. This reverses the direction of air flow. The trailing edge,
which is deeply braked, is then streamed from the back and flies in the opposite direction and the canopy rotates
around its vertical axis.
There are 2 causes for a spin:
- A brake line is pulled through too quickly and too far (example: initiating a spiral dive).
- in slow flight one side is braked too much (example: in thermal circling)
If an inadvertently initiated negative turn is immediately released, the glider returns to normal flight without great loss
11
of altitude. If the negative turn is held longer, the glider can accelerate and shoot forward on one side. This can result
in an impulsive collapse or entanglement.
12.7. Wingover:
Tight turns to the left and right are flown alternately. The cross slope is progressively increased. If the dynamics and
lateral position of this flight manoeuvre is too high, the outer wing can relieve the load. If the lateral inclination is
further increased and the reaction is wrong, the result may be an impulsive, large-scale collapse.
Full stall, spin and wingover on all paragliders can have life-threatening consequences!!
12.8. Emergency steering:
If the steering lines fail, the "Blizzard" can easily be steered by using the rear risers. The distance to the stall is of
course much shorter when steering with the rear risers than with the steering lines, it is about 10 - 15 cm with the
"Blizzard". You can also fly light curves by pulling the Stabilo lines or by weight shifting.
13. Decent aids:
13.1. Spiral dive:
The spiral dive is the most efficient way to descend fast. However, high loads occur for material and pilot.
It has to be taken into consideration that, depending on the daily shape, the outside temperature (cold!) and the sink
rate, you may sooner or later lose consciousness. Many pilots slow down their breathing during the spiral or go over
to press breathing, which increases the risk of losing control even more. At the first signs of dizziness, loss of
consciousness and loss of vision, the spiral must be immediately stopped.
The spiral dive is initiated by carefully pulling the brake line on one side and shifting the weight to the inside of the
curve. Due to the direct handling the Blizzard quickly takes a high lateral inclination and flies a steep turn. As soon as
the wing comes in front of the pilot ( goes on the nose ) an impulse is generated, which the pilot should follow by
shifting his weight to the outside of the curve.
The sink rate and inclination in the spiral dive are increased by a controlled pulling of the brake line inside the curve.
Slight braking on the outside of the curve prevents the outer wingtip from collapsing.
To exit the spiral dive, the brake inside the curve is slowly released.
Rapid release of the brake means that the high airspeed (up to over 100 km/h) is translated in a strong pendulum
movement into height. The result is an extreme deceleration at the end of the pendulum movement with subsequent
tilting of the canopy. You also have to calculate that you will get into your own wake vortex (rotor)!
Due to the extreme loss of height in the spiral dive, it is always important to ensure sufficient safety height!
Attention: Almost every paraglider reaches a sink rate at which the canopy faces the openings downwards ("goes
up on the nose!") and remains in this position despite releasing the steering lines and continues to spiral (stable spiral
dive).
The Blizzard has been classified C according to EN 926-2:2013. Due to unfavourable influences, however, the
reactions can also be more demanding than described in this classification. The causes in such a case can be
complex. For example: harness geometry (suspension height), cross straps, turbulent air, holding on to the riser,
shifting the pilot's weight to the inside of the curve and similar.
If, against all expectations, a stable spiral dive should occur, this is released by shifting the pilot's weight to the outside
of the curve and counter-braking in a controlled manner.
Attention: in a stable spiral dive, extreme G loads can have an effect on the body and require a lot of physical
strength!

12
12
13.2. Big Ears:
The so called "big ears" manoever is an easy, but not very effective descent method where the forward speed is
higher than the descent speed. It is more suitable to reduce the glide angle and to gain horizontal distance from a
source of danger than to descend fast.
To perform "big ears", the two wingtips are folded symmetrically downwards by pulling the outer A-riser lines.
The "big ears" can increase the descent speed to approx. 5 m/sec. and reduce the glide angle.
By using the foot accelerator the sink rate and the forward speed can be increased significantly.
It is sufficient to release the outer A-riser lines to exit this manoever. The wing tips of the Blizzard usually opens
automatically. The pilot can slightly brake to speed up the opening.
Attention: Never fly a spiral dive with big ears, because the middle A-lines are loaded beyond their limits.
13.3. B-Stall:
The B-stall is easy to enter with the Blizzard. The B-risers are slowly and symmetrically pulled down to 20 cm. The
airflow stops and the glider descends vertically.
To exit the manoever it is sufficient to raise the B-risers again in a time of approx. 1 second.
If the glider starts to rotate during the B-stall or if it forms a collar, the flying manoeuvre must be immediately released.
The reasons can be: turning: asymmetrical pulling of the risers, 1 B-riser and 1 C-riser pulled down; collar: too
excessive pulling of the B-risers.
All descent aids should only be practised in calm air and at a sufficient safety height, preferably as part of a safety
training, in order to be able to use them in emergency situations!
Summary:
This is valid for all extreme flight manoeuvres and descent aids:
- first practice only under the guidance of a flight instructor or as part of a safety training course
- before starting the manoeuvres, ensure that the airspace under the pilot is free
- During the manoeuvre the pilot must have eye contact with the canopy and constantly check the altitude.
14. Folding, Care, Storage, Repairs, Maintenance, Disposal
The condition of the paraglider affects your life in the air. A well-kept and properly treated paraglider can reach twice
its age. To ensure that the Blizzard carries its pilot as long as possible and safely through the air, please consider the
following points:
Folding:
For a long durability of the paraglider and to avoid unnecessary kinking of the nylon rods in the nose area, we
recommend to fold the glider profile on profile (similar to an accordion), or to roll it together loosely seen from the
stabilizer (without kinking the nylon rods). Improper packing and prolonged storage may cause deformation of parts
in the glider.
Care:
!The UV rays of the sun damage the fabric of the paraglider in the long run. Therefore the paraglider should not be
unnecessarily exposed to sunlight.
!When unfolding the glider, make sure that neither the canopy nor the lines are heavily soiled. The dirt particles can
damage the material.
!The line lengths should be checked after tree and water landings.
!Do not pull the paraglider over the ground. The coating of the cloth will be damaged.
!Moisture damages the coating of the cloth and shortens the service life.
!If the lines stick to the ground, they can be overstretched or torn off during take-off.
!Do not step on the lines!
13
!When folding up, please place the supplied textile bag underneath to avoid mechanical abrasion and damage of
the sail.
!The lines should be bended as less as possible.
!After contact with salt water, rinse the equipment immediately with fresh water!
!Insects that got lost in the cells should be removed alive, not only because of animal love, but also because they
secrete a corrosive liquid.
!Clean the paraglider only with water. Avoid mechanical stress such as brushing and rubbing. Chemical cleaning
agents damage cloth and lines.
Storage:
!The paraglider must always be stored in a dry place. If it gets wet, spread it out to dry as soon as possible (but not in
full sunlight!).
!Do not store the glider near chemical vapours or gases.
!During transport and storage, especially in cars, make sure that the paraglider is not exposed to unnecessarily
high temperatures.
Repairs:
!Smaller rips in the fabric that do not run along the seam can be provisionally repaired with an adhesive sail from a
paraglider dealer.
!All other types of damage, such as large rips, rips at seams, torn line hangpoints, torn and damaged lines may only
be repaired by an authorised workshop or the manufacturer.
!Only original spare parts are to be used! A list of the lines used in the glider model can be found in the individual line
plan under item 16 "Individual line lengths". The lines can only be purchased from the manufacturer.
!Any modification to the paraglider, except those approved by the manufacturer, will void the operating license of
the equipment.
Maintenance:
!The Blizzard must be inspected at least every two years or every 100 operating hours by an authorized workshop
or by the manufacturer.
!A line measurement should be performed every 20 flying hours and should be compared with the data sheet.
Disposal:
!The materials used in a paraglider require proper disposal. Please return used equipment to us. We will dispose
them properly.
15. Nature and landscape friendly behaviour:
Actually self-evident, but here again expressly mentioned: Please practice our nature-orientated sport in such a way
that nature and landscape are protected!
Please do not walk off the marked paths, leave no rubbish behind, do not make unnecessary noise and respect the
sensitive balance in the mountains. Especially at the take-off place our respect to nature is required!
12
12
13.2. Big Ears:
The so called "big ears" manoever is an easy, but not very effective descent method where the forward speed is
higher than the descent speed. It is more suitable to reduce the glide angle and to gain horizontal distance from a
source of danger than to descend fast.
To perform "big ears", the two wingtips are folded symmetrically downwards by pulling the outer A-riser lines.
The "big ears" can increase the descent speed to approx. 5 m/sec. and reduce the glide angle.
By using the foot accelerator the sink rate and the forward speed can be increased significantly.
It is sufficient to release the outer A-riser lines to exit this manoever. The wing tips of the Blizzard usually opens
automatically. The pilot can slightly brake to speed up the opening.
Attention: Never fly a spiral dive with big ears, because the middle A-lines are loaded beyond their limits.
13.3. B-Stall:
The B-stall is easy to enter with the Blizzard. The B-risers are slowly and symmetrically pulled down to 20 cm. The
airflow stops and the glider descends vertically.
To exit the manoever it is sufficient to raise the B-risers again in a time of approx. 1 second.
If the glider starts to rotate during the B-stall or if it forms a collar, the flying manoeuvre must be immediately released.
The reasons can be: turning: asymmetrical pulling of the risers, 1 B-riser and 1 C-riser pulled down; collar: too
excessive pulling of the B-risers.
All descent aids should only be practised in calm air and at a sufficient safety height, preferably as part of a safety
training, in order to be able to use them in emergency situations!
Summary:
This is valid for all extreme flight manoeuvres and descent aids:
- first practice only under the guidance of a flight instructor or as part of a safety training course
- before starting the manoeuvres, ensure that the airspace under the pilot is free
- During the manoeuvre the pilot must have eye contact with the canopy and constantly check the altitude.
14. Folding, Care, Storage, Repairs, Maintenance, Disposal
The condition of the paraglider affects your life in the air. A well-kept and properly treated paraglider can reach twice
its age. To ensure that the Blizzard carries its pilot as long as possible and safely through the air, please consider the
following points:
Folding:
For a long durability of the paraglider and to avoid unnecessary kinking of the nylon rods in the nose area, we
recommend to fold the glider profile on profile (similar to an accordion), or to roll it together loosely seen from the
stabilizer (without kinking the nylon rods). Improper packing and prolonged storage may cause deformation of parts
in the glider.
Care:
!The UV rays of the sun damage the fabric of the paraglider in the long run. Therefore the paraglider should not be
unnecessarily exposed to sunlight.
!When unfolding the glider, make sure that neither the canopy nor the lines are heavily soiled. The dirt particles can
damage the material.
!The line lengths should be checked after tree and water landings.
!Do not pull the paraglider over the ground. The coating of the cloth will be damaged.
!Moisture damages the coating of the cloth and shortens the service life.
!If the lines stick to the ground, they can be overstretched or torn off during take-off.
!Do not step on the lines!
13
!When folding up, please place the supplied textile bag underneath to avoid mechanical abrasion and damage of
the sail.
!The lines should be bended as less as possible.
!After contact with salt water, rinse the equipment immediately with fresh water!
!Insects that got lost in the cells should be removed alive, not only because of animal love, but also because they
secrete a corrosive liquid.
!Clean the paraglider only with water. Avoid mechanical stress such as brushing and rubbing. Chemical cleaning
agents damage cloth and lines.
Storage:
!The paraglider must always be stored in a dry place. If it gets wet, spread it out to dry as soon as possible (but not in
full sunlight!).
!Do not store the glider near chemical vapours or gases.
!During transport and storage, especially in cars, make sure that the paraglider is not exposed to unnecessarily
high temperatures.
Repairs:
!Smaller rips in the fabric that do not run along the seam can be provisionally repaired with an adhesive sail from a
paraglider dealer.
!All other types of damage, such as large rips, rips at seams, torn line hangpoints, torn and damaged lines may only
be repaired by an authorised workshop or the manufacturer.
!Only original spare parts are to be used! A list of the lines used in the glider model can be found in the individual line
plan under item 16 "Individual line lengths". The lines can only be purchased from the manufacturer.
!Any modification to the paraglider, except those approved by the manufacturer, will void the operating license of
the equipment.
Maintenance:
!The Blizzard must be inspected at least every two years or every 100 operating hours by an authorized workshop
or by the manufacturer.
!A line measurement should be performed every 20 flying hours and should be compared with the data sheet.
Disposal:
!The materials used in a paraglider require proper disposal. Please return used equipment to us. We will dispose
them properly.
15. Nature and landscape friendly behaviour:
Actually self-evident, but here again expressly mentioned: Please practice our nature-orientated sport in such a way
that nature and landscape are protected!
Please do not walk off the marked paths, leave no rubbish behind, do not make unnecessary noise and respect the
sensitive balance in the mountains. Especially at the take-off place our respect to nature is required!
14
16.1. Line names
All lines in Skyman paragliders are named according to the same scheme.
When ordering replacement lines, please always determine the designation according to the following
explanation and order it stating the type and size of glider!
The first digit indicates the line level (A, B, C, D; K = brake). The numbering starts from the centre of the glider at
1 and continues to the stabilizer.
Top lines (upper level) are marked with the level and the number starting from the centre of the glider. Example:
A 5 = the 5th A-line from the middle of the glider (for Blizzard 16: 48 cm)
The stabilizer upper line has the additional designation "e". Example: B15E = B-Stabilizer line at the top of the
canopy (Blizzard 16: 46 cm).
Middle lines (middle level) get the designation "M". Example: CM4 = 4th middle line from the centre of the glider
on the C-level (for Blizzard 16: 105 cm)
The main lines have the additional wording 'R'. Example: AR2 = 2nd A main line from the centre of the canopy
(Blizzard 16: 323 cm)
16.2. Line material used
main lines: Liros PPSLS 200, Edelrid 7343-280, Edelrid 7343-230, Edelrid 7343-140
middle lines: Edelrid 8000-190, Edelrid 8000-135, Edelrid 7343-075
top lines: Edelrid 8000-135, Edelrid 8000-090, Edelrid 7343-075
brake lines: KR: Edelrid 10/200, KL: Liros PPSLS125, K: Liros PPSLS065
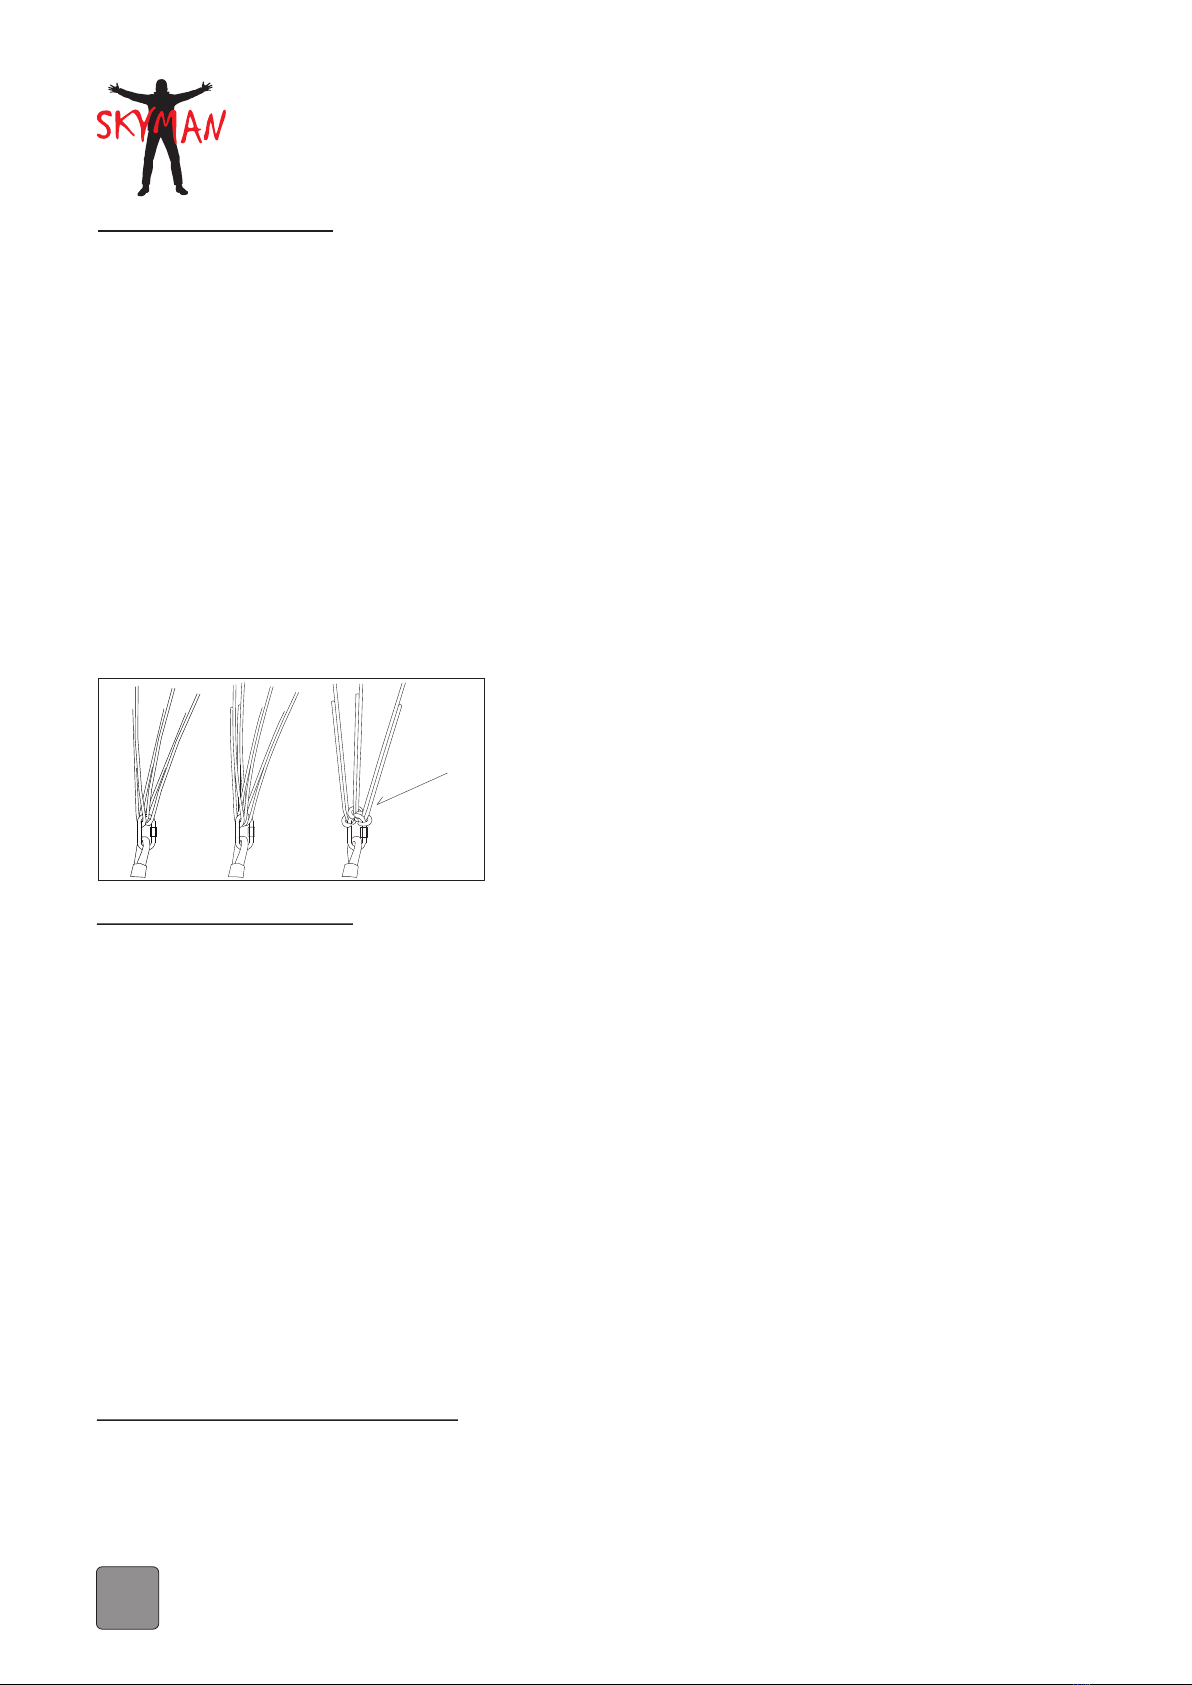
Factory delivered configuration with double
loop on C-riser lines for trimming during aging
15
16. Line lengths
Ageing of lines and trimming possibility
So far it has always been thought that lines stretch under use. In the case of the middle A and B lines - where the
heaviest load is attached - this is even true.
All lines (Kevlar as well as Dyneema lines) get cracks in their thin threads and then they begin to swell and
shrink. The rear C lines and the outer A, B, C lines are loaded with only a few grams during flying. This leads to a
slow shortening of the lines - because there is not enough load on the lines to stretch them during flying. On the
technical side, almost nothing can be done. The Blizzard is equipped with a minimal faster trim (+mm to C) to
avoid this shortening.
Less stressed lines are delivered with a trim knot. This can be used to lengthen the line if necessary.
The service company or the pilot now has the possibility to trim the glider without any problems and without
having to replace the lines. A line measurement should be performed every 20 flying hours and should be
compared with the data sheet. It is completely normal that lines can shrink by up to 30 mm at very intensive use.
All line changes are gradual. So they do not occur suddenly. You also do not crash, but often you only notice this
when you are less able to fly against the wind or when the glider loses some of ist performance.
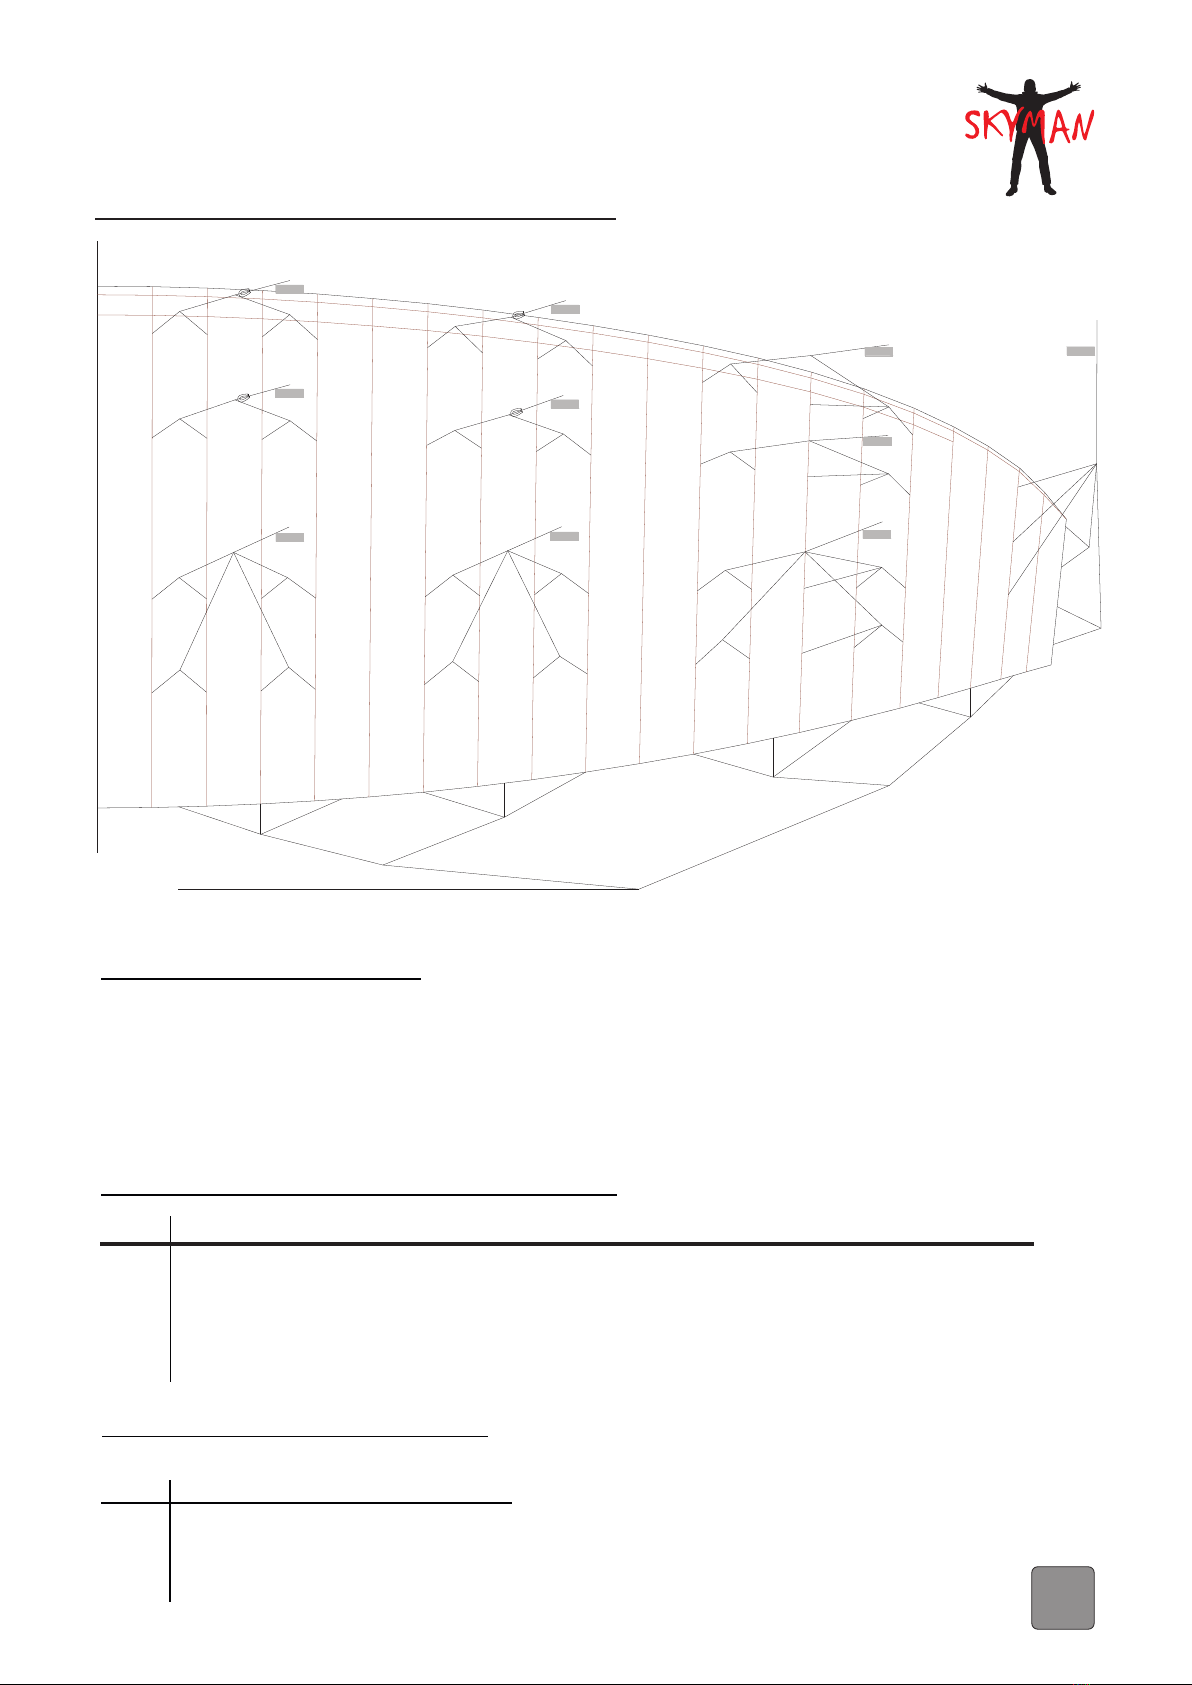
16.3. Single line length Blizzard 16
* = C-main lines with double loop
AR2
AR1
AR3
(Double
Loop)
BR2
BR1
BR4
CR2
CR1
CR3
BR3
1234
5678
9
10
11
12
13
14
15e
46.5
46
49.5
55.5
49.5
107.5
104
108.5
47
48.5
53
51.5
57
60.5
51
49.5
57
62
62
56.5
54
61.5
68
56.5
39
36
44.5
51
43
40
48.5
56
65.5
47
43
52.5
60.5
86.5
45.5
41.5
51.5
60
88
46
41.5
52
61.5
48
43.5
53.5
63.5
99
85.5
50
44.5
55.5
65.5
49
43.5
54.5
64.5
99
50
44
55
65.5
117.5
53
47
58
68.5
323
105 105
322
105 105
321*
105 105
105
105
323
105
105
322
105
105
321*
105
105 105
105
330
100
80
330
100
80
329
100 80
100
80
183+15
128
135 115 128
132
132
330
50
50
A Riser
B Riser
C Riser
A Riser
C Riser
B Riser
B Riser
C Riser
B Riser
12345
6
7
8
9
10
11
12
A Riser
17.1. Overall line length Blizzard 16
All line and riser lengths listed below are, in accordance with EN 926-2:2013, in conformity with the test
specimen. The specified lengths have been checked by the testing laboratory and are within the tolerance
permitted in the standard.
Lengths measured from suspension point of riser to lower sail, brake lines to end of main steering line
under 50 N tension
17. Overall line length
in mm 1 2 3 4 5 6 7 8 9 10 11 12 Stabi
A 5340 5310 5300 5310 5290 5270 5265 5280 5260 5220 5195 5140 5160
B 5270 5240 5235 5245 5235 5215 5215 5230 5230 5190 5170 5125 5145
C 5355 5325 5320 5330 5310 5295 5290 5300 5290 5250 5220 5175
D
Brake
13
4905
4870
4915
14
5460 5430 5420 5430 5410 5390 5375 5380 5365 5315 5285 5225 5210
5635 5450 5315 5250 5140 5125 5085 4995 5050 4915 4900 4925
5175
4795
4790
4825
4885
17.2. Riser length Blizzard
Lengths measured from suspension point
to lower edge of shackle
mm normal accelerated
A 530 435
B 530 470
C 530 530
14
16.1. Line names
All lines in Skyman paragliders are named according to the same scheme.
When ordering replacement lines, please always determine the designation according to the following
explanation and order it stating the type and size of glider!
The first digit indicates the line level (A, B, C, D; K = brake). The numbering starts from the centre of the glider at
1 and continues to the stabilizer.
Top lines (upper level) are marked with the level and the number starting from the centre of the glider. Example:
A 5 = the 5th A-line from the middle of the glider (for Blizzard 16: 48 cm)
The stabilizer upper line has the additional designation "e". Example: B15E = B-Stabilizer line at the top of the
canopy (Blizzard 16: 46 cm).
Middle lines (middle level) get the designation "M". Example: CM4 = 4th middle line from the centre of the glider
on the C-level (for Blizzard 16: 105 cm)
The main lines have the additional wording 'R'. Example: AR2 = 2nd A main line from the centre of the canopy
(Blizzard 16: 323 cm)
16.2. Line material used
main lines: Liros PPSLS 200, Edelrid 7343-280, Edelrid 7343-230, Edelrid 7343-140
middle lines: Edelrid 8000-190, Edelrid 8000-135, Edelrid 7343-075
top lines: Edelrid 8000-135, Edelrid 8000-090, Edelrid 7343-075
brake lines: KR: Edelrid 10/200, KL: Liros PPSLS125, K: Liros PPSLS065
Factory delivered configuration with double
loop on C-riser lines for trimming during aging
15
16. Line lengths
Ageing of lines and trimming possibility
So far it has always been thought that lines stretch under use. In the case of the middle A and B lines - where the
heaviest load is attached - this is even true.
All lines (Kevlar as well as Dyneema lines) get cracks in their thin threads and then they begin to swell and
shrink. The rear C lines and the outer A, B, C lines are loaded with only a few grams during flying. This leads to a
slow shortening of the lines - because there is not enough load on the lines to stretch them during flying. On the
technical side, almost nothing can be done. The Blizzard is equipped with a minimal faster trim (+mm to C) to
avoid this shortening.
Less stressed lines are delivered with a trim knot. This can be used to lengthen the line if necessary.
The service company or the pilot now has the possibility to trim the glider without any problems and without
having to replace the lines. A line measurement should be performed every 20 flying hours and should be
compared with the data sheet. It is completely normal that lines can shrink by up to 30 mm at very intensive use.
All line changes are gradual. So they do not occur suddenly. You also do not crash, but often you only notice this
when you are less able to fly against the wind or when the glider loses some of ist performance.
16.3. Single line length Blizzard 16
* = C-main lines with double loop
AR2
AR1
AR3
(Double
Loop)
BR2
BR1
BR4
CR2
CR1
CR3
BR3
1234
5678
9
10
11
12
13
14
15e
46.5
46
49.5
55.5
49.5
107.5
104
108.5
47
48.5
53
51.5
57
60.5
51
49.5
57
62
62
56.5
54
61.5
68
56.5
39
36
44.5
51
43
40
48.5
56
65.5
47
43
52.5
60.5
86.5
45.5
41.5
51.5
60
88
46
41.5
52
61.5
48
43.5
53.5
63.5
99
85.5
50
44.5
55.5
65.5
49
43.5
54.5
64.5
99
50
44
55
65.5
117.5
53
47
58
68.5
323
105 105
322
105 105
321*
105 105
105
105
323
105
105
322
105
105
321*
105
105 105
105
330
100
80
330
100
80
329
100 80
100
80
183+15
128
135 115 128
132
132
330
50
50
A Riser
B Riser
C Riser
A Riser
C Riser
B Riser
B Riser
C Riser
B Riser
12345
6
7
8
9
10
11
12
A Riser
17.1. Overall line length Blizzard 16
All line and riser lengths listed below are, in accordance with EN 926-2:2013, in conformity with the test
specimen. The specified lengths have been checked by the testing laboratory and are within the tolerance
permitted in the standard.
Lengths measured from suspension point of riser to lower sail, brake lines to end of main steering line
under 50 N tension
17. Overall line length
in mm 1 2 3 4 5 6 7 8 9 10 11 12 Stabi
A 5340 5310 5300 5310 5290 5270 5265 5280 5260 5220 5195 5140 5160
B 5270 5240 5235 5245 5235 5215 5215 5230 5230 5190 5170 5125 5145
C 5355 5325 5320 5330 5310 5295 5290 5300 5290 5250 5220 5175
D
Brake
13
4905
4870
4915
14
5460 5430 5420 5430 5410 5390 5375 5380 5365 5315 5285 5225 5210
5635 5450 5315 5250 5140 5125 5085 4995 5050 4915 4900 4925
5175
4795
4790
4825
4885
17.2. Riser length Blizzard
Lengths measured from suspension point
to lower edge of shackle
mm normal accelerated
A 530 435
B 530 470
C 530 530

16 17
18. Inspection instructions Blizzard
Attention: Fly market GmbH & Co. KG is not liable for any errors made by the person (or service company) carrying
out the inspection. This person (or company) always works on their own responsibility!
If in doubt about the procedure of the inspection or the airworthiness of the equipment, always contact Fly market
GmbH & Co. KG or, if necessary, send the equipment directly to us for inspection.
18.1. Inspection scope
!Every paraglider is subject to mandatory inspection.
!The inspections may be carried out by the manufacturer or by a person authorised by the manufacturer who
meets the following requirements. Since 01.07.2001 there is also the legal possibility that the owner can
check his device himself. This possibility is not recommended by the manufacturer, because the owner
usually has not the technical knowledge and necessary measuring equipment available. In addition, in this
case the equipment may only be flown by the owner - the use of the paraglider by third parties will then be
excluded!! A test report is being drawn up at each inspection. The owner is obliged to always keep the last
inspection report and to send a copy of it to the manufacturer. Each inspection step must be carried out
conscientiously and entered in the inspection report.
!If a defect is found during the inspection, the glider is not allowed to be flown any further. The glider must be
repaired by the manufacturer or a person authorized by the manufacturer.
18.2. Inspection intervals
The intervals for training equipment and commercially used tandem paragliders are every 12 months, all other
paragliders every 24 months or after 100 operating hours.
A line measurement should be made every 20 flying hours and compared with the data sheet.
18.3. Personnel requirements for the inspection
Personnel requirements for the inspection of paragliders used only for personal and single-seater use:
!A valid unrestricted pilot's licence for paragliders or an equivalent approved licence.
!Sufficient type-related training at the manufacturer's or importer.
Note: If a paraglider has been tested exclusively for personal use, its use by third parties is excluded.
Personnel requirements for the inspection of paragliders used by third parties and for two-seaters:
!Vocational training favourable to the examination activity
!A professional activity of two years in the manufacturing or maintenance of paragliders, hang-gliders or similar
technical equipment, including 6 months within the last 24 months.
!Sufficient type-related training of at least two weeks at the manufacturer or importer.
18.4. Necessary documents
!Current version of the inspection instructions
!Data sheets
!Previous inspection reports (only for further inspections)
!Maintenance and calibration documents for the measuring instruments
!manufacturer's corrective action instructions
!Airworthiness directive if applicable
18.5. Test procedures
Identification of the equipment:
!Once the paraglider has been handed over, an initial inspection is carried out and the paraglider is identified
on the basis of the official manufacturer's documents.
!Check the type label and inscriptions for correctness, completeness and readability.
Visual inspection of the canopy:
!The upper and lower sail, leading edge, trailing edge, ribs (including any V-ribs), cell partitions, seams, flares
and line loops are examined for cracks, shearing, stretching, damage to the coating, repairs and other
conspicuous features. The test result must be recorded in the inspection report.
!In case of rips at the seams and other damages the repair must be carried out only by original spare parts
and original seam pattern, no gluing with adhesive sail, use of non-original spare parts, etc.
Visual inspection of the lines:
!If the lines are damaged (seams, rips, folds, chafe marks, thickenings, core exits, etc.), they must be
replaced immediately with original spare parts and original seam pattern.
!In case of injuries to the lines (seam pattern, coat, etc.), they must be replaced immediately with original
spare parts and original seam pattern.
Visual inspection of the connecting parts
!All line shackles and any existing trimmers and speed systems must be checked for conspicuous features
such as rips, chafing and difficult movement. Both risers are checked for shearing points, tears and heavy
wear and then measured under a load of 5 daN. The values determined must be compared with the
specifications of the type identification sheet and documented in the inspection report.
!Max +/- 5 mm difference in riser lengths are permissible
Measurement of line lengths:
!The individual lines are laid out and measured loaded with 5 daN. The measurement is carried out from the
suspension point of the riser to the canopy including the loop. The rib numbering starts in the middle of each
wing and the wing sides are seen in the direction of flight. The total line lengths determined are documented
in the inspection report and compared with the nominal line lengths of the corresponding type identification
sheet. The measurement of the opposite wing side can be carried out by a symmetry check, if the same
conditions are met. Compliance with the tolerances to be taken from the manufacturer's instructions must be
documented in the inspection report.
!Limit values (tolerance values) may deviate by a maximum of +/- 10 mm from the type identification sheet,
whereby there may be no significant trim shift due to the tolerances. The tolerances of the brake lines are +/-
10 mm deviation from the type identification sheet.
!The restrictive rule is that a fine trim must be carried out in 2 cases (the procedure must be requested from
the manufacturer):
#if more than 50 % of the lines reach the tolerance limit, with the tolerance limit deviating only in either the
+ or - direction (all values of 5-10 mm are calculated).
#or 25 % of the lines deviate the tolerance limits in both directions (+ or -) (Example: A/B lines are 5-10 mm
longer, while at the same time the C/D lines are 5-10 mm shorter than in the type identification sheet (trim
shift to the rear due to ageing)

18 19
Control of line strength:
The proof of line strength should be documented analogously to the proof required in the LTF for the type test:
!Main line: From each line level (A, B, C) a main line is removed from the centre of the glider and the breaking
load is determined. The removed lines must be listed in the inspection report (e.g. AR1, BR1, CR1, DR1 in
flight direction left). This is important so that the line replaced in the previous test is not checked in a
subsequent inspection. In the 3rd and 4th inspections, main lines are checked next to the middle main line
(i.e. AR2, BR2, CR2). After the 5th inspection the cycle starts again from the beginning (e.g. AR1, BR1, CR1
in flight direction left, according to the first inspection).
!Above the main line, a further line is removed up to the canopy and the breaking load is also determined. If
the determined breaking load of these lines is 1.25 times the nominal value (e.g. nominal value 50 daN,
determined breaking load >62,5 daN), a test of further lines on the B/C/D levels can be omitted.
!Limit values of the individual lines for the Blizzard:
Inspection of the canopy strength::
!The testing of the canopy strength is done with the Bettsometer (B.M.A.A.aproved Patent No. GB 2270768
Clive Betts Sales). In this test, a needle-thick hole is made in the upper and lower sails in the area of the A-
line attachment and the fabric is tested for its tear resistance. The limit value of the measurement is set at
800 g and a crack length of 5 mm.
!The exact test procedure is specified in the operating instructions for the Bettsometer. The measured value
determined is entered in the inspection report.
Inspection of the air permeability of the cloth:
!Using a JDC textile clock, a porosity measurement is carried out at at least 5 points on the upper sail (with at
least 2 measuring points in the middle third of the canopy) and at least 3 points on the lower sail. The values
determined are recorded in the inspection report. The measuring points on the upper/lower sail are
distributed over the span and approx. 20-30 cm behind the leading edge.
!Limit values: no measuring point may reach a value below 15 seconds. If a measurement shows a value of
less than 15 seconds, the paraglider loses ist airworthiness.
Visual control of trim and settings:
!All lines must be checked according to the line overview plan to ensure that they have been correctly set
and that all line levels are running free. The brake lines must also be checked to ensure that everything is
correctly set up and running free.
!The visual inspection must correspond exactly to the line overview plan.
Checkflight:
!A check flight is only necessary after major repairs.
!During the check flight it must be determined whether the flight characteristics of the paraglider being tested
have changed compared to a brand-new glider.
!The examiner must be capable of comparing the construction regulations with the flight behaviour of the
paraglider to be tested and of determining any changes in the characteristics of the paraglider. This includes
above all that the paraglider and its characteristics / flight behaviour are known to the examiner.
!The type certification standards applied at the time of approval of the type must be known.
!A check flight must include at least the following points: take-off behaviour, tendency to deep stall (return
from B-stall), tendency to negative curves, steering range lengths, side collapse >50% .
!Wenn das überprüfte Gerät in irgendeiner Weise sich nicht richtig verhält, darf mit diesem Gerät nicht mehr
geflogen werden und muss zur Überprüfung zum Hersteller. Keinesfalls darf man selbst versuchen, den
Fehler zu beheben.
!
18.6. Inspection equipment
The test equipment to be used for the individual tests must be the equipment listed below:
- Air Porosity Meter: JDC
- Length measuring device: Measuring tape made of steel or laser measuring device
- Tensile strength device for lines: electronic measurement with maximum value memory, sampling rate > 50
measurements/second
- Strength tester for canopy: Bettsometer, B.M.A. GB 2270768All measuring devices must be calibrated and
maintained at regular intervals according to the manufacturer's specifications.
18.7. Documentation
!All test results as well as all details of the glider (type, size, serial number, year of manufacture) must be
recorded in the inspection report.
!Repair and maintenance work will also be noted on the inspection report.
!The overall state of the glider is displayed according to the checkboxes of the verification protocol. In the
overall state, all determined values such as strength, porosity, etc. are included.
!If the inspection result is negative, contact the manufacturer to agree on the further procedure (e.g. sending
the device to the manufacturer for repair).
!Exceptional defects must be reported to the manufacturer immediately!
!The inspection is to be marked on the glider next to the type label with an appropriate inspection stamp or
label. The information must include at least the time of the next inspection, place, date, signature and name
of the inspector.
!All inspection documents (inspection report and measurement report) shall be prepared in triplicate. The
equipment owner, inspector and manufacturer each receive one copy (the copy must be submitted
promptly). The retention period for the inspection documents is 6 years.
Line position Limit (daN) Line position Limit (daN)
AR1 - AR3, BR1 - BR3 125 AM5, AM6, BM5, BM6 60
BR4 50 CM1-CM6, DM1 - DM6 60
CR1, CR2 100 AM7, CM7, A15, B15, C15, D14e 20
CR3 90 A1 - A8, B1 - B8 60
AM1 - AM4, BM1 - BM4 85 A9 - A13, B9 - B13, C1 - C13, D1 - D13 40
Table of contents
Other Skyman Aircraft manuals


Popular Aircraft manuals by other brands


AUTO GYRO
AUTO GYRO RotorSport CALIDUS Pilot's handbook

Stevens Aero Model
Stevens Aero Model HeliumMG2 instruction manual

SUP’AIR
SUP’AIR EVO LITE 2 user manual

Micron Wings
Micron Wings MINI DELTA V2 manual

FlySynthesis
FlySynthesis STORCH CL Maintenance manual

Micron Wings
Micron Wings Glider Dual Fuse Fox manual