Skymsen DB-10 User manual

16
___________________________________________________________
___________________________________________________________
___________________________________________________________
___________________________________________________________
___________________________________________________________
___________________________________________________________
___________________________________________________________
___________________________________________________________
___________________________________________________________
___________________________________________________________
___________________________________________________________
___________________________________________________________
___________________________________________________________
___________________________________________________________
___________________________________________________________
___________________________________________________________
___________________________________________________________
___________________________________________________________
___________________________________________________________
___________________________________________________________
___________________________________________________________
___________________________________________________________
___________________________________________________________
___________________________________________________________
___________________________________________________________
___________________________________________________________
___________________________________________________________
___________________________________________________________
___________________________________________________________
___________________________________________________________
___________________________________________________________
___________________________________________________________
___________________________________________________________
___________________________________________________________
___________________________________________________________
___________________________________________________________
___________________________________________________________
Metalúrgica Skymsen Ltda
Rodovia Ivo Silveira 9525
Volta Grande
88355-202 Brusque/SC/Brasil
CNPJ: 82.983.032/0001-19
www.skymsen.com – Fone: +55 47 3211 6000
69780.0 - ENGLISH/ESPAÑOL
Data de Revisão: 06/11/2023
THE INFORMATION CONTAINED IN THE PRESENT INSTRUCTION MANUAL MAY BE MODIFIED WITHOUT PREVIOUS NOTICE.
INSTRUCTION MANUAL
MANUAL DE INSTRUCCIONES
POTATO PEELER, 10 kg / PELADORA DE PAPAS, 10 kg
MODEL/MODELO
DB-10

2
SUMARY
1. INTRODUCTION ............................2
1.1 Safety .................................................... 2
2. COMPONENTS AND TECHNICAL
CHARACTERISTICS ............................3
3. INSTALLATION AND PRE-OPERATION
.........................................................4
3.1 PosiƟoning............................................. 4
3.2 Electrical InstallaƟon.............................. 4
3.3 Hydraulic InstallaƟon..............................4
3.4 Pre OperaƟon ........................................ 4
4. OPERATION...................................5
4.1 StarƟng.................................................. 5
4.2 OperaƟonal Procedures ......................... 5
5. CLEANING.....................................5
6. MAINTENANCE .............................5
7. PROBLEM SOLVING.......................6
8. ELECTRICAL DIAGRAM ..................7
1. INTRODUCTION
1.1 Safety
When not properly used this equipment is a potenally
DANGEROUS machine. It is necessary to perform
maintenances, cleaning and/or any servisse by qualified
personnel and with the equipment disconnected from the
power grid.
The instrucons below must be followed to avoid accidents:
1.1.1 Read all the instrucons.
1.1.2 To avoid the risk of eletric shock and damages to
the appliance, never use it with: wet clothes and feet ou
on a wet surface, don´t patch it in water or any other liquid
or não mergulhe em água ou qualquer outro líquido e não
ulize jato de água diretwaterjet direct to the appliance.
1.1.3 Any appliance ulizaon must always be
supervised, mainly when it is being used near children.
1.1.4 Disconnect the aplliance from the power grid
when, it´s not being used, before cleaning it, removing the
accessories, acessories introducon, maintenance or any
other service.
1.1.5 Don´t use the equipment if the cable or plug is
damaged. Make sure that the power cable isn´t on the edge
of the table/counter or that it touches hot surfaces.
1.1.6 If the Equipment physically falls down, suffers any
kind of damage or has stopped working for any reason, it is
necessary to call specialized technical assistance.
1.1.7 The use of accessories not recommended by the
manufacturer can lead to injuries.
1.1.8 Keep your hands and any utensil far from the parts in
movement of the appliance while in operaon to avoid body
injuries or damage to the appliance.
1.1.9 During operaon never wear loose clothes with wide
sleeves, especially on the wrists.
1.1.10 Make sure that the electrical tension of the appliance
and the power grid are the same and that the appliance is
connected to the grounding grid.
1.1.11 When placing the Disc Nº.07 (Pic.01) make sure its
perfect fing on Central ShaPin # 02 (Pic. 02), avoiding to
damage the equipment.
1.1.12 This product was developed to be used in commercial
kitchens. It is used, for example, in restaurants, cafeterias,
hospitals, bakeries, etc.
This appliance usage is not recommended when:
- The producon process should be done in a connuous
way in industrial scale;
- The workplace is in an atmosphere of corrosive, explosive,
with dust or gas.
Make sure the cord is in perfect working condiƟons, if
not, change it for one in accordance to the local safety
standards. Such change shall be made by qualified
professional following the local safety standards.
This equipment shall not be used by children or any
person with reduced physical or mental capacity, lack of
experience or knowledge, unless they are under supervision
or have received from the person responsible for safety,
proper instrucƟons on how to use the equipment.
Children shall be watched in order to avoid them to
play with the equipment.
In case of emergency, unplug the appliance from wall
electrical outlet immediately.
Never spray water directly on the equipment.
15
VOLTAJE
PRENDE/APAGA
110/220V - 60Hz
LLAVE SELECTORA DE
VOLTAJE

14
8. DIAGRAMA ELÉCTRICO
PRENDE/APAGA
VOLTAJE
110/220V - 60Hz
3
2. COMPONENTS AND TECHNICAL CHARACTERISTICS
All the components that are part of this appliance are built
with highly selected materials for each purpose, according
to standard tests and with Skymsen experience.
PICTURE 01
08
01
07
04
05
06
02
03
09
01 – Water Entrance - Nipple
02 – Motor Housing
03 – Outlet Waste
04 – Feet
05 – ON/OFF Switch
06 – Door
07 – Lid
08 – Abrasive Disc
09 – Voltage Selector Switch
TABLE 01
CHARACTERISTICS UNIT DB-10 DB-10
Average Producon kg/h Up to 200 Up to 200
Voltage V 110/220 220
Frequency Hz 60 50
Power Rang W 368 368
Height inches 28 1/3 28 1/3
Width inches 18 7/10 18 7/10
Depth inches 22 8/10 22 8/10
Net Weight lb 53,4 53,4
Gross Weight lb 61,0 61,0
Load Capacity kg 10 10

4
01 - Central Sha
02 - Central ShaPin
PICTURE 02
02
01
3. INSTALLATION AND PREͳOPERATION
3.1 InstallaƟon
3.1.1 Placing
Your appliance must be installed in an aligned, non-slip,
stable surface with 850 mm of height.
PICTURE 03
800mm
1000mm
/ŶƐƚĂůůĂƟŽŶ
Area
FRONT SIDE
23 5/8”
19 7/10”
3.2 Electric InstallaƟon
This equipment has been designed for 110/220 V (50 or
60Hz) or 220 V (50Hz). When you receive the equipment
check tension printed in the tag on the electric cable.
If necessary, adjust the equipment to the desired voltage.
To do so, remove the Rubber Lid located at the boom of
the Equipment Base No. 09 (Pic.01) and adjust the Selector
Switch to the desired tension.
The cord has a plug with 3 pins, and the central pin is
intended to the grounding. It´s mandatory that the three
points are connected before starng the appliance.
Make sure the power grid where the appliance is
installed is compaƟble to the tension is compaƟble with
the tension indicated in tag in the feeding cable.
Before starƟng processing, the products must be clean,
without soil and without sand.
3.3 Hydraulic InstallaƟon
It is recommended to install the machine near a drain or
channel the Waste Outlet. It is also necessary to install a
faucet (diameter ¾) with tap water directly on the product
to be stripped. Alternavely, it is possible to pick up water
from another faucet through the water inlet pipe.
PICTURE 04
NIPPLE
Water entrance to
be connected to
the Nipple.
WATER EXIT PIPE
For water and
residues.
Install the
machine near a
water sink.
PRODUCT
ENTRANCE
It is mandatory
to let water
flow directly on
the product.
The water oulow jet shall not drop beyond the disc centre
as shown on Picture 05.
The water oulow shall not exceed 2.5 litres per minute.
PICTURE 05
WATER OUTFLOW JET
WATER ENTRANCE
DISC
3.4 Pre OperaƟon
Before to use the equipment all parts to be in contact with
the product shall be washed with water and neutral soap
(see item 3.3 Cleaning).
Make sure the equipment is firm on its working placv.
13
2 - Verificaciones a ejecutar cada tres meses:
- Verificar los componentes eléctricos como la llave prende/
desliga, botón de emergencia, botón rearme, y circuitos
electrónicos con respecto a sobrecalentamiento, aislamiento
deficiente o avería mecánica.
- Verificar posibles holguras en los ejes y rodamientos.
- Verificar retenedores, anillos O’ring , anillos V’ring, y otros
sistemas de vedamiento.
Pase el lector de QR Code para obtener
informaciones sobre seguridad y
mantenimiento.
7. RESOLUCIÓN DE PROBLEMAS
TABLA 02
PROBLEMAS CAUSAS SOLUCIONES
- La maquina no prende.
- Falta de energía eléctrica en
la red.
- Problemas en el circuito
eléctrico interno o externo de la
maquina.
- Verifique si hay energía
eléctrica en la red
- Llame la Asistencia Técnica.
- Olor a quemado ó humo.
- Problemas en el circuito
eléctrico interno ó externo de la
maquina.
- Llame la Asistencia Técnica.
- La maquina prende, sin
embargo cuando el producto
es colocado sobre el disco,
este para o gira en baja
rotación.
- Correa desliza.
- Problema en el motor
eléctrico.
- Llame la Asistencia Técnica.
- Cable eléctrico damnificado. - Problema durante el
transporte. - Llame la Asistencia Técnica.
- Ruidos anormales. - Rodamiento dañado. - Llame la Asistencia Técnica.
Este equipo fue diseñado para que necesite un mínimo
de manutención. Sin embargo pueden ocurrir algunas
irregularidades en su funcionamiento, debido al desgaste
natural causado por su uso.
Caso haya algún problema con su maquina, verifique la
Tabla – 02 abajo, donde están indicadas algunas soluciones
recomendadas.

12
En ninguna circunstancia toque con la mano el Disco
mientras el esté en movimiento.
4. OPERACIÓN
4.1 Accionamiento
Para prender el equipo proceda como abajo:
- Coloque el enchufe en la toma de la red eléctrica.
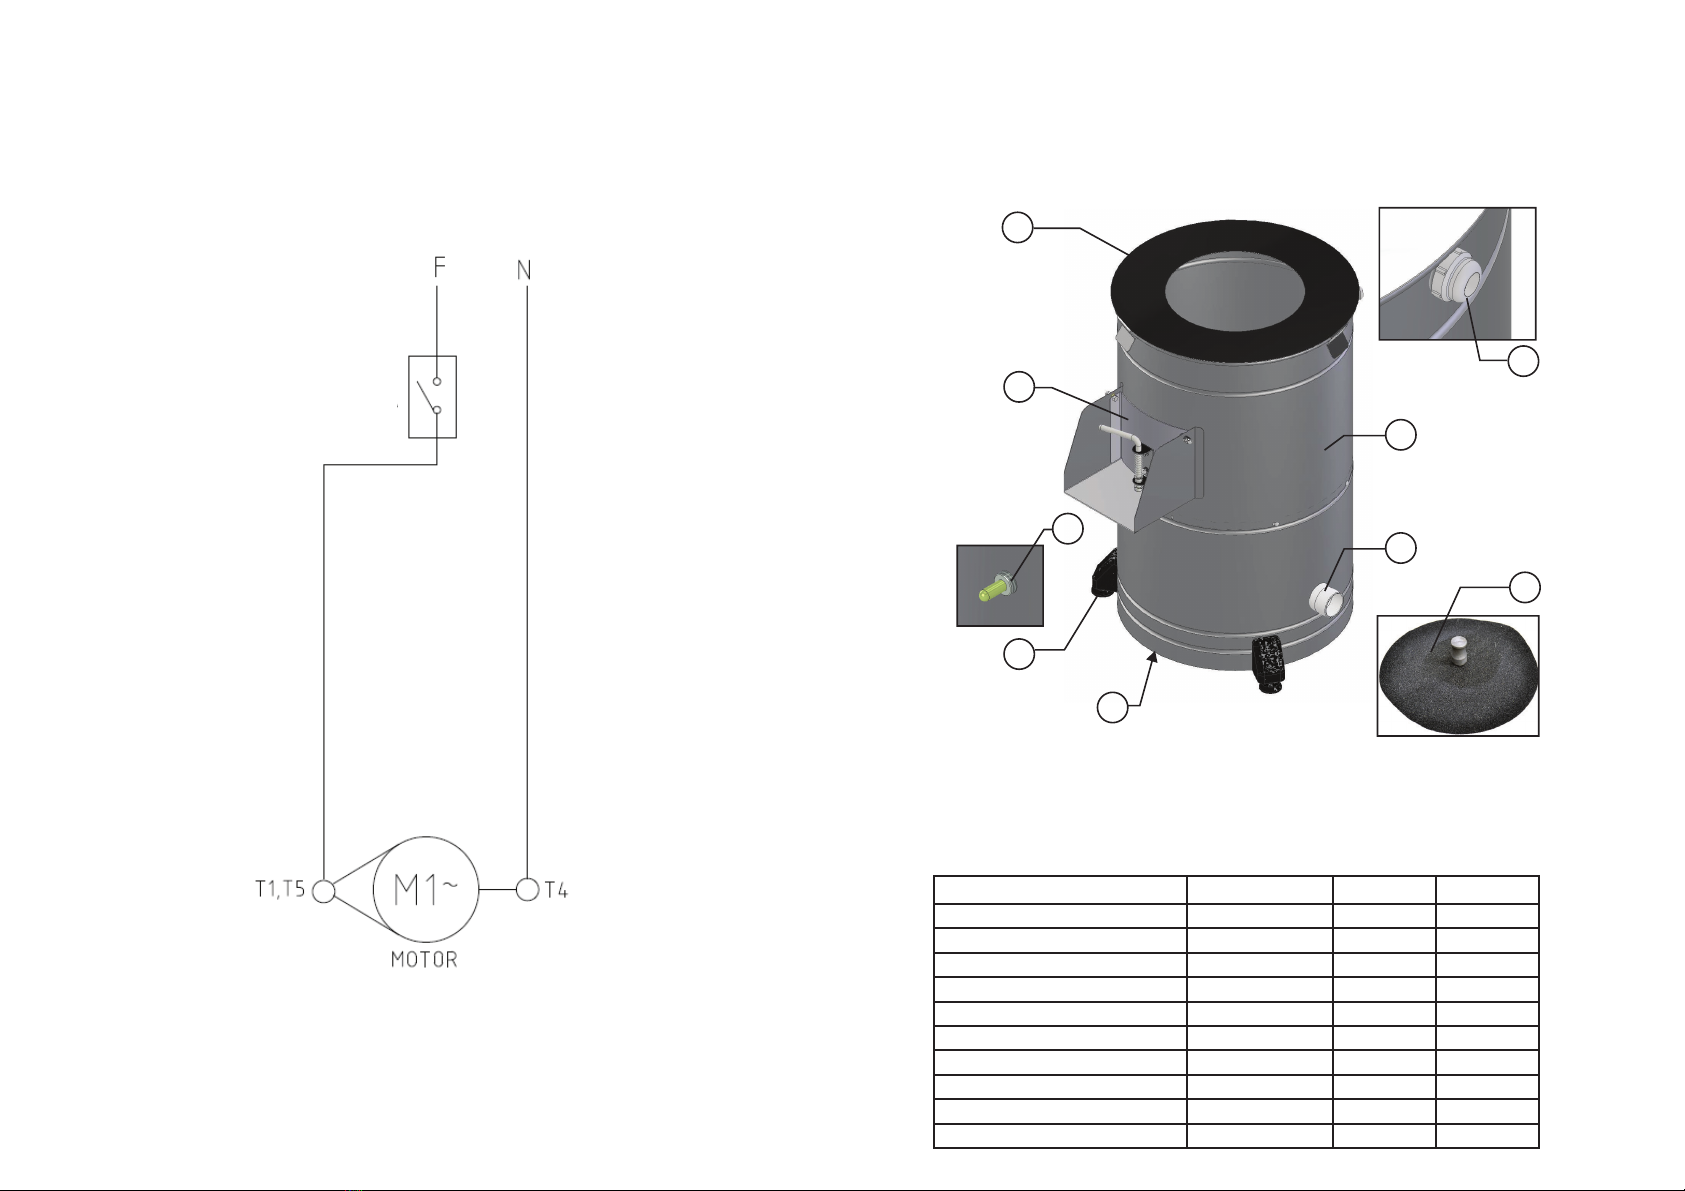
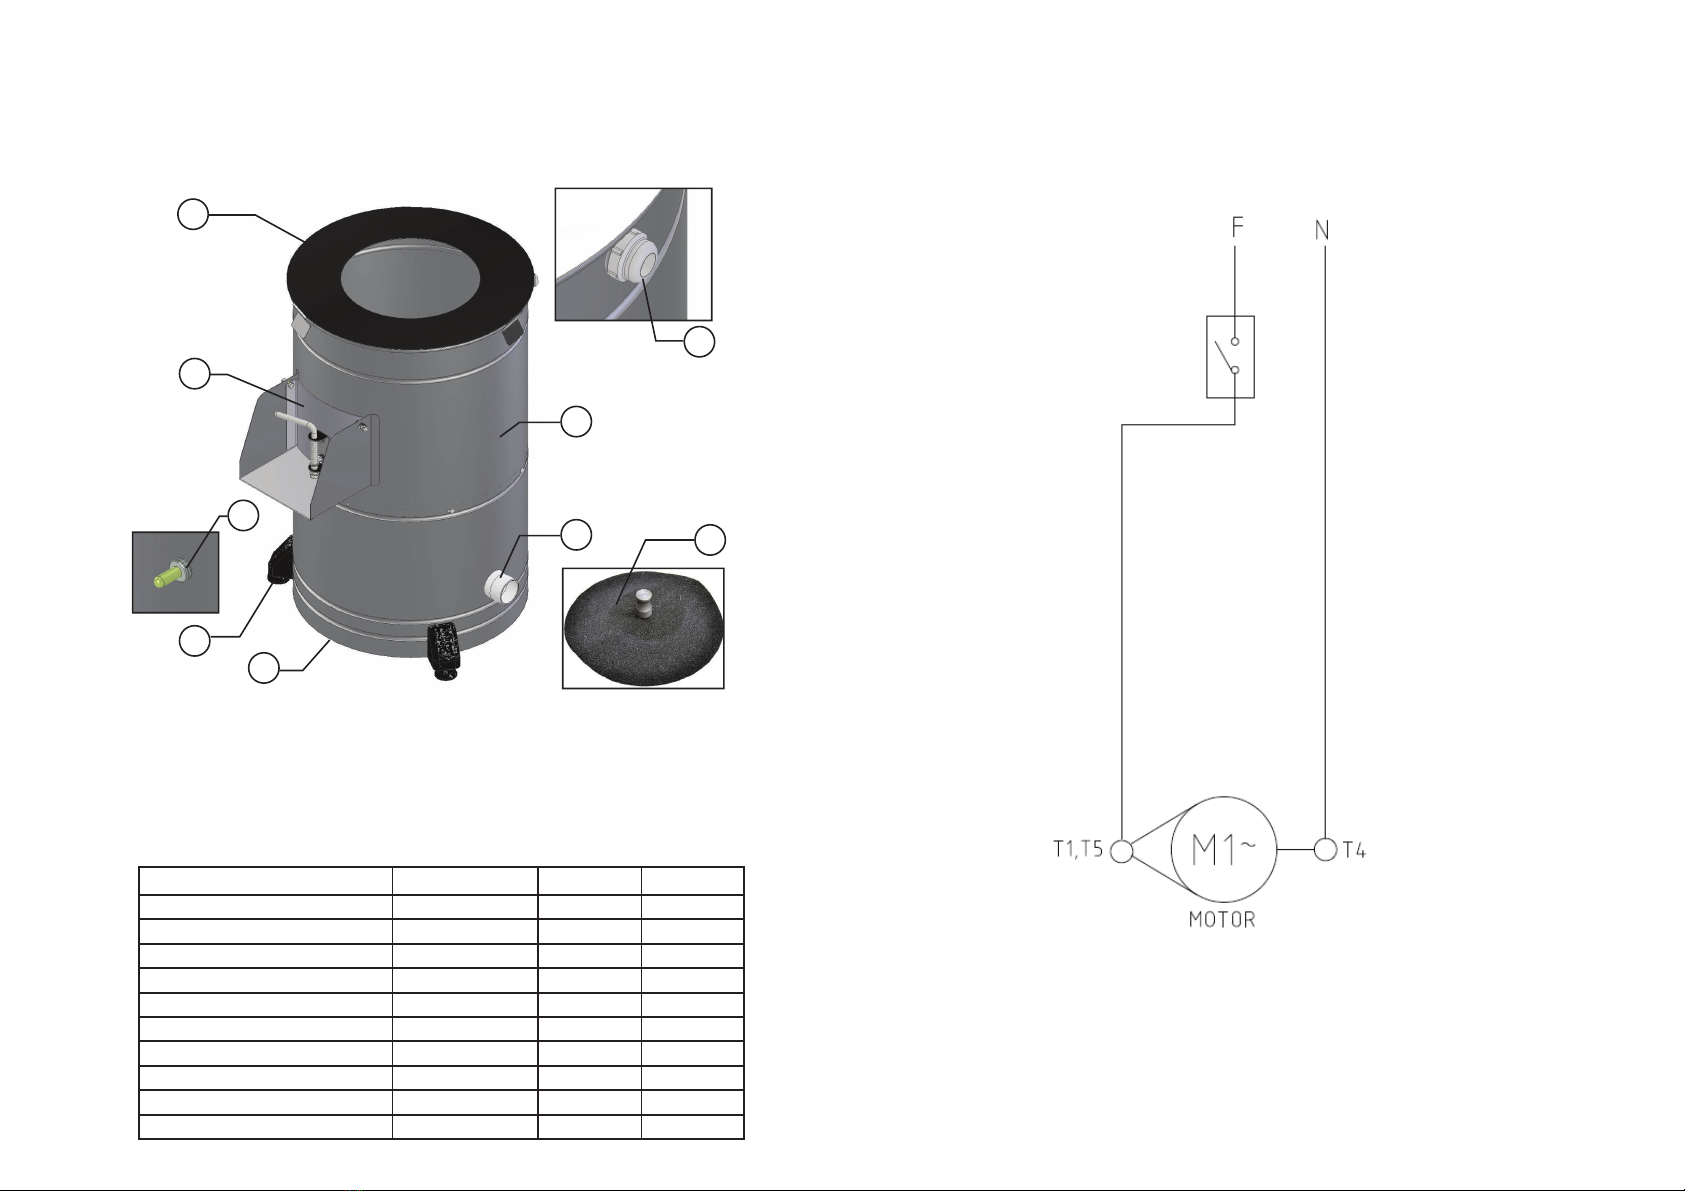
1 - Verifique si la Tapa No. 07 (Fig.01) esté colocada
correctamente.
2 - Presione la Llave Prende/Desliga No. 05 (Fig.01) en la
posición “I”.
4.2 Procedimiento para la Operación
- Coloque el producto a ser descascarado dentro el equipo.
- Fije a Tapa Nº 07 (Fig. 01) em su debido lugar.
- Abra el agua.
- Prenda el equipo con la Llave Prende/Desliga No.05 (Fig.01)
poniéndola en la posición “I” (prende).
- La peladora ene una capacidad máxima de 10 Kg de
papas y el empo esmado para la operación es de 1,2 a
2 minutos.
- Es posible observar cuando el producto estuviera
descascarado a través de la abertura existente en la Tapa
No.07 (Fig.01). Depois de se ter o produto descascado,
desligue o equipamento e espere até que o disco esteja
completamente parado e rere o produto manualmente.
ReƟre el enchufe de su toma antes de iniciar la
limpieza.
Nunca use chorros de agua directamente sobre la
maquina.
5. LIMPIEZA
El equipo debe ser totalmente limpio y higienizado, cuando:
- Antes de la ulizarlo por la primera vez;
- Todos los días después del turno de trabajo;
- Siempre que no ulizarlo por un largo período de empo;
- Antes de ponerlo en operación después de un largo
período de empo de inacvidad.
- Algunas partes pueden ser removidas para la limpieza:
- Disco Abrasivo No. 08 (Fig.01)
Para hacer una buena limpieza de la maquina siga las
siguientes instrucciones:
1. Prenda la maquina en vacío y hágala trabajar por algunos
minutos, dejándole escurrir agua en abundancia;
2. Desligue la maquina de la red eléctrica y espere que el
disco No.08 (Fig.01) esté completamente parado.
3. Pase un paño húmedo en la parte externa de la maquina.
4. Rere la Tapa No.07 (Fig.01) y levante el disco No.08
(Fig.01).
5. Use un cepillo con dientes de nylon y agua abundante
para limpiar el disco.
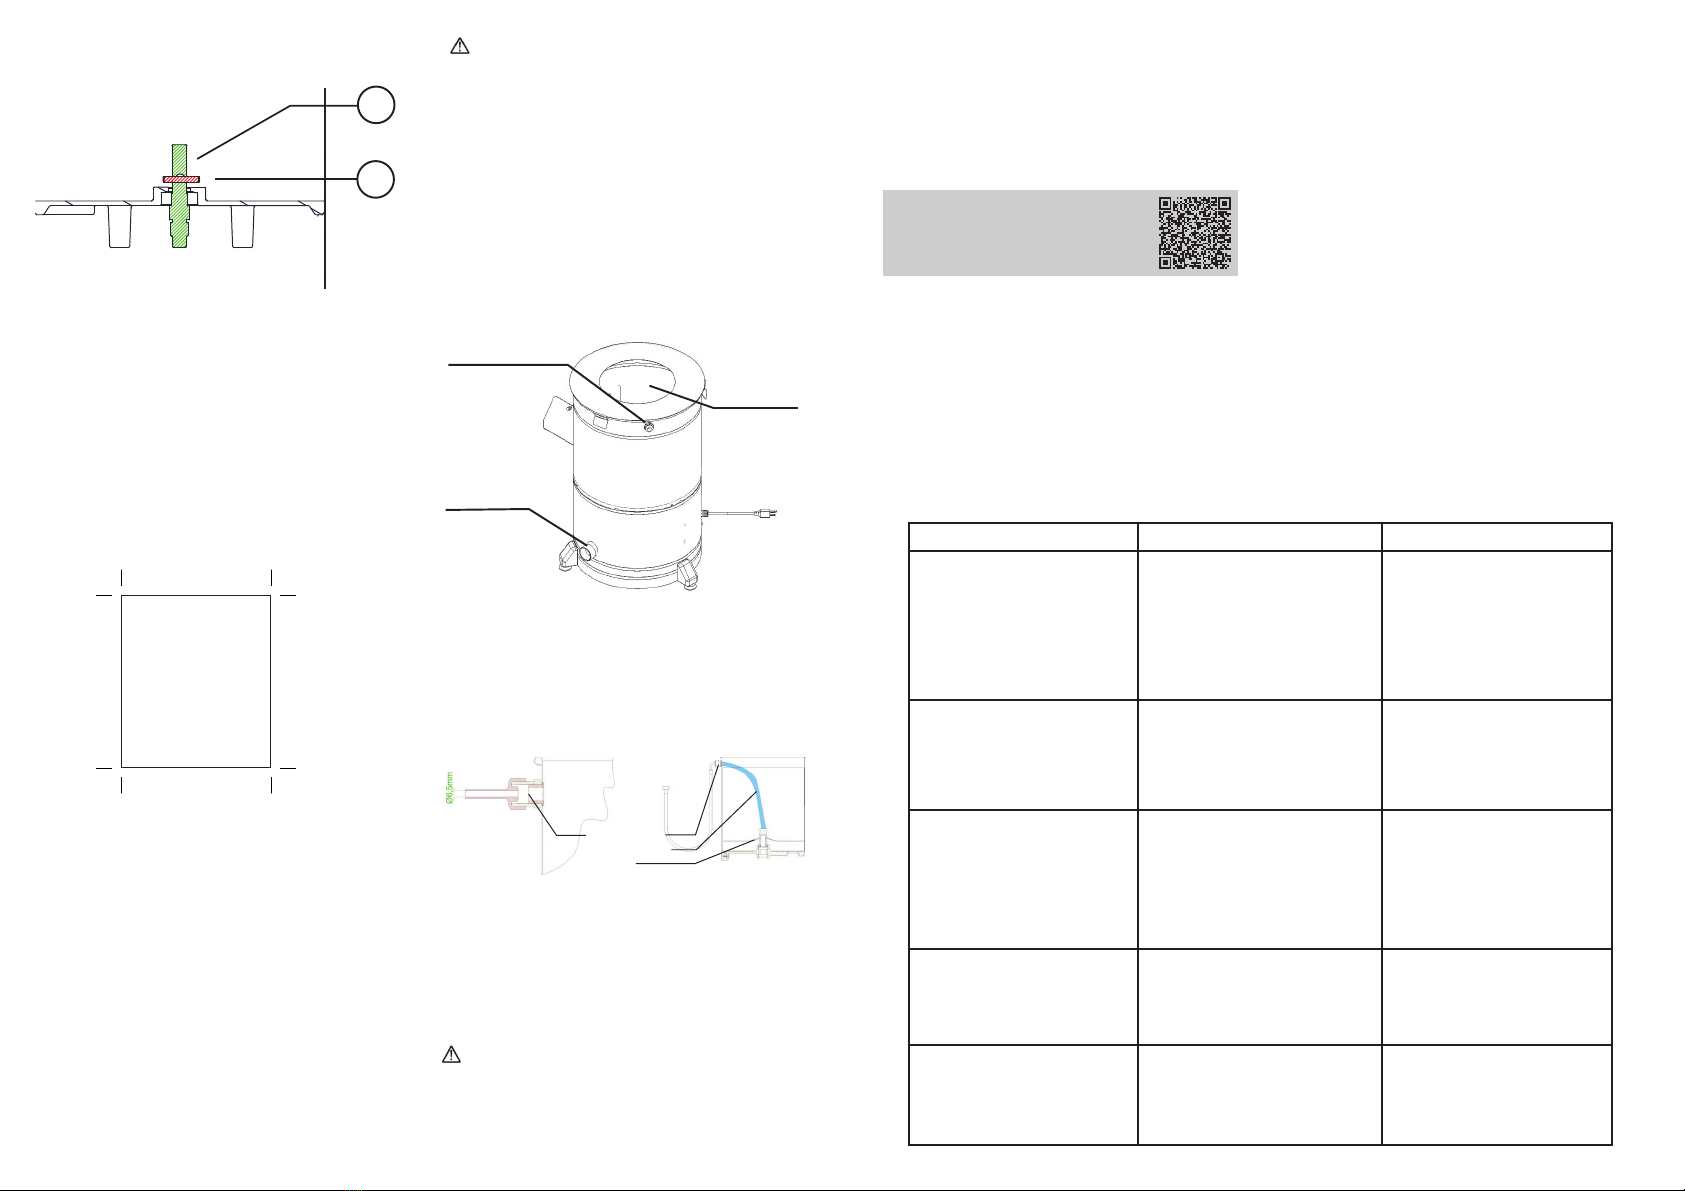
6. Recoloque el disco y la tapa al terminar la limpieza. Tenga
cuidado para que el disco se encaje en el perno del eje
central No.02 (Fig 02).
Lave todas las partes con agua y jabón neutro.
Pase el lector de QR Code para obtener
informaciones sobre cuidados con los
aceros inoxidables.
6. MANUTENCIÓN
El mantenimiento debe ser considerado como un conjunto
de procedimientos con el objevo de conservar el equipo en
las mejores condiciones de funcionamiento propiciando un
aumento de su vida úl y de su seguridad.
* Limpieza – Verificar el ítem No.3.3 de este manual.
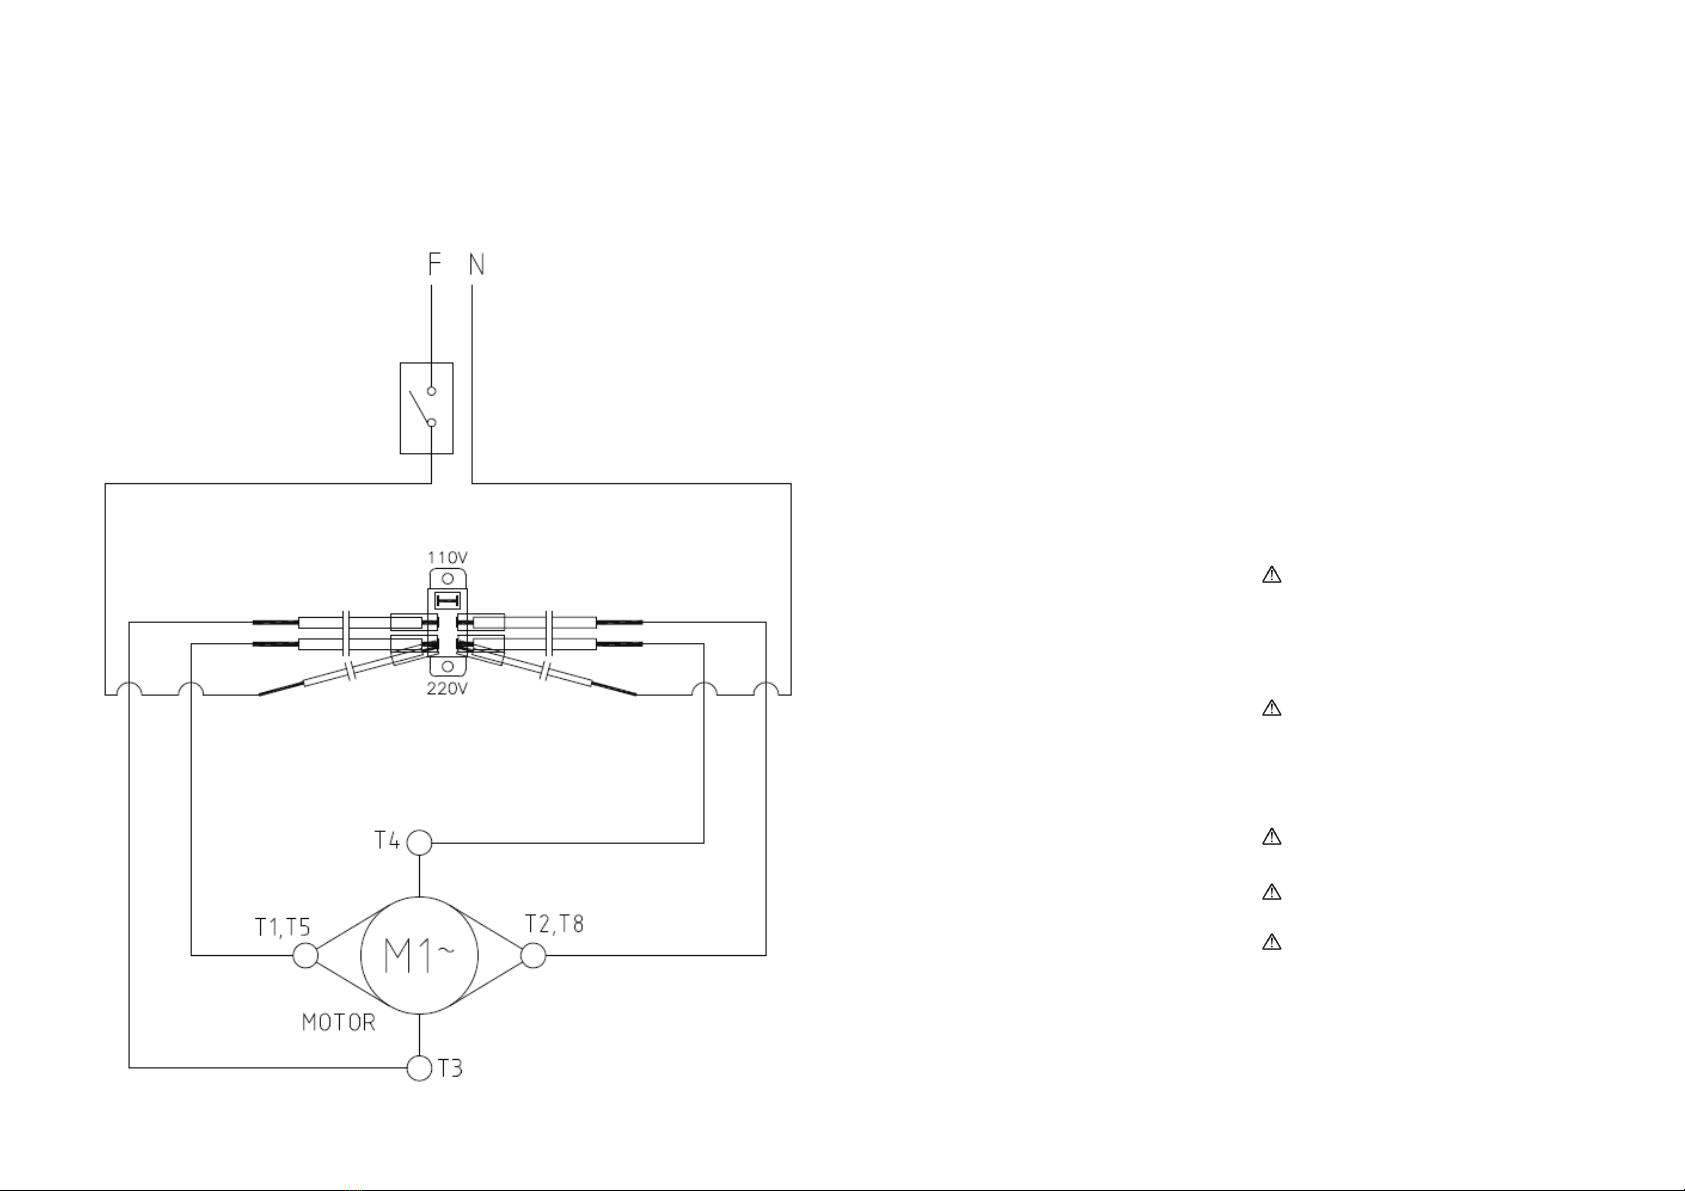
* Cableado – Verifique todos los cables cuanto a su
deterioración y todos los terminales cuanto a su aprieto y
corrosión.
* Contactos – Llave prende/desliga, botón de emergencia,
botón rearme, circuitos electrónicos, etc Verifique el
equipo para que todos los componentes estén funcionando
correctamente, y que la operación del equipo sea normal.
* Instalación – Verifique la instalación de su equipo de
acuerdo con el ítem 2.1 de este manual.
1 - Verificaciones a ejecutar mensualmente:
- Verificar la instalación eléctrica;
- Controlar la tensión de la toma eléctrica;
- Medir la corriente eléctrica y compararla con la corriente
nominal;
- Verificar el aprieto de todos los terminales eléctricos para
evitar malos contactos;
- Verificar posibles holguras del eje del motor eléctrico;
- Controlar el cableado eléctrico para idenficar señales
de sobrecalentamiento, aislamiento deficiente o avería
mecánica.
5
4. OPERATION
4.1 StarƟng
To turn on your appliance you should follow the direcons
below:
- Plug the equipment to the electric network.
1 - Verify if the Lid No. 07 (Pic.01) is properly posioned.
2 - Press the ON/OFF Switch No. 05 (Pic.01) to posion “I”.
4.2 OperaƟng Procedures
- Place the product inside the equipment.
- Close the Lid.
- Open the water flow.
- Start the equipment pressing the ON/OFF Switch to
posion “I”.
- The Peeler has a maximum capacity of 10 Kg potatoes and
the processing me is 1.2 to 2 minutes.
- It is possible to watch through the Lid the moment when
the product is peeled. Aer the product is peeled, switch
OFF the equipment and wait unl the disc has stopped, then
manually remove the potatoes.
Never place the hand on the Disc while it is on
movement.
Unplug the machine from the electric network, before
to start cleaning.
Never spray water directly on to the equipment.
5. CLEANING
Use Your QR Code Reader to access more
informaon regarding the cares needed
when handling stainless Steel.
6. MAINTENANCE
Maintenance must be considered a set of procedures
with the purpose to keep the equipment best operang
condions, therefore increasing the equipment life and
safety.
* Cleaning – Check item 3.3 Cleaning.
* Wiring – Check all wires regarding deteriorate condions as
well as all electric contacts (terminals) regarding ghtening
and corrosion.
* Contacts – ON/OFF switch, emergency buon, reset
buon, electronic circuits etc, check the equipment in order
to assure that all components are correctly working and the
equipment operaon is normal.
* Installaon – Make sure the installaon followed item 2.1
instrucons.
1 - Each month check:
- Check the electrical installaon;
- Measure the voltage at the socket;
- Measure the working current and match it with the
nominal current;
- Check the ghtening of all electric terminals to avoid bad
contacts ;
- Check electric motor shaclearance;
- Check the wiring for overeang, insulaon failures and
mechanical damages.
2 - Each three month checks:
- Check electrical components such as ON/OFF switch,
emergency buon, reset buon, electronic electric circuits,
overeang, insulaon failings, or mechanical damages.
- Check bearings clearances.
- Check retainers, O’rings, V’rings and other seals.
The equipment shall be totally cleaned and sanized:
- Before using it for the first me;
- Every day before closing the work shi;
- Always when it has not been in use for a long me;
- Before using aer it has not been in use for a long me.
Some parts of the equipment may be removed:
- Abrasive Disc # 08 (Pic.01)
To achieve a good machine cleaning, follow the instrucons
below:
1. Start the machine empty, and let it work during some
minutes, adding abundant water.
2. Switch OFF the machine and unplug it. Wait for the Disc
No.08 (Pic.01) to stop completely.
3. Clean the outside of the housing with a wet cloth.
4. Remove the Disc No. 08 (Pic.01).
5. Clean the Disc using a nylon brush and abundant water.
6. Replace the Disc inside the machine. Make sure to have
the Disc fing on the central shapin No. 02 (Pic.02).
All parts shall be washed with water and neutral soap.

6
7. PROBLEM SOLVING
Use Your QR Code Reader to access
more informaon regarding safety and
maintenance.
PROBLEM CAUSE SOLUTION
- The machine does not start.
- Electric energy shortage.
- Problem with the internal or
external wiring.
- Check electric Energy source.
- Call Technical Assistance.
- Burnt smell or smoke. - Problem with the internal or
external wiring. - Call Technical Assistance.
The machine starts, but when
the product is placed on the
Disc, the Disc stops or turns
slowly.
- Belts sliding.
- Problem with the Electric
motor".
- Call Technical Assistance.
- Damaged Cord. - Problem during transportaon. - Call Technical Assistance.
- Abnormal Noises. - Problems with the bearings. - Call Technical Assistance.
11
01 – Eje central
02 – Perno del Eje Central
FIGURA 02
02
01
3. INSTALACIÓN Y PRE OPERACIÓN
3.1 Instalación
3.1.1 Posicionamiento
El equipo debe ser colocado y nivelado sobre una superficie
seca y firme.
650mm
750mm
Área para
Instalación
FRENTE
600 mm
500 mm
FIGURA 03
3.2 Instalación Eléctrica
Verifique el voltaje de la red eléctrica para ver se es 110 ó
220V (60Hz) ó 220 V (50Hz).
Si necesario, ajuste el equipo a la tensión deseada. Para
hacerlo, rere la tapa de goma ubicada en la parte inferior
de la base del equipo No. 09 (Fig.01) y ajuste el interruptor
a la tensión deseada
El cable de alimentación posee un enchufe con dos clavillos
redondos y un clavillo plano (aterramiento) es obligatorio
que los tres estén debidamente conectados antes de usar
el equipo.
Cerquese de que la tensión de la red eléctrica es la
misma de la tensión indicada en la equeta del cable de
alimentación.
Antes de iniciar el procesamiento, los productos
deben estar limpios, sin Ɵerra y sin arena.
3.3 Instalación Hidráulica
Recomiendase instalar la maquina cerca de un desaguadero
o canalizar la salida del agua. Es también necesario instalar
un grifo (diámetro ¾) con agua corriente directamente sobre
el producto que se desee descascarar. Como alternava , es
posible captar el agua por otro grifo a través del tubo de
entrada de agua.
FIGURA 04
NIPPLE
Entrada de
agua, atravez
de un tubo.
WATER EXIT PIPE
For water and
residues.
Install the
machine near a
water sink.
ENTRADA DEL
PRODUTO
Es obligatoria
la entrada de
agua corriente
directamente
sobre el
producto.
El chorro de agua que entra no debe pasar el centro del
disco, como representado en la figura 05.
El flujo de agua debe ser en el máximo de 2,5 l por minuto.
CHORRO DE AGUA
ENTRADA DE AGUA
DISCO
FIGURA 05
3.4 Pre Operación
Antes de usar el equipo se debe lavar todas las partes que
entren en contacto con el producto con agua y jabón neutro
(vea ítem 3.3 Limpieza).
Cerquese que la Peladora de Papas esté firme en su lugar
de trabajo.

10
2. COMPONENTS Y CARACTERÍSTICAS TÉCNICAS
Todos los componentes que incorporan la maquina son
construidos con materiales cuidadosamente seleccionados
para su función, dentro de los padrones de prueba y de la
experiencia de SKYMSEN.
FIGURA 01
08
01
07
04
05
06
02
03
09
01 – Entrada de Agua – Nipple
02 – Motor Housing
03 – Caño de Salida
04 – Piés
05 – Llave Prende/Desliga
06 – Puerta
07 – Tapa
08 – Disco Abrasivo
09 – Llave Selectora de Voltaje
TABLA 01
CARACTERÍSTICAS UNIDAD DB-10 DB-10
Producción Mediana kg/h hasta 200 hasta 200
Tensión V 110/220 220
Frecuencia Hz 60 50
Potencia W 368 368
Altura mm 720 720
Ancho mm 475 475
Profundidad mm 580 580
Peso Neto kg 24,2 24,2
Peso Bruto kg 27,6 27,6
Capacidad de Carga kg 10 10
7
8. ELECTRIC DIAGRAM
VOLTAGE
220V - 50Hz
ON/OFF

8
VOLTAGE
ON/OFF
110/220V - 60Hz
VOLTAGE SELECTOR SWITCH
9
INDICE
1. INTRODUCCIÓN.............................9
1.1 Seguridad ...............................................9
2. COMPONENTS Y CARACTERÍSTICAS
TÉCNICAS ....................................... 10
3. INSTALACIÓN Y PRÉ-OPERACIÓN. 11
3.1 Posicionamiento ...................................11
3.2 Instalación Electrica ..............................11
3.3 Instalación Hidráulica
............................11
3.4 Pré Operación.......................................11
4. OPERACIÓN ................................ 12
4.1 Accionamento.......................................12
4.2 Procedimiento para Operación .............12
5. LIMPIEZA .................................... 12
6. MANUTENCIÓN .......................... 12
7. RESOLUCIÓN DE PROBLEMAS ..... 13
8. DIAGRAMA ELECTRICO ............... 14
1. INTRODUCCIÓN
1.1 Seguridad
Este artefacto es potencialmente PELIGROSO cuando se
uliza incorrectamente. Es necesario que la manutención,
limpieza y/o cualquier servicio, sea realizado por una
persona calificada y con el equipamiento desconectado de
la red eléctrica.
Las instrucciones a connuación deberán ser seguidas para
evitar accidentes:
1.1.1 Lea todas las instrucciones.
1.1.2 Para evitar el riesgo de descarga eléctrica y daños
al artefacto, nunca lo ulice con: ropas o pies mojados e/o
en superficies húmeda o mojadas; no sumerja en agua
o en cualquier otro líquido y no ulice chorro de agua
directamente en el equipamiento.
1.1.3 El uso de cualquier equipamiento debe ser siempre
supervisado, principalmente cuando se ulice próximo de
niños.
1.1.4 Desenchufe el artefacto de la red eléctrica cuando:
no esté en uso, antes de limpiarlo, inserción o extracción de
accesorios, manutención y cualquier otro po de servicio.
1.1.5 No use el equipo cuando tenga el cable o el enchufe
damnificado. No deje que el cable de alimentación se quede
en el borde de una mesa, o que toque superficies calientes.
1.1.6 Cuando el equipo se haya caído, estuviera
damnificado de alguna manera ó no funcione llévelo hasta
una Asistencia Técnica para revisión y reparo.
1.1.7 Usar accesorios no recomendados por el fabricante
puede proporcionar lesiones corporales.
1.1.8 Mantenga las manos ó cualquier otro objeto lejos
de todas las partes en movimiento mientras el equipo
estuviera funcionando para evitar lesiones corporales y/ó
daños al equipo.
1.1.9 Nunca use ropas con mangas anchas,
principalmente cerca de los puños, durante la operación.
1.1.10 Cerquese que la tensión del equipo y de la red
eléctrica sean iguales , y que el equipo esté aterrado.
1.1.11 Cuando colocar el Disco No. 07 (Fig.01) verifique su
perfecto encaje en el Perno del Eje Central No 02 (Fig.02).
Asegúrese que el cable de alimentación esté en
perfectas condiciones de uso. Si no lo está, reemplácelo
por otro que aƟenda a las especificaciones técnicas y de
seguridad.
Este reemplazo deberá ser realizado por un profesional
calificado atendiendo las normas de seguridad local.
Este equipo no es para ser uƟlizado por personas
(inclusive niños) con capacidades İsicas o mentales
reducidas, o con falta de experiencia o conocimiento, a no
ser que tengan recibido supervisión o instrucción referente
al uso de este equipo por una persona responsable por la
seguridad del mismo.
Recomendamos que se vigile a los niños para no
permiƟrles jugar con la máquina
En caso de emergencia, reƟre el enchufe del
tomacorriente.
Nunca use chorros de agua directamente sobre el
equipo.
Other manuals for DB-10
1
Table of contents
Other Skymsen Industrial Equipment manuals
Popular Industrial Equipment manuals by other brands

Isel
Isel ICV 4030 CAN user manual

FTI
FTI LBRA-7 Operation, maintenance, and repair manual

York
York AHV8 UH Series User's information, maintenance and service manual

probst
probst VZ-H-UNI-KV operating instructions

Chicago Dryer
Chicago Dryer King Edge instruction manual

Larius
Larius Zeus Liner 50L Operating and maintenance instruction manual

ESCO Technologies
ESCO Technologies ETS-Lindgren 5247 quick start guide

Meritor
Meritor Meritor ELSA 195 Maintenance manual

Schuck Group
Schuck Group SHD Installation & operation manual

Siemens
Siemens 3VF 9 524-1FA.0 operating instructions

Binks
Binks DXA-SC31B Service manual

ABB
ABB HT844572 Operation manual