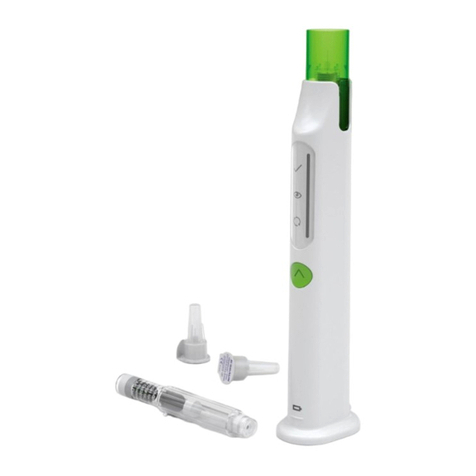
Skytrofa Auto-Injector User manual

Ascendis Pharma Customer Support
1-844-44ASCENDIS
(1-844-442-7236)
Device expiration
Keep Track of Your Injections This is your
Instructions for Use
• For quick overview of steps, read your Quick Reference Guide
• For training video, go to www.skytrofa.com
This Instructions for Use has been approved by
the U.S. Food and Drug Administration.
Approved: Month, Year
2021-07-16 13500500
Distributed by:
Ascendis Pharma, Inc.
Palo Alto, CA 94301
USA
Phillips-Medisize A/S
Gimsinglundvej 20
DK-7600 Struer
Denmark
Instructions
for Use
Instructions
for Use
Quick
Reference Guide
Training
Video
Single-patient use

Insert
cartridge
into
flashing
green
top.
3.1 3.2
Click
cartridge
inplace.
(Greentop
willstop
flashing,mixing
icon will
lightup, and
batteryicon
willswitch off)
After
click,
remove
finger
from
cartridge.
3.3
Thentake the second injection by repeating
Step1 to Step 11 with a new cartridge and needle
beforecontinuing to Step 12.
1Check and assemble cartridge and needle
1.1 1.2 1.3
9.29.1
Keepupright
untilyou hear
2loudbeeps
andthe entire
progressbar
lightsup.
Pulloff needle
cover.
Donot twist.
Keepneedle
coverfor
later.
Washhands.
Medicineis ok to use if it is colorless
andclear (some air bubbles are ok).
Goto Step 8.
Donot use the mixed
medicineif it has visible
particles.Press the green
buttonfor 3seconds and
goto Step 10.
Pressand hold
greentop against
theinjection site for
10to 15 seconds
until you hear 2
loudbeeps.
Removethe
auto-injector
fromskin and
waituntil you
hear2loud
beeps.
(Greentop
willflash 2times
andcheck
markicon
willlight up)
(Greentop will
startflashing)
Checkthat
cartridgeis empty.
Putused cartridge and
needlein a sharps
disposalcontainer.
(Moreinfo:
SeeInstructions for Use - page 34)
Puton the protective cover.
Storeat room temperature
between59°F to 86°F (15°C to 30°C),
tobe ready for next use.
Back
Front
Stomach(abdomen)
Thighs Buttocks
6.1 6.2
10.1 10.2 10.3
6Finish mixing
5Turn the auto-injector up and down
8Prepare for injection 11 Check cartridge and throw away
12 Store the auto-injector
9Inject medicine
2Turn on the auto-injector
3Insert cartridge
4Wait while mixing 10 Remove cartridge
7Check mixed medicine
Checkexpiration
dateand cartridge
doseon cartridge
pack.
Pressand
releasethe green
buttonto turn on
theauto-injector.
(Youwill hear 2
loudbeeps.
Batteryicon
willlight up and
greentop will
startflashing)
Waituntil you
hear2loud
beepsand the
entireprogress
barflashes.
(Eyeicon will
lightup)
Check
expiration
dateon
needle.
Wait4 to 8
minutesfor the
auto-injectorto
mixmedicine.
Watchprogress
bargradually
lightup.
Turnthe auto-injector up
anddown.
Atick sound confirms
theturns are correct.
Turn5 to 10 times
untilyou hear
2loudbeeps and
theprogress bar,
exceptthe top
element,lights up.
Remove
paper
from
needle.
year month
YYYY MM-
day
DD-
Expirationdate
Expirationdate
year month
YYYY MM-
Cartridgedose
Screwneedle
tightlyon cartridge.
Donot remove
needlecover. Press
needle
coverinto
flashing
greentop. Press
needle
cover
downto
release
cartridge.
Remove
used
cartridge.
8.1 8.2 8.3
Choosean injection site:
Stomach(abdomen),
thighs,or buttocks.
Changethe injection site for
everyinjection.
Cleaninjection
sitewith alcohol
wipe.Do not
injectthrough
clothes.
Doesyour weekly dose require 2 cartridges?
Prepare Mix
Inject After injection
Wait4 to 8
minutes
65
Parts Overview
Getting Started
How to Use
Troubleshooting
and Care
Product Information
1 4 7 10
2 5 8 11
3 6 9 12
Green Top
Starts injection when pressed
against skin
Inspection Window
Allows for inspection of mixed
medicine
Progress Bar
Shows progress of mixing and injection
bRead more on pages 20–24 and 30–31
(and pages 42–43 for troubleshooting)
SKYTROFA Cartridge
Contains medicine and water for injection
Status Icons
Needle
Green Button
To turn on the SKYTROFA Auto-Injector or to
reject mixed medicine
Green Check Mark
Injection successfully completed
Constant Green
aBattery is fully charged
aThe auto-injector is ready to use
Green Eye
Mixed medicine is ready for inspection
in window
Flashing Green
aAt least 1 injection remaining, but
charging recommended after use
Green Mixing
Medicine mixing is in progress
Flashing Red
aBattery needs charging
Battery Icon
Status Icons
bRead more about status icons on
pages 18–33 (and pages 40–47 for
troubleshooting)
bRead more about battery status
icons on page 17

Ascendis Pharma Customer Support
1-844-44ASCENDIS
(1-844-442-7236)
Device expiration
Keep Track of Your Injections This is your
Instructions for Use
• For quick overview of steps, read your Quick Reference Guide
• For training video, go to www.skytrofa.com
This Instructions for Use has been approved by
the U.S. Food and Drug Administration.
Approved: Month, Year
2021-07-16 13500500
Distributed by:
Ascendis Pharma, Inc.
Palo Alto, CA 94301
USA
Phillips-Medisize A/S
Gimsinglundvej 20
DK-7600 Struer
Denmark
Instructions
for Use
Instructions
for Use
Quick
Reference Guide
Training
Video
Single-patient use
• Important Information
• Before You Begin
• Setting Up
• Step-by-Step Guide
• Troubleshooting
• Cleaning and Maintenance
• Charging and Charger Cable
• Storing
• Product Safety
• Expiration
• EMC Compliance Levels
Ř7HFKQLFDO6SHFLƓFDWLRQ
• Symbols
• Warranty and Disclaimer
• Parts Overview

2
Step-by-step Instructions
for the SKYTROFA Auto-Injector
Read and follow this Instructions for Use
that comes with your auto-injector before
you start using it. This information does not
take the place of talking to your healthcare
provider about your medical condition or
your treatment.
The back cover of this Instructions for Use
folds out for reference while you read the
rest of the instructions.
If you have any questions about the
auto-injector, the medicine, or these
instructions, please contact your healthcare
provider or Ascendis Pharma Customer
Support. For contact information
bback cover.

Getting Started
3
Getting Started
Page
Important Information …………… 4
Before You Begin ………………… 6
Setting Up ………………………… 8

4
Important Information
Important information about your
SKYTROFA Auto-Injector:
The auto-injector is used to give
(administer) SKYTROFA under your skin
(subcutaneously).
Do not use the SKYTROFA Auto-Injector
for the first time until you receive training
from a healthcare provider. If you do not
follow the instructions for the auto-injector,
you may not get the right dose, cause
injury, or get an infection.
The auto-injector should only be used with
SKYTROFA cartridges and needles that are
prescribed by your healthcare provider.
Cartridges and needles come together
in the same packaging. Follow the
instructions that come with SKYTROFA
cartridges. If refrigerated, take the
cartridge out of the refrigerator and leave
at room temperature for 15 minutes
before use.
Your weekly dose may require
that you use 2 cartridges.

Getting Started
5
Do not use your auto-injector with other
medicines or needles.
Do not share your auto-injector with
other people, even if the needle has been
changed. You may give other people a
serious infection or get a serious infection
from them.
Do not reuse needles.
Do not drop the cartridges because they
may break.
Keep out of the reach of children.
This product contains small parts that may
present a choking hazard to small children.
The cable can present a strangulation
hazard. The auto-injector should only be
used under the supervision of a caregiver.
Do not point the auto-injector at yourself
or other people, except when you are
ready to inject.
Do not use or place the auto-injector
closer than 12 inches (30 cm) to microwave
ovens or electronic equipment with
antennas such as mobile phones and
WiFi transceivers.

6
Before You Begin
The SKYTROFA Auto-Injector
The auto-injector is an electronic, reusable
device for people needing injections
of SKYTROFA. It automates parts of the
procedure for injecting SKYTROFA. The
auto-injector is designed for personal
home use, so that the injections may be
given without the assistance of a medical
professional.
The SKYTROFA Cartridge
SKYTROFA comes in a single-use cartridge.
The cartridge has 2 chambers, 1 filled with
powder and 1 filled with water. The
auto-injector automatically mixes the
powder and the water during preparation,
making it ready for injection.
The Needle
The single-use needle comes with
SKYTROFA cartridges and is used for
injecting the medicine.

Getting Started
7
Before You Begin
Charger
Quick Reference
Guide
SKYTROFA Auto-Injector
Figure A
USB to
Micro-USB Cable
Auto-Injector
Protective Cover
Product Overview

8
1. Remove the SKYTROFA Auto-Injector
from the package.
2. Connect the USB (large end of the
cable) to the charger (only use the
provided charger). Plug the charger
into a power outlet. Connect the
Micro-USB (small end of the cable)
to the back of the auto-injector. For
protection, charge the auto-injector
with the protective cover on
(see Figure B).
• For more information on charging
bpage 49.
Setting Up
Figure B

Battery
icon
Getting Started
9
Setting Up
3. Fully charge the auto-injector before
XVLQJLWIRUWKHƓUVWWLPH7KLVZLOO
take 2hours and 30 minutes. When
the battery icon located at the base
of the auto-injector (see Figure C) is
ŴDVKLQJUHGRUJUHHQLWLVFKDUJLQJ
When it shows constant green, the
auto-injector is fully charged and is
ready to use after the charging cable
is unplugged.
• When fully charged, the battery
should last for at least 4injections.
• When traveling, bring your charger
and the right adaptor for different
power outlets depending on your
destination.
• The auto-injector cannot be used
when connected to the charger.
Figure C

10
4. Find a quiet place where you can
perform your injection.
5. Gather your supplies and place
WKHPRQDŴDWKDUGFOHDQVXUIDFH
Supplies needed for an injection:
From SKYTROFA Auto-Injector
packaging
(see Figure A):
• 1 SKYTROFA Auto-Injector
From SKYTROFA packaging
(see Figure D):
• 1 SKYTROFA Cartridge
Ř 2PQLFDQƓQHPP[PP
*[Ő%%UDXQQHHGOH
Other supplies (not included)
(see Figure D):
• 1 Alcohol Wipe
• 1 Sharps Container
If your weekly dose requires
2 cartridges, you will need the
following additional supplies:
• 1 SKYTROFA Cartridge
Ř2PQLFDQƓQHPP[PP
*[Ő%%UDXQQHHGOH
• 1 Alcohol Wipe
Setting Up

Getting Started
11
Alcohol Wipe
Needle
B.Braun
Sharps
Container
SKYTROFA Cartridge
Ascendis Pharma
Supplies Needed for Each Injection
Figure D

12
Does Your Weekly Dose
Require 2 Cartridges?
Your healthcare provider may prescribe
a dose that requires use of the
medicine in 2 cartridges.
If you have been prescribed a dose
that requires 2 cartridges:
• 7DNH\RXUƓUVWLQMHFWLRQ6WHS
WR6WHSSDJHVŊ
• Then take your second injection
by repeating Step 1 to Step 11
with a new cartridge and needle.
• After your second injection,
continue to Step 12 (page 36).

How to Use
13
How to Use
Step-by-Step Guide Page
Prepare …………………………… 14
Mix ………………………………… 20
Inject ……………………………… 26
After Injection …………………… 32

1
14
Check and assemble cartridge and needle
1.1 Check the expiration date and
cartridge dose on the cartridge
packaging (see Figure E).
Remove the SKYTROFA cartridge
from the packaging according to the
instructions on its lid.
Do not use if the expiration date has
passed on the cartridge.
• If you are unsure about your dose,
contact your healthcare provider.
• If you are unsure about the
medicine expiration date, please
call Ascendis Pharma Customer
Support. For contact information
bback cover.
Figure E
Prepare
Cartridge dose
Expiration date
YYYY - MM
————
——
year month

How to Use
15
Check and assemble cartridge and needle
1.2 Check the expiration date on the
needle. Remove the paper from the
needle (see Figure F).
Do not use if the expiration date has
passed on the needle.
1.3 Screw the needle straight on the
cartridge by turning clockwise until
there is a WLJKWƓW (see Figure G).
Do not remove the plastic needle
cover. You will need it to insert
the cartridge into the
SKYTROFA Auto-Injector.
Figure F
Figure G
Expiration date
YYYY - MM - DD
————
——
——
year month day

2
16
Prepare
Turn on the auto-injector
2.1 Disconnect the auto-injector from the
charger when charged.
• The auto-injector cannot be used
when connected to the charger.
2.2 Find a quiet place where you can give
your injection.
2.3 Remove the protective cover. Place the
DXWRLQMHFWRUXSULJKWRQDŴDWVXUIDFH
2.4 Press and release the green button to
turn on the auto-injector
(see Figure H).
• You will hear a humming sound. The
battery icon and the 3 icons above
the green button will light up. Then
all of the icons will turn off, except
the battery icon.
Press and
release the green
button to turn on
the auto-injector. (You will hear 2
loud beeps.
Battery icon
will light up and
green top will
VWDUWŴDVKLQJ
Figure H

How to Use
17
• You will hear 2loud beeps and the
JUHHQWRSZLOOVWDUWŴDVKLQJ7KH
auto-injector is ready for use.
• If the auto-injector is not active for
6minutes, it will turn off. Press the
green button to turn it on again.
2.5 Check the battery icon on the base
of the auto-injector to see if it is
charged. The battery icon is green
when the auto-injector is ready to use:
Constant Green
Battery is fully charged.
The auto-injector is ready to use.
Flashing Green
At least 1 injection remaining, but
charging is recommended after
use.
Flashing Red
Battery needs charging.
If no icons light up bpage 44.
,I\RXVHHŴDVKLQJLFRQVRWKHUWKDQWKHEDWWHU\
bpages 46–47.

3
18
3.1 ,QVHUWWKHFDUWULGJHLQWRWKHŴDVKLQJ
green top by pushing straight down
with the needle cover still on
(see Figure I).
3.2 Click the cartridge into place. Make
sure the cartridge is pushed all the
way down (see Figure J).
• You will hear a click, the green top
ZLOOVWRSŴDVKLQJWKHJUHHQPL[LQJ
icon will light up, and the battery
icon will switch off.
• The cartridge cannot be inserted
when the auto-injector is connected
to the charger.
3.3 $IWHUWKHFOLFNUHPRYH\RXUƓQJHU
from the cartridge (see Figure K).
Prepare
Insert cartridge
Insert
cartridge
into
ŴDVKLQJ
green
top.
Click
cartridge
in place.
(Green top
will stop
ŴDVKLQJPL[LQJ
icon will
light up, and
battery icon
will switch off)
After
click,
remove
ƓQJHU
from
cartridge.
Figure I Figure J Figure K
Other manuals for Auto-Injector
2
Table of contents
Other Skytrofa Medical Equipment manuals