Skywalker SKYBED Series User manual

WARNING
!
Read all precautions and instructi-
ons in this manual before using this
equipment. Save this manual for
future reference.
Maximum weight capacity 700 lbs.
Assembly Information, Maintenance
and User Instructions Manual
SKYWALKER
SPORTS
Skywalker Holdings LLC
PO Box 574, Brigham City, UT 84302
Model SSBD100 Skybed Patio Furniture
SKYBED
CAUTION: Adult Assembly
Required

Model # ID label is located at the bottom base corner of the Skybed.
Before you Begin....................................................................................................................3
Installation.............................................................. .. ...............................................................3.
User Instructions....................
...... ....
.................... .........................................................................................4.
..............................................................................................4
Using The Skybed Safely
................................................................................................4
Assembly...............................................................................................................................9-16
Parts List ................................................................................................................................7
If you have questions after reading this manual, please call our toll-free Customer Care Hot
Line. Our trained technicians will provide immediate assistance.
WARNING
Read the assembly, installation, care, maintenance, and use instructions in this manual
prior to assembling and using this equipment. Save this manual for future reference.
2
(Model # ID label location)
!
...............................................................................................5-6
Part Identification chart
Maintenance information .......................................................................................................19
Limited Warranty ....................................................................................................................20
CONTENTS
REPLACEMENT PARTS or QUESTIONS
Customer Care Hot Line: 1-866-603-5867
Monday --- Friday, 8:00 am ---- 5 p.m. Mountain Time
SkybedSafety Information
Exploded Drawings..................................................................................................................8
Appended Diagram .............................................................................................................17

3
1.
2.
3.
4.
INSTALLATION
WARNING! To reduce the risk of serious injury, read all important precautions and instructions
in this manual and all warnings on the Skybed before assembly and use of this product.
Thank you for selecting a Skywalker Holdings Skybed. The Skybed will provide you many
years of backyard lounging and enjoyment. Your Skybed comes equipped with warnings and
instructions for the assembly, care, maintenance, and use. This information must be read by
all Skybed users before use.
If you have any questions after reading this manual, please call our toll-free Customer Care
line at 1-866-603-5867, Monday through Friday, 8 a.m until 5 p.m. Mountain Time (excluding
holidays)
5.
BEFORE YOU BEGIN
It is the responsibility of the owner of the Skybed to make sure all users follow the safety
instructions printed in this material.
Total weight capacity is 700 lbs.
Be sure to place Skybed on a level surface not less than 6 ft (1.8m) from any structure or
obstruction such as a fence, garage, house, overhanging branches, laundry lines, or
electrical wires.
Do not allow children to use the bed without adult supervision. This is not a toy.
Always inspect the Skybed before it is used and replace any worn, defective, or missing
parts. (Users may be hurt if Skybed is used when it is in poor condition.)

4
SKYBED SAFETYINFORMATION
USING THE SKYBED SAFELY
The Skybed frame is made of metal. It is not grounded and will conduct elctricity.
For this reason, an electrocution hazard exists. No light, electric heaters,
extension cords, or household electrical appliances are to be permitted in or on the Skybed
at any time.
Placing the Skybed in a Safe Place
The skybed is a piece of furniture. This is not a toy.
Electrocution Hazard Associated with the Metal Frame of the
Skybed
To avoid injury, the Skybed must be kept away from objects and possible hazards including
electric power wiring, tree limbs, and fences. Do not place the Skybed near any recreational
device or structures such as a swimming pool or hot tub. The Skybed must be placed on a
level surface before use.
Observing the following statement and warnings reduces the likelihood of serious or
fatal injury.
Watch your step around the lower ropes. They may cause a tripping hazard.
This is a stationary furniture. Do not swing.
Enter the Skybed carefully. Step on or off the bed. Do not jump.
Use care with the soft materials. Do not leave out in harsh weather.
Watch your head while using the bed to avoid hitting it on poles or extended pieces.
The Skybed is meant for use while sitting or laying. Do not stand on the bed.
The ropes may cause a strangulation hazard for small children. Do not allow them to use
the bed without adult supervision. This is not a toy.
Do not crawl or lay beneath bed.
Use covers for cushion frame to avoid a pinch hazard from the assembly cords.
Use caution when approaching the Skybed when in use.
Do not attempt to twist ropes.
Do not use without stabilizing ropes.
When using the Skybed, sit or lay in middle of the cushion to prevent from tipping.
USER INSTRUCTIONS
1.
2.
3.
4.
5.
6.
7.
8.
9.
10.
11.
12.
13.
5
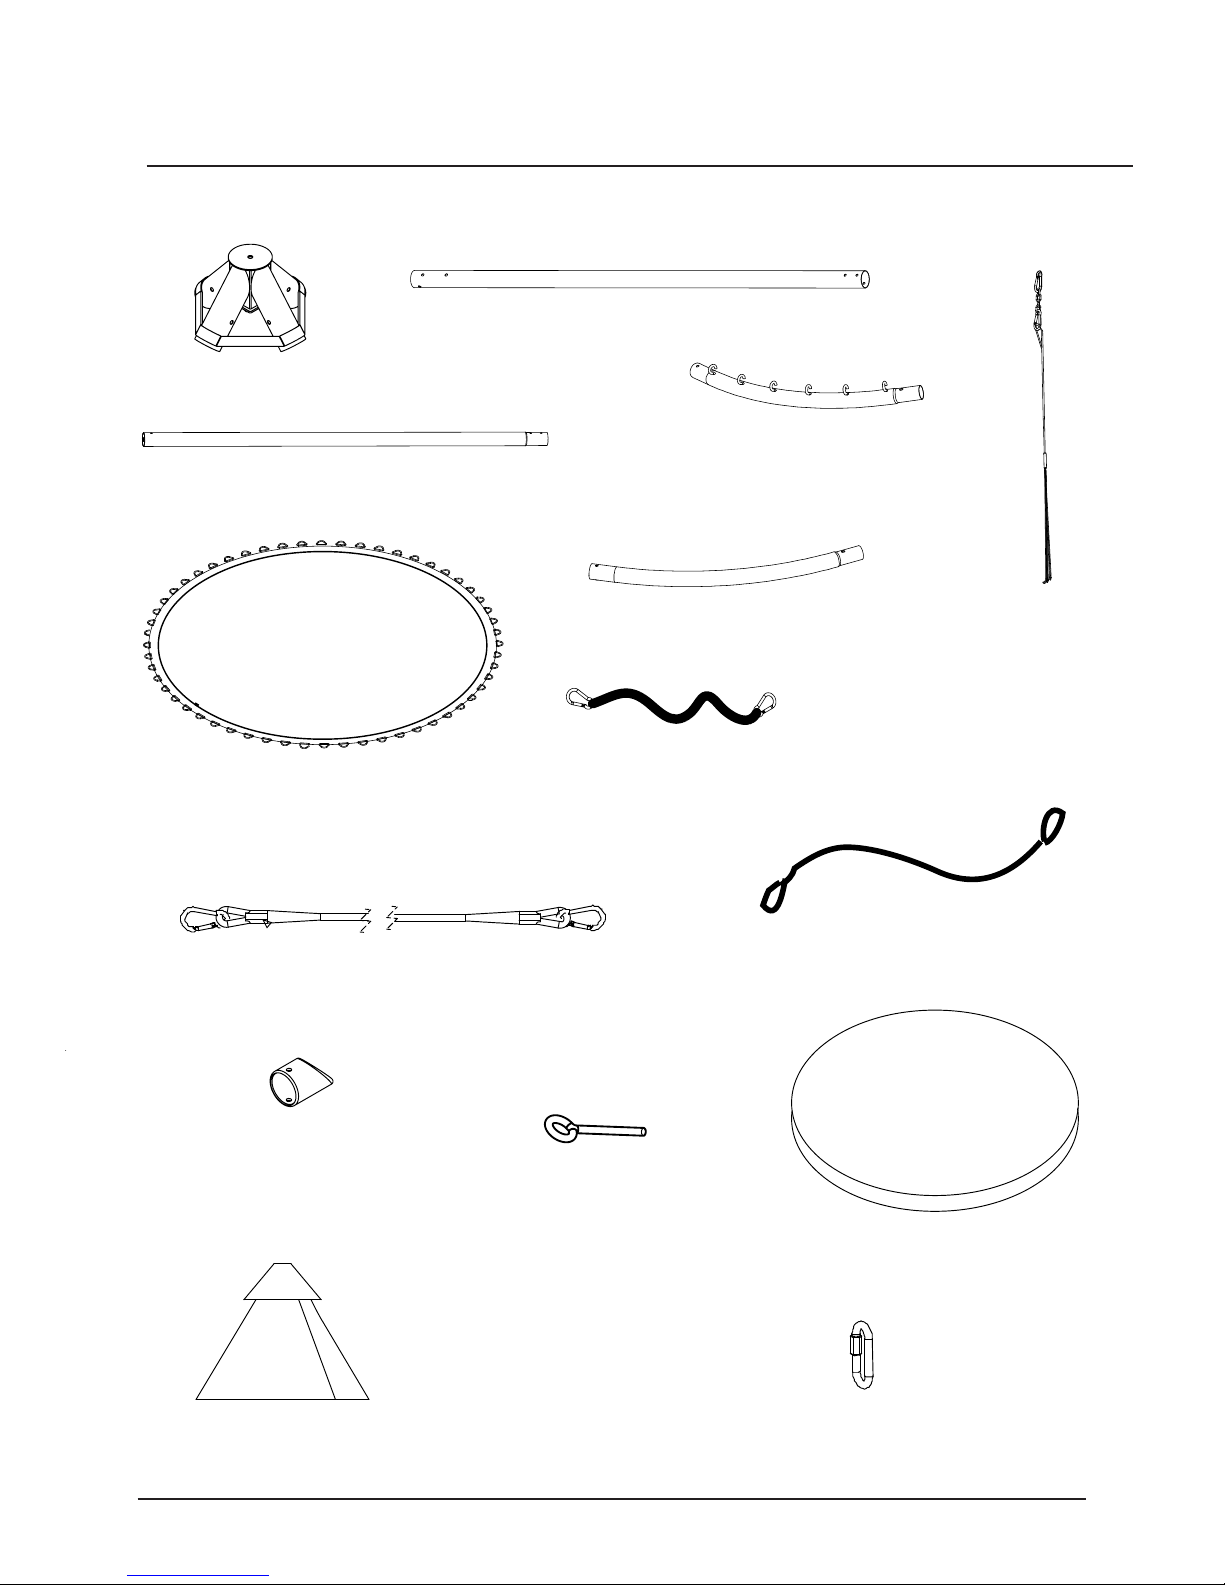
ASSEMBLY PART IDENTIFICATION CHART
Before beginning assembly, refer to the drawings below to identify all the parts used in assembly.
Top Joint (1)-1pc
Upper Pole (2) - 4pcs
Lower Pole (3) - 4pcs Frame Tube W/Hooks (4) - 4pcs
Frame Tube W/O Hooks (5) - 4pcs
Mat w/ D-rings (6) -1pc
Straps w/ Clip on Each End (7) - 4pcs
Suspension Rope W/
Chain and Clips (8)
- 4pcs
Bottom Rope W/Clips (9) -2pcs
Bottom Tube Endcap
(11) - 4pcs Closed Eyebolt (12) - 4pcs
Cushion (13) - 1pc
Sunshade W/Elastic
Rope (14) - 1pc
D10mm Connection
Ring (16) - 3pcs
Limit Rope (10) - 4pcs

6
M10 x 85mm Hex Bolt(17) - 4pcs M10 Curved Washer (18) - 8pcs
M8 Locknut (24) - 20pcs
M10 Nut (19) - 4pcs
M8 x 60mm Button Bolt(20)-8pcs
ASSEMBLY PART IDENTIFICATION CHART
M8 x 75mm Button Bolt(21) - 4pcs
M8 x 85mm Button Bolt(22) - 4pcs
M8 Curved Washer (23) - 40pcs
M8 Flat Washer(25) - 4pcs Spacer(26) - 4pcs
M12 x 20mm Hex Bolt(27) - 1pc M12 Flat Washer(28) - 1pc
Frame Cover (29) - 1pc
Elastic with Ball(30) - 4pcs
Allen Wrench(31) - 1pc
M12 Big Washer
(15) - 1 pc

PART LIST
Key No. Qty Descriprition
1 1 Top Joint
2 4 Upper Pole
3 4 Lower Pole
4 4 Frame Tube W/Hooks
5 4 Frame Tube W/O Hooks
6 1 Mat w/ D-rings
7 4 Straps w/ Clip on Each End
8 4 Suspension Rope W/Chain and Clips
9 2 Bottom Rope W/Clips
10 4 Limit Rope
11 4 Bottom Tube Endcap
12 4 Closed Eyebolt
13 1 Cushion
14 1 Sunshade W/Elastic Rope
15 1 M12 Big Washer
16 3 D10mm Connection Ring
17 4 M10X85mm Hex Bolt
18 8 M10 Curved Washer
19 4 M10 Nut
20 8 M8X60mm Button Bolt
21 4 M8X75mm Button Bolt
22 4 M8X85mm Button Bolt
23 40 M8 Curved Washer
24 20 M8 LockNut
25 4 M8 Flat Washer
26 4 Spacer
27 1 M12X20mm Hex Bolt
28 1 M12 Flat Washer
29 1 Frame Cover
30 4 Elastic with Ball
31 1 Allen Wrench
7

EXPLODED DRAWING
14
15
27
28
1
2
3
8
9
11 12
16
25
24
2
2
2
16 16
3
3
3
8
8
8
17
18 18 19
24
25 26
23
22
23 21
24
25
26
23
23
22
21
22
21
23
23
23
26
23 24 23
23 24
21
22
2526
4
5
7
9
29
30
10
6
13
8
20
23
23
24
5
5
54
4
4
20
20
20
20
20
20
23
23
24
24
24
24 24
24
24
23
23
23
23
23
23
23
23
23
23
23
23
20
23
23
Make Things Easier for Yourself!
This manual is designed to ensure that the Skybed can be assembled successfully by anyone
Most people find that by setting aside plenty of time, assembly will go smoothly.
Before beginning assembly, carefully read the following information and instruction:
*
The assembly requires at least two people.
* For help indentifying parts, use the PART IDENTIFICATION CHART on page 5 and 6, and the
PART LIST on page 7 and EXPLODED DRAWING on page 8.
* Place all parts in a cleared area and remove all packaging materials. Do not dispose of the
packaging materials until assembly is completed.
* Tighten all parts as you assemble them, unless instructed to do otherwise.
9
ASSEMBLY
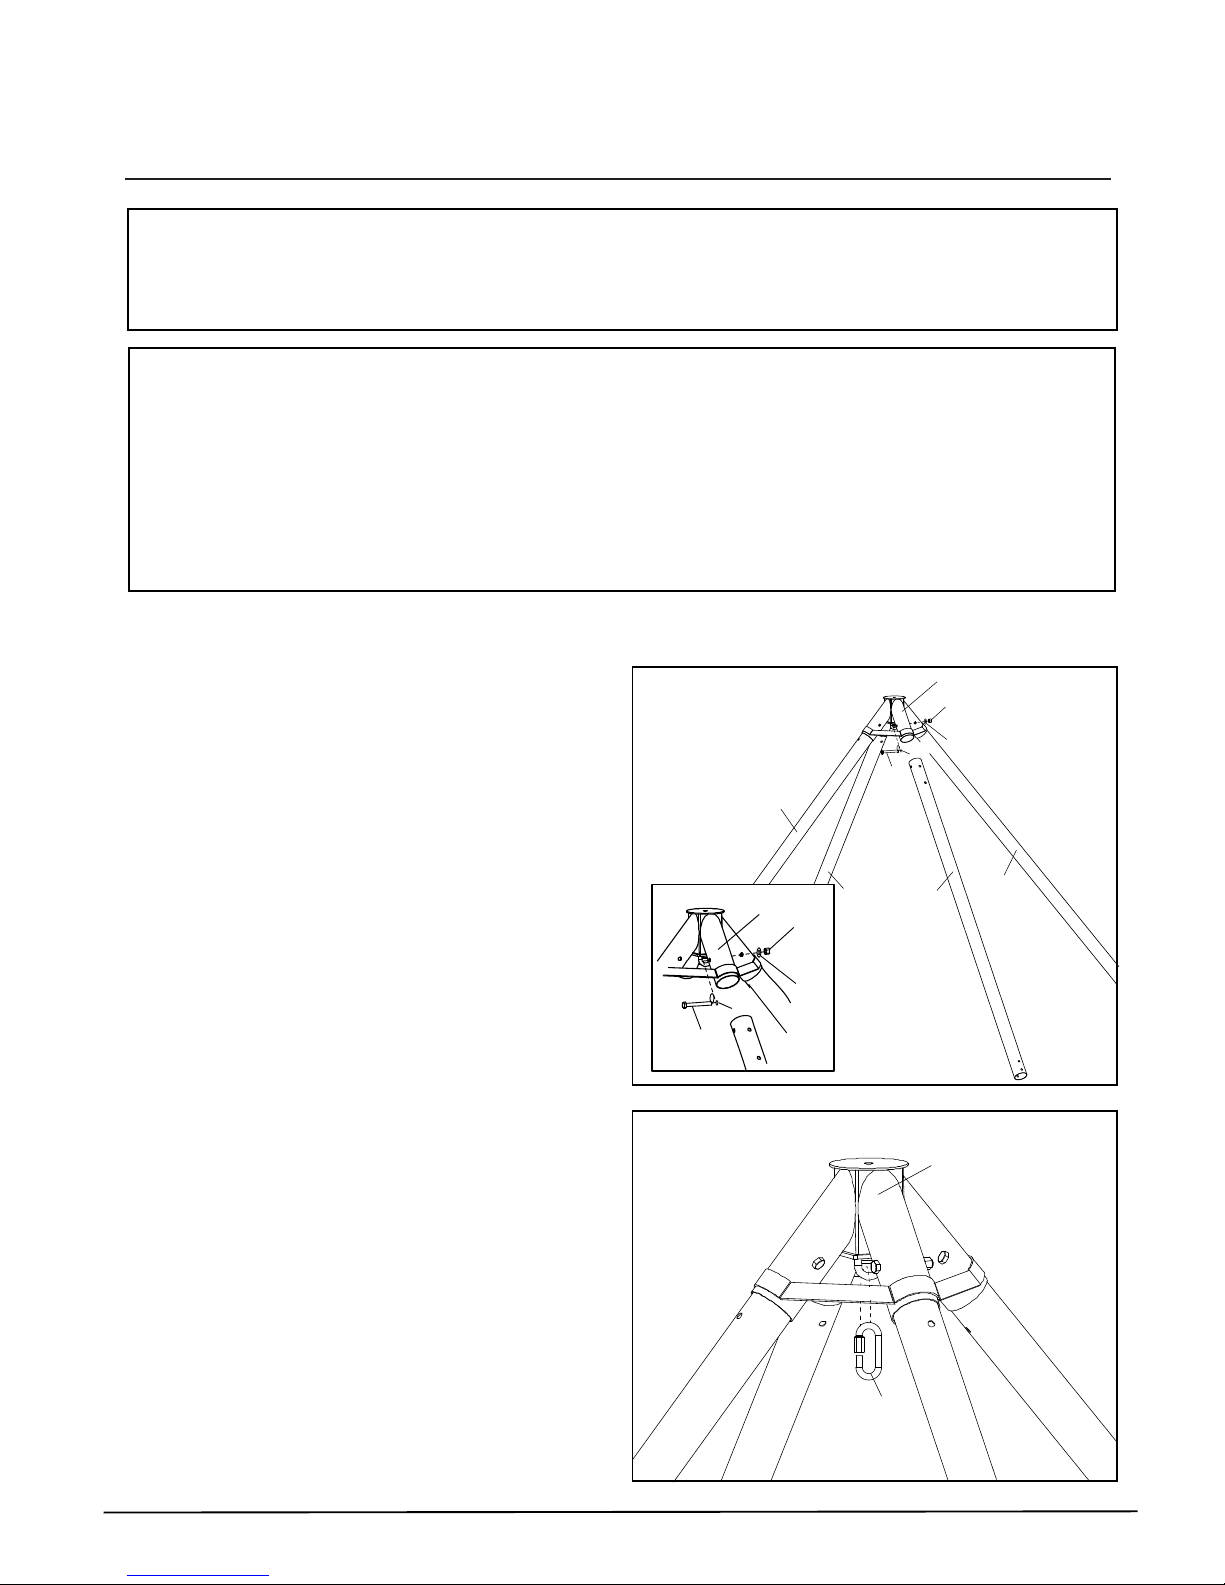
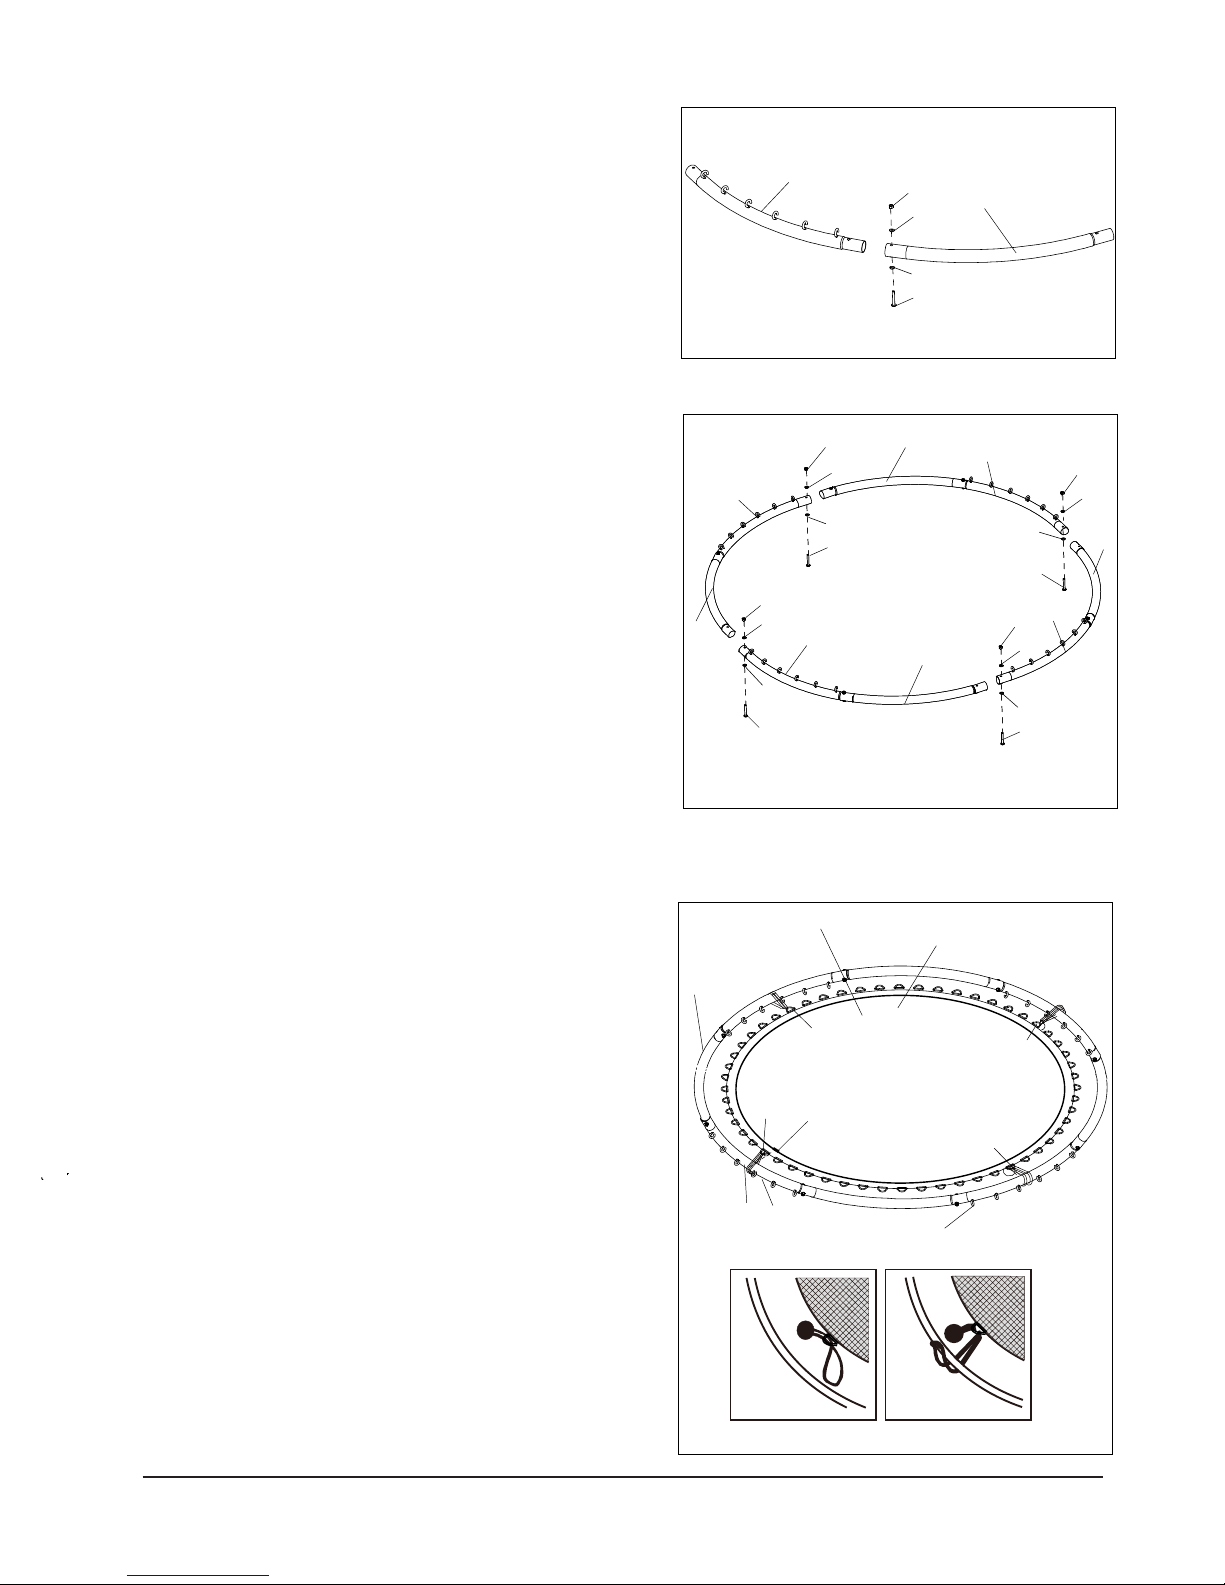
1. Attach the Upper Pole (2) to the Top Joint (1)
with M10X85 Hex Bolt ( 17 ), two M10 Curved
Washers (18) and M10 Nut (19).
Attached the other three Upper Poles (2) to the
Top Joint (1) with three M10X85 Hex Bolts (17),
six M10 Curved Washers (18) and three M10
Nuts (19) in the same way.
2. Attach the D10mm Conection Ring (16) to the
Top Joint (1) as shown, then tighten the Nut of
D10mm Connection Ring (16) .
1
2
222
17
18 18
19
1
17
18 18
19
1
16

10
3. Attach two D10mm Connection Rings (16) to the
D10mm Connection Ring (16) as shown, then
tighten the nuts of D10mm Connection Rings (16).
16
16
4. Attach two Suspension Ropes W/Chain and Clips
(8) to one of the D10mm Connection Rings(16) as
shown, then attach the other two suspension
ropes w/chain and Clips (8) to the other D10mm
Connection Ring (16).
16
16
8
88
8
11
27
28
15
14
1
5. Cover the Top Joint (1) with the Sunshade
w/elastic rope (14) aligning the hole in the top of the
shade with the hole at the top of the top joint. Then
attach the the Sunshade w/elastic rope (14) to the
Top Joint (1) with M12X 20mm Hex Bolt (27), M12
Flat Washer (28) and M12 Big Washer (15).
14
2
strap
6. Pull the sides of the Sunshade(14) together with the
straps, tying a knot as shown.
3
23
24
23
12
11
7. Attach the Bottom Tube Endcap (11) to the Lower
Pole (3) with the Closed Eyebolt (12), two M8 Curved
Washers (23) and M8 Nut (24).
Attach the other three Bottom Tube Endcaps (11) to
the other Lower Poles (3) in the same way.
26
26
24
24
25
25
23
23
22
22
21
21
2
2
3
3
8. Note: This step needs two adults for assembly.
Now attach the Upper Pole(2) to the Lower Pole(3)
by aligning the holes and placing the M8X75mm
Button Bolt (21), two M8 Curved Washers (23), and
an M8 LockNut (24) in the Lower hole.
Do not tighten the Bolt yet.
Then place the M8X85mm Button Bolt (22), two M8
Curved Washers (23), the Spacer (26), the M8 Flat
Washer (25) and an M8 LockNut (24) in the top hole.
(The spacer should be facing out)
Attach the other three Upper Poles (2) to the other
Lower Poles (3) in the same way.
Tighten all the Bolts.
9
9
12
12
12
12
9. Attach the Bottom Rope W/Clip (9) to the Closed
Eyebolts (12) of the Lower Poles (3) as shown.
Note: This needs to be a diagonal connection from
one Lower Pole (3) to another Lower Pole (3).
Note: The distance of the two diagonal Lower Poles
(3) may be a little larger than the length of the
Bottom Rope W/Clip (9) Some force may be
necessary to pull the rope and attach it.
3
12
Closed Eyebolt(14) towards the inside
4
5
20
23
24
10. Lay the Frame Tube W/Hooks (4) and the Frame
Tube W/O Hooks (5) on the ground in the positions
as shown.
Attach the Frame Tube W/Hooks (4) to the Frame
Tube W/O Hooks (5) with the M8X60mm Button Bolt
(20), two M8 Curved Washers (23) and an M8 Nut
(24). Do not tighten the Bolt yet.
Repeat this step three additional times to assemble
three more frame tube sections.
23
20
23
24
23
20
23
24
23
20
23
24
23
4
4
4
4
5
5
5
5
20
23
24
23
11. Note: During this step, you will connect the four
assembled frame tube sections together.
Take two frame tube sections and hold them in the
position as shown. Attach the Frame Tube W/Hooks
(4) to the Frame Tube W/O Hooks (5) with the M8X
60mm Button Bolt (20), two M8 Curved Washers (23)
and an M8 LockNut (24).
Repeat this step until all four frame tube sections are
connected.
Tighten all the Bolts.
start position of zipper
430
13
#1
#15
#29
#43
12. Flip the frame so the hooks of the Frame Tube
w/Hooks (4) are facing towards the ground.
Then set the Mat w/D-rings (6) inside of the
frame making sure the zipper is located between the
third and fourth hooks of any frame tube w/hooks (4)
as shown to ensure mat is in the proper position on
the frame.
Note: You will be temporarily connecting the Mat
w/D-rings (6) to the frame with the elastics with balls
(30) to keep it in place as you attach the mat to the
frame. Place the elastics with balls (30) in the
locations shown to the right, 1-15-29-43 (#1 should
be placed in the middle of the frame tube w/ hooks
to the left of the zipper placement). Remaining
numbers represent the physical count of D-rings.
6
5
enlarged drawing
towards the ground
towards the upward
7
D-ring 6
13. Attach the Straps w/Clip on Each End (7) as follows:
Clip one end of a Straps w/Clip on Each End (7)
into a D-ring sewn on the Jump Mat w/D-rings (6). Pull
the strap until it reaches the frame.
Then wrap the strap around the frame and through the
next closest D-ring continuing in this manner until you
reach the end of the strap. Attach the clip at the end of
the strap to the closest D-ring. Attach the other three
Straps w/Clip on Each Ends (7) to the frame in the
same manner, starting the new strap on the D-ring the
previous strap ended. When finished, pull all the straps
to tighten.
If the strap is a little too long, please continue to wrap
as before until the end of the strap is reached.
Remove the four Elastics with balls (30).
Note: if the Mat w/D-rings (6) is not sitting in the middle
of the frame, you will need to adjust it by pulling the
straps until it sits properly.
Caution: It is wise to wear leather gloves while
attaching the straps.
frame hook
6
29
14. Lay the Frame Cover (29) on the Mat w/D-rings (6).
Adjust the position of the frame cover (29) so that the
zipper can be directly connected. Attach the frame
cover (29) to the Mat (6) with the zipper.
Caution: Do not use the Skybed without the frame
cover (29). The frame cover is designed to reduce
the possibility of injuries due to user coming in
contact with the frame. Make sure to properly install
the frame cover before using the Skybed.
If you do not have a frame cover, contact your dealer
to obtain one.
14

15
backside
29 6
29
6
15. Wrap the frame cover (29) around the frame.
Look underneath the Skybed and locate the clips on
the underside of the frame cover (29). Attach the
clips to the D-rings of the Mat (6) .
Repeat this step with all remaining clips (not shown).
If the straps are a little long or the frame cover (29)
is too loose, please pull the straps to hang on other
farther D-rings.
clip
8
8
8
8
16. Attach the Skybed by clipping the Suspension Rope
W/ chain and clips (8) to the hooks of the Frame
Tube W/Hooks (4).
Note: The longest rope (Blue) attaches to the
farthest two clips of the Frame Tube W/Hooks (4).
The shortest rope (Green) attaches to the two
center clips of Frame Tube W/Hooks (4).
Blue
Blue
Green
Red
strap
4
4
backside
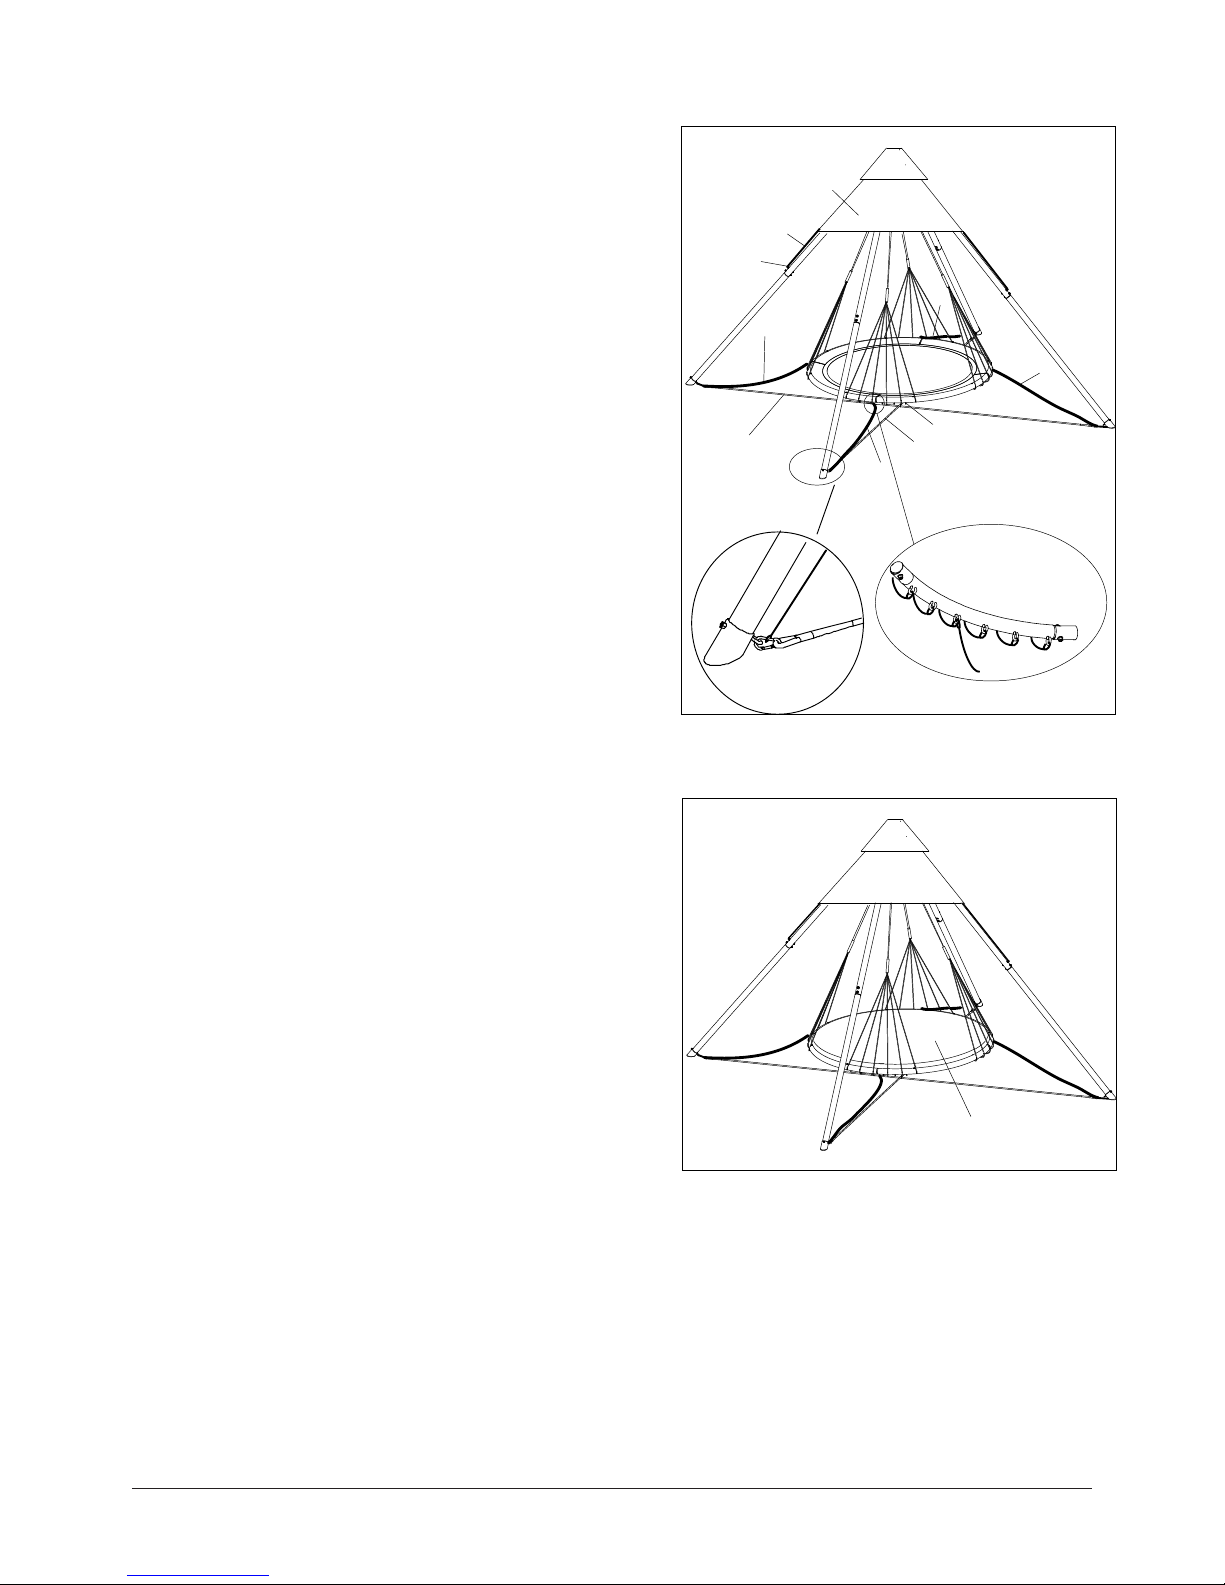
10
10
10
10
17.
16
Attach the Bottom Rope W/Clip (9) to the Frame
Tube W/Hooks (4) with Limit Rope (10).
The Limit Rope (10) can attach to either the third
or fourth hook of the Frame Tube W/Hooks (4).
Pull the elastic rope of the Sunshade W/elastic
rope (14) to the Spacer (26).
994
18. Place the Cushion (13) on the the Mat w/
D-rings (6).
13
26
14
elastic rope
Your assembly is now complete! Enjoy your new Skybed.

17
Appended Diagram
The diagrams below shows the proper method of use. Use the diagrams to ensure proper use, and
to make sure that the Skybed is assembled correctly.
1. After a period of time, the Suspension Rope W/Chain and Clips (8) may be stretched, causing
the Cushion (13) to hang unlevel or hang lower. You can adjust the chain of the Suspension Rope
W/Chain and Clips (8) to fix this issue.
Chain
2. You can untie the straps of the Sunshade W/elastic Rope (14) to open and let in sunshine
whenever desired. Just attach the
elastic rope to the opposite Spacer (26).
elastic rope

! WARNING
Read the assembly, installation, care, maintenance, and use instructions in this manual
prior to assembling and using this Skybed. Save this manual for future reference.
18

MAINTENANCE INFORMATION
19
This product was manufactured using quality materials and crafted to provide you and your
family with many years of enjoyment. Proper maintenance care will help to prolong the life and reduce the
possibility of injury. The following guidelines should be followed.
1. Tighten all hardware regularly.
2. Lubricate all metallic moving parts per manufacturer’s instructions.
3. Check all protective coverings. Replace if they are loose, cracked, or missing.
4. Check all moving parts. Replace as needed.
5. Check metal parts for rust. If found, sand and repaint using a nonlead-based paint.
6. At the end of each use season or when the temperature drops below 32°F: remove all soft material
including cushion, ropes, mat, etc. and take indoors or do not use. Owners shall be responsible
for maintaining the legibility of the warning labels.
7. To clean any part of the Skybed, wipe down with a damp cloth.
8. To clean the Sunbrella brand fabric of the cushion and sunshade, brush off any loose dirt and clean
using a mild solution and soft cloth. Rinse thoroughly. For detailed cleaning instructions, please visit
the manufacturer’s website at www.sunbrella.com.
9. Disposal Instructions — Disassemble and dispose of the patio furniture in such a
way that no unreasonable hazards will exist at the time the Skybed is discarded.

20
LIMITED WARRANTY
Skywalker Holdings, LLC warranties its products to be free from defects in material and
workmanship under normal use and service conditions. The steel frame is warranted for two
(2) years after the date of purchase. All other parts are warranted for one (1) year after the
date of purchase. There is a five (5) year limited warranty on the Sunbrella fabric. This war-
ranty protects against the Sunbrella fabric from becoming unserviceable due to color or
strength loss from normal usage and exposure conditions, including sunlight, mildew and
atmospheric chemicals.
All warranty coverage extends only to the original retail purchaser from the date of purchase.
Skywalker Holdings, LLC obligation under this Warranty is limited to replacing or repairing, at
Skywalker Holdings, LLC option, the product at one of this authorized service centers. All
products for which a warranty claim is made must be received by Skywalker Holdings, LLC
at one of its authorized locations. Preauthorization may be obtained by calling Skywalker
Holding, LLC Customer Care Hot Line at 1-866-603-Jump(5867). This Warranty does not
extend to any product or damage to a product caused by or attributable to freight damage,
abuse, misuse, improper or abnormal usage, or repair not provided by a Skywalker Hold-
ings, LLC authorized service center, or to products used for commercial or rental purpose.
No other Warranty beyond that specifically set forth above is authorized by Skywalker
Holdings, LLC.
SKYWALKER HOLDINGS, LLC IS NOT RESPONSIBLE OR LIABLE FOR INDIRECT,
SPECIAL OR CONSEQUENTIAL DAMAGES ARISING OUT OF OR IN CONNECTION
WITH THE USE OR PERFORMANCE OF THE PRODUCT OR OTHER DAMAGES WITH
RESPECT TO ANY ECONOMIC LOSS, LOSS OF PROPERTY, LOSS OF REVENUE OR
PROFITS, LOSS OF ENJOYMENT OR USE, COST OF REMOVAL, INSTALLATION OR
OTHER CONSEQUENTIAL DAMAGES. SOME STATES DO NOT ALLOW THE
EXCLUSION OR LIMITATION OF INCIDENTAL OR CONSEQUENTIAL DAMAGES.
ACCORDINGLY, THE ABOVE LIMITATION MAY NOT APPLY TO YOU.
THE WARRANTY EXTENDED HEREUNDER IS IN LIEU OF ALL OTHER WARRANTIES
AND ANY IMPLIED WARRANTY OF MERCHANTABILITY OR FITNESS FOR A PARTICU-
LAR PURPOSE IS LIMITED IN ITS SCOPE AND DURATION TO THE TERMS SET FORTH
HEREIN. SOME STATES DO NOT ALLOW LIMITATIONS ON HOW LONG AN IMPLIED
WARRANTY LASTS. ACCORDINGLY, THE ABOVE
LIMITATION MAY NOT APPLY TO YOU. This Warranty gives you specific LEGAL RIGHTS.
You may also have other rights which vary state to state.
THIS WARRANTY IS VALID ONLY IN THE UNITED STATES.
Skywalker Holdings, LLC, PO Box 574, Brigham City, UT 84302 USA.
Printed in China © 2015 Skywalker Holdings, LLC,
THE WARRANTY DOES NOT COVER DAMAGE FROM MISUSE OR ABUSE, IMPROPER INSTALLATION,
WIND, WEATHER, OR ACTS OF GOD.
Table of contents
Popular Patio Furniture manuals by other brands


Patio Premier
Patio Premier 207004 instruction manual

Sunnydaze Decor
Sunnydaze Decor MERANTI FRN-732 manual

Home Decorators Collection
Home Decorators Collection YJAF052-C Use and care guide

Loll Designs
Loll Designs Platform One LOUNGE + CORNER BACK REST Assembly instructions

Scolaro
Scolaro Galileo Retractable 3x3 Assembling Instruction

Marquee
Marquee 3M CANTILEVER UMBRELLA Assembly instructions


