Skywatch Xplorer 4 User manual
Instruction Manual
visit www.ntechusa.com/support.html for full
manual with all other languages
FEATURES:
Instant Windspeed•
Maximum Windspeed•
Temperature (air/water)•
Wind chill•
Wind Direction (Digital Compass)•
Altitude•
48 Hour History of Altitude•
Relative and Absolute Air Pressure•
48 Hour History of Pressure•
Waterproof•
Backlight•

2
INDEX
TOPIC PAGES
TechnicalSpecications ............................................2
Brief Instructions .................................................3-4
General Information ...............................................5
Warranty ...................................................5
Care&Maintenance ...........................................5-6
Switching On & Off................................................6
Permament Operation ..........................................6
Battery ........................................................7
Backlight ......................................................7
ModesandModeChanging..........................................8
Wind speed .....................................................9
Maximum Wind Speed..........................................9
Temperature....................................................10
Wind Chill ......................................................11
Wind Direction/Digital Compass.......................................12
CalibrationofCompass.........................................12
Altitude. . . . . . . . . . . . . . . . . . . . . . . . . . . . . . . . . . . . . . . . . . . . . . . . . . . . . . . . 13-14
Maximum Altitude.............................................14
CalibrationofAltitude..........................................14
AirPressure ....................................................15-17
Absolute&RelativePressure .....................................15
CalibrationofPressure .........................................16
RecordingModes.................................................17
Activating/Deactivating History....................................18
ViewingHistoryRecords ........................................18
GeneralReset...................................................18
Other NTech Products ..............................................BACK
Contact Information ...............................................BACK

3
TECHNICAL SPECIFICATIONS
Size and weight: 3.5 x 1.5 x 0.75 in, 2 oz. (41 x 93 x 17 mm, 53 g)
Operational temperature: -22°F to +140°F (-30°C to +60°C)
Waterproof: 1meterforshortduration;doesnotoat
Battery: 1 CR2032 button cell
Battery Life: Approx. 30,000 1-minute measurements; 500 hours
With recording on, approx. 25,000 measurements; 416 hours
WIND SPEED: 2 measurements per second with 0.1 unit resolution
Measuring range: 1.1 to over 93 mph (150 km/h, 42 m/s, 81 knots, 136 fps)
Accuracy: +/- 3%
TEMPERATURE: 2 measurements per second with 0.1°F/C resolution
Measuring range: -58°F to 212°F (-50°C -- 100°C)
Accuracy: +/- 0.5°F (0.3°C)
COMPASS: 2 measurements per second with 1° resolution
Measuring range: 0° to 359°
Accuracy: +/- 4°
ALTITUDE: 1 measurement per second with 3ft (1m) resolution
Measuring range: -2,300 to 29,500 ft (-700 to 9,000 m)
(above 9,999 ft, only meters will be displayed)
Accuracy: +/- 10 ft (+/- 3 m)
PRESSURE: 1 measurement per second with 0.01 inhg (1 hPa) resolution
Measuring range: 8.86 to 32.50 inHg (200 to 1100 hPa)
Accuracy: +/- 0.03 inhg (1 hPa)
All accuracies are based on ideal situations. Actual accuracies will depend on airow, proper
use, and time to adjust to surrounding variances.

4
BRIEF INSTRUCTIONS
For complete instructions on each feature, please refer to the instruction manual
GENERAL OPERATION
The SKYWATCH Xplorer features one-button operation. The battery is already installed. To turn on, press
and release the button on the front of the unit, located beneath the LCD screen. The display will show
the same screen as when it was turned off last after about four seconds. Press and release the button
to cycle through each mode. While in a mode, press and hold the button to enter different screens and
features. The SKYWATCH Xplorer will automatically shut off one minute after the last button press. This
featurecanbetemporarilydisabledbypressingthebuttonwhiletheLCDisashing.
WIND SPEED
Wind speed is measured by holding the Xplorer upright into the wind. The small impeller rotates, which
createsamagneticeldreadbytheXplorer.Windspeedisdisplayedatthetopinallmodesotherthan
pressure or altitude history. Maximum wind speed can be displayed in the bottom. To change units,
selectthemaximumwindspeedmode,thenpressandholdthebutton.Aftervesecondstheunitswill
change; release when the desired units are displayed.
TEMPERATURE
Temperature is measured by a thermometer adhered to the inside of the back metal plate. This avoids
any possible damage to an exposed sensor, but it may take several minutes to adjust to ambient
air temperature. Contacting the back plate to a surface that is in the environment will speed up the
adjustment. Water temperature can also be measured by immersion. The two temperature modes are
temperature and windchill. To change the units between C and F, while in either temperature mode
press and hold the button for three seconds and release when the desired unit is displayed.

5
WIND DIRECTION/COMPASS
The digital compass allows for accurate wind direction measurement. Find the direction of wind by
holding the Xplorer upright facing into the wind. The compass will show the degrees off North, 0 is
North, 90 is East, 180 is South, and 270 is West. When used for the rst time, the compass needs
to be calibrated before any reading is possible. An initial calibration is necessary, and calibration
when in a new environment will assure the most accurate readings. While in the compass mode, press
and hold the button for two seconds, release when “CAL” is displayed on the top. Slowly turn in a 360
degree circle, about four seconds per quarter turn. When the small circle is complete on the bottom
screen, press the button once to accept.
ALTITUDE & AIR PRESSURE
The SKYWATCH Xplorer 4 has a precise Swiss barometer for measuring altitude and air pressure.
Altitude is measured on the basis of air pressure - this is true in EVERY altimeter, including those found
on aircraft. The Xplorer 4 is designed to perform an adjustment each time it is turned on to adjust to
a close altitude reading. However it is necessary to calibrate to a known altitude before beginning an
ascent or descent. While in an altitude or pressure mode, press and hold the button for FOUR seconds
to change between meters and feet, or hPa and inHg. Please refer to the instruction manual for detailed
instructions on calibration of air pressure and altitude.
ALTITUDE AND PRESSURE HISTORY
There is one history mode for altitude and two history modes for air pressure. By default the recording
is off; to turn recording of history on, while in any history mode press and hold the button until the
top screen shows anything other than “0h”. To scroll backward through history, from 0h (current)
to1h,2h...48hsimply press and hold the button.Releasethebuttontostopataspecictime,for
example “6h” will display the measurement from 6 hours before. This is useful for tracking changing
air pressure, or for noting ascent or descent.

6
GENERAL INFORMATION
Thank you for purchasing NTech USA’s SKYWATCH®Xplorer 4. This instrument is manufactured by JDC
Electronic SA, based in Switzerland, designed and tested to meet the highest standards.
The Xplorer 4 is tted with a precision replaceable impeller and internal sensors to measure your
environment. It is suitable for a range of activities including hang gliding, kiteboarding, hunting,
shooting, hiking, climbing, or atmospheric monitoring.
The SKYWATCH®Xplorer range has been designed to withstand short-term immersion in water at a
depth of up to three feet.
IMPORTANT!
This instrument is designed as an aid to users who are in an open air environment, but IT
CANNOT replace advice and warnings from the local weather station. This means that you
should regularly check and compare the measurements provided by your instrument with the
information put out by local sources. NTech USA and JDC ELECTRONIC SA can in no way be held
responsible for any consequences, direct or indirect, or for any prejudice, which might result from
the use of this instrument.
WARRANTY
NTech USA warrants this product for 2 years from date of purchase, with proper receipt or product
registration, or one year from date of manufacture with no receipt. Warranty does not necessarily cover
misuse, physical damage, or battery. Please contact us with any problems!
CARE AND MAINTENANCE
Avoid items such as hair, thread, sand and other dust materials getting into the impeller, as they could
cause defective rotation of the impeller and therefore a loss of precision. If a hair or a piece of thread
should manage to get into the impeller, extract it gently using tweezers; in the case of dust or sand,
you can run clean water over the impeller. The Xplorer 4 features a removable, replaceable impeller.

7
Avoid exposing the instrument to extreme climatic conditions for over-long periods. While it uses
components resistant to such temperatures, we recommend that you do not expose your instrument to
strong sources of heat, for example under the windscreen of a vehicle. DO NOT EXPOSE the instrument
to powerful chemicals. Such products could damage it.
SWITCHING ON
The Xplorer 4 features a one-button operation. Thus, this one button will perform several operations
depending on the mode and the amount of time it is depressed. To turn on the Xplorer, press and
release the button. The startup will show the software version (in this example 1.28), the model
number (1, 2, 3, or 4), then show measurements.
SWITCHING OFF
Switching off automatically (Auto-off): Your SKYWATCH® Xplorer goes off automatically 1 minute
after the button was last pressed or after the wind was last measured. This means that it does not stop
while the impeller is still turning (more than 10 seconds).
Switching off manually: In order to switch Xplorer off manually (valid in every mode), hold the
button pressed down until it switches off, then release.
Permanent operation possible: Either at the time of the manual switching off by releasing the
buttonduring theashing ofthe large digits, or atthe timeof automatic switching off bypressing
brieyonthe button duringtheashing.Duringpermanentoperation,anypressureonthebutton
returns Xplorer into automatic off mode.

8
BATTERY
Your SKYWATCH® Xplorer gets its power supply from a replaceable lithium battery 3V type CR2032.
To change the battery:
Unscrew the metal back (6 screws). Place screws in safe location.1.
Unscrew the screw of the battery cover.2.
Gently bend back the cover in order to extract the battery.3.
Put in the new battery observing the polarity (+ upwards), then screw back the battery4.
cover. Make sure that the tiny tongue in the centre of the top is raised so that it touches
the metal back.
Before retting the back make sure that the seal is clean and securely positioned 5.
in its slot.
Retthebackandthe6screws.6.
IMPORTANT! This operation must be carried out with care! ANY DEFECTIVE MANIPULATION
DURING THE REPLACEMENT OF THE BATTERY CAN CAUSE LASTING DAMAGE TO YOUR
INSTRUMENT. IN CASE OF DOUBT CONSULT YOUR WATCH DEALER OR REPAIRER, OR
CONTACT NTECH USA.
Normal battery life: approximately 30,000 measurements of 1 minute (auto-off) and more than 20
years when off without records. With records approximately 25,000 measurements of 1 minute (auto-
off), but 7 years maximum when off.
BACKLIGHT
To get the backlight to light up keep the button pressed for 1 second and as soon as the backlight lights
up, release the button. The backlight remains illuminated for 3 seconds. If within the 5 seconds which
follow you re-illuminate the backlight, it stays lit up for 15 seconds. Beyond these 5 seconds, it lights
up again for 3 seconds. Note: the backlight lights up in the same way in all modes. When the button
isheld,forexampletochangetheunits,thebacklightwillashonbrieyandturnoff.IMPORTANT:
intensive use of the backlight reduces the life of the battery approximately 100 x greater than without
backlight.
9
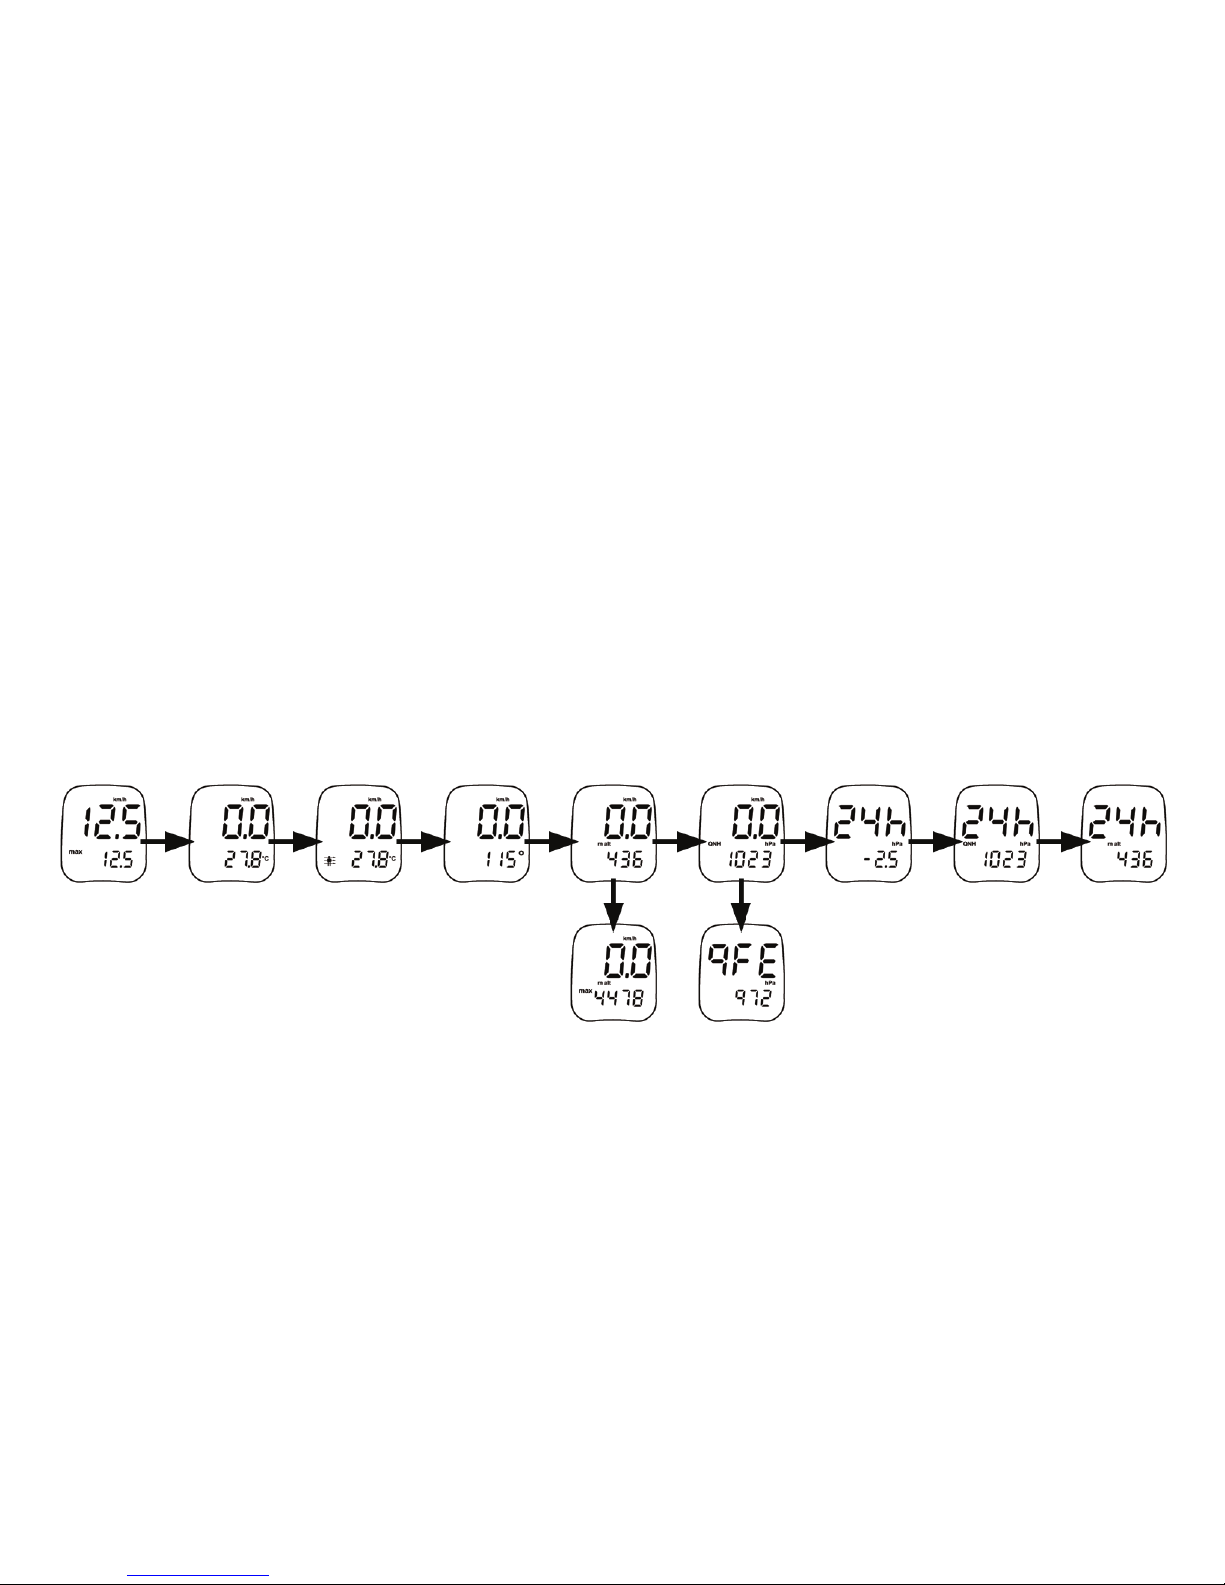
MODES AND MODE CHANGING
TochangethemodeontheSKYWATCHXplorer4,brieypressandreleasethebutton.Thecycleof
the nine modes is:
wind + maximum wind1.
wind + temperature2.
wind + wind chill temperature3.
wind + compass4.
wind + altitude and maximum altitude (press and hold the button for 2 seconds to view maximum5.
altitude, press and release to switch back to current altitude)
wind + relative and absolute pressure (press and hold the button for 2 seconds to view absolute6.
pressure - QFE, press and release to switch back to relative pressure - QNH)
history of pressure difference7.
history of relative pressure values8.
history of altitude9.
Within each mode pressing and holding the button will perform different functions, such as changing
the units, calibration, and viewing past history. Pressing and holding the button for 1 second while
in any mode will turn on the backlight. Pressing and holding the button continuously will turn off the
Xplorer; depending on the mode this will be between 6 and 30 seconds. When turned on, the Xplorer
will display the last mode viewed when turned off.
max wind temp wind chill compass altitude pressure press. trend press. history alt. history

10
MODE: INSTANT WIND SPEED WITH MAXIMUM
Choice of wind speed measurement unit:
To select the wind speed measurement units, the Xplorer must be in the instant
wind speed and maximum wind speed mode. By keeping the button pressed for
approximately 4 seconds, the units start to change. You can choose between the
following units : km/h (kilometers per hour), mph (miles per hour), knots, m/s
(metres per second), and fps (feet per second). When the unit of your choice
appears, release the button and the unit of measurement is thereby selected. This
unit will remain on all wind measurements until changed, even after the Xplorer is
turned off.
Measurement of speed:
For the measurement to be as exact as possible it is necessary to align the instrument along the axis
of the wind.
Display:
The display of the current speed is done on the large digits and the maximum speed reached on the
small digits with the indication max.
Deletion of the maximum:
The maximum is retained even when the instrument is off. In order to reset it to zero keep the button
pressed for at least 2 seconds, then release it.
Accuracy: +/-3% from 1.1 mph to 93 mph
Measuring range: from 1.0 to over 93 mph (42 m/s, 81 knots, 150 km/h, 136 fps)
Measuring cycle: 2 measurements per second
Resolution: to one decimal place up to 99.9, then in whole units
Display range: from 0.0 to 299 units (accuracy is reduced when over the stated range)

11
MODE: INSTANT WIND SPEED WITH AMBIENT TEMPERATURE
Choice of temperature measurement unit:
To select the temperature measurement units, the Xplorer must be in the instant
wind speed and temperature OR wind chill. By keeping the button pressed down
for at least 2 seconds the units start to change. The units possible are °C (degrees
Celsius) and °F (degrees Fahrenheit) When the unit of your choice appears, release
the button and the unit of measurement is thereby selected.
Measuring ambient temperature:
Note: the temperature sensor is integrated with the metal back of the casing, and
therefore it is the temperature of the back of the casing which is displayed. This special feature makes
it possible to measure very accurately the temperatures such as:
water (springs, streams, etc.) by immersing the instrument several centimeters;•
surfaces (ground, metal parts, refrigerator interiors etc) by laying as closely as possible the back•
of the instrument on the surface to be measured;
ambient air, either by allowing the instrument to reach the air temperature, which can take•
several minutes, or even several dozens of minutes according to the wind speed (avoid direct
sunraysandcontactofthebackofthecasingwithyourngers).Otherwise,togetarapidand
precise measurement, but the back of the casing into contact with an object which is the same
temperature as the air (vehicle bodywork, metal barrier, smooth walls etc.) avoiding surfaces in
dark colors and exposed to sunlight).
Display:
The display of the instant wind speed is done on the large digits while the ambient temperature is
displayed on the small digits.
Measuring cycle: 2 measurements per second with 0.1°F/C resolution
Measuring range: -58°F to 212°F (-50°C to 100°C)
Accuracy: +/- 0.5°F (0.3°C)
12
MODE: CURRENT WIND SPEED WITH WIND CHILL TEMPERATURE
Choice of temperature measurement unit:
See previous section, Wind Speed with Ambient Temperature.
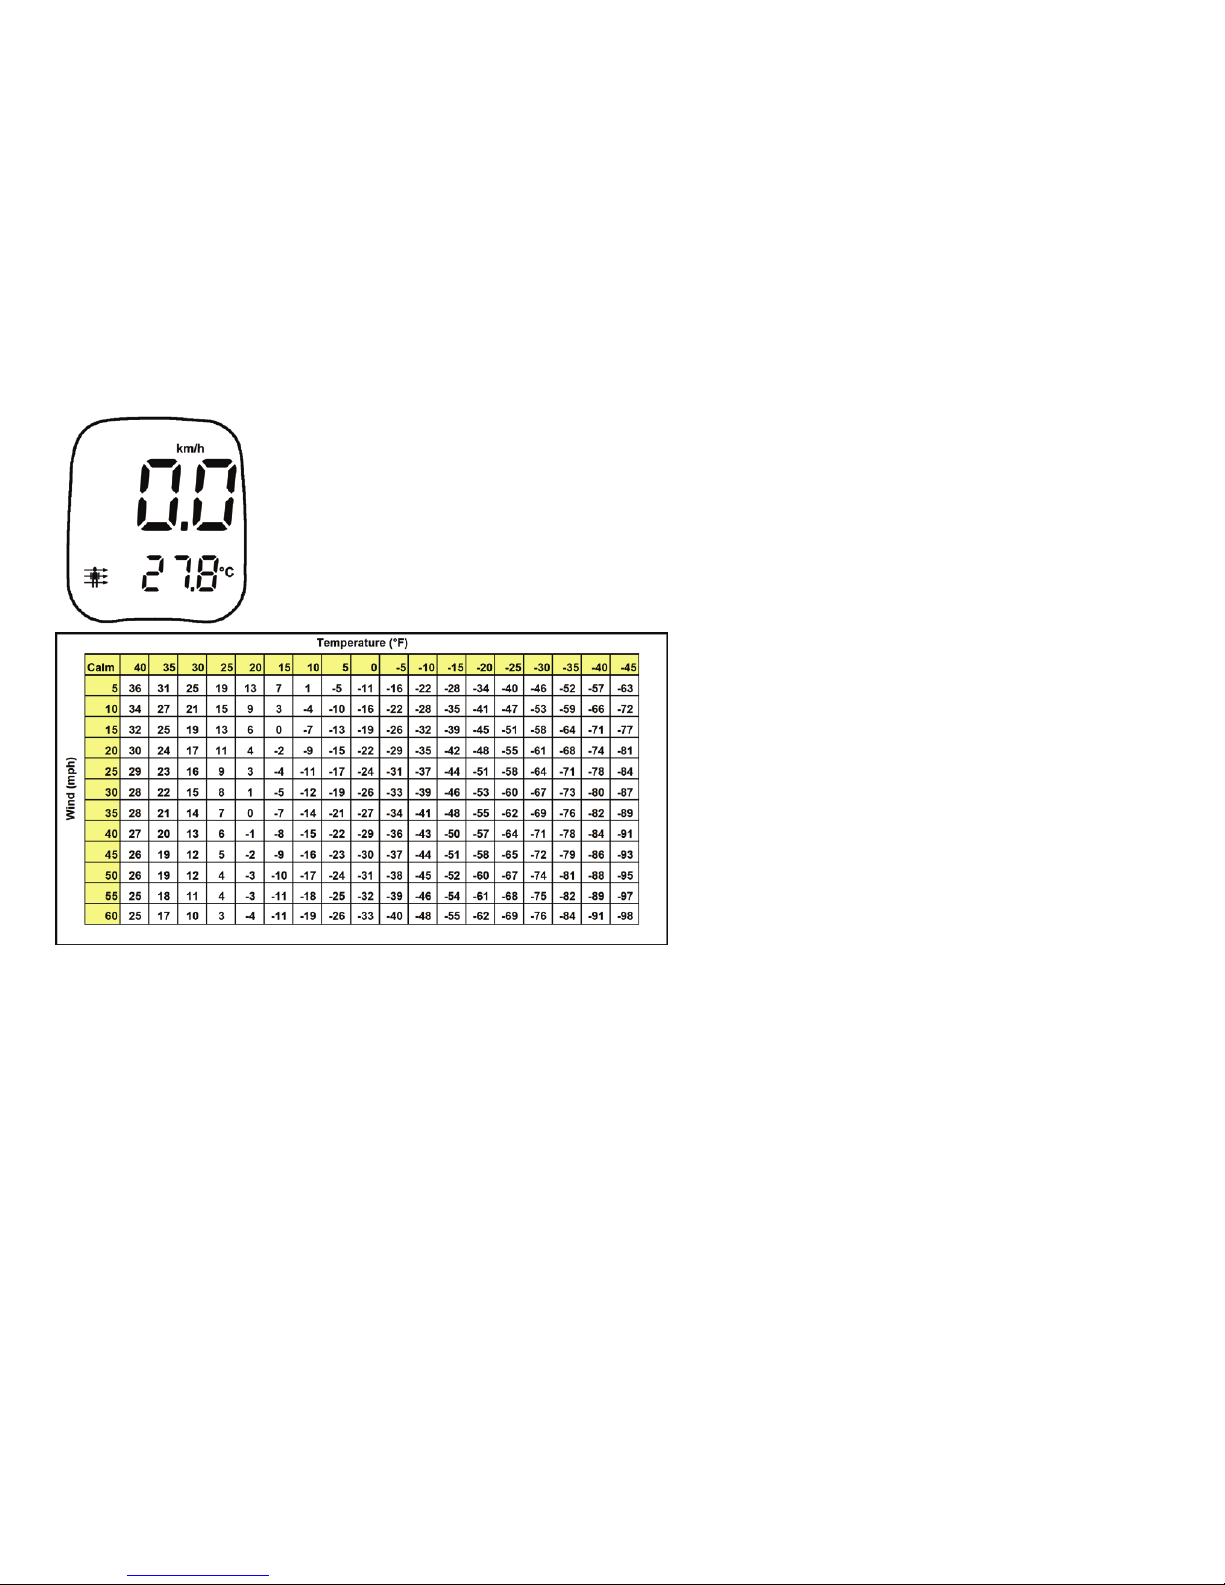
Wind Chill Information:
Low temperatures present a danger to the human body and this danger is aggravated
by the speed of the wind. The Xplorer 4 shows immediately the temperature felt by
the body and warns of risks of frostbite and hypothermia.
The wind chill factor is calculated on the
basis of ambient temperature and wind
speed. In the event of wind, it gives an
indication of the loss of heat by the body if
the temperature is less than 50°F (10°C).
This is the formula which was adopted in
January 2003 by the United States Federal
Ofce for Meteorological Coordination with
the Meteorological Service of Canada (MSC),
the US Department of Defence (DoD) and
the United States National Oceanic and
Atmospheric Administration (NOAA).
Example: an ambient temperature of 0°F and a wind of 20 mph act on your body as if the temperature
were -15°F!
Measuring cycle: 2 measurements per second with 0.1°F/C resolution
Measuring range: -99°F to 40°F (-37°C to 4°C)
(above 40°F (4°C), the temperature shown is ambient temperature)
Accuracy: +/- 1°F (0.5°C)
13
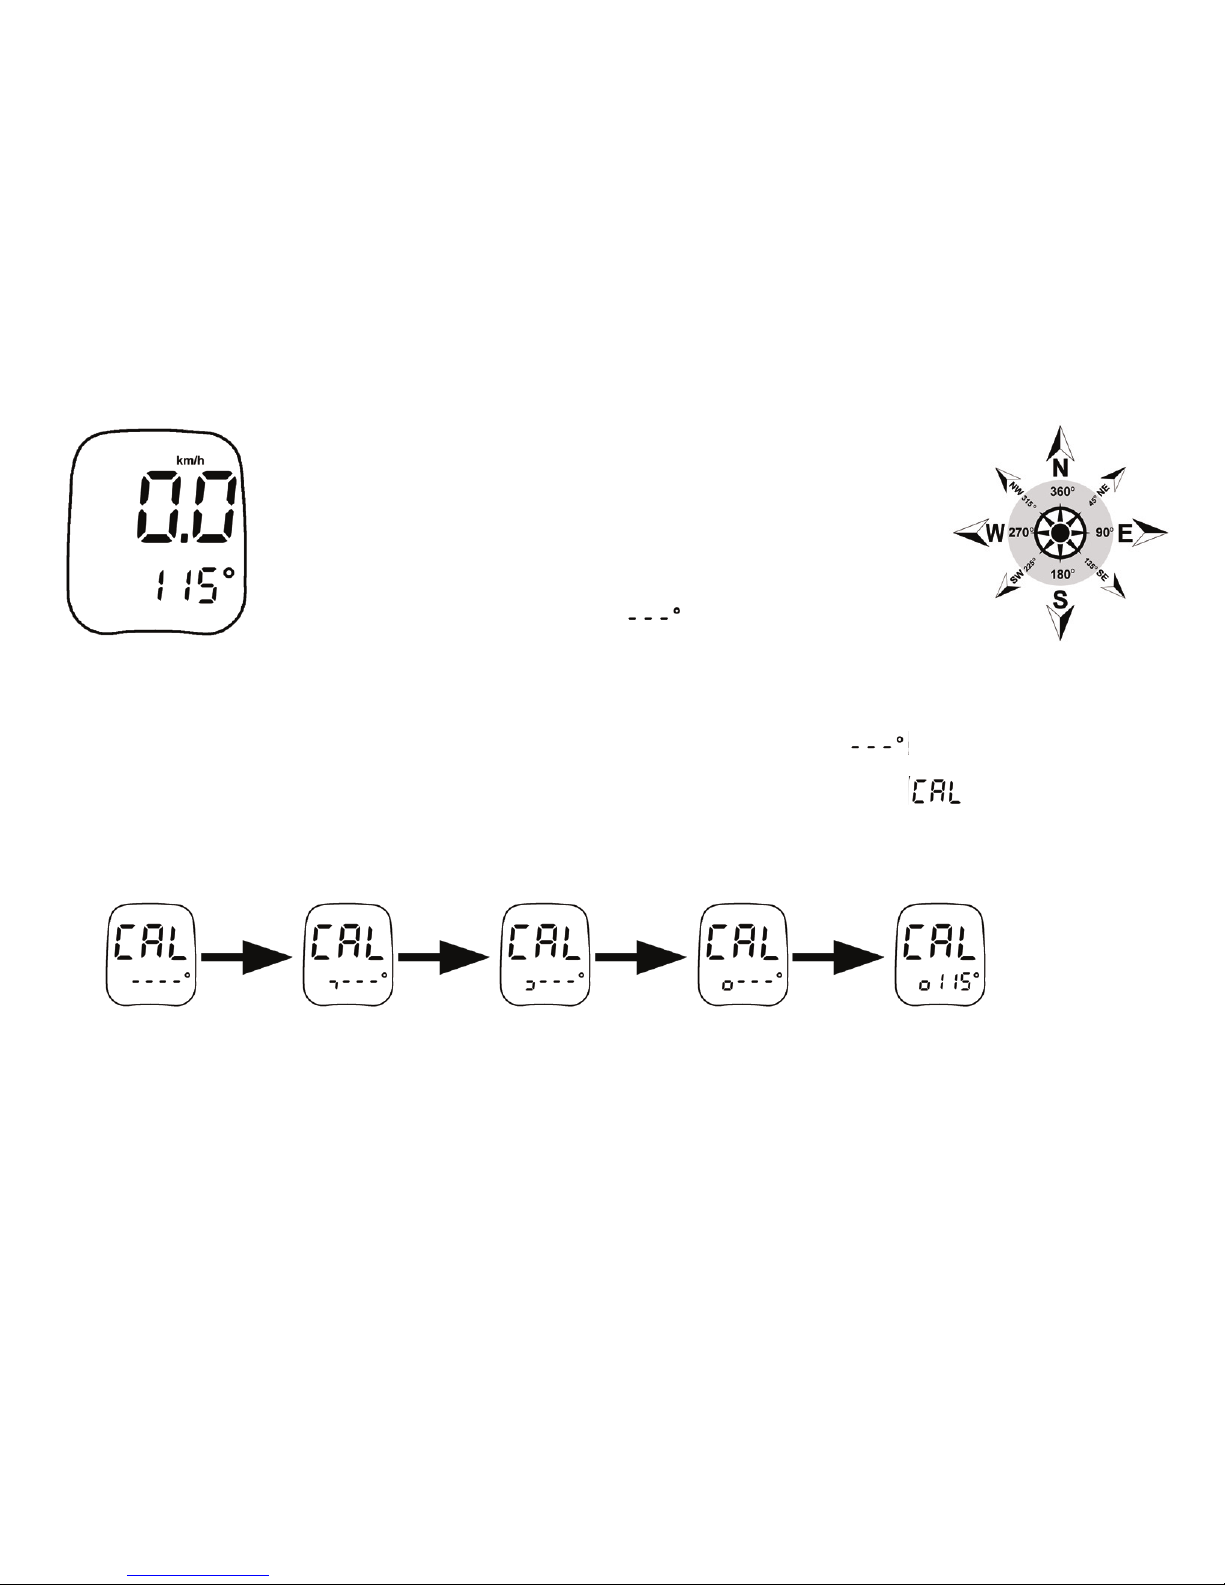
MODE: INSTANT WIND SPEED WITH ELECTRONIC COMPASS
Compass display:
The compass display is given in degrees on the small digits. The
Xplorer shows magnetic north, and not geographical north!
Measurement:
To carry out a measurement as accurate as possible, hold your
instrument perfectly vertical, as when measuring wind speed.
If the Xplorer is tilted, it will show rather than an incorrect
reading, unlike many electronic compasses.
Calibration:
IMPORTANT!CalibrateyourXplorerbeforetherstuseandateachchangeofenvironmentorbattery.
Whentheinstrumentisrststartedfromthefactory,itwillonlydisplay for the compass.
Hold the button pressed down for approximately 3 seconds and release when is displayed. Keeping
the Xplorer completely vertical, slowly turn in a complete circle; it should take approximately 20
seconds to complete one turn. The progression of the screen will be as follows:
Uponsuccessfulcalibration,pressthebuttontoconrmandreturntothecompassmode.Toobtainan
accurate calibration, the impeller MUST NOT turn! If there is wind, shelter the impeller between your
thumbandyourindexnger.
Note:Theearth’smagneticeldaredisturbedbymetalenvironments,buildings,powerlines,vehicle
interiors,magneticeldsgeneratedbyanyelectricalequipmentandbymagnets.Inordertoobtain
accurate measurements, move away from the source of disturbance or to recalibrate.
rst90° 180° 270° 360°(fullcircle) successfulcalibration

14
MODE: CURRENT WIND SPEED WITH ALTITUDE
Choice of altitude measurement unit:
The altitude can be shown in m (metres) and ft (feet). Please note that above 9,999
feet the Xplorer 4 will only read in meters due to the limit on the LCD. To change
the units press and hold the button for approximately 4 seconds and the units will
change. Release the button when the desired units are displayed and the instrument
returns to the mode of measuring the instant wind speed with display of the altitude.
This setting will remain until changed again, even after turning the Xplorer 4 off.
Altitude explanation:
ALL altimeters calculate altitude based on a known elevation, and
measure the change in air pressure to determine the change in
altitude, often measured as the height above Mean Sea Level
(MSL). The Xplorer 4 uses a Swiss barometer, which is used for
both the air pressure reading and altimeter functions. The terms
altitude and elevation are often used interchangeably, however
technically elevation is a point on the earth’s surface (mountains for
example) and altitude points above the earth’s surface (airplanes
and structures for example). The altitude displayed by the Xplorer
4 is the height above mean sea level.
Altitude and air pressure relationship:
Air pressure decreases approximately 0.01 inHg for every 10 feet
increase in altitude (at altitudes below 5,000 ft above MSL). Since altitude is based on air pressure,
the change in air pressure from weather patterns will affect the altimeter reading. For example an
incoming storm can lower barometric air pressure by 0.06 inHg in an hour, resulting in a change in
altitude measured of 60 feet. This is a normal occurrence! Altimeter and barometer readings will also
be affected by an external pressure source, for example a well-sealed building or a moving car. The
Xplorer will take between 5 and 20 seconds to adjust to a new altitude reading. The SKYWATCH Xplorer
4 uses a sensitive Swiss barometer and can sense a change in altitude of one foot (0.3 meters).
Mount McKinley has a larger bulk and
rise than Mount Everest. Even though
the summit of Everest is about 9,000 feet
(2,700 m) higher as measured from sea
level, its base sits on the Tibetan Plateau
at about 17,000 feet (5,200 m), giving it
a real vertical rise of a little more than
12,000 feet (3,700 m). The base of Mount
McKinley is roughly a 2,000-foot plateau,
giving it an actual rise of 18,000 feet
(5,500 m).has a lower elevation of 20,000
feet, yet because its base is at 2,000 feet,
the actual vertical rise is 18,000 feet -
6,000 feet more than Mt. Everest!

15
MODE: CURRENT WIND SPEED WITH ALTITUDE (CONTINUED)
Display of the maximum altitude:
Hold the button pressed down for approximately 2 seconds and at the moment
when the indication is displayed, release the button; in this way the instrument goes
into the mode for measuring the instant wind speed with display of the maximum
altitude. In order to quit this mode press once on the button. The instrument then
returns to the wind/altitude mode. To delete the maximum altitude, while in the
maximum altitude mode, press and hold the button for approximately 2 seconds,
then release it. The maximum altitude will revert to the current altitude.
Calibration of the altitude:
Before using the Xplorer to measure altitude, be sure to calibrate it to a known altitude. Alternatively,
it can be calibrated to the local reported relative air pressure, please see the next section
on air pressure. The difference in altitude can always be measured without calibration.
While in the altimeter mode, press and hold the button for 3 seconds until appears
in the large digits and release. Press and hold the button to increase the altitude in steps
of1unit.Toreducethealtitude,releasethebuttonbrieythenonceagainpressand
hold the button. As the button is held, the altitude will increase/decrease at a faster rate.
If the altitude requires a large change and the button is held down for many seconds,
theXplorer4maystarttoashtoturnoff.Simplyreleasethebutton,thenrepeattoadjust.Oncethe
altimeterreadingiscorrect,releasethebutton,thenbrieypressitonce.Pleasenotethatthealtimeter
will revert to meters when the altitude is above 9,999 feet. There are many sources for local elevation,
you can check www.earthtools.org for a good source.
Measurement frequency: 1 measurement per second with 3ft (1m) resolution
Measuring range: -2,300 to 29,500 ft (-700 to 9,000 m)
(above 9,999 ft, only meters will be displayed)
Accuracy: +/- 10 ft (+/- 3 m) change in altitude
16
MODE: CURRENT WIND SPEED WITH BAROMETRIC AIR PRESSURE
Choice of air pressure measurement unit:
The air pressure can be shown in inHg (inches of Mercury) or hPa (hectoPascals,
the same as mb millibars). To change the units press and hold the button for
approximately 4 seconds and the units will change. Release the button when the
desired units are displayed and the instrument returns to the mode of measuring
the instant wind speed with display of the air pressure. This setting will remain until
changed again, even after turning the Xplorer 4 off.
Air pressure explanation:
Barometric air pressure is the measurement of the weight of air in
the atmosphere above the measurement point. At higher elevations,
there is less air mass above, thus a lower pressure. Local atmospheric
pressure variations are an important aspect of weather. Low and High
pressure fronts develop and dissipate constantly, and are a major factor
in weather. Low pressure fronts generally bring cloudy and stormy
weather, while High pressure fronts bring clear, cool weather. Extreme
Low pressure fronts occur in centers of hurricanes and tornados.
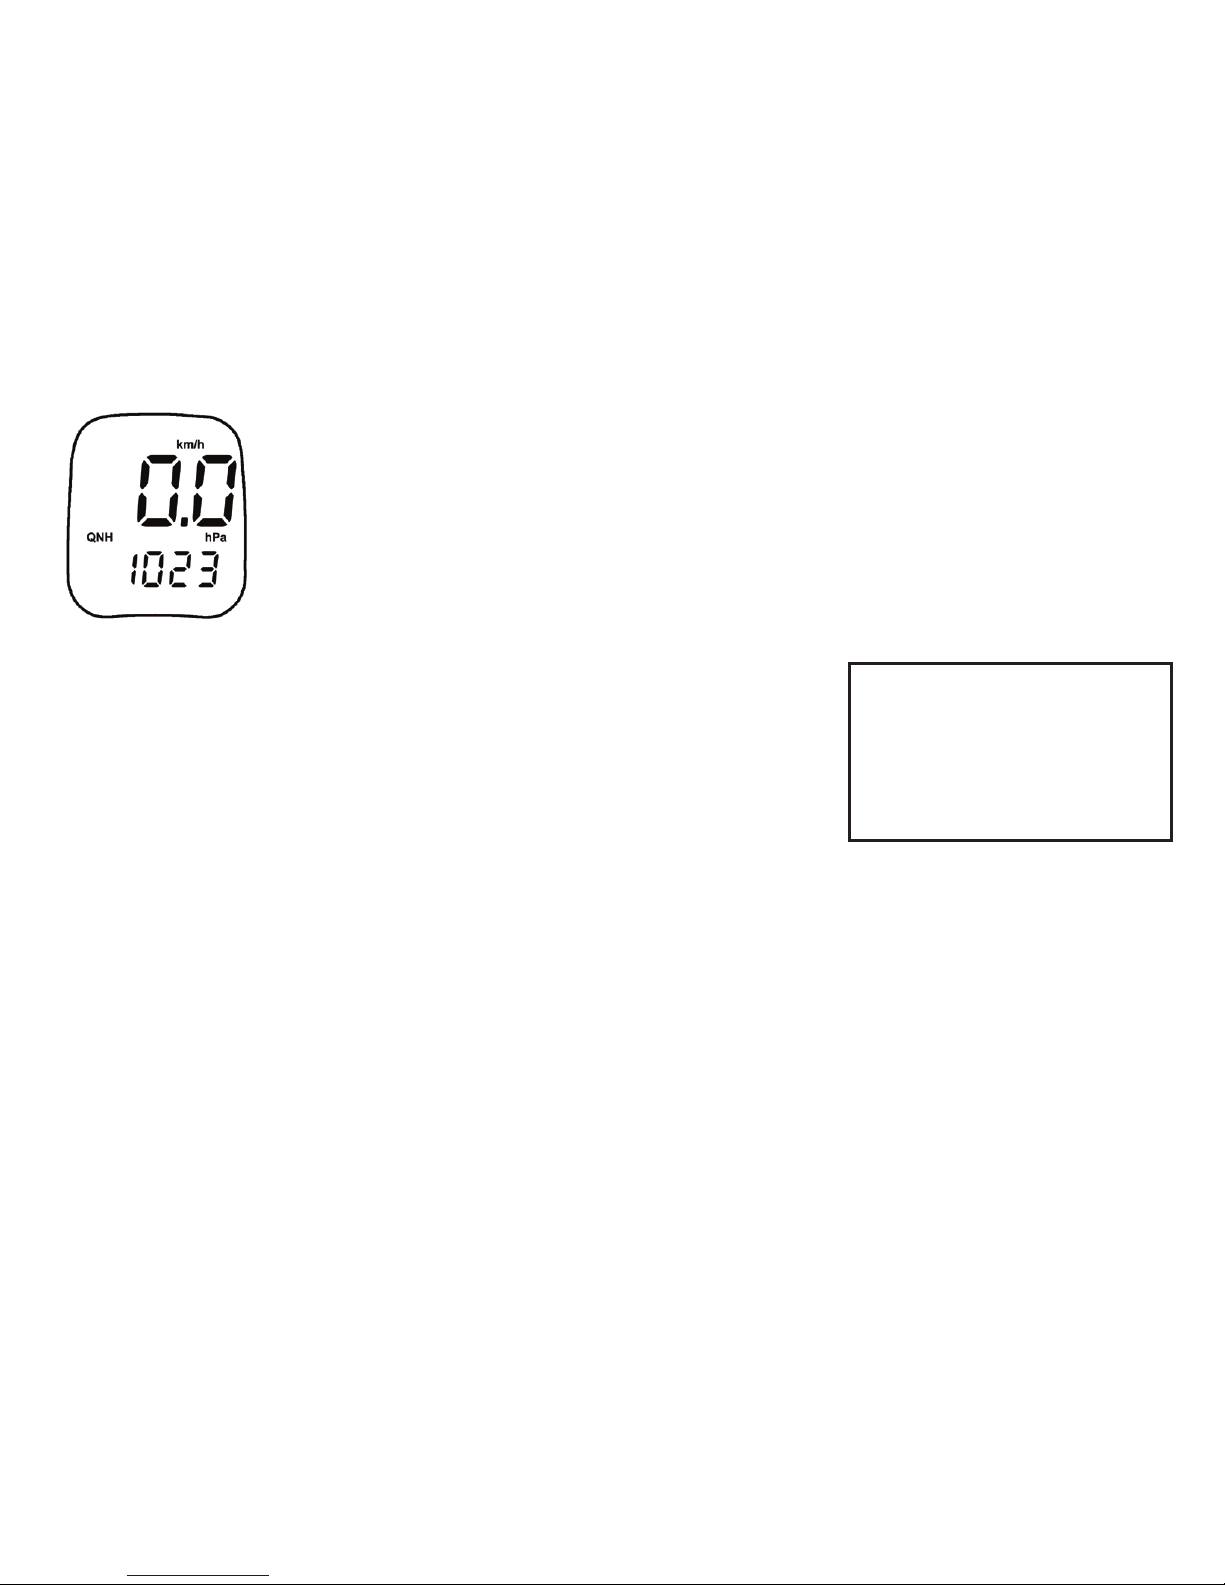
The instrument offers 2 modes for displaying pressure: QFE pressure and QNH pressure. These two
abbreviations (QFE and QNH) are taken from the famous “Q” code. This code was instituted by the
London conference of 1912. It is made up of a list of three letter indicators, valid for all the countries
of the world, used most often in the aeronautical world.
QFE: Atmospheric pressure at ground level, also known as absolute pressure. This reading is not
adjustable, it is an absolute reading of the exact barometric air pressure.
QNH: Atmospheric pressure obtained by calculation at sea level in standard atmospheric conditions,
also known as relative pressure. This is the pressure mentioned in meteorological bulletins or on the
television. This setting is calibrated according to exact altitude.
In the Northern hemisphere, winds
will rotate counterclockwise around
Low pressure fronts, and clockwise
around High pressure fronts. In the
Southern Hemisphere the directions
are reversed. While High pressure
generally involves clearing weather,
it can also bring strong winds.

17
Choice of Pressure Measurement Unit:
The air pressure can be shown in inHg (inches of Mercury) and hPa (hectoPascals/millibars). To change
the units press and hold the button for approximately 4 seconds and the units will change. Release the
button when the desired units are displayed and the instrument returns to the mode of measuring the
instant wind speed with display of the air pressure. This setting will remain until changed again, even
after turning the Xplorer 4 off.
Display of absolute pressure (QFE):
Keep the button pressed down for approximately 2 seconds and at the very moment
when the indication (QFE) is displayed in the large digits, release it. The instrument then
goes into the mode for displaying absolute pressure. To quit this mode, press once on the
button, and the instrument returns to the mode wind speed and QNH/relative pressure.
Calibration of relative pressure (QNH):
Before using the Xplorer to measure relative air pressure, be sure to calibrate it to
a known relative air pressure reading. Alternatively, it can be calibrated to a known
altitude, please see the previous section on altitude. While in the air pressure mode,
press and hold the button for 3 seconds until appears in the large digits and release.
Press and hold the button to increase the air pressure in steps of 0.01 inHg or 1
hPa.Toreducetheairpressure,releasethebuttonbrieythenonceagainpressandhold
the button. As the button is held, the air pressure will increase/decrease at a faster rate.
If the air pressure requires a large change and the button is held down for many seconds, the Xplorer
4maystarttoashtoturnoff.Simplyreleasethebutton,thenrepeattoadjust.Oncetheairpressure
readingiscorrect,releasethebutton,thenbrieypressitonce.
Comments:
IfQNHgureissteady(isnotashing)thisindicatesthecurrentrelativepressure(QNH)credible•
due to a slow change, indicative of a change in weather patterns, not altitude change.
TheQNHsignashesifthispressurehaschangedsincethelastcalibration.•
IftheQNHgureisashing,itindicatestheQNHpressureenteredatthelastcalibration.•
A rise in altitude or a meteorological variation when the recording is not active makes the QNH•
gureash.

18
Calibration of the QNH or of the altitude (known datum) makes it possible to re-adjust the Xplorer•
in relation to the measured ambient pressure. This varies continually according to the altitude and
the current meteorological conditions.
The only reference for the Xplorer is the air pressure which it is measuring, from which it deduces•
the altitude. Any variations in this pressure makes the altitude change: 9 metres per hPa a low
altitudes, 14 metres at 5,000 metres, and this is why it is necessary to calibrate as often as
possible to maintain a credible display (even airline pilots have this to comply with!).
Historical Recording Modes:
The Xplorer 4 records the air pressure, even when it is OFF, every hour for the past 48 hours. By default
this setting is turned OFF to save battery economy. There are three recording modes, for air pressure
trend, relative air pressure (QNH) and altitude. However all three records are stored based on the air
pressure at the time of measurement and the current calibration of altitude/QNH.
Trend: This is the difference in pressure over the last 24 hours (or 48 hours, or 1 hour etc.).
ThisisvalidiftheXplorerisinthesameplace(samealtitude).Anegativegureindicates
adropinpressure,apositivegure,anincrease.Pressurenaturallyvariesduringtheday,
and the weather trend is more accurate at 12 to 24 hours. Increasing air pressure generally
indicates clearing weather, decreasing air pressure worsening weather, and steady pressure
no weather change. A large drop in air pressure (0.06 inHg within 12 hours) can indicate an
approaching storm. A large increase in air pressure can bring strong winds.
QNH: This is the relative pressure at 24 hours ago (or 48 hours, etc.). Valid if the Xplorer
is at the same place and is recalibrated.
Altitude: If you set off for a mountain walk or go paragliding, you can check the altitudes
achieved hour by hour. The altitude will be accurate if you force the QNH calibration of the
Xplorer on the weather pressure that was present when you recorded.

19
Activating/deactivating the history:
The Xplorer 4 recording mode is set to OFF. To turn the recording mode on, with the Xplorer 4 on,
brieypressthebuttontooneofthethreerecordingmodes(“0h”displayedatthetop.Pressandhold
the button at least two seconds until a number other than 0h is displayed. To deactivate recording,
press and hold the button until “0h” is again displayed.
Display of a particular moment in the record:
When in either of the three recording modes, press and hold the button to change the time in past
displayed. The Xplorer 4 will progress from 1h, then 24h, then 48h, and next hour by hour, from 1h
to 48h. Release the button when the time is displayed. To continue recording, be sure to leave it on a
time other than 0h!
Comments:
If you consult the record and you leave displayed 5 h for example, the next time you switch on the•
Xplorer, it will display 24 h if there has been a new pressure measurement, this being generated
by the internal clock (one measurement per hour).
On releasing on 0h, the record will no longer do a measurement each hour (but will retain the•
current contents) thereby giving you battery economy.
In going back to active record mode (anything other an 0h) the current measurement is stored as•
the starting time and displayed under 1h.
If there is no record in a time slot (for example it has only recorded for 10 hours and you are•
trying to view the record from 24 hours ago), it will display
General Reset:
Thismoderesetsbydefaultallguresandremovesthecalibrationofthecompass.In
order to carry out a general reset, switch off the instrument as normal. Then hold the
buttonpresseddown.AtthemomentwherealltheLCDdigitsappearreleaseitbriey,
then press and hold the button down until it turns off. You can then start up your
instrument in the normal way.

Developed and manufactured by:
JDC Electronic SA
Switzerland
www.jdc.ch
North American Sales & Support:
NTech USA
PO Box 284
Holmen, WI 54636
www.ntechusa.com
608.498.4021
WIND METERS
Xplorer 1: Wind speed only
Xplorer 2: Adds Temperature
Xplorer 3: Adds Digital Compass
Xplorer 4: Adds Air Pressure and Altitude
EOLE: “Cup-style” Wind Speed
METEOS: “Cup-Style” Wind plus Temperature
ATMOS: “Cup-Style” Wind, Temperature, Humidity
Products available through NTech USA:
OTHER PRODUCTS
FLOWATCH: Flowofwater/uids
SPEEDWATCH: Wireless Boat Knotmeter
POROSIMETER: Porosity of fabrics
Table of contents
Popular Marine Equipment manuals by other brands


Raymarine
Raymarine SmartPilot ST6001 operating guide

SBG Systems
SBG Systems Navsight Solution Hardware manual

Aquatic
Aquatic AQ-DM-5BT DIGITAL MEDIA LOCKER owner's manual

Pfannenberg
Pfannenberg PA 130 Operating and installation instruction

hyfire
hyfire TAURUS TAU-BS-01 manual

Furuno
Furuno VR-7000 Operator's guide

Simrad
Simrad GO XSE Series Operator's manual

CQR
CQR Senza Installation and operating instructions

Lopolight
Lopolight 300-138 installation instructions

ECO SISTEMS
ECO SISTEMS Water-pro Compact S-90 12V owner's manual

Raymarine
Raymarine LIGHTHOUSE 4 Operation instructions

Kongsberg
Kongsberg HiPAP 502 instruction manual