Sleavon D023H User manual

Home Dehumidifier
Please read the manual carefully
before using the unit
D023H
USER MANUAL
www.sleavon.com


Thank you for purchasing our dehumidifier.
Sleavon wishes that our products and services can bring convenience to your work
and life. We highly recommend that you keep the manual for reference if you
encounter unexpected events using the unit.
Please read the manual carefully to ensure proper use of the dehumidifier. Our
dehumidifiers are widely used in family bedrooms, bathrooms, basements, offices
and storage rooms, etc.
The dehumidifiers from provide quick and efficient operation to reduce Sleavon
room's humidity and bring you a healthy and comfortable life.
If there is any problem of the product, please contact Sleavon Customer Service
at with your Purchase Order ID to help you address the support@sleavon.com
problem more effectively.
FOR CUSTOMERS
TO ACCESS CUSTOMER SUPPORT FASTER

To prevent any internal damage, it is very important to keep
refrigeration units (like this one) upright throughout their journey.
Please leave it standing upright and outside the box for 24 HOURS
before plugging it in.
BEFORE FIRST USE:

TABLE OF CONTENTS
SAFETY INSTRUCTIONS .......................................................1
FEATURES & SPECIFICATIONS..........................................2
PRODUCT DRAWINGS ............................................................3
MACHINE SETUP & OPERATION .......................................4
WATER DRAINAGE ..................................................................7
MAINTENANCE & STORAGE.............................................10
TROUBLE SHOOTING...........................................................11
SPECIAL NOTES......................................................................12
WARRANTY & CONTACT US ..............................................13

IMPORTANT NOTICE FOR FIRST USE:
For your safety, please read the manual carefully and keep the manual for future
reference. Please use this product according to the instructions of installation
and operation of this manual.
Don't try to repair, dismantle or modify this appliance, or it may cause damage.
Install the unit on flat and hard floor to diminish vibration or noise.
Never immerse the unit in water or other liquids.
Never operate the unit if the cable or other connector is damaged, or something abnormal that
happened, please call customer service for help.
Disconnect the unit from power supply when it is not in use, or before relocating or cleaning it.
Operate the unit only at the voltage specified.
The unit is for indoor use only. Don’t use it for other purpose.
Do not put heavy objects on the appliance.
Do not tip the unit to any side as spilled water may damage the appliance.
Never insert any other objects into the unit body to avoid any hazard or unit failure.
Do not put the unit close to heat-generating devices or near flammable and dangerous materials.
This appliance is not intended for use by persons (including children) with reduced physical,
sensory or lack of experience and knowledge, unless they have been given supervision or
instructions concerning use of the appliance by a person responsible for their safety. Children
should be supervised to ensure that they do not play with the appliance.
If the supply cord is damaged, it must be replaced by the manufacturer or its service agent or a
similarly qualified person in order to avoid a hazard.
The appliance must be placed properly so that the plug is accessible.
The appliance shall be installed in accordance with national wiring regulations.
The ambient temperature range for the appliance is 41℉- 95℉.
SAFETY INSTRUCTIONS

FEATURES & SPECIFICATIONS
Model No.
Power Source
Rated Power(86˚F,80%RH)
Rated Current(86˚F,80%RH)
Moisture Removal(65˚F,60%RH)
Moisture Removal(80˚F,60%RH)
Moisture Removal(86˚F,80%RH)
Moisture Removal(95˚F,90%RH)
Noise
D023H
AC115V 60Hz
195W
2.0A
9 Pints/Day(4.2L/Day)
13 Pints/Day(6.1L/Day)
24 Pints/Day(11.3L/Day)
32 Pints/Day(15.1L/Day)
1.46liters/kWh
204psi(1.41Mpa)
88psi(0.60Mpa)
≤36dB(A)
R134a 3.70oz
41˚F - 95˚F
10.0*8.5*19.5in
10.4kg/23 lbs
SPECIFICATIONS
PRODUCT FEATURES
● 40 pints per day, efficient dehumidification
● Three optional modes (AUTO,CNT,SLEEP)
● Compact and modern design
● Extremely quiet operation(36dB(A))
● Auto defrosting
Working Temp.
Refrigerant / Charge
Product Dimensions
Net Weight
This product can expose you to chemicals including Styrene and its compounds,
which are known to the State of California to cause cancer and birth defects or other
reproductive harm. For more information, please visit: www.P65Warning.ca.gov.
WARNING
IEF(65˚F,60%RH)
HIGH PRESSURE
LOW PRESSURE

PRODUCT DRAWINGS
Front
Control Panel
Air Inlet
Air Outlet
Water Tank
Back
Continuous Drainage Outlet
Universal Castor
Display Lamp
Front Shell
Back Shell
Visible Water Level
Power Cord

MACHINE SETUP & OPERATION
Button Function
1. Power
After plugging the power, the “POWER” indicator will light up, the machine is in
standby mode.
In this mode, press the “POWER” button to turn on the machine, it will enter the
Auto Mode automatically , the “HUM SET” indicator will light up, the fan will run
at default high wind speed, and the default humidity value is 50%RH.
In runnning status, press this “POWER” button, the compressor will stop
immediately, and the fan will shut down after 30 seconds’ delay, all indicators
except the "POWER" indicator will be off, the machine will be back in standby
mode.
2. Modes
Auto Mode—Continuous Drying Mode—Sleep Mode Switch, press the “MODE”
button to switch the mode from one to another, the corresponding indicator will light up.
DIGITIAL DISPLAY
Blue
humidity<45%
Green
45%≤humidity≤65%
Red
humidity>65%
OPERATRIONS
8.8.

3. Timer
The timing fuction is designed for you to automatically turn on (when the machine
is off), or to turn off (when the machine is on) the machine by the timer.
Press the timer button you can set the timer within the range of 0-12 hours at the
interval of 1 hour. Each time you press this button, the value will increase by 1 hour
and the corresponding timing value will be displayed on the screen.
When you set the timer, the setting time will flash on the screen to show the setting
value.
If you successfullly set the timer, the timer indicator will be on, and the screen will
the display the setting time when you press the “TIMER” button again.
If you set the timing value to “00”, it is called the invalid setting time or to cancel
the timing function.
MACHINE SETUP & OPERATION
● Auto Mode
Both the fan speed and the humidity value can be adjusted under Auto Mode, and the
“HUM SET” indicator will light up at this mode.
When environmental humidity ≥ set humidity by 3%RH, the fan will start to work and
compressor will start 3 seconds afterwards. When environmental humidity ≤ set
humidity by 3%RH, the compressor will stop working, the fan will stop after 30
seconds’ delay.
● Continuous Drying Mode
The machine continues to run, but the humidity can not be adjusted at this mode, the
sleep indicator “ ” will light up.
● Sleeping Mode
Neither the fan speed nor the humidity value can not be adjusted under sleeping mode.
Press the “MODE” button you can choose the Sleep Mode, the sleep indicator “ ”
will light up and start this function.
If no operation within 10 seconds, all indicators will turn dark gradually and the wind
speed is automatically switched from high to low. You can press any button to wake up
the indicator. Press the “MODE” button again will exit the Sleep Mode.
When environmental humidity ≤ 57%, the compressor will stop working and the fan
will shut down after 30 seconds’ delay. When environmental humidity ≥ 63%RH, the
fan will start working and compressor starts after 3 seconds.

MACHINE SETUP & OPERATION
4. Humidity Setting
Press the humidity button you can check the current environment humidity, and
press again you can set the humidity. The range of target humidity is:
30%- 35% - 40% - 45% - 50% - 55%- 60% - 65% -70% - 75%- 80%.
After setting for 3 seconds, the system will confirm the input value, then the
machine will exit the setting status, and return the current humidity.
In the Drying Mode, the target humidity cannot be changed.
Long Press humidity button for 3 seconds will display the current ambient
temperature.
5. Fan Speed
High Wind - Low Wind Switch, press this button once to switch the fan speed, then
the corresponding indicator will light up.
In Continuous Drying Mode, Sleep Mode and defrosting period, the wind speed can
not be changed.
6. Child-lock
Long press the button for 3 seconds to turn on/off the child-lock function.

Water Tank Full Alarm
When the tank is full for 5 seconds, it activates the Full Tank Alarm. The Full Tank
indicator will turn red and the unit will buzz for 5 times.
Clear the alarm
When the buzz is on, press any button to stop it. The compressor and fan will shut
down, and all the functions will freeze until the tank is emptied and put back in
right position.
Empty the tank
Grab the notch at the bottom of the tank and pull it out with both hands.
Take it out slowly and steadily in case spilling water.
Empty the water.
Put the water tank back in position, the dehumidifier will automatically start
working again.
WATER DRAINAGE

WATER DRAINAGE
PRECAUTIONS
Do not remove the float out of the
tank otherwise the dehumidifier
can not start up.
Ensure the water tank is in right
position when putting it back,
otherwise the dehumidifier can
not start up.
If the tank is dirty, wash it with cool/warm water. Do not use detergent,
steel balls, chemically treated dustproof cloth, gasoline, benzene, thinners
or other chemical solvents in case damage and leakage.
12
3
Working Distance
When the dehumidifier is in operation, make sure that the front and rear of the
dehumidifier maintains a minimum working distance of 20 cm from the
surrounding objects.
4
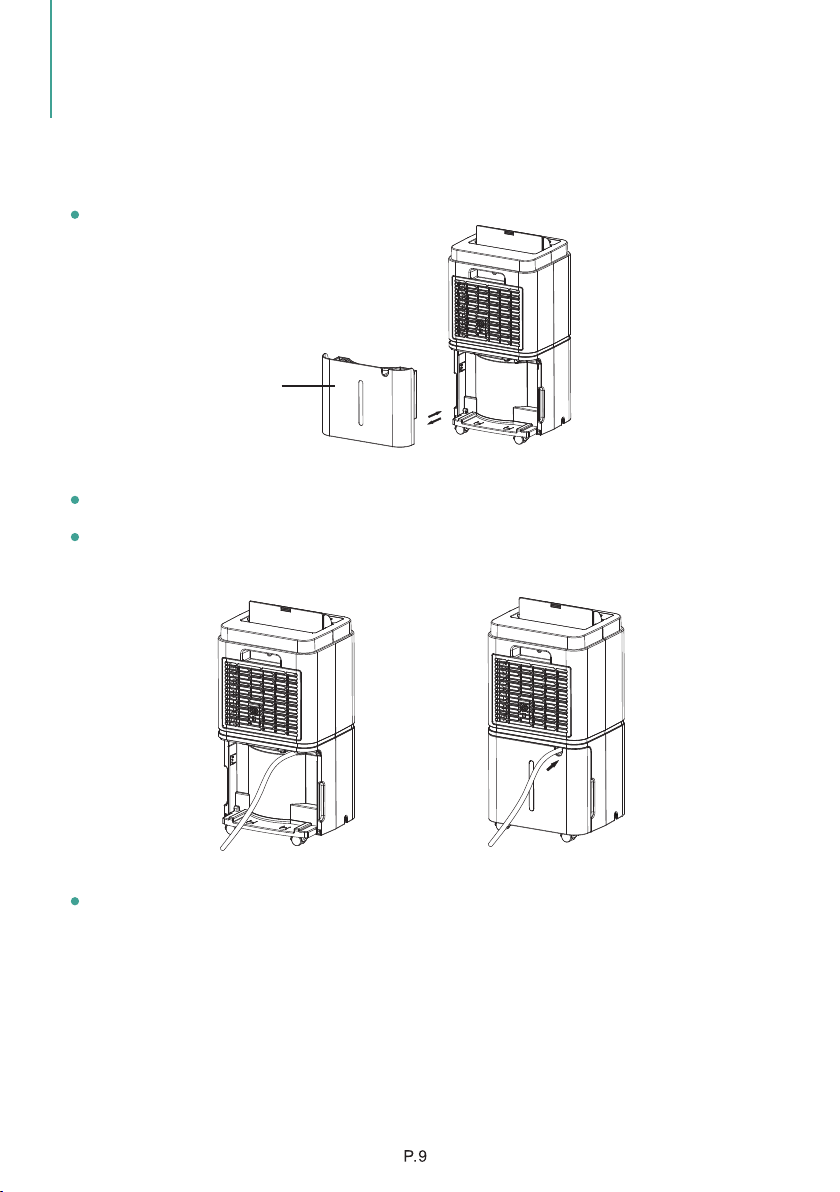
CONTINUOUS DRAINAGE
Take out the water tank
Use a water hose to connect the water outlet.
Dress the water hose through the cutting hole in the tank and push the tank back
to the machine.
For continuous drainage, the drainage end of the hose should not be submerged in
water in case being blocked or damaged.
WATER DRAINAGE
Water Tank

Body Cleaning
Use a soft and slightly wet cloth to clean the dehumidifier body.
Filter Cleaning
1. Take off the filter mesh.
2. Use a vacuum cleaner to gently absorb the dust on the surface. If the filter is very
dirty, wash it with water and a soft cloth and dry it thoroughly afterwards.
3. Put the filter back.
MAINTENANCE
1. 2. 3.
STORAGE
When not using the product for a long time and intend to store it, please pay attention
to the following steps:
1. Empty the water in the water tank and wipe the water droplets at the bottom of
machine inside.
2. Roll up the power cord and tie it up.
3. Clean the filter.
4. Place the machine in a cool and dry environment.
MAINTENANCE & STORAGE
MAINTENANCE

TROUBLE SHOOTING
Not working
No power supply.
Bad functioning
Water full indicator flashes.
No air intake
Is the air filter clogged?
Loud noise when running
Is the filter clogged?
Problem Possible Cause Solution
E2
Is the machine put in the plat place?
Humidity sensor problem.
Environmental humidity is below 20%.
Environmental humidity is above 90%.
FUNCTIONING TEMP.
41℉ ≤ Ambient Temp. ≤95 ℉
When the ambient temp. is lower or higher than the functioning temp., the dehumidifier
will stop operating.
When the machine is working between the ambient temperature of 41℉ and 60.8℉, the
compressor will automatically defrost at intervals.When defrosting, the compressor will
stop and the fan will keep running.
BEFORE CALLING FOR CUSTOMER SERVICE
Before contacting the professional service, you can take a time to review the Trouble
Shooting List that includes common occurrences that are not the result of defect in
workmanship or materials as below.
Not very effective
LO
HI
CL
CH
Room temperature ˂ 41℉,or ˃ 95℉.
Is the intake duct or discharge duct
obstructed?
Is the filter clogged?
Low temperature protection, the
environmental temperature<41℉.
High temperature protection, the
environmental temperature>95℉.
Connect to a functioning outlet and
switch on.
Drain water tank and reset it, or re-
position the water tank to right place.
Clean the air filter as instructed.
Wash the filter.
Put the machine on the plat ground.
Change a sensor.
The dehumidifier shuts down for
self- protection.
Self-protection designed to protect
the unit. Can not work under such
temperature.
Remove the obstruction from the
discharge duct or intake duct.
Wash the filter.

Do not insert thin rods and hard
objects into the machine body to
avoid malfunction and danger.
When cleaning the dehumidifier,
please use the wet textile to
wipe gently, do not shoot the
water directly.
Please clean the filter every two
weeks (do not use hot water
above 104°F, alcohol, gasoline
or toluene.)
When continuous drainage,
the drain hose must be
placed horizontally, without
unevenness and winding.
After cleaning the filter, please
do not dry it under direct
sunlight, in case deformation.
SPECIAL NOTES
P.12

Sleavon offers a 12-month warranty to all of our products together with the
original proof of purchase when a defect occured, including those newly
purchased and unused, from leavon or through an authorized reseller, wholly or S
substantially, or as a result of faulty manufacturing parts, or workmanship during
the Warranty Period.
The warranty does not apply if damage is caused by other factors, including but
without limitation of:
Register your product at to extend your 1-year warranty by an www.sleavon.com
additional year.
*Please fill out all required fields and inlcude your Order ID, Date of Purchased if
applicable.
Warranty
Extend Your Warranty by 1 Year
Customer Support
There are our general terms for the warranty service, but we always encourage our
customers to contact us if any issues, regardless of warranty terms.
If you are experiencing an issue with Sleavon product, you can reach out to us at
support@sleavon.com, we will dedicate our efforts to resolve it for you.
(a) Normal wear and tear;
(b) Abuse, mishandling, accident or failure to follow operating instructions;
(c) Exposure to liquid or infiltration of foreign particles;
(d) Servicing or modification of the product other than by Sleavon.
If you have any questions or concerns about your product, please feel free to
contact our expert support team. Sleavon customer service is here to help.
Sleavon Office
13211, Spring Street Baldwin Park, CA, US
Email: support@sleavon.com
Live Chat: www.sleavon.com
Support Hours
24 Hours available
*Please have your Order Number ready before contacting customer support.
WARRANTY & CONTACT US
P.13


We are expecting to see our products fulfill your life and hear your voice.
Your satisfaction means a lot to us.
Please tag us if you share a snap on your social media.
For FAQs and more information please visit:
www.sleavon.com
(Scan the QR Code for Live Chat)
www.sleavon.com
Sleavon
Sleavon
Sleavon
Sleavon
Table of contents
Other Sleavon Dehumidifier manuals


