Slider C3033 User manual
1
1Introduction
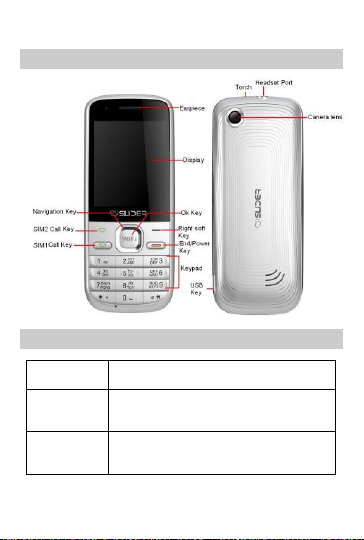
1.1 Phone Display
1.2 Key Functions
Key
Function
SIM1/SIM2
Call Key
Press to answer/make a call from SIM1 or SIM
2 card.
View call logs in standby mode.
End /Power
Key
Pressing and holding to turn the phone on/off.
End a call or reject an incoming call.
Return to the idle mode.
2
Left/Right
Soft Key
Press to perform the function currently
displayed in the bottom left/right corner of the
screen.
OK Key
Press to confirm the selected function.
In standby mode, press to access WLAN
Numeric key
Enter numbers, letters or characters.
Select a submenu item labeled with the
corresponding number.
* Key
Press and hold to toggle between +, (pause
character) P, and (wait character) W when
entering phone numbers in idle mode. Press
to enter symbol when editing text.
# Key
Press to switch input modes when entering
text.
Press and hold to activate or deactivate the
silent mode when phone is in idlemode.
Navigation
Key
Press to access four functions in idle mode.
Within a menu, press Up, Down, Left or Right
to scroll through menu options.
Note: “Press” in this manual, means to press and release the key;
“press and hold” means to press and hold the key for at least 2
seconds.
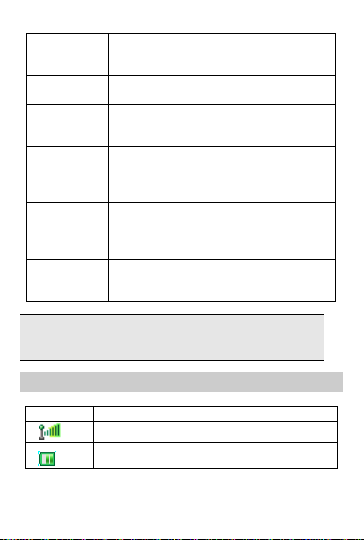
1.3 Icons & Symbols
Icon
Description
Indicates a WIFI connection is set up.
Battery - Indicates battery level.

3
To log on GPRS - Theicon will be displayed only
when you have logged onto GPRS.
Indicates new multimedia message(s).
Indicates new text message(s).
Missed call - Indicates there is a missed call.
Call Divert - Indicates that “Divert All Voice Calls”
is activated.
Lock- Indicates that the keypad is locked.
Alarm-Indicates that the alarm clock is on.
Headset-Indicates that headset profile is
activated.
Alert type is “Ring”.
Vibrate –Indicates that the vibrator is on.

4
2Getting Started
Please read the safety instructions in the "Safety Information and
Notices" section before use.
2.1 Inserting the SIM Card and the battery
2.1.1 Remove the back cover and battery
2.1.2 Insert the SIM cards
Make sure that the metallic contacts are facing downwards.
slide the SIM cards into SIM slots.
2.1.3 Install the battery and back cover

5
2.2 Inserting a T-Flash Card
With the metal contacts facing down, gently slide the T-Flash card into
the slot.
2.3 Keypad Lock and Unlock
Go to Settings > Security settings > Auto keypad lock to select the
time for keypad lock.
In idle mode, if the time expires, the keypad will be locked automatically.
3Text Entry
3.1 Input Method
3.1.1 Changing the input modes
During text editing, you can press the # Key to switch input modes,
or press the Left Soft Key [Options] and choose Input Method to select
different input modes.
3.1.2 Entering Symbols
In any input mode, press the * Key to open the symbols input screen.
Use the navigation key to choose the desired symbol and the OK key to
select it.
3.2 Predictive text entry
Letters and symbols represented by each key are as follows:
2 to 9
Press to input letters.
0
Press 0 to enter a space.
1
Press to input symbol.

6
◀/▶
Press to browse the previous or next
available word.
▲/▼
Press to browse the available words in
previous or next line.
Left Soft Key
Select the letter or word.
OK Key
Press to confirm the letter or word.
Right Soft Key
Press to clear a letter, press and hold to
clear all entries.
#
Switch between input mode.
*
Press to activate punctuation mode.
Example: How to enter the word "HOME"
1. Press the # Key to switch to ABC.
2. Press 4 6 6 3, the first word “GOOD” appears.
3. Press ▶to select “HOME”.
4. Press the OK Key to confirm “HOME”.
3.3 Multi-tap Input
This method requires multiple key presses to reach the desired
character: the letter "h" is the second letter on the 4 key, so you must
press 4 twice quickly to enter "h". Using this mode requires you to press
a key as many times as needed to enter the desired letter.
Example:
To enter the word “home” in Multi-tap input mode “ ABC”, press key
4(GHI) twice, press key 6(MNO) thrice, press key 6(MNO) once and key
3(DEF) twice.
3.4 Numeric Input
Press the # Key to select "123" input option then you can enter the
numbers.
4Calling
4.1 Making a Call
1.In idle mode, enter the phone number.

7
2.Press the SIM1/SIM2 Call Key to make the SIM1/SIM2 call.
3.Press the End/Power Key to end the call.
4.1.1 Making an International Call
1. In idle mode, press * key twice to enter "+".
2. Enter the country code.
3. Enter the area code followed by the phone number.
4. Press the SIM1/SIM2 Call Key to make the SIM1/SIM2 call.
4.2 Answering a Call
Press the Dial/Answer Key or Left Soft Key Options > Answer to
answer it.
Press End/Power key to reject it.
5Menu Functions
5.1 How To Use
5.1.1 Select Menu
Press the Left Soft Key to enter main menu in idle mode.
Press the Navigation Key to choose desired menu and press the OK
Key to enter the selected menu.
You can exit a menu and return to idle mode by pressing the Right Soft
Key [Back] or the End/Power Key.
5.2 Call center
5.2.1 View Call History
1. Select Menu > Call center > Call history.
2. Press the Navigation Key to view different call logs.
3. Choose a particular number and press the Dial Key to call the
number directly.
5.2.2 Adjust Call Settings
1. Select Menu > Call center > Call settings.
2. Now you can set the call waiting, call divert, call barring and so
on.
8
5.3 STK
Note: The submenus of this feature depend on the operator and
different operatorsmay provide different services (some SIM cards
do not support STK).please contact your operator.
5.4 Fun & Games
This phone provides you some built-in games.
You can also access social networks here, such as Facebook :select>
Fun&Games>java>Facebook.
To access Facebook, you need to get internet service first. Please
contact your network operator for more details.
5.5 Multimedia
5.5.1 Camcorder
Your cellular phone features a camera that allows you to take pictures
and record short videos. The pictures and videos can be saved in
memory card or phone. Take a photo
Launch
Camera
From idle mode, press the Left Key to enter the
main menu then select Multimedia >
Camcorder
Take a
picture
Press Navigation Left/Right Key to Camera
mode.
Press the OK Key to take a picture.
Exit
Press the End/Power Key or the Right Soft Key
[Back].
Record a video
Launch
Video
From idle mode, press the OK Key to enter the
main menu then select Multimedia >
Camcorder
9
Record a
video
Press Navigation Left/Right Key to Video record
mode.
Press the OK Key once to begin recording. Press
the OK/Left Soft Key again to pause.
To save the video, press the Right Soft Key. The
video will automatically saved and it will be
stored in File Manager.
Exit
Press the End/Power Key or the Right Soft Key.
Camcorder Option Menu
When the camcorder is activated you can change a number of settings
by pressing the Left Soft Key before taking a picture or recording a
video.
5.5.2 Image Viewer
This menu lists the picture from Menu > File Manager >
Phone/Memory card > Fotos according to its storage setting.
5.5.3 Media player Keys Operation
The keypad operations during music playback are as follows:
Key
Description
The OK Key
List the audio file from the storage you set.
Navigation
Key ▼
Press to stop themusic.
Navigation
Key ◀/▶
Short press to select the previous song/next
song. Press and hold to rewind/fast forward the
track during playback.
*, #
Adjust volume.
Left Soft Key
[List]
List the audio file from the storage you set.
Right Soft
Key [Back]
Return to previous menu.
Navigation
Key Up ▲
Press to Start/Pause/resume the current music.

10
In the music list screen, you can press the Left Soft Key [Options] and
select Settings > Pre.playlist to change the storage.
5.5.4 Sound Recorder
1. Select Menu > Multimedia > Sound recorder.
2. Press the Left Soft Key [Options] and select Settings to set
your storage and file format.
3. Back to the previous menu, select New record.
4. In the recording screen, you can press the Left Soft Key to
pause or continue.
5. If you have finished, press the Right Soft Key [Stop] to stop
recording.
6. Press the Left Soft Key [Yes] to save the file you just recorded.
Note: Saved sound files can befound in the Menu >
Multimedia >File Manager > Phone/ Memory card > Audio menu
according to your storage setting.
5.5.5 FM Radio
Note: The FM radio will not work unless the headset is attached.
To operate the radio:
1. Select Menu >Multimedia >FM radio.
2. If the FM is off, press the Navigation Down Key to activate or
deactivate the FM radio.
3. Press the * / # Key to adjust thevolume.
4. Press the Navigation Up Key to activate or deactivate Auto
search.
5. Press the Navigation Right/Left Key to switch the channels. If
auto search is activated, pressing the Navigation Right/Left
Key will skip to the previous or next available searched
channels; if auto search is deactivated, pressing the Navigation
Right/Left Key will skip to the channel varying by 0.1 intervals.
6. Press the OK Key to record if you want.
Press the Left Soft Key [Options] to access the FM settings.
5.6 Phonebook
Your phonebook list is saved either on the SIM card’s memory or

11
Phone’s memory. You can also choose to list both.
5.6.1 Search contact
Key in full name or first character of contact person’s name, the
phonebook list will automatically jump to the character you have entered
or the matched contact will be displayed.
5.6.2 Add New Contact
To create a newSIM/phone contact:
1. Select Menu > Phonebook > Add New Contact.
2. Then enter all related information about the contact.
3. Press the OK Key to save the contact details.
5.6.3 Others
In this Phonebook menu, you can also view the Caller groups.
Select “Menu > Phonebook, press Options to select Phonebook
settings can set the preferred storage for the contacts.
5.7 Messaging
5.7.1 Creating a message
1. Select Menu > Messaging > Write message.
2. Write a message, please refer to the Text entry section of this
manual for detailed information. You can also add pictures,
sound, and other objects to the multimedia message.
3. After entering text, you can press the Left Soft Key [Options]
and then select Send to.
4. Enter the recipient number, or choose a contactfrom
phonebook.
5.7.2 Broadcast Message
1. Select Menu > Messaging > Broadcast messages.
2. Press the OK Key and then select [On] to activate this function.
3. Press the Navigation Down Key to select Channel settings to
enter the channel number.
Note: To obtain the codes corresponding to the different types of
messages, you must contact your operator.
5.7.3 Others
In this “Messages” menu, You can view the message you have sent,

12
saved, unsent or received in the Sent messages,Drafts, Outbox,Inbox
Select “Menu > Messaging > Delete messages” to delete the message
if you need.
Select “Menu > Messaging > Templates” to use the default SMS and
MMS templates
Select “Menu > Messaging > Message settings”to adjust the
message settings.
5.8 Organizer
5.8.1 Torch
To light in darkness, you may activate Torch by below operations:
In idle screen, select Menu > Organizer > Torch. Press Left Soft Key /
OK Key to switch torch on or off.
5.8.2 Calendar
This feature allows you to keep track of your schedule and tasks saved
in the calendar. You can also switch on the alarm with the task for
reminding.
To make a note and reminder in Calendar for the first time:
1. In Organizer menu, choose Calendar.
2. Select a day in the calendar.
3. Select Options > View to view the event. You can also select
Options > Add event to add a new event.
4. Choose a type of the event. Input the start and endtime of your
event, and describe the event contents in Subject and Details,
after you finish editing the contents of your event, select
Options > Done to save your description.
5. Choose Alarm clock to turn on or off.
6. Choose Once/ Everyday/Custom/ Weekly/ Monthly/Yearly in
Repeat.
7. Then you can edit other information.
8. Press Done to save the event.
5.8.3 Tasks
You can also view, edit or delete the tasksfrom the options under this
feature. For thefirst-time user, you will need to follow the steps below:
1. Select Add in the Task List.
2. Edit your Task by entering date, time, Subject, alarm, repeat
and other information.
3. You can choose to turn the alarm on as thereminder.

13
4. Select OK and Yes to save your task.
5.8.4 Set an alarm
1. Select Menu > Organizer > Alarm.
2. Select an alarm and then press the Left Soft Key [Edit] to create.
3. Press the Navigation Left / Right Key to turn it on or off.
4. Enter other information, such as time, repeat, and so on.
5.8.5 World clock
You can view the local date and time via selecting the GMT and city.
When the cross points out a certain city, it will show the local date and
time. 5.8.6 Calculator
Calculator applies simple calculator function such as addition,
subtraction, multiplications and division.
5.8.7 Unit converter
This feature helps you to convert either the weight or length to a
different unit.
5.8.8 Stopwatch
This function is designed to store the timepiece, which is to start or stop
for exact timing.
To use stopwatch
1. From the main menu select Extra > Stopwatch.
2. Select Typical stopwatch. You can choose different record
methods and view records.
Split Timing: When you select this, the timepiece
will be saved and continue to count when you press Split.
The 2nd timepiece is recorded based on the continuous
timing. You can stop and resume anytime.
Lap Timing: When you select this, the timepiece
will be saved and start the new timing when you press Lap.
The 2nd timepiece is recorded in new timing. You can stop
and resume anytime.
View records: You can view those timepieces you
have recorded or delete the records.
3. Select nWay stopwatch. You can make four records.
5.9 Services
Your phones support Web Browser. You can obtain various services

14
such as up-to date news, weather, sport, and other information as well
as other Internet services. These services are designed and maintained
by WAP service providers.
Note: To activate WAP service, you may need to contact your
service provider.
5.10 Settings
You can configure your cellular phone to best suit your usage
preferences.
5.10.1 Dual SIM switch
This feature allows you to switch SIM
5.10.2 Dual SIM settings
Your phone support dual SIM mode which allows you to switch from one
to the other as required. Dual-SIM operation allows the use of two
services without the need to carry two phones at the same time.
You phone provides 3 different SIM settings, including:
•Dual SIM Open: Allows you to activate dual SIMmode, so you
can switch between both SIM.
•Only SIM1 Open: Allows you to activate only SIM1 connection.
•Only SIM2 Open: Allows you to activate only SIM2 connection.
5.10.3 Phone settings
This menu option allows you to set phone parameters such as time and
date, schedule power on/off, language, Pref. input methods, Display,
Dedicated key, Flight mode and Misc.settings.
5.10.4 Network settings
Here you can search the network, set your preferred network and
change the GPRS connection.
5.10.5 Security settings
This function allows you to activate password to protect your phone
against unauthorized use.
SIM1/ SIM2 security: This function allows you to lock the phone with a

15
specific SIM1/ SIM2 card. The feature is designed to prevent the use of
your SIM card by means of another person’s phone if your SIM1/ SIM2
cards lost. You can switch on or off to activate the PIN1/ PIN2 Lock
function.
Phone security: You can switch on or off to activate the phone lock
function to protect your phone. If you switch Phone Lock on, you need to
enter the password to set the request on. The default password is
“0000”. You can also change the phone password here.
Auto keypad lock: This allows you to lock the phone’s keypad to
prevent accidental key pressed. In Auto Keypad Lock submenu, select
the time that after the last key press will be disabled.
Certificate manager: Select to view, delete, delete all or set the key
usage. 5.10.6 Connectivity Bluetooth
Your phone is designed to be compliant with Bluetooth technology.
Bluetooth technology enables wireless connections between electronic
devices. The Bluetooth connection can be used to listen to stereo music,
send images, video, texts and vCards.
Connection management
You can view the details of WIFI connection or cut off the WIFI link.
Data Account
You can access WAP via GPRS. To get the analogue number or ISDN
number information, you may need to contact your operator for the
service. To get the access point of GPRS, you may need to contact your
operator for the service. Service
Homepage
To access the browser from the standby mode, go to Internet service in
Services and select Homepage. Once connected, the homepage is
displayed. The content depends on the service provider. To exit the
browser, press the End Key.
You can access the homepage address in WAP > Homepage.
Bookmarks
You can use this menu to save URL addresses to quick access a

16
website.
Input address
You can key in the URL address. When you are done, select Options >
Done. Your phone will connect the URL you just keyed in. After the
address is entered, you may select the URL and select Options > Go to
to connect next time.
Last web address
Press to access the last web address you visited.
Recent pages
You can view the recent pages you have visited.
Stored pages
Press to view the pages that you have stored.
Settings
GPRS (General Packet Radio Service) is a technology that usefor
sending and receiving data over the mobile network.
If the settings have made by the service provider, you may begin
immediately. Otherwise, you may key in settings manually.
You can also restore browser settings here.
Internet tethering
Tethering is a method for connecting a computer or other devices to the
internet via an internet-capable mobile phone. It will share your phone's
internet connection. You may be charged for it.
You turn on WLAN hotspot and your phone will become a WLAN
hotspot.
5.10.7 Restore factory settings
This function allows you to reset the most of the phone setting to the
original setting when it is produced. The phone lock password is needed
to access this function.
5.11 File Manager
1. Select Menu > File Manager.
2. Press the Left Soft Key [Options] and select Open toview
different folders.
5.12 User profiles
Your phone provides 5 different profiles, including General, Silent,

17
Meeting, Outdoor and My style profile.
Note: If you customize the alert type, the indication icon may be
changed. The Headset profile is activated when the headset is
plugged in.
To activate a Profile
1. In Profile menu, select a profile.
2. Select Options > Activate.
To edit the Profile
You can customize Profile settings to meet your preference.
1. In Profile menu, select a profile.
2. Select Options > Customize.
5.13 WLAN
Your phone supports WI-FI function, you canconnect to Internet via a
wireless network access point.
1. Go to Menu > WIFI, your phone will search networks
automatically and list the available networks.
2. Press Navigation Key Up/Down to select one network, and
then choose Options > Connect to connect to the network.
Input correct password if a password is required before
connecting.
3. Once a WI-FI network is connected successfully, the WI-FI
connecting icon will be displayed on the status bar. You can
choose Options > Disable WLAN to close WI-FI.
4. You can also access other options by pressing Left Soft Key
[Options].
6Safety Information and Notices
Using the Cellular Phone
Warning:
Do not use the phone while you are driving. Pull over and stop your
automobile to dial or answer a phone call.
Usage of cellular phones in aircrafts or hospitals is prohibited. Turn the
phone off to prevent interference with electronic medical devices. Follow
any rules or regulations in such places.
Do not use the phone at a gas station, near fuel or near chemicals.

18
Do not use the phone near electronic medical devices such as hearing
aids, pacemakers and auto-control devices such as fire detectors and
automatic doors.
If you have to use your cellular phone near an electronic medical device
such as a pacemaker, please contact your manufacturer or dealer for
information about preventing interference.
Caution:
Electronic systems in automobiles such as anti-lock brakes, speed
control, or fuel spraying systems, are usually not influenced by wireless
devices. Manufacturers of these systems will tell you whether they are
provided with good screening functions. If you suspect that an
automobile failure is caused by a wireless wave, please contact your
automobile dealer.
Avoid using your phone in crowded places.
Using the Battery
Danger:
Do not dispose of the battery into a fire. Doing so may cause battery
explosion or even fire.
If you have difficulties installing the battery, do notforce the installation.
This may cause battery leakage, overheating, explosion or even fire.
Keep metal objects away so they do not come in contact with the battery
or its connectors as it may cause the battery to short circuit, overheat or
explode.
Do not weld the polarities of the battery directly together. Thismay
cause battery leakage, overheating, explosion or even fire.
Battery liquid is severely harmful for your eyes. If battery liquid gets in
your eyes, do not rub them. Instead, wash your eyes with water first
and then go directly to a doctor for help.
Do not use or store your phone in high temperature areas. This may
cause battery leakage, overheating, explosion or even fire.
Warning:
Replace the battery when the normal usage time begins to decrease or
if you notice the battery is overheated or has changed shape or color.
If battery liquid leaks onto your skin or clothes, immediately wash the

19
affected parts with water.
If the battery begins to leak or emits a strange odor, properly dispose of
the battery according to local regulations. Do not throw it into a fire.
Caution:
Do not leave the product or its battery inside avehicle or in places
where the temperature may exceed 60°C (140°F), such as on a car
dashboard, window sill, or behind a glass that is exposed to direct
sunlight or strong ultraviolet light for extended periods of time. This may
damage the product, overheat the battery, or pose a risk to the vehicle.
Using the Charger
Danger:
Only use the charger that came with the phone. Using a different
charger may cause the phone to breakdown or explode.
If the charger short circuits, a fire may occur.
Do not use a damaged, worn or broken charger. This may cause a fire.
Clean dust away from the power socket to avoid the possibility of a fire.
Do not store the charger near any liquids. If liquids spill onto the charger
it may cause it to overheat or breakdown.
If liquid does spill onto the charger, immediately unplug the power cable
to prevent overheating, fire or another type of breakdown.
Do not use the charger in places with high humidity like a bathroom.
This may cause a fire or other breakdown.
Do not touchthe charger, power cable or socket with wet hands. This
may cause an electric shock.
Caution:
Keep the environment temperatureswithin the range of 0ºC ~40ºC while
charging. Temperature below 0ºC or higher than 40ºC will cause
insufficient charging, terminate charging or even cause the battery to
explode.
Unplug the charger from its power source before cleaning it.
Do not place heavy objects on the power cord. This may cause electric
shock or fire.
Hold the plug while unplugging the power cord. This will avoid any
potential damage or even fire.

20
Requirements for Cellular Phone
Avoid using your cellular phone in extremely high or low temperatures.
Use the phone in a temperature range between 0ºC ~40ºC and humidity
of 35%~85%.
It is recommended that you do not use your cellular phone near a
telephone, TV set, radio or other radio frequency sensitive devices.
Requirements for the Battery
When not in use, store the battery in a cool, well-ventilated place with
sunlight.
If you will not be using the cellular phone for an extended period of time,
charge the battery on a regular basis to avoid battery breakdown.
The phone battery wears out fast. If after charging thebattery does not
improve its performance, it is time to replace the battery. Properly
dispose of the battery according to local regulations. Do not throw it into
a fire.
Requirements for the Charger and AC Adapter
Do not charge your phone under the following circumstances: sunlight,
temperatures equal to or lower than 0ºC, temperatures equal to or
higher than 40ºC, high humidity, dust, highvibration areas, or near a TV,
a radio, etc.
Specific Absorption Rate (SAR) information.
Your phone has been designed to comply with applicable safety
requirements for exposure to radio waves. These requirements are
based on scientific organizations through periodic and thorough
evaluation of scientific studies. These guidelines include safety margins
designed to assure the safety of all persons, regardless of age and
health.
The radio wave exposure guidelines employ a unit of
measurement known as the Specific Absorption Rate, or SAR.
Tests for SAR are conducted by using standardized method
with the phone transmitting at its highest certified power level
in all used frequency bands.
This phone is designed to meet the relevant guidelines for
exposure to radio waves.
The SAR limit recommended by the international Commission
on Non-Ionizing Radiation Protection (ICNIRP), which is 2
Table of contents
Other Slider Cell Phone manuals


