Slime 50139 User manual

PART# 50139 | REV021623ART
ATTENTION! READ ALL INSTRUCTIONS CAREFULLY
FAILURE TO FOLLOW WARNING INSTRUCTIONS CAN RESULT IN FIRE, PERSONAL
INJURY OR PROPERTY DAMAGE.
!
TRUCK/SUV
EMERGENCY
POWER SOURCE
• Plugs into 12 volt,
15 amp power outlet
• 13.94ft. (4.25m) length
ON/OFF
BUTTON
AIR/SEALANT
HOSE
REPLACEABLE SLIME SEALANT
CARTRIDGE # 10189
SELECT MODE
AIR ONLY OR
AIR + SEALANT
DIAL GAUGE
• 0 - 100 PSI / 0 - 7 BAR
PRESSURE
RELEASE
• Deflates tire
if it has too much air
VALVE
DEPRESSOR*
ADAPTERS
PRESTA
VALVE
BALL INFLATABLES
* VALVE DEPRESSOR IS TO BE USED WITH ACCESSORY ADAPTERS (SEE PAGE 2)
FLAT TIRE REPAIR KIT
Slime® provides a quick emergency repair. Treated tires should be repaired by a qualified tire
professional at the earliest opportunity to ensure safety and proper cleaning of tire pressure sen-
sor, if so equipped. We recommend treated tire be repaired within 3 days or 100 miles after use of
Slime Tire Sealant, whichever comes first. Advise tire professional of product use.

VEHICLE EXHAUST WITHOUT PROPER VENTILATION IS
EXTREMELY DANGEROUS. ALWAYS ALLOW FOR PROPER
VENTILATION.
AIR ONLY INSTRUCTIONS
A
I
R
O
N
L
Y
A
I
R
+
S
E
A
L
A
N
T
1
3
4
12v
3
4
12v
12V
1. Select AIR ONLY. NOTE: Lay Flat Tire Repair Kit on the ground facing upward.
2. Screw AIR/SEALANT hose onto tire’s valve stem.
3. Plug inflator into 12 volt accessory power outlet.
4. Push ON/OFF button to turn system on. Fill to desired pressure.* Press ON/OFF
button to turn system off and check tire pressure. Once correct tire pressure has
been achieved, disconnect AIR/SEALANT hose and power plug.
*NOTE: Correct tire pressure can be found in vehicle owner's manual or on driver's
side door jamb.
IMPORTANT! When using the supplied inflatable adapters, the valve
depressor adapter (Fig. A) must be used in conjunction with the inflatable
adapters. Failure to use the supplied valve depressor adapter with inflatable
adapters will result in over-pressurization and failure of the Flat Tire Repair
Kit. To install, remove the valve depressor adapter assembly from the back
of the Flat Tire Repair Kit. Unscrew the Presta valve adapter and set aside.
Thread the valve depressor adapter into the air hose of the Flat Tire Repair
Kit (Fig. B) until fully seated. Thread on the desired inflatable adapter until
snug and inflate item.
Fig. A
Fig. B
Ensurethatthevehicleisoutside,orinanopen,well-ventilatedareaandNOTINSIDEACONFINED
AREA,SUCH ASA GARAGEasbodily injuryor asphyxiationresultingindeath couldoccur.Always
operatetheinflatorinawell-ventilatedareafreeofcombustiblematerials,gasoline,orsolventvapors.
Alwayssetparking/emergencybrakeandensurevehicleisinPark(orneutralifequippedwithmanual
transmission).
CAUTION: HOT • DO NOT HOLD IN HAND WHILE OPERATING
NOTICE: ENGINE SHOULD BE RUNNING WHILE USING THIS INFLATOR
It is recommended that you operate your inflator with your vehicle’s engine running to achieve
the optimal inflator performance. Never start a vehicle with the inflator plugged into the DC 12
Volt power socket.
• Do not attempt to disassemble inator.
• No user serviceable parts inside. The only user serviceable part is replaceable fuse.
• Keep inator out of reach of children.
• Place inator on a hard, clean surface.
• Ensure air hose chuck touches the core of the valve stem for proper ination.
•DONOTuseinatorcontinuouslyformorethan10minutes.Allowunittocoolapproximately25minutes
between uses. Do not leave inator unattended.
• ALWAYS use a pressure gauge to check tire pressure. DO NOT over-inate.
• Soft inatables(i.e.rafts,balls,etc.)maynot haverecommendedpressuremarkings.Be careful not to
inate items beyond their capacity.
• While operating, never block the inator input or output.
• For use with 12 volt DC power outlets rated 15 amps or higher. Do not use with older 8 amp cigarette
lighter receptacles.
NOTE: Engine should be running while using this inflator. See Warning Section for
further details.

The PRESSURE RELEASE ensures optimum PSI pressure. Push the area to
deflate the tire if it has been overinflated, or if there is too much air prior to
inflation. Check the gauge for the desired PSI level.
FLAT TIRE REPAIR (AIR + SEALANT) INSTRUCTIONS
A
I
R
O
N
L
Y
A
I
R
+
S
E
A
L
A
N
T
1
3
4
12v
3
4
12v
12V
2.0 MI/3.2 KM
PSI
BAR/KPA
1. Select AIR + SEALANT. NOTE: Lay Flat Tire Repair Kit on the ground facing upward.
2. Screw AIR/SEALANT hose onto tire’s valve stem.
3. Plug inflator into 12 volt accessory power outlet.
4. Push ON/OFF button to turn system on. Fill to desired pressure.* Press ON/OFF
button to turn system off and check tire pressure. Once correct tire pressure has
been achieved, disconnect AIR/SEALANT hose and power plug.
5. Drive 2 miles (3.2km) with speeds less than 25 miles per hour to disperse sealant
throughout the tire, allowing it to seek out and seal the puncture. Recheck tire
pressure to verify that the puncture has been sealed.
*NOTE: Correct tire pressure can be found in vehicle owner's manual or on driver's
side door jamb.
Check your tire warranty prior to installation of this product.
NOTE: Engine should be running while using this inflator. See Warning Section for
further details. Seals punctures up to 1/4 in. (6mm) in tread area for flat tire repair.
PRESSURE RELEASE
SEALANT CARTRIDGE REMOVAL INSTRUCTIONS
1. Unwrap AIR/SEALANT hose.
2. Lift off cartridge cover.
3. Rotate cartridge to upright position.
4. Pull cartridge out horizontally.

FOR WARRANTY INFORMATION GO TO: WWW.SLIME.COM / WARRANTY
QUESTIONS OR COMMENTS:
Call (888)457-5463 or visit www.slime.com
ITW Global Tire Repair • 125 Venture Drive, Suite 210, San Luis Obispo, CA 93401 USA
Slime®is a trademark of Illinois Tool Works, Inc., registered in the U.S. and other countries.
TROUBLESHOOTING
Sealant cartridge refills available on Slime.com • PART# 10189
WARNING: HARMFUL OR FATAL IF SWALLOWED. IRRITANT TO SKIN AND EYES. Avoid
ingestion and inhalation. Avoid eye and skin contact. Wash hands after use. Use only as
directed. KEEP OUT OF REACH OF CHILDREN.
FIRST AID: In case of eye contact, rinse eyes for 15 minutes with cool water, lifting eyelids
occasionally. If on skin, wash with soap and water. If inhaled, seek fresh air. If ingested, DO
NOT INDUCE VOMITING; drink plenty of water and contact a physician or hospital. Contains
ethylene glycol and natural latex rubber.
Call ChemTel: +1-800-255-3924 or 1-813-248-0573
Reference product name: PART#50139 V1D or #10189 V1D (Refill)
Inflator fails to operate when plugged in:
1. Check fuse in power cord.
2. Check vehicle fuse.
3. Check vehicle’s battery charge.
4. Ensure connection is secure.
5. Check receptacle and plug terminals for dirt (particularly tobacco). Use a non-
conductive probe (not fingers or metal) to dislodge and remove debris.
Inflator runs but does not inflate:
1. Be sure the connector is tightly screwed on the valve stem as far as possible.
2. Check tire for leaks, and check hose for breaks and leaks at fittings.
Inflator runs slowly:
1. If overheated from excessive use, shut it off and allow to cool for 25 minutes.
2. Voltage too low, check condition of vehicle’s battery.
NOTE: If tire is totally deflated, it is possible that the tire could separate from the rim
allowing air to leak out when trying to inflate. In the event this occurs, you will have to
jack up the tire prior to inflation.
Dispose of this product at an e-waste recycling collection point or facility.
Do not place in the trash or standard recycling receptacle.

¡ATENCIÓN! LEA TODAS LAS INSTRUCCIONES CON ATENCIÓN
SI NO SIGUE LAS INSTRUCCIONES DE ADVERTENCIA, PUEDE CAUSAR INCENDIO,
LESIONES A PERSONAS O DAÑOS MATERIALES.
!
BOTÓN DE
ENCENDIDO
MANGUERA DE
AIRE/SELLADOR
CARTUCHO REEMPLAZABLE DE
SELLADOR SLIME Parte No. 10189
DEPRESOR
DE LA
VÁLVULA*
ADAPTADORES
VÁLVULA
PRESTA
PELOTA ARTÍCULOS
INFLABLES
* EL DEPRESOR DE LA VÁLVULA SE DEBE USAR CON LOS ADAPTADORES PARA ACCESORIOS (VEA LA PÁGINA 2)
Slime® funciona para una reparación de emergencia rápida. Se recomienda realizar una
reparación profesional con un experto en pinchaduras a la primera oportunidad para asegurar
la correcta limpieza del sensor de aire (en caso de que su vehículo cuente con este sistema).
La recomendación es realizar esta actividad dentro de los siguientes 3 días o 160kms (lo que
ocurra primero) posterior a haber utilizado el sellador de Slime. Informe al mecánico reparador
de su llanta que utilizó Slime.
SELECCIONE
EL MODO
AIRE O AIRE Y
SELLADOR
MEDIDOR DE
CUADRANTE
• 0 - 100 PSI / 0 - 7 BAR
DESCARGA DE
PRESIÓN
• Desinfla la llanta si tiene
demasiado aire
FUENTE DE ENERGÍA
• Se conecta en una toma de corriente de
12 V toma de corriente de 15 amperios.
• 13.94 pies (4.25 m) de largo
TRUCK/SUV
EMERGENCY
FLAT TIRE REPAIR KIT

EL ESCAPE DEL VEHÍCULO SIN LA VENTILACIÓN
ADECUADA ES EXTREMADAMENTE PELIGROSO. SIEMPRE
UTILICE CON VENTILACIÓN APROPIADA.
A
I
R
O
N
L
Y
A
I
R
+
S
E
A
L
A
N
T
1
3
4
12v
3
4
12v
12V
INFLADO DE LLANTAS
AsegúresedequeelvehículoestéalairelibreoenunáreaabiertaybienventiladayNODENTRODE
UNÁREACERRADA,COMOUNGARAJE,yaquepodríanproducirselesionesoasfixiaconresultadode
muerte.Siempreopereelcompresorenunáreabienventiladalibredematerialescombustibles,gasolina
ovaporesdesolventes.Siemprecoloqueelfrenodemano/emergenciayasegúresedequeelvehículo
esté en Punto Muerto (o neutral si está equipado con transmisión manual).
PRECAUCIÓN: CALIENTE • NO SOSTENER EN LA MANO DURANTE LA OPERACIÓN
AVISO: EL MOTOR DEBE ESTAR FUNCIONANDO MIENTRAS UTILIZA ESTE COMPRESOR
Se recomienda que opere su inflador con el motor de su vehículo en marcha para lograr un
rendimiento óptimo. Nunca arranque un vehículo con el compresor enchufado a la toma de
corriente de 12 volts.
• No intente desarmar el inador.
• Nohaypiezasreparablesporelusuarioenelinterior.Laúnicapiezareparableporelusuarioeselfusible
reemplazable.
• Mantenga el inador fuera del alcance de los niños.
• Coloque el inador sobre una supercie dura y limpia.
• Asegúrese que la nariz de la manguera de aire toque el núcleo del vástago de la válvula para inarlo
correctamente.
• NO use el inador continuamente por más de 10 minutos. Deje que la unidad se enfríe durante
aproximadamente 25 minutos entre usos. No deje el inador desatendido.
• Utilice SIEMPRE un manómetro para comprobar la presión de las llantas. NO ine demasiado.
• Es posible que los inables blandos (es decir, balsas, pelotas, etc.) no tengan las marcas de presión
recomendadas. Tenga cuidado de no inar los artículos más allá de su capacidad.
• Durante el funcionamiento, nunca bloquee la entrada o salida del inador.
• Para usar con tomas de corriente de 12 volts de corriente de 15 amperios o más. No lo use con
receptáculos de encendedor de cigarrillos de 8 amperios más antiguos.
NOTA: El motor debe estar funcionando mientras usa este inflador. Consulte la sección de
advertencia para obtener más detalles.
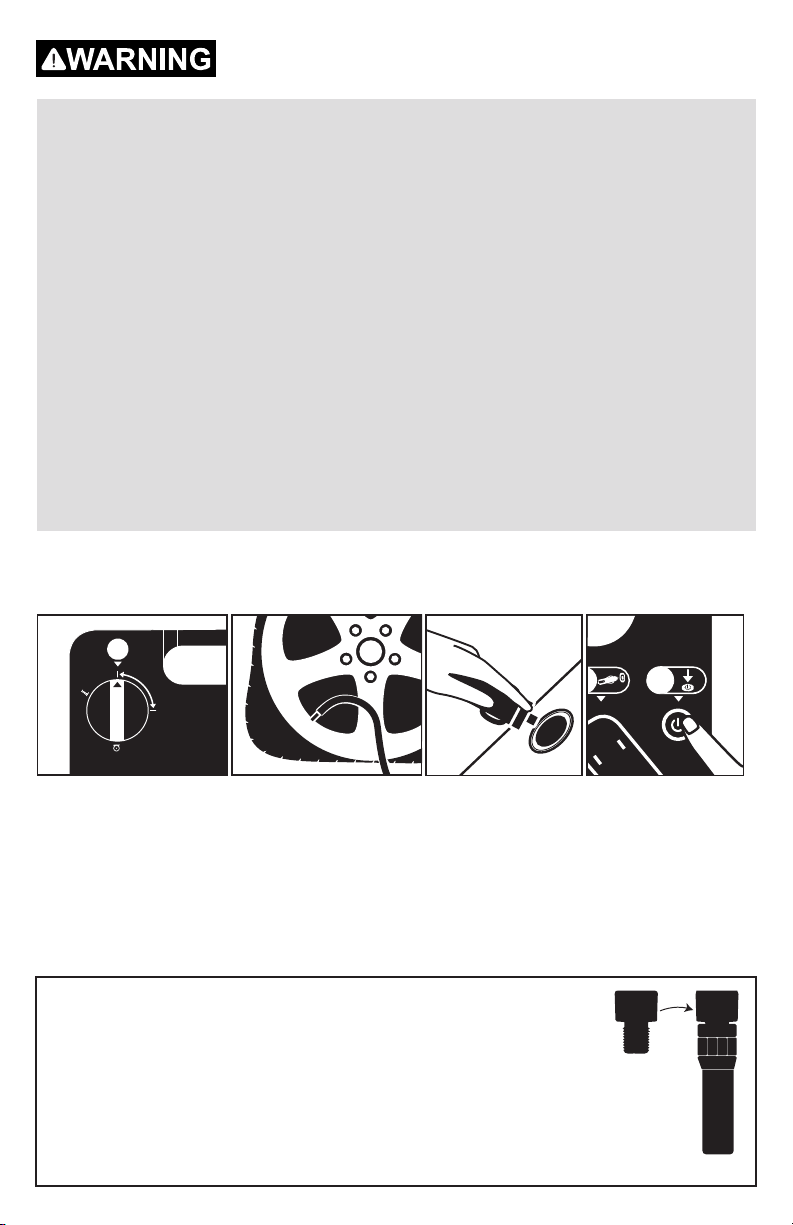
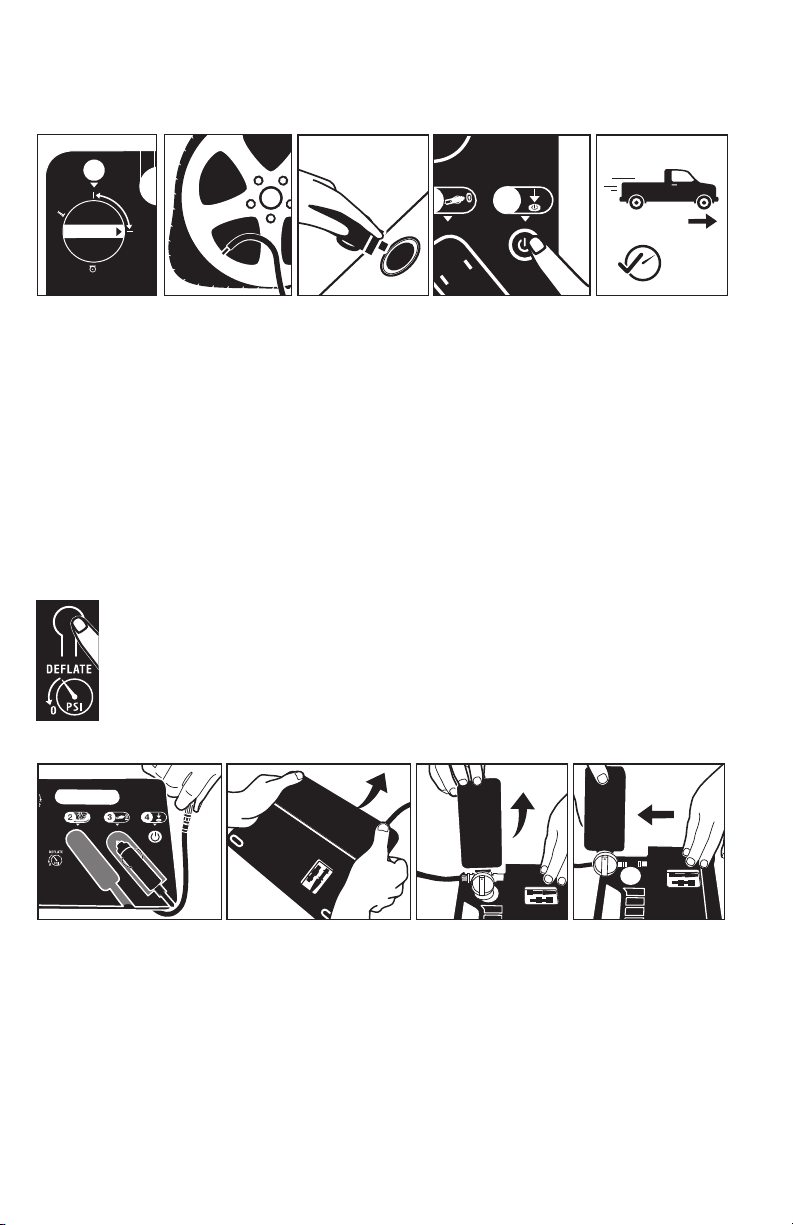
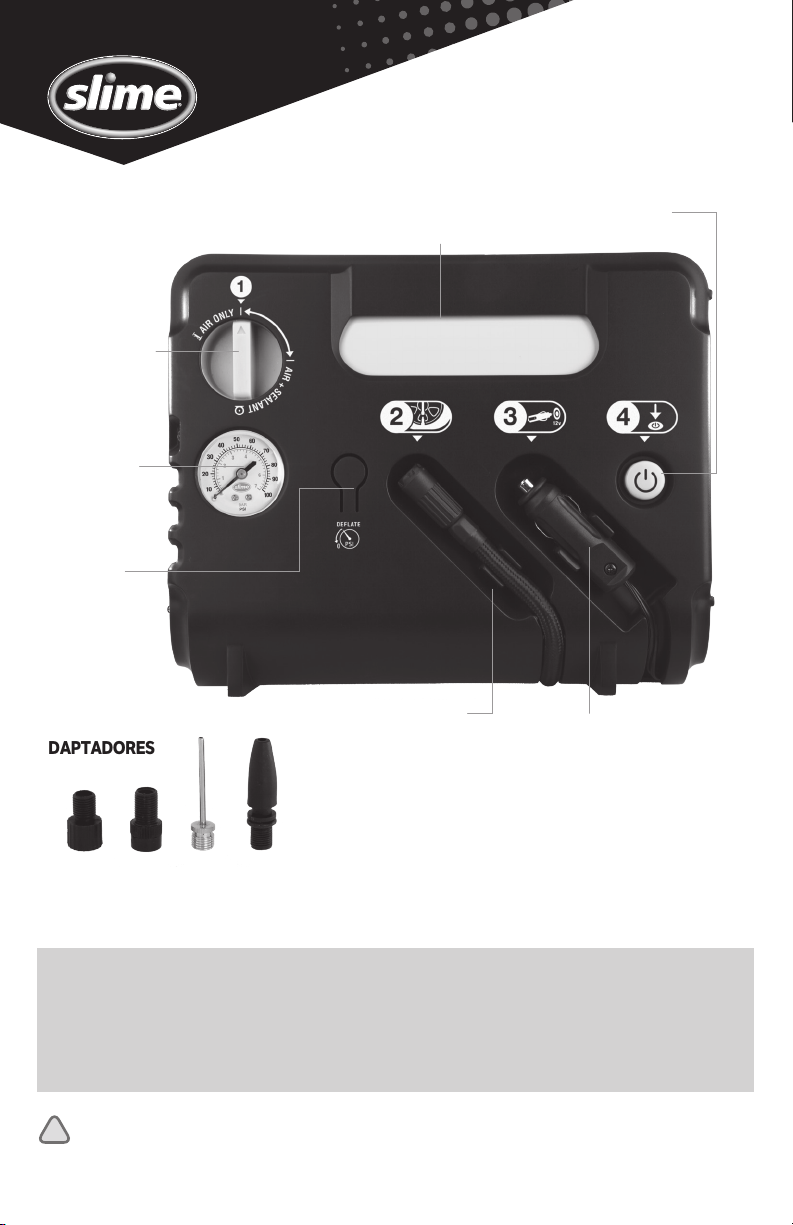
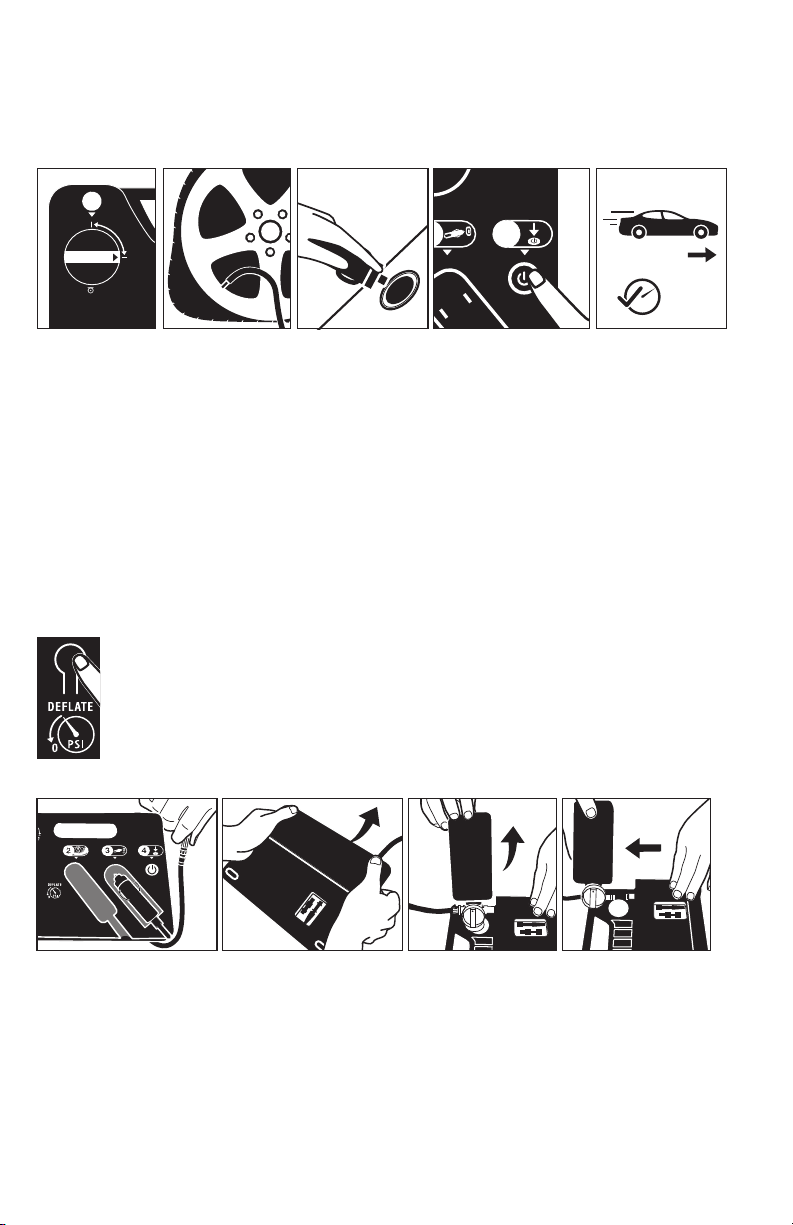
1. Seleccione “AIR ONLY.” NOTA: Coloque Flat Tire Repair Kit sobre el piso volteado hacia
arriba.
2. Atornille la manguera de sellador/aire en el vástago de la válvula de la llanta.
3. Enchufe el cordón eléctrico en la toma de corriente para accesorios de 12 voltios.
4. Presione el botón ON/OFF para encender el sistema. Inflar a la presión deseada.* Pulse el
botón ON/OFF para apagar el sistema y comprobar la presión de las llantas.
*NOTA: La presión de la llanta adecuada se encuentra en el manual del propietario del
vehículo o en el panel de la puerta del lado del conductor.
¡IMPORTANTE! Cuando use los adaptadores de inflación incluidos, se debe usar el
adaptador del depresor (Figura A) junto con los adaptadores de inflación. Si no se
usa el adaptador del depresor de la válvula incluido con los adaptadores de inflación,
esto da lugar a demasiada presión y el Equipo de reparación de llantas desinfladas no
funciona. Para instalarlo, retire el ensamble del adaptador del depresor de la válvula
que se encuentra en la parte posterior del Equipo de reparación de llantas desinfladas.
Destornille el adaptador de la válvula Presta y colóquelo a un lado. Atornille el adaptador
del depresor de la válvula en la manguera de aire del Equipo de reparación de llantas
desinfladas (Figura B) hasta que quede bien asentado. Atornille el adaptador de inflación
deseado hasta que quede apretado e infle el artículo.
Fig. B
Fig. A

INSTRUCCIONES PARA LA REPARACIÓN DE LLANTAS DESINFLADAS
(AIRE Y SELLADOR)
A
I
R
O
N
L
Y
A
I
R
+
S
E
A
L
A
N
T
1
3
4
12v
3
4
12v
12V
2.0 MI/3.2 KM
PSI
BAR/KPA
Revise la garantía de su llanta antes de instalar este producto.
NOTA: El motor debe estar funcionando mientras usa este inflador. Consulte la sección de
advertencia para obtener más detalles. Sella perforaciones de hasta 6 mm (1/4”) en la banda de
rodamiento.
1. Seleccione “AIR + SEALANT.” NOTA: Coloque Flat Tire Repair Kit sobre el piso volteado
hacia arriba.
2. Atornille la manguera de sellador/aire en el vástago de la válvula de la llanta.
3. Enchufe el cable de corriente en la toma de corriente para accesorios de 12 voltios.
4. Presione el botón ON/OFF para encender el sistema. Inflar a la presión deseada.* Pulse el
botón ON/OFF para apagar el sistema y comprobar la presión de las llantas. Una vez que
se haya logrado la presión correcta de las llantas*, desconecte la manguera de aire y el
enchufe.
5. Maneje 2.0 millas (320 kilómetros) a una velocidad inferior a los 40 kilómetros (25 millas)
por hora para esparcir el sellador por la llanta y permitir que encuentre y selle el pinchazo.
Revise nuevamente la presión de la llanta para verificar que se selló el pinchazo.
La DESCARGA DE PRESIÓN asegura una presión óptima en pies por pulgada
cuadrada (PSI). Oprima para desinflar la llanta si está demasiado inflada o si
tiene demasiado aire antes de inflarla. Verifique el medidor para obtener el nivel
deseado de PSI.
DESCARGA DE PRESIÓN
1. Desenrolle la manguera de aire/sellador.
2. Levante la tapa del cartucho.
3. Gire el cartucho hasta que quede en posición vertical.
4. Tire del cartucho en dirección horizontal.
INSTRUCCIONES PARA REMOVER EL CARTUCHO DE SELLADOR
*NOTA: La presión de la llanta adecuada se encuentra en el manual del propietario del
vehículo o en el panel de la puerta del lado del conductor.

PARA INFORMACIÓN DE GARANTÍA: WWW.SLIME.COM/WARRANTY
PREGUNTAS O COMENTARIOS: Llame al (888)457-5463 o visite www.slime.com
ITW Global Tire Repair • 125 Venture Drive, Suite 210, San Luis Obispo, CA 93401 EE. UU.
Slime® es una marca comercial de Illinois Tool Works, Inc., registrada en EE. UU. y otros países
SOLUCIÓN DE PROBLEMAS
El inflador no enciende:
1. Verifique el fusible en el cable eléctrico.
2. Verifique el fusible del vehículo.
3. Verifique la carga de la batería del vehículo.
4. Cerciórese de que la conexión esté bien asegurada.
5. Inspeccione el receptáculo y las clavijas del conector en busca de suciedad (en particular
tabaco). Use una sonda no conductora (no los dedos ni nada metálico) para desalojar y
remover los residuos.
El inflador funciona pero no infla:
1. Asegúrese de que el conector de la manguera esté atornillado firmemente en el vástago
de la válvula.
2. Verifique que la llanta no tenga fugas. Revise que la manguera no tenga grietas ni fugas
en las conexiones.
El inflador funciona lentamente:
1. El inflador puede estar sobrecalentado debido a uso excesivo. Apáguelo y espere 25
minutos para que se enfríe.
2. El voltaje puede ser demasiado bajo. Revise la condición de la batería de su vehículo.
NOTA: Si la llanta está totalmente desinflada, es posible que esté separada del rin y éste permite
que el aire se escape cuando trata de inflarla. Si ocurre esta situación, puede ser necesario
levantar la llanta con un gato para inflarla.
Deseche este producto en un área de reciclaje de desechos electrónicos.
No lo coloque en la basura o en el receptáculo de reciclaje estándar.
Hay repuestos de cartucho de sellador disponibles en Slime.com • PARTE NO. 10189
ADVERTENCIA: NOCIVO O MORTAL SI SE INGIERE. IRRITANTE PARA LA PIEL Y LOS
OJOS. Evitar la ingestiónolainhalación.Evitarelcontactoconojoso piel. Lávese las
manos después de usar. Usar solamente como indica. MANTENER FUERA DEL ALCANCE
DE LOS NIÑOS.
PRIMEROS AUXILIOS: En caso de contacto con los ojos, enjuague los ojos durante 15
minutos con agua fría, levantando los párpados ocasionalmente. En caso decontacto
con lapiel,lavarconaguayjabón.Sise inhala, busque aire fresco. Si se ingiere, NO
PROVOCAR EL VÓMITO, beber abundante agua y llamar inmediatamente el médico o el
hospital. Contiene el etilenglicol y el látex de caucho natural.
Llamar a ChemTel: +1-800-255-3924 o 1-813-248-0573 • Nombre de referencia del producto:
PART#50139 V1D or #10189 V1D (repuesto)
Table of contents
Languages:
Other Slime Automobile Accessories manuals
Popular Automobile Accessories manuals by other brands

Directed
Directed 933.SUBARU2 installation guide

Yakima
Yakima 8005015 quick start guide

Shoreline 4x4
Shoreline 4x4 Extreme X-1 Fitting instructions

Corvette
Corvette BLU-C5 Quick start installation guide

Laser
Laser NAVC-BHUD-982 user manual

TeraHop Networks
TeraHop Networks KeyZone KZV-290 Vault installation guide