Slingshot S64 Operation instructions

11
SLINGSHOT
PROFESSIONAL
COFFEE GRINDER
ORIGINAL INSTRUCTION USER HANDBOOK
Models S64 S75 C68

INSTRUCTIONS FOR USE
Page 3
INDEX
Page 5
Page 6
Page 8
Page 7
Page 9
Page 11
Page 12
Page 18
Page 10
Precautions and Safety Features
Application and use of the Grinder
Initial Setup
Adjusting the Fork-Portalter
Function Selector
• Auto Mode
• On Demand
• Burrs Life
Ready to Start
Using the Grinder
Dispensing the Coee in the Portalter
Safety Devices
Cleaning and Maintenance
Trouble Shooting
Adjusting the Grind
Adjustable Grinding Scale
Adjusting the Dosage
Grinding Time Delay
General Description
SLINGSHOT TECHNOLOGY CORPORATION LTD
All right reserved. It is prohibited to reproduce, adapt or translate this document without prior written authorisation.

33
The packing materials (carton, cellophane, staples, polystyrene, etc..) can cut, wound or create hazards
if used improperly or handled carelessly. Store such materials out of reach of children and irresponsible
persons.
This symbol on the appliance or package means that the appliance must not be considered as normal
household refuse but that it must instead be delivered to an appropriate collection centre for the recycling
of electric and electronic appliances.
Read this manual from cover to cover before using the appliance as it contains important instructions
for the safety, operation and maintenance of the appliance. Look after this manual and keep it in a safe
place.
DISPOSAL OF THE UNIT
At the end of its service life, this product cannot be disposed of in normal domestic waste. The symbol on
the product and in the operating instructions point out to this fact. The materials are recyclable according
to your marking. With the reuse, recycling or other forms of recycling of old equipment, you make an
important contribution to the protection of our environment. Please ask your municipal administration for
the disposal point.
The manufacturer reserves the right to make changes to the product and to the manual.
The company cannot be held liable for any damage to people or property resulting from failure to respect
the instructions concerning safety, installation and maintenance contained in this manual.
Before connecting the machine, check that voltage and frequency values of the supply mains correspond
to the ratings indicated on the label featuring the grinder’s technical data.
IT IS COMPULSORY TO EARTH THE APPLIANCE.
Avoid use of multiple-plug adapters and extension cords or makeshift connections.
The Coee Grinder must be installed only by authorised, qualied personnel.
THE COFFEE BEANS HOPPER MUST BE PLACED ON THE APPLIANCE AND PROPERLY FIXED
WITH THE APPROPRIATE SCREW.
If the thermal breaker to protect the motor is triggered, do not attempt any other manoeuvre. Unplug the
machine from the power mains and make sure that any problems have been solved before switching the
machine on again.
It is essential to check the state of the supply cable and plug periodically.
IN THE EVENT THE SUPPLY CABLE OR PLUG ARE DAMAGED, CALL IN SKILLED TECHNICAL
PERSONNEL TO REPLACE THEM, THIS TO PREVENT ANY RISK.
ELECTRICAL INSTALLATION RULE (S64, S75, C68)
Prior to installation, make sure there is a circuit breaker installed with a distance between the contacts
that allows for complete disconnection when there is a category III overload and that provides protection
against current leakage equal or less than to 30 mA. The circuit breaker must be installed on the power
supply in compliance with installation rules.
If the power supply is not working properly, the machine can cause transitory voltage drops.
The electrical safety of this machine is only ensured when it is correctly connected to an ecient earthing
system in compliance with the electrical safety laws in force. This fundamental safety requirement must
be veried. If in doubt, request that a qualied electrician inspect the system. The manufacturer cannot be
held responsible for any damage caused by the lack of an earthing system on the electrical supply.
It is unadvisable to use adaptors, multiple plugs, and/or extension cords. If their use is indispensable, only
use simple or multiple adaptor plugs and extension cords that are in compliance with safety laws. Make
sure these devices do not exceed the voltage capacity marked on the simple adaptor and on extension
cords, and the maximum voltage marked on the multiple adaptor.
PRECAUTIONS AND SAFETY FEATURES
33

44
This coee grinder has been designed only for grinding roasted coee beans.
Any other use is understood to be improper, and therefore hazardous.
OPERATING RANGE OF THE MOTOR
10s ON for 2 times / 60s OFF point out an allowed duty cycle of 10 seconds switched on for 2 times and
60 seconds switched o.
The manufacturer cannot be held responsible for any damage as a result of improper or incorrect use.
THIS COFFEE GRINDER HAS BEEN DESIGNED ONLY FOR PROFESSIONAL USE BY TRAINED
PERSONNEL AND NOT FOR HOUSEHOLD USE.
The user must be an adult. Do not allow children or incapable persons to use this coee grinder.
Children should be supervised to ensure that they do not play with the appliance.
The instructions concerning persons (including children) with reduced physical, sensory or mental
capabilities or lack of experience and knowledge and children playing with the appliance are not
applicable.
The grinder is intended to be used for commercial applications, for example in kitchens of restaurants,
canteens, hospitals and in commercial enterprises such as bakeries, but not for continuous mass
production of ground coee.
This appliance is to be connected with exible connections for equipotential bonding and connection to
services such as electricity supply, water supply, gas supply and steam supply such that the appliance
can be moved in the direction required for cleaning a distance not less than the dimension of the
appliance in the direction of movement plus 500 mm without the exible connections becoming taut or
being subject to strain.
WARNING:
Installation, dismantling, and adjustments must only be performed by qualied and authorised
technicians.
Carefully read the warnings and rules in this manual because they provide important information
regarding safe installation, use and maintenance of the machine.
Keep this booklet handy for easy reference.
After removing the machine from its packing materials, make sure that the machine and its safety devices
are intact.
If the power supply cord is damaged, it can only be replaced by qualied and authorised technicians.
(S64, S75, C68)
Packing materials (plastic bags, polystyrene foam, staples, etc.) must be keptout of the reach of children
because they are potentially hazardous.
Before plugging in the machine, make sure that the information on the nameplate (voltage, etc.) matches
that of the electrical and water systems.
Completely unwind the power supply cable.
The coee grinder should sit on a at, stable surface at least 20 mm from walls and from the counter.
Room temperature must range between 10 C and 32 C (50 F and 90 F).
Do not install in rooms (kitchens) that are cleaned with jets of water.
Do not clean the machine with jets of water.
Do not obstruct openings or ventilation and heat vents.
Do not install the machine outdoors.
APPLICATION AND USE OF THE GRINDER

55
MODEL S64 S75 C68
Volts (V) 220-240V 220-240V 220-240V
Frequency (Hz) 50-60Hz 50-60Hz 50-60Hz
Power (W) 380-460W 450-570W 450-570W
Revolution per min. (rpm) 1215-1458 750-900 450-540
Burrs type/size Flat 64mm Flat 75mm Conical 68mm
Noise level (dba) 85 87 87
Weight (kg) 19.5kg 23.5kg 23.5kg
Fig. A
Fig. C
Fig. B
1
2
3
4
5
6
7
8
910
11
19
13
12
14
15
16
18
20
17
Width - 212mm
Depth - 440mm
Height - 632mm
AUTO
MODE
ON
DEMAND
BURRS
LIFE
General Description
1. Display Window - Hopper Lid
2. Coee Bean Hopper
3. Adjustable Scale
4. Side Panels
5. Digital Display
6. LED Light
7. Single Dosage Adjustment
8. Double Dosage Adjustment
9. Main Power Switch
10. Function Selector
11. Fork Portalter
12. Doser Locking Screw
13. Sliding Gate
14. Grinding Adjustment
15. Position Counter
16. Push Button
17. Open/Close Coee Bean Hopper
18. Coee Hopper Screw Holder
19. Extractor Fan
20. Adjustment Scale Knob

66
INSTRUCTIONS FOR USE
INITIAL SETUP
ADJUSTING THE FORK PORTAFILTER
The Slingshot features a unique volumetric self-dosing chamber which is always on standby to provide
the professional barista with their next shot of espresso. To be able to perform at its optimum an initial
setup is required.
Before you start using the grinder, you will need to adjust the height of the Fork-portalter. Slingshot can
accommodate any type and brand of portalter thanks to its patented spring-loaded support system.The
height of the portalter can vary from 36 to 48 mm, 54mm or 57-58 mm basket diameter.
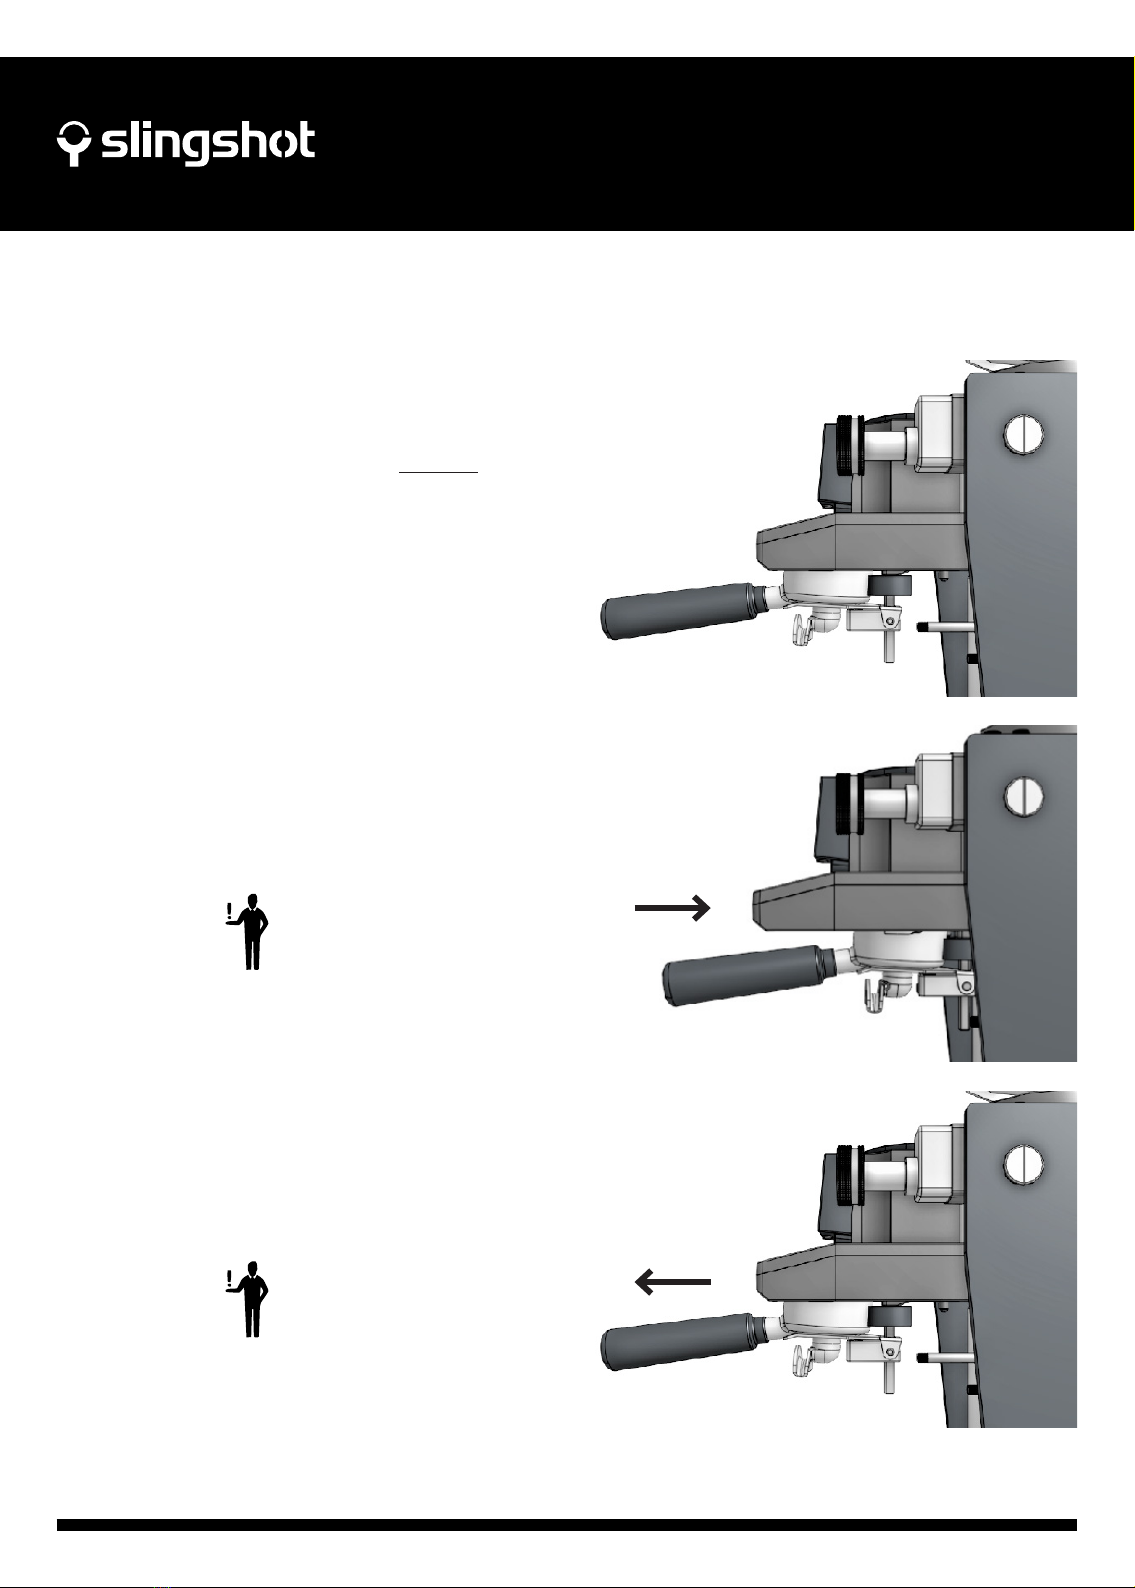
(A) Using the appropriate tool, untighten the screw that holds the Fork
(B) Insert the Portalter
(C) Lift up the Fork (11) until the top of the portalter is attached to the sliding gate
(D) Re-tighten screw making sure that the top of the portalter stays ush against the sliding gate
NOTE: To be able to deliver the correct coee dose, the portalter top edge must always be in contact with
the stainless steel sliding gate. Once set in position, push the portalter towards the grinder until it stops
then pull the portalter back out making sure that it moves smoothly.
Fig. D Fig. E
Note: To test if Portalter has been set up correctly, push down on the center of the portalter when locked in. If done
correctly, there should be no movement.
Push up until top of
Portalter is attached
to the sliding gate then
re tighten the screw
Untighten the single
screw that hold the
Fork - this will allow
you to adjust up or
down.

77
INSTRUCTIONS FOR USE
USING THE GRINDER
Before you start using the grinder, It is important to understand the information displayed:
Fig. F shows all the available information displayed, and the functionality of the press button.
NOTE: THE COFFEE BEAN ICON WILL ONLY LIGHT UP WHEN COFFEE BEAN HOPPER IS EMPTY.
THE BURRS LIFE ICON WILL ONLY LIGHT UP WHEN THE BURRS NEED REPLACING.
To reset the Coee Beans icon: Fill up coee beans hopper with fresh coee beans then press the top
button.
Only an authorised technician can reset the Burrs Life icon after replacing the old burrs with new ones.
REAL TIME COFFEE MATURATION
In AUTO MODE the display will show the time since last grinding coee in
between the burrs (tail of the coee) and if you press the top button once
the display will show the total resting time of the ground coee in the coee
chamber (head of the coee).
This information will help the Barista to determine when the coee is at its best.
Fig. F
Slingshot GREEN
Ready to dispense coee
Slingshot RED
Wait until grinding is
complete
Beans Icon RED
Coee beans hopper empty
Button Functions
AUTO MODE
Press to swap between:
1. Time since last grinding
2. Time spent of ground
coee inside the coee
chamber
3. Time needed for last
grinding
ON DEMAND
Press to Start/Stop grinding
BURRS LIFE
Press to swap between:
1. Time left in the burrs
2. Total number of doses
delivered on current set
of burrs.
3. Total number of doses
delivered over the
Grinder’s life.
Digital Timer
Auto Mode: Time since last grinding
On Demand: Grinding time
Burrs Life: Time left in the burrs
Burrs Icon RED FLASHING
Call technician to replace burrs

88
INSTRUCTIONS FOR USE
FUNCTION SELECTOR
READY TO START
1) Fill the Hopper with fresh coee beans (max. capacity is approx. 1.2kg).
3) Position the Function Selector to ON DEMAND
4) Turn the ON/OFF switch ON. Switch will light up indicating Grinder is ready for use.
2) Open the Hopper Slide.
Slingshot features a Function Selector (Fig.C) that allows the user to set the grinder in three dierent
modes: AUTO MODE, ON DEMAND and BURRS LIFE.
AUTO MODE
The grinder will always grind for the next shot. Use this
function during the busy service.
ON DEMAND
The grinder will grind only when you press the Push Button.
Use this function during slow service or for calibration
purposes.
BURRS LIFE
When the Function Selector (Fig. C) is set on BURRS LIFE
the coee grinder wont operate and the digital display will
show the number of grinding hours left before changing the
burrs. When the display reaches 3 hours of grinding left,
the burrs life icon in the screen (Fig. F) will start ashing.
This will warn the user to call the technician to change the
burrs.
NOTE: To familiarise yourself with the grinder and to adjust (calibrate) both the coee grind size
(coarser or ner) and dosage, we advise to select the ON DEMAND function.
When ON DEMAND mode, each time you press the button, the grinder will grind until the coee ground
chamber is full (approximately 30g of ground coee).
Fig. C
AUTO
MODE
ON
DEMAND
BURRS
LIFE
99
INSTRUCTIONS FOR USE
DISPENSING THE COFFEE IN THE PORTAFILTER
Slingshot’s unique self-dosing coee chamber delivers the desired coee dosage directly into the portalter:
1
2
3
NOTE: The portalter will
stop once it has reached
the dosage rods
NOTE: You must not wait
with the portalter inserted
all the way. Pull it back as
soon as it has completed
its travel.
Insert the portalter straight between the fork,
then start to push towards the grinder.
Push the portalter gently until it stops.
Pull back the portalter. The dosage has
been delivered.

1010
INSTRUCTIONS FOR USE
ADJUSTING THE GRIND
ADJUSTABLE GRINDING SCALE
GRINDING TIME DELAY
To adjust grinding neness, it is necessary to use the knob (Fig. G1), turning it clockwise for ner grinding
or anti-clockwise for a coarser grind.
Each complete turn of the digital position counter will increase/decrease by 10.
Please consider that the coee ground chamber may hold up to 35 grams of coee grounds, after
changing the coee grinding size it is necessary to dispense a minimum of 3 double doses before the new
grinding setting can be used.
Once the Barista has adjusted the Slingshot to the perfect espresso shot, the main grinding scale (Fig. A3)
is reset to the Absolute Zero.This adjustable point of reference facilitates coee grinding calibration
throughout the day.
To be able to reset the grinding scale unlock the adjustment scale knob (Fig. B18) and reset the scale
to the “0”.
When in AUTO MODE the grinder will start grinding for a new coee dose as soon as you have inserted the
portalter. It is possible to program a time delay for retarding the start of the grinding. This will improve dosage
consistency, especially for the beginner.
When in AUTO MODE press and hold the top button until the display shows a single digit number (time delay in
seconds). Press the button to increase the time delay (from 0 seconds to a max of 5 seconds). Once you have
set the desired time delay, wait until display goes back to the normal AUTO MODE.
0085
NOTE: To be able to recognise the single portalter, the single spout needs to be positioned in the
left at a 90 degree angle in relation to the portalter handle.
In the case where the single portalter’s spout is positioned on the right, unscrew ROD B completely and
screw into location C(Fig. G)
B
1
A
C
Fig. G
ADJUSTING THE DOSAGE
To adjust the coee dosage delivered into the portalter:
Turn the metal rods located under the doser CLOCKWISE (for more coee)
or ANTI-CLOCKWISE (for less coee)
To adjust for a double portalter use ROD A
To adjust for a single portalter use ROD B.
NOTE: The quantity of coee dosed is directly related to the SIZE of
your portalter basket.
Ensure that the basket size you are using is appropriate for your needs.
1111
SAFETY DEVICES
THERMAL OVERLOAD PROTECTION
The appliance’s motor is protected against overheating resulting from overload by a thermal overload
protection which, when tripped, cuts o the power supply to the motor.
Should the protection trip as a result of anomalous operation, such as the grinding blades jamming, the
appliance must be turned o using the on-o switch, UNPLUGGED FROM THE MAINS, AND SKILLED
TECHNICAL PERSONNEL CONTACTED. NEVER PERFORM ANY WORK ON THE APPLIANCE
WHILE IT IS ATTACHED TO THE MAINS, TO AVOID THE RISK THAT MOTOR TURNS ON SUDDENLY.
If the appliance overheats as a result of the motor stopping, allow the appliance to cool down before
performing any repair work.
MOTORSAFETY MICROSWITCH
There is a system that protects against accidental contact with the rotating parts of the grinder consisting of
a micro-switch. Situated under the body of the grinder, the micro-switch will cut electricity to the motor if the
coee hopper is not properly positioned in place.
The push button that controls this device is operated by the back screw (Fig. B16) that holds the coee
hopper. If the hopper is removed or not properly in place, the micro-switch prevents the grinder from
working.
WARNINGS REGARDING SAFETY
This electrical appliance must be used in conformity with the rules in force governing safe operation.
When operating the appliance, beware of the moving mechanical parts’ in the area of the grinding blades and of
the ground coee outlet.
Before removing the hopper from the grinding system, disconnect the power supply.
Avoid removing foreign bodies from the grinding system or hopper without rst unplugging the appliance from
the mains.
The user is not authorised to remove screws or any parts screwed onto the coee grinder.
In the event the appliance is not working properly or is faulty, contact skilled technical personnel, and do not
attempt to make repairs yourself.
Before performing any work on the appliance, including cleaning and/or maintenance, disconnect it from
the power supply by unplugging. Turning o the grinder using its master switch does not assure the same
conditions of safety.
The operator must be aware of the sharpness of the blades-burrs and care is needed when handling cutting
blades-burrs during cleaning.
Take care, as the grinding blades may continue rotating for a short while even after the appliance is switched o.
When the appliance is not in use, the appliance’s power supply must be disconnected using its main switch.
Do not let liquids of any kind come into contact with the internal or external parts of the appliance.
Never put ground coee in the hopper. Intended only for coee beans.
The manufacturer cannot be held responsible for bodily injury or damage to property if these regulations are not
complied with.
1212
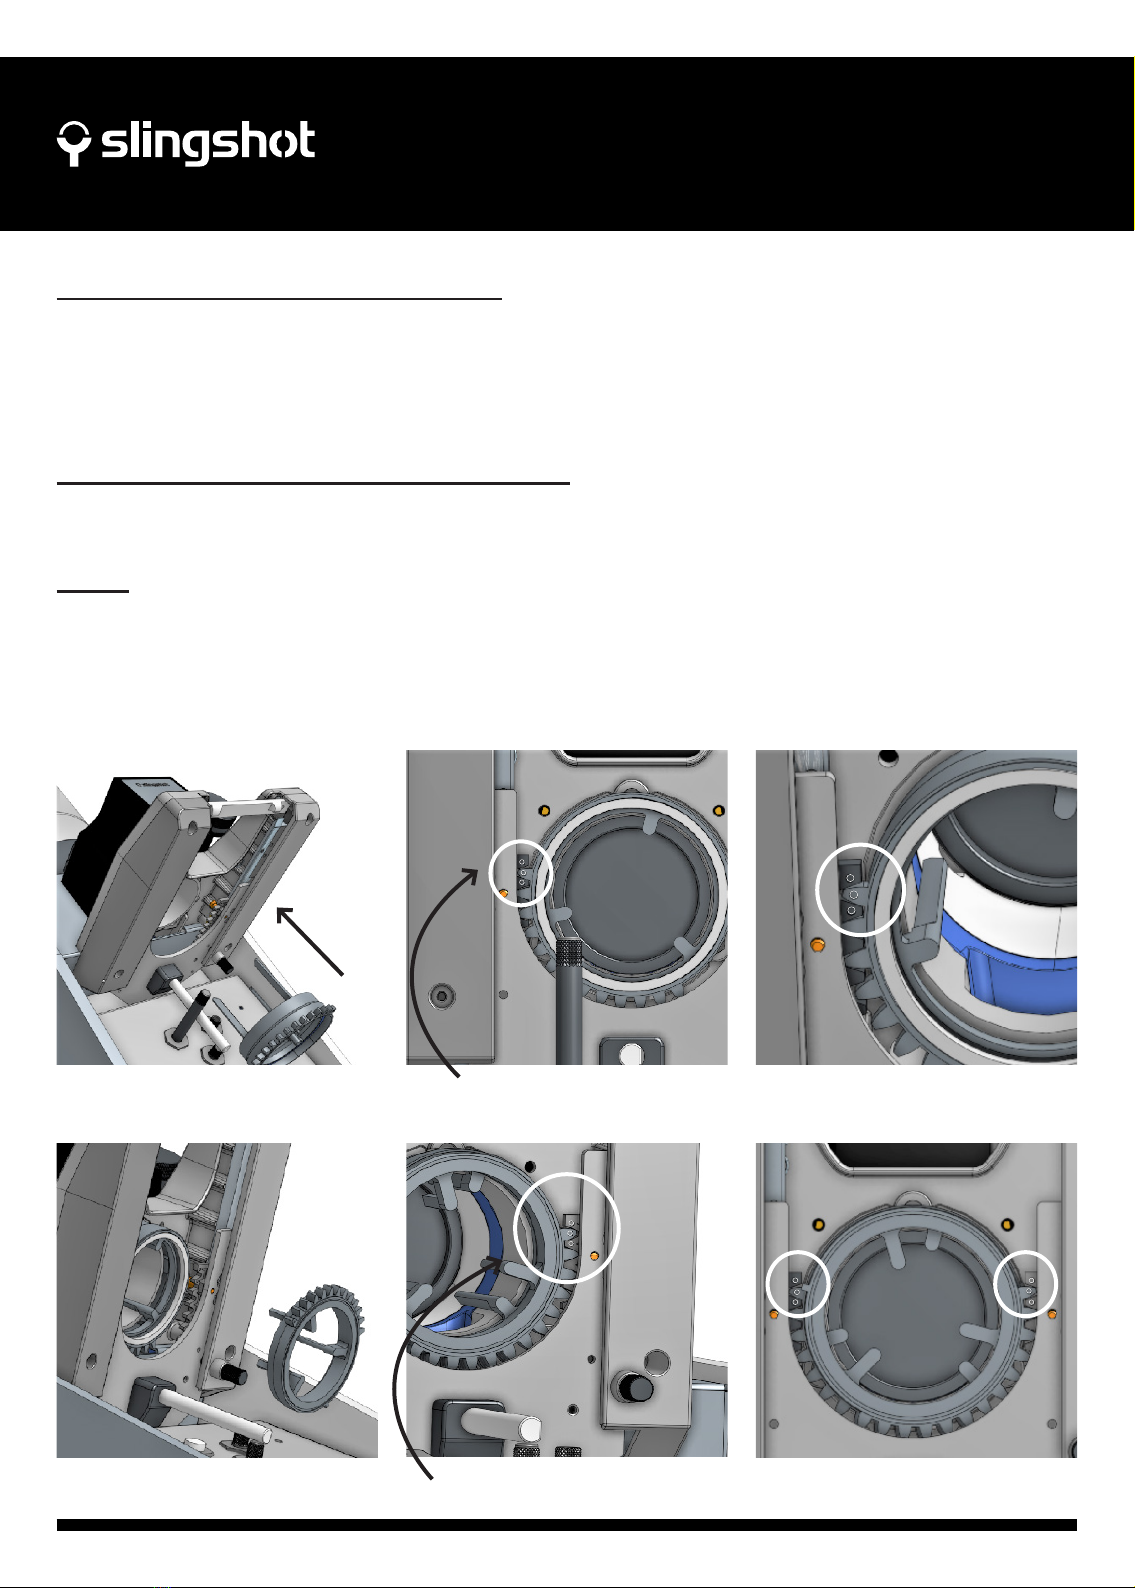
CLEANING AND MAINTENANCE
CLEANING THE GRINDER
COFFEE HOPPER
MIXING CHAMBER
GRINDING SYSTEM
DISCONNECT THE APPLIANCE’S POWER SUPPLY BY UNPLUGGING IT BEFORE CLEANING.
THE APPLIANCE MUST BE CLEANED PERIODICALLY BY SKILLED TECHNICAL PERSONNEL ONLY.
Wash the coee hopper once it has been removed from the appliance, using neutral soap and water, rinse
abundantly with lukewarm water and dry thoroughly.
It is advisable to clean the hopper periodically. Once the hopper has been cleaned it must be put back on
the appliance properly, xing it with the relevant screws.
Having discharged the ground coee, clean the coee ground mixing chamber with a clean brush,
expelling the material removed by pushing the sliding gate.
When a more thorough cleaning is required, the operation must be performed only by skilled authorised
technical personnel.
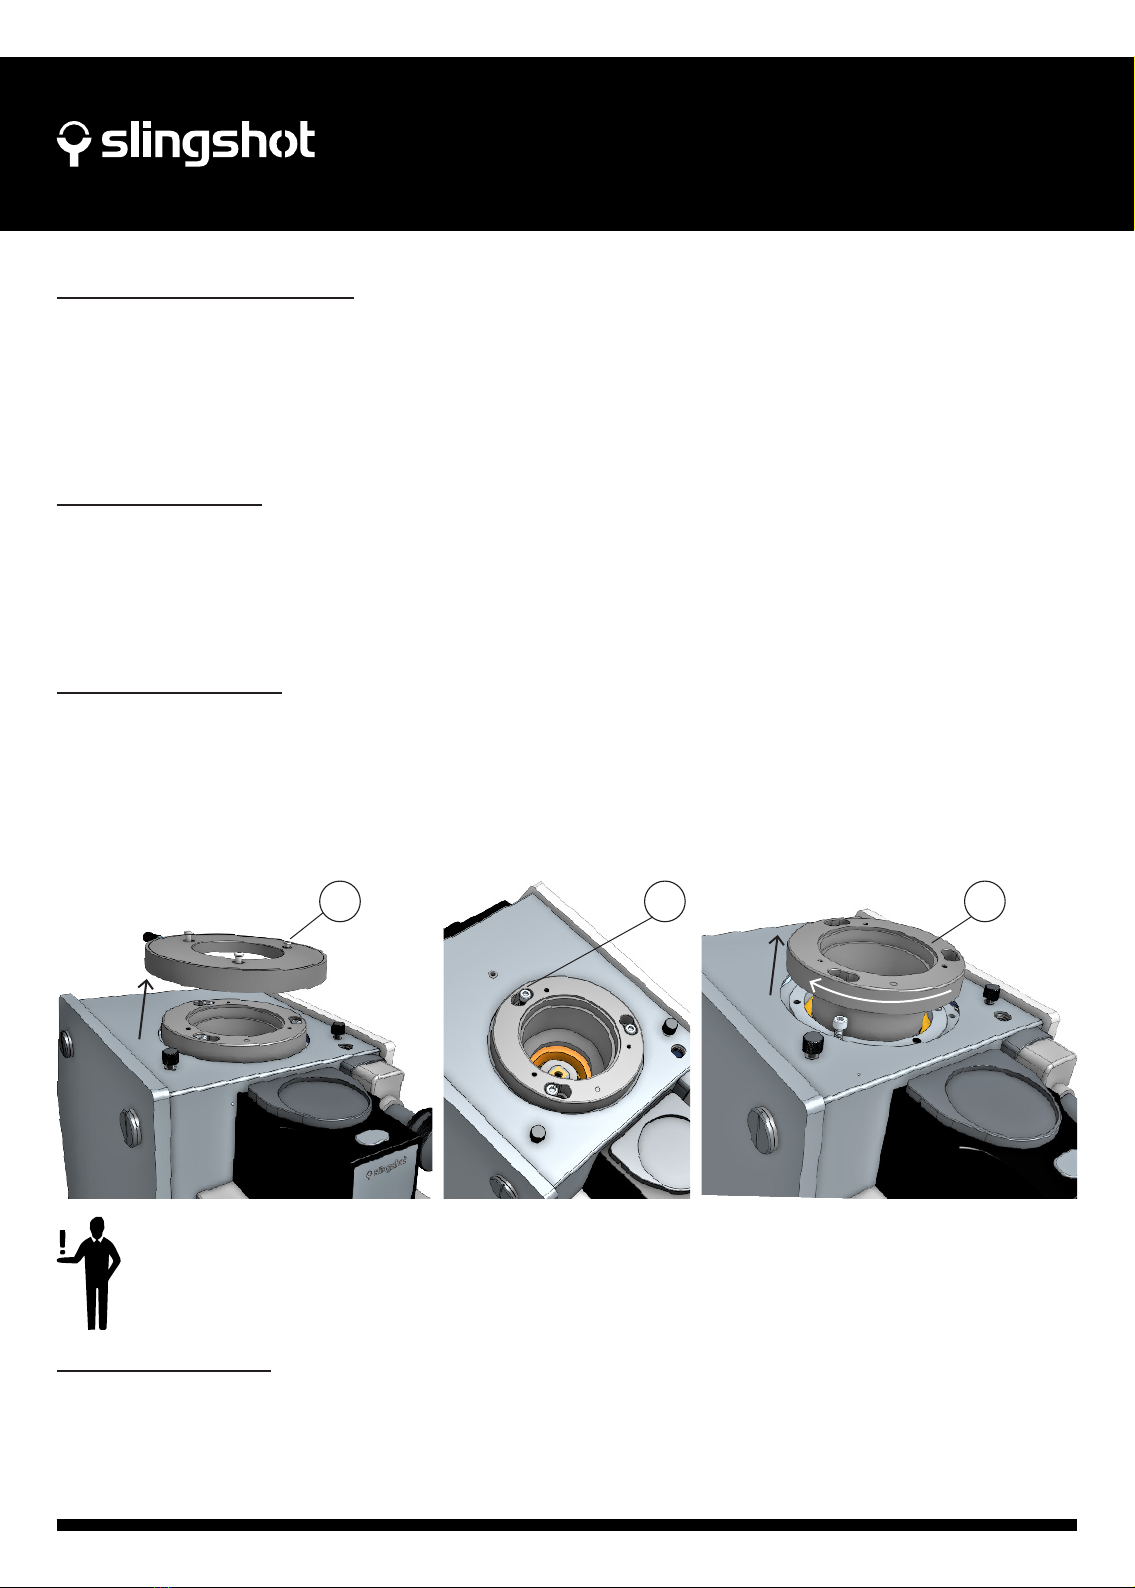
After removing the coee hopper:
Step 1: Unscrew the 3 screws (Fig. H1) that hold the adjustable grinding scale, lift and remove.
Step 2: Slightly loosen the screws that hold the top burr (Fig. H2)
Step 3: Twist and lift the top burr holder (Fig. H3) to remove.
Use perfectly clean, disinfected cloths or brushes for cleaning.
Do not use abrasive products as these are liable to take the sheen o shiny parts.
1 2 3
Having removed the upper grinding burr holder, clean the grinding burrs and the entire grinding chamber thoroughly using a clean
brush and cloth.
When nished the cleaning, reassemble following the steps from 3 to 1.
Fig. H
1313
CLEANING AND MAINTENANCE
DISASSEMBLING THE DOSAGE MECHANISM
Before starting, ensure that the following has been done:
• Ensure that the grinder has been completely turned o. Disconnect from the appliance’s power supply.
• Empty the hopper and ensure that all coee has been removed from the mixing chamber.
• Carefully place the grinder on it’s back
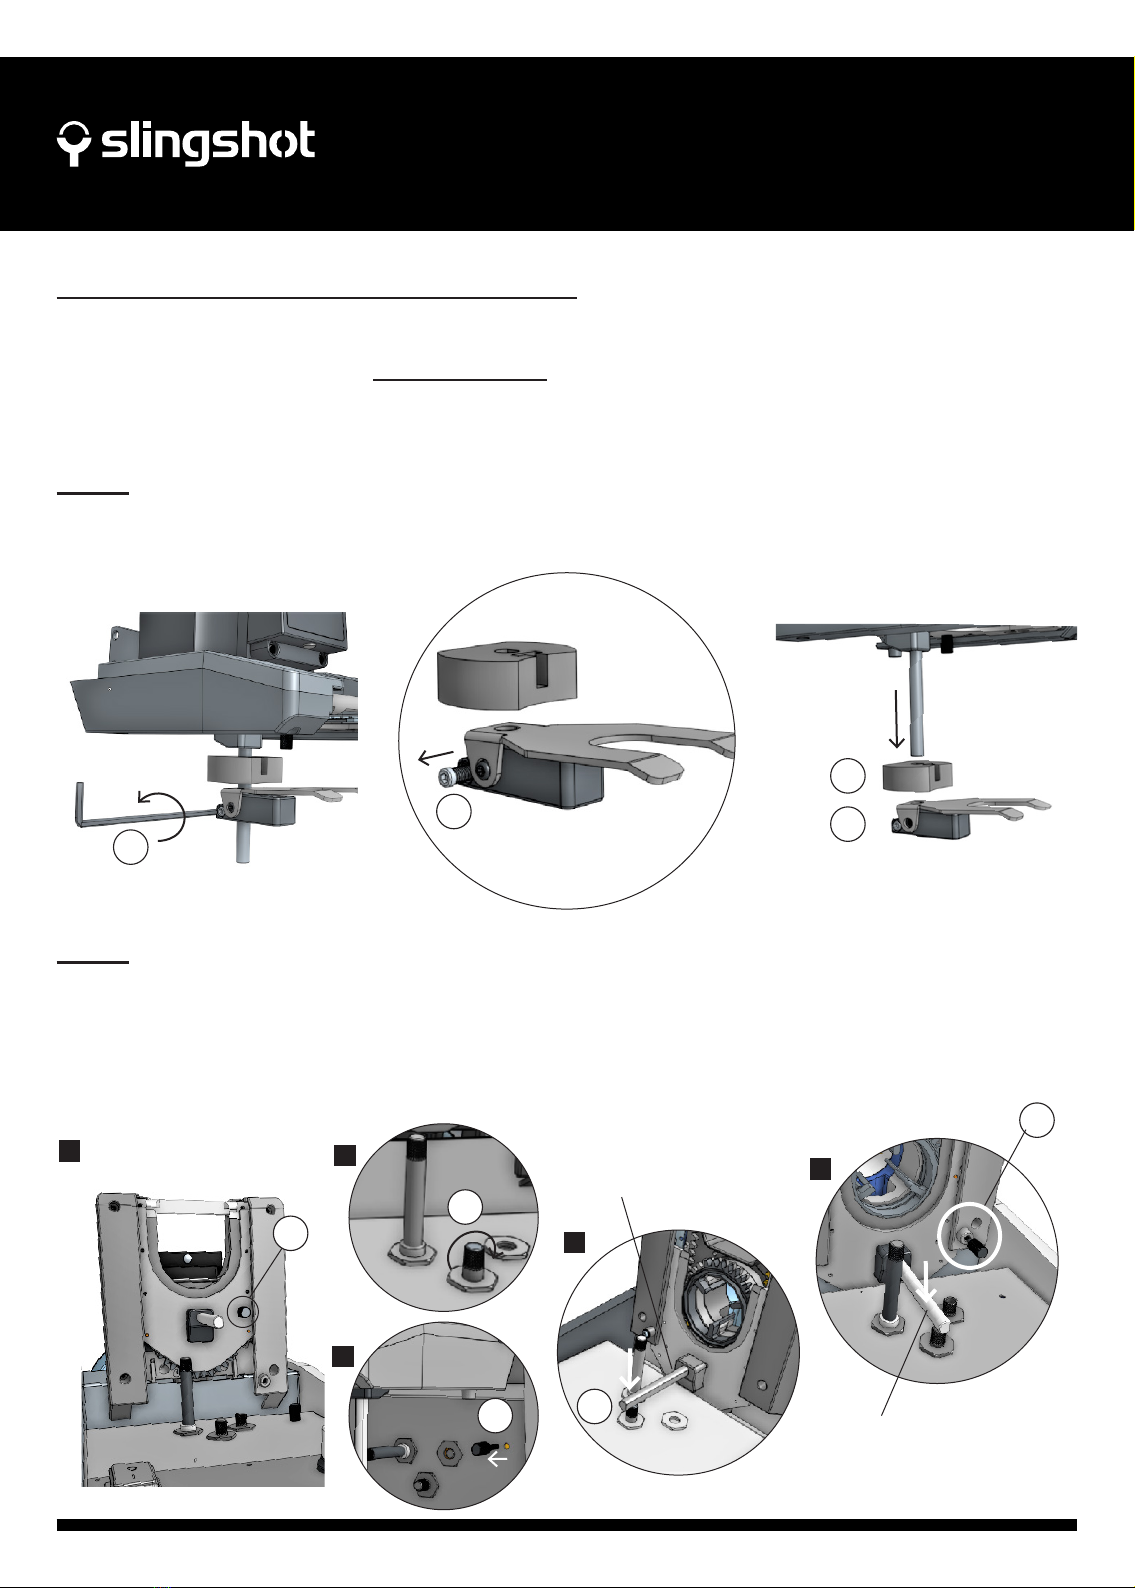
Step 1
• Using the appropriate tool, slightly loosen the single screw (A) clamping the back of the Fork Portalter.
• Once loosened, slide o the Fork Portalter (B) and Rubber Adaptor (C) from the Portalter Rod.
A
A
B
C
Step 2
1. Using your ngers, remove completely the screw on the Sliding Gate (D) and store safely.
2. Rotate the Double Dosage Adjustment Rod (E) CLOCKWISE until you’ve reached its maximum.
3. Using your ngers, remove completely the Doser Locking Screw (G).
4. Using your hand, push the Portalter Rod (F) all the way in.
5. Using your other hand insert and tighten Doser Locking Screw (G) into screwhole as shown. This will lock the
plate in place.
D
G
G
E
F
Ensure that the rod (F) is
pushed all the way in to allow
the screw (G) to be tightened
to its maximum.
Ensure that you are still applying
pressure on the rod (F) whilst
tightening the screw (G).
12
3
4
5

1414
CLEANING AND MAINTENANCE
Step 3
Step 4
• Using your ngers, carefully slide out the Sliding Plate (H).
• Carefully remove the two scrapers for cleaning.
Bottom Scraper
marked with a
WHITE dot
Top Scraper
marked with a
GREEN dot
H
1515
REASSEMBLING THE DOSAGE MECHANISM
Once the two scrapers have been cleaned it is now time to reassemble the dosage mechanism.
CLEANING AND MAINTENANCE
Step 1
• Ensure that the felt seals are inserted back into the Upper Scraper.
• Reinsert the Upper Scraper making sure to align the teeth of the scraper to the correct gear rack (see below)
• Reinsert the Lower Scraper making sure to align the teeth of the scraper to the correct gear rack (see below)
• Remove the felt seals and brush o any coee grounds
• Brush o any coee ground build up
• Using a mild soap and warm water, wash the scrapers to remove excess oils from coee ground build up.
• Ensure that the scrapers are completely dry before attempting to reassemble.
HOW TO CLEAN THE TWO SCRAPERS
Ensure that the WHITE dots are correctly aligned as shown in the diagram.
Ensure that the GREEN dots are correctly aligned as shown in the diagram.

1616
CLEANING AND MAINTENANCE
Step 2
Step 3
• Slide the Sliding Plate back into place, ensuring that it’s pushed all the way in.
• Using your ngers, screw back into place the screw (D) for the Sliding Gate.
D
1717
Step 4
• Using one hand, keep applying pressure on the rod and continue to push it towards the body of the Grinder
• Using your other hand, slightly loosen the screw (G) until you feel the rod trying to spring back.
• Slowly release pressure on the rod to allow the Sliding Gate to spring back into position.
• Return Doser Locking Screw (G) back to its orginal position on the body of grinder.
Note: Sliding Plate is spring loaded. Be sure to exercise caution when performing this procedure.
Step 5
• Put back both the Adaptor (B) and Portalter Fork (C)
• Re-adjust the forks based on your Portalter and refasten the screw (A) to lock in position.
Continue to push down on the rod until you feel
the rod trying to spring back.
B
C
A
G
G

1818
TROUBLESHOOTING
Before requesting the technical assistance of the service centre, carry out the following checks:
NOTE: If it is not possible to solve the problem as suggested, or if problems other than those described
above occur, please contact an authorised technical service centre.
PROBLEM POSSIBLE CAUSE SOLUTION
Grinder does not start after
pressing START|STOP
button
• Grinder not plugged in properly.
• Bean hopper not attached correctly
• Grinder has overheated.
• Ensure plug is plugged into power outlet.
• Lock bean hopper into position ensuring that Safety Screw
is screwed in.
• Remove power plug from power outlet. Leave for 20 minutes
to cool down before using again.
Beans Icon ashing.
• No coee beans in hopper
• Hopper sliding gate is closed
• Grinder/bean hopper is blocked
• Fill hopper with fresh coee beans
• Ensure hopper gate is open
Digital Display not turning on
• Grinder not switched on
• Grinder not plugged in correctly
• Hopper Safety Switch screw not
screwed in all the way
• Check that machine is correctly plugged in
• Ensure that the Coee Hopper Screw is fastened all the way.
Not enough/too much coee
grind in portalter
• Dosage rods not correctly set up
• Portalter not set up correctly
• Incorrect portalter basket size
• Incorrect technique of dispensing
coee into portalter
• Refer to Adjusting the Dosage on page 10
• Ensure Portalter is adjusted correctly for use (refer to
Adjusting the Fork Portalter on page 6)
• Ensure portalter basket size is appropriate for your
espresso recipe
• Refer to Dispensing the coee in the Portalter on page 9
to ensure correct technique.
Inconsistent dosage
• Portalter not set up correctly
• Incorrect technique of dispensing
coee into portalter
• Ensure Portalter is adjusted correctly for use (refer to
Adjusting the Fork Portalter on page 6)
• Refer to Dispensing the coee in the Portalter on page 9
to ensure correct technique.
Dosage Mechanism isn’t
operating smoothly
• Portalter not set up correctly
• Coee grind build up
• Ensure that portalter is set up correctly (refer to Adjusting
the Fork Portalter on page 6)
• Clean dosage mechanism (refer to Disassembling of
Dosage Mechanism on page 13)
Adjustment of grind (coarser/
ner) not taking eect
• Dosing chamber still contains coee
with pre-adjusted setting
• Adjustment on Position Counter not
sucient enough
• Ensure that you have purged the grinder of any coee
that had been ground on the pre-existing setting (usually
takes around 3 grind cycles).
SLINGSHOT TECHNOLOGY CORPORATION LTD reserves the right to apply technical changes to the equipment
should they become necessary, without advance notice.
In case of loss or damage of this Original Instruction Manual, user can download a PDF copy of the original instruction
from www.slingshot.coee/manual
1919
EC Declaration of Conformity
The manufacturer:
Slingshot Technology Corporation Ltd
7/F Meyer Industrial Building , 2 Chong Yip Street, Kowloon , Hong Kong
declares that the product described is in conformity with the following European Directives: 2006/42/EC
and The EMC Directive:2014/30/EU
For verication of compliance with said directive, the following harmonized standards have been applied:
2006/42/EC Annex I
EN ISO 12100:2010
EN60204-1:2006+A1:2009/AC:2010
Product Name: Slingshot Coee Grinder
Product Model: S64, S75, C68
Trade Mark: SLINGSHOT
AUTHORISED PERSON TO
COMPILE THE TECHNICAL FILE
Mr. Luca Giorgella
2/19 Rudloc Rd, Morley WA 6062
+61 1300 066 992
We guarantee that we will provide the authorised representative information before we export the
machine to E.U.Responsible for making this declaration is the manufacturer.
Luca Giorgella
Director R&D

ASIA
Slingshot Technology Corporation Ltd
7/F Meyer Industrial Building
2 Chong Yip Street, Kowloon. HK
+852 23438211
USA & CANADA
+1-201-745-6765
EUROPE
Slingshot Europe
Via Industriale, 1
24040 Chignolo D’isola BG, Italy
+39 035 494 9555
AUSTRALIA & NZ
Slingshot Technology Pty Ltd
2/19 Rudloc Rd
Morley WA 6062
+61 1300 066 992
Other manuals for S64
1
This manual suits for next models
2
Table of contents
Other Slingshot Coffee Grinder manuals


