manuals.online logo
Brands
  1. Home
  2. •
  3. Brands
  4. •
  5. SMART-AVI
  6. •
  7. Controllers
  8. •
  9. SMART-AVI 4K-WALL User manual

SMART-AVI 4K-WALL User manual

Other manuals for 4K-WALL

1

Other SMART-AVI Controllers manuals

SMART-AVI EZ-WALL 2X2L User manual

SMART-AVI

SMART-AVI EZ-WALL 2X2L User manual

SMART-AVI XTREEM-WALL User manual

SMART-AVI

SMART-AVI XTREEM-WALL User manual

Popular Controllers manuals by other brands

Digiplex DGP-848 Programming guide

Digiplex

Digiplex DGP-848 Programming guide

YASKAWA SGM series user manual

YASKAWA

YASKAWA SGM series user manual

Sinope Calypso RM3500ZB installation guide

Sinope

Sinope Calypso RM3500ZB installation guide

Isimet DLA Series Style 2 Installation, Operations, Start-up and Maintenance Instructions

Isimet

Isimet DLA Series Style 2 Installation, Operations, Start-up and Maintenance Instructions

LSIS sv-ip5a user manual

LSIS

LSIS sv-ip5a user manual

Airflow Uno hab Installation and operating instructions

Airflow

Airflow Uno hab Installation and operating instructions

ABB ACS580-01 drives Hardware manual

ABB

ABB ACS580-01 drives Hardware manual

Panasonic GM1 Series Reference manual

Panasonic

Panasonic GM1 Series Reference manual

Emerson SW93 owner's manual

Emerson

Emerson SW93 owner's manual

AutoAqua Smart ATO micro SATO-120P manual

AutoAqua

AutoAqua Smart ATO micro SATO-120P manual

Panasonic FP? Positioning Unit RTEX Technical manual

Panasonic

Panasonic FP? Positioning Unit RTEX Technical manual

Alpha IP MIOB 21001 manual

Alpha IP

Alpha IP MIOB 21001 manual

Siemens OpenAir GMA 1 Series Mounting instructions

Siemens

Siemens OpenAir GMA 1 Series Mounting instructions

Surecom SR-629 user manual

Surecom

Surecom SR-629 user manual

Regulus SRS1 T Installation and operation manual

Regulus

Regulus SRS1 T Installation and operation manual

3M MicroTouch EX113 reference guide

3M

3M MicroTouch EX113 reference guide

KUHN TKS user manual

KUHN

KUHN TKS user manual

S&C PMH Instructions for operation

S&C

S&C PMH Instructions for operation

manuals.online logo
manuals.online logoBrands
  • About & Mission
  • Contact us
  • Privacy Policy
  • Terms and Conditions

Copyright 2025 Manuals.Online. All Rights Reserved.

1
Made in U.S.A. www.SmartAVI.com 1-800-AVI-2131
4K-WALL
Integrated 2x2 Video Wall Controller and 4x4 Port HDMI, Real Time Switch Matrix with
On Screen Display Control & No Software Required.
User Manual
HDMI/DVI Video Wall Controller and 4x4 Switch Matrix.
2
INTRODUCTION
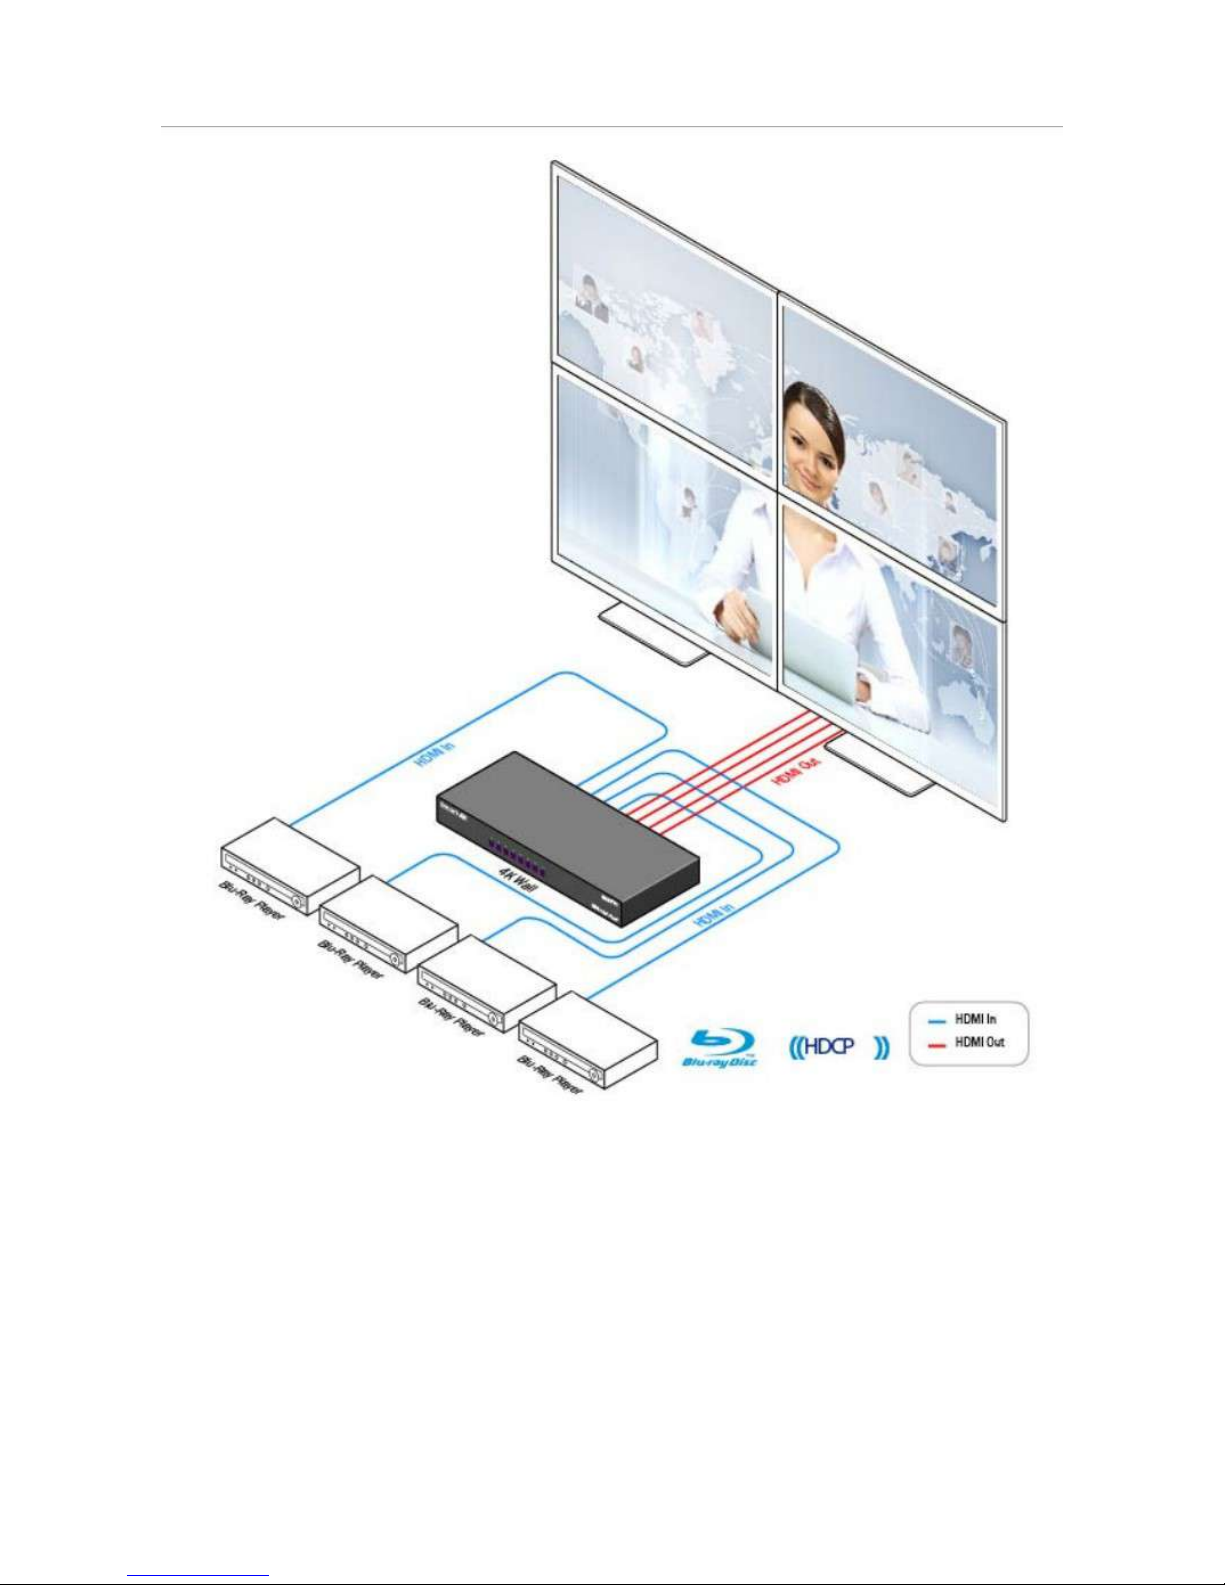
To create a four-screen 2x2 video wall with four HD video inputs, the 4K-Wall video wall controller provides a truly
simple plug-and-play hardware solution. With four inputs and four outputs, users can arrange their content in nu-
merous ways, providing unique functionality by combining the abilities of a video wall hardware controller and a
4x4 HDMI port Matrix. The 4K-Wall is HDCP compliant.
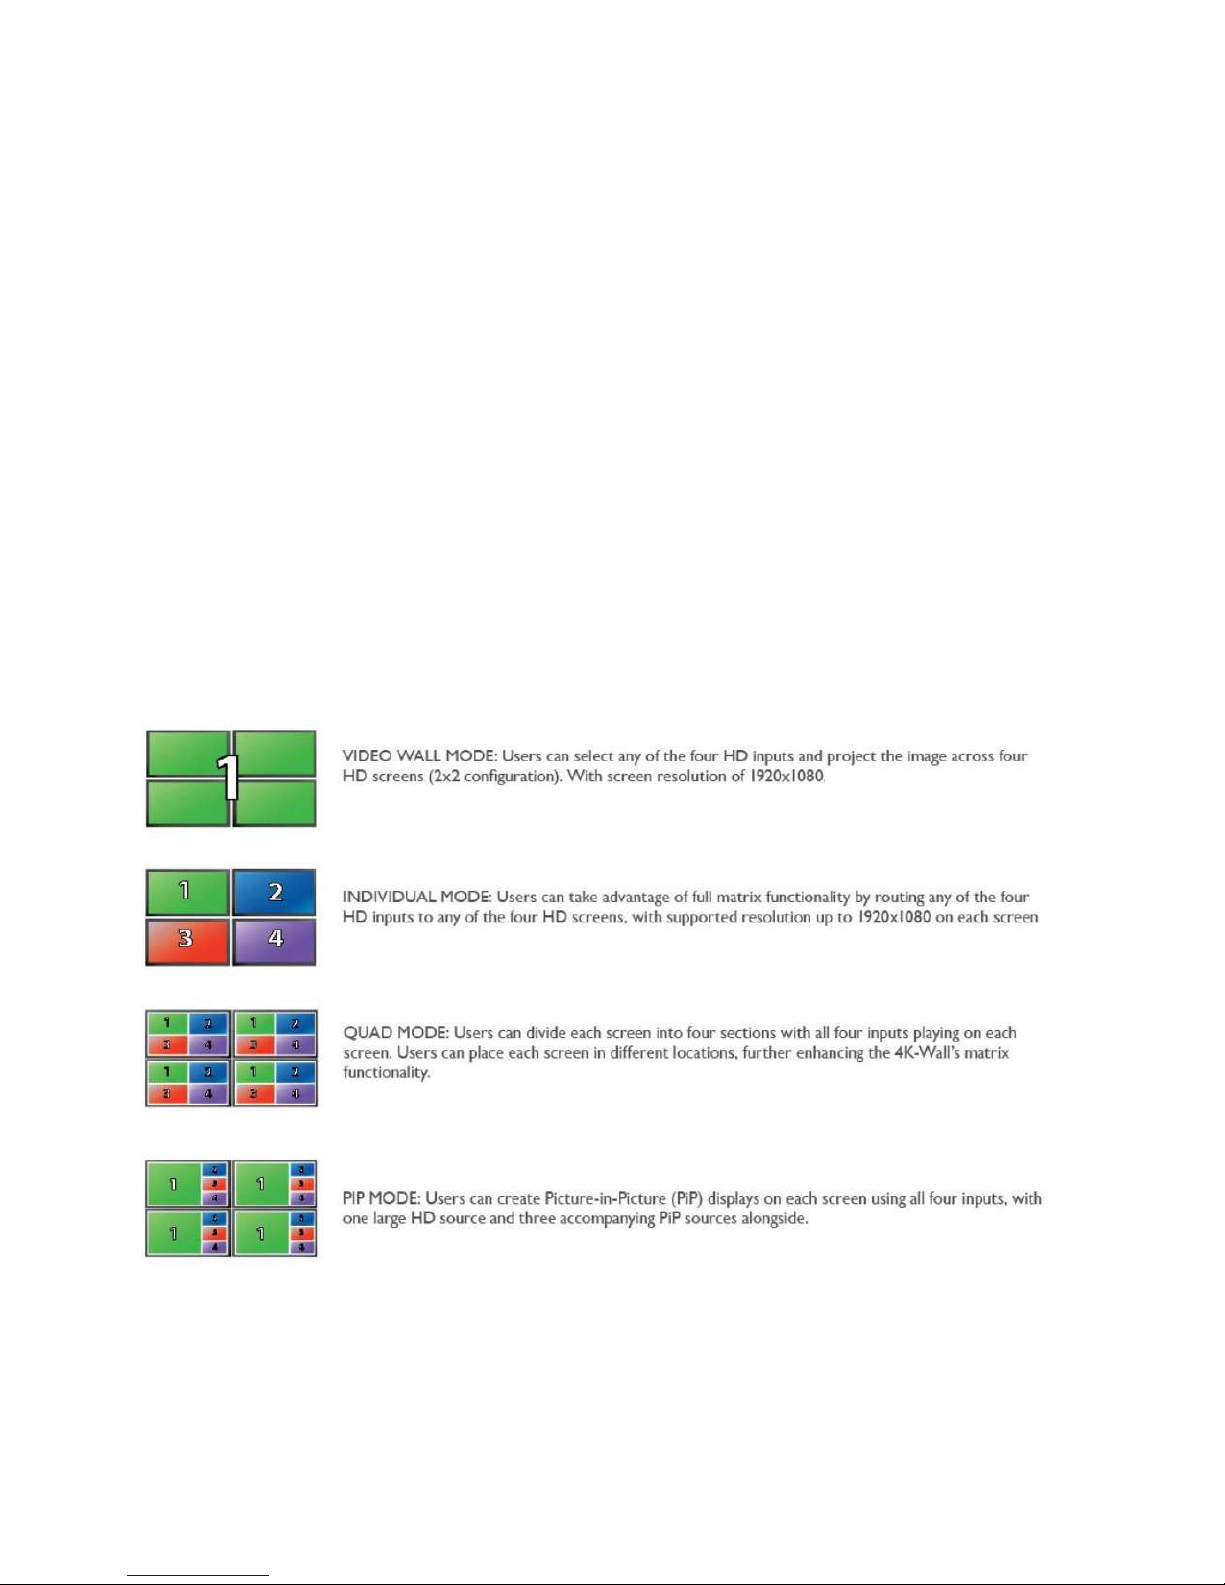
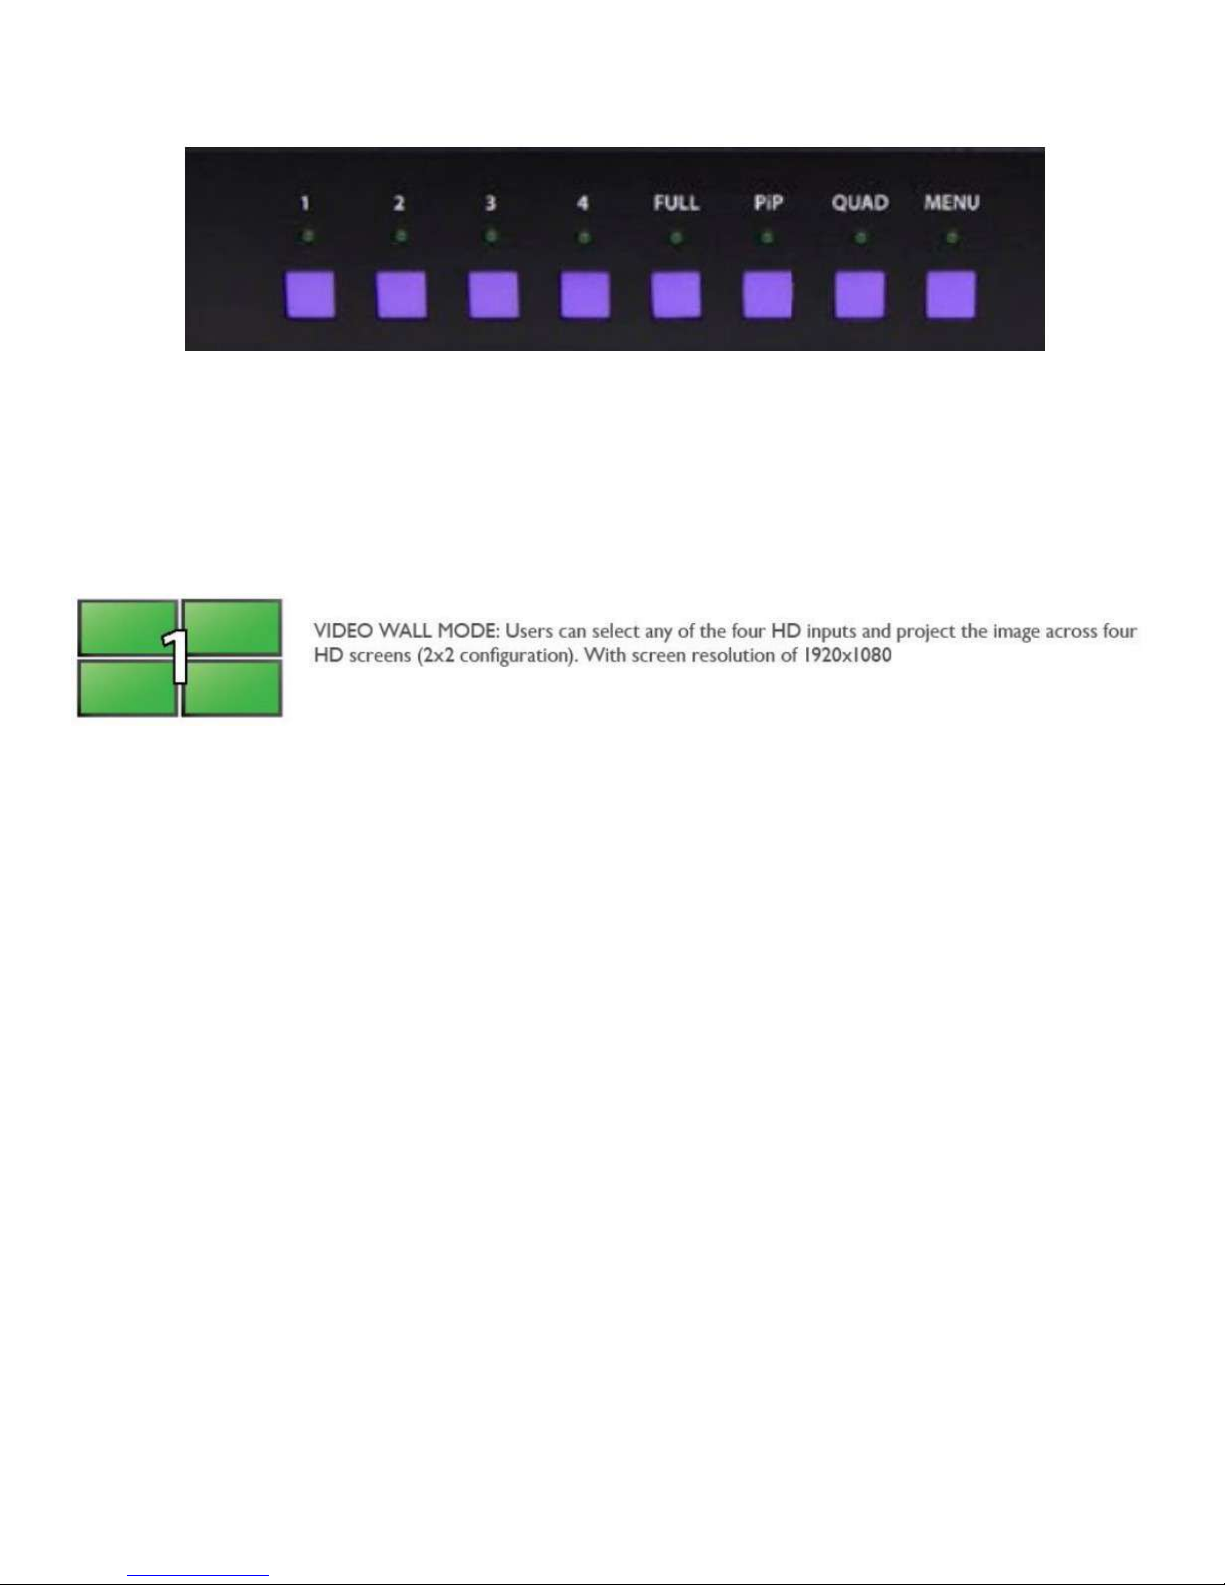
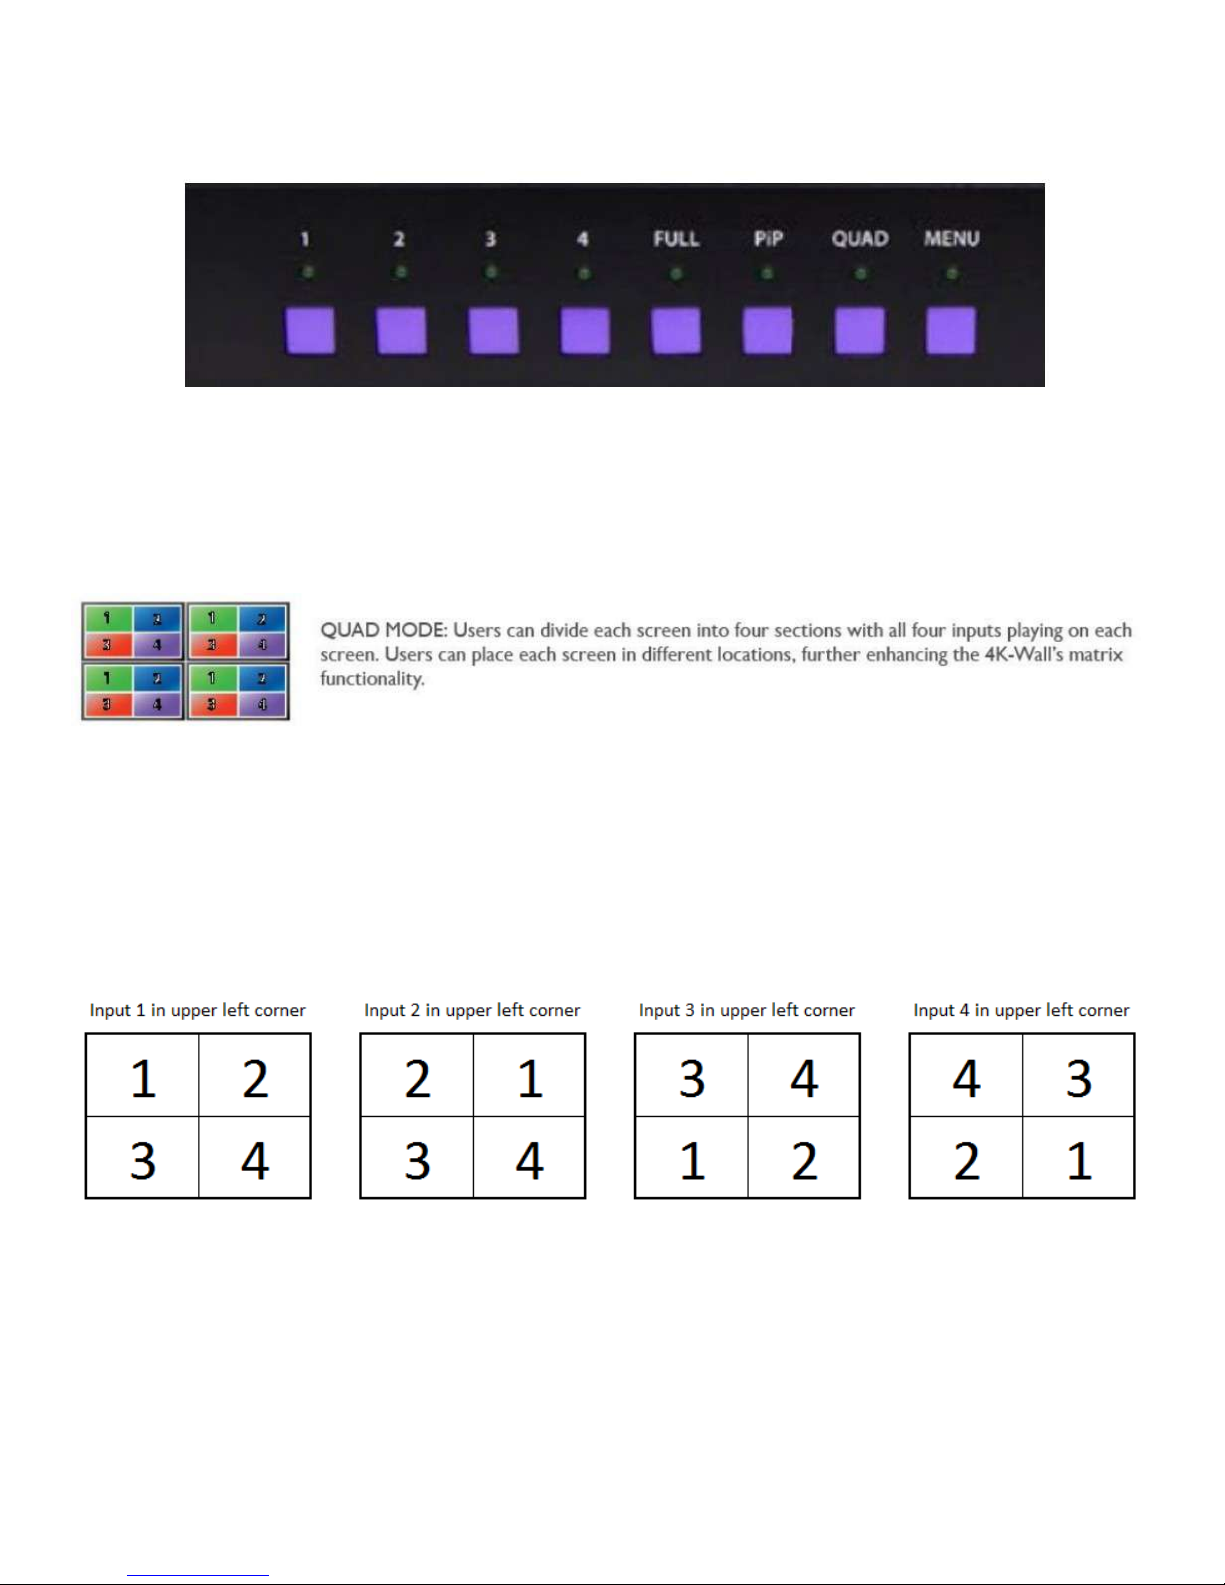
Users can stretch one large image over four screens, send an input to each screen, send four images to each
screen or create a customizable Picture-in-Picture display. Better still, there’s no software required, as all content
management options are effortlessly controlled via the 4K-Wall video wall controller unit itself. There’s no need for
additional drivers. Just connect the HD inputs and HD screens to the controller and it’s ready to go.
TABLE OF CONTENTS Page
WHAT’S IN THE BOX? 2
INTRODUCTION 2
FEATURES 2
TECHNICAL SPECIFICATIONS 3
APPLICATION DIAGRAM 4
APPLICATIONS 4
HARDWARE INSTALLATION 5
AVAILABLE CONFIGURATIONS 5
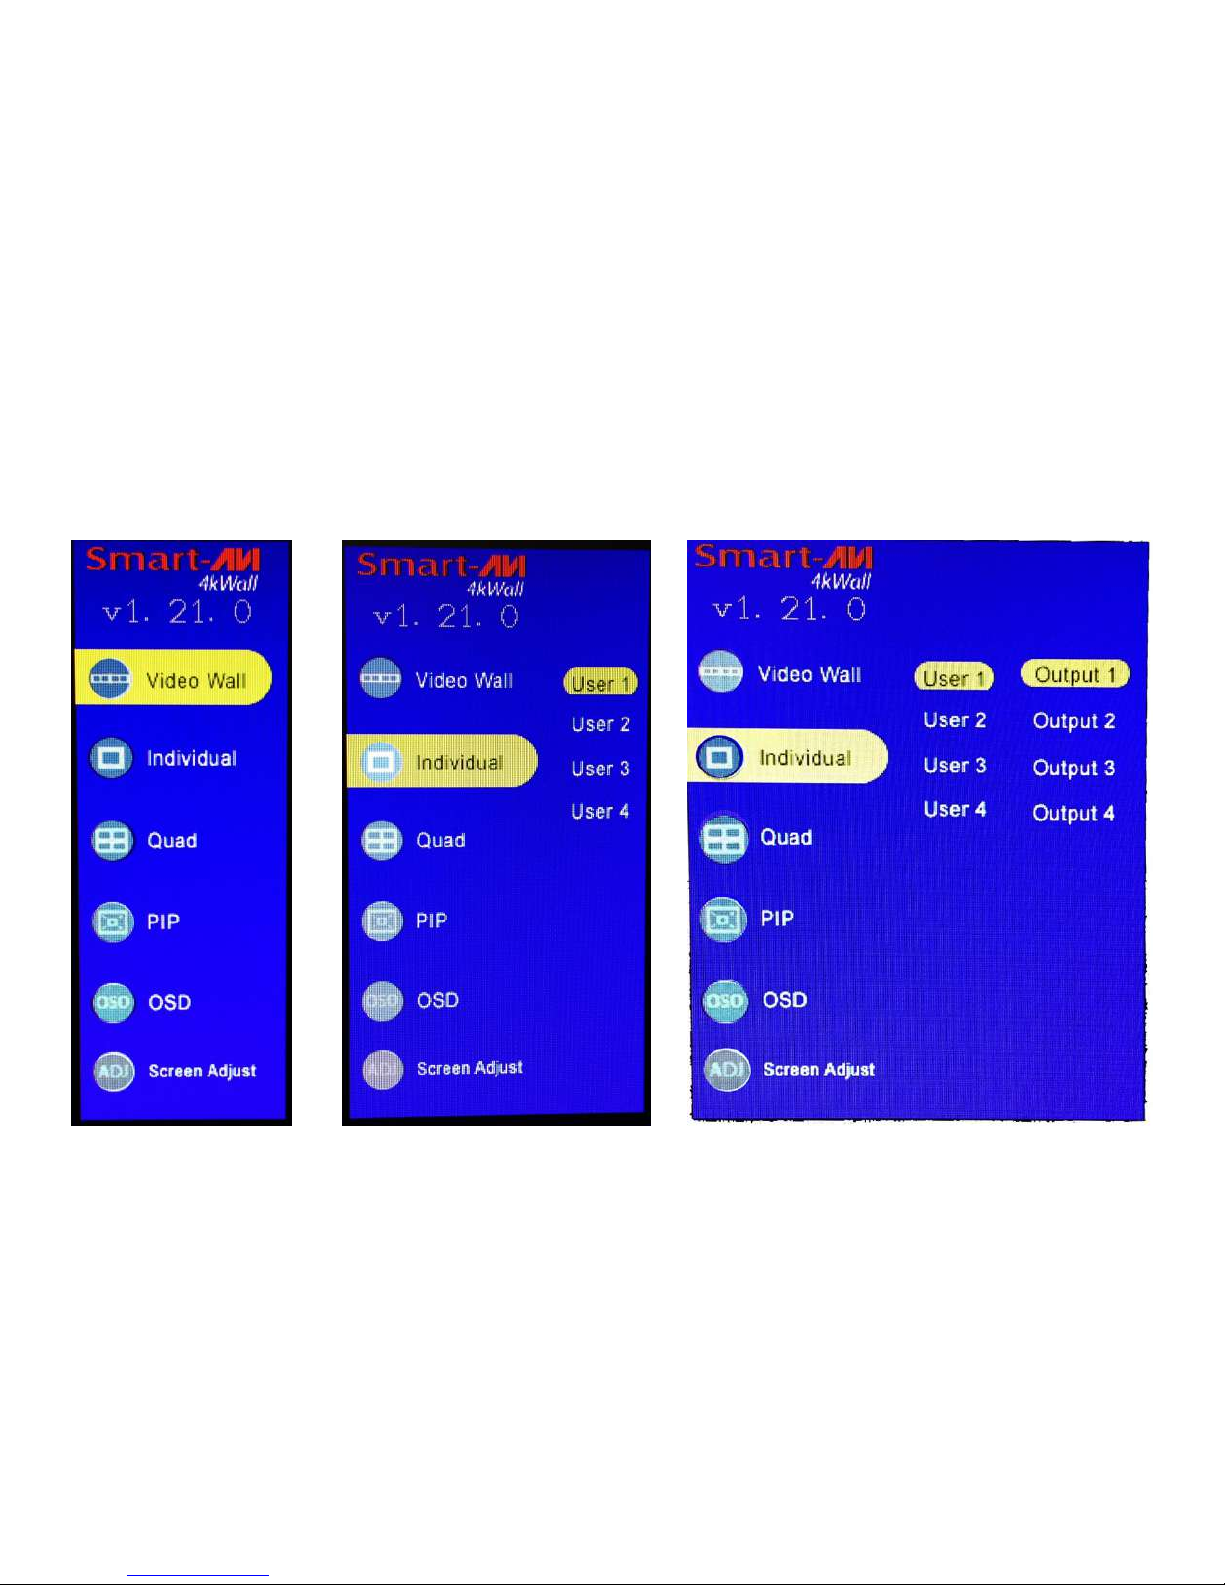
CONTROL USING THE FRONT PANEL 6
ON-SCREEN DISPLAY (OSD) 7
CONTROL USING ON-SCREEN DISPLAY (OSD) WITH THE FRONT PANEL 8-11
CONTROL USING IR REMOTE CONTROL 12
USING RS-232 CONTROL 13-14
RS-232 INTEGRATION WITH THIRD PARTY SOFTWARE 15
TCP/IP CONTROL 16
Limited warranty statement 17
FEATURES
•Stand-Alone Unit, Requiring no Additional Hardware or Software
•Plug-and-play ready
•Four HDMI inputs and four HDMI outputs
•DVI-D up to 1920x1200 input
•Learns any EDID
•Internal EDID database
•Multiple configurations
•HDCP and HDMI 1.4 compliant
•Supports IR and RS-232
WHAT'S IN THE BOX?
PART NO. QTY DESCRIPTION
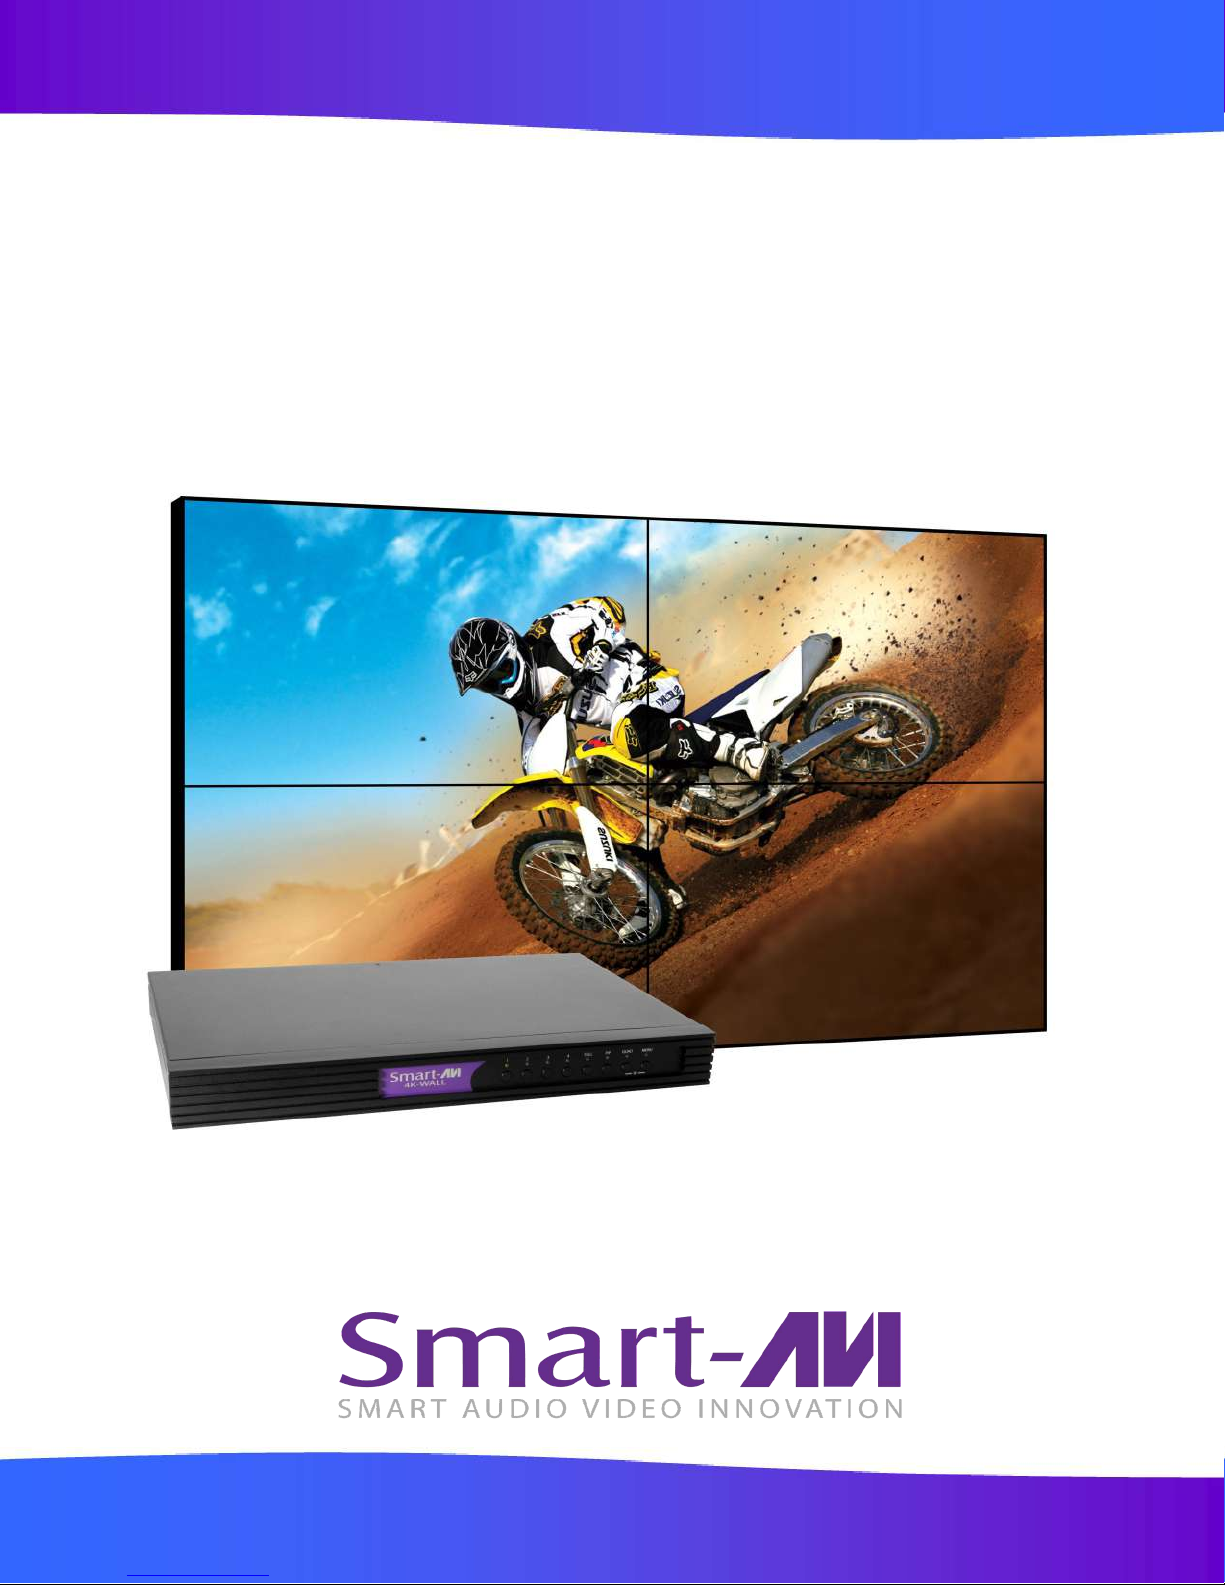
SM-4KWL-S 1 4X4 Port HDMI, Real-Time switching matrix with integrated 2x2 video
wall
CCPWR06 1 6' Power Plug Cable
SAVI-RMT 1 IR Remote Control
SM-EYE-NY 1 IR receiver
EN-QKVM-EAR-P 2 Mounting Brackets
1 Quick Start Guide
3
TECHNICAL SPECIFICATIONS
VIDEO
Video Bandwidth Single-link 340MHz [10.2Gbps]
Resolution HDTV Up to 1080p
PC Resolution Up to 1920 x 1200
Input Video Signal 1.2 volts
Input DDC Signal 5 volts
Single Link Range 1080p
Format HDMI 1.4
DVI Compliance Single-link DVI-D 2.0
Output Cable Length Up to 20 ft.
HDCP Compliance 1.0/2.0
Video Bandwidth Single-link 340MHz [10.2Gbps]
Input Interface (4) HDMI
Output Interface (4) HDMI
HDMI Connector Type A [19-pin female]
CONTROL
Front Panel Buttons
RS-232 DB9 (female)
IR Remote Control IR RC5
TCP/IP Ethernet Control
POWER
Requirements Internal 100-240 VAC
MECHANICAL
Dimensions 17” W x 10.875” D x 1.875” H
Weight 7.5 lbs. (Unit only)
4
APPLICATION DIAGRAM
APPLICATIONS
• Corporate or Educational Presentations • Corporate Lobbies
• Airport Installations • Restaurants
• Wall Displays • Entertainment Venues
• Digital Signage • Point-of-Sale
• Dealer Rooms • Security
• Control Rooms
• Shopping Centers
5
HARDWARE INSTALLATION
Make sure the 4K-Wall is turned off.
Connect up to 4 HDMI inputs (i.e. PC, Blu-Ray Player, Digital Signage, etc.) to the HDMI INPUT ports of the 4k-
Wall using HDMI cables.
Connect up to 4 HDTVs to the HDMI OUTPUT ports of the 4k-Wall using HDMI cables for or HDMI-to-DVI
adapters for DVI displays.
Connect the IR receiver to the IR input jack at the back of the 4k-Wall.
Connect a cat5/cat6 cable to the RJ45 connector.
Optionally connect an RS-232 cable from PC to the RS-232 port of the unit for additional control.
Turn on the 4k-Wall.
Wait for the unit to initialize. This should take less than 1 minute.
AVAILABLE CONFIGURATIONS
There are four different configurations or modes that are easy to navigate through with the 4k-Wall. See fig-
ure 5-1. Switching between the display modes is simple. The front panel buttons, IR remote control, OSD, RS-
232 console command, and TCP/IP can be used to switch between modes.
FIGURE: 5-1
6
CONTROL USING THE FRONT PANEL
To switch to Video Wall Mode: Press the QUAD and MENU buttons simultaneously and then press the de-
sired input channel 1, 2, 3, or 4.
To switch to Individual Mode:
Press the FULL button on the front control panel
Press the Output Channel (1, 2, 3, or 4).
Press the Input Channel (1, 2, 3, or 4).
For Example: Input 4 to output 2 = “FULL, 2, 4”
To switch to Picture in Picture mode: Press the PiP button and then select the desired channel 1, 2, 3, or 4.
To switch to Quad Mode: Press the QUAD button and then select the desired channel 1, 2, 3, or 4.
FIGURE: 6-1
7
ON-SCREEN DISPLAY (OSD)
On Screen Display (OSD) gives users great flexibility and ease of use when looking to manage their video wall.
It can be operated with the IR Remote Control and through the Front Panel Buttons as shown in the following
pages.
The initial display, shown in Figure 7-1 is for selecting the various modes available with the 4K-Wall.
The second display, shown in Figure 7-2 is for selecting 1 of 4 inputs or sources.
The third display, shown in Figure 7-3 is for selecting 1 of 4 outputs or displays.
Figure 7-1 Figure 7-2 Figure 7-3
8
CONTROL USING ON-SCREEN DISPLAY (OSD) WITH THE FRONT PANEL
Figure 8-1
To change modes with the OSD navigate using the following buttons on the front panel shown in Figure 8-1:
1 = Down, 2 = Up, 3 = Back, 4 = Select, FULL = Enter
Video Wall Mode:
Figure 8-2
1. Press the MENU button and use the 1 (Down) or 2 (Up) buttons to highlight Video Wall.
2. Press 4 to display the 4 inputs (Displayed as Users.) Press the 1 (Down) or 2 (Up) buttons to highlight the
input number you want displayed as a video wall.
3. Press FULL. The video wall should display the selected input and the OSD display will vanish after a few
seconds.
The on screen display will disappear after a few seconds of inactivity or you can press MENU to make the on
screen display disappear. The 4K-Wall will remain in video wall mode and you can change inputs by pressing
the corresponding number button.
9
CONTROL USING ON-SCREEN DISPLAY (OSD) WITH THE FRONT PANEL
(Continued)
Figure 9-1
To change modes with the OSD navigate using the following buttons on the front panel shown in Figure 9-1:
1 = Down, 2 = Up, 3 = Back, 4 = Select, FULL = Enter
Individual Mode: (Routing individual inputs to individual output displays.)
Figure 9-2
1. Press the MENU button and use the 1 (Down) or 2 (Up) buttons to highlight Individual.
2. Press 4 to display the 4 inputs (Displayed as Users.) Press the 1 (Down) or 2 (Up) buttons to highlight the
desired input number.
3. Press 4 to display the 4 outputs. Press the 1 (Down) or 2 (Up) buttons to highlight the desired output dis-
play number.
4. Press FULL to rout the input to the desired display.
To rout another: Press 3 to move back to the list of inputs. Repeat steps 2-4 above.
Once you’re in Individual mode you can rout inputs to a display by pressing the display number followed by
pressing the input number.
The on screen display will disappear after a few seconds of inactivity or you can press MENU to make the on
screen display disappear. The 4K-Wall will remain in Individual mode and you can change the displays by
pressing the display number button followed by the input number button.
10
CONTROL USING ON-SCREEN DISPLAY (OSD) WITH THE FRONT PANEL
(Continued)
Figure 10-1
To change modes with the OSD navigate using the following buttons on the front panel shown in Figure 10-1:
1 = Down, 2 = Up, 3 = Back, 4 = Select, FULL = Enter
Quad Mode:
Figure 10-2
1. Press the MENU button and use the 1 (Down) or 2 (Up) buttons to highlight Quad.
2. Press 4 to display the 4 inputs (Displayed as Users.)
3. Press the 1 (Down) or 2 (Up) buttons to highlight the desired input number. The selected input number
will appear in the upper left corner of each display. The other 3 displays will be in the positions shown
below in Figure 10-3 depending on which input is selected.
4. Press FULL to execute.
Figure 10-3
To try a different configuration: Press 3 to move back to the list of inputs and repeat step 3 above selecting a
different input.
The on screen display will disappear after a few seconds of inactivity or you can press MENU to make the on
screen display disappear. The 4K-Wall will remain in Quad mode and you can switch to any of the configura-
tions in Figure 10-3 by pressing the number button for the input you want in the upper left corner.