Smart Eye Aurora User manual

Aurora
User Guide
Version 9.2


Contents
1 Introduction ......................................... 1
1.1 Intendeduse ...................................... 1
2 Software and System Requirements ........................... 2
2.1 Systemrequirements ................................. 2
2.2 Compatiblesoftware.................................. 2
3 Aurora Hardware ...................................... 3
3.1 What’sinthebox.................................... 3
3.2 Productcare ...................................... 3
4 Setup ............................................. 4
4.1 Softwareinstallation .................................. 4
4.2 Mounting ........................................ 5
4.3 Eyetrackercalibration ................................. 6
5 Software Update ...................................... 8
5.1 Upgradefirmware ................................... 8
6 Support ............................................ 10
6.1 Troubleshooting..................................... 10
6.2 Customersupport ................................... 10
Appendix A Safety and Compliance ............................ 11
A.1 Compliance....................................... 11
A.2 OperatingTemperature ................................ 11
Appendix B Technical Specifications ........................... 12

1 Introduction
The Smart Eye Aurora is an eye tracker designed to deliver insights wherever you are. The
small size of the Aurora makes it easy to switch between different screens and projects, without
compromising on the performance. If your needs change in the future, the existing Aurora can
be upgraded to deliver higher framerate.
This manual contains useful information about the Aurora eye tracker, ranging from safety and
compliance to product care. It also contains information about the mounting procedure and
software setup. If any questions or difficulties arises, do not hesitate to contact the support.
1.1 Intended use
The Aurora is primarily designed for fixation-based eye tracking on screens, such as laptop
screens and other monitors. The Aurora works well in all indoor illumination conditions, and of-
fers precise and accurate tracking on screens up to 24”. In addition to eye tracking, the Aurora
also delivers precise head tracking and eyelid tracking.
The Aurora is designed for collaboration, and can be integrated with other sensors and bio-
measuring systems.
Smart Eye Aurora eye tracker

2 Software and System Requirements
2.1 System requirements
Operating System Windows 10 Anniversary Update (version 1607) or newer
RAM 4 GB
CPU Quad core 6th generation Intel Core or Intel Xeon processor
or newer
Camera Interface USB 3.0 (for 60 Hz), USB-C (for 120 Hz)
Maximum Screen Size 24” (16:9 aspect ratio)
2.2 Compatible software
iMotions www.imotions.com

3 Aurora Hardware
3.1 What’s in the box
Aurora eye tracker
Two Chem Pad™ wipes for cleaning the mounting area
Two mounting brackets with tape
Safety and setup info note
Textile travel bag
USB-C cable, 2 m
3.2 Product care
The front glass of the eye tracker needs to be clean in order to ensure optimal tracking. If dirt
or dust ends up on the front glass, the eye tracker has to be cleaned in a correct manner.
To clean the front glass use a dry microfiber cloth intended for cleaning cameras, camera
lenses, or eyeglasses and carefully wipe the front glass. If unsupported cleaning methods are
used the eye tracker might be damaged.
Warning! Do not use alcohol to clean the front glass, as it may damage the eye tracker!

4 Setup
This section describes the steps needed to setup your eye tracker. Install required software,
mount the eye tracker on the screen and calibrate the eye tracker.
4.1 Software installation
The software Smart Eye Tracker needs to be installed before using your eye tracker. Follow
the installation steps below.
1. Launch the Smart Eye Tracker installer by double clicking it.
2. Click the Install button to start the installation.
3. A User Account Control window will be opened, click Yes to continue.
4. A Windows Security window will be opened, click Install to install eye tracker drivers. The
installation may take a while.
5. Click the Close button when the installation has finished to exit the installer.
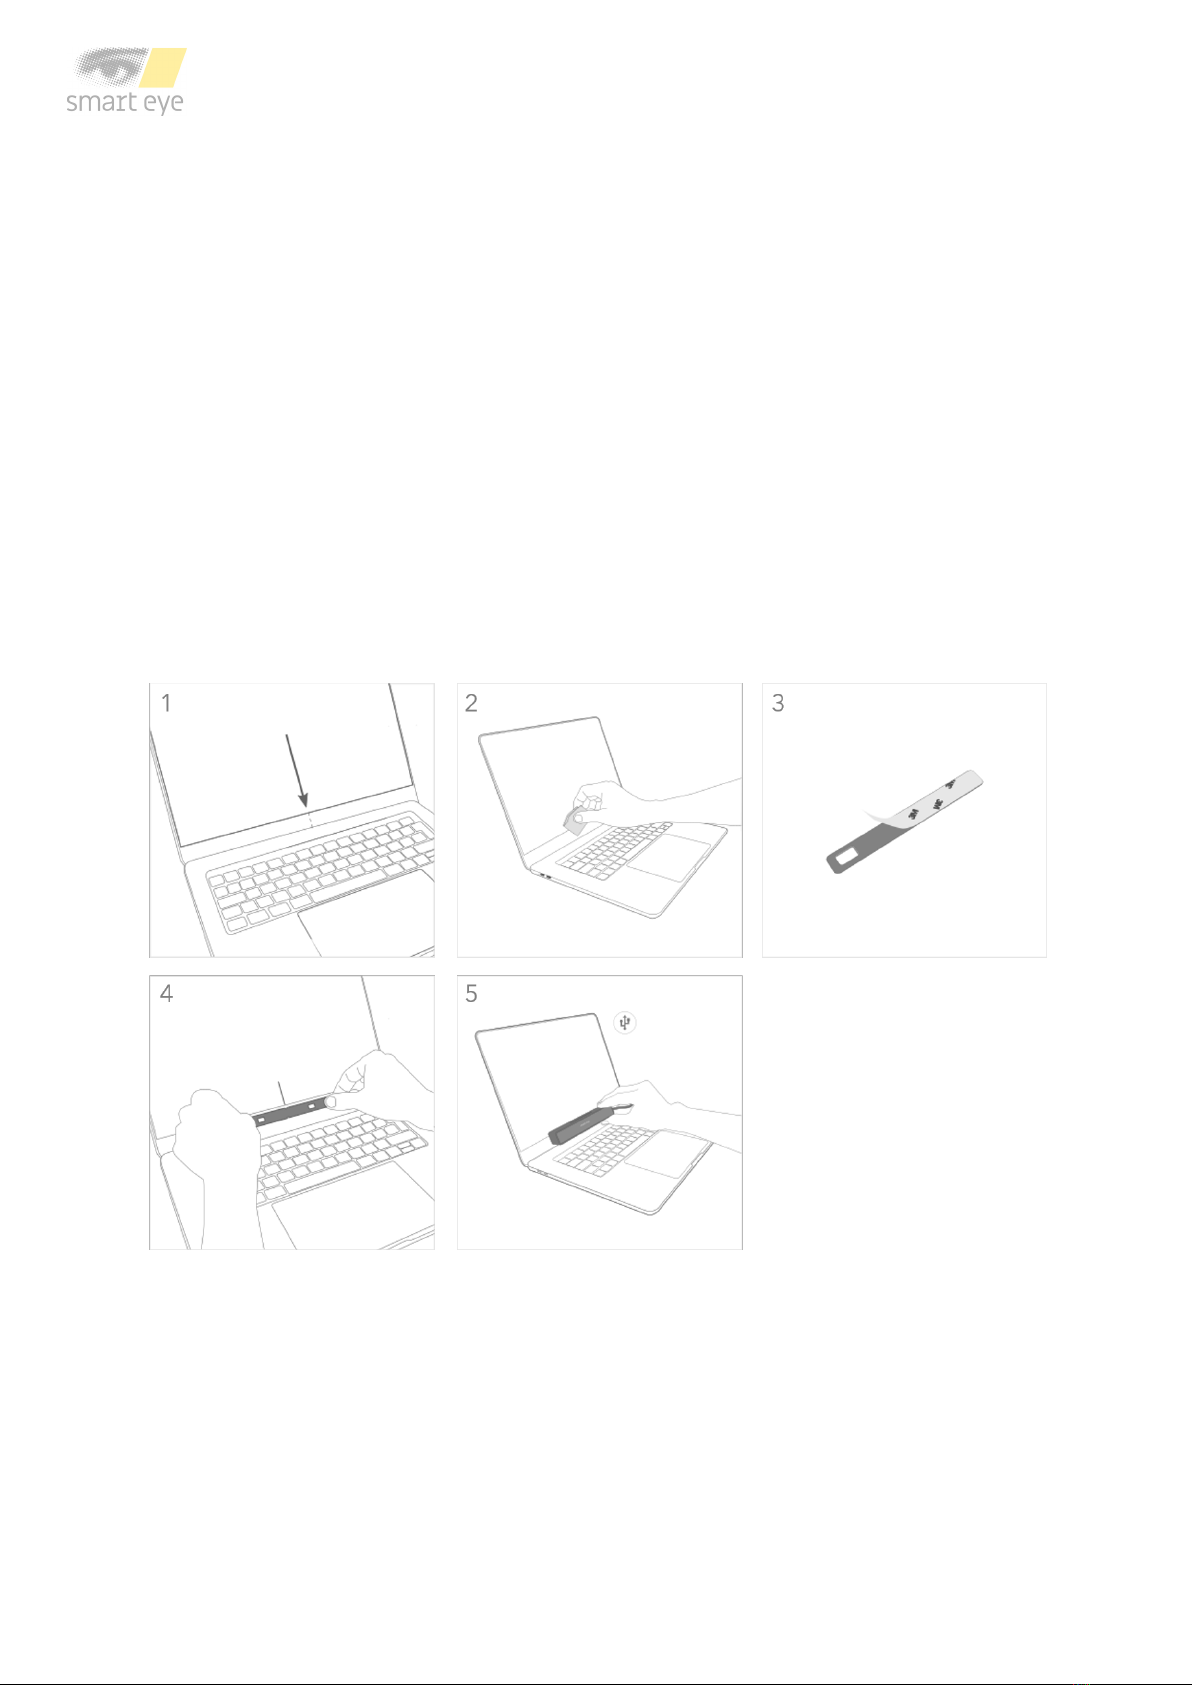
4.2 Mounting
The mounting bracket and Chem Pad™ wipe can be found in the box. To mount the eye tracker
follow the steps below:
1. Find the center of the lower screen edge by marking manually or by using the center
marker in the Smart Eye Setup Tool.
2. Clean the mounting area around the center with the Chem Pad™ wipe.
3. Remove the adhesive tape cover from the bracket.
4. Align the center of the bracket with the center of the lower screen edge. Make sure the
bracket is straight. Press and hold for 30 seconds.
5. Attach the eye tracker to the bracket and connect the eye tracker to the computer using
the supplied cable. If the cable is of type USB-A, make sure to connect it to a USB 3.0
port on the computer.
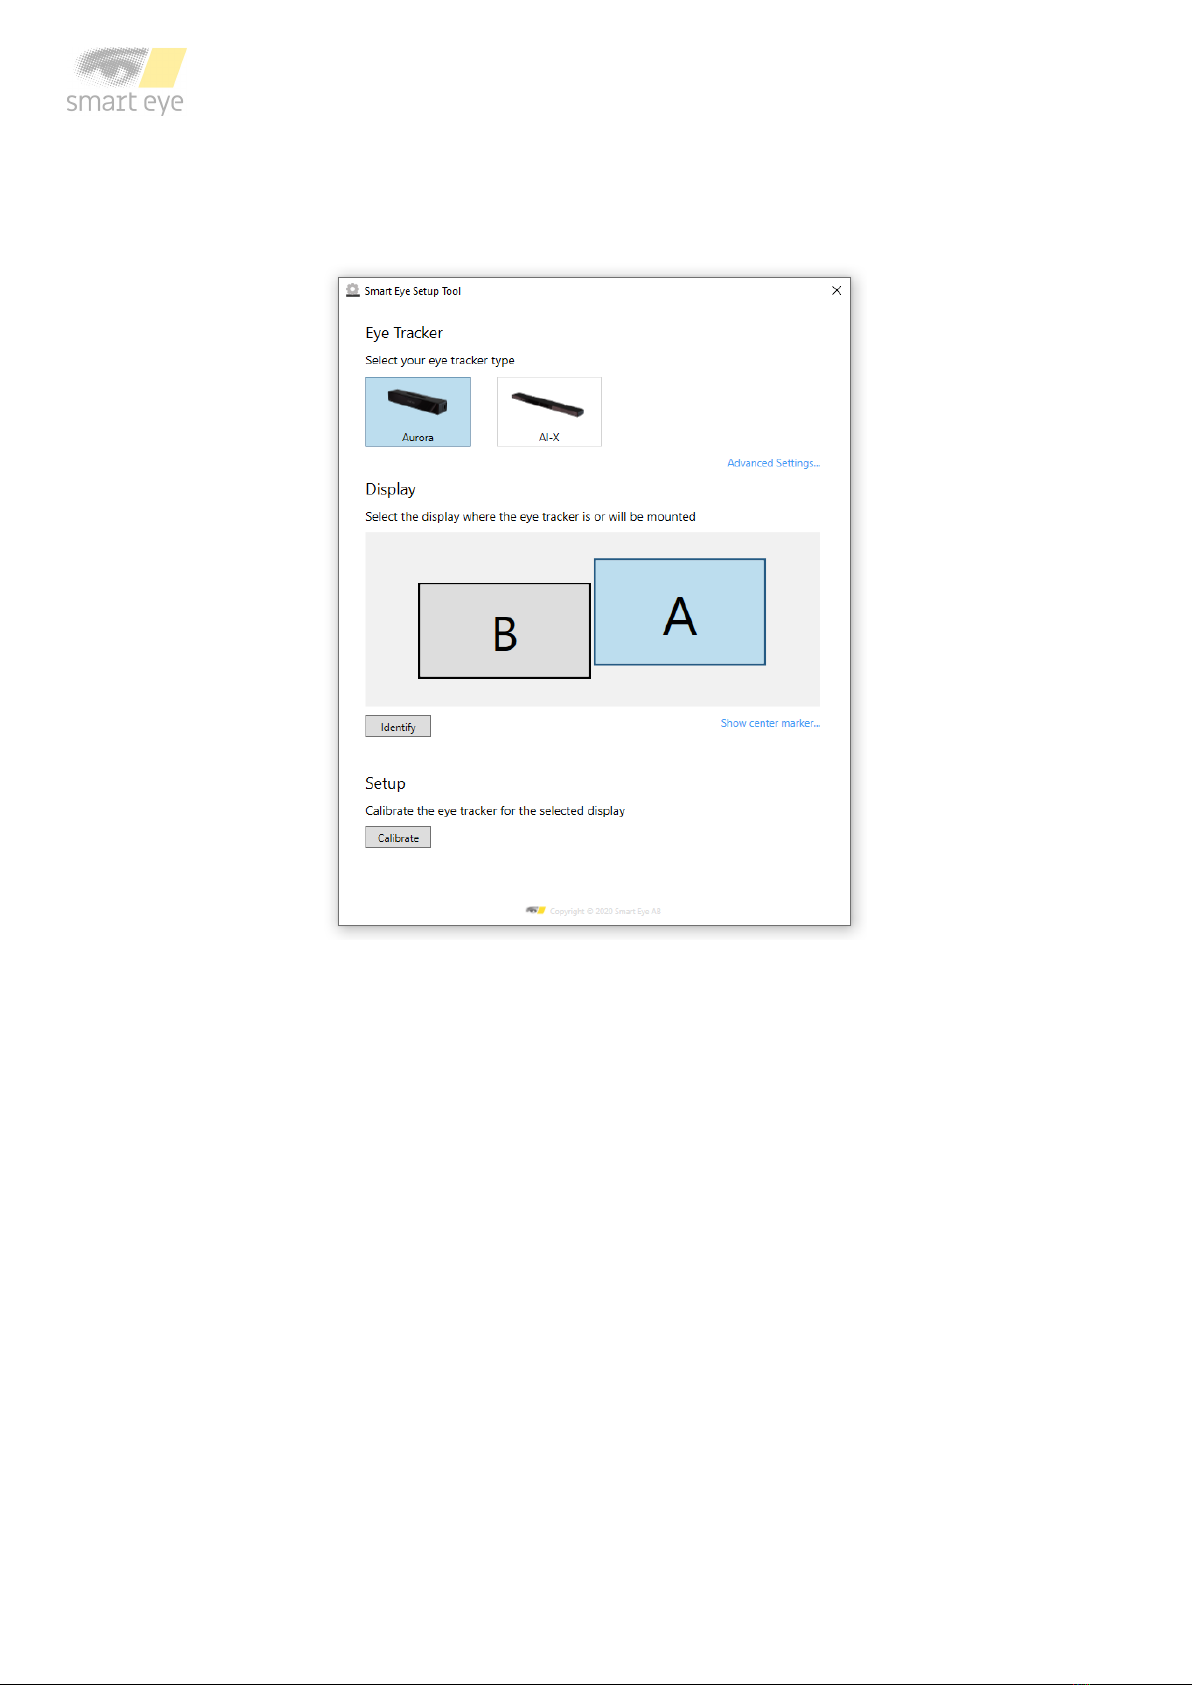
4.3 Eye tracker calibration
1. Run the Smart Eye Setup Tool. The Smart Eye Setup Tool is found in the Windows Start
Menu.
Smart Eye Setup Tool
2. Select your eye tracker.
3. Specify on which screen your eye tracker is mounted (if you have a single screen setup,
this step is not necessary). Click the Identify button if you are not sure which screen
your eye tracker is mounted to. To be able to identify your screen a unique letter will be
displayed on each screen connected to your computer.
4. Click the Calibrate button. The calibration window will be opened in full screen mode on
the screen that your eye tracker is mounted to.
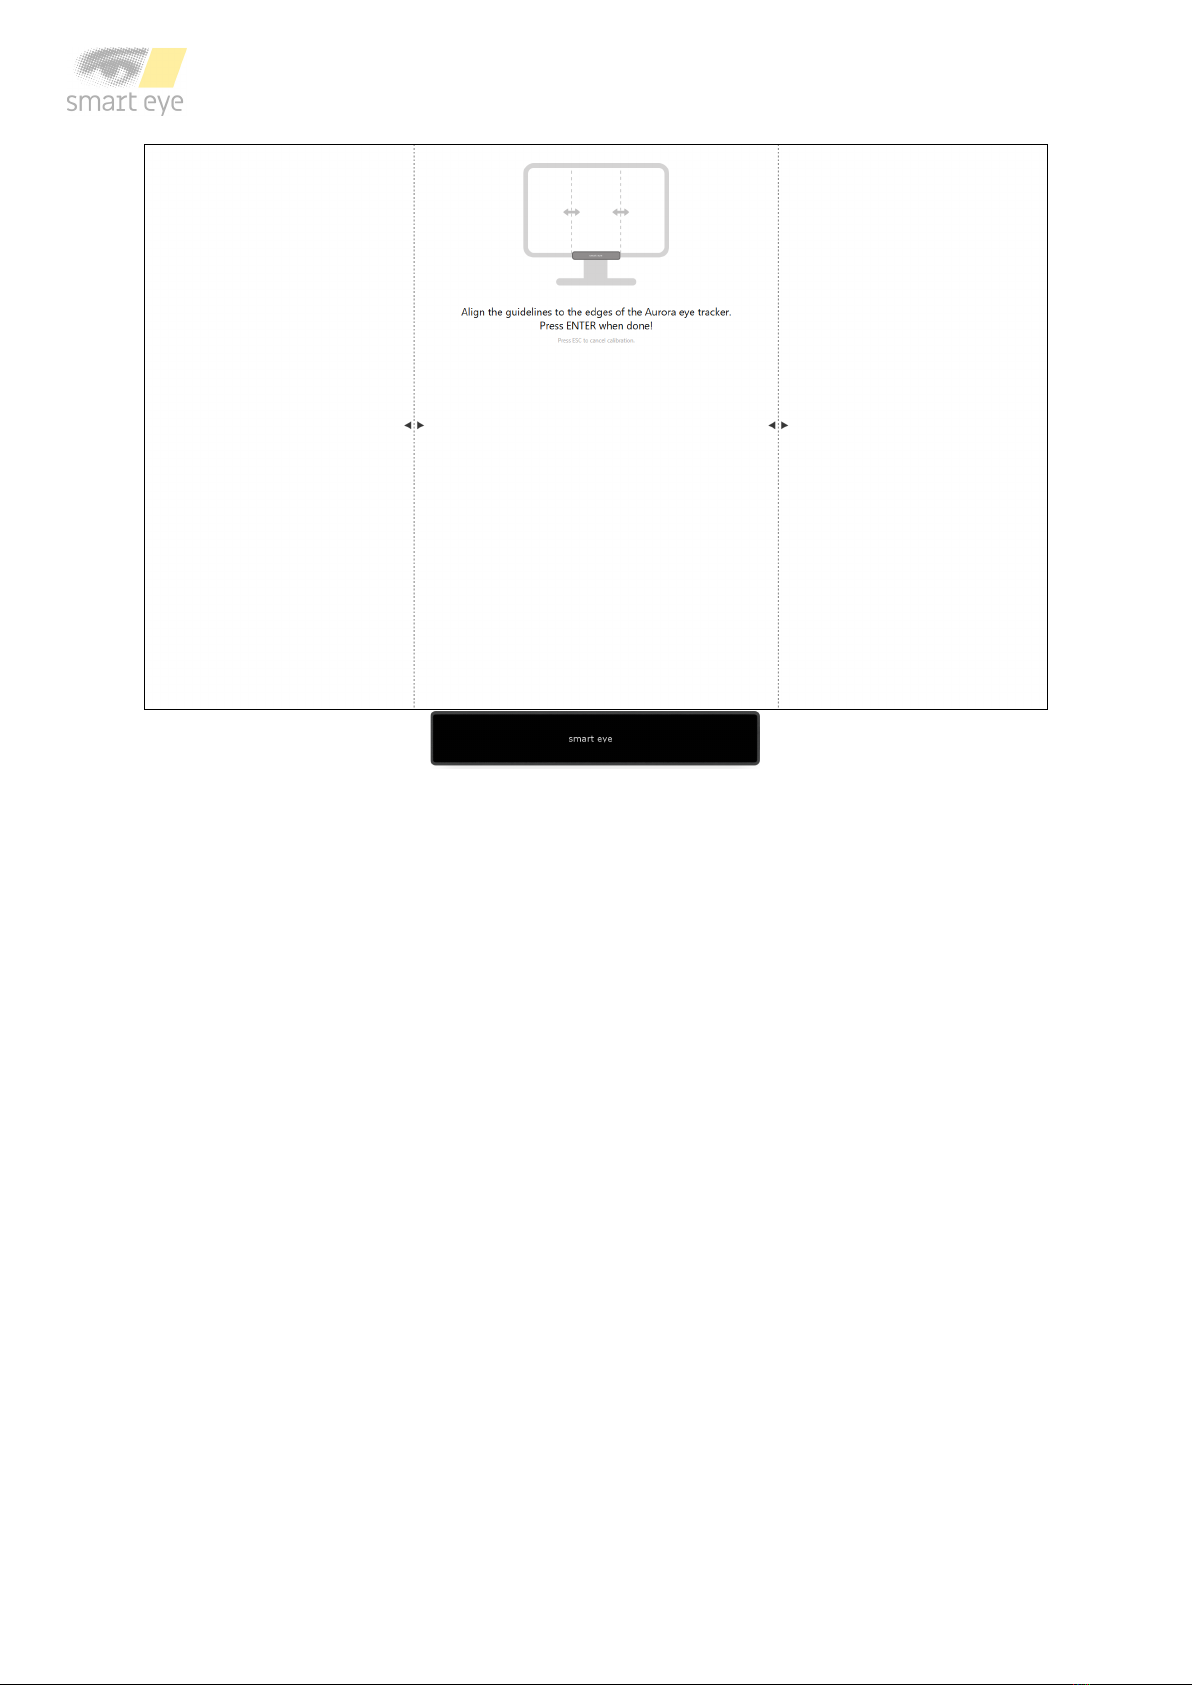
Calibration window
5. Calibrate your eye tracker by aligning the dashed lines to the edges of the eye tracker.
Confirm the calibration by pressing Enter. Once confirmed, the calibration is saved, and
the Smart Setup Tool can be closed.

5 Software Update
5.1 Upgrade firmware
The firmware of the Aurora eye tracker may at times require upgrading to improve performance
and stability of the Aurora eye tracker. Aurora firmware images are provided as .auimg files,
and are written to the eye tracker using the Smart Eye Setup Tool. To perform a firmware
upgrade, follow the steps below.
1. Open the Smart Eye Setup Tool (found in the Windows start menu).
2. Select Aurora as eye tracker and open the Advanced Settings...
3. Connect the Aurora eye tracker to a USB port on the computer (if not already done so),
if the supplied cable is of type USB-A make sure to connect it to a USB 3.0 port. Verify
that eye tracker information is updated with values from the eye tracker.
Advanced Settings: eye tracker information is displayed for the connected eye tracker. The displayed values will likely
differ from the ones shown here.
4. Select the firmware file (.auimg) containing the new firmware and press the Upgrade
button.
5. Wait for the firmware upgrade to complete. Note that this may take several minutes.

Warning! DO NOT unplug the Aurora eye tracker during the firmware upgrade! Doing
so may render the eye tracker unusable.

6 Support
In this section you will find information about troubleshooting and support.
6.1 Troubleshooting
This section presents solutions to problems that you may encounter when using the eye tracker.
If your problems persist or if you don’t find any solution here, please contact support.
I can’t install Smart Eye Tracker.
Make sure you have admin rights on the computer where you attempt to install Smart Eye
Tracker.
The laptop goes to sleep when I connect the eye tracker to the bracket.
The eye tracker contains a magnet to make sure it attaches to the magnetic holder. Some
laptop models also have a magnet in the lid to make sure the computer sleeps when the lid is
closed. Change the setting so the computer stays awake even when lid is closed. This setting
is found in the Power Options menu in the Control Panel.
There seems to be problem with the connection to the eye tracker.
Try unplugging the eye tracker and plugging it in again.
The framerate is low or fluctuates.
Make sure that the computer is connected to a power source and that a high performance
Windows power plan is used. The power plan can be set in the Power Options menu in the
Control Panel. Create a new power plan and make sure the high performance option is chosen.
6.2 Customer support
If you need any help or support with your eye tracker, please contact your sales representative
or retailer.

Appendix A Safety and Compliance
A.1 Compliance
The statements in this section apply to the Aurora eye tracking device.
Safety standards: IEC 62368
IEC 62471
Declaration of conformity: EU Directive 2014/30/EU (EMC)
EU Directive 2011/65/EU (RoHS)
A.2 Operating Temperature
The Aurora eye tracker has been tested at normal operating conditions during a 24 hours
period with an ambient temperature of 25 degrees. After approximately one hour of use the
device reaches a stable temperature which is maintained until the tracker is turned off. The
maximum temperature on the outside of the device was T degrees during the test. The Aurora
eye tracker is designed with a good margin to operate at a temperature of T degrees and
neither the function nor the lifespan of the product is adversely affected. The temperature T
degrees is not harmful to the user, although the device may be experienced as unexpectedly
warm to the touch.
Eye tracker sampling rate T (maximum temperature)
60 Hz 40 degrees
120 Hz 43 degrees

Appendix B Technical Specifications
Sampling Rate 60 and 120 Hz
Headbox (Freedom of head movement) 50 x 40 cm at 65 cm distance
Operating Distance 50 - 80 cm
Accuracy 0.3 degrees (typ.)
Precision 0.1 degrees (typ.)
Output Data Gaze origin, gaze point, pupil diameter, eyelid
opening, head position and rotation, real-time
time stamp
All outputs as binocular data with associated
quality index
Time Stamp Precision 1 ms
Blink Recovery Time 1 frame (immediate)
Gaze Recovery Time 1 frame (immediate)
Latency 25 ms (60 Hz), 17 ms (120 Hz)
Eye Tracking Principle Dark pupil and corneal reflection
Maximum Screen Size 24” (16:9 aspect ratio)
Operating Environment Indoor (all illumination conditions)
Size 146 x 24 x 27 mm (width x height x depth)
Weight 162 g
Cable Length 2 m (*for 60 Hz up to 8 m with additional hard-
ware)
Camera Interface USB 3.0 (for 60 Hz), USB-C (for 120 Hz)
Mount Type On screen (with mounting plate)
Operating System Windows 10
Accessories External Processing Unit
Other manuals for Aurora
1
Table of contents
Other Smart Eye GPS manuals


