SmartCow Soter User manual

Soter User's Manual
Version 1, March 2023

Copyright and legal statement
©2023 SmartCow AI Technologies Ltd. All rights reserved.
No part of this document may be reproduced, translated, modified, published, distributed, transmitted, or displayed
in any form or by any means, without the prior written permission from SmartCow AI Technologies Ltd. SmartCow® is
a registered trademark of SmartCow AI Technologies Ltd. Otherwise, you will be responsible for any infringement of
copyright law.
All other product names, brands, or logos used herein are the trademarks or registered trademarks of their respective
owners. All such material is used with the permission of the owners. The content of this document is furnished
confidential, privileged and for informational and instructional use only. It is subject to change without notice, and
should not be construed as a commitment by SmartCow. SmartCow acts in good faith and attempts to ensure that
content is accurate, complete or reliable, but it does not represent it to be error-free. SmartCow, its subsidiaries, the
directors, employees, and agents assume no responsibility or liability for any inaccuracies, omissions, or errors that may
appear in the content of this document.
Disclaimer
The information in this document is subject to change without prior notice and does not represent commitment.
The information in this document is subject to change without prior notice and does not represent commitment
from SmartCow AI Technologies Ltd. However, users may update their knowledge of any product in use by constantly
checking its manual posted on our website: http://www.smartcow.ai. SmartCow shall not be liable for direct, indirect,
special, incidental, or consequential damages arising out of the use of any product, nor for any infringements upon
the rights of third parties, which may result from such use. Any implied warranties of merchantability or fitness for any
particular purpose is also disclaimed.
Copyright and legal statement ii

Acknowledgements
All other products’ names or trademarks are properties of their respective owners.
• NVIDIA®, the NVIDIA logo, Jetson™, Jetson Orin™, and JetPack™ are trademarks of the NVIDIA Corporation.
• Arm® and Arm®v8-M architecture are registered trademarks of Arm Limited.
• Linux® is the registered trademark of Linus Torvalds in the U.S. and other countries.
• Ubuntu is a registered trademark of Canonical.
All other product names or trademarks are properties of their respective owners. No ownership is implied or assumed
for products, names or trademarks not herein listed by the publisher of this document.
Acknowledgements iii

Declaration of conformity
FCC
This equipment has been tested and verified to comply with the limits for a Class A digital device, pursuant to Part
15 of FCC Rules. These limits are designed to provide reasonable protection against harmful interference when the
equipment is operated in a commercial environment. This equipment generates, uses, and can radiate radio frequency
energy and, if not installed and used in accordance with the instructions, may cause harmful interference to radio
communications. Operation of this equipment in a residential area (domestic environment) is likely to cause harmful
interference, in which case the user will be required to correct the interference (take adequate measures) at their own
expense.
CE
The product described in this manual complies with all applicable European Union (CE) directives if it has a CE marking.
For computer systems to remain CE compliant, only CE-compliant parts may be used. Maintaining CE compliance also
requires proper cable and cabling techniques.
Declaration of conformity iv

Safety precautions
Please read the following safety instructions carefully. It is advised that you keep this manual for future references.
• All cautions and warnings on the device should be noted.
• All cables and adapters supplied by SmartCow are certified and in accordance with the material safety laws and
regulations of the country of sale. Do not use any cables or adapters not supplied by SmartCow to prevent system
malfunction or fires.
• Make sure the power source matches the power rating of the device.
• Position the power cord so that people cannot step on it. Do not place anything over the power cord.
• Always completely disconnect the power before working on the system’s hardware.
• No connections should be made when the system is powered as a sudden rush of power may damage sensitive
electronic components.
• If the device is not to be used for a long time, disconnect it from the power supply to avoid damage by transient
over-voltage.
• Always disconnect this device from any AC supply before cleaning.
• While cleaning, use a damp cloth instead of liquid or spray detergents.
• Make sure the device is installed near a power outlet and is easily accessible.
• Keep this device away from humidity.
• Place the device on a solid surface during installation to prevent falls.
• Do not cover the openings on the device to ensure optimal heat dissipation.
• Watch out for high temperatures when the system is running.
• Do not touch the heat sink or heat spreader when the system is running.
• Never pour any liquid into the openings. This could cause fire or electric shock.
• As most electronic components are sensitive to static electrical charge, be sure to ground yourself to prevent static
charge when installing the internal components. Use a grounding wrist strap and contain all electronic components
in any static-shielded containers.
• If any of the following situations arises, please contact our service personnel:
• Damaged power cord or plug
• Liquid intrusion to the device
• Exposure to moisture
• Device is not working as expected or in a manner as described in this manual
• The device is dropped or damaged
• Any obvious signs of damage displayed on the device
• Do not leave this device in an uncontrolled environment with temperatures beyond the device’s permitted
environment with temperatures (see specification) to prevent damage.
Safety precautions v

Warranty and RMA
Warranty Period
SmartCow warrants that products will be free from defects in material and workmanship for 2 years (24 months),
beginning on the date of invoice by SmartCow. SmartCow will provide free of charge warranty coverage to all the
products manufactured and sold in case the purchased product is proven defective in material or workmanship under
normal use during the warranty period.
Return Merchandise Authorization (RMA)
• Customers can claim RMA service by requesting “SmartCow RMA Service Form” from the account manager. After
filling out the form, the account manager will reply with a corresponding RMA number.
• Customers must collect all the information about the problems encountered and note anything abnormal or,
print out any on-screen messages, and describe the problems on the “SmartCow RMA Service Form” for the RMA
number application process.
• Customers shall return the RMA to SmartCow within 7 working days after the RMA number was generated and
enclose the “SmartCow RMA Service Form” with the returned packages.
• SmartCow has the right to refuse providing repair services for products no longer in warranty. If SmartCow chooses
to provide repair services, the customer will be charged for the repair fees and component fees. Additionally, the
needed repairing time depends on component acquisition.
• Any products returned by SmartCow to other locations besides the customers’ site will bear an extra charge and will
be billed to the customer.
Warranty and RMA vi

RoHS compliance
SmartCow RoHS environmental policy
SmartCow is a global citizen for building digital infrastructure. We are committed to providing green products and
services, which are compliant with European Union RoHS (Restriction on Use of Hazardous Substance in Electronic
Equipment) directive 2011/65/EU and 2015/863, to be your trusted green partner and to protect our environment.
RoHS restricts the use of Lead (Pb) < 0.1% or 1,000ppm, Mercury (Hg) < 0.1% or 1,000ppm, Cadmium (Cd) < 0.01% or
100 ppm, Hexavalent Chromium (Cr6+) < 0.1% or 1,000ppm, Polybrominated biphenyls (PBB) < 0.1% or 1,000ppm, and
Polybrominated diphenyl Ethers (PBDE) < 0.1% or 1,000ppm.
In order to meet the RoHS compliant directives, SmartCow has established an engineering and manufacturing task force
to implement the introduction of green products. The task force will ensure that we follow the standard SmartCow
development procedure and that all the new RoHS components and new manufacturing processes maintain the highest
industry quality levels for which SmartCow is renowned.
The model selection criteria will be based on market demand. Vendors and suppliers will ensure that all designed
components will be RoHS compliant.
RoHS compliance vii

Contents
Copyright and legal statement.............................................................................................................ii
Acknowledgements..............................................................................................................................iii
Declaration of conformity................................................................................................................... iv
Safety precautions................................................................................................................................ v
Warranty and RMA..............................................................................................................................vi
RoHS compliance................................................................................................................................ vii
Chapter 1: Introduction........................................................................................................................ 9
1.1 Dimensions......................................................................................................................................................... 9
1.2 Packing list..........................................................................................................................................................9
1.3 Optional accessories.......................................................................................................................................... 9
1.4 Front panel....................................................................................................................................................... 10
1.5 Rear panel........................................................................................................................................................ 11
1.6 Carrier board....................................................................................................................................................12
1.6.1 Main board........................................................................................................................................12
1.6.2 I/O board...........................................................................................................................................13
Chapter 2: Connection and installation..............................................................................................15
2.1 Mounting.......................................................................................................................................................... 15
2.2 Installing an OS image on Soter...................................................................................................................... 15
2.3 Booting from an external SSD......................................................................................................................... 18
Chapter 3: Specification......................................................................................................................20
viii

Introduction 1
Topics:
•Dimensions
•Packing list
•Optional accessories
•Front panel
•Rear panel
•Carrier board
Soter is a fanless AI edge network video recorder.
Soter is powered by the NVIDIA® Jetson Xavier™ NX module. It features eight PoE ports for Ethernet cameras. Soter is ideal
for machine vision applications.
SmartCow supplies the hardware as well as integration with the AINVR software.
1.1 Dimensions
The following figure shows Soter's dimensions from the front, back, top, and sides.
1.2 Packing list
Soter has two main items in its packing list.
Item Description Quantity
HAEG-SS1 AI NVR system with NVIDIA Jetson module 1
Power adapter DC 19V/4.73A, Terminal block 1
1.3 Optional accessories
Soter has several optional accessories.
Introduction 9

Part number Description
1Y0701830000HY US power cord
1Y0701830100HY EU power cord
51-U0000000004 Quectel EP06 Series (LTE Cat.6)
LTE antenna and coaxial cable
2.5-inch SATA SSD
51-U0000000005 Wi-Fi module
Wi-Fi antenna and coaxial cable
1.4 Front panel
The following figure shows the key components of Soter's front panel.
Number Name Description
1 SSD key lock Lock and unlock the SSD tray.
2 SD card slot SD card slot.
3 SIM card slot SIM card slot.
4 PoE ports PoE ports (10/100 MbE, total 75W) for connecting to the IP cameras or other PoE
devices.
5 IR This function is currently reserved.
6 LED indicator HDD: HDD LED indicator.
Fail: System fail LED indicator.
7 LAN/WAN One 10/100/1000 Base-Tx Ethernet ports for connecting to the network.
Introduction 10

Number Name Description
8 USB2.0 USB2.0 port.
9 Power
indicator
Power LED indicator.
1.5 Rear panel
The following figure shows the key components of Soter's rear panel.
Number Name Description
1 Audio input Connects to audio input devices, such as microphones. Note that the microphones
with a (built-in) amplifier and external power supply are required.
2 Antenna Connects the antenna to the AI mobile NVR for 3G/4G/Wi-Fi/GPS functions.
3 VGA Port This port is currently reserved.
4 Audio Output Connects to an audio output device, such as speakers. Note that the speakers with
a (built-in) amplifier and external power supply are required.
5 USB3.0 USB3.0 port.
6 HDMI Port HDMI display output.
7 RS-232 Port COM port for RS-232.
8 RS-485 Port COM port for RS-485.
Introduction 11
Number Name Description
9 Alarm IO Provides 4 digital inputs and 4 digital outputs
• Digital Input
• Input Voltage (Dry contact)
• Logic 0: Close to GND
• Logic 1: Di input 5~32V
• Digital Output
• Supply Voltage: 5V output (Wet contact)
• Sink Current: 200mA Max. per channel
10 DC power
input
Connects to the power source.
1.6 Carrier board
The following table shows the dimensions of Soter's main board, power board, and I/O board.
Dimensions (W x D x H)
Main board: 170 × 179.3 × 35mm / 6.7" × 7.1" × 1.38"
Power board: 30.1 × 98 × 25mm / 1.19" × 3.85" × 0.98"
I/O board: 45 × 98.3 × 18mm / 1.77" × 3.87" × 0.71"
1.6.1 Main board
The following figures show Soter's main board from the top view and side view.
Introduction 12

1.6.2 I/O board
The following figures display Soter's I/O board.
Introduction 13
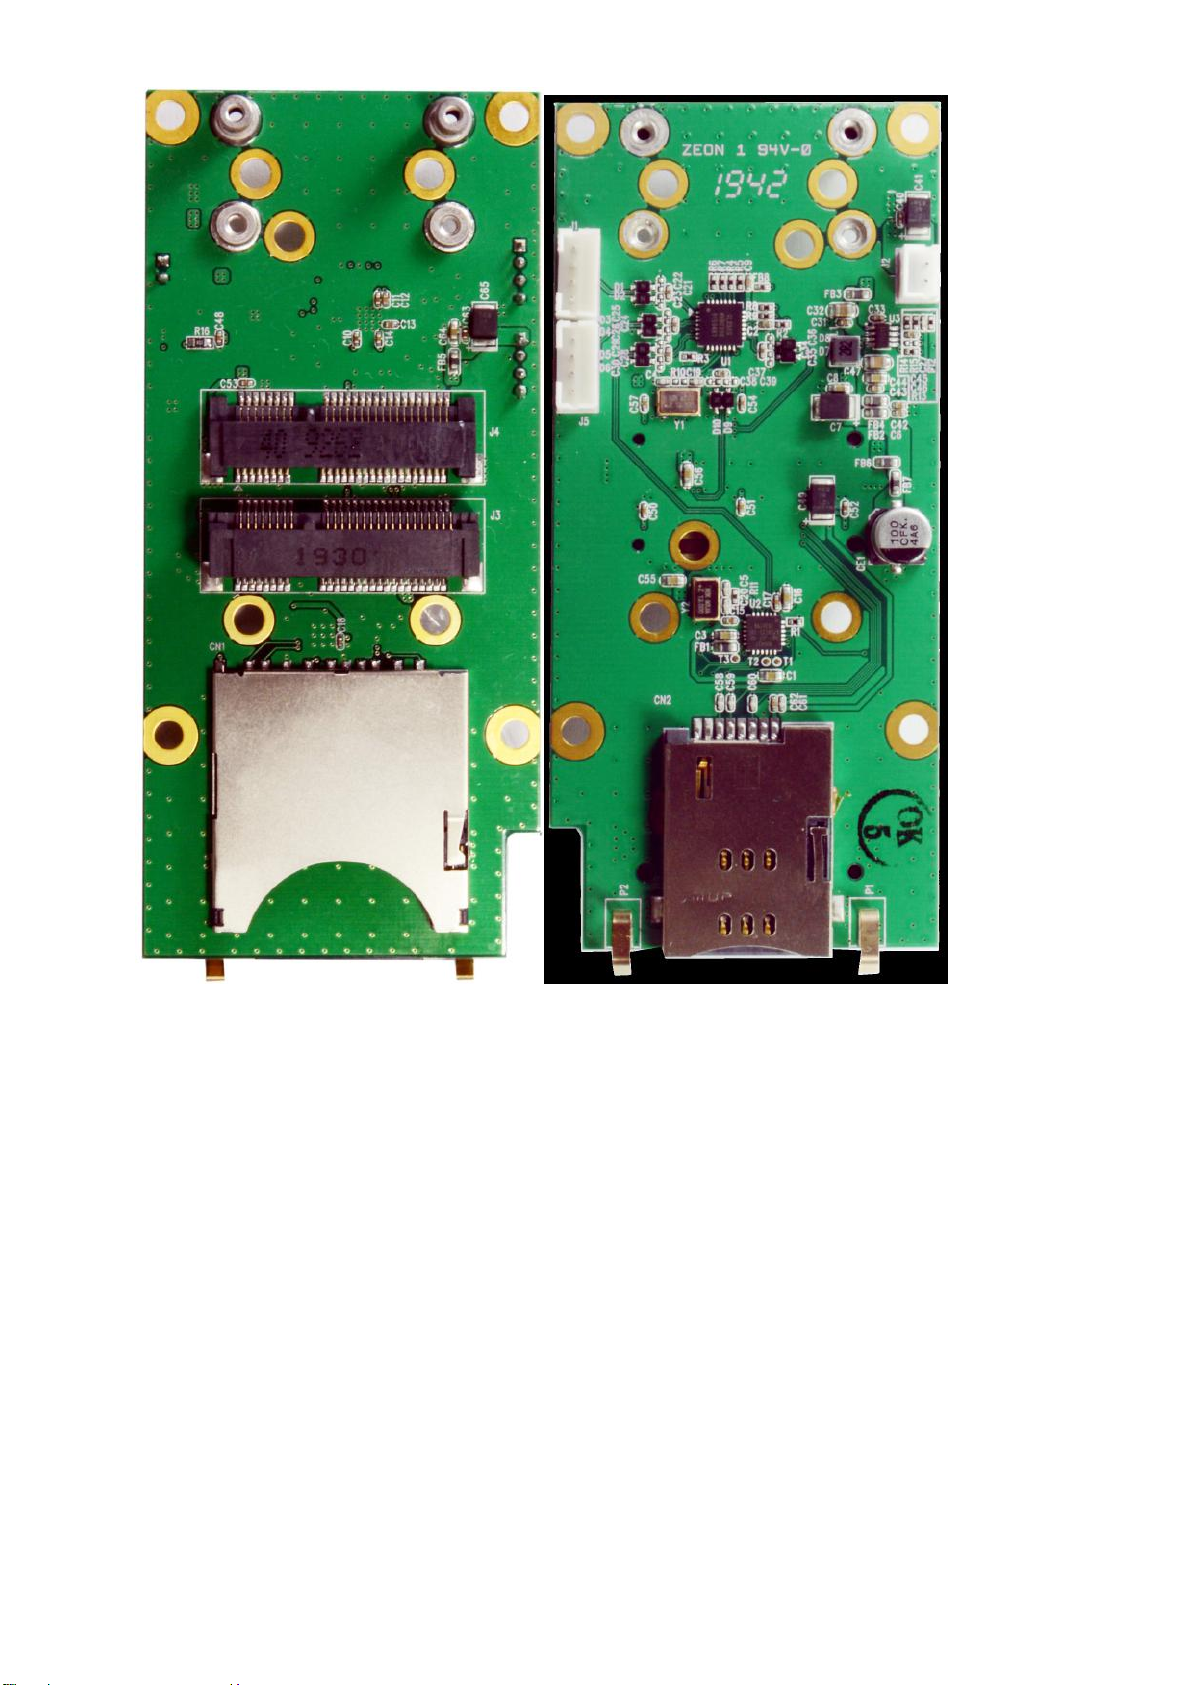
Introduction 14

Connection and installation 2
Topics:
•Mounting
•Installing an OS image on Soter
•Booting from an external SSD
This section describes how to set up Soter and what you need for a successful installation.
2.1 Mounting
The following figure demonstrates how to mount an AI mobile NVR onto Soter.
The mounting bracket is already installed. To mount the AI mobile NVR, use the supplied four black screws and eight
spacers (place two spacers on each screw hole).
2.2 Installing an OS image on Soter
About this task
To install an OS image on Soter, you need an Ubuntu computer.
Procedure
1. Prepare an Ubuntu machine to boot up the OS Image.
2. Download the OS Image from the link provided by SmartCow.
3. Place the tar.bz2 file (in the tar.bz2 format) into the home folder of the Ubuntu computer.
4. Set up Ubuntu on the device.
a) Open the top cover to find the Micro USB socket and jumper.
To open the top cover, remove all the screws on the device, as shown in the following figures.
Screws on Soter's front.
Connection and installation 15

Screws on Soter's back.
Screws on Soter's sides.
This is what the device looks like with its top removed.
Connection and installation 16

b) Find the jumper to plug in the J12 header (2) and short the jumper.
Boot the device into recovery mode after shorting the jumper.
Figure 1: J12 header and Micro USB socket.
• 1: Micro USB socket
• 2: J12 header
c) Find a Micro USB to USB-A cable to connect to the Micro USB socket (1).
d) Connect the USB-A to the Ubuntu computer.
e) Turn on the device.
5. On the Ubuntu computer, search for the Terminal application to run the following commands.
a) Extract the tra.bz2 file.
tar –xjvf <file_name>.tar.bz2
Where, <file_name> is the file name of the Terminal application.
b) Change the directory to the unzipped folder and use the following command to start image flashing.
cd <file_name>
sudo ./nvmflash.sh
You can see the progress and know when it is done.
6. Turn off the device.
7. Unplug the micro USB cable, and remove the jumper on J12.
Connection and installation 17

8. Connect the keyboard, mouse, and monitor.
9. Connect Soter to power, then turn Soter on.
10. Follow the installation guide and set up your own credentials.
11. After you see the Installation Complete pop up window, click on the Restart Now button to restart the device.
12. Log in to the Ubuntu computer with your account and password.
13. Run the following commands to update and upgrade the OS.
sudo apt-get update
sudo apt-get upgrade
2.3 Booting from an external SSD
About this task
There are seven main steps for booting Soter from an external SSD.
Procedure
1. Boot the device from eMMC and format the external SSD to Ext4 using the Disks Utility application.
2. Switch the rootfs to the SSD by running the rootOnNVMe script on the device’s eMMC.
git clone https://github.com/jetsonhacks/rootOnNVMe.git cd rootOnNVMe/
For more information, refer to the README.md file from the .git link.
3. Ensure that the mount device is the same as your SSD.
Connection and installation 18

4. Edit the root path in the config file located in /boot/extlinux/extlinux.conf for the changes to take effect.
5. Copy the rootfs of the eMMC to the SSD.
sudo ./copy-rootfs-ssd.sh
6. Restart the device for the changes to take effect.
7. Install NVIDIA CUDA Toolkit (v10.2).
https://developer.nvidia.com/cuda-10.2-download-archive
8. Install DeepStream SDK (v6.0).
https://docs.nvidia.com/metropolis/deepstream/dev-guide/text/DS_Quickstart.html
9. NVIDIA CUDA Toolkit and DeepStream SDK are compatible with the BSP version.
Connection and installation 19

Specification 3
These are the key specifications of Soter.
CPU 6-core NVIDIA Carmel
ARM®v8.2 64-bit CPU 6MB
L2 + 4MB L3 processor
GPU NVIDIA VoltaTM architecture
with 384 NVIDIA CUDA®
cores and 48 Tensor cores
Memory 16GB 128-bit LPDDR4x @
59.7GB/s
Xavier NX 16GB
Storage 16GB eMMC 5.1
CPU 6-core NVIDIA Carmel
ARM®v8.2 64-bit CPU 6MB
L2 + 4MB L3 processor
GPU NVIDIA VoltaTMarchitecture
with 384 NVIDIA CUDA®
cores and 48 Tensor cores
Memory 8GB 128-bit LPDDR4x @
59.7GB/s
NVIDIA Jetson Xavier NX
Xavier NX 8GB
Storage 16GB eMMC 5.1
BSP Jetpack 4.6
Power input DC 9-36V (with ignition pin)
General
Certification CE, FCC
Front I/O 1 x IR receiver
1 x USB 2.0
1 x GbE port
8 x PoE port
1 x Micro USB2.0 (Internal OTG)
1 x 2.5“ SSD bay
1 x SIM card slot
3 x LED indicator (HDD, Fail, Power)
Physical I/O
Rear I/O 1 x Audio input
1 x Audio output
1 x USB 3.0
1 x RS232
1 x RS485
1 x HDMI
4 x Alarm I/O (4-input, 4-output)
1 x Power input
5 x Antenna port
Specification 20
Table of contents


