SmartLine SL800 User manual

www.weathermatic.com
ADSL800_revB
1
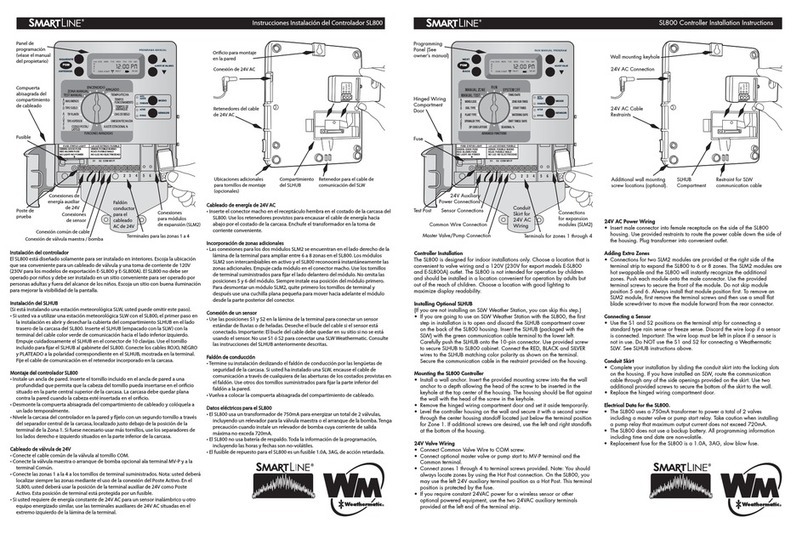
24V Valve Wiring
1. Connect Common Valve Wire to COM screw.
2. Connect optional master valve or pump start to MV-P terminal and the
Common terminal.
3. Connect zones 1 through 4 to terminal screws provided. Note: You
should always locate zones by using the Hot Post connection. On the
SL800, you may use the left 24V auxiliary terminal position as a Hot
Post. This terminal position is protected by the fuse.
4. If you require constant 24VAC power for a wireless sensor or other
optional powered equipment, use the two 24VAC auxiliary terminals
provided at the left end of the terminal strip.
24V AC Power Wiring
Insert male connector into female receptacle on the side of the SL800
housing. Use provided restraints to route the power cable down the side of
the housing. Plug transformer into convenient outlet.
Adding Extra Zones
Connections for two SLM2 modules are provided at the right side of the
terminal strip to expand the SL800 to 6 or 8 zones. The SLM2 modules are
hot swappable and the SL800 will instantly recognize the additional zones.
Push each module onto the male connector. Use the provided terminal
screws to secure the front of the module. Do not skip module position 5
and 6. Always install that module position first. To remove an SLM2 module,
first remove the terminal screws and then use a small flat blade screwdriver
to move the module forward from the rear connector.
Connecting a Sensor
Use the S1 and S2 positions on the terminal strip for connecting a standard
type rain sense or freeze sense. Discard the wire loop if a sensor is
connected. Important: The wire loop must be left in place if a sensor is not
in use. Do NOT use the S1 and S2 for connecting a Weathermatic SLW. See
SLHUB instructions above.
Conduit Skirt
Complete your installation by sliding the conduit skirt into the locking slots
on the housing. If you have installed an SLW, route the communication cable
through any of the side openings provided on the skirt. Use two additional
provided screws to secure the bottom of the skirt to the wall.
Replace the hinged wiring compartment door.
Electrical Data for the SL800.
The SL800 uses a 750mA transformer to power a total of 2 valves including
a master valve or pump start relay. Take caution when installing a pump
relay that maximum output current does not exceed 720mA.
The SL800 does not use a backup battery. All programming information
including time and date are non-volatile.
Replacement fuse for the SL800 is a 1.0A, 3AG, slow blow fuse.
Controller Installation
1. The SL800 is designed for indoor installations only. Choose a location
that is convenient to valve wiring and a 120V (230V for export models
E-SL800 and E-SL800A) outlet. The SL800 is not intended for
operation by children and should be installed in a location convenient
for operation by adults but out of the reach of children. Choose a
location with good lighting to maximize display readability.
Installing Optional SLHUB
(If you are not installing an SLW Weather Station, you can skip this step.)
If you are going to use an SLW Weather Station with the SL800, the first
step in installation is to open and discard the SLHUB compartment cover on
the back of the SL800 housing. Insert the SLHUB (packaged with the SLW)
with the green communication cable terminal to the lower left. Carefully
push the SLHUB onto the 10-pin connector. Use provided screw to secure
SLHUB to SL800 cabinet. Connect the RED, BLACK and SILVER wires to
the SLHUB matching color polarity as shown on the terminal. Secure the
communication cable in the restraint provided on the housing.
Mounting the SL800 Controller
1. Install a wall anchor. Insert the provided mounting screw into the the
wall anchor to a depth allowing the head of the screw to be inserted in
the keyhole at the top center of the housing. The housing should be flat
against the wall with the head of the screw in the keyhole.
2. Remove the hinged wiring compartment door and set it aside
temporarily.
3. Level the controller housing on the wall and secure it with a second
screw through the center housing stando located just below the
terminal position for Zone 1. If additional screws are desired, use the
left and right standos at the bottom of the housing.
Hot Post
Fuse
Hinged
Wiring
Compartment
Door
Programming
Panel (See
o
wner’s manual)
PGMPGM
FUSE STATUS LIGHT
GREEN: GOOD FUSE
RED: BLOWN FUSE
NO LIGHT: NO POWER
VERDE: FUSIBLE BUENO
ROJO: FUSIBLE MALO
NO LUZ: NO ELECTRICIDAD
LA LUZ ESTADO FUSIBLE
S1 S2 COM MV/P
2 3 4 5 6
7
Common Wire Connection
Master Valve/Pump Connection
Sensor Connections
Te rminals for zones 1 through 4
Connections
for expansion
modules (SLM2)
24V Auxiliary
Power Connections
Conduit
Skirt for
24V AC
Wiring
PGM SUN MON TUE WED
FAULT NO AC
ZONE START
A
B
C
D
THU FRI SAT
SL800 Controller
Installation Instructions
RED
BLACK
SILVER
24V AC Connection
Wall mounting keyhole
24V AC Cable
Restraints
SLHUB
Compartment
Additional wall mounting
screw locations (optional).
Restraint for SLW
communication cable

www.weathermatic.com
ADSL800_revB
2
SL800 Controller
Installation Instructions
Help Desk: 888-484-3776
Monday – Friday 8:00 am – 5:00 pm CST
Online: support.weathermatic.com
Email: support@weathermatic.com
SmartLine® Basic Programming
(See reverse side of card for Smart Programming
Instructions).
1Set time of day (AM/PM) and month/day/
year.
2Set daily start times (AM/PM) for
Programs (A, B, C, D) in use. Normally,
one start time is sucient. The start time is for
the Program and not each zone. The Program
will run all zones in consecutive order for each
start.
3Set zone run times (1 min to 9 hours 55
minutes) for Programs (A, B, C, D) in use.
4Set watering days by selecting days of
week or interval (1 to 30 days) or odd or
even days for Programs (A, B, C, D) in use.
5Set omit times, days, and dates to
accommodate watering blackout periods
(optional).
6Set seasonal % by month for Programs A,
B, C, D (optional).
7Return dial to RUN.
SMART
BASIC
MORE
/
LESS
SOIL TYPE
PLANT TYPE
SPRINKLER TYPE
ZIP CODE/LATITUDE
PROGRAM START TIMES
ZONE RUN TIMES
DAYS TO WATER
OMIT TIMES / DAYS
SEASONAL % ADJUST
MANUAL ZONE
MANU
AL TEST
ADVANCED
MENU
RUN
SYSTEM OFF
S
MART
BASI
C
MO
RE
/
L
E
SS
S
O
IL TYPE
PLANT TYPE
S
PRINKLER TYPE
Z
IP
COD
E/
LATIT
U
DE
P
R
OG
RAM START TIME
S
ZO
NE RUN TIME
S
DAYS T
O
WATER
OMIT TIMES
/
DAYS
S
EAS
O
NAL % ADJUS
T
M
ANUAL ZONE
M
AN
U
AL TE
S
T
ADVAN
C
E
D
MENU
RUN
S
YSTEM OFF
CURRENT TIME / DATE
Manual Zone
Turn dial to MANUAL ZONE. Use NEXT button
to select zone to run. Use UP and DOWN arrow
keys to select zone run time (1 min to 9 hours 55
minutes). Return dial to RUN to start.
Manual Test
Turn dial to MANUAL TEST. Use UP and DOWN
arrows to enter run time (10 seconds to 10
minutes) for all zones with assigned run time.
Return dial to RUN to start.
Refer to Owner’s Manual for Advanced Menu dial position.
Use PGM to select program A, B, C, or D.
Use NEXT and BACK buttons to select options and scroll
between zones.
1Installation of optional SLW weather
station and Basic Programming is
required for Smart Programming.
• Verify correct time and date at
Current Time/Date dial position.
• Enter Program Start Times, Zone Run Times, and Days.
See Basic Programming instructions.
2Turn dial to steps noted below. Use NEXT and UP and
DOWN buttons for the following program steps:
3Enter ZIP Code or Latitude.
4Enter Sprinkler Type or Precipitation Rate
for each zone. Set zones to be operated
in Basic to STD setting. Unused zones should
be set to OFF.
5Enter Plant Type for each zone
6Enter Soil Type and Degree of Slope for
each zone.
7Enter More or Less setting (optional). Set
% by zone to accommodate factors like
shade, wind, and sprinkler ineciencies.
8Return dial to RUN.
9Initiate communication with the SLW weather
station. You will need to go to the SLW weather
station and push down on the Rain Sensing tab at
the top for 15 seconds. If communications have
been established, you will see an antenna icon on
the bottom of the display. Flashing antenna icon
indicates communication has occurred in last five
minutes. See Owner’s Manual.
10Use MODE button to enter Smart Watering
Mode. If you have communication with the SLW,
the Smart GREEN LED will light. This confirms that you are
operating in Smart mode.
11Select ON LED for Rain/Freeze sensing position so that
the controller will shut down during rain and freeze
events.
inch
1/2
3/4
1/41/8
PGMPGM
PGM SUN MONT UE WED
FAULTN O AC
ZONE START
A
B
C
D
THUF RI SAT
SMART
BASIC
MORE
/
LESS
SOIL TYPE
PLANT TYPE
SPRINKLER TYPE
ZIP CODE/LATITUDE
ZONE RUN TIMES
DAYS TO WATER
OMIT TIMES / DAYS
SEASONAL % ADJUST
MANUAL ZONE
MANU
AL TEST
ADVANCED
MENU
RUN
SYSTEM OFF
CURRENT TIME / DATE
S
MART
BASI
C
MO
RE
/
L
E
SS
S
O
IL TYPE
PLANT TYPE
S
PRINKLER TYPE
Z
IP
COD
E/
LATIT
U
DE
ZO
NE RUN TIME
S
DAYS T
O
WATER
OMIT TIMES
/
DAYS
S
EAS
O
NAL % ADJUS
T
M
ANUAL ZONE
M
AN
U
AL TE
S
T
ADVAN
C
E
D
MENU
RUN
S
YSTEM OFF
CURRENT TIME
/
DAT
E
PROGRAM START TIMES
SMART
BASIC
MORE
/
LESS
SOIL TYPE
PLANT TYPE
SPRINKLER TYPE
ZIP CODE/LATITUDE
DAYS TO WATER
OMIT TIMES / DAYS
SEASONAL % ADJUST
MANUAL ZONE
MANU
AL TEST
ADVANCED
MENU
RUN
SYSTEM OFF
CURRENT TIME / DATE
PROGRAM START TIMES
S
MART
BASI
C
MO
RE
/
L
E
SS
S
O
IL TYPE
PLANT TYPE
S
PRINKLER TYPE
Z
IP
COD
E/
LATIT
U
DE
DAYS T
O
WATER
OMIT TIMES
/
DAYS
S
EAS
O
NAL % ADJUS
T
M
ANUAL ZONE
M
AN
U
AL TE
S
T
ADVAN
C
E
D
MENU
RUN
S
YSTEM OFF
CURRENT TIME
/
DAT
E
P
R
OG
RAM START TIME
S
ZONE RUN TIMES
SMART
BASIC
MORE
/
LESS
SOIL TYPE
PLANT TYPE
SPRINKLER TYPE
ZIP COD
E/LATITUDE
OMIT TIMES / DAYS
SEASONAL % ADJUST
MANUAL ZONE
MANU
AL TEST
ADVANCED
MENU
RUN
SYSTEM OFF
CURRENT TIME / DATE
PROGRAM START TIMES
ZONE RUN TIMES
S
MART
BASI
C
MO
RE
/
L
E
SS
S
O
IL TYPE
PLANT TYPE
S
PRINKLER TYPE
Z
IP
COD
E/
LATIT
U
DE
OMIT TIMES
/
DAYS
S
EAS
O
NAL % ADJUS
T
M
ANUAL ZONE
M
AN
U
AL TE
S
T
ADVAN
C
E
D
MENU
RUN
S
YSTEM OFF
CURRENT TIME
/
DAT
E
P
R
OG
RAM START TIME
S
ZO
NE RUN TIME
S
DAYS TO WATER
SMART
BASIC
MORE
/
LESS
SOIL TYPE
PLANT TYPE
SPRINKLER TYPE
ZIP COD
E/LATITUDESEASONAL % ADJUST
MANUAL ZONE
MANU
AL TEST
ADVANCED
MENU
RUN
SYSTEM OFF
CURRENT TIME / DATE
PROGRAM START TIMES
ZONE RUN TIMES
DAYS TO WATER
S
MART
BASI
C
MO
RE
/
L
E
SS
S
O
IL TYPE
PLANT TYPE
S
PRINKLER TYPE
Z
IP
COD
E/
LATIT
U
DE
S
EAS
O
NAL % ADJUS
T
M
ANUAL ZONE
M
AN
U
AL TE
S
T
ADVAN
C
E
D
MENU
RUN
S
YSTEM OFF
CURRENT TIME
/
DAT
E
P
R
OG
RAM START TIME
S
ZO
NE RUN TIME
S
DAYS T
O
WATER
OMIT TIMES / DAYS
SMART
BASIC
MORE
/
LESS
SOIL TYPE
PLANT TYPE
SPRINKLER TYPE
ZIP COD
E/LATITUDE
MANUAL ZONE
MANU
AL TEST
ADVANCED
MENU
RUN
SYSTEM OFF
CURRENT TIME / DATE
PROGRAM START TIMES
ZONE RUN TIMES
DAYS TO WATER
OMIT TIMES / DAYS
S
MART
BASI
C
MO
RE
/
L
E
SS
S
O
IL TYPE
PLANT TYPE
S
PRINKLER TYPE
Z
IP
COD
E/
LATIT
U
DE
M
ANUAL ZONE
M
AN
U
AL TE
S
T
ADVAN
C
E
D
MENU
RUN
S
YSTEM OFF
CURRENT TIME
/
DAT
E
P
R
OG
RAM START TIME
S
ZO
NE RUN TIME
S
DAYS T
O
WATER
OMIT TIMES
/
DAYS
SEASONAL % ADJUST
SMART
BASIC
MORE
/
LESS
SOIL TYPE
PLANT TYPE
SPRINKLER TYPE
ZIP CODE/LATITUDE
CURRENT TIME / DATE
PROGRAM START TIMES
ZONE RUN TIMES
DA
YS TO WATER
OMIT TIMES / DAYS
SEASONAL % ADJUST
MANU
AL ZONE
MANU
AL TEST
ADVANCED
MENU
SYSTEM OF
F
S
MART
BASI
C
MO
RE
/
L
E
SS
S
O
IL TYPE
PLANT TYPE
S
PRINKLER TYPE
Z
IP
COD
E/
LATIT
U
DE
CURRENT TIME
/
DAT
E
P
R
OG
RAM START TIME
S
ZO
NE RUN TIME
S
DA
YS T
O
WATER
OMIT TIMES
/
DAYS
S
EAS
O
NAL % ADJUS
T
M
AN
UAL ZONE
M
AN
U
AL TE
S
T
ADVAN
C
E
D
MENU
S
YSTEM OF
F
RUN
SMART
BASIC
MORE
/
LESS
SOIL TYPE
PLANT TYPE
SPRINKLER TYPE
ZIP CODE/LATITUDE
CURRENT TIME / DATE
PROGRAM START TIMES
ZONE RUN TIMES
DA
YS TO WATER
OMIT TIMES / DAYS
SEASONAL % ADJUST
MANU
AL ZONE
MANU
AL TEST
ADVANCED
MENU
SYSTEM OFF
S
MART
BASI
C
MO
RE
/
L
E
SS
S
O
IL TYPE
PLANT TYPE
S
PRINKLER TYPE
Z
IP
COD
E/
LATIT
U
DE
CURRENT TIME
/
DAT
E
P
R
OG
RAM START TIME
S
ZO
NE RUN TIME
S
DA
YS T
O
WATER
OMIT TIMES
/
DAYS
S
EAS
O
NAL % ADJUS
T
M
AN
UAL ZONE
M
AN
U
AL TE
S
T
ADVAN
C
E
D
MENU
S
YSTEM OFF
RUN
SMART
BASIC
MORE
/
LESS
SOIL TYPE
PLANT TYPE
SPRINKLER TYPE
MANUAL ZONE
MANUAL TEST
RUN
SYSTEM OFF
CURRENT TIME / DATE
PROGRAM START TIMES
ZO
NE RUN TIMES
DAYS
TO WATER
OMIT TIMES / DAYS
SEA
SONAL % ADJUST
ADVANCED
MENU
S
MART
BASI
C
MO
RE
/
L
E
SS
S
O
IL TYPE
PLANT TYPE
S
PRINKLER TYPE
M
ANUAL ZONE
M
AN
U
AL TE
S
T
RUN
S
YSTEM OFF
CURRENT TIME
/
DAT
E
P
R
OG
R
AM START TIME
S
ZO
NE RUN TIME
S
DAYS
T
O
WATER
OMIT TIMES
/
DAYS
S
EAS
O
NAL % ADJUS
T
ADVAN
C
E
D
MENU
ZIP CODE/LATITUDE
SMART
BASIC
MORE
/
LESS
SOIL TYPE
PLANT TYPE
MANUAL ZONE
MANUAL TEST
RUN
SYSTEM OFF
CURRENT TIME / DATE
PROGRAM START TIMES
ZO
NE RUN TIMES
DAYS
TO WATER
OMIT TIMES / DAYS
SEA
SONAL % ADJUST
ADVANCED
MENU
ZIP CODE/LATITUDE
S
MART
BASI
C
MO
RE
/
L
E
SS
S
O
IL TYPE
PLANT TYPE
M
ANUAL ZONE
M
AN
U
AL TE
S
T
RUN
S
YSTEM OFF
CURRENT TIME
/
DAT
E
P
R
OG
R
AM START TIME
S
ZO
NE RUN TIME
S
DAYS
T
O
WATER
OMIT TIMES
/
DAYS
S
EAS
O
NAL % ADJUS
T
ADVAN
C
E
D
MENU
Z
IP
COD
E/
LATIT
U
DE
SPRINKLER TYPE
SMART
BASIC
MORE
/
LESS
SOIL TYPE
MANUAL ZONE
MANUAL TEST
RUN
SYSTEM OFF
CURRENT TIME / DATE
PROGRAM START TIMES
ZO
NE RUN TIMES
DA
YS TO WATER
OMIT TIMES / DAYS
SEA
SONAL % ADJUST
ADVANCED
MENU
ZIP CODE/LATITUDE
SPRINKLER TYPE
S
MART
BASI
C
MO
RE
/
L
E
SS
S
O
IL TYPE
M
ANUAL ZONE
M
AN
U
AL TE
S
T
RUN
S
YSTEM OFF
CURRENT TIME
/
DAT
E
P
R
OG
RAM START TIME
S
ZO
NE RUN TIME
S
DA
YS T
O
WATER
OMIT TIMES
/
DAYS
S
EAS
O
NAL % ADJUS
T
ADVAN
C
E
D
MENU
Z
IP
COD
E/
LATIT
U
DE
S
PRINKLER TYPE
PLANT TYPE
SMART
BASIC
MORE
/
LESS
MANUAL ZONE
MANUAL TEST
RUN
SYSTEM OFF
CURRENT TIME / DATE
PROGRAM START TIMES
ZO
NE RUN TIMES
DA
YS TO WATER
OMIT TIMES / DAYS
SEA
SONAL % ADJUST
ADVANCED
MENU
ZIP CODE/LATITUDE
SPRINKLER TYPE
PLANT TYPE
S
MART
BASI
C
MO
RE
/
L
E
SS
M
ANUAL ZONE
M
AN
U
AL TE
S
T
RUN
S
YSTEM OFF
CURRENT TIME
/
DAT
E
P
R
OG
RAM START TIME
S
ZO
NE RUN TIME
S
DA
YS T
O
WATER
OMIT TIMES
/
DAYS
S
EAS
O
NAL % ADJUS
T
ADVAN
C
E
D
MENU
Z
IP
COD
E/
LATIT
U
DE
S
PRINKLER TYPE
PLANT TYPE
SOIL TYPE
SMART
BASIC
MANUAL ZONE
MANUAL TEST
RUN
SYSTEM OFF
CURRENT TIME / DATE
PROGRAM START TIMES
ZO
NE RUN TIMES
DAYS
TO WATER
OMIT TIMES / DAYS
SEA
SONAL % ADJUST
ADVANCED
MENU
ZIP CODE/LATITUDE
SPRINKLER TYPE
PLANT TYPE
SOIL TYPE
S
MART
BASI
C
M
ANUAL ZONE
M
AN
U
AL TE
S
T
RUN
S
YSTEM OFF
CURRENT TIME
/
DAT
E
P
R
OG
R
AM START TIME
S
ZO
NE RUN TIME
S
DAYS
T
O
WATER
OMIT TIMES
/
DAYS
S
EAS
O
NAL % ADJUS
T
ADVAN
C
E
D
MENU
Z
IP
COD
E/
LATIT
U
DE
S
PRINKLER TYPE
PLANT TYPE
S
O
IL TYPE
MORE
/
LESS
SMART
BASIC
RUN
SYSTEM OFF
CURRENT TIME / DATE
PROGRAM START TIMES
ZO
NE RUN TIMES
DA
YS TO WATER
OMIT TIMES / DAYS
SEA
SONAL % ADJUST
ADVANCED
MENU
ZIP CODE/LATITUDE
SPRINKLER TYPE
PLANT TYPE
SOIL TYPE
MORE
/
LESS
MANUAL TEST
S
MART
BASI
C
RUN
S
YSTEM OFF
CURRENT TIME
/
DAT
E
P
R
OG
RAM START TIME
S
ZO
NE RUN TIME
S
DA
YS T
O
WATER
OMIT TIMES
/
DAYS
S
EAS
O
NAL % ADJUS
T
ADVAN
C
E
D
MENU
Z
IP
COD
E/
LATIT
U
DE
S
PRINKLER TYPE
PLANT TYPE
S
O
IL TYPE
MO
RE
/
L
E
SS
M
AN
U
AL TE
S
T
MANUAL ZONE
SMART
BASIC
MANUAL ZONE
RUN
SYSTEM OFF
CURRENT TIME / DATE
PROGRAM START TIMES
ZO
NE RUN TIMES
DA
YS TO WATER
OMIT TIMES / DAYS
SEA
SONAL % ADJUST
ADVANCED
MENU
ZIP CODE/LATITUDE
SPRINKLER TYPE
PLANT TYPE
SOIL TYPE
MORE
/
LESS
S
MART
BASI
C
M
ANUAL ZONE
RUN
S
YSTEM OFF
CURRENT TIME
/
DAT
E
P
R
OG
RAM START TIME
S
ZO
NE RUN TIME
S
DA
YS T
O
WATER
OMIT TIMES
/
DAYS
S
EAS
O
NAL % ADJUS
T
ADVAN
C
E
D
MENU
Z
IP
COD
E/
LATIT
U
DE
S
PRINKLER TYPE
PLANT TYPE
S
O
IL TYPE
MO
RE
/
L
E
SS
MANUAL TEST
Other manuals for SL800
4
Other SmartLine Controllers manuals
