SmartPool Smart Clear EQ-SC-1900 Troubleshooting guide
SMART ™
INSTALLATION INSTRUCTIONS AND OPERATION MANUAL
Model: EQ-SC-1900
TABLE OF CONTENTS
Important Safety Instructions ...........................................................................................................2
How a Sand Filter Works .................................................................................................................2
List of Components and Specifications............................................................................................3
Installation........................................................................................................................................4
Operation .........................................................................................................................................6
Winterization ....................................................................................................................................7
Troubleshooting ...............................................................................................................................7
Warranty...........................................................................................................................................8

2
!
WARNING:
!
WARNING:
!
WARNING:
!
WARNING:
!
WARNING:
!
CAUTION:
!
CAUTION:
!
WARNING:
!
CAUTION:
!
WARNING:
!
WARNING:
!
WARNING:
!
WARNING:
!
CAUTION:
!
CAUTION:
!
WARNING:
Read and follow all instruction in this owner’s manual and on the labels of the equipment. Failure to do so can
cause serious injury or death.
Suction entrapment hazard near or in suction outlets or suction outlet covers that are damaged or missing.
Entrapment can cause serious injury or death.
Ensure all suction outlet points are inspected routinely and remove debris or repair damaged components that
could lead to an increase in entrapment potential.
It is recommended that a vacuum relief or vent system is installed to relieve entrapping suction.
Ensure the suction lines, return lines and valve position are open and clear prior to starting the system. Failure to
do so can result in a dangerous increase in pressure that can lead to violent separation of filter or pump
components.
Check all connections (seal ring, hose clamps, pump fittings, return and suction fittings, etc) for proper installation.
Failure to do so can lead to leaks or separation hazards causing damage to property or severe injury/death.
All electrical wiring must be performed by a professional and must conform to local codes and regulations.
Ensure the system is plugged directly into a GFI protected outlet.
Do not use an extension cord to operate the filter system as this is an electrical shock hazard.
Do not allow children to install or operate the filter system.
Ensure the filter system is unplugged before changing the valve position or performing any maintenance.
Ensure the filter system is positioned as to prevent using the unit to gain access to the pool.
Never change the valve position while the system is running.
Do not submerge the filter or pump in water.
Do not carry or lift the filter by the handle.
Do not attempt to carry the filter while filled with filter media or water.
Do not operate the filter system while in standing water or with wet hands.
Do not use petroleum based lubricants.
Do not operate the filter system if pool water temperatures exceed 95ºF or fall below 39ºF as this may damage
the unit and will void the warranty.
!
CAUTION:
!
CAUTION:
IMPORTANT SAFETY INSTRUCTIONS
The filter uses specific filter sand that acts as the media for trapping dirt particles suspended in pool water. The water is pulled
from the suction outlet of the pool and is pumped into the top of the filter tank. The water is forced down through the filter sand
and back up through the center stand pipe, where it is directed back to the pool through the return line, by the control valve. As the
water passes through the sand bed, it is filtered, leaving dirt particle behind and returning clean water back to the pool. This
process is automatic and is essential in keeping the pool a clean and healthy environment.
The filter will reach a point when it needs to be cleaned. This is determined by an increase in pressure and a decrease in water
flow. When this occurs, the system should be shutdown and the valve turned to the Backwash position. The valve reverses the
flow of the water so that it travels down the center stand pipe, up through the sand and out the Backwash port. Once the water
runs clear, the valve is turned to the Rinse position before it is turned back to the Filter position, to resume pool filtering.
HOW A SAND FILTER WORKS

3
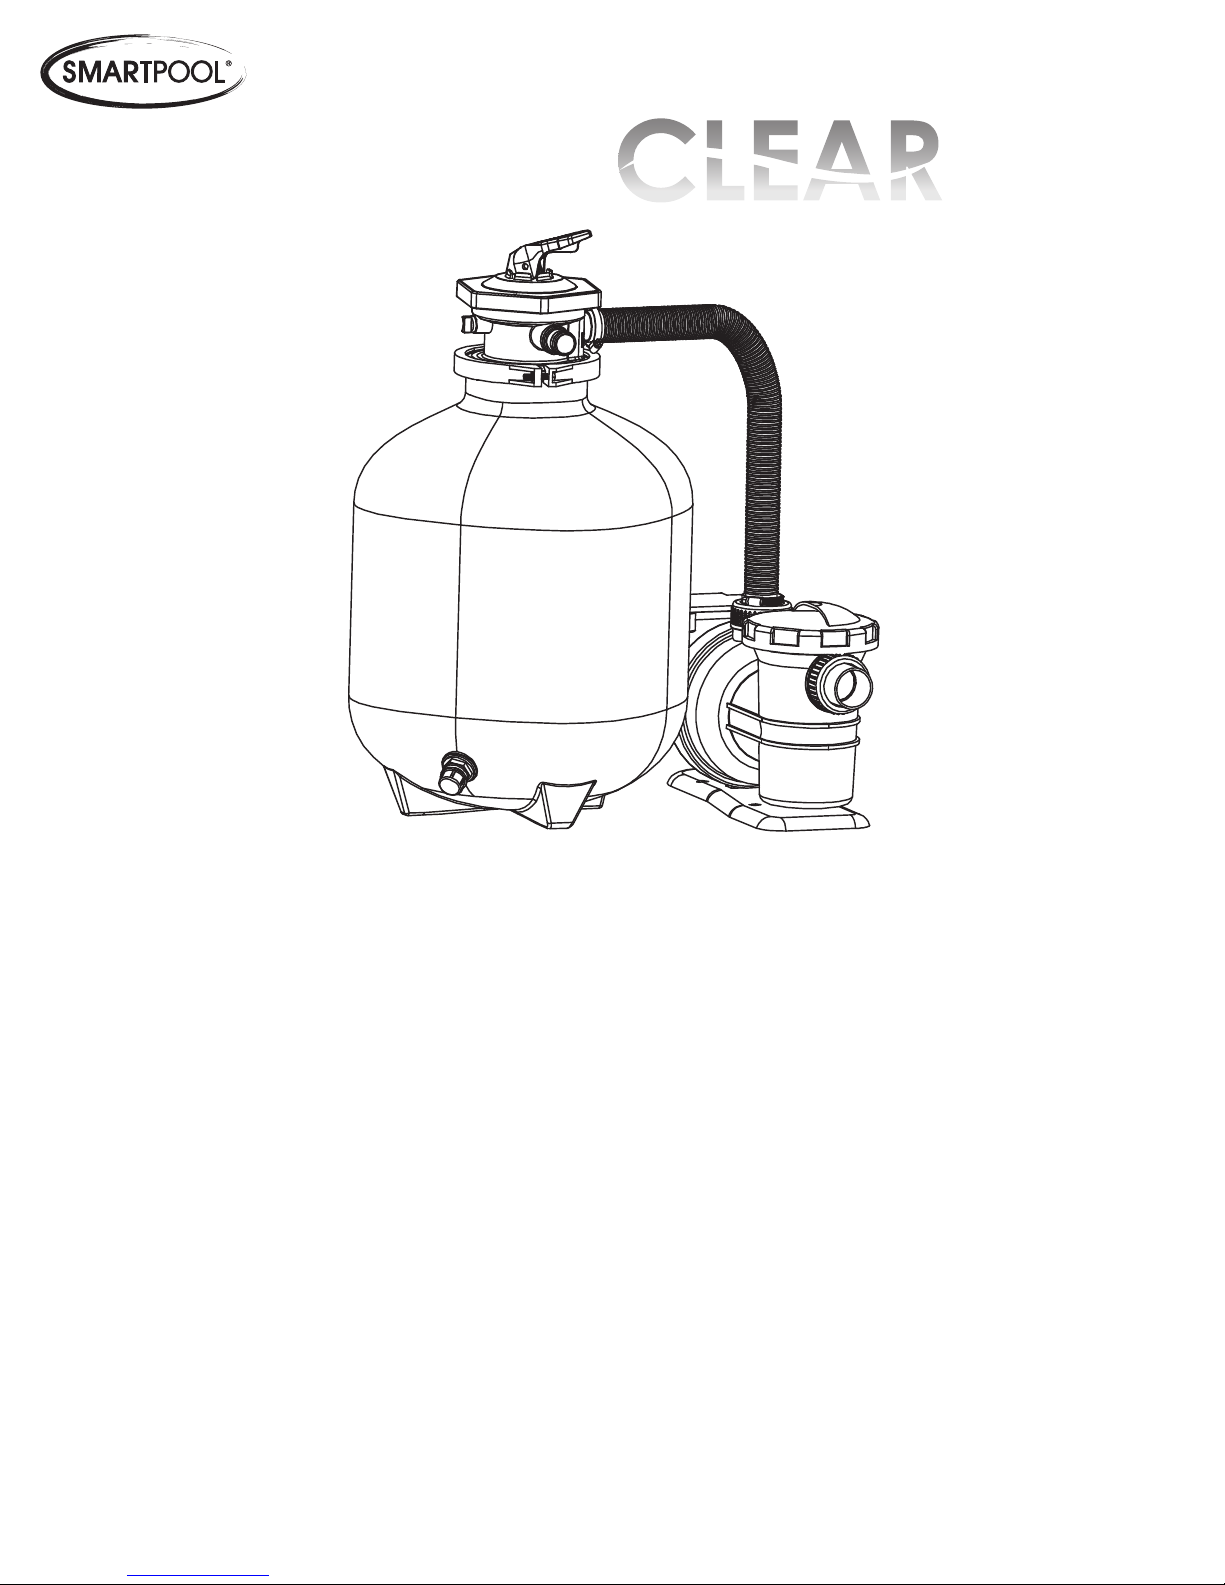
LIST OF COMPONENTS AND SPECIFICATIONS
SPECIFICATIONS
Model Number
Filtration Area Maximum Working
ressure
Media Required
Type Amount
ft2m2SI BAR Filter Sand lbs kg
EQ-SC-1900 1.73 0.16 50 3.4 0.45-0.55mm 150 68
No. Description Qty
1 7 osition Valve 1
2 Valve Cap with O-Ring 1
3 Valve Clamp 1
4 Valve Gasket 1
5 Filter Tank 1
6 Center ipe 1
7 Basket Filter 1
8 Filter Drain Valve 1
9 Clamp rotector 1
10 Filter Hose 1
11 Hose Clamp 2
12 Hose Reducer 1
13 Sand Funnel 1
14 Barbed Fitting 2
15 ump Motor 1
16 Barbed Fitting O-Ring 2
17 Seal Ring 2
18 Strainer Basket 1
19 Strainer Cover O-Ring 1
20 Clear Strainer Cover 1
21 Strainer Cover Seal Ring 1
22 Strainer Cover Wrench 1
23 ump Drain Valve 2
24 Drain Valve O-Ring 2

4
INSTALLATION
Tools
• Flat-head Screwdriver
• Channel Lock liers or Adjustable Wrench
• Allen Key (included)
• Strainer Lid Wrench (included)
• Teflon Tape
G idelines for Positioning
• Install the filter system 1.5 feet below the pool water level.
• Install the filter system on a level, firm surface.
• The filter system should be far enough from the pool as to not be used as a
means to access the pool.
• Ensure there is adequate space provided around the filter system for
operation, maintenance and winterization.
Motor Assembly
1) Install O-Ring (16) into the center outlet port of the ump Motor (15) as
shown in Figure 1.
2) lace one of the Barbed Fittings (14) on the center outlet port and secure
using a Seal Ring (17) as shown in Figure 2.
3) Install O-Ring (16) into the channel of the front intake port as shown in Figure 3.
4) lace the Barbed Fittings (14) on the front intake port and secure using a Seal
Ring (17) as shown in Figure 4.
Figure 1
Figure 2
Figure 3
Figure 4

5
Filter Assembly and Filter Sand Loading
1)
Install the Drain Valve (8) by placing one gasket on the inside of the Filter
Tank (5) and one on the outside of the tank. Carefully tighten the locking nut
with pliers as shown in Figure 5.
2) lace the tank in the location that it will be installed and connected to the pool.
3) lace the Center ipe/Basket assembly (6,7) into the center of the tank as
shown in Figure 6.
4)
lace the Sand Funnel (13) over the Center ipe (6), making sure the pipe is
resting in the bottom of the tank and is centered in the tank opening as
shown in Figure 7.
5) Fill the tank ~half way with water to act as a cushion for when the filter sand
is added.
6) Slowly add the appropriate amount of sand to the tank as listed on the
Specification Table.
7) Once the sand is loaded, remove the funnel and store in a secure area for
future use.
8)
Ensure the Valve Gasket (4) is installed on the 7 osition Valve (1) and fit the
valve over the Center ipe (6), providing steady, even pressure for proper
seating of the valve as shown in Figure 8.
9) Rotate the valve so that the port marked UM is facing the ump Motor
(15) and port marked RETURN is facing the pool.
10) Secure the valve to the tank using the Valve Clamp (3) and the Allen Key
supplied with the unit as shown in Figure 9.
11) Remove the Valve Cap (2) and install the Gauge supplied with the unit,
using Teflon tape to prevent leaks as shown in Figure 10. Do not over-
tighten the Gauge.
12) Connect the tank to the pump using the Filter Hose (10) and Hose Clamps
(11). Tighten using a flat-head screwdriver as shown in Figure 11.
Figure 5
Figure 6
Figure 7
Figure 8
Figure 9
Figure 10
Figure 11

6
Connecting the Filter System
CAUTION: If replacing an existing system, make sure to disconnect the old system and plug
the return and suction lines of the pool to prevent water loss.
1) Connect the suction hose from the pool to the front intake port of the ump
Motor using a hose clamp (hose and clamp not supplied).
2) Connect the return line hose to the valve port marked RETURN and secure
it using a hose clamp (hose and clamp not supplied).
3) Remove any plugs from the return and suction lines, allow the system to fill
with water and check for leaks. Tighten clamps to close off any leaks.
4) Tighten the Strainer Cover Seal Ring (21) using Wrench (22) as shown in Figure 12.
Figure 12
OPERATION
Initial Start Up
1) Ensure proper amount of filter sand is placed in the tank.
2) Check that all connections are made and are secure.
3) Turn the valve to the Backwash position.
IM ORTANT: All suction and return lines must be open prior to turning the system
ON as failure to do so can cause a dangerous increase in pressure.
4) Turn the filter ON by plugging in the ump Motor and let the system run for
1 minute to clear any impurities.
5) After 1 minute, unplug the pump and turn the valve to Rinse. lug the pump
in and run for 30 seconds.
6) Unplug the pump, turn the valve to Filter and restart the pump.
7) Tighten any connections that may be leaking and adjust the return fitting in
the pool for desired flow.
IM ORTANT: Note the initial pressure gauge reading. Once the pressure gauge
reads 5 SI greater than the initial reading, it is time to backwash the filter.
NOTE: Initial clean up or start up for the season may result in frequent
backwashing due to heavy debris loads.
NOTE: After initial start up procedures are followed, normal use of the filter system
can resume, running the system on the Filter position and Backwashing as
necessary.
Backwashing
1) Unplug the ump Motor.
2) Turn the Valve to the Backwash position.
3) lug the ump Motor in and let the filter run until the water runs clear,
approximately 1-2 minutes depending on debris load.
4) Unplug the ump Motor and turn the Valve to the Rinse position.
5) lug the ump Motor in and run for approximately 30 seconds to 1 minute.
6) Unplug the ump Motor, turn the Valve to Filter and return to regular use of
the system.

7
Valve Positions and F nctions
IM ORTANT: Unplug the pump prior to changing the valve position on the filter.
Se ing Func ion
Filter Water will flow through the sand to remove particles from the water.
Backwash Reverses the flow through the filter to clean the sand.
Rinse Used after backwashing to clear the valve of any residual debris.
Recirculate Used during pool clean-up or chemical treatment to create water movement
without filtering the water through the sand.
Waste Bypasses the filter to remove any large contaminants from the water. Ideal for
vacuuming.
Open The lever will be between locking positions to keep the valve in an open
position. Used for winterization of the filter system.
Close Restricts the flow of water. Ideal for maintenance and cleaning of strainer.
DO NOT RUN PUMP IN THIS POSITION.
WINTERIZATION
1) Unplug the pump from the outlet.
2) lug the return and suction outlets to shut off water flow to the filter system.
3) Turn the valve to the O EN position.
4) Remove the drain plug from the filter and pump to drain water from the system.
5) Remove the 7- osition Valve and allow it to drain.
6) Store the pump and valve in a dry area where temperatures do not go below freezing.
TROUBLESHOOTING
SYMPTOM SUGGESTED REMEDIES
ump Not Turning ON
1) Check GFI and reset if needed
2) Check main circuit breaker and reset if needed
3) Ensure plug is secure in outlet
Low Water Flow
1) Clean skimmer and pump strainer baskets
2) Check that suction and return lines are clear
3) Check if system is taking in air
4) Backwash filter
ool Water is Not Clear
1) Check pool chemical balance
2) Ensure valve is positioned to FILTER
3) Operate filter for longer periods of time
4) Check flow and Backwash filter if needed
Air in System
1) Check seal at suction/intake port
2) Ensure water level is high enough
3) Loosen the Seal Ring of the Clear Cover briefly
to release trapped air

1-YEAR L I M I T E D W A R R A N T Y
This product has been manufactured, tested and inspected in accordance with carefully
specified engineering requirements. It is warranted to be free from defects in materials
and workmanship under normal use and service, subject to qualifications, conditions and
limitations described below.
This warranty extends to the first consumer/purchaser for a period of 12 months from the
original date of purchase.
Consumable or expendable parts such as O-Rings, ressure Gauge, Strainer Basket,
Mechanical Seal (complete) or Hoses are NOT covered under this limited warranty. This
warranty only applies to products used in North America.
This warranty covers only normal and reasonable use. Any damage, defects, malfunctions
or other failures arising from any use which does not comply with the instructions in this
manual, including failure of the purchaser to provide reasonable and necessary
maintenance, will void this warranty. The customer must provide a copy of the original
retail receipt to establish the warranty and file a claim.
The warranty obligations of Smart ool shall be limited to repair or replacement of the
product or any defective component, at the discretion of Smart ool. The repair or
replacement may include the use of refurbished components and/or units. Smart ool will
not be liable or responsible under any circumstances or in any amount for any
consequential or incidental damages, for any injury or damages to persons or property
using or used in connection with this product, or for loss of profits or other costs or
expenses of any kind or character. Return costs such as freight are the responsibility of
the consumer.
THERE ARE NO OTHER WARRANTIES OR RE RESENTATIONS, EITHER
EX RESSED OR IM LIED, WHETHER OF MERCHANTABILITY, FITNESS FOR A
ARTICULAR UR OSE, OR OTHER, MADE BY SMART OOL OTHER THAN THOSE
S ECIFICALLY SET FORTH IN THIS WARRANTY. NO ERSON, FIRM, OR
COR ORATION IS AUTHORIZED TO MAKE ANY RE RESENTATIONS OR INCUR ANY
OBLIGATIONS IN THE NAME F OR ON BEHALF OF SMART OOL, EXCE T AS
STATED HEREIN. THE REMEDIES SET FORTH IN THIS WARRANTY ARE
EX RESSLY UNDERSTOOD TO BE THE EXCLUSIVE REMEDIES AVAILABLE TO THE
URCHASER, AND THIS WARRANTY CONTAINS THE FULL AND COM LETE
AGREEMENT BETWEEN SMART OOL AND THE URCHASER. THIS WARRANTY
SETS FORTH THE ONLY OBLIGATIONS OF SMART OOL WITH REGARDS TO THIS
RODUCT, AND THERE ARE NO WARRANTIES WHICH EXTEND BEYOND THE
DESCRI TION ON THE FACE HEREOF.
This warranty gives you specific legal rights and you may also have other rights which
vary from state to state.
To obtain warranty service, call Smart ool Technical Support Specialist
at (732) 730-9880, Monday – Friday, 9:00 a.m. – 5:00 p.m. EST.
www.smartpool.com
All trademarks are property of Smart ool LLC.
© 2013 Smart ool LLC. EQ-SC-1900 Man. Ver. 1.0. 2013
lease visit smartpool.com to view our full line of quality pool products,
including robotic pool cleaners, solar pool heaters, lights, saltwater
chlorine generators and alarms.
Table of contents
Popular Water Filtration System manuals by other brands

Wisy
Wisy LineAir 100 Installation and operating instructions

Schaffner
Schaffner Ecosine FN3446 Series User and installation manual

Pentair
Pentair FLECK 4600 SXT Installer manual

H2O International
H2O International H20-500 product manual

Renkforce
Renkforce 2306241 operating instructions

Neo-Pure
Neo-Pure TL3-A502 manual


