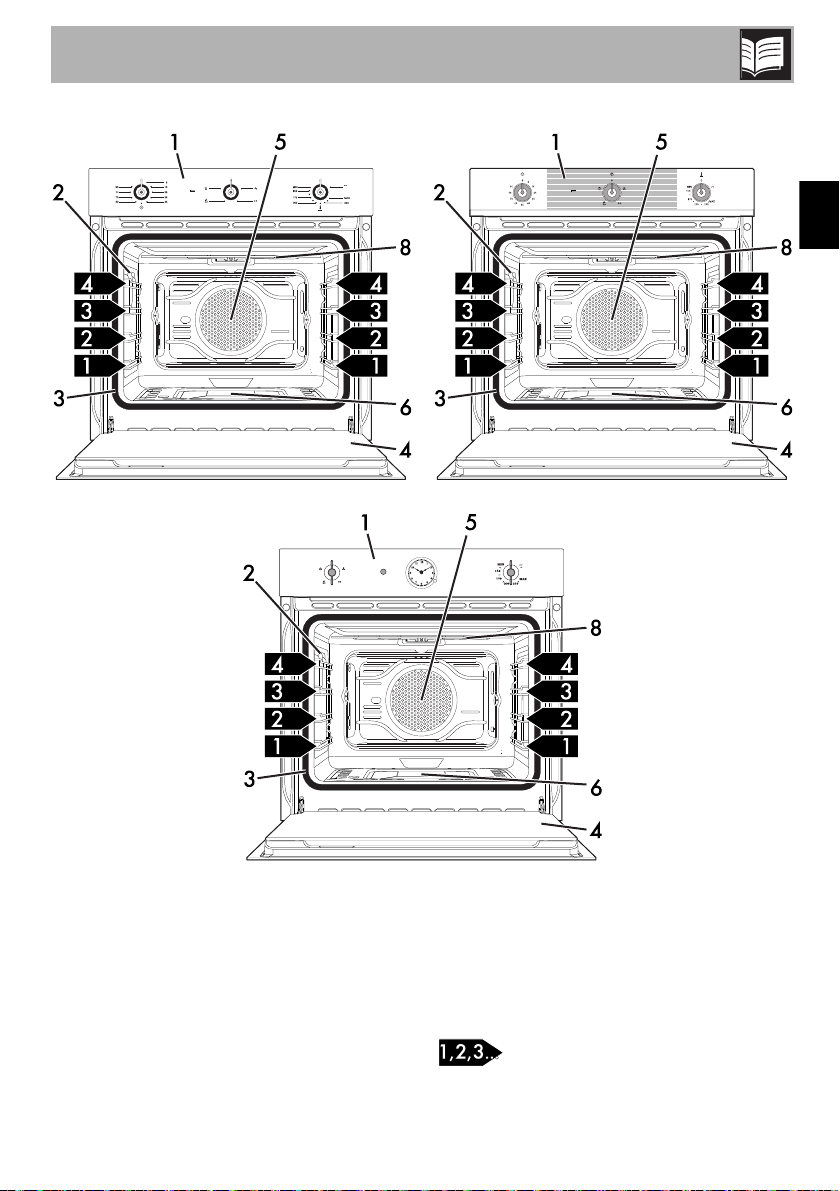
Smeg SF61M3GVS User manual

Contents
43
EN
1 Instructions 4
1.1 General safety instructions 4
1.2 Appliance purpose 8
1.3 Manufacturer liability 8
1.4 This user manual 8
1.5 Identification plate 8
1.6 Disposal 8
1.7 How to read the user manual 9
2 Description 10
2.1 General description 10
2.2 Control panel 12
2.3 Other parts 15
2.4 Available accessories 15
3 Use 17
3.1 Instructions 17
3.2 First use 17
3.3 Using the accessories 18
3.4. Using the oven 19
3.5 Cooking advice 22
3.6 Clock function (on some models only) 23
4 Cleaning and maintenance 26
4.1 Instructions 26
4.2 Cleaning the surface 26
4.3 Cleaning the door 26
4.4 Cleaning the oven cavity 28
4.5 Extraordinary maintenance 29
5 Installation 31
5.1 Gas connection 31
5.2 Adapting to different types of gas 34
5.3 Electrical connection 38
5.4 Replacement of the cord 38
5.5 Positioning 39
We recommend that you read this manual carefully. It includes all the instructions on
maintaining the esthetic qualities and functionality of the appliance you have purchased.
For more information about the product: www.smeg.com
TRANSLATION OF THE ORIGINAL INSTRUCTIONS
These instructions apply only to the destination countries listed on the appliance's data
plate. This is a class 3 built-in oven.

Instructions
44
1 Instructions
1.1 General safety instructions
Risk of personal injury
• During use the appliance and its
accessible parts become very hot.
Never touch the heating elements
during use.
• Protect your hands by wearing
oven gloves when moving food
inside the oven.
• Never try to put out a fire or flames
with water: turn off the appliance
and smother the flames with a fire
blanket or other appropriate
cover.
• This appliance may be used by
children aged at least 8 and by
people of reduced physical,
sensory or mental capacity, or
lacking in experience in the use of
electrical appliances, provided
that they are supervised or
instructed by adults who are
responsible for their safety.
• Children must never play with the
appliance.
• Keep children under the age of 8
at a safe distance unless they are
constantly supervised.
• Keep children under the age of 8
away from the appliance when it
is in use.
• Cleaning and maintenance must
not be carried out by unsupervised
children.
• Cooking process should always
be kept under control. A short
cooking process must be
continuously surveyed.
• Never leave the appliance
unattended during cooking
operations where fats or oils could
overheat and take fire. Be very
careful.
• Do not pour water directly onto
very hot trays.
• Keep the oven door closed during
cooking.
• If you need to move food or at the
end of cooking, open the door 5
cm for a few seconds, let the
steam come out, then open it fully.
• Do not insert pointed metal objects
(cutlery or utensils) into the slots in
the appliance.

Instructions
45
EN
• Switch off the appliance after use.
• DO NOT USE OR STORE
FLAMMABLE MATERIALS NEAR
THE APPLIANCE.
• DO NOT USE AEROSOLS IN
THE VICINITY OF THIS
APPLIANCE WHILST IT IS IN
USE.
• DO NOT MODIFY THIS
APPLIANCE.
• Have qualified personnel carry out
installation and assistance
interventions according to the
standards in force.
• Do not try to repair the appliance
yourself or without the intervention
of a qualified technician.
• Do not pull the cable to remove
the plug.
Risk of damaging the appliance
• Do not use abrasive or corrosive
detergents (e.g. scouring
powders, stain removers and
metallic sponges) on glass parts.
Use wooden or plastic utensils.
• Do not use rough or abrasive
materials or sharp metal scrapers.
• Do not use cleaning products
containing chlorine, ammonia or
bleach on parts made of steel or
that have metallic surface finishes
(e.g. anodizing, nickel- or
chromium-plating).
• Racks and trays should be inserted
as far as they will go into the side
guides. The mechanical safety
locks that prevent them from being
removed must face downwards
and towards the back of the oven.
• Do not sit on the appliance.
• Do not use steam jets to clean the
appliance.
• Do not spray any spray products
near the appliance.
• Never leave objects on the
cooking surface.
• Do not obstruct ventilation
openings and heat dispersal slots.
• DO NOT USE THE APPLIANCE
TO HEAT ROOMS FOR ANY
REASON.

Instructions
46
• Do not use plastic cookware or
containers for cooking.
• Do not place sealed tins or
containers in the oven cavity.
• Remove all trays and racks which
are not required during cooking.
• Do not cover the bottom of the
oven cavity with aluminium or tin
foil sheets.
• Do not place pans or trays directly
on the bottom of the oven cavity.
• If you wish to use greaseproof
paper, place it so that it will not
interfere with the hot air circulation
inside the oven.
• Do not use the open door to place
pans or trays on the internal
glazing pane.
• Never use the oven door to lever
the appliance into place when
fitting.
• Avoid exerting too much pressure
on the door when open.
• Do not use the handle to lift or
move this appliance.
Installation and maintenance
• THIS APPLIANCE MUST NOT BE
INSTALLED IN A BOAT OR
CARAVAN.
• This appliance must not be
installed on a pedestal.
• Position the appliance into the
cabinet cut-out with the help of a
second person.
• To prevent any possible
overheating, the appliance should
not be installed behind a
decoration door or a panel.
• Have the gas connection
performed by authorised staff.
• Installation using a hose must be
carried out so that the length of the
hose does not exceed 2 metres
when fully extended for steel hoses
and 1.5 metres for rubber hoses.
• The hoses should not come into
contact with moving parts and
should not be crushed in any way.
• If required, use a pressure
regulator that complies with
current regulations.

Instructions
47
EN
• After carrying out any operation,
check that the tightening torque of
gas connections is between
10 Nm and 15 Nm.
• At the end of the installation, check
for any leaks with a soapy
solution, never with a flame.
• Have qualified personnel carry out
installation and assistance
interventions according to the
standards in force.
• Have the electrical connection
performed by authorised
technicians.
• The appliance must be connected
to ground in compliance with
electrical system safety standards.
• Use cables withstanding a
temperature of at least 90 °C.
• The tightening torque of the screws
of the terminal board leads must
be 1.5 - 2 Nm.
• If the power supply cable is
damaged, contact technical
support immediately and they will
replace it.
• Before any operation on the
appliance (installation,
maintenance, positioning or
movement) always wear PPM.
• Before performing any operation
on the appliance, switch off the
power supply.
For this appliance
• Ensure that the appliance is
switched off before replacing the
bulb.
• Do not rest any weight or sit on the
open door of the appliance.
• Take care that no objects are stuck
in the doors.
• Do not install/use the appliance
outdoors.

Instructions
48
1.2 Appliance purpose
• This appliance is intended for
cooking food in the home
environment. Every other use is
considered inappropriate.
• The appliance is not designed to
operate with external timers or with
remote-control systems.
1.3 Manufacturer liability
The manufacturer declines all liability
for damage to persons or property
caused by:
• use of the appliance other than
that specified;
• failure to comply with the
instructions in the user manual;
• tampering with any part of the
appliance;
• the use of non-original spare parts.
1.4 This user manual
This user manual is an integral part of the
appliance and must therefore be kept in its
entirety and within the user’s reach for the
whole working life of the appliance.
Read this user manual carefully before using
the appliance.
1.5 Identification plate
The identification plate bears the technical
data, serial number and brand name of the
appliance. Do not remove the identification
plate for any reason.
1.6 Disposal
This appliance must be disposed
of separately from other waste
(Directives 2002/95/EC,
2002/96/EC, 2003/108/EC).
The appliance does not contain substances
in quantities sufficient to be considered
hazardous to health and the environment,
in accordance with current European
directives.

Instructions
49
EN
To dispose of the appliance:
• Cut the power supply cable and remove
it along with the plug.
• Deliver the appliance to the appropriate
recycling centre for electrical and
electronic equipment waste, or return it to
the retailer when purchasing an
equivalent product, on a one for one
basis.
Our appliances are packaged in non-
polluting and recyclable materials.
• Deliver the packing materials to the
appropriate recycling centre.
1.7 How to read the user manual
This user manual uses the following reading
conventions:
1. Sequence of instructions for use.
• Standalone instruction.
Power voltage
Danger of electrocution
• Disconnect the mains power supply.
• Unplug the appliance.
Plastic packaging
Danger of suffocation
• Do not leave the packaging or any part
of it unattended.
• Do not let children play with the plastic
bags.
Instructions
General information on this user
manual, on safety and final
disposal.
Description
Description of the appliance and its
accessories.
Use
Information on the use of the
appliance and its accessories.
Cleaning and maintenance
Information for proper cleaning and
maintenance of the appliance.
Installation
Information for the qualified
technician: Installation, operation
and inspection.
Safety instructions
Information
Advice

Description
50
2 Description
2.1 General Description
Gas / Electric grill oven models
Gas / Gas grill oven models

Description
51
EN
Gas / Electric fan grill oven models
1 Control panel
2 Lamp
3 Seal
4 Door
5 Fan (on some models only)
6 Gas oven
7 Gas grill (on some models only)
8 Electric grill (on some models only)
Frame shelf

Description
52
Fan-assisted models (note for UK market)
Unlike the traditional gas oven that you
usually find in the United Kingdom, where
the hottest part of the cavity is usually
located in the upper area of the oven, the
new fan-assisted gas oven has a European-
style central lower burner which allows you
to get optimal results, thanks to the efficient
zone cooking device.
The oven has a fan that distributes the heat
evenly inside it. However, the lower part is
the hottest area and it allows you to cook in
the same way as in the upper part of a
traditional oven (depending on the mode
selected).
The central areas cook at the temperature
set on the control panel, whereas in the
upper area the heat is distributed to a
slightly lower temperature, which equals the
temperature of the lower shelf of an electric
oven.
Before carrying out a cooking process,
preheat the oven in order to get optimal
results. Moreover, during all cooking
operations the oven door must be closed to
enable the safety device to work properly.
2.2 Control panel
Gas / Electric grill oven models

Description
53
EN
Gas / Gas grill oven models
Gas / Electric fan grill oven models

Description
54
1 Electromechanical minute minder timer
knob
In order to use the minute minder timer, the
buzzer must be set by turning the knob
clockwise. The numbers correspond to
minutes (maximum 90 minutes). Adjustment
is progressive and intermediate positions
between the figures can be used.
The end of cooking buzzer does not
interrupt oven operations.
(where present) The position /
enables the light inside the oven cavity to
be switched on during normal operations
(without minute minder).
2 Electric grill heating element bulb
(gas grill models excluded)
It switches on to indicate that the electric
grill is operating.
3 Function knob (on some models only)
Turn the function knob to the required
symbol:
switches on the fan inside the
oven cavity;
starts the rotisserie motor;
starts the rotisserie fan and motor;
switches on the light inside the
oven cavity.
4 Temperature knob
Useful for lighting the lower burner or the
electric grill, or the gas grill (depending on
the models).
The cooking temperature is selected by
turning the knob anticlockwise to the
required setting, between MIN and MAX.
To switch on the electric or gas grill, turn the
knob clockwise to the symbol / /
(depending on the models).
5 Clock (on some models only)
Useful for displaying the current time.
In models without printing, when
the minute minder knob is between
90 and 0, no function is activated.

Description
55
EN
2.3 Other parts
Shelves
The appliance features shelves to position
trays and racks at different heights. The
insertion heights are indicated from the
bottom upwards (see 2.1 General
Description).
Cooling fan
The fan cools the oven and comes into
operation during cooking.
The fan causes a steady outflow of air from
above the door which may continue for a
brief period of time even after the appliance
has been turned off.
Interior lighting
The appliance’s interior lighting comes on:
• when the door is opened:
• when the function is selected.
2.4 Available accessories
Rack
Used for supporting containers with food
during cooking.
Tray rack (on some models only)
To be placed over the top of the tray; for
cooking foods which may drip.
When the door is open, it is not
possible to turn off the interior
lighting.
Some models are not provided
with all accessories.

Description
56
Tray (on some models only)
Useful for collecting fat from foods placed
on the rack above.
Deep tray
Useful for collecting fat from foods placed
on the rack above and for cooking pies,
pizzas and baked desserts.
Rotisserie support (on some models only)
To be used to support the rotisserie rod.
Rotisserie rod (on some models only)
Useful for cooking chicken and all foods
that require uniform cooking over their entire
surface.
The oven accessories intended to
come into contact with food are
made of materials that comply with
the provisions of current legislation.
Original supplied and optional
accessories can be requested to
Authorised Assistance Centres.
Use only original accessories
supplied by the manufacturer.

Use
57
EN
3 Use
3.1 Instructions
3.2 First use
1. Remove any protective film from the
outside or inside of the appliance,
including accessories.
2. Remove any labels (apart from the
technical data plate) from the
accessories and from the oven cavity.
3. Remove and wash all the appliance
accessories (see 4 Cleaning and
maintenance).
4. Heat the empty oven at the maximum
temperature for the time required to burn
off any residues left by the manufacturing
process.
Improper use
Risk of damage to surfaces
• Do not cover the bottom of the oven
cavity with aluminium or tin foil sheets.
• If you wish to use greaseproof paper,
place it so that it will not interfere with the
hot air circulation inside the oven cavity.
• Do not place pans or trays directly on
the bottom of the oven cavity.
• Do not pour water directly onto very hot
trays.
High temperature inside the oven
during use
Danger of burns
• Keep the oven door closed during
cooking.
• Protect your hands wearing heat
resistant gloves when moving food
inside the oven.
• Do not touch the heating elements inside
the oven.
• Do not pour water directly onto very hot
trays.
• Do not allow children to approach the
appliance when it is in operation.
High temperature inside the oven
during use
Danger of fire or explosion
• Do not spray any spray products near
the appliance.
• Do not use or leave flammable materials
near the appliance.
• Do not use plastic cookware or
containers for cooking.
• Do not place sealed tins or containers in
the oven cavity.
• Never leave the appliance unattended
during cooking operations where fats or
oils could be released.
• Remove all trays and racks which are
not required during cooking.

Use
58
3.3 Using the accessories
Racks and trays
Racks and trays have to be inserted into the
side guides until they come to a complete
stop.
• The mechanical safety locks that prevent
the rack from being taken out
accidentally have to face downwards
and towards the oven back.
Tray rack (on some models only)
The tray rack has to be inserted into the tray.
In this way fat can be collected separately
from the food which is being cooked.
Rotisserie rod (on some models only)
When cooking with the rotisserie, position
the rotisserie support frame on the second
shelf. Once the rod frame is inserted, the
shaped part must sit facing outwards.
Prepare the rotisserie rod with the food
using the rotisserie rod provided.
Gently insert racks and trays into
the oven until they come to a stop.
Clean the trays before using them
for the first time to remove any
residues left by the manufacturing
process.

Use
59
EN
Screw on the handle provided so that you
can handle the rod with the food on it
readily.
Once you have prepared the rotisserie rod,
place it on the rotisserie support.
Insert the rod into the hole Aso that it
connects with the rotisserie motor.
Make sure that the pin is
placed correctly on the guide frame B.
3.4 Using the oven
Using the gas oven
Electronic spark ignition:
1. Open the oven door completely.
2. Press and turn the temperature knob anti-
clockwise between the values
and . The electric spark ignition is
activated automatically.
3. After lighting, keep the knob pressed in
for a few seconds to allow the
thermocouple to heat up.
Remove the handle before closing
the door.
We recommend that you place the
tray on the first shelf to collect fats
more easily.
In the event of a power supply
failure the cooling fan does not
work. Do not light the oven
manually.
If the burner does not ignite after
15 seconds, stop attempting to
light it, leave the oven door open
and do not try to light it again for at
least 60 seconds.
In case of accidental extinguishing,
turn the knob to the off position and
do not try to light the burner again
for at least 60 seconds.

Use
60
Using the gas grill (on some models only)
Electronic spark ignition:
1. Open the oven door completely.
2. Press and turn the temperature knob
clockwise to the symbol . The electric
spark ignition is activated automatically.
3. After lighting, keep the knob pressed in
for a few seconds to allow the
thermocouple to heat up.
Using the electric grill
(on some models only)
Press and turn the temperature knob
clockwise on the symbol / /
(depending on the models).
High temperature inside the oven
during use
Danger of fire or explosion
• Grilling processes must never last more
than 30 minutes.
If the burner does not ignite after
15 seconds, stop attempting to
light it, leave the oven door open
and do not try to light it again for at
least 60 seconds.
The gas oven and the gas grill must
never be used at the same time.
High temperature inside the oven
during use
Danger of fire or explosion
• Grilling processes must never last more
than 60 minutes.
The gas oven and the electric grill
must never be used at the same
time.

Use
61
EN
Functions list
Gas burner
The heat coming just from the
bottom allows you to complete the
cooking of foods that require a
higher bottom temperature, without
affecting their browning. Perfect for
cakes, pies, tarts and pizzas.
+
Gas burner + fan
In combination with the gas burner,
the fan distributes the heat evenly.
This function is perfect for slow
cooking operations using a steady
temperature.
+
Gas burner + rotisserie
The rotisserie rotates food while the
gas burner is operating.
+
Gas burner + fan + rotisserie
The rotisserie rotates food while the
fan distributes heat quickly.
Grill
The heat coming from the grill
element or the gas grill burner
(depending on the models) gives
perfect grilling results above all for
thin and medium thickness meat and
in combination with the rotisserie
(where fitted) gives the food an
even browning at the end of
cooking. Perfect for sausages,
spare ribs and bacon. This function
enables large quantities of food,
particularly meat, to be grilled
evenly.
+
Fan with grill
The air produced by the fan softens
the strong heatwave generated by
the grill element, grilling perfectly
even very thick foods. Perfect for
large cuts of meat (e.g. shin of
pork).
Grilling processes must never last
more than 30 minutes.

Use
62
3.5 Cooking advice
General advice
• Use a fan assisted function to achieve
consistent cooking at several levels.
• It is not possible to shorten cooking times
by increasing the temperature (the food
could be overcooked on the outside and
undercooked on the inside).
Advice for cooking meat
• Cooking times vary according to the
thickness and quality of the food and to
consumer taste.
• Use a meat thermometer when roasting
meat, or simply press on the roast with a
spoon. If it is hard, it is ready; If not, it
needs another few minutes cooking.
+
Grill + Rotisserie
The rotisserie works in combination
with the grill element or the gas
burner grill (depending on the
models) and allows food to be
perfectly browned.
+
Fan grill + rotisserie
The rotisserie works in combination
with the grill element allowing food
to be perfectly browned; the fan
distributes heat very quickly.
Combined cooking and grilling
processes must never last more
than 60 minutes.
For safety reasons, the fan does
not work in combination with the
gas burner grill.
Defrost
Rapid defrost is helped by the
switching on of the fan that ensures
uniform distribution of air inside the
oven. (We recommend using the 1st
or 2nd runner).
Light
In this position the oven light can be
turned on during normal operations.
This manual suits for next models
1
Table of contents
Other Smeg Oven manuals

Smeg
Smeg Oven Instruction manual

Smeg
Smeg SC112-8 User manual

Smeg
Smeg Oven ALFA135B1 User manual

Smeg
Smeg SCP111EB2 User manual

Smeg
Smeg Classic SFA63M3TVX User manual

Smeg
Smeg CE9IMX User manual

Smeg
Smeg GCE9003 User manual

Smeg
Smeg Oven Instruction Manual

Smeg
Smeg SF4603VCNX User manual

Smeg
Smeg F166-5 User manual
Popular Oven manuals by other brands

Salton
Salton RS-1061 Instruction booklet

Siemens
Siemens HM936GC.1 Series User manual and installation instructions

American Range
American Range AROFFHGE230L use and care manual

Bosch
Bosch HBN 93 Series Installing and operating instructions

Hotpoint Ariston
Hotpoint Ariston FZ 990 C.1 /HA operating instructions

Electrolux
Electrolux OEF3H70TX user manual