Smeg KSED65X Technical manual

E MONTAJE Y MODO DE EMPLEO
P INSTRUÇÕES PARA MONTAGEM E UTILIZAÇÃO
F PRESCRIPTIONS DE MONTAGE ET MODE D’EMPLOI
GB INSTRUCTION ON MOUNTING AND USE
D MONTAGE- UND GEBRAUCHSANWEISUNG
NL MONTAGEVOORSCHRIFTEN EN GEBRUIKSAANWIIZING
RU ÈÍÑÒÐÓÊÖÈ ÏÎ ÌÎÍÒÀÆÓ Ó ÝÊÑÏËÓÀÒÀÖÈÈ
I ISTRUZIONI DI MONTAGGIO E D’USO
HR UPUTSTVA ZA MONTAU I ZA UPORABU
GR ÏÄÇÃÉÅÓ ÔÏÐÏÈÅÔÇÓÇÓ ÊÁÉ ×ÑÇÓÇÓ
CZ NÁVOD NA MONTÁ A POUÍVÁNÍ
PL INSTRUKCJA MONTA¿U I OBS³UGI

1
3
7
9
9
10
11
15
15
5
3
6
7
11
2288
12A
13A
5
16F
16F
4a
4b
4a
12F
13F
12F
F
Instalación
Instalação
Montage
Installation
Installierung
Installatie
Montá
Óñòàíîâêà
Installazione
In taliranje
ÅãêáôÜóôáóç
In talacja
B
Hinweis! Die Position der Einrastpunkte (5- rechteckige Löcher) und der Punkte für die obligatorische Befestigung (8 - runde Löcher)
können miteinander vertauscht sein! Deshalb an der Rückseite der in Ihrem Besitz befindlichen Haube die Position dieser Punkte
überprüfen.
Let op! De positie van de hechtpunten (5– Rechthoekige gaten) of van de verplichte bevestigingspunten (8 – ronde gaten) kunnen
omgewisseld zijn! Controleer daarom de rugzijde van de kap in uw bezit om de positie ervan te verifiëren.
Âíèìàíèå! Ïîëîæåíèÿ òî÷åê ïîäâåøèâàíèÿ 5 ïðÿìîóãîëüíûå îòâåðñòèÿ) èëè òî÷åê îáÿçàòåëüíîãî êðåïëåíèÿ (8 êðóãëûå îòâåðñòèÿ)
ìîãóò áûòü ïåðåñòàâëåíû! Ïîýòîìó ïðîâåðüòå ýòî ïîëîæåíèå íà çàäíå ñòåíêå èìåþùå ñÿ ó Âàñ âûòÿæêè.
Attenzione! La posizione dei punti di aggancio (5- Fori rettangolari) o dei punti di fissaggio obbligatorio (8 - fori circolari) possono
essere invertiti! Controllare perciò lo schienale della cappa in Vs. possesso per verificarne la posizione.
UPOZORENJE! Pozicija prikacnih mjesta (5 - pravokutnih rupa) ili obaveznih fiksirajucih mesta (8 - kruznih rupa)
mogu se medjusobno zamjeniti. Zato prekontrolisite tablu koja pripada vasem aspiratoru da bi videli pravu poziciju.
Ðñïóï÷ç! Ç èåóç ôùí óçìåéùí ãáíôæùìáôïò (5-Ïðåò ïñèïãùíéåò) ç ôùí óçìåéùí õðï÷ñåùôéêçò óôáèåñïðïéçóçò (8-Ïðåò êõêëéêåò)
ìðïñïõí íá å÷ïõí áíôéóôñáöåé! Åëåãîå ãé áõôï ôï ðéóù ìåñïò ôïõ áðïññïöçôçñá óáò ãéá íá åîáêñé ùóåéò ôçí èåóç.
Pozor! Pozice závìsných bodù (5- obdélníkové otvory) anebo bodù povinného upevnìní (8-okrouhlé otvory) mù•e být
obrácena! Proto zkontrolujte zadní stranu odsávaèe ve Vašem vlastnictví k ovìøení její pozice.
Uwaga! Punkty zaczepienia okapu (5 ot ory prostok¹tne) i punkty moco ania okapu (8 ot ory ko³o e), na okapie mog¹ byæ oznaczone
od rotnie! W z i¹zku z tym przed przyst¹pieniem do instalacji urz¹dzenia, nale¿y spra dziæ po³o¿enie y¿ej podanych punktó .
Atención! La posición de
los puntos de enganche (5
- orificios rectangulares) o
de los puntos de sujeción
obligatoria (8- orificios
circulares) se pueden
intercambiar. Para ello
controle la estructura de la
campana que Usted posea
para comprobar la posición.
Atenção! A posição dos
pontos de pendurar (5 -
Furos rectangulares) ou
dos pontos de fixação
obrigatória (8- furos
circulares) podem estar
invertidas! Portanto,
controlar a parte traseira de
sua coifa para verificar a
posição dos mesmos.
Attention! La position des
points d’accrochage (5 –
trous rectangulaires) ou des
points de fixation obligatoires
(8– trous circulaires)
peuvent être inversés !
Contrôler donc le dossier de
la hotte en votre possession
pour vérifier la position.
Warning! The position of the hook points (5 – Rectangular perforations) or the compulsory fastening points (8– circular drill holes)
may be inverted! Therefore check the back of the cooker hood in your possession to verify the position.

CLOSED
OPEN
CLOSED
OPEN
CG
O
N
Z1
Z2
CG
MK
J
L
L
EP
E
S
R
Montaje de repisas (opcionales):A la altura
deseada, clavar en los armarios adyacentes los
4 soportes laterales R y luego apoyar a ellos la
repisa S.
Opçãodagrelhadeadorno:Nasparedeslateraisdo
móvel,fixar4suportesRecolocaragrelhaS.
Option: montage des étagères: Sur les meubles
adjacents,fixerles4supportslatérauxRauxdimension
voulueset poser lesétagèresS.
Fasteningofshelves(optional):Fastenthefourside
supportsRtotheadjacentcabinetsandplacetheshelf
onthe supports S.
Anbringung eventueller Regalbretter: An der
gewünschten Höhe die vier seitlichen Halter R an den
angrenzenden Schränken befestigen, und das
AblagebrettdarauflegenS.
Hetaanbrengenvaneventuelepannenrooster(naar
keuze): De 4 steunen R op de gewenste maat aan de
naastgelegenkeukenkastjesaanbrengenenhetrooster
Serop leggen.
Êðåïëåíèå ïîëîê ôàêóëüòàòèâíîå):
Ïðèêðåïèòå ÷åòûðå áîêîâûå îïîðíûå
äåòàëè R ê ïðèëåãàþùå ìåáåëè íà
æåëàåìî âûñîòå, çàòåì êëàäèòå íà íèõ
ïîëêó S.
Fissaggio mensole (optional):Fissare alla misura
volutaiquattrosupportilateraliRaimobiliadiacentied
appoggiare la mensola Ssopra di essi.
Po tavljanje polica (po elji)
Prièvrstite na namjetaj R, na eljenoj visini,
èetiri boèna stalaka i postavite policu S.
Óôåñ ùóç ñáöéþí (ðñïáéñåôéêÜ):
Óôåñåþóôå óôçí åðéèõìçôÞ áðüóôáóç ôá
ôÝóóåñá ðëåõñéêÜ õðïóôçñßãìáôá R óôá
ðñïóêåßìåíá Ýðéðëá êáé óôçñßîôå ôï ñÜöé S
åðÜíù ôïýò.
Opcjonalnie: Monta¿ pó³ek
Do s¹siaduj¹cych szafek zamoco aæ cztery
boczne sporniki R i umieciæ pó³kê na
spornikach S.
Upevnìní møíek (volitelné): Pøipevnìte
ètyøi úchyty R na boky skøínìk a umístìte na
nì møíku S.

1
3
7
9
9
10
11
15
15
5
3
6
7
11
2288
12A
13A
5
4a
4b
4a
F
13F
12F 12F
I
nstalación -sólopara el modelocon ojetes para lasalida de loshumosen versión filtrante,obtenidosdirectamente en lachimenea
(sin rejillas de plástico)
IInstalação – apenas para o modelo com fendas para a saída dos fumos na versão filtrante, realizadas directamente na chaminé
(sem grades de plástico).
Installation – uniquement pour modèle avec ouvertures pour l’évacuation des fumées dans la version filtrante, obtenues
directement sur la cheminée (sans grilles en plastique).
Installation - only for model with recirculation version fume outlet slots formed directly on the chimney (with no plastic grills)
Installation - nur für Modelle in Umluftversion mit direkt am Kamin herausgearbeiteten Abluftschlitzen (ohne Plastikgitter).
Installatie - alleen voor het model met uitsparingen voor de uitgang van de rook in de filterversie, rechtstreeks in de schouw
(zonder kunststof roosters).
Óñòàíîâêà òîëüêî äëÿ ìîäåëè ñ ïðîðåçÿìè, ñäåëàííûìè íà ñàìîì äûìîõîäå (áåç ïëàñòìàññîâûõ
ðåøåòîê), äëÿ âûõîäà äûìà èç âûòÿæêè â ôóíêöèè ôèëüòðàöèè.
Installazione - solo per modello con asole per l’uscita dei fumi in versione filtrante ricavate direttamente sul camino (senza
griglie in plastica)
Montaa - samo za modele opremljene s kopèama za izbacivanje dima, u varijanti s filterom, ugraðenima
direktno na dimnjaku (bez plastiènih pregrada)
ÅãêáôÜóôáóç - ìüíï ãéá ìïíôÝëï ìå ó÷éóìÝò ãéá ôçí Ýîïäï ôùí êáðíþí óôï ìïíôÝëï ìå öéëôñÜñéóìá ðïõ
õðÜñ÷ïõí ðÜíù óôçí êáìéíÜäá (÷ùñßò ðëáóôéêÝò ãñßëéåò)
Montá pouze pro model vefiltraèní verzi, výstupní tìrbiny jsou pøímo na dekorativním komínku (bez
plastových møíek)
H
H

11
1
2
3
3
4-9
4-9
6
7
7
8
8
5
5
13A
10
10
12
13F
14
15
15
Modelo con cùpula (Versiòn Filtrante)
Modelo com cúpula (Versão filtrante)
Modèle avec chapeau (Version Filtrante)
Model with dome (Filter Version)
Modell mit Kuppel (Umlufthaube)
ModelmetKoepel(Filterversie)
Ìîäåëü ñ çîíòîì (â ôèëüòðóþùåì ðåæèìå)
Modello con cupolino (Versione Filtrante)
Model sa kupolom (filtrirajucoj verziji)
Ìïíô ëï ìå êÜëõììá (Ìïíô ëï ìå
öéëôñÜñéóìá)
Model domeèkem
Model z kopu³¹ (wer ja z filtrem)
Instalación-Modeloconperfilredondeado
Instalação–Modelocomperfilarredondado
Installation-Modèleavecprofilarrondi
Installation–Modelwithroundedborder
Installierung-ModellmitabgerundetemProfil
Installatie–Modelmetafgerondprofiel
Installazione-Modelloconprofiloarrotondato
In taliranje model a zaobljenim profilom
Åãêáôáóôáóç: Ìïíôåëï ìå ðñïöéë óôñïããõëåìåíï
Óñòàíîâêà Ìîäåëü ñ çàêðóãëåííûì ïðîôèëåì
Montá - model e zaokrouhleným profilem
In talacja okapu Model po iadaj¹cy profil zaokr¹glony
12
13
13
10
10
11
11

Consult the designs in the front pages referenced in the text by
alphabet letters. Closely follow the instructions set out in
this manual. All responsibility, for any eventual inconveniences,
damages or fires caused by not complying with the instructions
in this manual, is declined.
Installation
The cooker hood must be placed at a minimum distance of
60 cm from the cooking plane for electric cookers and 70cm
for gas or mixed cookers.
Do not tile, grout or silicone this appliance to the wall. Surface
mounting only.
Do not fix chimney flue to furniture or fly over shelves unless
the chimney flue can be easily removed, in case maintenance
is ever required.
Use
The cooker hood is provided with an upper air exit Bfor
discharging fumes externally for models including chimney
flue C( Suction Version A- exhaust pipe 13A not supplied).
In the instance where it is not possible to discharge cooking
fumes and vapours externally even if utilising the model with
chimney flue C, the cooker hood may be used in the filter
version Fby mounting two active carbon filters E, the fumes
and vapours are then recycled via the upper grill G
(depending on the model the grill may be directly placed on
the chimney flue or via the mounting of two small grills – 16F).
If in possession of a model with grill placed on chimney flue
then two Hextensions must be placed on the deflector 13F.
The models provided with small dome Dmay only be used
in the filter version F.
The models without suction motor operate only in the suction
version and must be connected to a peripheral suction unit
(not supplied).
Electrical connection
The electrical tension must correspond to the tension noted
on the label placed inside the cooker hood. Connect the
electrical plug, where provided, to the an easily accessible
outlet in conformity with local standards in force.
Where an electrical plug is not provided (for direct connection
to electrical network) place a standards approved bipolar
switch with an aperture distance of not less than 3mm
(accessible) from the contacts.
Operation
The cooker hood is provided with a key or pushbutton control
panel situated of the frontal part of the cooker hood, depending
on the basis of the cooker hood type in possession. For
proper operation consult the text below and the relative
illustration:
a. ON/OFF lighting
b. OFF motors
c. - d. - e. Minimum suction power (c.), medium (d.),
maximum (e.).
f. Operation warning light (where present).
Use the high suction speed in cases of concentrated kitchen
vapours. It is recommended that the cooker hood suction
is switched on for 5 minutes prior to cooking and to leave
in operation during cooking and for another 15 minutes
approximately after terminating cooking.
Model with electronic controls
1- Motor OFF button
2-ON button and motor speed selection button 1 - 2 - 3 -
1 - 2 - . . . .
3- Speed 1 LED
4- Speed 2 LED and metal grease filter saturation LED (in
this latter case, the LED will flash - See instructions on
grease filter cleaning).
5- Speed 3 LED and active carbon filter saturation LED (in
this latter case, the LED will flash - See instructions on
active carbon filter replacement).
Warning!
The active carbon filter saturation LED is not activated.
In order to activate the active carbon filter saturation
indicator, press buttons 2and 7simultaneously for 3
seconds. Initially, only LED 4 will flash, then after the
3 seconds have passed, LED 5 will also start flashing,
indicating that the active carbon filter saturation control
system is active.
To switch off the system, re-press the same two
buttons: after 3 seconds LED 5 will stop flashing and
the device will be switched off.
6 - Intensive speed LED
7 - Intensive speed ON switch
This speed should be used when the concentration of
cooking fumes or odours is particularly strong (for
INSTRUCTION ON MOUNTING AND USE
GB
a
a b-c de
b-c-d-e
b-c-d-e
a
abcde
1234 56789

example when frying, cooking fish etc.). T h e
fast speed will run for about 5 minutes and then return
to the speed previously set automatically (1, 2 or 3),
or switch off if no speed was selected. T o
turn off the fast speed, before the end of the 5 minutes,
press button 1 or button 2 (see page 13).
8 - OFF lamp button
9 - ON lamp button
If the hood fails to operate correctly, briefly disconnect it from
the mains power supply for almost 5 sec. by pulling out the
plug. Then plug it in again and try once more before
contacting the Technical Assistance Service.
Maintenance
Prior to any maintenance operation ensure that the cooker
hood is disconnected from the electrical outlet.
Cleaning
The cooker hood should be cleaned regularly internally and
externally.
For cleaning use a cloth moistened with denatured alcohol
or neutral liquid detergents. Avoid abrasive detergents.
Warning:
Failure to carry out the basic standards of the cleaning of the
cooker hood and replacement of the filters may cause fire
risks. Therefore we recommend oserving these instructions.
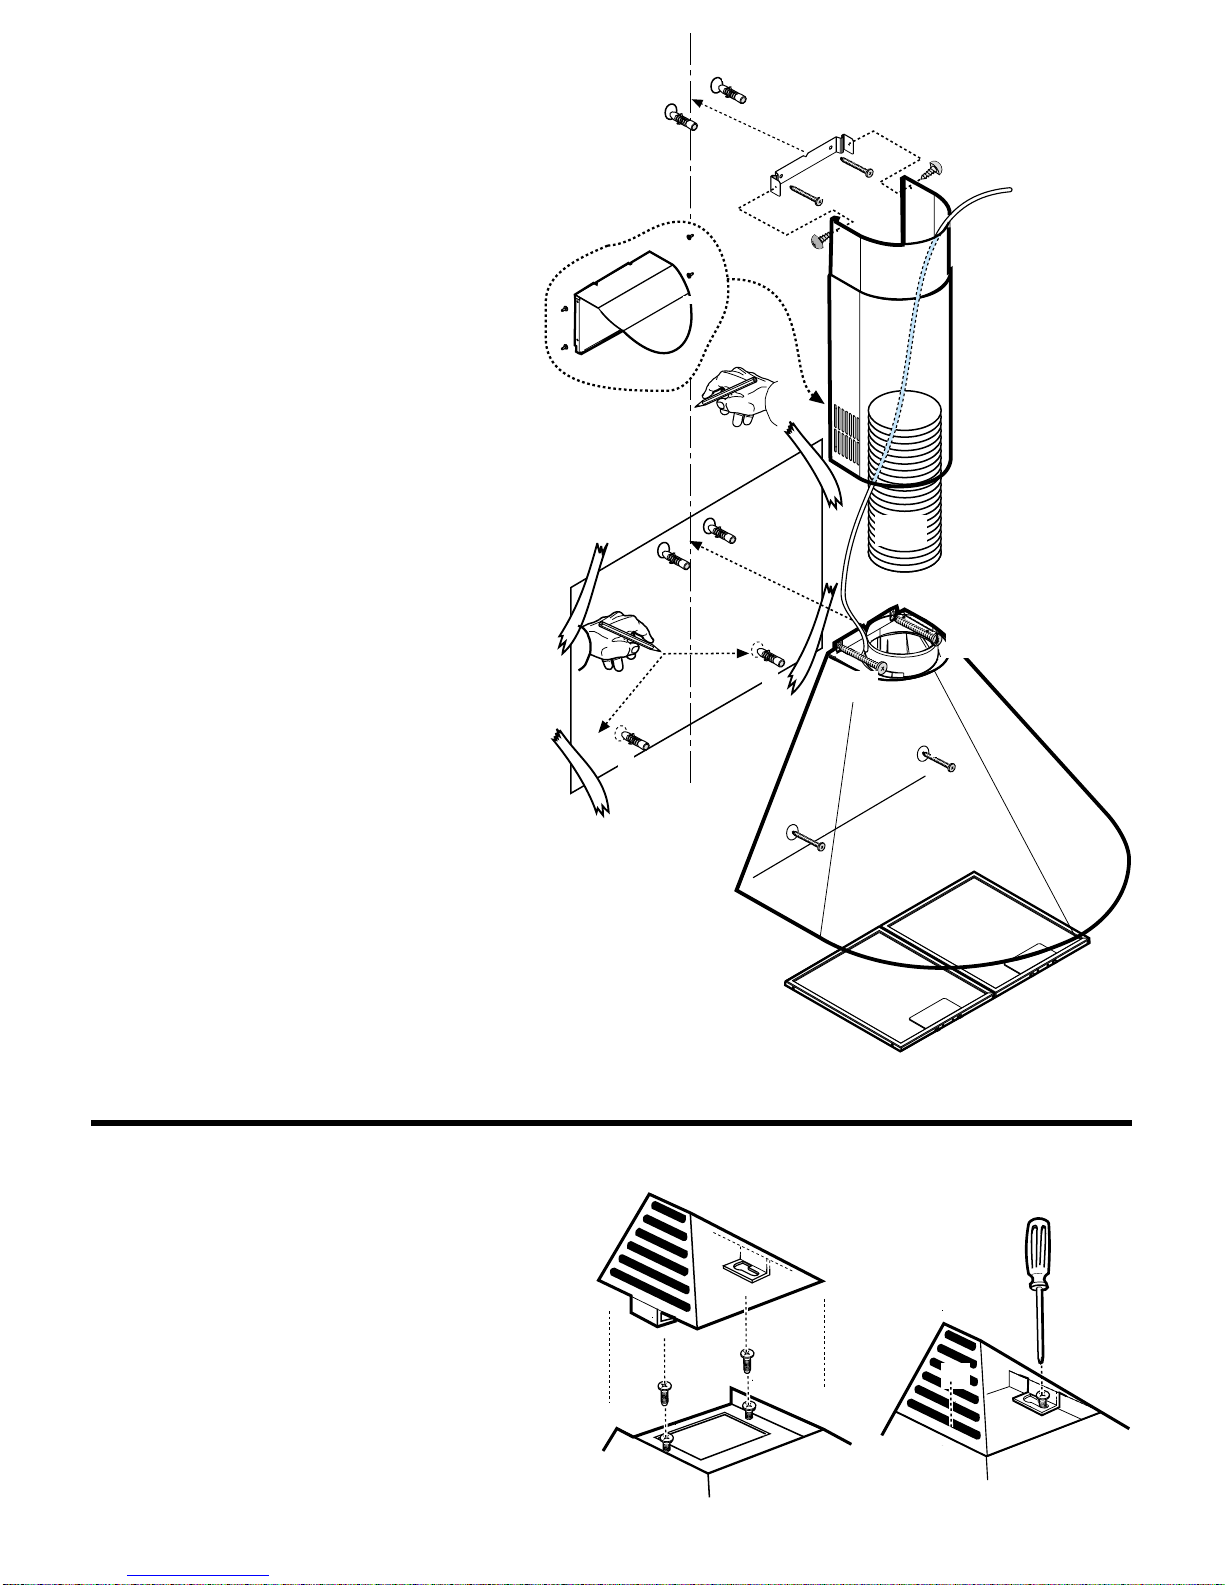
Anti-grease Filter –
If situated inside the support grill, it may be one of the following
types:
Paper filter must be replaced once a month or if colouring
appears on upper side, in such cases the colouring is evident
through the grill openings.
Sponge filter should be washed with hot soapy water once
a month and replaced every 5 to 6 washes.
Metallic filter must be cleaned once a month, with non
abrasive detergents, by hand or in dishwasher on low
temperature and short cycle.
To obtain access to the grease filter Jopen the grill K via
the hooks Land free the grill from the stoppers M.
Some models are provided with a metal filter N without
support grill, this filter should be washed as instructions
noted for metallic filter above and is removed from its placing
by pushing the handles Otowards the back and sliding the
filter Ndownwards.
When washed in a dish-washer, the grease filter may
discolour slightly, but this does not affect its filtering capacity.
Only for model with electronic control panel:
Once the grease filters have been cleaned, press button 1
(see preceding page) for about 3 seconds until you hear the
acoustic signal (beep): the LED 4 will now stop flashing.
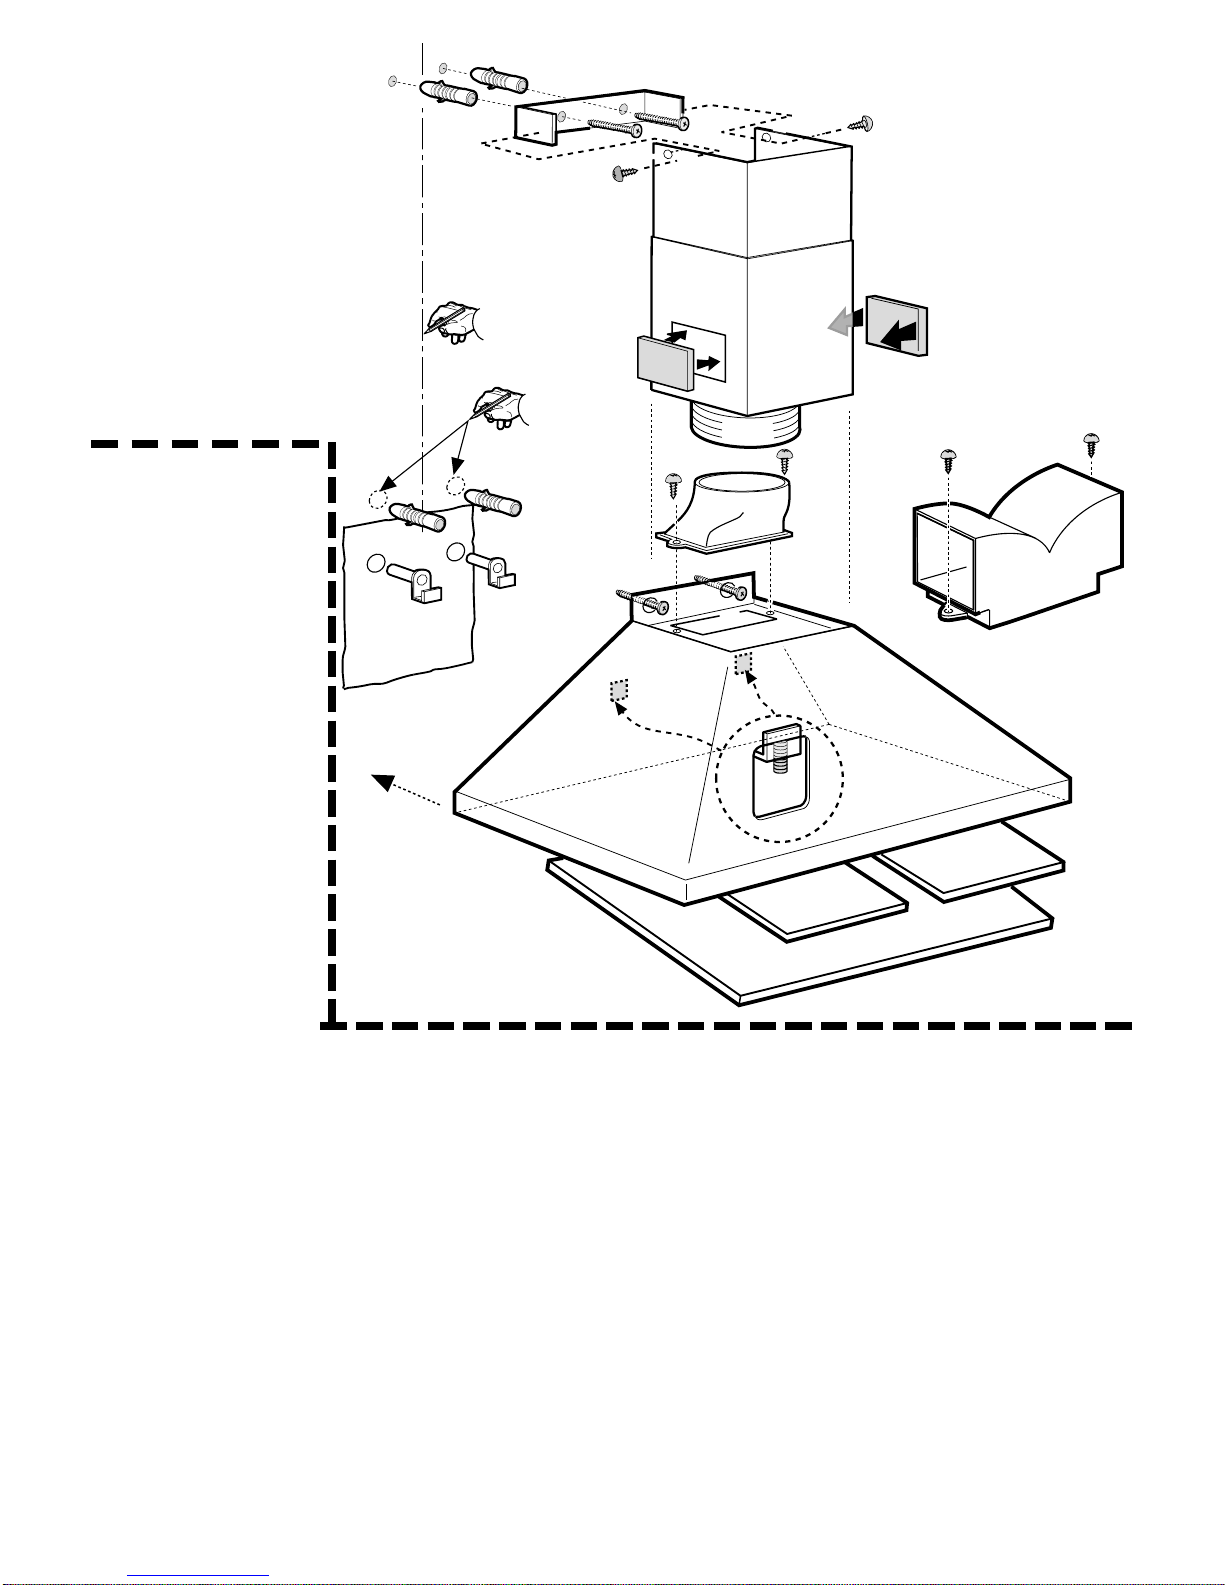
Carbon Filter
(2 pieces – only for filter version)
The active carbon filters Eare not washable nor regenerative.
It should be changed every 6 months in normal use.
The active carbon filters capture unpleasant cooking
odours.
Apply one on each side covering both grills protecting the
motor propeller, then turn the filter central handles Pclockwise.
In order to dismantle turn the central handle Panti-clockwise
for each filter.
Only for model with electronic control panel:
Once you have replaced the charcoal filter, press button 1
(see preceding page) for about 3 seconds until you hear the
acoustic signal (beep).
LED 5 will now stop flashing.
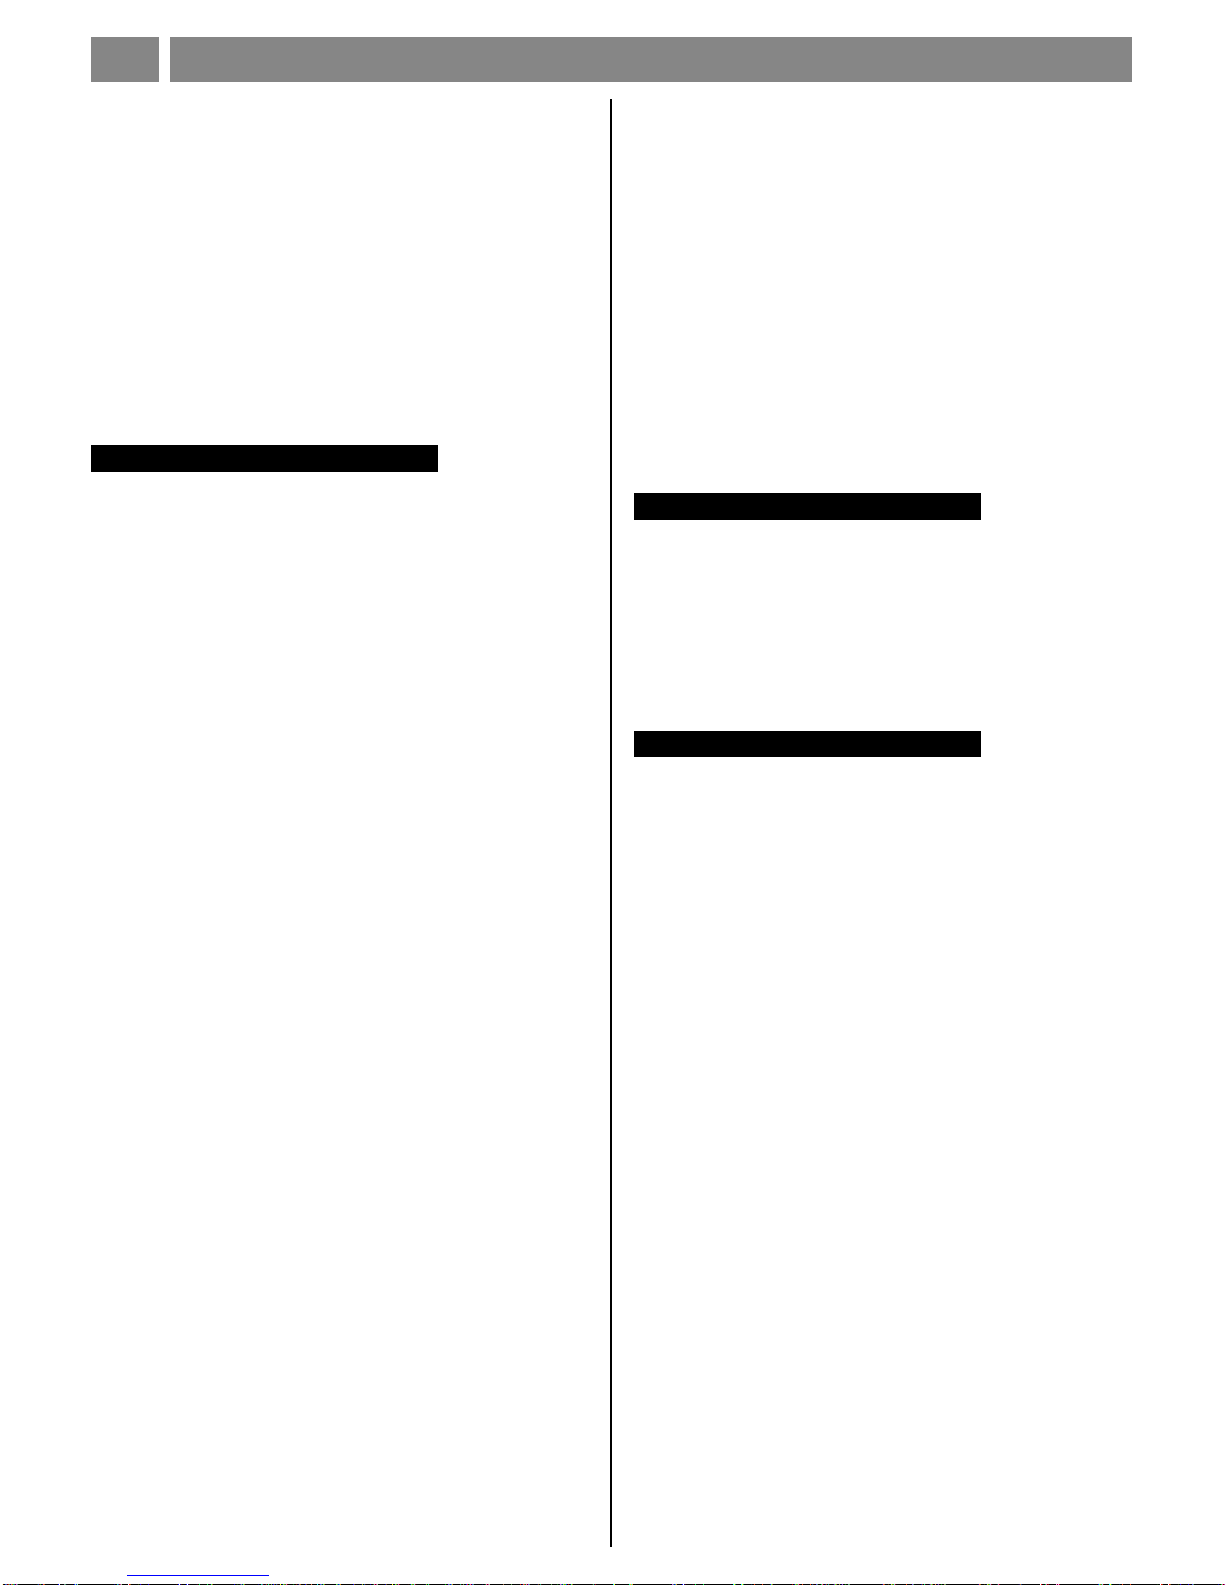
Replacing lightbulbs
Remove the anti-grease filter support grill or the anti-grease
filter to attain access to the lightbulb area. Remove the
damaged lightbulb and replace with an incandescent oval
bulb max. 40W E14.
If the cooker-hood comes with a halogen light, take off its protection
byunscrewing(Z1)orbyremovingit(Z2liftingwithasmallflatedged
screwdriver).Remove thedamagedbulbandsubstituteitwithamax
20W halogen bulb (G4).
Caution
Thisapplianceisdesignedtobeoperatedbyadults.Childrenshould
notbeallowedto tamper with thecontrolsorplay with the appliance.
Do not use the cooker hood where the grill is not correctly
fixed! The suctioned air must not be conveyed in the same
channel used for fumes discharged by appliances powered
by other than electricity. The environment must always be
adequately aerated when the cooker hood and other
appliances powered by other than electricity are used at the
same time. Flambé cooking with a cooker hood is
prohibited. The use of a free flame is damaging to the filters
and may cause fire accidents, therefore free flame cooking
must be avoided. Frying of foods must be kept under close
control in order to avoid overheated oil catching fire. Carry
out fumes discharging in accordance with the regulations in
force by local laws for safety and technical restrictions.
INSTRUCTION ON MOUNTING AND USE
GB

LI1PCH Ed. 01/03
Table of contents
Languages:
Other Smeg Ventilation Hood manuals

Smeg
Smeg SST60S User manual

Smeg
Smeg KEIV90 Technical manual

Smeg
Smeg KSET610X User manual

Smeg
Smeg KSEIR60 Technical manual

Smeg
Smeg KSEG50 Technical manual

Smeg
Smeg Victoria Aesthetic KTR90XE User manual

Smeg
Smeg KSED97X Technical manual

Smeg
Smeg PASC7801FPX User manual

Smeg
Smeg k24x90 User manual

Smeg
Smeg KEFV60 Technical manual
Popular Ventilation Hood manuals by other brands

Miele
Miele DA 220-2 OPERATING AND INSTALLATION Manual

Haier
Haier HATS6DS2XWIFI Installation and user manual

Frigidaire
Frigidaire FRIGIDAIRE installation instructions

Franke
Franke Retro 710 FDR 906 BK/XS User instructions

Infiniton
Infiniton CMPTRAL-NG61 instruction manual

Küppersbusch
Küppersbusch KD 6600 Instruction booklet