Smipack FP560 User manual


Use and maintenance manual FP560 - FP560A - FP870A
3
USE AND MAINTENANCE MANUAL
Manual or semi-automatic L-sealer
FPF560 - P560A - FP870A
MANUAL CODE:
DATE OF CREATION:
REVISION:
VERSION DATE:
DM210702
23.10.2012
A
10.09.2014
4
PREFACE
While thanking you for choosing us, SMIPACK S.p.A. is pleased to welcome you among its
large range of customers, hoping that the use of this machine will fully satisfy you.
This manual can be used for the model FP560 - FP560A - FP870A. It has been drawn up to
put you in conditions to be able to intervene on the various parts, and to understand the various
maintenance and intervention operations.
We recommend strictly keeping to the standards prescribed herein in order to guarantee
efficiency, duration and performance.
SMIPACK S.p.A. will not be held liable for direct or indirect consequences due to a proper or
improper use of this publication. We reserve the right to perform technical modifications on our
systems and on this manual without prior notice.
SMIPACK S.p.A. - Via Piazzalunga, 30 - 24015 S. Giovanni Bianco (BG) - ITALY
Tel. +39.0345.40400 - Fax +39.0345.40409
READ THIS MANUAL CAREFULLY AND FULLY BEFORE INSTALLING THE
MACHINE.
THIS MANUAL IS AN INTEGRAL PART OF THE MACHINE AND MUST
THEREFORE ACCOMPANY IT UNTIL ITS FINAL DISMANTLING.

CE DECLARATION OF CONFORMITY
(Directive 2006/42/EC - Annex IIA)
Company name and address of manufacturer of the machine :
SMIPACK S.p.A. - Via Piazzalunga, 30 - 24015 S. Giovanni Bianco (BG) - ITALY
Tel. +39.0345.40400 - Fax +39.0345.40409
Name and address of the company authorized to compile the technical documentation :
S.L.M. S.r.l. - Via S. Ambrogio, 51 - 22040 Alzate Brianza - CO (Italy) - Tel : +39 031 630925 - in the
person of Giorgio Livio.
We hereby declare that the machine :
with the function of :
complies with Directive 2006/42/EC and to provisions of law which transpose Directives
2004/108/EC (Electromagnetic compatibility) and 2006/95/EC (Low-voltage)
It also complies with the following harmonised standards:
• EN ISO 12100: 2010
• EN ISO 13849-1:2008 + AC:2009
• CEI EN 60204-1:2006
►Model :
□FP560 □FP560A □FP870A
►Serial number :
□Manual or semi-automatic L-sealer
Giuseppe Nava
(Legal Representative)
San Giovanni Bianco,

White page

Use and maintenance manual FP560 - FP560A - FP870A
7
CE DECLARATION OF CONFORMITY................................................................................................................................................5
1. GENERAL STANDARDS AND RECOMMENDATIONS .............................9
1.1 HOW TO READ AND USE THE MANUAL ........................................................................................................9
1.2 WARRANTY AND EXCLUSION OF LIABILITY .................................................................................................9
1.3 REFERENTIAL STANDARDS .........................................................................................................................10
1.4 SYMBOLS KEY ...............................................................................................................................................10
2. MACHINE INSTALLATION .......................................................................13
2.1 DESCRIPTION OF THE MACHINE COMPONENTS ......................................................................................13
2.2 WEIGHT AND DIMENSIONS OF PACKED MACHINE ...................................................................................15
2.3 MACHINE WEIGHT AND DIMENSIONS .........................................................................................................15
2.4 TRANSPORTATION AND UNPACKING .........................................................................................................16
2.5 ASSEMBLY BY USER .....................................................................................................................................16
2.6 ELECTRICAL CONNECTION ..........................................................................................................................20
2.7 ELECTRICAL INSTALLATION DATA ..............................................................................................................21
2.8 CONDITIONS FOR USE .................................................................................................................................21
2.9 DEMOLITION AND WASTE DISPOSAL .........................................................................................................21
3. INFORMATION ON THE MACHINE .........................................................23
3.1 DESCRIPTION OF THE MACHINE .................................................................................................................23
3.2 DESCRIPTION OF DANGER ZONES .............................................................................................................23
3.3 AUTOMATED OPERATION OF MACHINES ..................................................................................................25
3.4 IDENTIFICATION DATA AND TECHNICAL DATA OF THE MACHINE .........................................................25
3.5 TECHNICAL SPECIFICATIONS OF THE PRODUCT .....................................................................................26
3.6 FEATURES OF THE FILM ..............................................................................................................................27
3.7 DETERMINATION OF FILM WIDTH ...............................................................................................................27
3.8 FILM SEALING OPERATION ..........................................................................................................................27
4. PREPARING THE MACHINE FOR USE ...................................................29
4.1 POSITIONING REEL AND FILM PASSAGE ...................................................................................................29
4.2 ADJUSTING FILM PERFORATORS ...............................................................................................................29
4.3 ADJUSTING THE PACKAGING PLANE .........................................................................................................30
4.4 ADJUSTING THE SEALING FRAME ..............................................................................................................30
4.5 POSITIONING REEL HOLDER SUPPORT AND PRODUCT HOLDING PLATE ...........................................31
4.6 USING THE SCRAP COLLECTION DEVICE ..................................................................................................31
4.7 FIRTS FILM SEALING .....................................................................................................................................32
4.8 PACKAGING PRODUCTS ..............................................................................................................................34
5. OPERATION AND USE .............................................................................37
5.1 OPERATOR PANEL INTERFACE .................................................................................................................37
5.2 TURNING THE MACHINE ON ........................................................................................................................38
5.3 ACTIVATION AND STOP OF THE PACKAGING CYCLE ON THE SEMI-AUTOMATIC
MODELS (FP560A-FP870A) ...........................................................................................................................38
5.4 STOPPING THE MACHINE IN AN EMERGENCY ..........................................................................................38
5.5 SAVING A PROGRAM ....................................................................................................................................39
5.6 PARAMETERS MENU .....................................................................................................................................39
5.7 ACCESS TO RESERVED MENU ....................................................................................................................41
5.8 DESCRIPTION OF SYMBOLS ON DISPLAY .................................................................................................42
SUMMARY

8
6. CLEANING AND MAINTENANCE ............................................................43
6.1 GENERAL WARNINGS AND PRECAUTIONS ...............................................................................................43
6.2 NATURE AND FREQUENCY OF MAINTENANCE CHECKS AND INTERVENTIONS ..................................45
6.3 REPLACING SEALING BLADE .......................................................................................................................45
6.4 REPLACING PTFE AND SILICON RUBBER ..................................................................................................46
6.5 CHECKING THE LEVEL OF COOLANT .........................................................................................................47
6.6 ACCESS TO ELECTRICAL PANEL ................................................................................................................47
6.7 MACHINE ACCESS AREAS FOR INSPECTIONS .........................................................................................48
7. ANOMALIES AND FAULTS - HOW TO RESOLVE ..................................49
7.1 SOLUTIONS TO OPERATING PROBLEMS ...................................................................................................49
7.2 ERROR AND MESSAGE DISPLAYS ..............................................................................................................49

Use and maintenance manual FP560 - FP560A - FP870A
9
1.1 HOW TO READ AND USE THE MANUAL
This manual constitutes an integral part of the machine and therefore it must be preserved
during its entire lifetime and must be handed on to eventual future owners.
Purpose of use and maintenance manual
Before carrying out any type of operation on the machine, you must carefully read this manual
and any attached documentation in order to avoid possible damage to the machine, to persons
or to objects.
The manual and all attached documents must be kept in a place which can be easily accessed,
close to the machine and known to the users (operators and maintenance personnel) so that
they may be consulted promptly when circumstances require it.
SMIPACK S.p.A. will not be held liable for possible faults, accidents or problems due to failure
to comply with the provisions contained in this user manual or caused by unauthorised
modifications and installations of accessories.
Preservation of use and maintenance manual
• Keep the use and maintenance manual with care.
• Do not remove, tear or rewrite parts of the use and maintenance manual.
• Make sure that any amendment implemented is incorporated in the text.
Consulting use and maintenance manual
Consultation of this manual is facilitated by the insertion, in the first pages, of a summary which
allows you to quickly locate the topics described.
Method for updating manual in the event of modifications to the machine
The descriptions and illustrations of this manual cannot be contested. SMIPACK S.p.A.
reserves the right (while maintaining the essential features) to modify these machines at any
time for their functional, commercial and aesthetic improvement without being obliged to
update previous manuals and production except for exceptional situations.
Any updates or integrations of the manual will be considered an integral part of it. We would
like to thank you in advance for any suggestions which you would like to point out to us in order
to implement further improvement.
1.2 WARRANTY AND EXCLUSION OF LIABILITY
SMIPACK declines all liability deriving from:
- electrical and pneumatic supply defects;
- lack of maintenance;
- pollution external to the machine;
- unauthorised modifications and repairs;
- use of non-original spare parts;
- acts of God such as earthquakes, floods or fires.
CHAPTER 1 - GENERAL STANDARDS AND RECOMMENDATIONS

Chapter 1 - General standards and recommendations
10
The machine is shipped to the Customer ready to be installed, after it has passed all of the
foreseen tests and inspections in the factory, in compliance with legislation in force. The
warranty has a 365 day validity starting from the date of purchase. During the period covered
by warranty, SMIPACK commits itself to remove any faults or defects as long as periodical
maintenance is performed and original parts are always used. Expendable materials, parts
subject to normal wear or breakage, faults caused by atmospheric agents, transporting the
machine to an assistance centre and labour charges are excluded from the warranty. The
warranty is only valid for the original purchaser and only if the warranty certificate is properly
filled out in every part and sent within 20 days from the date of purchase. Repairs carried out
covered by the warranty do not interrupt or extend the warranty period.
The warranty will become void and invalid immediately in the following cases:
> improper use of the machine
> variation of process conditions
> unauthorised tampering by third parties
> failure to comply with that indicated in the instruction manual
> failure to use the manufacturer's original spare parts
1.3 REFERENTIAL STANDARDS
The machine models contained in this manual comply with Legislative Provisions which
transpose the following Directives.
European Directives applied to the equipment and/or the assembly:
• 2006/42/EC - Directive concerning the approximation of the laws of Member states relating
to machinery.
• 2006/95/EC - Directive concerning low voltage.
• 2004/108/EC - Directive concerning electromagnetic compatibility.
Technical standards applied to the equipment and/or the assembly:
• EN ISO 12100: 2010 - Safety of machinery - General design principles - Risk assessment
and risk reduction.
• EN ISO 13849-1:2008 + AC:2009 - Safety of machinery - Safety-related parts of control
systems - Part 1: general principles for design.
• IEC EN 60204-1:2006-06 - Safety of machinery - Electrical equipment of machines - Part
1: general rules.
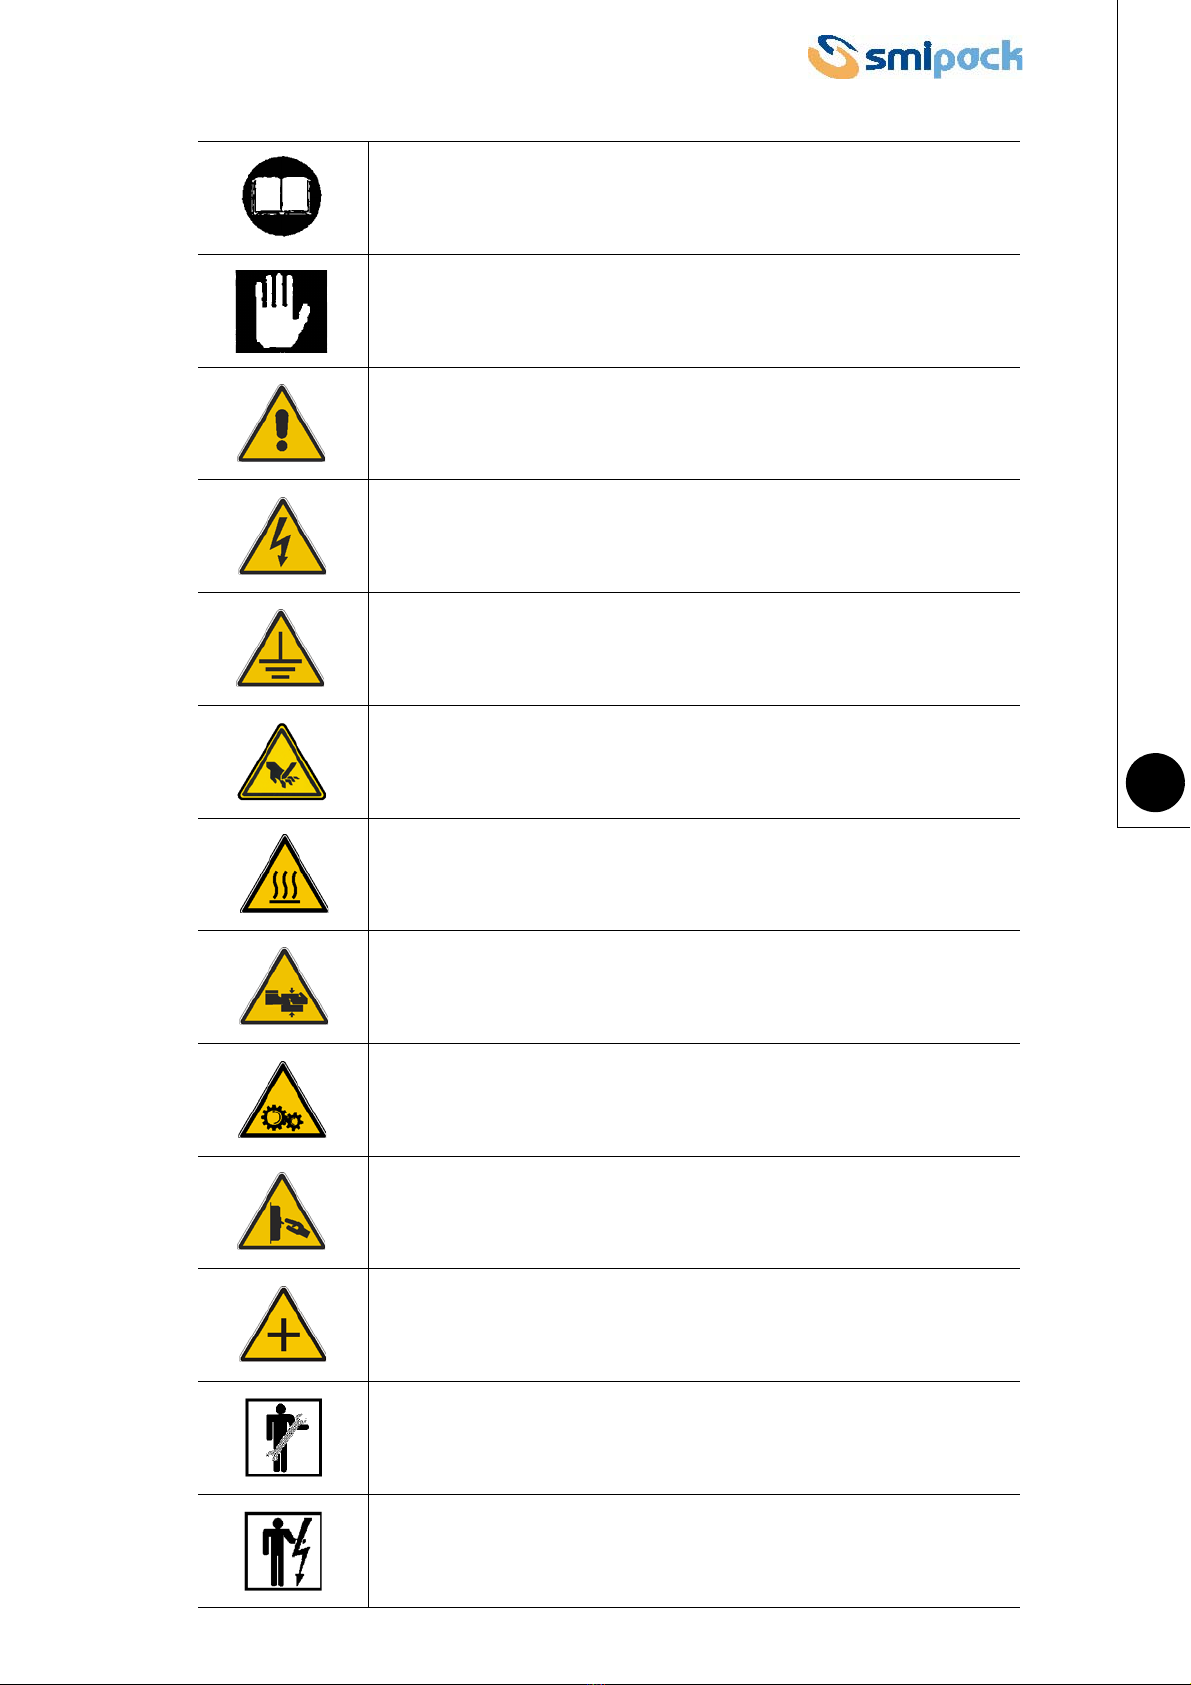
1.4 SYMBOLS KEY
All of the instructions and information contained in this manual are often associated with certain
simple. Their meaning is explained in the following table.
Use and maintenance manual FP560 - FP560A - FP870A
11
N.B.!
This indicates useful information for consultation of the manual and
proper operation of the machine.
WARNING!
This indicates situations of risk for the machine and/or for the product
being processed.
ATTENTION!
This indicates personal hazardous situations and suggests standards of
conduct.
HIGH-VOLTAGE ZONE!
Electrocution danger inside electrical panel.
EARTHING
The earthing connection of the system is compulsory!
CUTTING DANGER!
Be careful of the upper limbs.
BURNING DANGER!
Be careful not to enter into contact with elevated temperature surfaces.
CRUSHING DANGER!
Be careful not to crush parts of the body, especially the upper limbs.
MOVING PARTS DANGER!
Be careful not to intervene on gears or mechanical systems while in
movement.
ELECTROCUTION DANGER - CUT POWER BEFORE OPERATING!
Make sure to have disconnected voltage before carrying out the
indicated operations.
CHECK MACHINE MODEL PURCHASED
Before operating make sure the indications refer to the machine model
you have purchased.
MECHANICAL MAINTENANCE TECHNICIAN
ELECTRICAL MAINTENANCE TECHNICIAN

Chapter 1 - General standards and recommendations
12
USE OF SAFETY FOOTWEAR COMPULSORY
USE OF HEARING PROTECTION COMPULSORY
USE OF GLOVES COMPULSORY
CLOTHING COMPULSORY
GOGGLES COMPULSORY
Use and maintenance manual FP560 - FP560A - FP870A
13
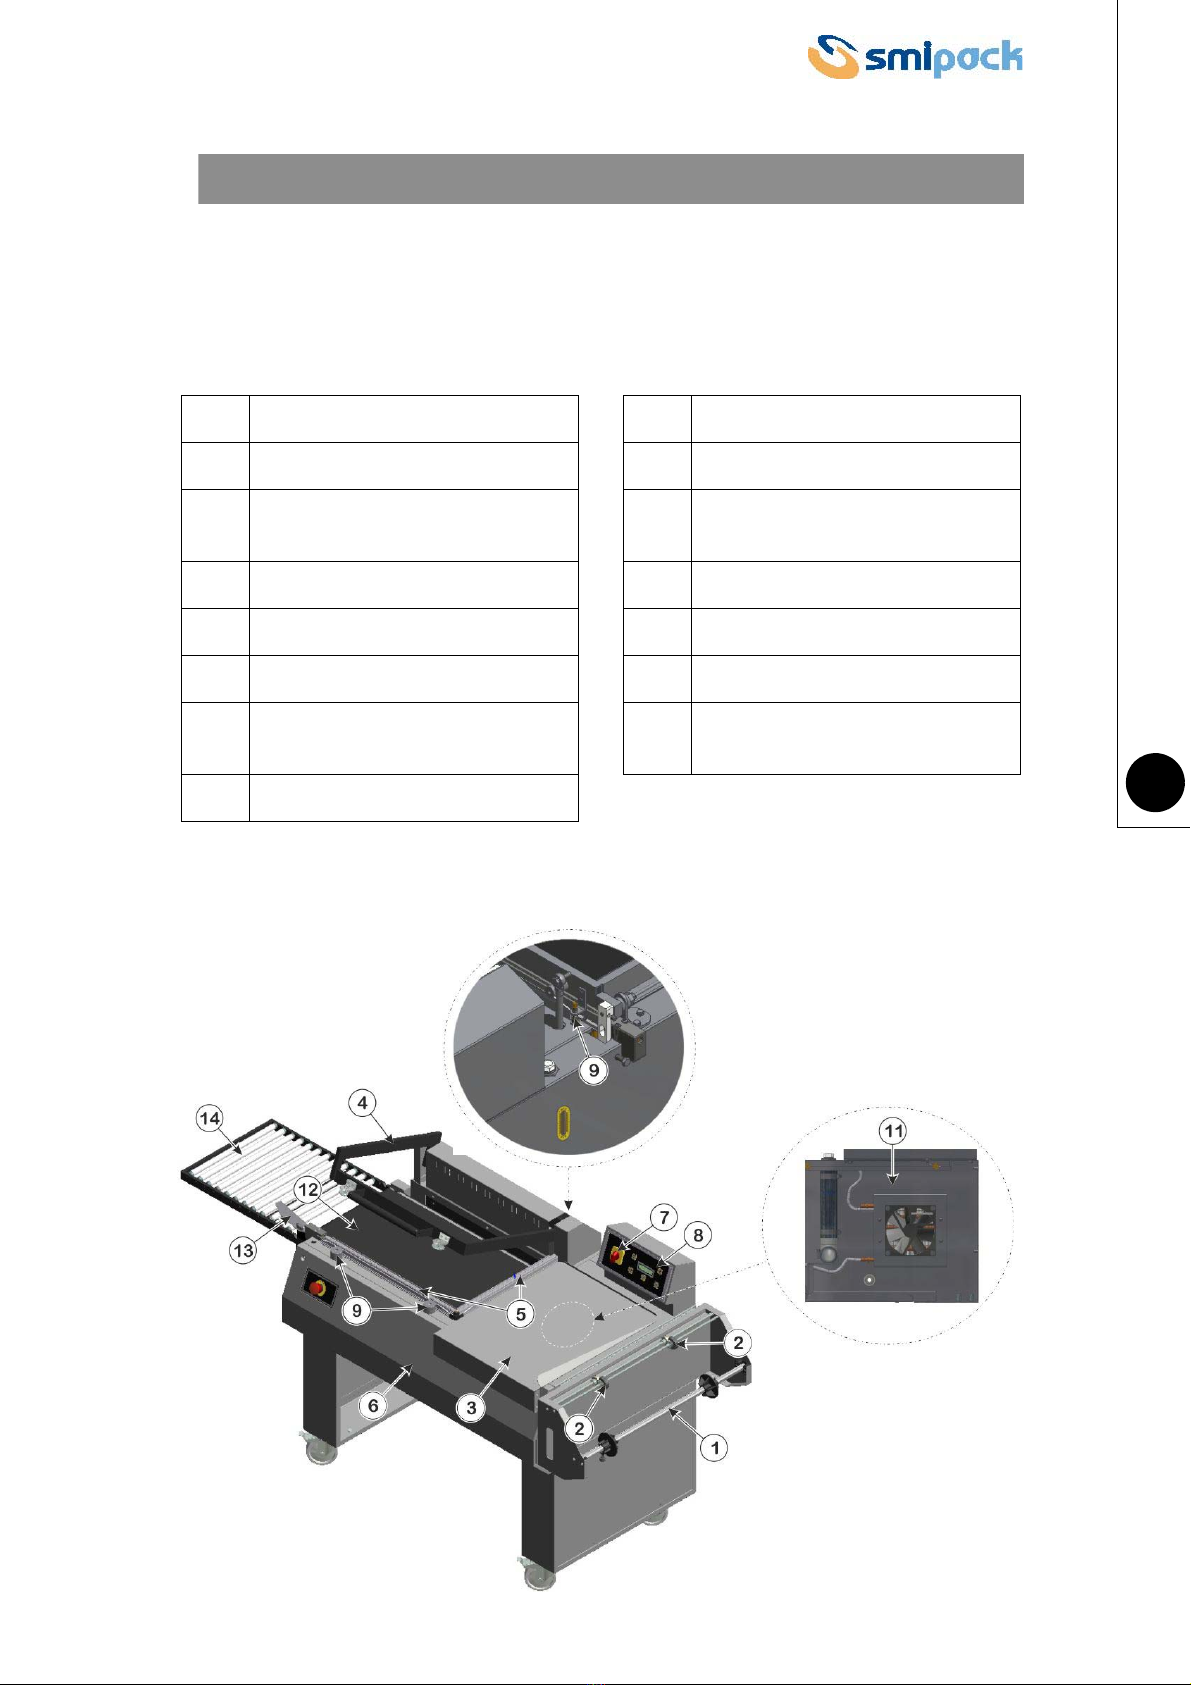
2.1 DESCRIPTION OF THE MACHINE COMPONENTS
A) MODEL FP560
1REEL HOLDER 9ELECTROMAGNET
2FILM PERFORATORS 10 CYCLE START MICROSWITCH
3INFEED PRODUCT-HOLDING
PLATE 11 COOLING UNIT
4SEALING FRAME 12 OUTFEED CONVEYOR BELT
5SEALING BLADE 13 PACKAGE DEVIATION DEVICE
6ELECTRICAL PANEL 14 ROLLER UNIT
7MASTER SWITCH 15 FILM SCRAP COLLECTION DEVICE
(optional)
8OPERATOR PANEL
CHAPTER 2 - MACHINE INSTALLATION
Fig. 2.1.1

Chapter 2 - Machine installation
14
B) MODEL FP560A - FP870A
1REEL HOLDER 8OPERATOR PANEL
2FILM PERFORATORS 9CYCLE START MICROSWITCH
3INFEED PRODUCT-HOLDING
PLATE 10 COOLING UNIT
4SEALING FRAME 11 OUTFEED CONVEYOR BELT
5SEALING BLADE 12 PACK DEVIATION DEVICE
6ELECTRICAL PANEL 13 ROLLER UNIT
7MASTER SWITCH 14 FILM SCRAP COLLECTION DEVICE
(optional)
Fig. 2.1.2

Use and maintenance manual FP560 - FP560A - FP870A
15
2.2 WEIGHT AND DIMENSIONS OF PACKED MACHINE
2.3 MACHINE WEIGHT AND DIMENSIONS
X (mm) Y (mm) H (mm) WEIGHT (kg)
FP560 1400 880 1160 161
FP560A 1400 880 1160 177
FP870A 2125 1110 1293 320
Fig. 2.2.1
Fig. 2.3.1
X (mm) X1 (mm) Y (mm) H (mm) WEIGHT (kg)
FP560 1520 490 790 1050 129
FP560A 1520 490 790 1050 145
FP870A 2015 1035 1055 1125 267
Chapter 2 - Machine installation
16
2.4 TRANSPORTATION AND UNPACKING
SMIPACK S.p.A., depending on the type of transportation and products to be delivered, uses
adequate packaging to guarantee integrity and preservation during transportation.
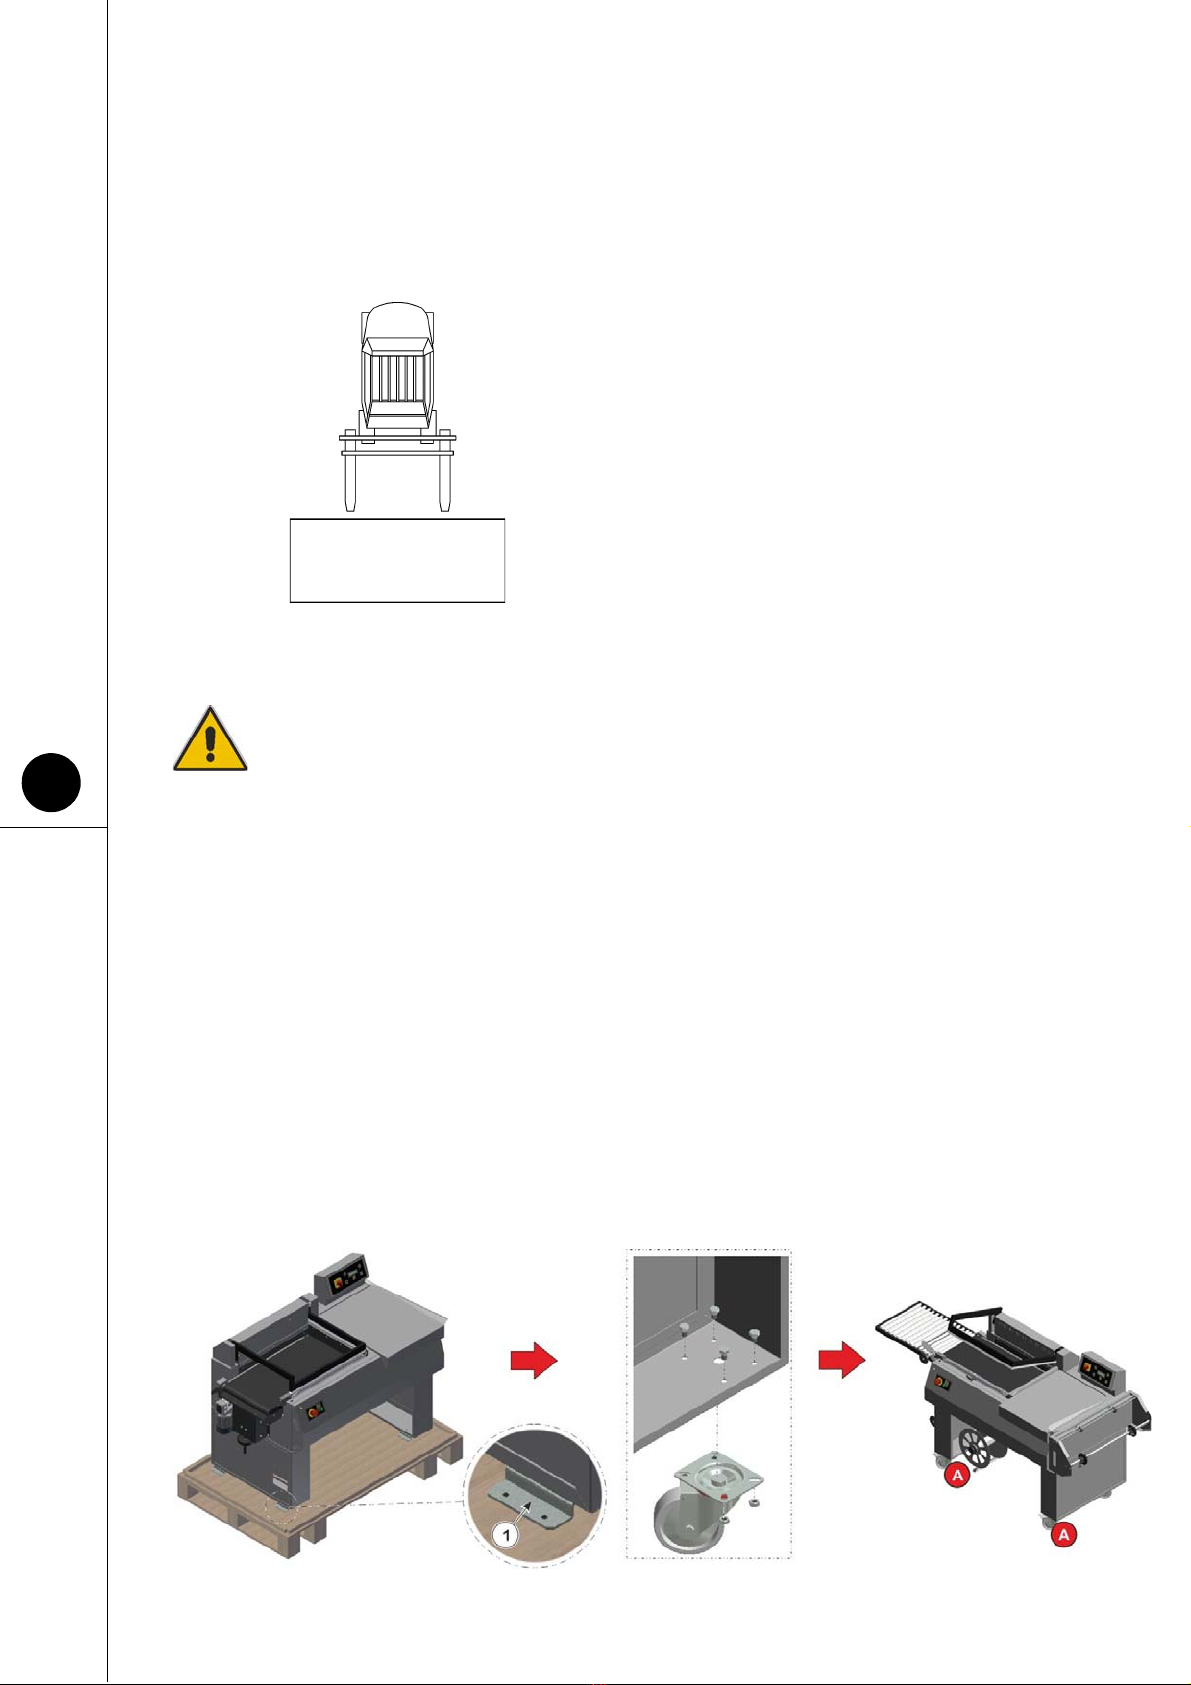
Handle with care when transporting and positioning the
machine. The carrier is liable for damage sustained
during transportation. Be careful not to damage the
exposed parts when unpacking the unit. The machine
module must be handled from beneath. Due to the type
of packaging, systems that work from above cannot be
used.
Lift the machine in the middle from the longest side and
adjust the position of the fork-lift truck at the greatest
centred position possible.
ATTENTION!
Before handling, always make sure that the lifting device is suitable to lift the load.
For prolonged storage, place the machine in a covered area at a temperature ranging from -
15 °C to +55 °C, with a humidity degree between 30% and 90% without condensation.
2.5 ASSEMBLY BY USER
This section describes the assembly processes which must be carried out by the user
according to the user's own requirements.
1) ASSEMBLY OF THE WHELLS
• Remove the supports 1 of the machine attached to the pallet.
• Keeping up the machine using a fork-lift truck mount the wheels as shown in the figure.
Fig. 2.4.1
Fig. 2.5.1
Use and maintenance manual FP560 - FP560A - FP870A
17
Attention! Mount the two wheels A equipped with brakes at the front of the machine.
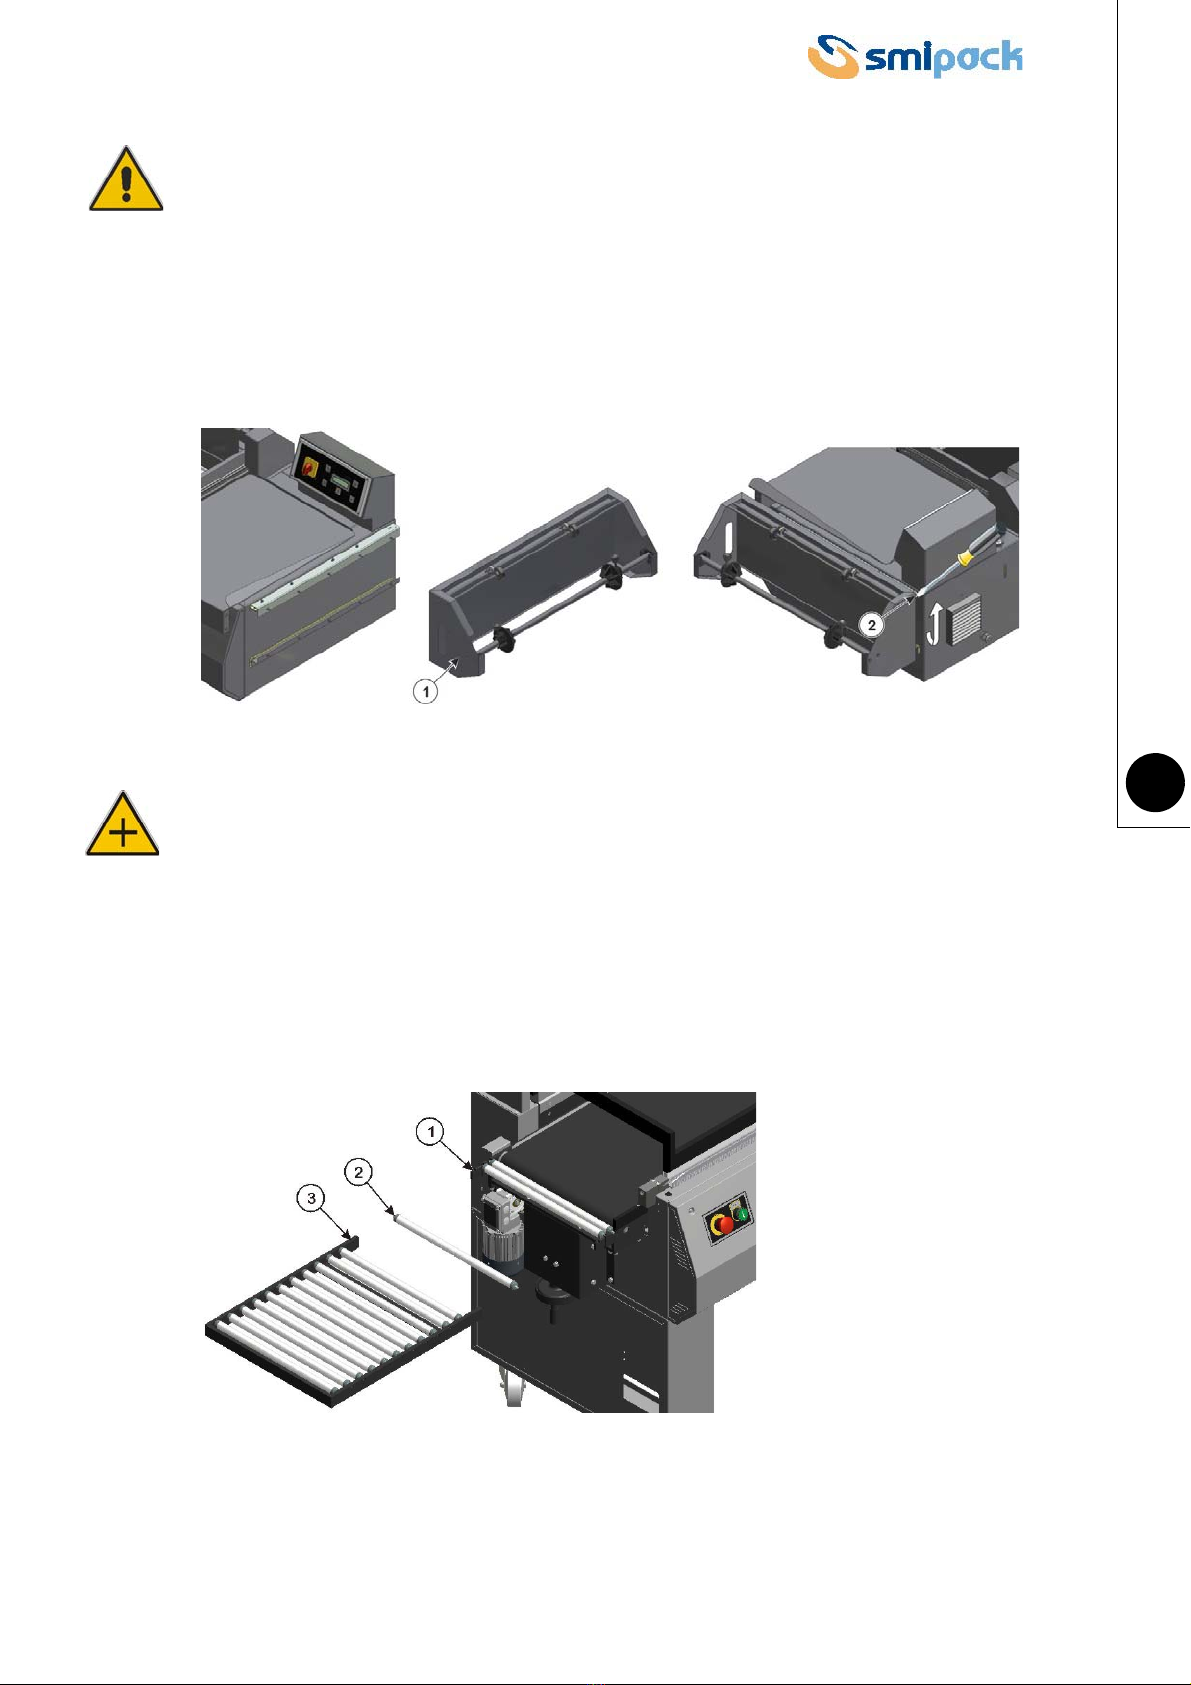
2) ASSEMBLY OF THE REEL HOLDER
• Put the reel holder support (1) in the relative guides.
• Use a screwdriver at point 2.
3) INSTALLATION OF THE ROLLER CONVEYOR
a) For models FP560 and FP560A :
• Insert the roller conveyor in the couplings 1 of the conveyor belt, securing it with the roller
2 in the relevant holes 3.
• During assembly and disassembly avoid pushing the roller conveyor sideways in order not
to damage its couplings.
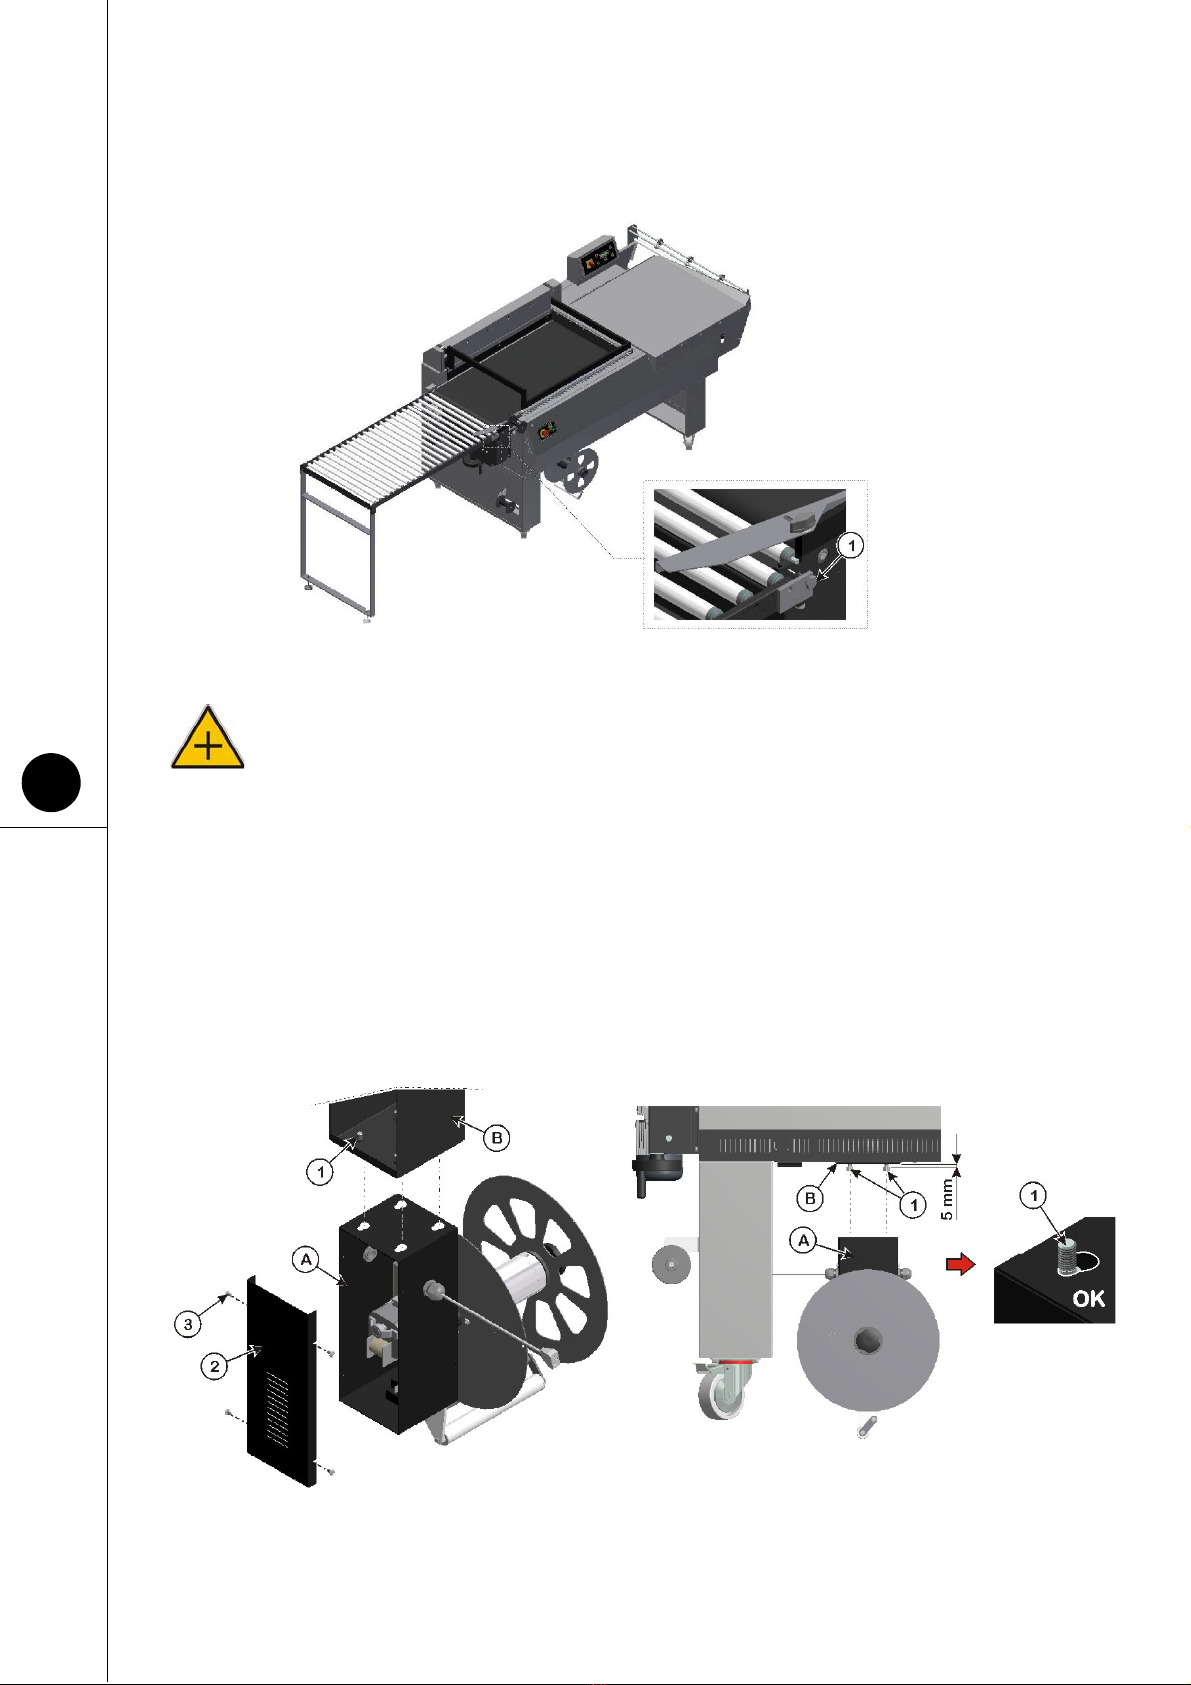
b) For model FP870A :
• With screws 1 attach the roller conveyor to the pre-drilled holes on the machine as shown
in the figure.
Fig. 2.5.2
Fig. 2.5.3
Chapter 2 - Machine installation
18
• During assembly and disassembly avoid pushing the roller conveyor sideways in order not
to damage its couplings.
4) INSTALLATION OF THE SCRAP COLLECTION DEVICE
a) MOUNTING THE FILM SCRAP COLLECTION DEVICE
• Apply screws 1 on machine support B, being careful not to tighten them in order to facilitate
the subsequent operations. (stay at about 5 mm from the stop).
• Remove the protection guard 2 by undoing the screws 3.
• Position the device so that the upper side of support A comes into contact with support B,
surpassing the previously mounted screws by means of the wider holes. Then move the
device sideways in order to reach the final conditions shown in the figure and then fully
tighten the screws 1.
• Finally reassemble the protective casing 2.
Fig. 2.5.4
Fig. 2.5.5

Use and maintenance manual FP560 - FP560A - FP870A
19
b) MOUNTING THE FILM SCRAP TRANSMISSION ROLLERS
• Mount the two film scrap tensioning rollers 4 and 5 in the relevant pre-drilled holes on the
machine as indicated in the figure.
c) MOUNTING THE SCRAP GUIDE DEVICE
• Fit the device 6 which allows to guide the film scrap in the position shown in the figure and
secure it by tightening the knob 7.
d) ACTIVATING THE SCRAP COLLECTION DEVICE
• Connect the device electrically to the relevant socket 10 on the back of the machine. To
activate device operation press the switch indicated in the figure.
Fig. 2.5.6
Fig. 2.5.7

Chapter 2 - Machine installation
20
5) ASSEMBLY OF THE PACK DEVIATOR DEVICE
• Screw the pack deviator device 7 into the prepared hole on the machine as shown in the
figure.
2.6 ELECTRICAL CONNECTION
Power must be cut from the machine for all operations involving connection to the electrical
network.
ATTENTION!
Whenever accessing the electrical system, remember to cut the power and to wait at
least five minutes before operating.
THE EARTH CONNECTION IS COMPULSORY!
Connecting the machine to the mains must be carried out in compliance with standards in force
in the user's country.
Check to make sure that the machine's power supply frequency and voltage (see plate
applied on the machine) correspond to the power supply network.
Fig. 2.5.8
Fig. 2.5.9
Other manuals for FP560
1
This manual suits for next models
2
Table of contents
Other Smipack Packaging Equipment manuals


Popular Packaging Equipment manuals by other brands

ErgoPack
ErgoPack 700 Original operating instructions

U-Line
U-Line S-11303 quick start guide

Orion
Orion L55S-13 instruction manual

Fromm
Fromm P329 M/HA Operation manual & spare parts list

ALLpaQ Packaging Group
ALLpaQ Packaging Group Genesis Series Operator user manual

Dynaric
Dynaric MUL-320 Operation manual


Promax
Promax DC-530-H Operation manual

Minipack-Torre
Minipack-Torre FM90sc instruction manual

Minipack-Torre
Minipack-Torre Tunnel 50 instruction manual

Minipack-Torre
Minipack-Torre Media Matic Installation, operation and maintenance

coesia
coesia CITUS KALIX KP 600 instruction manual

Extend
Extend EXS-303 Operation manual