ALLpaQ Packaging Group Genesis Series User manual

Chapter 1 - ALLpaQ Genesis 500 Operational Instructions
1.1 Moving the Container
Pallet Base may be moved using manual
handling equipment such as Fork lift truck
or manual pallet jack.
The Pallet base allows for a four way entry
however if the handling equipment in use
has forks lifting from the legs; two way entry
should be used from short either side. (see
Fig 1.2).
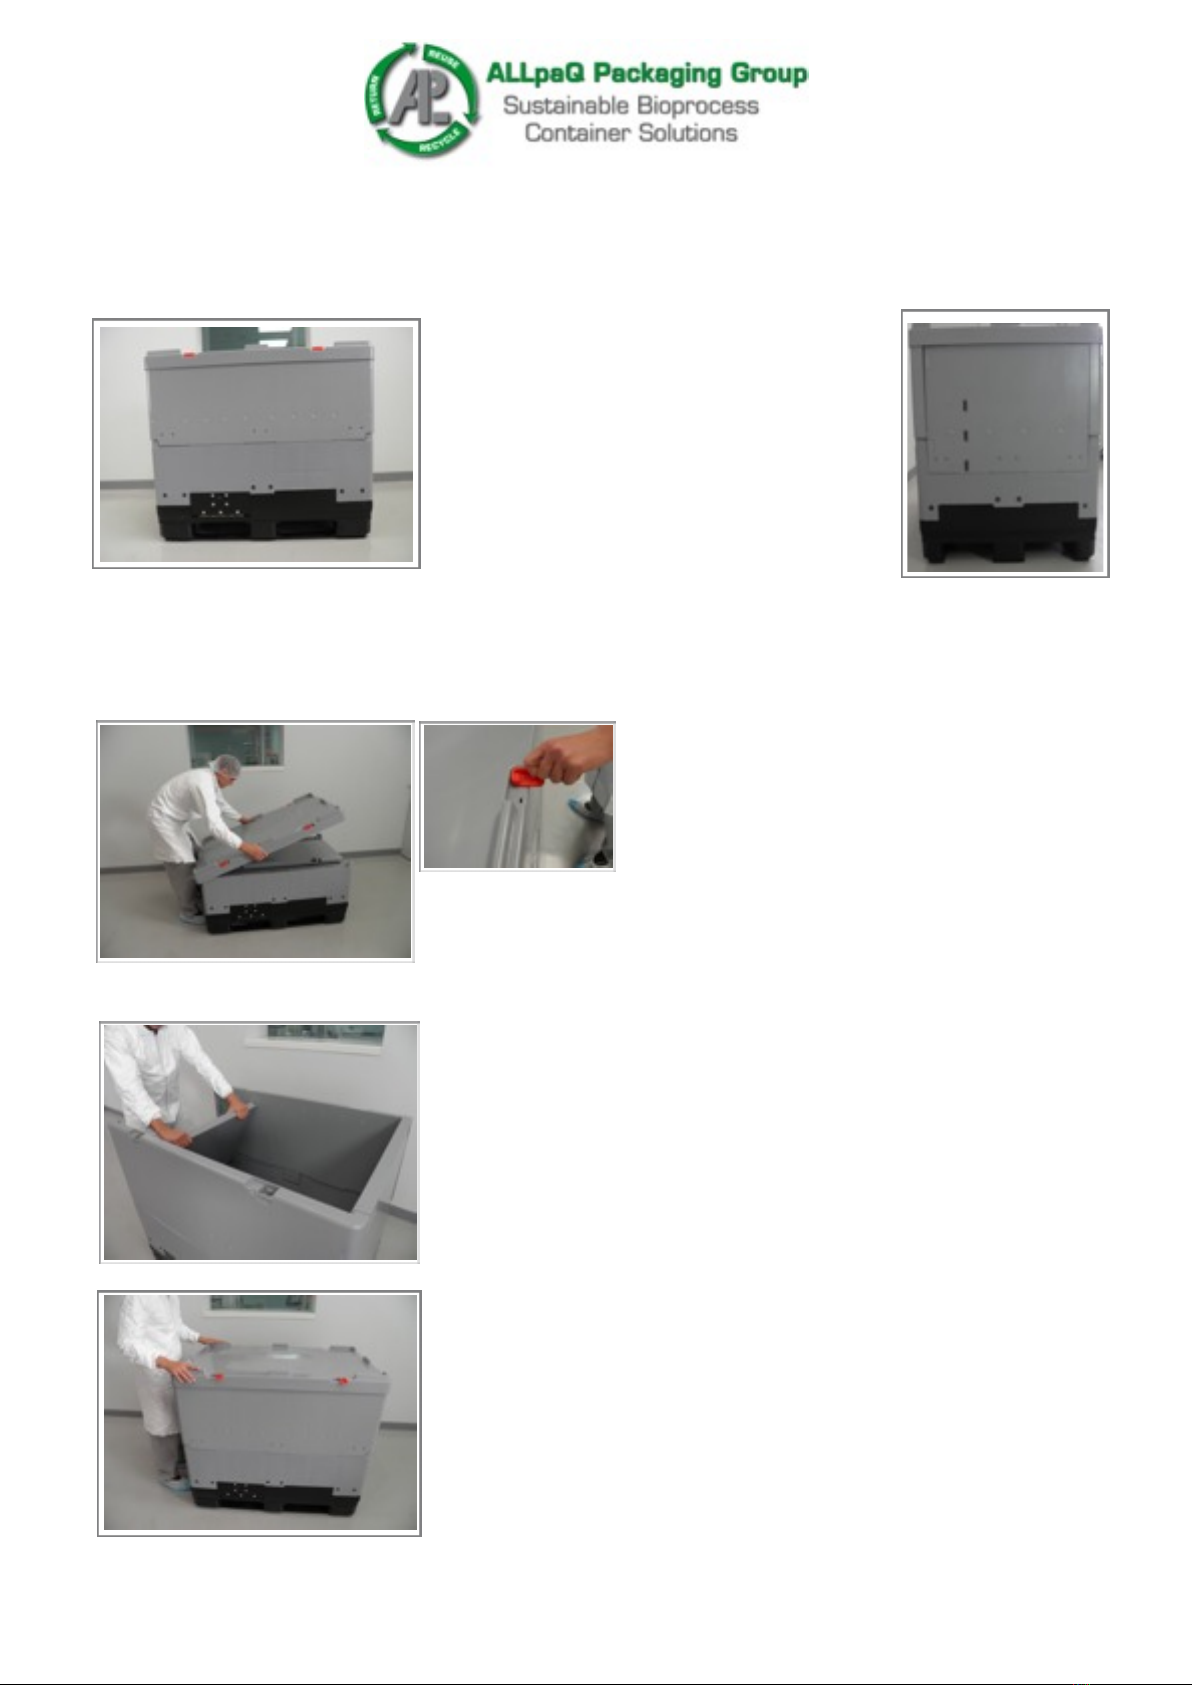
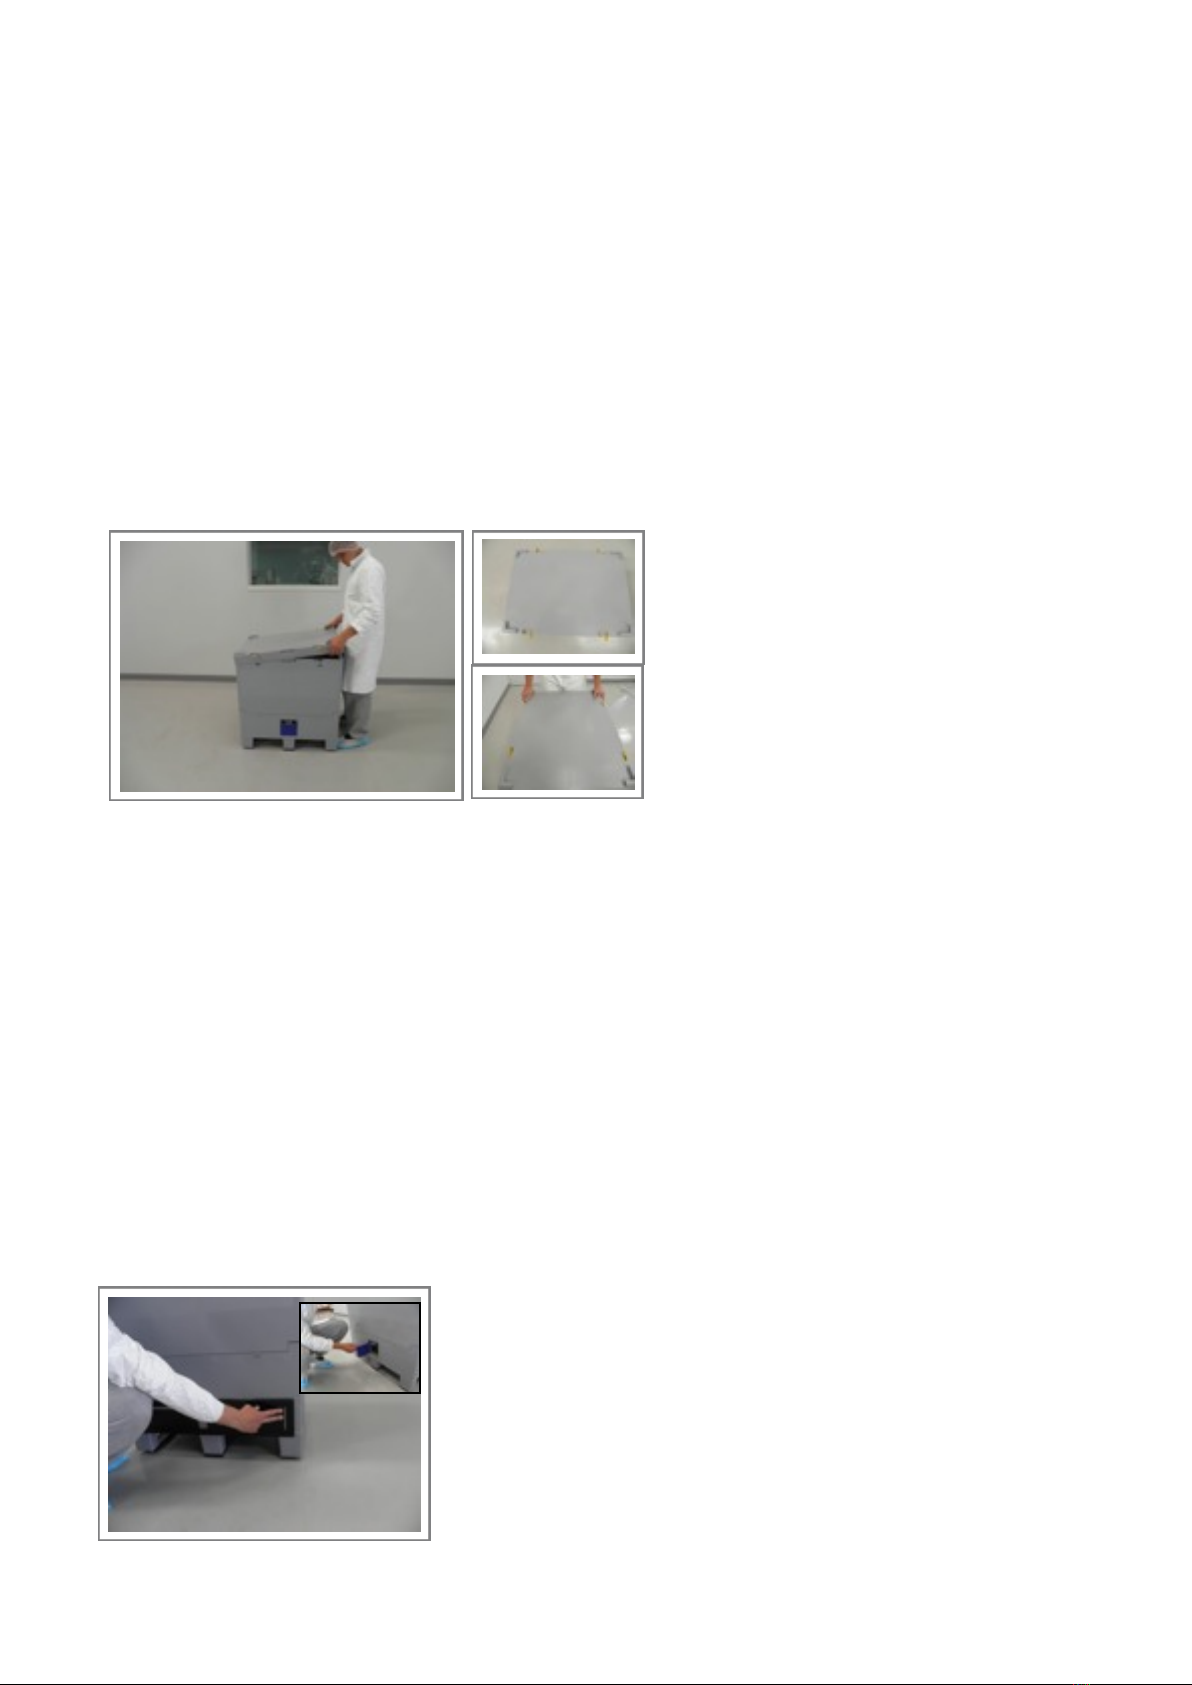
1.2 Unfold the container for use
When you receive an empty container it will be collapsed or folded with the lid on.
Turn red catches to unlock position. (Fig 2.4)
Simply lift the lid from the base unit and
store safely away from marked walk way
(Fig 2.1).
DO NOT attempt to lift by red catches to avoid damage.
Erect by lifting the top of the sidewalls by pulling towards the
body and clicking into locked position. (Fig 2.2)
Replace lid as necessary (Fig 2.3)
When replacing the lid ensure that you lock red catches into
position to avoid accidental damage.
Manual V1 - (Sept 14th 2012)
Fig1.1
Fig 1.2
Fig 2.1
Fig 2.2
Fig 2.3
Fig 2.4
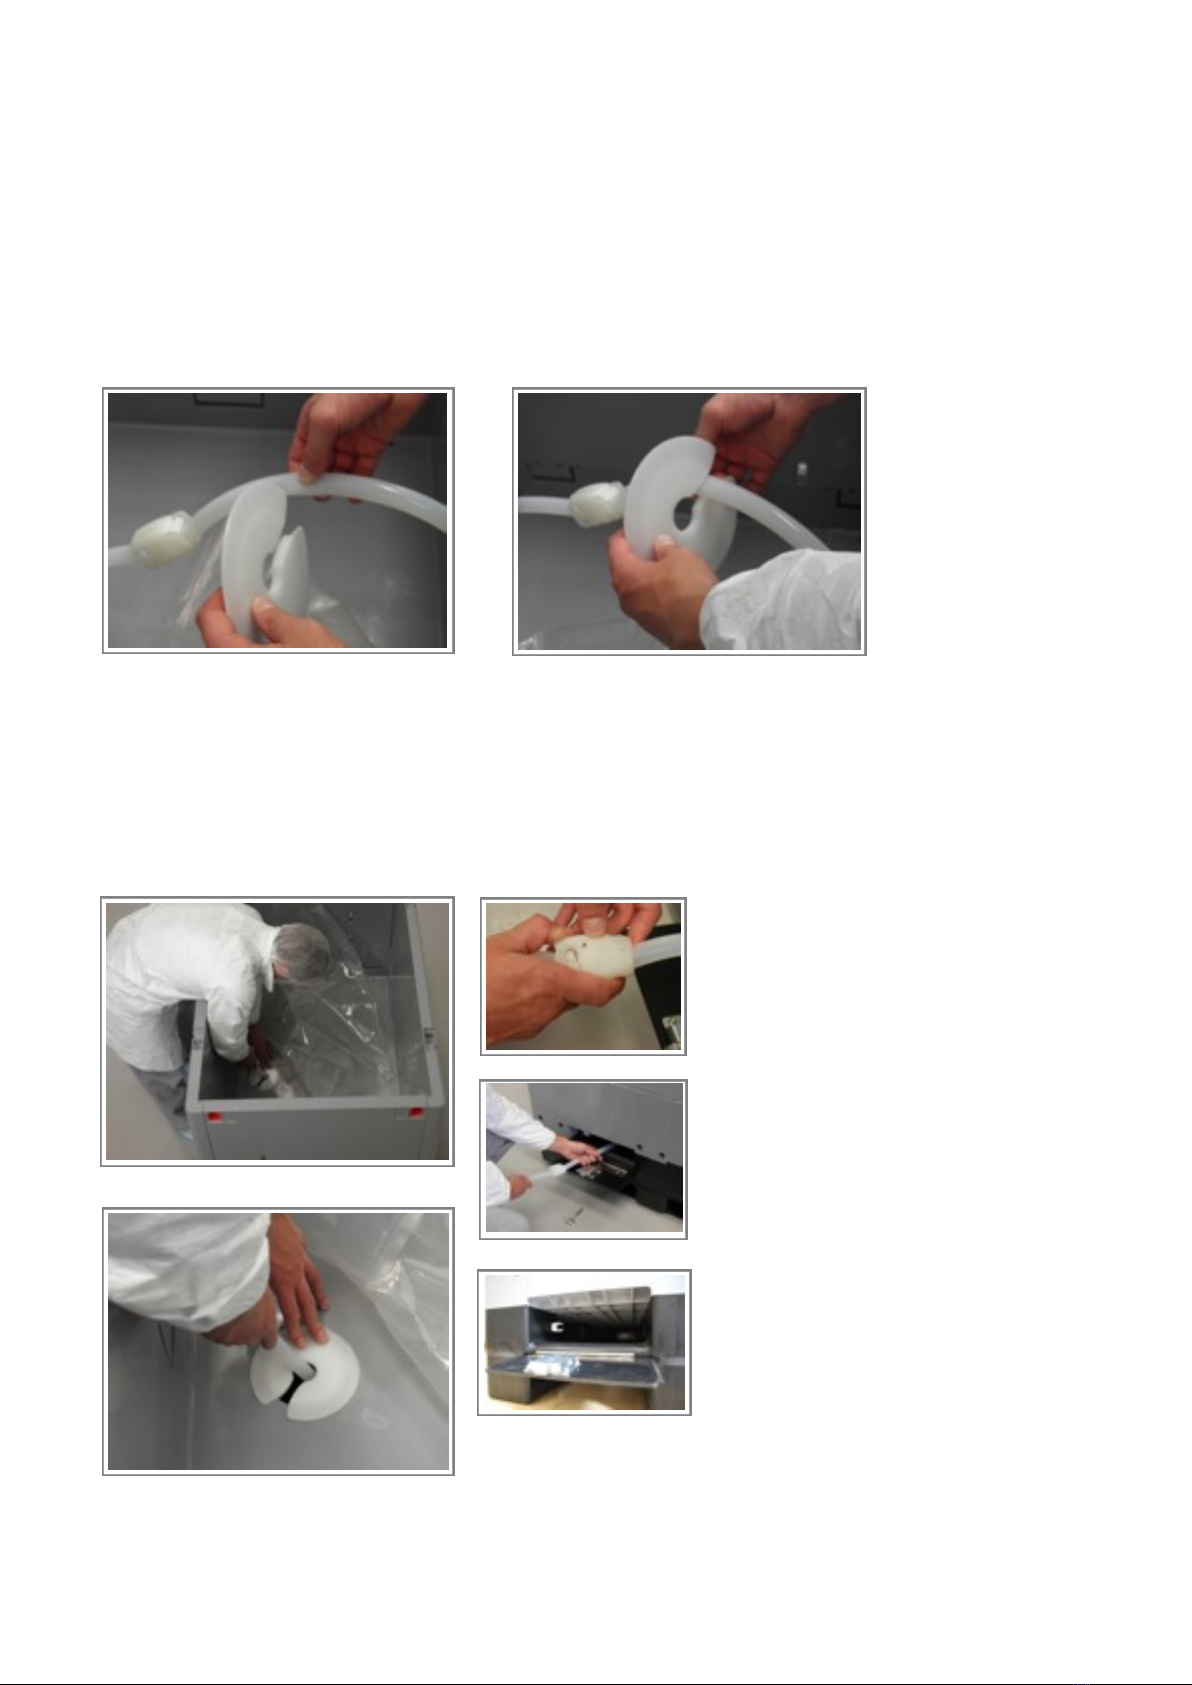
1.3 Fitting port position plates to bag
ALLpaQ recommend that all 3D bags used in conjunction with it bioprocess range of containers
should be fitted with a small plastic support disc when filled. Some bags may be pre fitted with a
similar disc however if this is not the case please contact ALLpaQ immediately before use.
To fit the disc simply squeeze the tubing (Fig 3.1) and slide towards the centre of the disc as
shown (Fig 3.2).
1.4 Fitting the bag
When fitting a bag the operator can access the base of the container over the erected side panels
(Fig 4.1).
The bag can be located from this position.
Please ensure that the clamp on the
outlet tube is closed/open prior to
operation according to manufacturers
instruction. (Fig 4.3)
Feed the outlet tubing through the
drain hole in the base of the
container (Fig 4.1).
It may be helpful to pull the tubing by
accessing the chamber via the front
door on the base of the unit (Fig 4.4).
Once the tubing has been fed
through, the white disc will locate in
the bottom drain hole of the base
unit (Fig 4.2).
The end of the drain tubing should
be fitted to the tube clamp for easy
access (Fig 4.5)
Bag filling can commence, according to manufacturers recommendations.
ALLpaQ recommend foam dunnage for all shipping containers (see 2:4 Fig 4.5)
Manual V1 - (Sept 14th 2012)
Fig 3.1 Fig 3.2
Fig 4.1
Fig 4.3
Fig 4.2
Fig 4.5
Fig 4.4

1.5 Fitting the lid
One Operator
Hold the lid against the front panel (Fig 5.1). Simply lower the lid until it is located across all four
corners of the container (Fig 5.2). Always lock the lid to a fully erected container.
1.6 Moving the container to storage
Pallet base allows for four way entry provided the manual handling equipment used is either a
pallet jack or fork lift truck (See Fig 1.1 and 1.2 above).
Material handling equipment with forks lifting from the legs (Fig 6.2) ensure two way entry is used
when lifting from front or rear of the base.
1.7 Emptying the container
Move the container into position as described in point 1.6
1.8 Removing the lid
Please do not attempt to lift the lid using the red catches this will increase the risk of breakage.
Please refer to instruction 1.2
Manual V1 - (Sept 14th 2012)
Fig 5.1 Fig 5.2
Fig 6.2
Fig 6.1

1.9 Connect Bag Outlet
Open the front base access door using the square key (Fig 9.1).
The outlet tubing can be taken from the clamp (Fig 9.4), the end
of drain tubing pulled from base storage area (Fig 9.3) and
connected according to bag suppliers instructions.
Bag can now be drained.
1.10 Removal of bag
Once the bag is drained apply any clamps to the outlet tubing
(Fig 10.1).
The bag can now be pulled out of
the top of the container.
Once removed the base access
door should be closed (Fig 10.2)
Once removed the bag should be
disposed of in line with company
policy.
1.11. Folding the container
To begin with the lid is removed
and the container is empty.
Start with either of the short
sided panels; slide red catches to
the centre of the panel (Fig 11.2).
Manual V1 - (Sept 14th 2012)
Fig 9.1
Fig 10.1
Fig 10.2
Fig 9.2 Fig 9.3
Fig 11.1
Fig 11.2
Fig 9.4

Once the panel has been released allow the panel to be lowered into the box using both hands.
Repeat the procedure with the opposite short panel.
Starting with either of the
remaining long sided panels,
lower the panel folding towards
the centre (Fig 11.3).
Repeat the process for the last
side panel ( Fig 11.4)
The lid should then be fitted to the folded container.
Note that the red locking catches may be in the locked
position before operation. (Fig 11.5).
1.12 Moving the container to storage area.
Please refer to instruction point 1.6 (refer to Fig 6.1 and 6.2).
Chapter 2 - ALLpaQ Genesis 1000 operational Instructions
2.1 Moving the Container
As with the ALLpaQ Genesis 500L container the pallet base allows for 4 way entry (Fig 1.2) when
using a pallet jack or fork lift truck. Material handling equipment using forks which lift from the legs
must use the 2 way entry front and rear (Fig 1.1).
Manual V1 - (Sept 14th 2012)
Fig 11.3
Fig 11.4
Fig 11.5
Fig 1.1 Fig 1.2
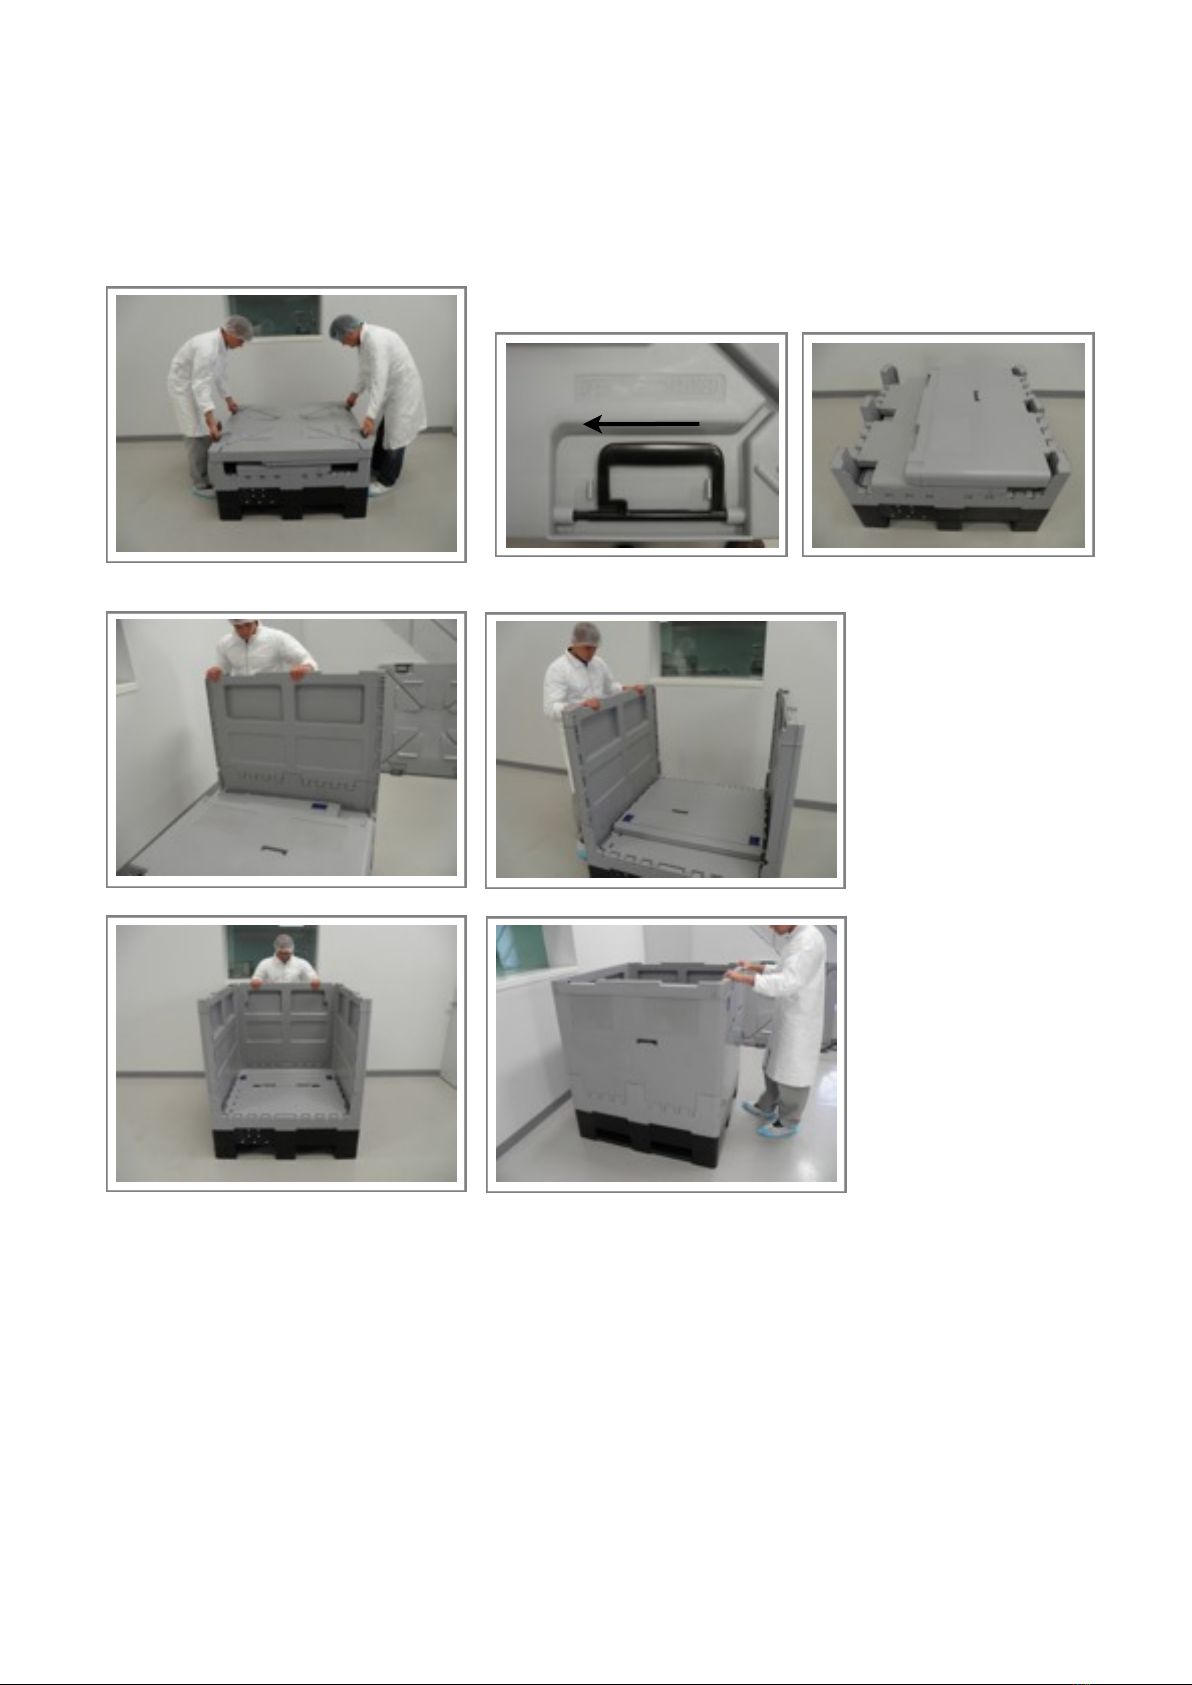
2.2 Unfolding the container for use
When lifting the lid of a 1000 Litre container it is recommended that two people be involved in the
operation.
Hold and lift the
black handles at the
four corners of the
lid and move
towards the centre,
to the open position
(Fig 2.2).
Using both hands
pull the side panel
towards you to erect
the first sidewall (Fig
2.4).
Repeat this action
for the opposite
panel (Fig 2.5)
Complete the same
action with the rear
panel making sure
the wall clicks into
position (Fig 2.6)
Lock the front and final sidewall into position (Fig 2.7).
Replace the lid in a reversal of the description see instruction 2.5 below (Fig 5.1).
2.3 Fitting port position plate to bag
ALLpaQ recommend that all 3D bags used in conjunction with it bioprocess range of containers
should be fitted with a small plastic support disc when filled. Some bags may be pre fitted with a
similar disc however if this is not the case please contact ALLpaQ immediately before use.
For full instructions refer to instruction 1.3
Manual V1 - (Sept 14th 2012)
Fig 2.1
Fig 2.2 Fig 2.3
Fig 2.4 Fig 2.5
Fig 2.6 Fig 2.7

2.4 Fitting the bag
Before fitting the bag make sure you can gain access to the base by opening the drop door
situated at the front of a standard unit (Fig 4.1). Note units may be supplied with two drop doors.
Place the fingers in the slots provided and lift upwards (Fig
4.2), pull towards your body to unhinge the door; allow the
door to rest against the front wall of the container (Fig 4.3).
For full instruction on fitting the bag (see1.4 above).
Once the bag has been fitted correctly and filling is complete
in accordance with bag suppliers instructions a foam
shipping pad is placed over the bag for additional protection
during transportation and storage (Fig 4.5).
ALLpaQ recommend that foam dunnage (Fig 4.5) always be
used during shipment in its range of containers. If foam
dunnage has not been supplied contact ALLpaQ
immediately.
The foam dunnage is simply placed on top of the filled bag
before fitting and securing the lid for storage and
transportation.
Each pad is designed to bag specification to accommodate
the inlet tubing.
2.5 Fitting the lid
Each operator lifts the lid until square over the container.
Lock catches should be open (see Fig 2.2 above).
Push lid down over all four corners then slide the lid handles
to the locked position.
Manual V1 - (Sept 14th 2012)
Fig 4.1
Fig 4.2 Fig 4.3
Fig 4.4
Fig 4.5
Fig 5.1

2.6 Moving the container to storage area
Pallet base allows for four way entry provided the manual handling equipment used is either a
pallet jack or fork lift truck (See Fig 1.1 and 1.2 above). Material handling equipment with forks
lifting from the legs (1.6, Fig 6.2) ensure two way entry is used when lifting from front or rear of the
base.
2.7 Emptying the container
Move container into position in line with previous instructions (see 1.6).
2.8 Removing the lid
When removing the lid please refer to instruction 1.2.
2.9 Connect bag outlet
Connecting bag please refer to previous instructions (see 1.9)
2.10 Removal of the bag
Removing the bag please refer to previous instructions (see 1.10)
2.11 Folding the container
Remove the lid and ensure
the container is empty.
Locate fingers onto the blue
door catches and depress
towards the centre of the box
(Fig 11.1)
Allow the panel to fold
inwards and rest on the
base of the container
(Fig11.2).
Repeat this process for
the opposite rear panel.
On the side panel insert fingers lift panel and fold inwards (Fig 11.3)
Repeat process for opposite panel (Fig 11.4).
Replace lid using ensuring black handles are in open position first (Fig 1.5).
2.12 Moving the container to storage
Pallet base allows for four way entry and two entry dependent upon manual handling equipment.
For detailed information please refer to instruction at (See 1.6)
Manual V1 - (Sept 14th 2012)
Fig 11.1
Fig 11.2
Fig 11.3
Fig 11.4
Fig 11.5Fig 11.4
Chapter 3 - All ALLpaQ Genesis 50 - 250 E & C Versions
3.1 Moving the Container
Pallet base may be moved using manual handling equipment such as Fork lift truck or manual
pallet jack.
Both units are based upon the same foot print and both pallet bases allow a two way entry on the
long side (see Fig 1.1 & 1.2).
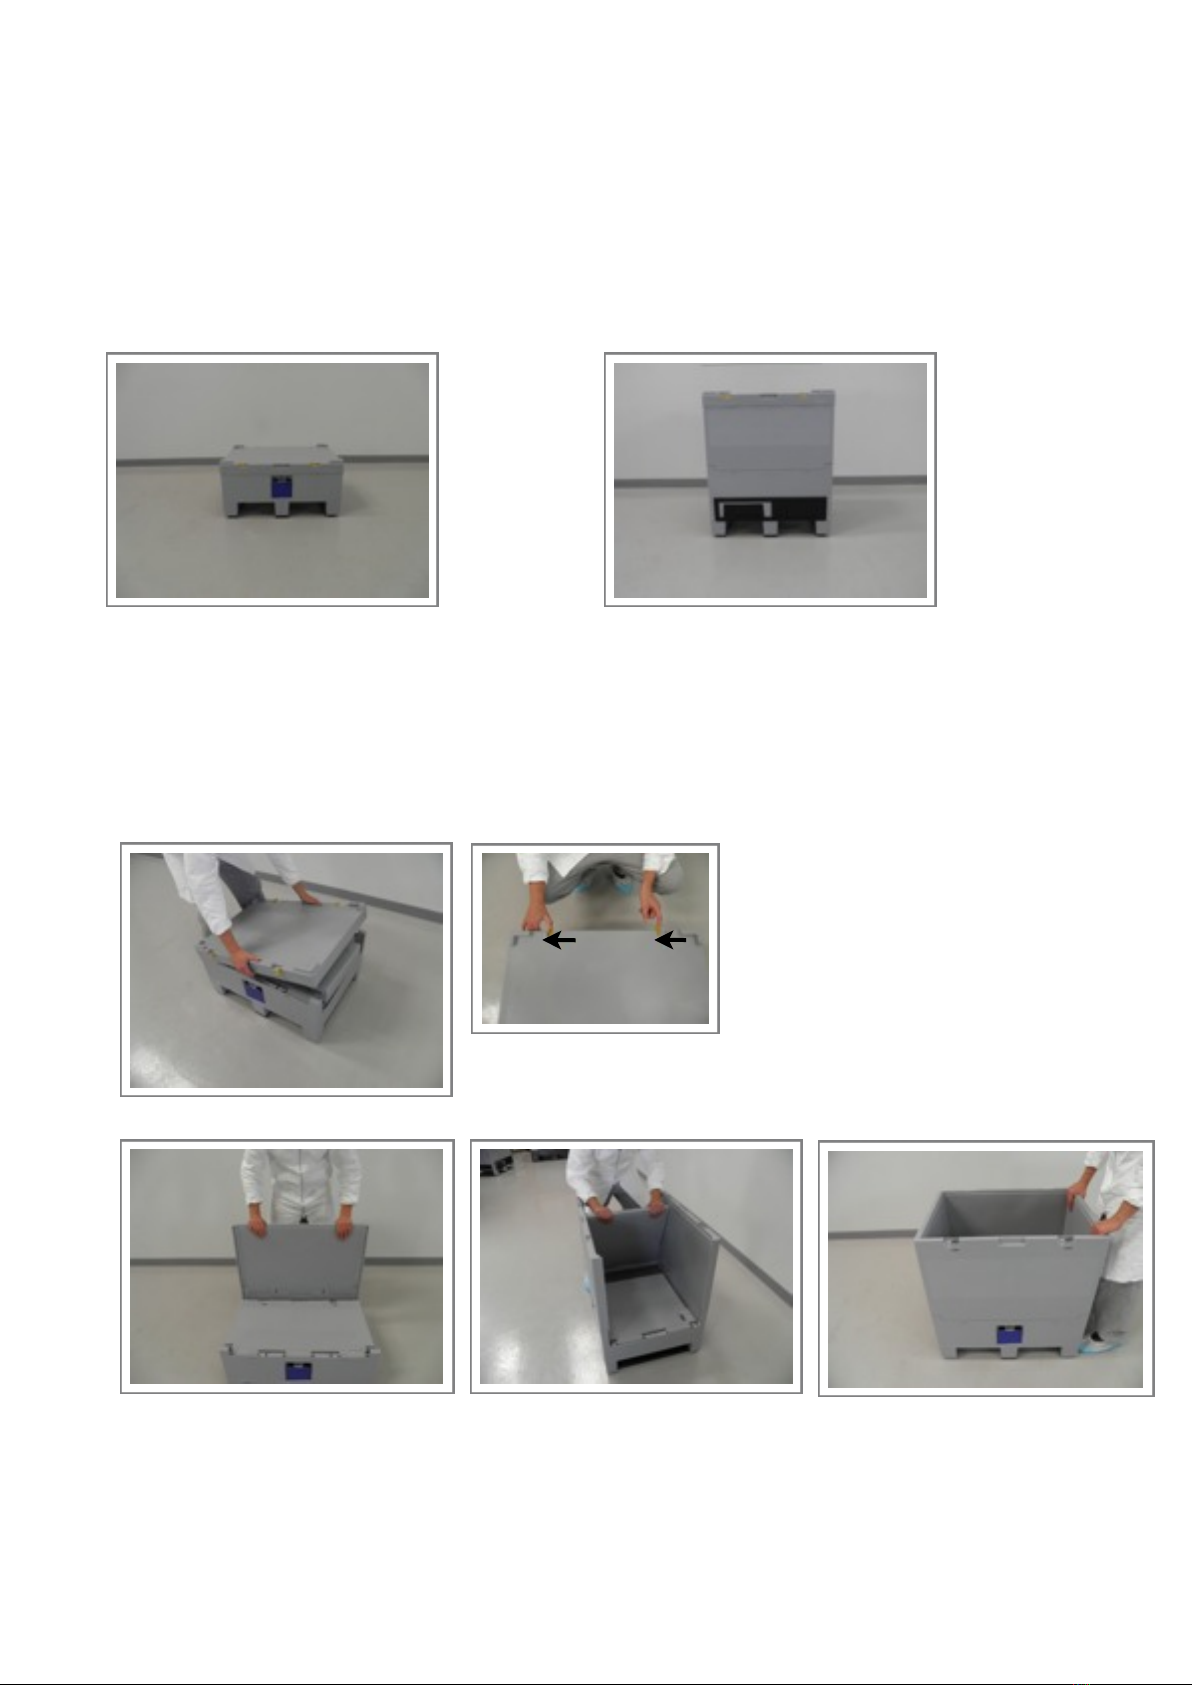
3.2 Unfolding the container for use
This instruction is applicable to all versions.
Open the yellow catches to
release the lid from the base (Fig
2.2).
Simply lift the lid from the base
unit and store safely away from
marked walk way (Fig 2.1).
DO NOT attempt to lift by yellow catches to avoid damage.
Erect by lifting the top of the long sidewall by pulling towards the body
(Fig 2.3).
Repeat procedure for the opposing long sidewall before erecting the short sidewalls in sequence
and locking into position (Fig 2.4 and 2.5)
Manual V1 - (Sept 14th 2012)
Fig 1.1
ALLpaQ Genesis 200E
ALLpaQ Genesis 250 C
Fig 1.2
Fig 2.2
Fig 2.1
Fig 2.3 Fig 2.4 Fig 2.5

ALLpaQ Genesis 200E Only
Once the container is unfolded remove the padded detachable floor panel and place safely near
the unit avoiding any marked walkways.
This will reveal a steel frame in the collapsed position (Fig 2.6).
Lift frame and unfold legs to each corner of the container and ensure white legs are at the rear of
the container Fig (2.7)
Replace detachable padded floor panel (Fig 2.8) and container is ready for use.
3.3 Fitting the port position plate to the bag
The procedure for fitting the port position follows the same procedure for the 500L & 1000L
versions of the ALLpaQ Genesis range.
ALLpaQ recommend that all 3D bags used in conjunction with it bioprocess range of containers
should be fitted with a small plastic support disc when filled. Some bags may be pre fitted with a
similar disc however if this is not the case please contact ALLpaQ immediately before use.
For full instructions see 1.3
3.4 Fitting the bag
Instruction applies for the ALLpaQ Genesis 200E (Fig 4.1)
and ALLpaQ Genesis 250 (Fig 4.2).
To access the container operator can reach over the side
panels to position the bag.
Any tubes and clamps should be
closed/open in according to
manufacturers recommendations.
Feed the drain tubing through the hole in the base of the
container.
It may be helpful to pull the tubing through the front of the
base via the access door (Fig 4.2 inset).
Manual V1 - (Sept 14th 2012)
Front
Fig 2.6
Fig 2.7 Fig 2.8
Fig 4.2
Fig 4.1
Once the tubing has been fed through, the white disc will locate in the bottom drain hole of the
base unit (Fig 4.2).
Bag filling can commence in according to manufacturers recommendations. ALLpaQ recommend
foam dunnage for all shipping containers (see 2:4 Fig 4.5)
3.5 Fitting the lid
Hold the lid against the panel (Fig 5.1). Simply lower the lid until it is located across all four
corners of the container (Fig 5.3). Always lock the lid to a fully erected container.
Ensure the yellow catches are in the
open position before attempting to fit the
lid to the container. (Fig 5.2)
Once the lid is on the container return the
yellow catches to the locked position. (Fig
5.3)
3.6 Moving the container to storage area
Please refer to instruction 3.1
3.7 Emptying the container
Move container into position in line with previous instructions (see 3.1).
3.8 Removing the lid
When removing the lid please refer to instruction 3.2
3.9 Connect bag outlet
ALLpaQ 250. Open the front base access door by sliding door to the centre of the unit. (Fig 9.1)
ALLpaQ 200E by opening the hinged door. (Fig 9.1 inset)
Bag outlet tubing can be pulled and connected according to
bag suppliers recommendations. (Fig 9.2 and 9.2 inset)
Manual V1 - (Sept 14th 2012)
Fig 5.3
Fig 5.2
Fig 5.1
Fig 9.1

Any sampling should be conducted according to bag suppliers
recommendations.
Bag can be drained.
3.10 Removal of bag
Once the bag is drained
apply any clamps to the
outlet tubing (Fig 10.1).
The bag can now be pulled
out of the top of the
container.
Once removed the base access door should be closed (Fig 10.2)
Once removed the bag should be disposed of in line with company policy.
3.11 Folding Container
First fold steel frame then rest in the base and replace the
padded floor by reversing the procedure at 3.2 (Fig 2.7)
Hold either of the two short sided panels and firmly push towards the centre of the unit. (Fig 11.1)
Allow the panel to rest on the base inside the unit and repeat the action for the opposite short side
panel. (Fig 11.2)
The remaining long side panels may be folded in sequence and the lid fitted to the folded container
Ensure the yellow catches are in open position to fit the lid, then locked inwards on completion.
3.12 Moving the container to storage
Pallet base allows for four way entry and two entry dependent upon manual handling equipment.
For detailed information please refer to instruction at (See 3.1).
Manual V1 - (Sept 14th 2012)
Fig 9.2
Fig 10.1 Fig 10.2
Fig 11.1
Fig 11.2
Fig 11.3
Fig 11.4
This manual suits for next models
5
Table of contents


