Smith Realiser A16 Use and care manual

Installing new firmware to your Realiser A16
Rev 1.75 Oct 15 2019
Updating your A16 with rev 1.75 Oct 15 2019 is only necessary if your A16’s firmware is older. The
current revision of your firmware is found in SETTINGS>UPDATES/ABOUT as described below in step 5. If
an update is required please begin with step 1.
Issues addressed in this update
1) Previously when playing CDs or DVDs over HDMI or SPDIF and jumping or transitioning audio
tracks, a momentary audio stutter could be heard as the track began playing. This issue was
investigated by MDS and their solution has now been implemented in firmware rev 1.75.
Consequently the ‘Auto Mute’feature introduced in rev 1.70 is no longer required. However, it
remains in the menu as a general purpose programmable mute timer. For now, please keep
‘Auto Mute’ at the minimum 50ms value.
2) USB audio that was unintentionally left muted in rev 1.70 is now functioning normally again.
3) Audio bypass and HDMI 2.0 now function for all 4 HDMI ports. A revised menu for these controls
is described in the new features section below.
Update procedure
STEP 1. The new firmware for the Realiser A16 is uploaded through the micro-SD card slot on the front
panel. First, obtain a micro-SD card (commonly 16 GB) and ensure it is formatted as FAT32. Second,
create a ‘realiser’ folder in the root directory and copy the firmware file FIRMA001.SVS into the realiser
folder. Insert this micro-SD card into the slot on the front of your A16.
STEP 2. Power up the A16 ensuring the power indicator LED is steady green. You can power it up using
the remote control or by momentarily depressing either User A or User B volume knobs. Now turn off
the A16 by pushing in and holding in the User A volume knob for at least 3 seconds. The LCD screen will
switch off and the power indicator LED will turn red. Release the User A volume knob.
STEP 3. Push in and hold in the User B volume knob and, simultaneously, push in and release the User A
volume knob. Then release the User B volume knob. The action of holding in B and depressing A
activates the firmware update manager as shown below. The power indicator LED will also be blinking
green.
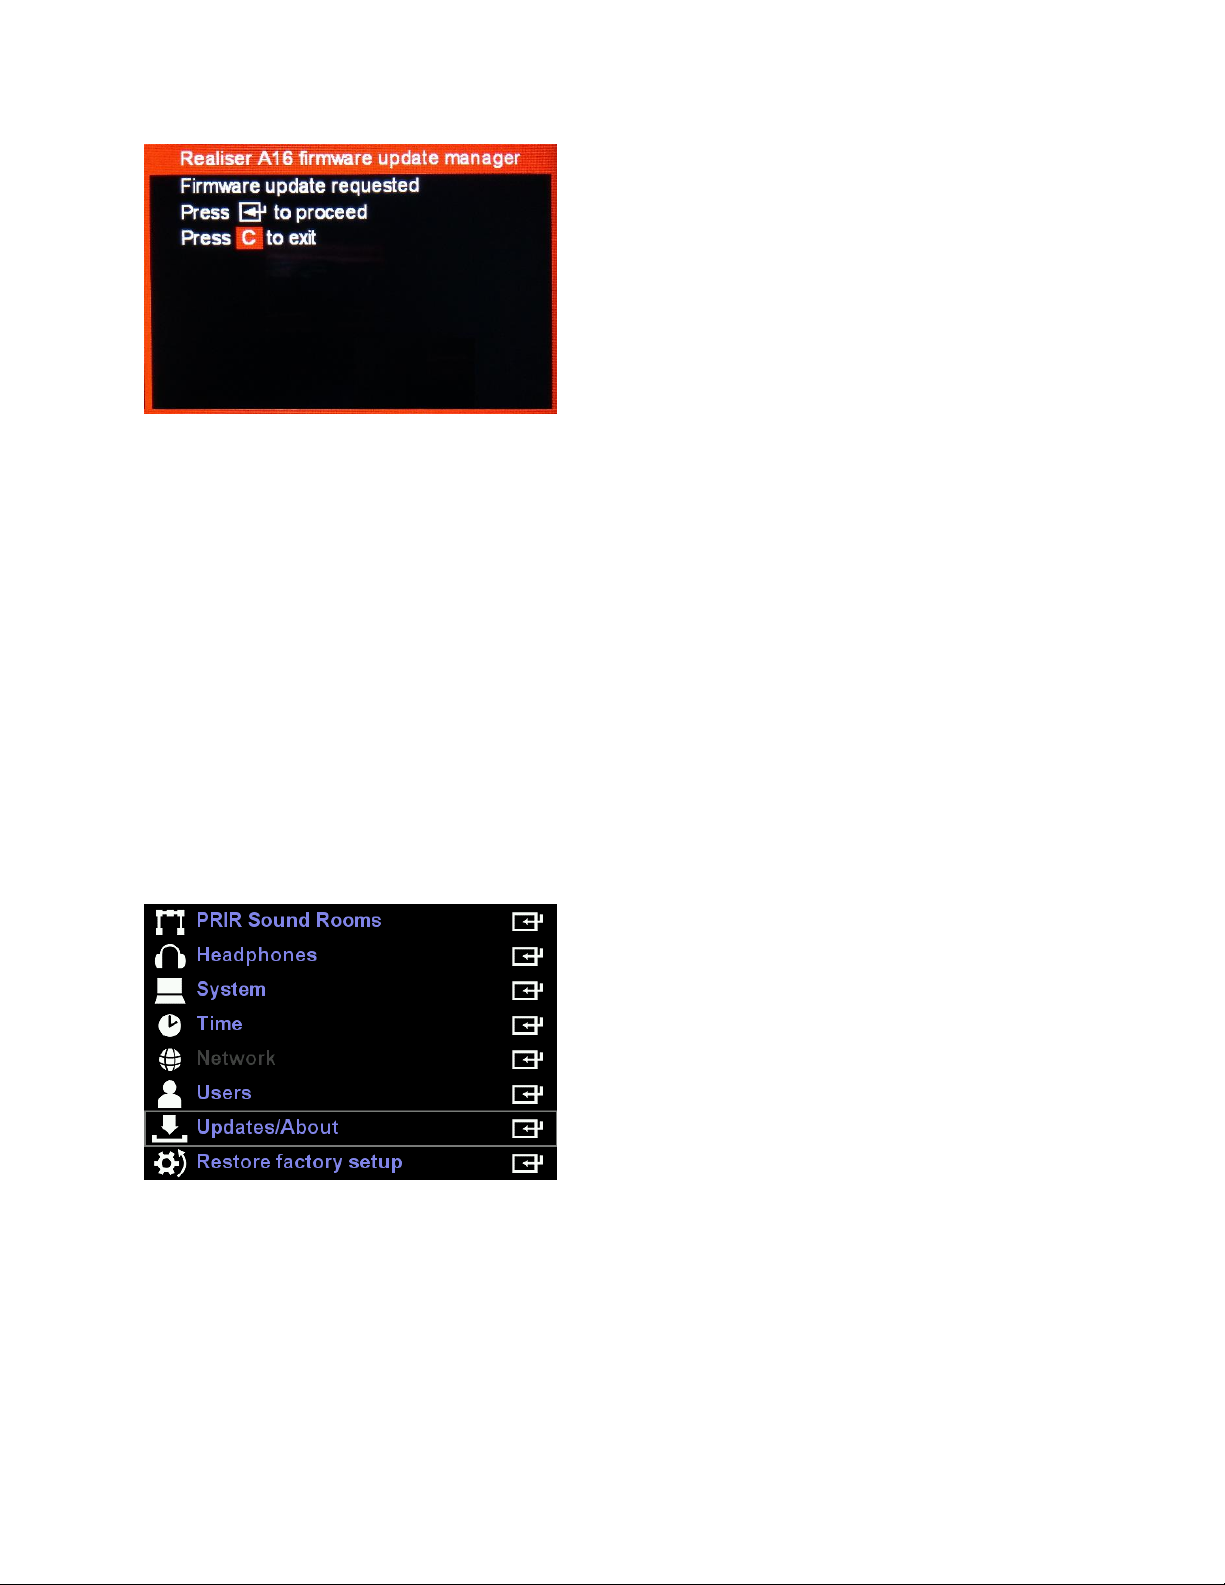
STEP 4. Using the remote control, press the ENTER key twice to begin the firmware update.
The A16 will enter a long period (20-25 minutes) of authenticating the software, loading and
rebooting. When the unit first reboots it will begin updating the firmware for the individual
hardware modules. After the individual firmware modules have been reprogrammed the unit
will reboot using the normal power-up sequence to the Speaker Map display for User A.
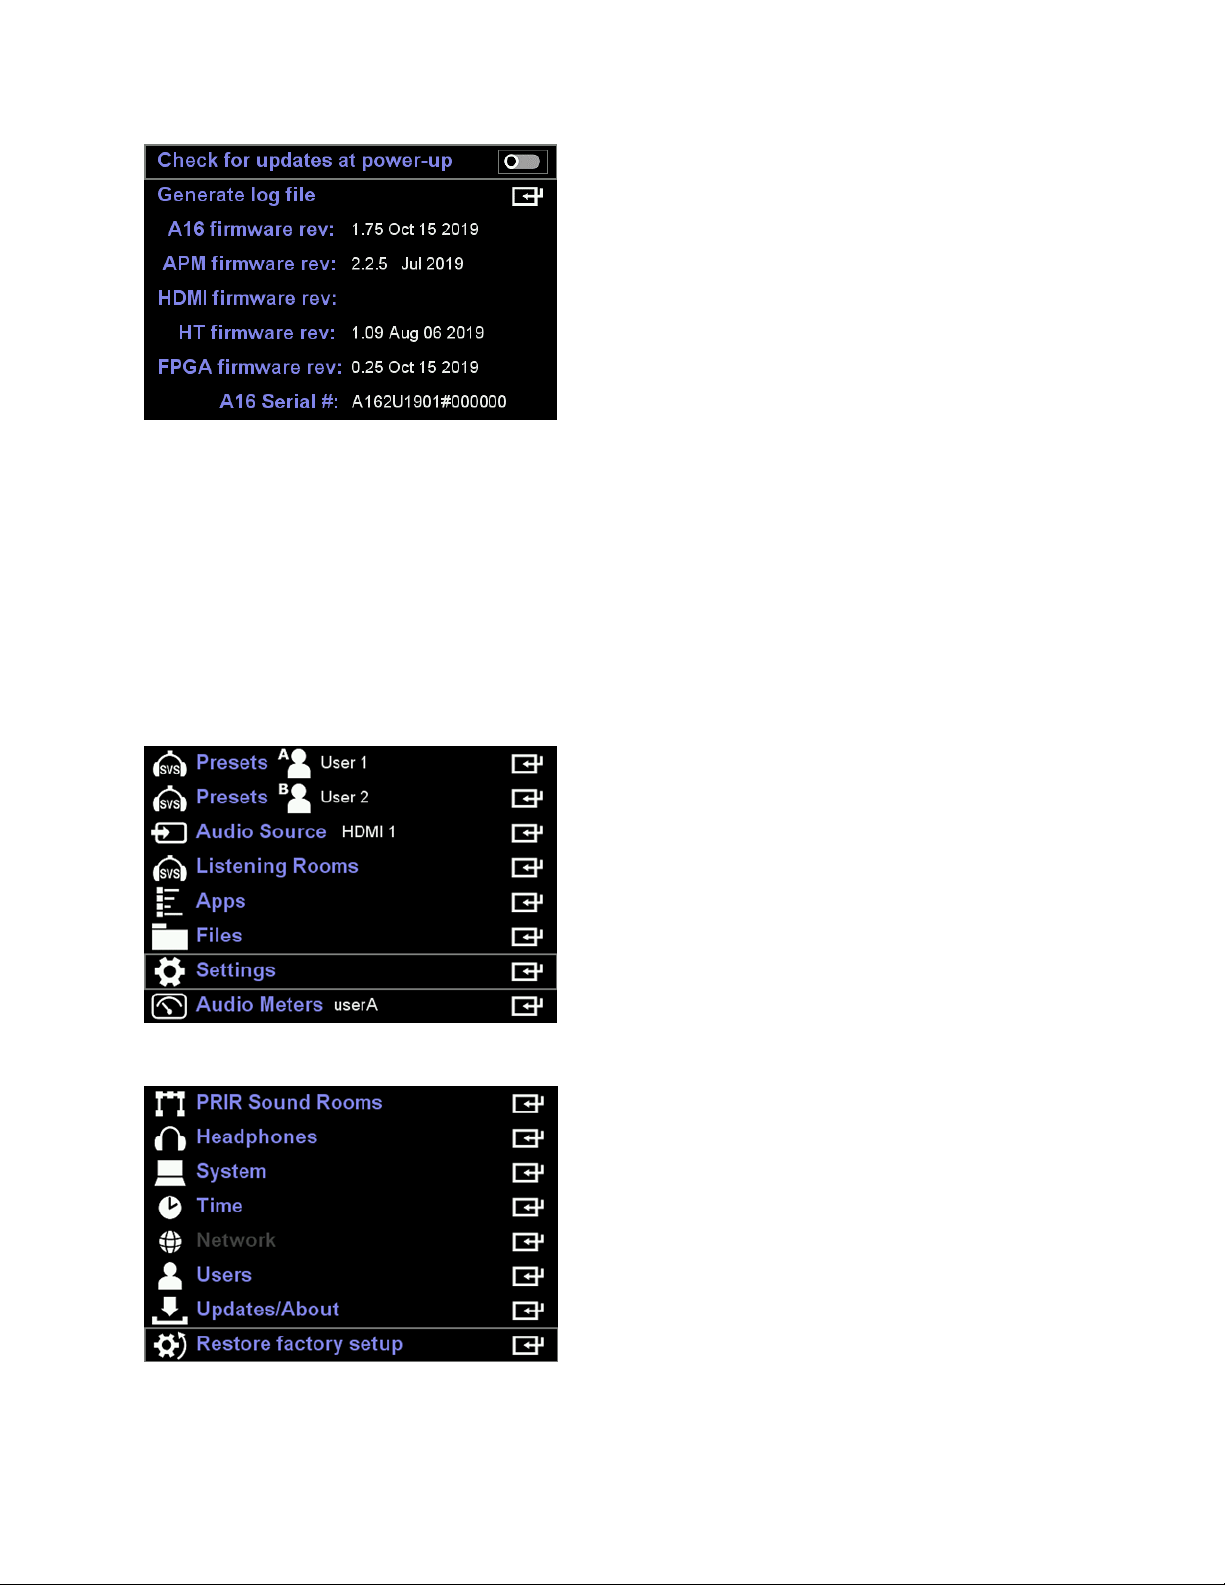
STEP 5. To confirm the firmware update was a success please check the revision numbers displayed in
UPDATES/ABOUT accessed via the SETTINGS page. First, power cycle the A16 (turn off and then on)
since the revision information is cleared following an update and is only refreshed on the next power up.
Once the User A Speaker Map display is running, press BACK and navigate to
SETTINGS>UPDATES/ABOUT and press ENTER.
Confirm the A16 firmware revision is 1.75 Oct 15 2019 and that the FPGA firmware revision is 0.25 Oct
15 2019. All other software modules are unchanged from the previous firmware update.
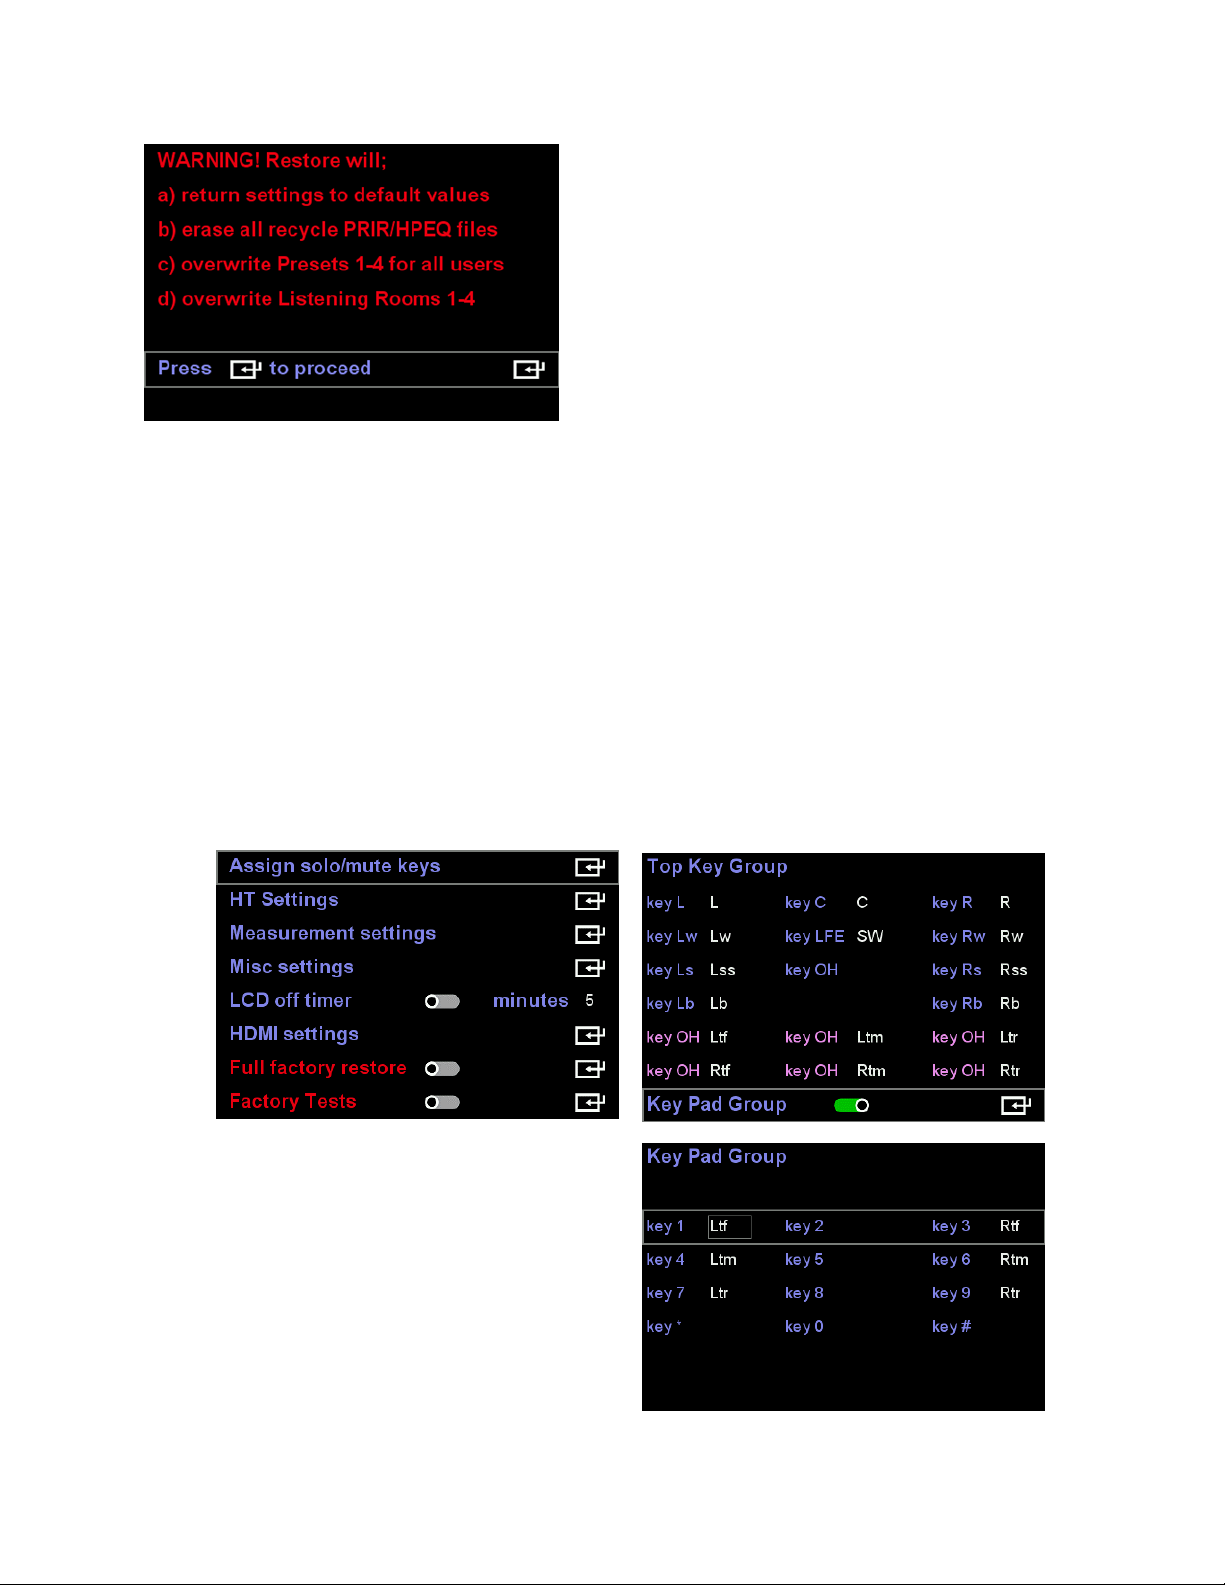
STEP 6. The firmware update is now complete. However, for rev 1.75 it is also necessary to run ‘Restore
factory setup’ to ensure all settings are also updated. This step will overwrite all User A and User B
Presets 1-4 as well as all Atmos/DTS:X and PCM sound rooms 1-4 and any PRIR/HPEQ measurements in
the recycle memory. If desired, save any measurements in the recycle memory to the internal storage
memory before proceeding. Internal storage for PRIR and HPEQ files is not affected by a factory restore.
A factory restore will not always be required following a firmware update. It is just a requirement for rev
1.75.
First press BACK and then navigate to ‘Settings’ and press ENTER.
Then navigate to ‘Restore factory setup’ and press ENTER again.
Then press ENTER again to begin the restoration.
The restore will take approximately 10 minutes to complete, thereafter the A16 will automatically return
to the User A Speaker Map display.
New features in this update
1) Group speaker assignment for OH key
The ‘Assign solo/mute key’feature has been altered. In rev 1.75 the Top Key group (L key, C key,
R key, etc) and the Key Pad group (1 key, 2 key etc) have been separated and use of the Key Pad
group for solo/mute keys can now be enabled or disabled.
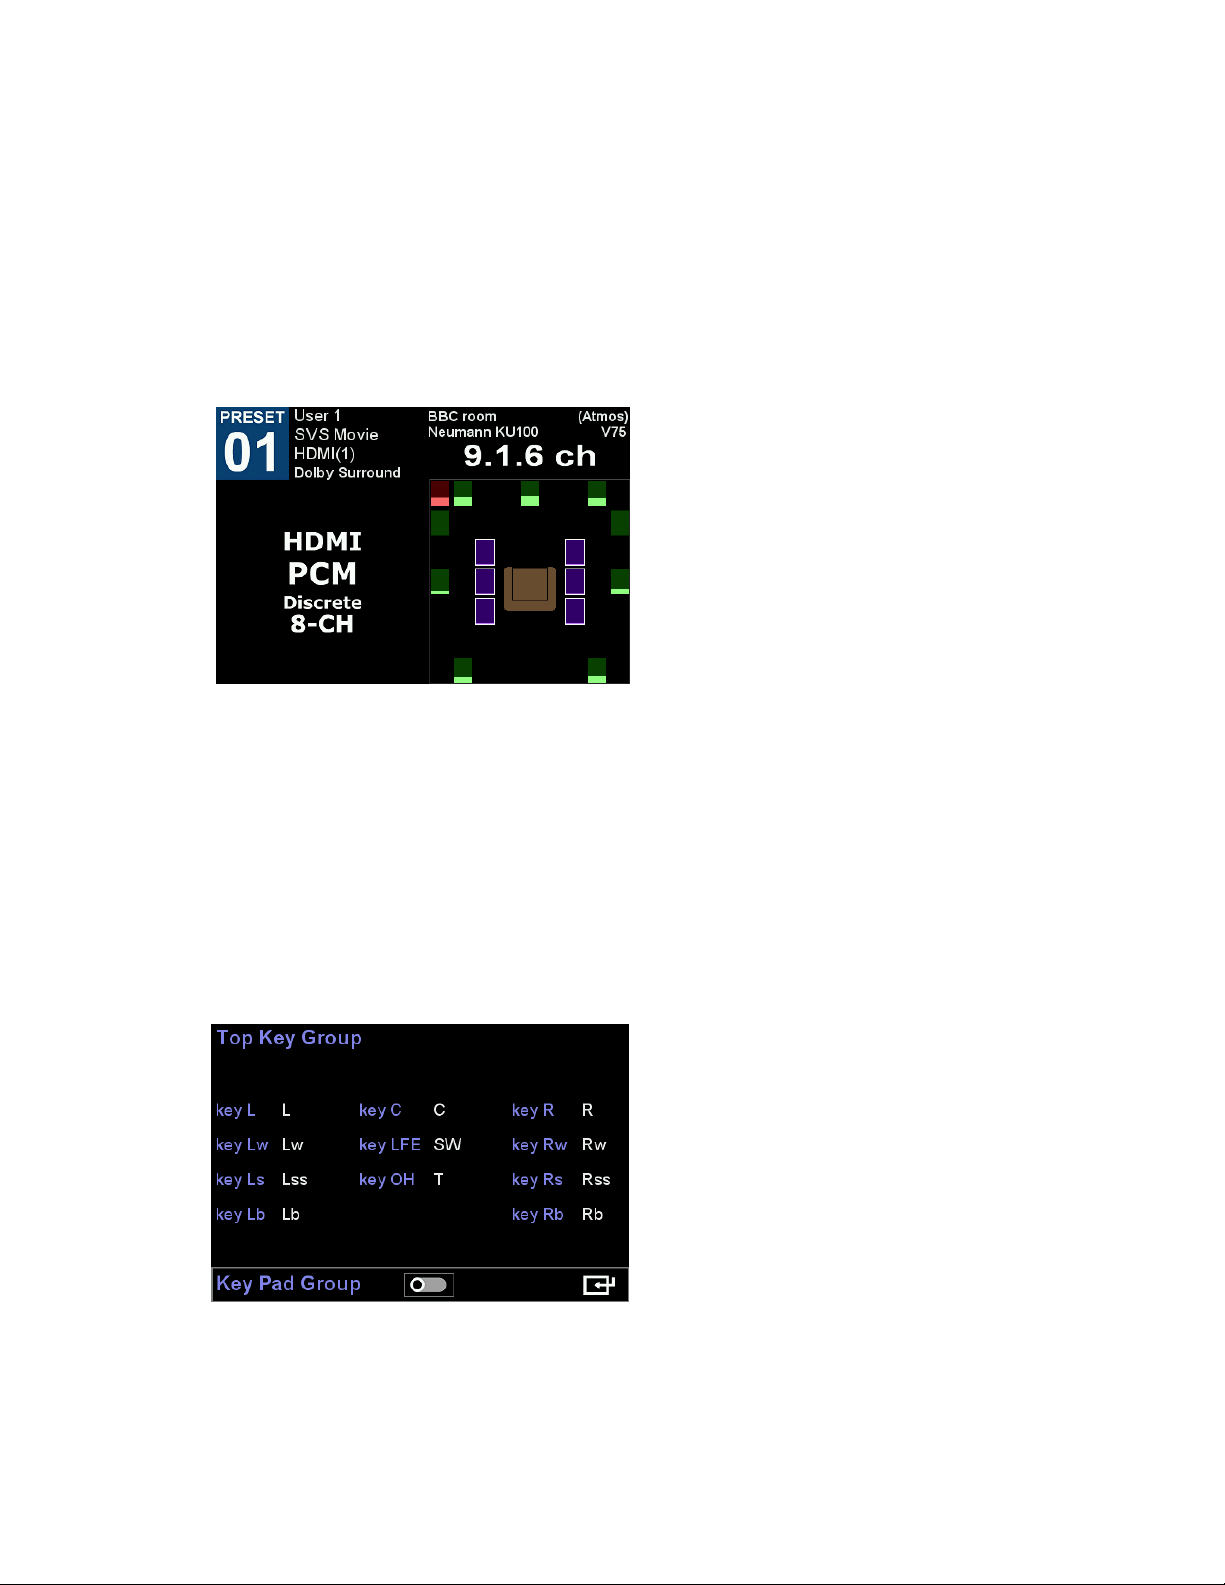
When the Key Pad group is enabled, these keys can be used to solo/mute assigned
loudspeakers, as before. When the Key Pad group is disabled the numerical keys (1, 2,...9) are
used alternatively to select presets. Since Key Pad keys are often used to solo height and
overhead speakers the OH key in the top group can now be assigned up to 7 different speakers
as a single solo group. For example, one could assign Ltf, Rtf, Ltm, Rtm, Ltr and Rtr and listen to
all six top Atmos speakers together using just the OH key. Note that this new OH group
assignment works regardless of whether the Key Pad group is enabled or disabled.
2) Direct Preset Selection
With the Key Pad group disabled, the numerical keys (1, 2,...9) now act to select presets 01 to
09. However preset entry using these keys is only possible when a speaker map display is active.
For example, pressing PA followed by 1 will cause User A PRESET 01 to load. Pressing PA is not
necessary if the User A speaker map is already displayed. Pressing PB followed by 7 will cause
User B PRESET 07 to load. Presets 10 to 16 can be selected in the normal way from the preset
menu itself or sequentially using the ADJ+/- keys.

3) Audio Delay for HDMI and SPDIF inputs
A global (lip sync) delay of up to 340ms can now be specified in User A presets for audio sourced
from HDMI and SPDIF inputs. This delay affects all audio channels for both User A and User B
equally for both AV and SVS headphone listening modes. Audio delays are used in situations
where the video lags the audio, as can sometimes be the case when viewing movies using smart
HD/UHD TVs.
4) Audio Source selection within Presets
The audio source can now be specified in User A presets. The original audio source selector
located in the home page remains, but it must be disabled for the system to use audio sources
specified by User A presets.
When HDMI is selected as an audio source and the HDMI has no signal or is in the process of
synchronizing, the A16 will now display HDMI ! in both the home and preset-landing pages to
better alert the user of this fact.
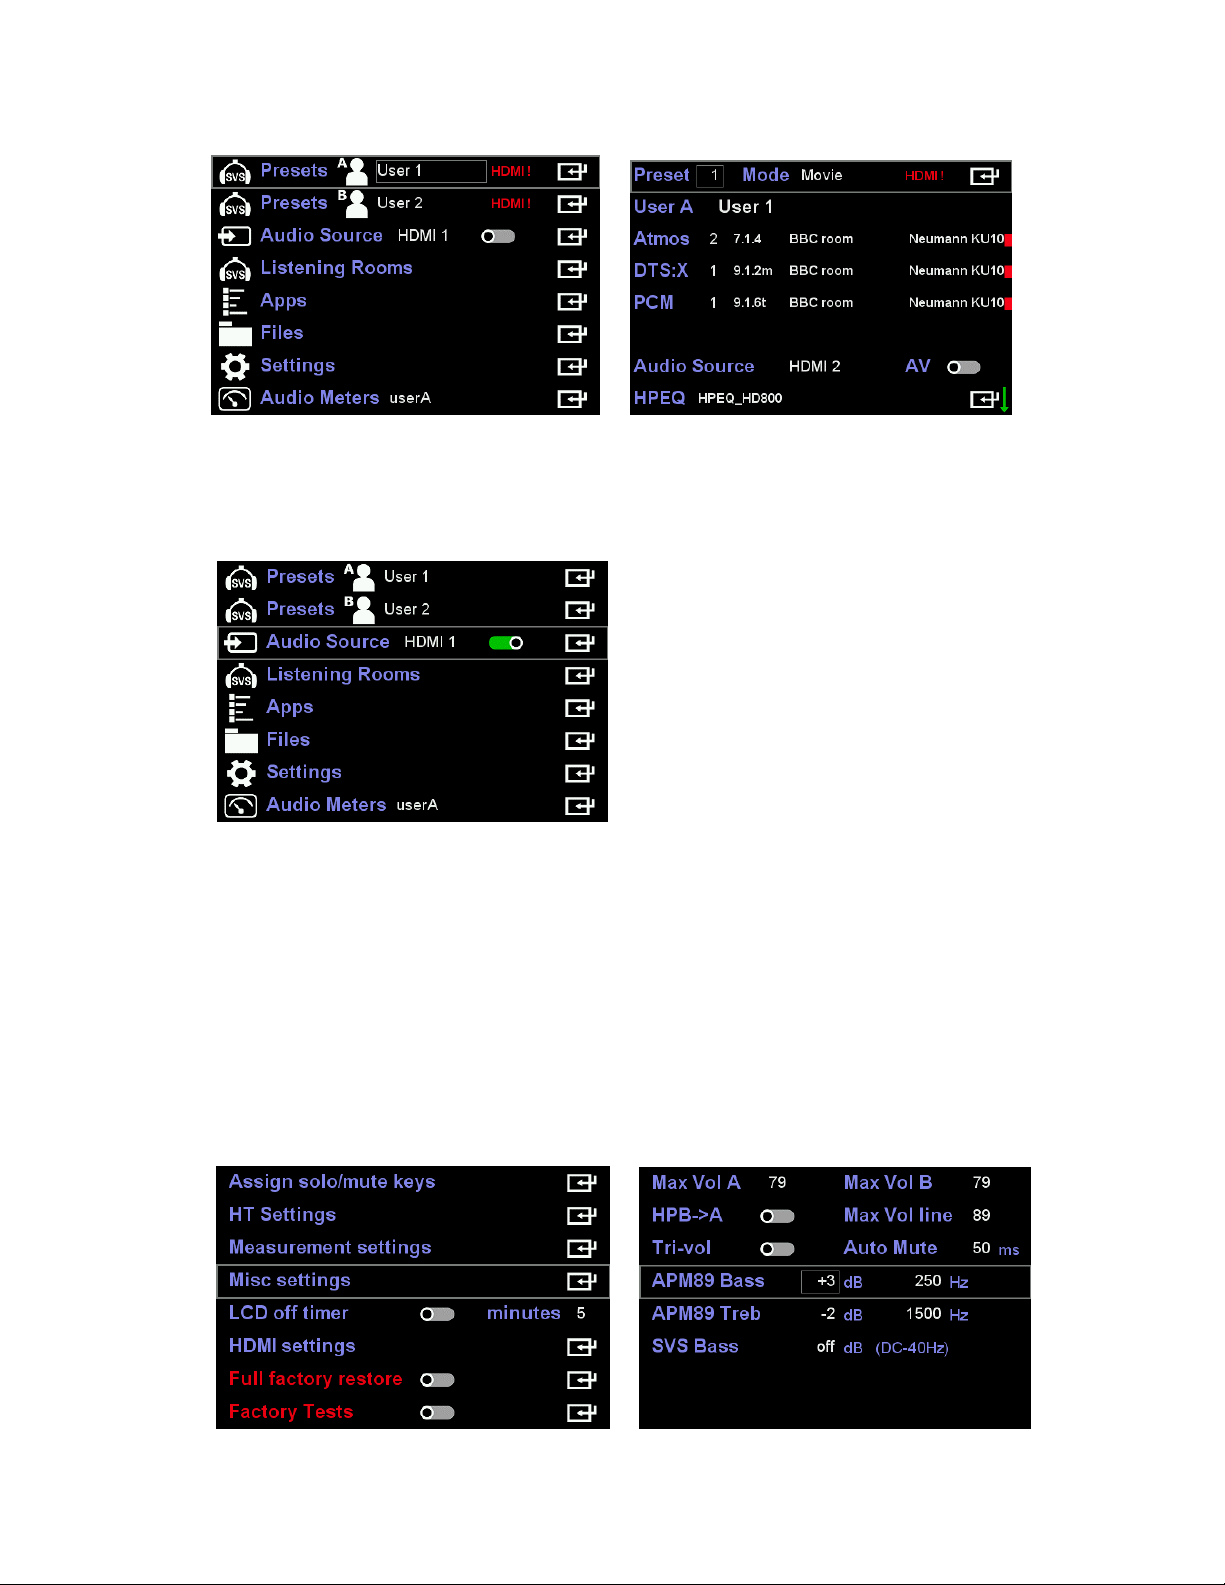
To stop preset driven audio selections simply re-enable Audio Source on the home page. Note
that when this is disabled again, the system will immediately switch to the audio source
specified in the active User A preset.
5) Bass and Treble for HDMI and SPDIF inputs
Master bass and treble shelving filters are now available under SETTINGS>SYSTEM>MISC
SETTINGS for HDMI and SPDIF sourced audio. APM89 Bass and APM89 Treb gains can be
adjusted +/- 12dB while the shelf frequency can be adjusted from 50 to 500Hz for the bass
control and 500 to 5000Hz for the treble control (shelf frequency is the 70% point). Adjustments
to these filters occur in real time and affect all audio channels for both User A and User B
equally.
For consistency, the SVS bass shelving filter control has been moved to MISC SETTINGS. Note
that SVS Bass operates on the headphone signal (output from the SVS processors) whereas the
APM89 Bass/Treb operates on the audio input to the SVS processors and the audio output to
the line outputs in AV mode.
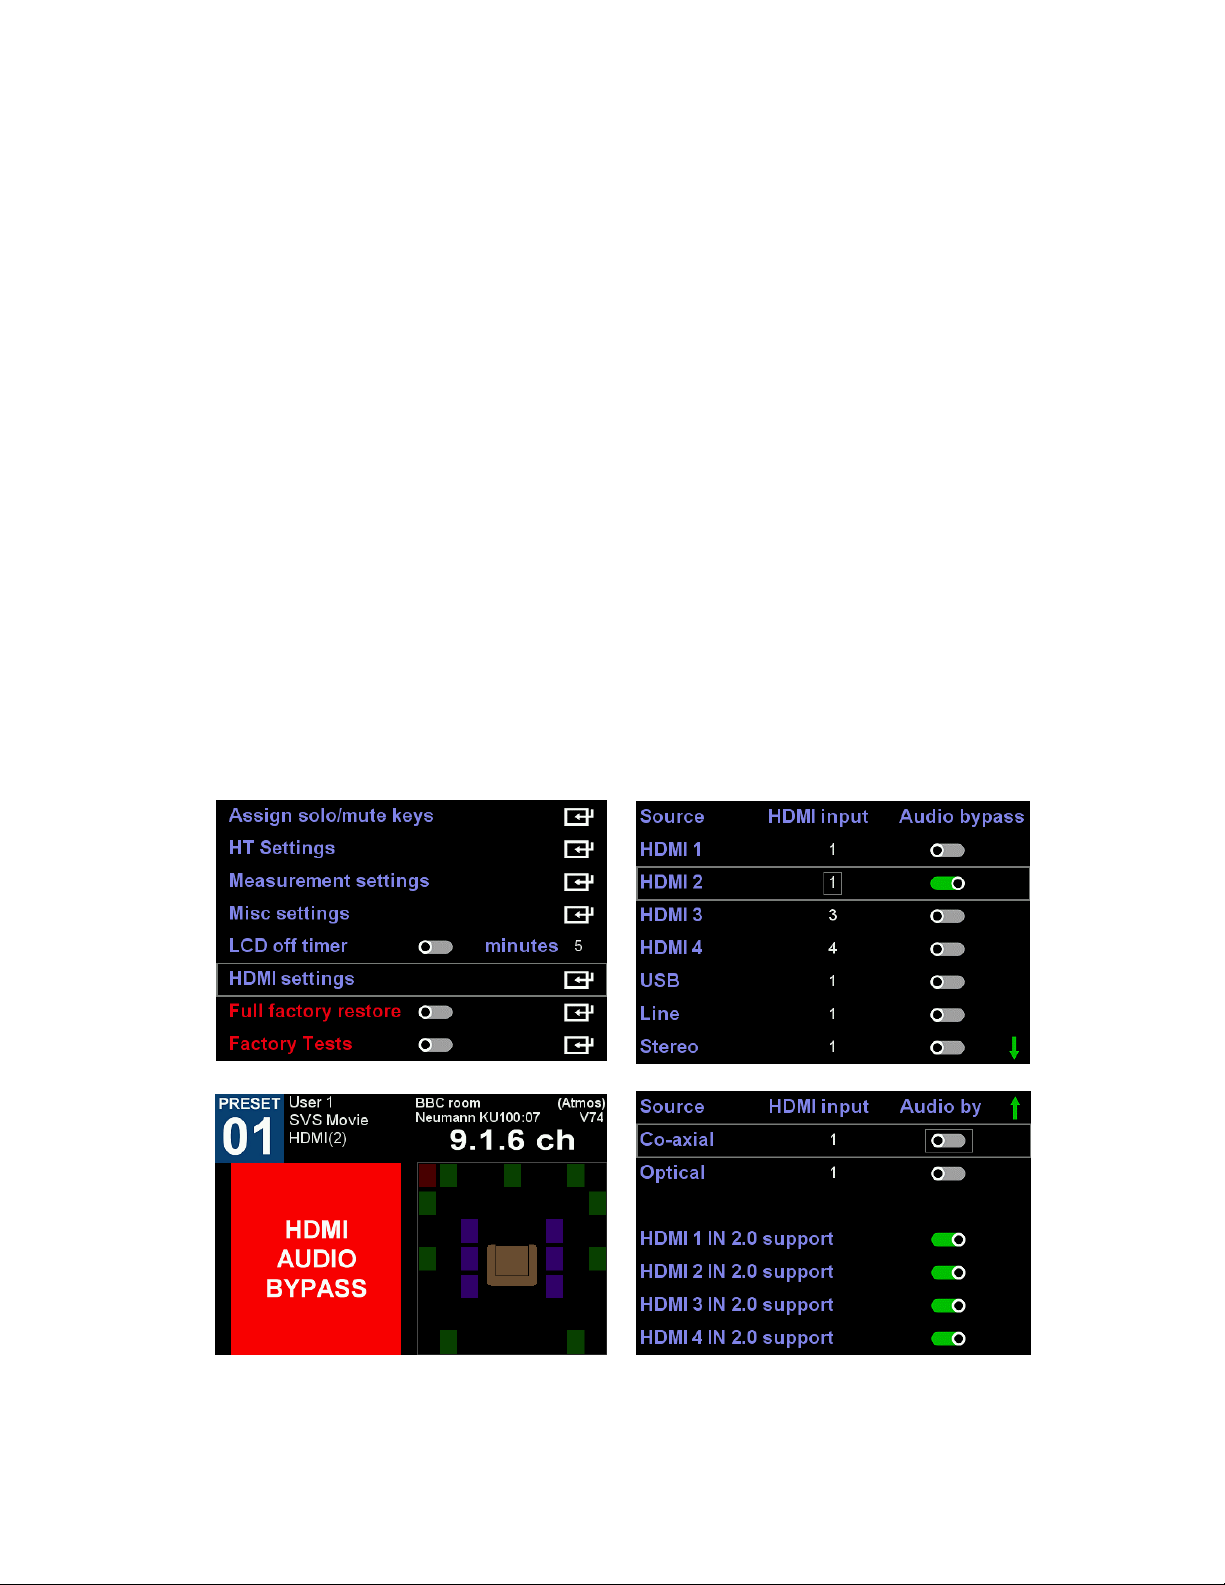
6) Default HDMI inputs, Audio Bypass and HDMI 2.0 support
This menu was previously called ‘Default HDMI input’. It has been renamed ‘HDMI settings’.
HDMI audio bypass is now operational in this firmware revision as well as switched HDMI
1.4/2.0 support per input port. Disabling 2.0 support may be helpful when interfacing to legacy
HDMI equipment. The default HDMI input mapping menu has been changed slightly. It is now
possible to assign a physical HDMI input to every audio source label and for every physical HDMI
input to operate in either the normal audio extract mode or in audio bypass mode. Specifically,
source labels HDMI 1,2,3 and 4 do not need to be paired with their respective physical HDMI
input ports, but can instead be associated with any of the 4 physical inputs. For example, label
HDMI 2 could be associated with the first HDMI input (1) as shown below. HDMI 2 could also
have audio bypass enabled. Now one preset could select HDMI 1 as its audio source and another
could select HDMI 2. By switching between these presets one can either listen to the audio on
HDMI 1 input on headphones or bypass this audio to a downstream TV. Note, adjustments to
the settings in these menu pages are implemented in real time.
--------------------------------------------------------------- END --------------------------------------------------------------------
Other manuals for Realiser A16
3
Table of contents
Other Smith Recording Equipment manuals


Popular Recording Equipment manuals by other brands


Micro control systems
Micro control systems MCS-BACNET-ROUTER 2 Installation reference guide

Campbell
Campbell NL110 instruction manual

MD
MD mXion BASIC-S user manual

MicMix Audio
MicMix Audio Dynaflanger 265 operating instructions

Hitachi
Hitachi EH-TP504 operating instructions

dbx
dbx 911 instruction manual