Smiths Hotline User manual

Blood and
Fluid Warmer
®
Maintenance, Testing
and Calibration

HOTLINE®Blood and Fluid Warmer Technical Service Pack 46
SECTION 5
Maintenance
Maintenance
Before each use
Carefully inspect the HOTLINE®for signs of damage, cracked or
split case, insecure poleclamp, damaged mains cable, etc.
If the Disposable Set does not install easily, lubricate the O-
Ring Seals.
Lubricating the O-Ring Seals
Using a cotton swab, apply a small amount of silicone grease
(Smiths Medical Part Number EZL 80-04-002) to the O-Rings in the
Disposable Set connector block.
If this does not solve the problem, reject the unit.
After each use
Wipe all external surfaces of the HOTLINE®with a soft cloth,
using an aqueous solution of mild detergent. If necessary, the
external surfaces may be disinfected using a solution of 10% bleach
in distilled water.
■Do not autoclave.
■Do not use alcohol or solvents.
■Do not use abrasive cleaning agents.
■Do not use cold sterilants.
■Do not immerse any part of the HOTLINE®in liquids.

HOTLINE®Blood and Fluid Warmer Technical Service Pack 47
SECTION 5
Maintenance
Routine Maintenance Tasks
Smiths Medical recommends that preventative maintenance
be carried out at specified intervals. Some maintenance tasks need
to be repeated at 30-day intervals and others at annual intervals,
depending on your choice of recirculating solution.
The three approved recirculating solutions and their
associated maintenance protocols are:
Precise directions for mixing the above solutions to the correct
strength are given on page 54.
Exceptionally, if the unit has had any non-routine servicing or
repair work, it will need to undergo a more thorough test and
recalibration sequence. This is detailed on page 64 and onwards.
Recirculating
Solution At 30-day Intervals At 12-month Intervals
Sterile
Distilled
Water
Visual Inspection
Lubricate O-Ring Seals
Replace Recirculating
Solution
Test All Alarms
Replace O-Ring Seals
Replace Recirculating Solution
Verify Temperature Calibration
Electrical Safety Test
Isopropyl
Alcohol
Solution
Visual Inspection
Lubricate O-Ring Seals
Replace Recirculating
Solution
Test All Alarms
Replace O-Ring Seals
Replace Recirculating Solution
Verify Temperature Calibration
Electrical Safety Test
Hydrogen
Peroxide
Solution
Visual Inspection
Lubricate O-Ring Seals
Test All Alarms
Replace O-Ring Seals
Replace Recirculating Solution
Verify Temperature Calibration
Electrical Safety Test

HOTLINE®Blood and Fluid Warmer Technical Service Pack 48
SECTION 5
Every 30 days
Every 30 days
■Perform a Visual Inspection looking for damage to the case,
poleclamp, mains cable, etc.
■Lubricate O-Ring Seals with a cotton swab, applying a small
amount of silicone grease to the O-Rings.
Either, if using DISTILLED WATER as the
recirculating solution:
■Drain and replace the recirculating solution as described on
page 54.
or, if using ISOPROPYL ALCOHOL as the
recirculating solution:
■Drain and replace the recirculating solution as described on
page 56.
Finally
■Fill in, sign, and date the maintenance log record!

HOTLINE®Blood and Fluid Warmer Technical Service Pack 49
SECTION 5
Every 12 Months
Every 12 Months
Alarm Testing
Place the HOTLINE®on a suitable firm surface. Visually check
that the recirculating solution level in the reservoir is above the MIN
mark. Attach a Disposable Set, ensuring that it is free from kinks and
twists.
Plug the unit into the electricity supply and switch on. Verify
that the unit is working normally (recirculating solution circulating,
temperature display gradually rising towards 41°C).
General Alarm Test
Press the General Alarm Test button. Observe:
■the GREEN LED extinguishes.
■the THREE RED LEDs light up.
■the AUDIBLE ALARM commences beeping.
■the RECIRCULATING SOLUTION ceases circulating.
If any of the above responses are missing, the unit must be
removed from service and repaired.
HOTLINE®Blood and Fluid Warmer Technical Service Pack 50
SECTION 5
Every 12 Months
Over Temperature Alarm Test
Allow the unit to run for sufficient time to stabilise the
temperature. Press and hold the Over Temperature Alarm Test
button. Observe:
■the DISPLAY rises to 43°C - 44°C .
■the GREEN LED extinguishes.
■the RED Over Temperature LED lights up.
■the AUDIBLE ALARM commences beeping.
■the RECIRCULATING SOLUTION ceases circulating.
If any of the above responses are missing, the unit must be
removed from service and repaired.
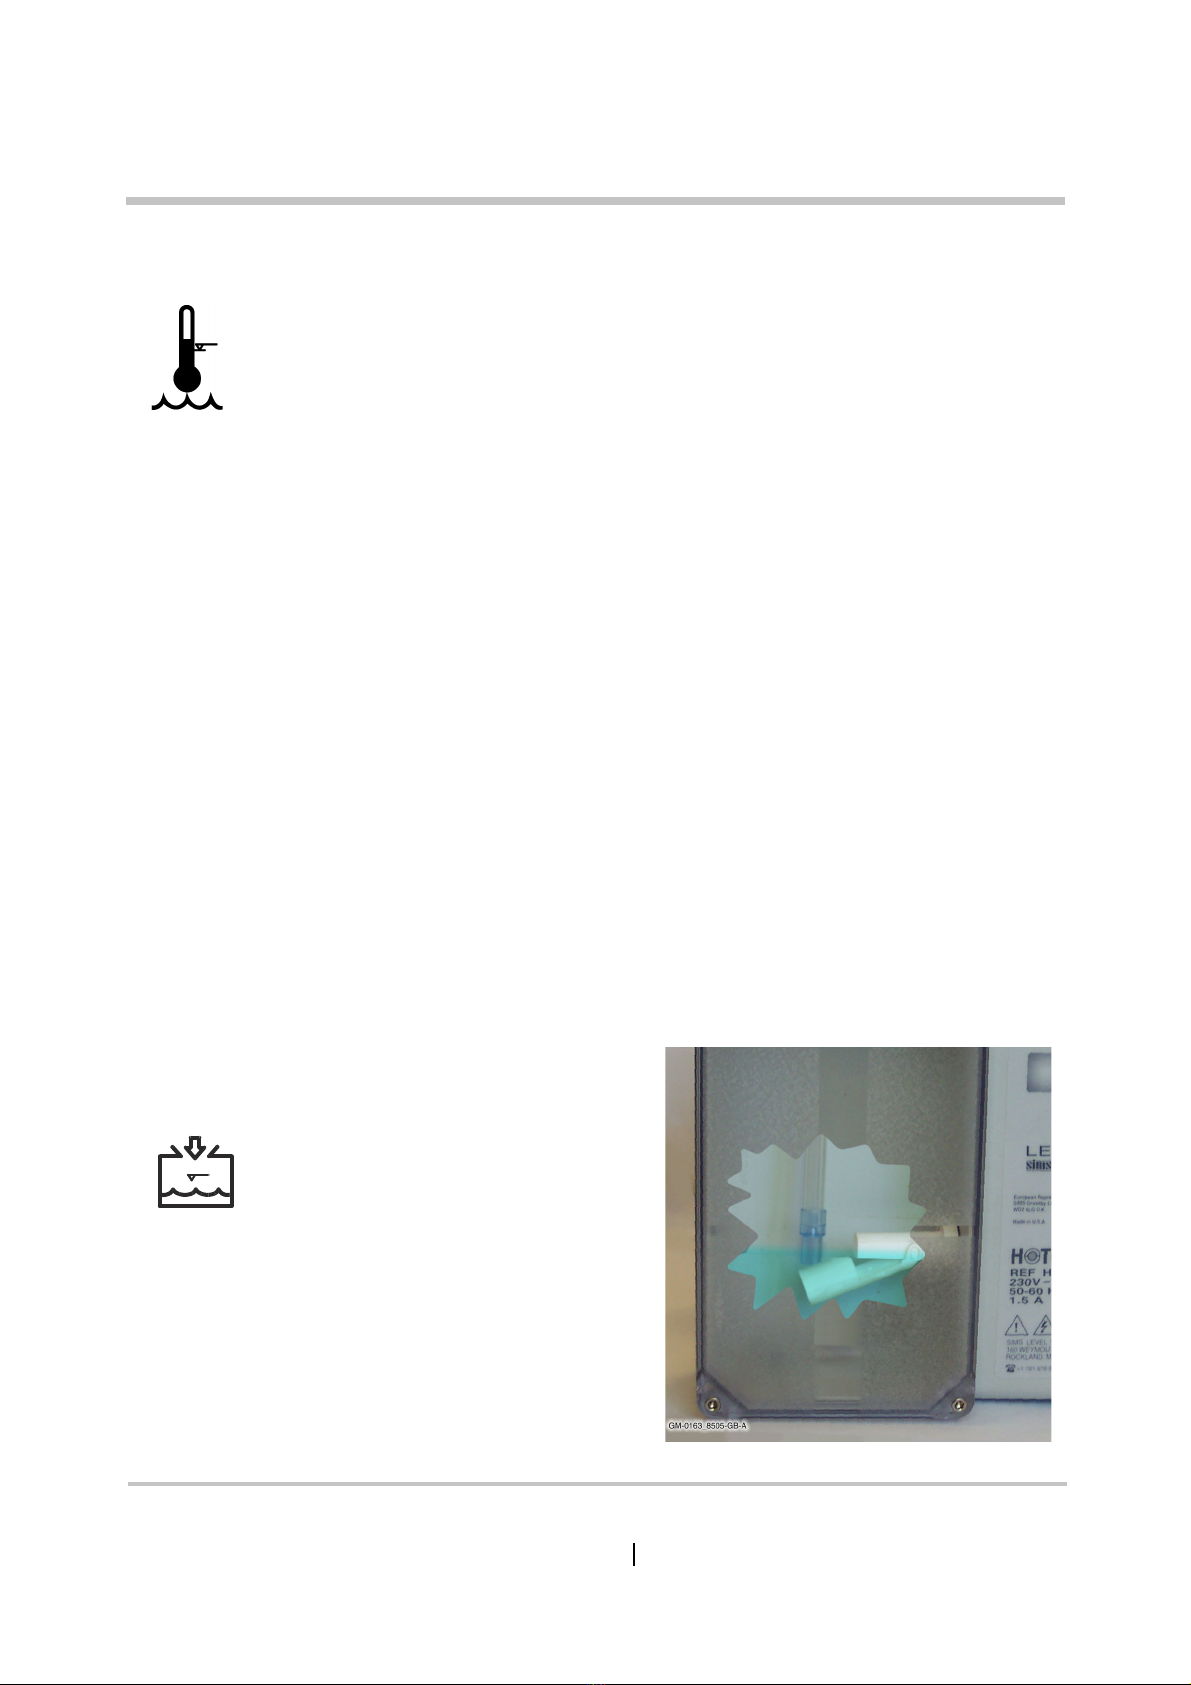
Recirculating Solution Level Alarm
Remove the Fill Port plug. Using a non-magnetic tool, gently
depress the float switch arm.
Figure 5 - 1: Depressing the float
switch. Here you see an offcut of
scrap Disposable Set performing
excellently as a non-magnetic probe.

HOTLINE®Blood and Fluid Warmer Technical Service Pack 51
SECTION 5
Every 12 Months
Observe that:
■the GREEN LED extinguishes.
■the RED recirculating Solution Level LED lights up.
■the AUDIBLE ALARM commences beeping.
■the RECIRCULATING SOLUTION ceases circulating.
If any of the above responses are missing, the unit must be
removed from service and repaired. The unit should return to
normal operation upon releasing the float switch.
Disposable Set Interlock Alarm
While the unit is working normally, gently ease the Disposable
Set away from the interlock block. Be aware that a small amount of
recirculating solution may escape during this test. Before the
Disposable Set is fully disconnected, the alarm should operate.
Observe that:
■the GREEN LED extinguishes.
■the RED Interlock Alarm LED lights up.
■the AUDIBLE ALARM commences beeping.
■the recirculating SOLUTION ceases circulating.
If any of the above responses are missing, the unit must be
removed from service and repaired. The unit should return to
normal operation upon correctly reattaching the Disposable Set.

HOTLINE®Blood and Fluid Warmer Technical Service Pack 52
SECTION 5
Every 12 Months
Replace O-Ring Seals
■Remove the socket head screws with an 1/8-inch Allen key.
■Remove the disposable interface block, being careful of the
microswitch lever.
■Using a cotton swab, remove the old O-Rings, and clean out
the empty sockets.
GM-0163_8501-GB-A
Figure 5 - 3: Revealed: the O-Rings in their niches
Figure 5 - 2: Getting access to the O-Ring Seals

HOTLINE®Blood and Fluid Warmer Technical Service Pack 53
SECTION 5
Every 12 Months
■Apply a smear of silicone grease (Smiths Medical Part
Number EZL 80-04-002) to two new O-Rings, and locate
them in the sockets.
■Re-attach the disposable interface block.
■Re-fit the socket head screws. Again, take care not to
damage or bend the microswitch operating lever.
A kit of parts is available to make this task simpler. Please ask for
part number reference EZL 80-04-001.
Either, if using DISTILLED WATER as the
recirculating solution:
■Drain and replace the recirculating solution as described on
page 54.
or, if using ISOPROPYL ALCOHOL as the
recirculating solution:
■Drain and replace the recirculating solution as described on
page 56.
or, if using HYDROGEN PEROXIDE as the
recirculating solution:
■Drain and replace the recirculating solution as described on
page 57.
Finally
■Fill in, sign, and date the maintenance log record!

HOTLINE®Blood and Fluid Warmer Technical Service Pack 54
SECTION 5
Maintenance Solutions
Changing Recirculating Solution (Distilled Water)
If using plain distilled water as the recirculating fluid, then this
must be changed at the 30-day service interval, using the procedure
given here. Smiths Medical currently recommends using the
Hydrogen Peroxide based recirculating solution which allows a
12-monthly recirculating solution change protocol, resulting in a
significant reduction of service time.
Maintenance Solutions
At service intervals of either 12-months or 30-days, depending on the
composition of your recirculating solution, you will need supplies of ready mixed
solutions to perform maintenance. To make up a batch (1.4 litres) of solution, you
will need:
Formula 1
140ml of 3% Hydrogen Peroxide PLUS 1260ml distilled water
This may be used as a disinfectant fluid for flushing the recirculating solution
path during routine maintenance, or as a long-life recirculating solution enabling
fluid change intervals to be extended to 12-monthly.
Formula 2
700ml of 70% Isopropyl Alcohol PLUS 700ml distilled water
This may be used as a disinfectant fluid for flushing the recirculating
solution path during routine maintenance, or as a recirculating solution. It is NOT
suitable for long-term use, and must be replaced at 30-day intervals.

HOTLINE®Blood and Fluid Warmer Technical Service Pack 55
SECTION 5
Maintenance Solutions
■Unplug the HOTLINE®.
■(Old case) Remove the Fill Port plug and hold the Unit over a
sink to empty the water.
(New case) Deploy the drain tube to empty the Unit.
■Rinse reservoir with distilled water twice.
■Refill the reservoir with 1.4 litres of disinfectant flushing
solution made to one of the formulae shown in the blue
panel above. Do not fill the HOTLINE® reservoir with a
Disposable Set in place, as this may result in an airlock in the
HOTLINE® warmer.
■Connect a Disposable Set to the HOTLINE®.
■Plug the Unit in and switch on.
■Allow the disinfectant solution to circulate for 30 minutes.
Drain Tube
(in deployed posn)
Drain Tube End Cap
Fill Port
Pole Clamp
Interlock Block
disposable connector
Stowage Clip
(for drain tube when
not deployed)
GM-HL90-8508-en
Figure 5 - 4: Rear view of new-style HOTLINE case, showing drain tube

HOTLINE®Blood and Fluid Warmer Technical Service Pack 56
SECTION 5
Maintenance Solutions
■Switch off and disconnect the Unit.
■Empty the unit once more.
■Rinse reservoir with distilled water again.
■Refill the unit with 1.4 litres of sterile distilled water.
■Replace the Fill Port plug.
NOTE: Unless using one of the approved maintenance solutions, use only
sterile distilled or de-ionised water. Failure to do so may lead to a
build-up of mineral deposits in the recirculating solution path which
may impair heater performance.
Changing Recirculating Solution (Isopropyl Alcohol)
Since the Isopropyl Alcohol solution gradually loses potency,
it must be replaced at the 30-day service interval using the
following procedure:
■Prepare two batches of 1.4 litres of recirculating solution
according to formula 2 above for 35% Isopropyl Alcohol
maintenance solution.
■Drain the HOTLINE®, and refill with one of the prepared
batches.
■Install an L-70 or L-70 NI Disposable Administration Set in
the HOTLINE®’s Disposable Set connector.
■Turn on the HOTLINE® and allow the fresh fluid to circulate
for 30 minutes.

HOTLINE®Blood and Fluid Warmer Technical Service Pack 57
SECTION 5
Maintenance Solutions
■Switch off the HOTLINE® and dispose of the Disposable Set
in accordance with the usual procedures for your
establishment. Drain the Fluid from the HOTLINE® and
discard.
■Refill the HOTLINE® with the second of the Isopropyl Alcohol
solution batches you made earlier.
NOTE: If the HOTLINE
®
requires topping up at any time before the next
routine recirculating solution change, make sure you always use the
correct mix of Isopropyl Alcohol and Distilled water.
Changing Recirculating Solution (Hydrogen Peroxide)
At the annual routine service interval the Hydrogen Peroxide
solution must be replaced as follows:
■Prepare two batches of 1.4 litres of recirculating solution
according to formula 1 above for 0.3% Hydrogen Peroxide
maintenance solution.
■Drain the HOTLINE®, and refill with one of the prepared
batches.
■Install an L-70 or L-70 NI Disposable Administration Set in
the HOTLINE®’s Disposable Set connector.
■Turn on the HOTLINE® and allow the fresh fluid to circulate
for 30 minutes.
■Switch off the HOTLINE® and dispose of the Disposable Set
in accordance with the usual procedures for your

HOTLINE®Blood and Fluid Warmer Technical Service Pack 58
SECTION 5
Maintenance Solutions
establishment. Drain the fluid from the HOTLINE® and
discard.
■Refill the HOTLINE® with the second of the recirculating
solution batches you made earlier.
NOTE: If the HOTLINE
®
requires topping up at any time before the next
routine recirculating solution change, make sure you always use the
correct mix of Hydrogen Peroxide and Distilled water.
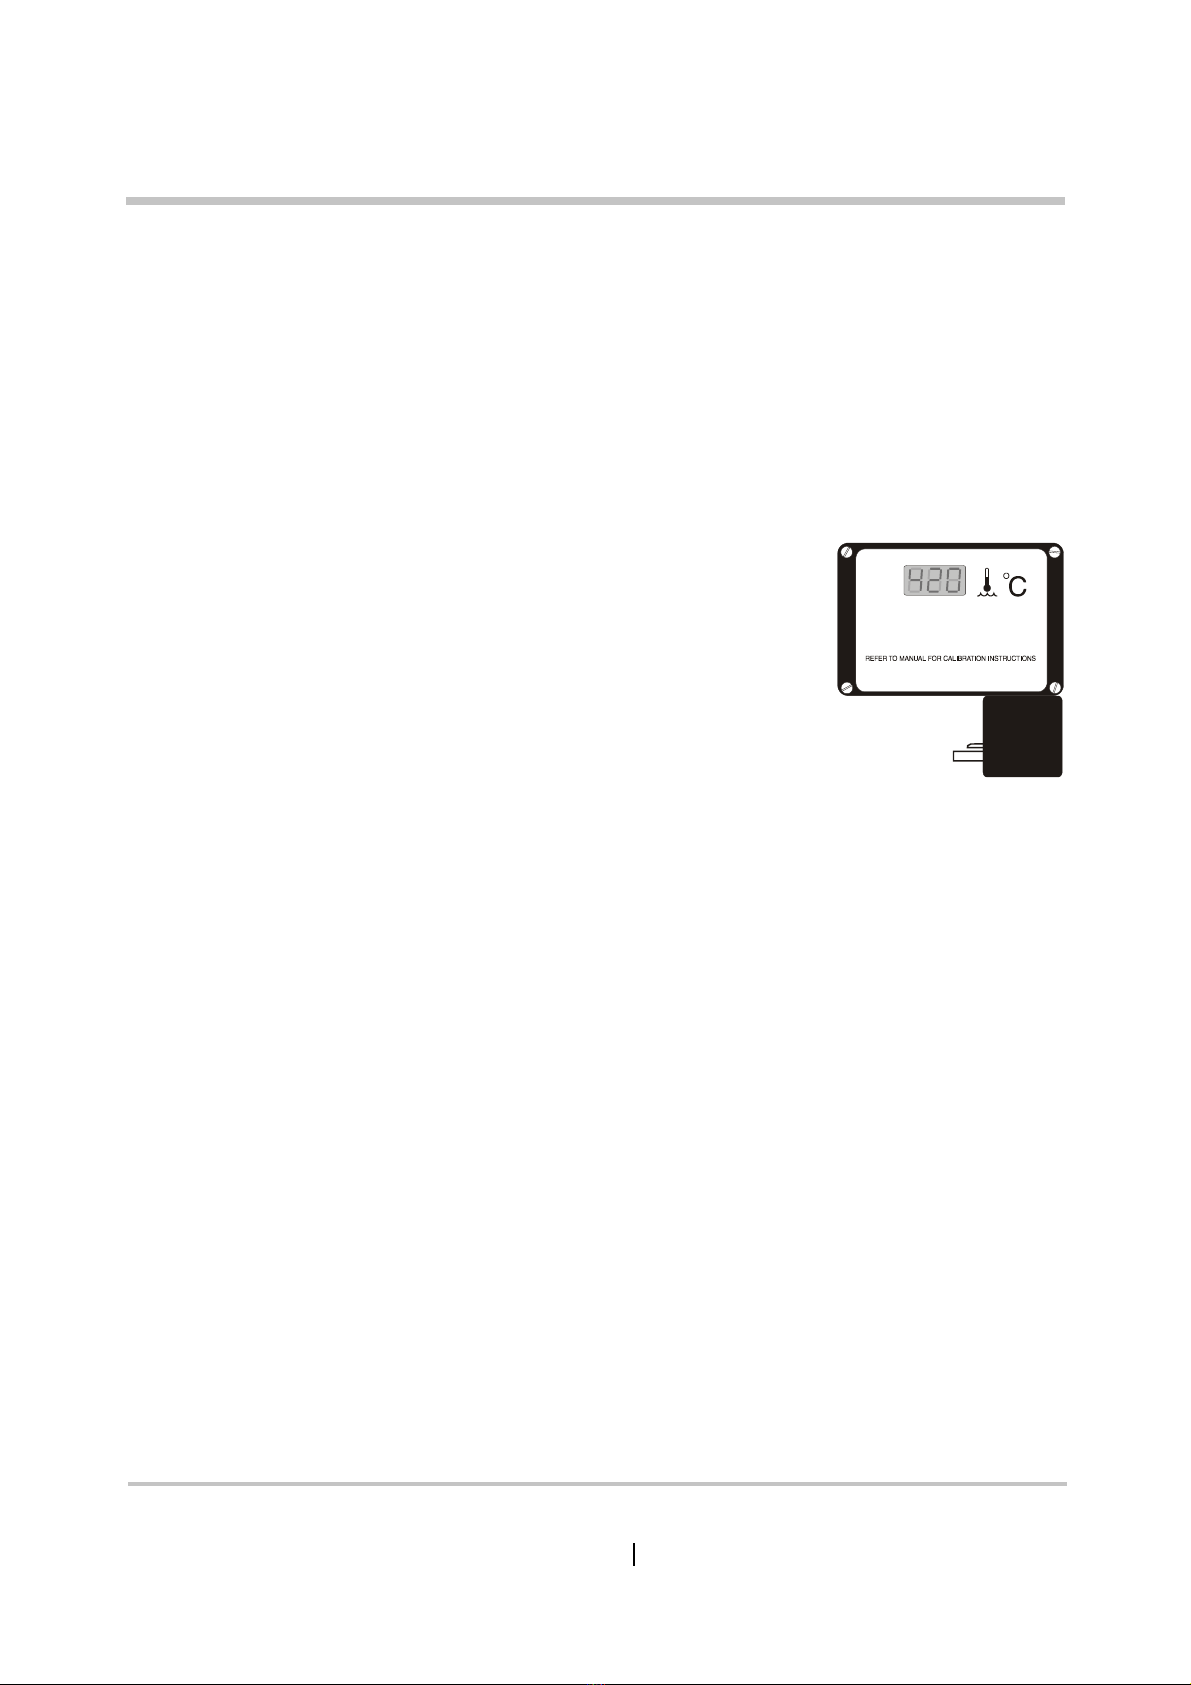
Temperature Checking
To accurately verify the displayed recirculating solution
temperature, you will need a HOTLINE® HLTA-40 TEMP CHECK
thermometer. This bespoke unit is inserted into the recirculating
solution flow and reads the temperature directly from the
recirculating solution as it leaves the heater element and internal
thermistor sensors. This is the point at which the recirculating
solution is at its highest temperature.
Measuring the temperature in the recirculating solution
reservoir is less accurate. Typically the temperature here may be
several degrees cooler, dependent on ambient temperature and
other factors.
TEMP
CHECK
GM-HL90-8502
Figure 5 - 5: A HOTLINE® HLTA-40 TEMP CHECK wet thermometer

HOTLINE®Blood and Fluid Warmer Technical Service Pack 59
SECTION 5
Maintenance Solutions
If you do not have a HOTLINE® TEMP CHECK thermometer,
units may be returned to Smiths Medical for temperature
verification.
Set up the HOTLINE® ready for use as before. Attach the TEMP
CHECK thermometer to the interlock block of the HOTLINE® and
connect the Disposable Set to the TEMP CHECK.
Carefully unpeel the black sticker from the back of the
HOTLINE®, and loosely attach it in a safe place ready for re-use. Plug
the TEMP CHECK ’s Mains cable into the Auxiliary Outlet socket of
the HOTLINE®.
NOTE: The Auxiliary Outlet is for use only with approved accessories
supplied by your Smiths Medical distributor for that purpose.
Run the HOTLINE® for 15 minutes to allow the temperature to
stabilise. Verify that:
■the TEMP CHECK indicates a recirculating solution tempera-
ture between 41°C and 42°C
■The HOTLINE®’s display indicates the same temperature.
If either of these conditions is not met, the unit will require
either recalibration or repairing and recalibration before it can be
returned to active service.
If both conditions are satisfied, dismantle the test assembly,
and replace the black sticker over the Aux socket. Document the
date and results of your tests and return the HOTLINE® to active
service.

HOTLINE®Blood and Fluid Warmer Technical Service Pack 60
SECTION 5
Routine Maintenance Checklists
Routine Maintenance Checklists
You may freely photocopy the checklists on the next three
pages to act as a continuing record of your routine HOTLINE® HL-90
maintenance.
The correct checklist to use is dependent on the choice of
protocol used for maintenance on the HOTLINE®s in your care. If
you choose to stick to the traditional distilled water recirculating
solution, you will need the first checklist. This allows for the
changing of the recirculating solution on a monthly cycle.
Otherwise, the third checklist corresponds with Smiths
Medical’s recommended protocol of having a 12-month interval
between solution changes, and using a disinfectant mixture as the
recirculating solution on a permanent basis.
In some territories, Hydrogen Peroxide may not be readily
available, or it may be that it is not included in the establishment’s
preferred protocols. If that is the case, and it is still necessary to
maintain a disinfectant recirculating solution, then the second
checklist gives the correct pattern when using Isopropyl Alcohol
solution with a 30-day replacement cycle. It is not permitted to use
the Isopropyl Alcohol solution on a 12-monthly replacement cycle
as it loses its potency much more rapidly than the recommended
Hydrogen Peroxide solution. For this reason, batches of Isopropyl
Alcohol solution (Formula 2) should ideally be freshly mixed
immediately before use.

HOTLINE®Blood and Fluid Warmer Technical Service Pack 61
SECTION 5
Routine Maintenance Checklists
GZX^gXjaVi^c\Hdaji^dc^hHiZg^aZ9^hi^aaZYLViZg
HI6GI
6;G:H=
G:8DG986G9
;DGI=>H
=DIA>C:
CDL
<B"%&+(T-*%("<7"6
BDCI=&
BDCI=(
BDCI='
BDCI=)
BDCI=*
BDCI=+
BDCI=,
BDCI=.
BDCI=-
BDCI=&&
BDCI=&%
BDCI=&'
Jc^iHZg^VaCjbWZg
9ViZd[6Xfj^h^i^dc
Bdci]&lVhl]Zc4
GZeaVXZD"G^c\HZVah
KZg^[ n IZbeZg Vij gZ 8V a^Wg Vi ^dc
Adl G ZX^gXja Vi^c \Hdaj i^dc 6aVgbIZhi
>ciZgadX`6aVgbIZhi
8]Vc\ZGZX^gXjaVi^c\Hdaji^dc
<gZVhZD"G^c\HZVah
<ZcZgVa6aVgbIZhi
DkZgIZbeZgVijgZIZhi
HOTLINE®Blood and Fluid Warmer Technical Service Pack 62
SECTION 5
Routine Maintenance Checklists
GZX^gXjaVi^c\Hdaji^dc^h(*>hdegdena6aXd]da
HI6GI
6;G:H=
G:8DG986G9
;DGI=>H
=DIA>C:
CDL
<B"%&+(T-*%."<7"6
BDCI=&
BDCI=(
BDCI='
BDCI=)
BDCI=*
BDCI=+
BDCI=,
BDCI=.
BDCI=-
BDCI=&&
BDCI=&%
BDCI=&'
Jc^iHZg^VaCjbWZg
9ViZd[6Xfj^h^i^dc
Bdci]&lVhl]Zc4
GZeaVXZD"G^c\HZVah
KZg^[ n IZbeZg Vij gZ 8Va^ Wg Vi ^dc
AdlGZX^gXjaVi^c\Hdaji^dc6aVgbIZhi
>ciZgadX`6aVgbIZhi
8]Vc\ZGZX^gXjaVi^c\Hdaji^dc
<gZVhZD"G^c\HZVah
<ZcZgVa6aVgbIZhi
DkZgIZbeZgVijgZIZhi

HOTLINE®Blood and Fluid Warmer Technical Service Pack 63
SECTION 5
GZX^gXjaVi^c\Hdaji^dc^h%#(=nYgd\ZcEZgdm^YZ
HI6GI
6;G:H=
G:8DG986G9
;DGI=>H
=DIA>C:
CDL
<B"%&+(T-*%,"<7"6
BDCI=&
BDCI=(
BDCI='
BDCI=)
BDCI=*
BDCI=+
BDCI=,
BDCI=.
BDCI=-
BDCI=&&
BDCI=&%
BDCI=&'
Jc^iHZg^VaCjbWZg
9ViZd[6Xfj^h^i^dc
Bdci]&lVhl]Zc4
GZeaVXZD"G^c\HZVah
KZg^[nIZbeZgVijgZ8Va^WgVi^dc
AdlGZX^gXjaVi^c\Hdaji^dc6aVgbIZhi
>ciZgadX`6aVgbIZhi
8]Vc\ZGZX^gXjaVi^c\Hdaji^dc
<gZVhZD"G^c\HZVah
<ZcZgVa6aVgbIZhi
DkZgIZbeZgVijgZIZhi
HOTLINE®Blood and Fluid Warmer Technical Service Pack 64
SECTION 5
Full Service Test Procedure
Full Service Test Procedure
This sequence must be used:
■either after any repair or service work where the case was
opened,
■or when the unit has failed temperature calibration
verification.
Things you will need
■Room Thermometer
■TEMP CHECK HLTA-40
■HOTLINE® Disposable Set L-70
■Small and Medium Straight Screwdrivers
■Non-magnetic Probe
CAUTION: Take care while operating the HOTLINE®with the case front open.
Mains voltages are present inside. Avoid contact with any internal
components not specified in this procedure.
CAUTION: The Auxiliary Outlet is for use only with approved accessories supplied
by your Smiths Medical distributor for that purpose.
CAUTION: Do not fill the HOTLINE®reservoir with a Disposable Set in place.
Failure to remove the Disposable Set before the fill procedure may
result in an airlock in the HOTLINE®warmer.
NOTE: When filling the HOTLINE
®
, use approved recirculating solutions
only. Failure to do so may cause damage to the equipment.
NOTE: Check the calibration due date on the back of the TEMP CHECK before
commencing this procedure.
NOTE: TEMP CHECK thermometers are designed for measuring circulating
recirculating solution flow only and are not intended for measuring
ambient (air) temperatures.
TEMP
CHECK
GM-HL90-8502
Table of contents
Other Smiths Food Warmer manuals


