Snell Advanced Media Kudos Pro UHD1000 User manual

www.s-a-m.com
User Manual
Kudos Pro UHD1000
Single Channel Linear SD/HD/3G/UHDTV1 Converter

Kudos Pro UHD1000 Information and Notices
Issue 1 Rev 2 Page 2 © 2016 SAM
Information and Notices
Copyright and Disclaimer
Copyright protection claimed includes all forms and matters of copyrightable material and
information now allowed by statutory or judicial law or hereinafter granted, including without
limitation, material generated from the software programs which are displayed on the screen
such as icons, screen display looks etc.
Information in this manual and software are subject to change without notice and does not
represent a commitment on the part of SAM. The software described in this manual is
furnished under a license agreement and can not be reproduced or copied in any manner
without prior agreement with SAM or their authorized agents.
Reproduction or disassembly of embedded computer programs or algorithms prohibited.
No part of this publication can be transmitted or reproduced in any form or by any means,
electronic or mechanical, including photocopy, recording or any information storage and
retrieval system, without permission being granted, in writing, by the publishers or their
authorized agents.
SAM operates a policy of continuous improvement and development. SAM reserves the right
to make changes and improvements to any of the products described in this document
without prior notice.
Contact Details
Customer Support
For details of our Regional Customer Support Offices please visit the SAM website and
navigate to Support/24/7-Support.
www.s-a-m.com/support/247-support/
Customers with a support contract should call their personalized number, which can be found
in their contract, and be ready to provide their contract number and details.
Kudos Pro UHD1000 Safety Information
Issue 1 Rev 2 Page 3 © 2016 SAM
Safety Information
Kudos Pro UHD1000 Safety Information
Issue 1 Rev 2 Page 4 © 2016 SAM
Kudos Pro UHD1000 Safety Information
Issue 1 Rev 2 Page 5 © 2016 SAM
Mains Power Supplies
This equipment has two 3-pin IEC power sockets, one for the main power supply unit and one
for the redundant power supply unit.
The power supply is auto switching for input voltages in the ranges of 100 V to 240 V nominal.
No voltage adjustment procedure is required.
Laser Safety
This product operates with Class 1 laser products.
Ventilation
Although the unit is constructed to meet normal environmental requirements, ensure that
there is a free flow of air at the front, rear, and sides of the unit to dissipate the heat produced
during operation. Installations should be designed to allow for this.
• This equipment has more than one power supply. To reduce the risk of electric
shock, plug each power supply into separate branch circuits employing separate
service grounds.
• Before performing any servicing or maintenance, disconnect and isolate the unit
from the mains input and from any product outputs.
• Do not operate this unit without an earth connection.
Caution: Use of controls or adjustments or performance of procedures other than those
specified herein may result in hazardous radiation exposure.
Do not obstruct the ventilation holes on the right-hand side of the unit. Damage to the
equipment may result.

Kudos Pro UHD1000 Safety Information
Issue 1 Rev 2 Page 6 © 2016 SAM
Compliance Standards
This equipment conforms to the following standards:
EN60950-1: 2006
Safety of Information Technology Equipment Including
Electrical Business Equipment.
UL1419 (3rd Edition) - UL File E193966
Standard for Safety – Professional Video and Audio equipment.
EMC Standards
This equipment conforms to the following standards:
EN 55103-1: 1996 (Environment E4)
Electromagnetic Compatibility, Product family standard for audio, video, audio-visual and
entertainment lighting control apparatus for professional use. Part 1. Emission.
EN 55103-2: 1996 (Environment E2)
Electromagnetic Compatibility, Product family standard for audio, video, audio-visual and
entertainment lighting control apparatus for professional use. Part 2. Immunity.
FCC/CFR 47:Part 15, Class A
Federal Communications Commission Rules Part 15, Subpart B, Class A.
EMC Environment
The product(s) described in this manual conform to the EMC requirements for, and are
intended for use in, the controlled EMC environment (for example, purpose-built broadcasting
or recording studios), and the rural outdoor environment (far away from railways, transmitters,
overhead power lines, etc.) E4.
EMC Performance of Cables and Connectors
Snell products are designed to meet or exceed the requirements of the appropriate European
EMC standards. In order to achieve this performance in real installations it is essential to use
cables and connectors with good EMC characteristics.
All signal connections (including remote control connections) shall be made with screened
cables terminated in connectors having a metal shell. The cable screen shall have a
large-area contact with the metal shell.
Coaxial Cables
Coaxial cables connections (particularly serial digital video connections) shall be made with
high-quality double-screened coaxial cables such as Belden 1694 or BBC type PSF1/2M.
D-type Connectors
D-type connectors shall have metal shells making good RF contact with the cable screen.
Connectors having “dimples” which improve the contact between the plug and socket shells
are recommended.

Kudos Pro UHD1000 Contents
Issue 1 Rev 2 Page 7 © 2016 SAM
Contents
Information and Notices . . . . . . . . . . . . . . . . . . . . . . . . . . . . . . . . . . . . . . . . . . . . . . . . 2
Copyright and Disclaimer . . . . . . . . . . . . . . . . . . . . . . . . . . . . . . . . . . . . . . . . . . . . . . 2
Contact Details . . . . . . . . . . . . . . . . . . . . . . . . . . . . . . . . . . . . . . . . . . . . . . . . . . . . . . 2
Safety Information . . . . . . . . . . . . . . . . . . . . . . . . . . . . . . . . . . . . . . . . . . . . . . . . . . . . . 3
Mains Power Supplies. . . . . . . . . . . . . . . . . . . . . . . . . . . . . . . . . . . . . . . . . . . . . . . . . 5
Laser Safety . . . . . . . . . . . . . . . . . . . . . . . . . . . . . . . . . . . . . . . . . . . . . . . . . . . . . . . . 5
Compliance Standards . . . . . . . . . . . . . . . . . . . . . . . . . . . . . . . . . . . . . . . . . . . . . . . . 6
EMC Standards. . . . . . . . . . . . . . . . . . . . . . . . . . . . . . . . . . . . . . . . . . . . . . . . . . . . . . 6
EMC Environment . . . . . . . . . . . . . . . . . . . . . . . . . . . . . . . . . . . . . . . . . . . . . . . . . . . . 6
EMC Performance of Cables and Connectors . . . . . . . . . . . . . . . . . . . . . . . . . . . . . . 6
1 Introduction . . . . . . . . . . . . . . . . . . . . . . . . . . . . . . . . . . . . . . . . . . . . . . . . . . . . . . . . . 8
1.1 Description . . . . . . . . . . . . . . . . . . . . . . . . . . . . . . . . . . . . . . . . . . . . . . . . . . . . . . 8
1.2 Front Panel View. . . . . . . . . . . . . . . . . . . . . . . . . . . . . . . . . . . . . . . . . . . . . . . . . . 8
1.3 Rear Panel View . . . . . . . . . . . . . . . . . . . . . . . . . . . . . . . . . . . . . . . . . . . . . . . . . . 8
1.4 Feature Summary . . . . . . . . . . . . . . . . . . . . . . . . . . . . . . . . . . . . . . . . . . . . . . . . . 8
1.5 Block Diagram. . . . . . . . . . . . . . . . . . . . . . . . . . . . . . . . . . . . . . . . . . . . . . . . . . . . 9
1.6 Order Codes . . . . . . . . . . . . . . . . . . . . . . . . . . . . . . . . . . . . . . . . . . . . . . . . . . . . . 9
2 Technical Specification. . . . . . . . . . . . . . . . . . . . . . . . . . . . . . . . . . . . . . . . . . . . . . . 10
3 Installation . . . . . . . . . . . . . . . . . . . . . . . . . . . . . . . . . . . . . . . . . . . . . . . . . . . . . . . . . 13
3.1 Unpacking the Unit . . . . . . . . . . . . . . . . . . . . . . . . . . . . . . . . . . . . . . . . . . . . . . . 13
3.2 Rack Mounting the Unit. . . . . . . . . . . . . . . . . . . . . . . . . . . . . . . . . . . . . . . . . . . . 13
3.3 Ventilation . . . . . . . . . . . . . . . . . . . . . . . . . . . . . . . . . . . . . . . . . . . . . . . . . . . . . . 13
4 Connections. . . . . . . . . . . . . . . . . . . . . . . . . . . . . . . . . . . . . . . . . . . . . . . . . . . . . . . . 14
4.1 UHD1000 (Base Model) . . . . . . . . . . . . . . . . . . . . . . . . . . . . . . . . . . . . . . . . . . . 14
4.2 Input and Output Connections. . . . . . . . . . . . . . . . . . . . . . . . . . . . . . . . . . . . . . . 14
4.3 Fiber Connectivity . . . . . . . . . . . . . . . . . . . . . . . . . . . . . . . . . . . . . . . . . . . . . . . . 15
4.4 Audio Connection Pin Numbers (Option) . . . . . . . . . . . . . . . . . . . . . . . . . . . . . . 16
5 Front Panel Features. . . . . . . . . . . . . . . . . . . . . . . . . . . . . . . . . . . . . . . . . . . . . . . . . 17
5.1 Front Panel Layout . . . . . . . . . . . . . . . . . . . . . . . . . . . . . . . . . . . . . . . . . . . . . . . 17
5.2 Front Panel Controls . . . . . . . . . . . . . . . . . . . . . . . . . . . . . . . . . . . . . . . . . . . . . . 17
6 System Operation . . . . . . . . . . . . . . . . . . . . . . . . . . . . . . . . . . . . . . . . . . . . . . . . . . . 19
6.1 Turning the Unit On. . . . . . . . . . . . . . . . . . . . . . . . . . . . . . . . . . . . . . . . . . . . . . . 19
6.2 The Home Screen. . . . . . . . . . . . . . . . . . . . . . . . . . . . . . . . . . . . . . . . . . . . . . . . 19
6.2.1 Video Monitoring . . . . . . . . . . . . . . . . . . . . . . . . . . . . . . . . . . . . . . . . . . . . . 19
6.3 Using the Front Panel - Basics . . . . . . . . . . . . . . . . . . . . . . . . . . . . . . . . . . . . . . 20
6.3.1 Entering Numeric Characters from the Front Panel . . . . . . . . . . . . . . . . . . 20
6.3.2 Entering Numeric Characters from the Rotary Control . . . . . . . . . . . . . . . . 20
6.3.3 Selecting an Action Using On/Off . . . . . . . . . . . . . . . . . . . . . . . . . . . . . . . . 20
6.3.4 Resetting Menu Options to Default Values . . . . . . . . . . . . . . . . . . . . . . . . . 21
6.4 Front Panel Buttons. . . . . . . . . . . . . . . . . . . . . . . . . . . . . . . . . . . . . . . . . . . . . . . 22
6.4.1 Input . . . . . . . . . . . . . . . . . . . . . . . . . . . . . . . . . . . . . . . . . . . . . . . . . . . . . . 22
6.4.2 Output . . . . . . . . . . . . . . . . . . . . . . . . . . . . . . . . . . . . . . . . . . . . . . . . . . . . . 23
6.4.3 Video. . . . . . . . . . . . . . . . . . . . . . . . . . . . . . . . . . . . . . . . . . . . . . . . . . . . . . 24
6.4.4 Audio. . . . . . . . . . . . . . . . . . . . . . . . . . . . . . . . . . . . . . . . . . . . . . . . . . . . . . 25
6.4.5 Memory . . . . . . . . . . . . . . . . . . . . . . . . . . . . . . . . . . . . . . . . . . . . . . . . . . . . 30
6.4.6 Home. . . . . . . . . . . . . . . . . . . . . . . . . . . . . . . . . . . . . . . . . . . . . . . . . . . . . . 30
6.4.7 Convert . . . . . . . . . . . . . . . . . . . . . . . . . . . . . . . . . . . . . . . . . . . . . . . . . . . . 30
6.4.8 ARC. . . . . . . . . . . . . . . . . . . . . . . . . . . . . . . . . . . . . . . . . . . . . . . . . . . . . . . 33
6.4.9 Enhance . . . . . . . . . . . . . . . . . . . . . . . . . . . . . . . . . . . . . . . . . . . . . . . . . . . 39
6.4.10 System . . . . . . . . . . . . . . . . . . . . . . . . . . . . . . . . . . . . . . . . . . . . . . . . . . . 43
6.5 Operation Via Web Browser . . . . . . . . . . . . . . . . . . . . . . . . . . . . . . . . . . . . . . . . 49
6.5.1 Browser-only Operations. . . . . . . . . . . . . . . . . . . . . . . . . . . . . . . . . . . . . . . 49
Kudos Pro UHD1000 Introduction
Issue 1 Rev 2 Page 8 © 2016 SAM
1 Introduction
1.1 Description
The UHD1000 is a motion-adaptive up/down format converter for a range of applications,
including:
• Integration of HD programming into UHDTV productions.
• Provision of HD simultaneous transmissions alongside UHDTV services.
• Mixed usage of four quadrant square-division and pixel-interleaved UHDTV content.
These converters are ideal for customers who need to manage both HD and UHD content
within their production or transmission workflow.
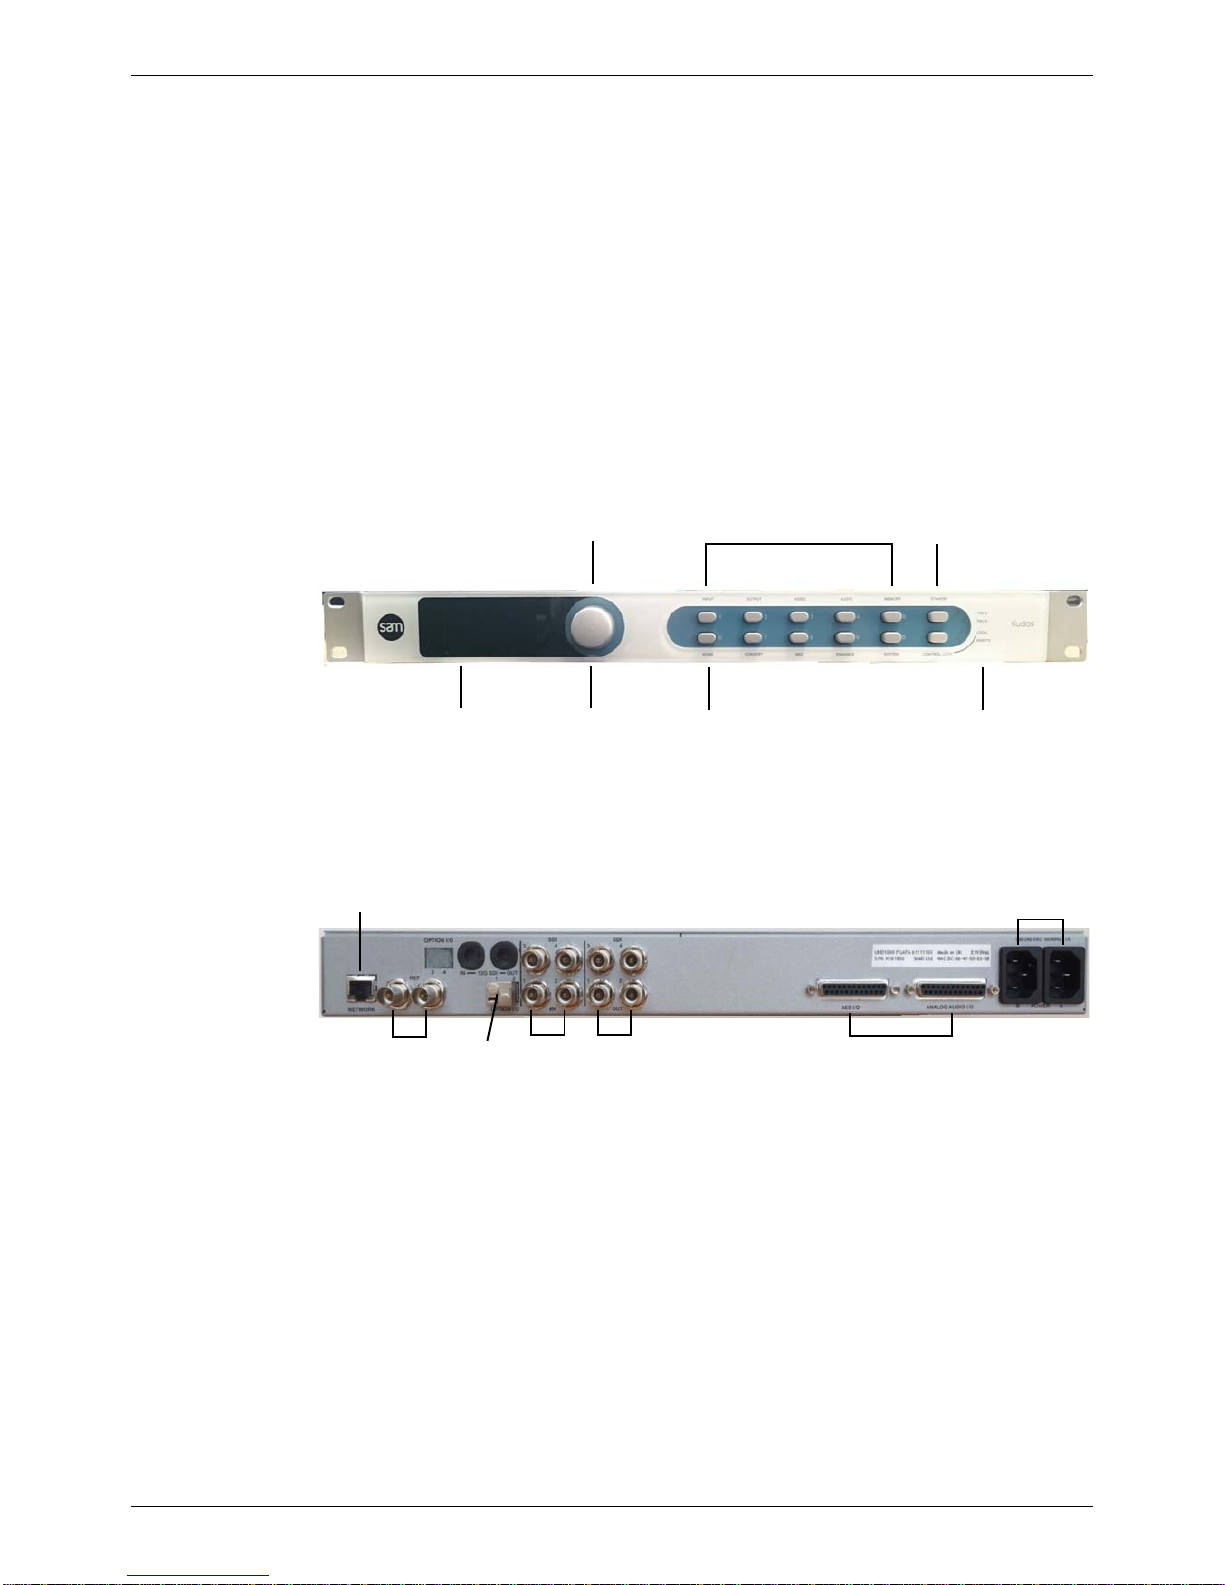
1.2 Front Panel View
1.3 Rear Panel View
1.4 Feature Summary
The UHD1000 format converter provides the following features:
• Linear motion adaptive SD/HD/3G/UHDTV up/down/cross conversion at the same
frame rate.
• 4 x SDI inputs, 4 x SDI outputs.
• 16-channel embedded audio processing.
• Dolby E guard-band alignment.
• hronization to a bi/tri-level reference.
• Quad link (2SI and QSD). Rec709/2020 color.
Rotary control for quick
menu navigation Function
buttons
Visual confidence
monitor screen Press to select
menu items Home
button Status
indicators
Standby
button
Ethernet
Fiber
(option)
Reference SDI
inputs Balanced AES and
analog audio
Dual PSU
SDI
outputs
Kudos Pro UHD1000 Introduction
Issue 1 Rev 2 Page 9 © 2016 SAM
• Dual PSU as standard.
• Automatic Aspect Ratio Conversion (AFD, VI, L23).
• Powerful picture enhancement tools.
• User-friendly front panel.
• Web interface remote control.
• Closed caption, teletext subtitle, and timecode handling.
• Noise reducer.
Further options available:
• Analog and AES audio inputs and outputs.
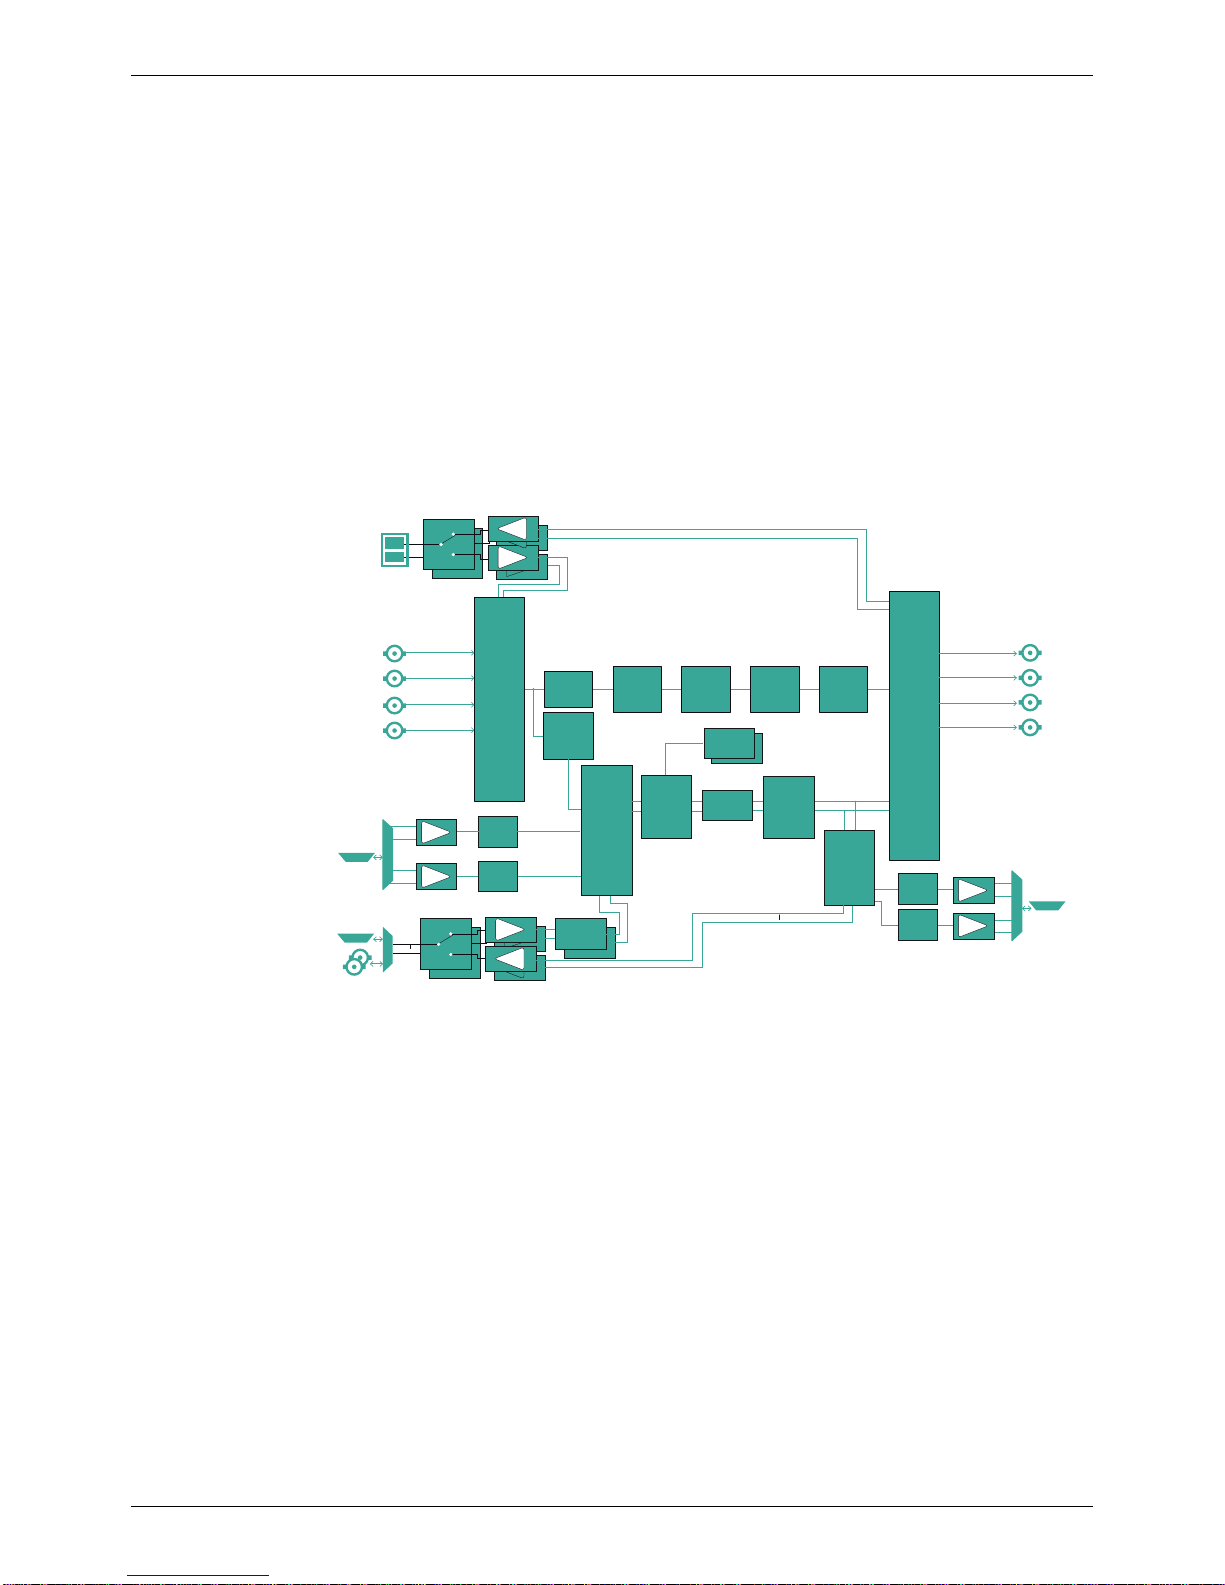
1.5 Block Diagram
1.6 Order Codes
The following product order codes are covered by this manual:
FGAFA 6111100X - UHD1000 UHD/HD/SD converter (base model)
FGAFA 6111110X - UHD1000 UHD/HD/SD converter with analog and AES audio I/O
Audio
De-embed
AES RX
In
In
Out 1-8
1-8
AES RX
AES TX
Line up
Level
ADC
ADC Line up
Level 1
2
3
4
DAC
DAC
AES RX &
Sample Rate
Conversion
AES RX &
Sample Rate
Conversion
Tone
Generator
Tone
Generator
8 Pair
Proc Amp
1-16
1-16
Audio
Process
Pair
Router
Pair
1-8
8 Pair
Fixed &
Tracking
Audio Delays
inc Dolby E
Auto Align
1-8
Line up
Level
Line up
Level
Ancillary
Data
Reading
Linear Frame
Rate
Converter
with Sync
Video
Proc. Amp &
RGB
Legalizer
Aspect
Ratio
Converter
with AFD &
WSS
Color
corrector,
H&V Detail
Enhancement
AES
Analog
Note: See order codes for fiber SFP options
SFP
SDI in 1
SDI in 2
SDI out 2
SDI out 1
Analog
1
2
4
3
Audio
Output
Pair
Router
18 x 16
Channel
Router
AES RX
In
In
Out SDI RX
SDI TX
Cross
Point
Router Audio /
Ancillary
Data
Embedder
SDI in 3
SDI in 4
SDI out 4
SDI out 3
†
†
†
†
†
†

Kudos Pro UHD1000 Technical Specification
Issue 1 Rev 2 Page 10 © 2016 SAM
2 Technical Specification
Inputs and Outputs
Signal Inputs
Serial Digital Inputs 4 x 75 Ohm SD/HD/3Gb/s serial digital with embedded audio
Input Standards UHDTV1 video interfaces
• Square division (4 x 1.5Gbps links) for <= 30fps
• Square division (4 x 3Gbps links) for > 30fps
• Sample interleaved SMPTE ST425-3 (2 x 3Gbps links) for
<=30fps
• Sample interleaved SMPTE ST425-5 (4 x 3Gbps links) for > 30fps
3Gb/s HD-SDI, SMPTE425 level A, dual-link level B
1.5 Gb/s HD-SDI SMPTE292M/SMPTE299M
270 Mbit/s SD-SDI SMPTE259M
Reference 1 x loop-through HDTV Tri-/SD Bi- (black and burst) SMPTE 240M/274M,
with auto selection dependant on output standard
Audio AES (option) Up to 41balanced AES inputs via 25-way D-type
1AES audio connector may be configured as input or output.
Audio Analog (option) 2 x stereo analog inputs via 25-way D-type
Signal Outputs
Serial Digital Outputs 2 x 75 Ohm SD/HD/3Gb/s serial digital with embedded audio
Output standards UHDTV1 video interfaces:
• Square division (4 x 1.5Gbps links) for <= 30fps
• Square division (4 x 3Gbps links) for > 30fps
• Sample interleaved SMPTE ST425-3 (2 x 3Gbps links) for
<=30fps
• Sample interleaved SMPTE ST425-5 (4 x 3Gbps links) for > 30fps
3Gb/s HD-SDI, SMPTE425 level A, dual-link level B
1.5 Gb/s HD-SDI SMPTE292M/SMPTE299M
270 Mbit/s SD-SDI SMPTE259M
Audio AES (option) Up to 41balanced AES outputs via 25-way D-type
Note: 1AES audio connectors may be configured as input or output.
Audio Analog (option) 2 x stereo analog outputs via 25-way D-type
Standards
Input Standards (Auto Detect) 525 59i
625 50i
720/1080 23/24/25/29/30/50/59/60p
1080 50/59/60i
1080 23/24/25/29/30/50/59/60p
1080 23/24/25/29psf, with film detection and processing
2160 23/24/25/29/30/50/59/60p

Kudos Pro UHD1000 Technical Specification
Issue 1 Rev 2 Page 11 © 2016 SAM
Output Standards 525 59i
625 50i
720/1080 23/24/25/29/30/50/59/60p
1080 50/59/60i
1080 23/24/25/29/30/50/59/60p
1080 23/24/25/29psf, with film detection and processing
2160 23/24/25/29/30/50/59/60p
Conversion Functions
Modes SD/HD/3G/UHDTV
Up, Down, and Cross Conversion
Conversion Linear/Motion Adaptive
Aspect Ratio Conversion
(Manual or Auto) AFD (SMPTE 2016), VI (RP186), WSS (L23)
Audio
Embedded Audio Each processing channel includes 16-channel embedded audio
processing.
PCM audio processing includes channel level gain and delay
compensation, as well as pair level routing with L/R swap and phase
invert feature.
Throughput Delay
With frame rate conversion, the average delay is< 130ms.
Note: Sync Mode (See section 6.4.8.1) applies only when the input and
output are the same format, e.g. 1080 50i to 1080 50i.
Note: The ARC feature (See section 6.4.8) is not available in UHD to
UHD conversion, but is always active for UHD up/down.
Audio Processing Delay Automatically tracks video processing delay.
Power
Input voltage range
(primary & secondary) 100 to 240VAC, 47 to 63Hz 0.4A, via three-pin IEC power socket
Power Consumption 20 W
Input Output Min Delay Max Delay
UHD SQD UHD SQD 0.1 Min plus 1 field
UHD SQD UHD 2SI <10ms Min plus 1 field
UHD 2SI UHD 2SI 0.1 Min plus 1 field
UHD 2SI UHD SQD <10ms Min plus 1 field
UHD SQD 3G/HD <18ms Min plus 1 field
UHD 2SI 3G/HD <8ms Min plus 1 field
UHD SQD SD <20ms Min plus 1 field
UHD 2SI SD <10ms Min plus 1 field
3G/HD UHD SQD <15ms Min plus 1 field
3G/HD UHD 2SI <7ms Min plus 1 field
SD UHD SQD <16ms Min plus 1 field
SD UHD 2SI <8ms Min plus 1 field

Kudos Pro UHD1000 Technical Specification
Issue 1 Rev 2 Page 12 © 2016 SAM
Mechanical
Temperature Range 0 to 40°C operating
Cooling Internal fan, side venting
Weight 2.4 kg
Case Type 1RU, rack mounting
Dimensions 44mm x 430mm x 170mm (H x W x D)
Note:
The AES audio connector may be assigned as either input or output.

Kudos Pro UHD1000 Installation
Issue 1 Rev 2 Page 13 © 2016 SAM
3 Installation
3.1 Unpacking the Unit
The unit is packed in a single cardboard box. Unpack the box carefully and check for any
shortages or shipping damage. Report any shortages or shipping damage to SAM
immediately.
The box contains the following items:
• 1 x UHD1000 unit.
3.2 Rack Mounting the Unit
Ensure that sufficient space is available for the unit.
When installing the unit, place on a suitably specified and installed rack shelf and secure the
unit using the front rack ears.
3.3 Ventilation
Ensure that there is a free flow of air at the front, rear, and sides of the unit in order to
dissipate the heat produced during operation. Installations should be designed to allow for
this.
Important:
Refer to Safety Information on page 3 before installing and connecting power to the unit.
Note:
Retain the product packaging. It may be required if returning the unit to SAM.
Important:
Do not obstruct the ventilation holes on the right-hand side of the unit. Damage to the
equipment may result.

Kudos Pro UHD1000 Connections
Issue 1 Rev 2 Page 14 © 2016 SAM
4 Connections
This section describes the physical input and output connections provided by the UHD1000
and UHD1000 with audio option.
4.1 UHD1000 (Base Model)
The rear panel accommodates SDI, AES and analog connections.
4.2 Input and Output Connections
Ethernet
Reference
Option I/O
Dual PSU
SDI
Inputs SDI
Outputs Balanced AES &
analog audio I/O
Label Description Connector
SDI in 1, 2, 3, 4 SDI inputs 4 x BNC
SDI out 1, 2, 3, 4 SDI outputs 4 x BNC
Network 10/100 BaseT Ethernet connection 1 x RJ45
Reference Reference input 2 x BNC
Option I/O Signal input/output 1 x dual SFP compatible
AES and Analog Audio
I/O (option) AES and Analog audio input/output 1 x 25-way D-type
Power A, B PSU inputs (primary, secondary) 2 x 3-pin IEC
Note:
If one of the reference connectors is not in use, it must be fitted with a 75 Ohm BNC
terminating plug. If not terminated correctly, genlock performance may be degraded.
Note:
The option sockets allow for up to two dual Small Form Factor Pluggable (SFP) transceiver
modules. The SFP modules can be used to add optional fiber connectivity, or optional I/O
using HD BNC connectors.

Kudos Pro UHD1000 Connections
Issue 1 Rev 2 Page 15 © 2016 SAM
4.3 Fiber Connectivity
A dual fiber port is available as an option. The port can be configured as one of the following:
• Dual receiver (RX/RX)
• Dual transmitter (TX/TX)
• Transceiver (RX/TX)
• Not fitted
If no fiber option is fitted on the rear panel, do not remove the safety covers from the option
slots.

Kudos Pro UHD1000 Connections
Issue 1 Rev 2 Page 16 © 2016 SAM
4.4 Audio Connection Pin Numbers (Option)
AES audio and analog audio support are available as an option. Connection is via 25-way
D-type. Balanced AES audio I/O connectors can be configured as either input or output.
Analog Audio I/O 25 Way D-Type
Connector
AES Audio I/O
Channel 25 Way
D-Type Pin Channel 25 Way
D-Type Pin
Chassis 1Chassis 1
GND1 14 GND1 14
Analog Out 4+ 2Port 8+ 2
Analog Out 4- 15 Port 8- 15
Analog Out 3+ 3Port 7+ 3
Analog Out 3- 16 Port 7- 16
GND2 4GND2 4
GND3 17 GND3 17
Analog Out 2+ 5Port 6+ 5
Analog Out 2- 18 Port 6- 18
Analog Out 1+ 6Port 5+ 6
Analog Out 1- 19 Port 5- 19
GND4 7GND4 7
GND5 20 GND5 20
Analog In 4+ 8Port 4+ 8
Analog In 4- 21 Port 4- 21
Analog In 3+ 9Port 3+ 9
Analog In 3- 22 Port 3- 22
GND6 10 GND6 10
GND7 23 GND7 23
Analog In 2+ 11 Port 2+ 11
Analog In 2- 24 Port 2- 24
Analog In 1+ 12 Port 1+ 12
Analog In 1- 25 Port 1- 25
GND8 13 GND8 13
Solder Pin Side
Kudos Pro UHD1000 Front Panel Features
Issue 1 Rev 2 Page 17 © 2016 SAM
5 Front Panel Features
The front panel provides a user-friendly interface for complete control of the unit. Various
buttons provide easy access to the unit’s features.
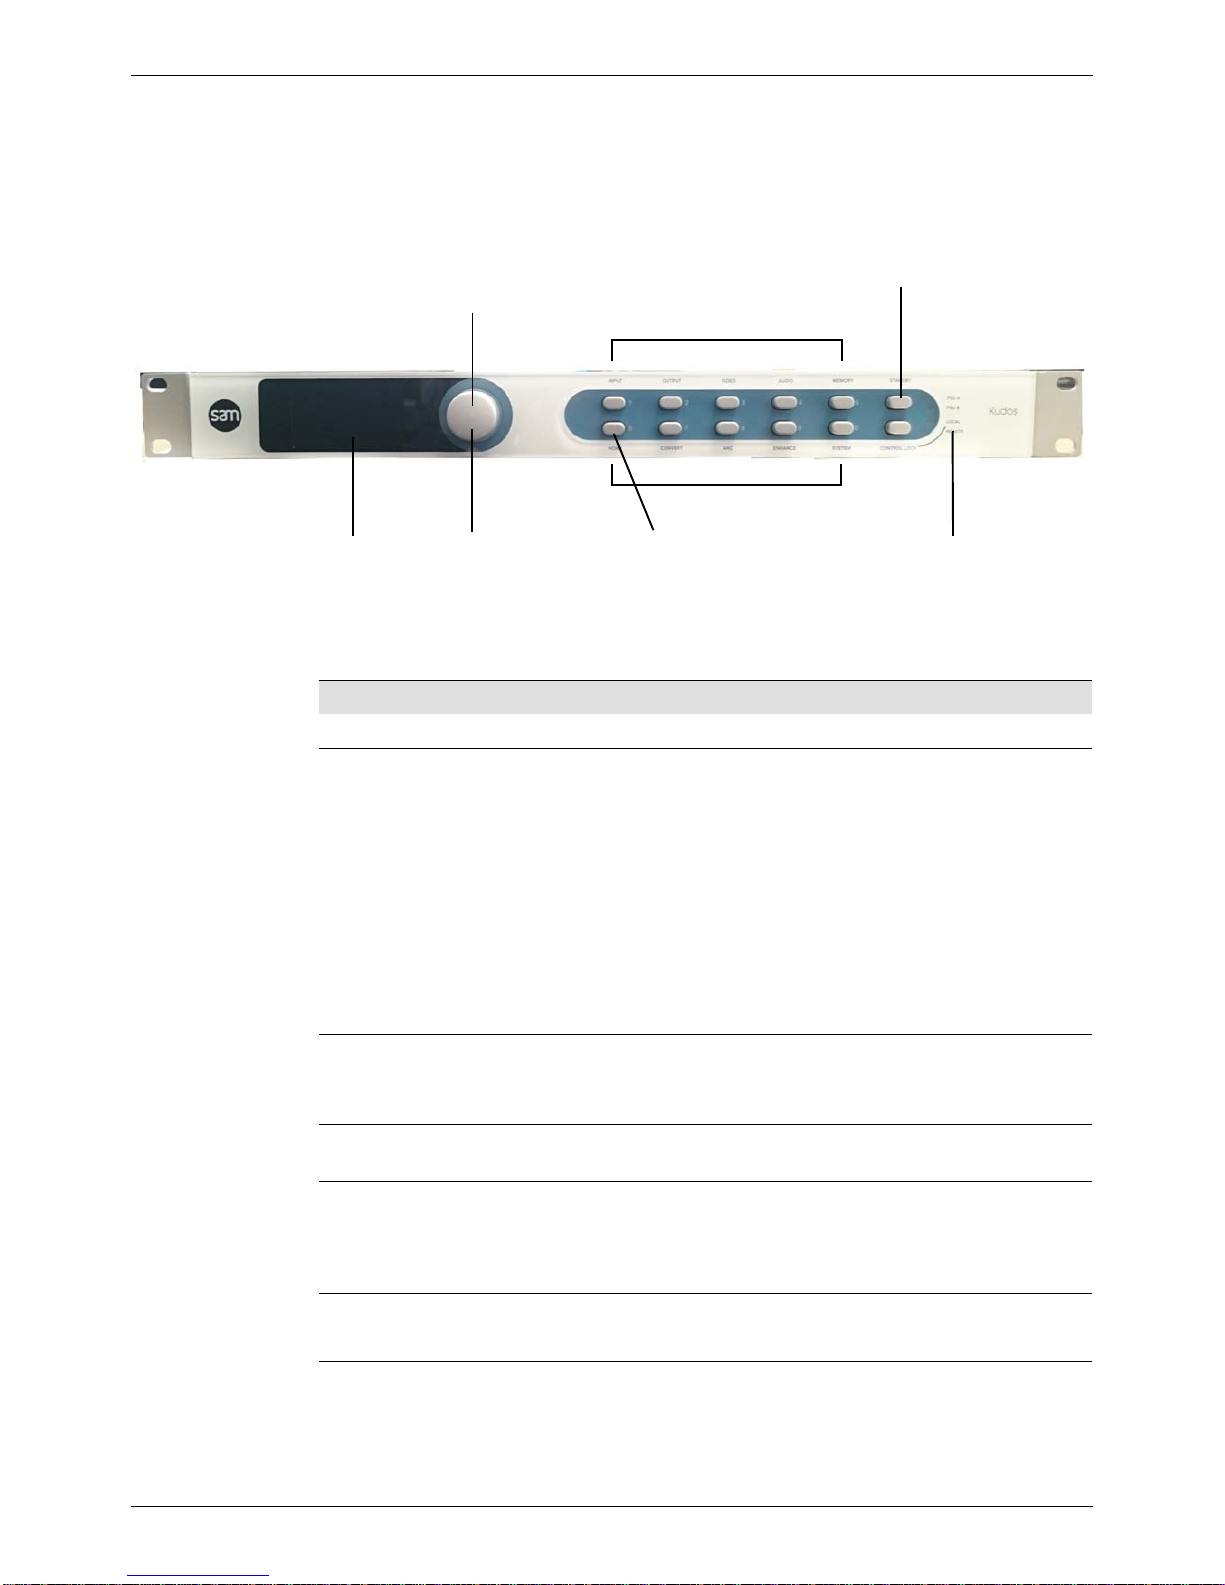
5.1 Front Panel Layout
5.2 Front Panel Controls
Rotary Control for fast
scrolling through menus
Screen for visual
confidence monitoring Press to select
menu items Home
button Status
indicators
Standby
Function/numeric entry buttons
Function/numeric entry buttons
Item Description
Display Shows either the output video or the menu options.
Rotary control Scrolls through the menu lists, selects menu options, and adjusts
values.
• Rotate clockwise or anti-clockwise to scroll down or up
through a menu list or to adjust values on a menu option.
• Press to select a menu option or confirm changes.
• Press and hold to jump to the “Back” option under a menu list.
• Press and hold when entering parameter values to return the
parameter to default value.
• When at the Home screen, press to toggle between status
display and video monitoring.
Home button Press to return to the default Home screen at any time.
When on the Home screen, press the Home button to toggle between
status display and video monitoring.
Function/Numeric
buttons Provide direct access to menus.
Standby button Turns the unit on or puts the unit into standby mode. Press once to
turn the unit on.
Press and hold to put the unit into standby mode. When the unit is in
standby mode, the corresponding PSU LEDs are illuminated red.
Control Lock button Press to lock the front panel controls.
Press and hold for three seconds to unlock the front panel controls.

Kudos Pro UHD1000 Front Panel Features
Issue 1 Rev 2 Page 18 © 2016 SAM
PSU Status LEDs Shows the status of the dual PSUs.
•PSU A illuminated green: PSU A (primary) in use.
•PSU B illuminated green: PSU B (secondary) in use.
•PSU illuminated red: unit in standby (power saving) mode.
Control Status LEDs Shows the monitoring status.
•Local illuminated: local control enabled.
•Remote illuminated: browser-based UI may be in use.
Item Description

Kudos Pro UHD1000 System Operation
Issue 1 Rev 2 Page 19 © 2016 SAM
6 System Operation
The UHD1000 can be controlled directly, using the front panel hardware buttons, or remotely,
using a software UI in a browser window. All operations are possible from either interface.
The operating instructions given here focus on operation via the front panel. Operation via the
browser-based UI follows the same basic control sequences, and should be self-explanatory.
6.1 Turning the Unit On
• Press the Standby button.
The PSU LED turns green and the splash screen is shown on the display. After ashort period,
the Home screen is displayed.
6.2 The Home Screen
The Home screen shows the following status information:
• Unit name;
• IP address;
• Input and output standard;
• Reference standard.
The Home screen can be displayed at any time by pressing the Home button.
6.2.1 Video Monitoring
To view the output video on the front panel monitor screen, first press the Home button to
return to the Home screen. From here, pressing the rotary control or the Home button will
toggle between Home screen and video monitor.
Note:
If no controls are used, the unit will automatically return to the Home screen after a few
minutes.

Kudos Pro UHD1000 System Operation
Issue 1 Rev 2 Page 20 © 2016 SAM
6.3 Using the Front Panel - Basics
The front panel buttons provide access to the UHD1000 control menus.
• Turn the rotary control clockwise to scroll down through a menu list, or anti-clockwise
to scroll up.
• When on the required menu item, press the rotary control to select it.
• When a menu option that offers adjustment is selected, such as audio gain, the value
can be adjusted by turning the rotary control. This allows control for fine-tuning values
in small increments. When the desired value has been entered, press the rotary
control to set the value.
•SelectBack at the bottom of each menu page go back up a level, or simply select
another front panel button to change to a different menu.
• To return to the Home screen, press the Home front panel button.
6.3.1 Entering Numeric Characters from the Front Panel
6.3.2 Entering Numeric Characters from the Rotary Control
Where a parameter may be set from a range of values with only certain specific steps,
numeric entry is via the rotary control:
1. Press the rotary control to show the current value, e.g. contrast.
2. Rotate the control clockwise to increment the value by each step, e.g. contrast
increments in steps of 0.2 dB. Likewise, rotate the control counter-clockwise to
decrement the value.
3. The value will not pass beyond its defined range, e.g. valid contrast adjustments are
from -6.0 dB to 6.0 dB.
4. To return to default, press and hold the rotary control. The values are reset.
5. When the value is set as required, press the rotary control again to confirm and return
to the last menu.
6.3.3 Selecting an Action Using On/Off
Where an action is available to turn a feature on or off using the rotary control:
1. Scroll the rotary control to the required item, e.g. Video > Enable proc amp.
2. Press the rotary control to view the current status, e.g. On.
3. To change the action, turn the rotary control until the desired action is visible, e.g. Off.
Press the rotary control to select.
Note:
• Press and hold the rotary control for a few seconds to jump to the Back option
when in any menu list.
• To reset any parameter back to its default value: from the parameter selected,
press and hold the rotary control for a few seconds.
This feature is not currently implemented. Use the Web browser user interface
to enter this kind of information. See section 6.5.
This manual suits for next models
4
Table of contents
Other Snell Advanced Media Media Converter manuals

Snell Advanced Media
Snell Advanced Media LiveTouch Lite User manual

Snell Advanced Media
Snell Advanced Media KudosPro MC1000 User manual

Snell Advanced Media
Snell Advanced Media KudosPro MC500 User manual

Snell Advanced Media
Snell Advanced Media IQUDC30 Operator's manual

Snell Advanced Media
Snell Advanced Media KudosPro LC2000 User manual

Snell Advanced Media
Snell Advanced Media MV-800 User manual

Snell Advanced Media
Snell Advanced Media IQUPC30 Operator's manual

Snell Advanced Media
Snell Advanced Media MV-800 User manual

Snell Advanced Media
Snell Advanced Media MV-820 User manual

Snell Advanced Media
Snell Advanced Media MV-820 User manual


 user guide")


