●Be sure to use the Pack &
Carry Fireplace and base plate
stand L / M.
●Please read the instruction
manual of each product used
carefully before use.
CAUTION
●Thoroughly read the
instruction manual for the
GigaPower LI Stove (GS-1000)
before use.
●The Pack & Carry Fireplace
(L) / (M) (ST-032R / ST-033R)
cannot be used with this
combination pattern.
CAUTION
① ② ③
① ② ③
Safety Precautions: Before use, please read thoroughly to ensure safety and avoid accidents.
How to use
Instructions for Use
Contents (Name of the Parts) Specifications
Storage case
Instruction manual
(this document)
Jikaro Firering Table Black
FES-011
Instruction Manual : Ver 1.00
●Size: Large Configuration Dimensions /
1,120×1,120×400(h)m (L 44.1” W 44.1” H 15.7”)
※Opening / 600×600mm (L 23.6” W 23.6”),Small
Configuration Dimensions / 890×890×400(h)mm
(L 35.0” W 35.0” H 15.7”) ※Opening / 370×370mm
(L 14.6” W 14.6”)
●Material: Table Top / Stainless Steel (Heat
Resistant Coating), Legs / Stainless Steel, Knob /
Aluminum Alloy
●Storage size : 745×170×400mm(29.3”×6.7”×15.7”)
●Weight: 10.8 kg(23 lbs)
Thank you for purchasing this Snow Peak product. This product is a table that surrounds the Pack & Carry Fireplace (L)/(M) (ST-032R/ST-033R) and the GigaPower LI Stove
(GS-1000). In order to ensure your safety when using this product, please read these instructions carefully before use. Please be sure to keep this document for future
reference. Although this product is expected to be complete and safe, please check all accessory items and practice assembling and handling it in a safe location prior to use
in the field. If there is an item in the instructions that you do not understand, or if you find a fault in the product, stop use immediately and consult where the store you
purchased this product or contact our User Service department.
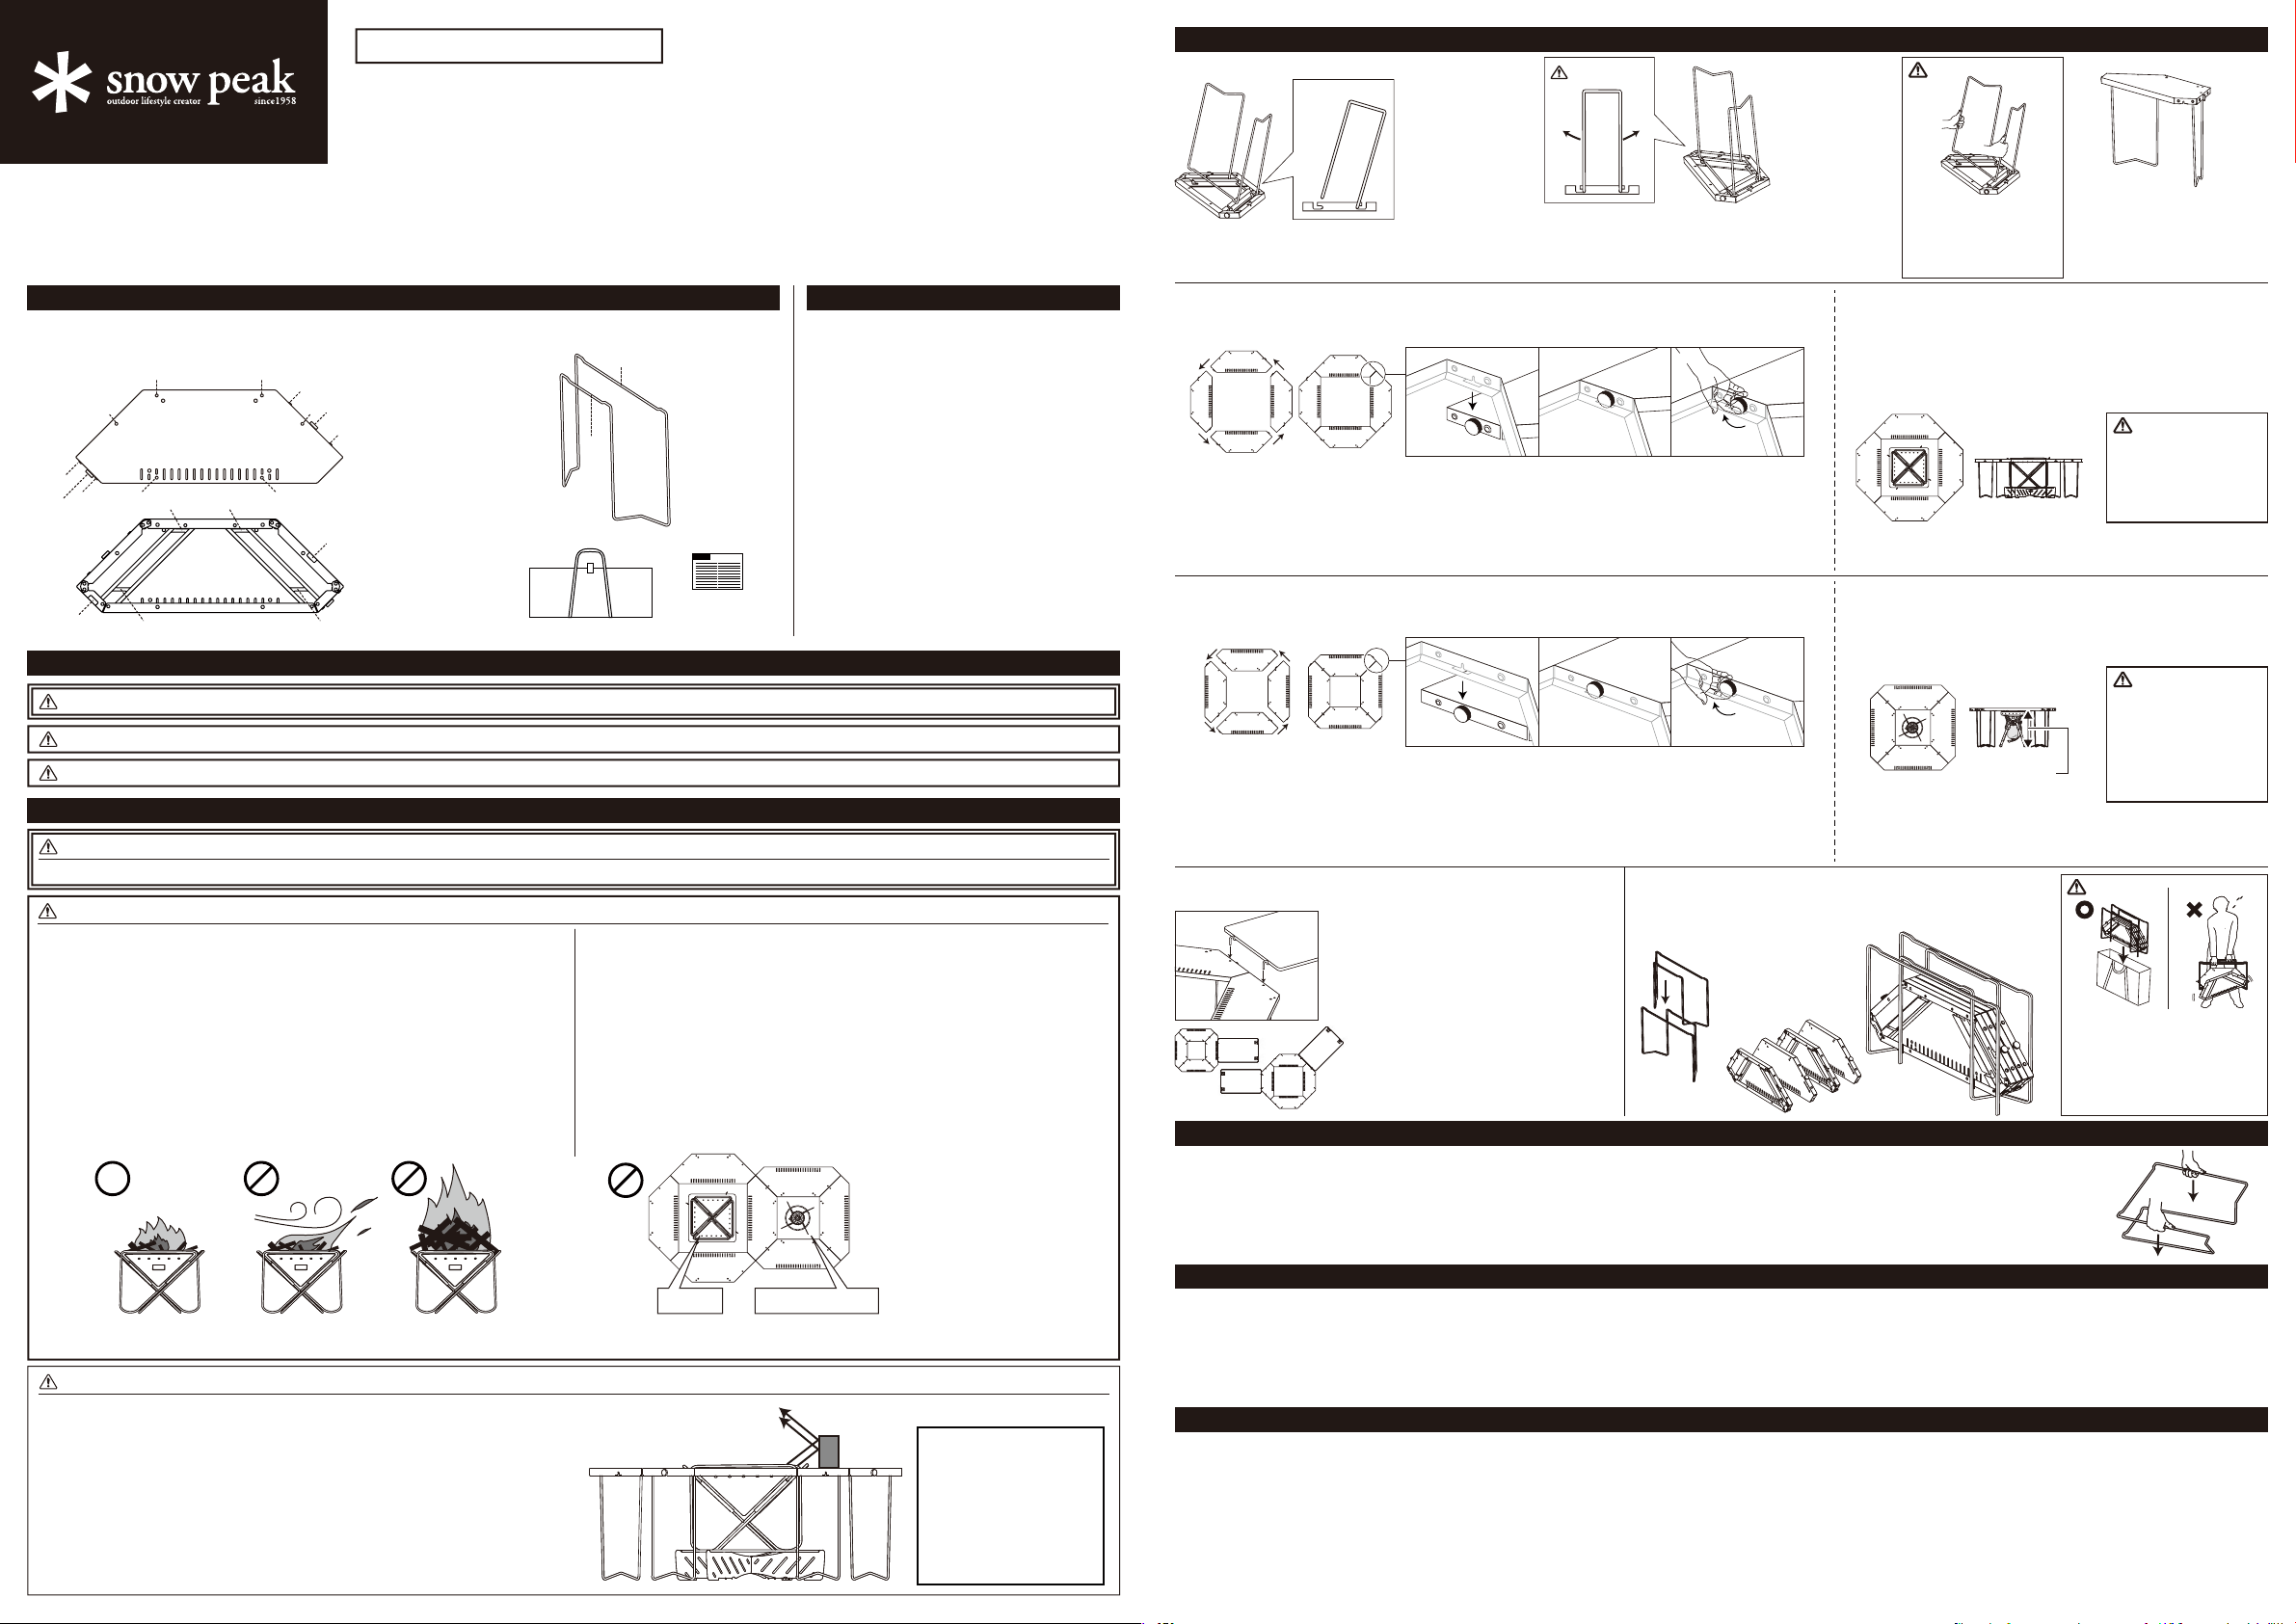
●Assembling the tabletop and legs
(1) Turn the tabletop section upside
down, and insert the A side of the
leg into groove A (2 locations).
(3) Confirm that the leg is
inserted into all 4 grooves, and
turn it right side up by holding
both the tabletop and leg.
(2) Extend the B side of the leg until it reaches groove B (2 locations), and
firmly insert as shown in the diagram above. Take care not to overextend
the leg, as this could deform it. If a leg has become deformed, refer to the
Maintenance section of this document and adjust the leg.
CAUTION / Misuse could result in injury to the user and/or damage to property.
●Do not place any objects that are easily affected by heat near the opening.
●This product is not meant for permanent use.
●Although the main unit is made of stainless steel, certain conditions may cause it
to rust.
●Ensure that the threading of the connecting wheels does not get sand or dirt in it.
●Due to the characteristics of the product, the bare metal of the tabletop and optional
connection parts may be exposed when using the product. Please understand this.
●Please be aware that scratches on this product may expose the bare metal surface.
Please be careful when transporting and handling the product.
●If a hot Dutch oven or pot is placed on the tabletop, the heat may cause
discoloration or melting of the coating on the tabletop.
WARNING / Misuse could result in serious injury or death.
●Do not use gas-powered devices (lanterns, stoves) on the tabletop.
●Do not place combustible objects or objects that are easily affected by heat on the
tabletop.
●Do not use this product on sloping or unstable ground, as this could lead to it
tipping over, which could cause serious accidents.
●When using any devices that involve fire, do not use under or near anything that
combusts easily (tent, tarp, dry grass, etc.).
●If you are moving this product, changing its assembly pattern, or changing any
other items, extinguish any flames in the Fireplace or Stove and ensure that all
items have sufficiently cooled first. Failure to do so may result in burns.
●If using the Pack & Carry Fireplace (L)/(M) (ST-032R/ST-033R), do not perform any
actions to purposefully create pillars of fire. Do not make an open fire using logs
when there are strong winds, etc. Flames could rise up, causing burns or fire.
●Depending on the items used, in addition to strong sunlight, this product and its
surrounding area may become extremely hot. Take care not to get burned.
●The maximum load of this product is 20kg per tabletop section. Do not place
anything exceeding that weight on top.
●Do not allow infants or small children to lie or sit on the table.
●Do not sit or lean on the tabletop.
●Pay close attention to the fire and surrounding environment during use.
Especially keep a constant watch over small children while fire is being used.
●Read the “Method of Use” section thoroughly, and only use this product after
confirming that it is set up correctly. The product could tip over or cause a fire or
burns if not set up correctly.
●Place the source of fire being used directly in the center of the product’s opening.
DANGER / Could easily result in a serious accident or death.
WARNING / Misuse could result in serious injury or death to the user.
CAUTION / Misuse could result in injury or damage to property.
DANGER / Misuse could easily result in a serious accident or death.
●Read the instruction manuals for each item you are using in combination with this product.
⑨
⑩
①
②
④ ④
④ ④
③
③
③
③
④ ④
⑤
⑦
⑧
⑤
⑥ ⑥
⑨
⑩
Tabletop sections x 4
(Surface)
(Underside)
(1) Connecting wheel A
(2) Connecting wheel B
(3) Connecting knob
(4) Multifunctional connecting holes
(5) Groove A
(6) Groove B
(7) Notch A
(8) Notch B
(9) A side of leg
(10) B side of leg
Appropriate
amount of wood
Use in strong
winds, etc.
Actions to purposefully
create pillars of fire
Wood and gas-powered devices (GigaPower LI Stove, etc.)
cannot be used in combination with this product if a table is connected to it.
Use of wood Use of gas-powered device
The area near the opening
and objects placed near the
opening can become
heated due to far- infrared
rays from the heat source.
Do not place any objects
that are easily affected by
heat near the opening, and
be cautious of burns.
Far-infrared rays
Be careful not
to overextend
When assembling, avoid
holding onto the leg by the A
and B sides that slide into the
grooves, as shown in the
diagram above, to prevent your
hands from getting pinched.
CAUTION
Maintenance
Warranty
Repair
●When cleaning this product, do not use a hard scrubbing brush, etc. as it may cause scratches. Use a soft cloth or sponge to clean the product.
●Store out of direct sunlight in a well-ventilated area with little humidity. ●If light grime or water gets on this product, promptly wipe with a dry cloth
and allow it to dry sufficiently. ●If salt (seasoning, etc.) or other chemicals get on this product, wipe thoroughly with a well-wrung cloth and allow it
to dry sufficiently. ●When washing, please wash the coating part with neutral detergent, and do not wash with anything containing acidic or alkaline
detergent. It may cause the coating to come off or stain. ●If you overextend a leg past the point at which the A side and B side of the leg align with
groove A and groove B, place the leg on a flat surface and correct it by placing even pressure onto it, as shown in the diagram to the right.
The specifications of Snow Peak products are based on field testing and quality control to ensure the correct function and longevity of every product. If apparent defects in the
manufacturing of the product are found, the defective product will be repaired or exchanged free of charge. Damages, as follows, are not covered under warranty.
1. Material deterioration caused by age. / 2. Damage caused by modifications or rough handling. / 3. Damage caused by improper use not following the instruction manual.
/ 4. Damage caused by unexpected accidents. / 5. Damage not caused by defects in the manufacturing process. / 6. Damage caused by dust or rust. / 7. Damage or defects
caused when dismantling the product. / 8. Damage and defects caused by dropping or other shocks to the product. / 9. Deterioration or failure of parts due to friction. / 10.
Damage caused by the use of the product in combination with other maker’s products.
●For repairs, please contact the retailer where you purchased the product or Snow Peak user service. ●When you ask for repair, please make sure that the product is dry and
clean. ●Please attach a memo or some kind of tag indicating the needed repair, and please write details of when and how the damage occurred. ●Shipping cost and repair fee
for the repair as follows. 1. Within warranty: Return shipping cost and repair fee will be covered by Snow Peak / 2. Outside warranty: Return shipping cost and repair fee will be
covered by the user.
MADE IN KOREA
Snow Peak, Inc.
456, Nakanohara, Sanjo-Shi, Niigata 955-0147 Japan
Tel. +81 256-46-5858 / Fax. +81 256-46-5860
www.snowpeak.co.jp
Snow Peak USA, Inc.
404 NW 23rd Avenue, Portland, Oregon 97210, USA
Tel. +1-503-697-3330 / Instagram. @snowpeakusa
●Assembly pattern 1 (combined with the Pack & Carry Fireplace (L)/(M) (ST-032R/ST-033R))
How to connect the tabletop sections together
(1)Loosen the connecting wheels A until about 5 to 10mm of each screw is visible. Slide the notches
A into the knob portions of the connecting wheels.
(2)Adjust the positioning so that the connecting knobs are engaged with the indents on the sides of
the tabletop sections.
(3)Turn the knobs on the connecting wheels A by running your finger along them from the notches A,
bringing the tabletop sections together. Be careful not to overtighten.
Line up the 4 assembled tabletop and leg components as shown in the diagram below,
and connect the tabletop sections together.
●Install the Pack & Carry Fireplace (L) / (M) (ST-032R / ST-033R)
For the Pack & Carry Fireplace (L)/(M) (ST-032R/ST-033R),
Base Plate(L)/(M). (ST-032BP/ST-033BP), Base Plate Stand
L/M(ST-032BS), please install them in the center of the
opening, as shown in the diagram below.
<Attachment example>
2 legs
2 legs
Arrange the tabletop
slats surface to surface
as shown below
Place the four tabletop sections between the legs, which have
been stacked together as shown in the diagram below. Place
everything into the storage case.
●Connection with a Bamboo Table Regular or Bamboo
Table Long (CK-116T, CK-117T)
●Storage
The Jikaro Table can be connected to a
Bamboo Table Regular or Bamboo
Table Long (CK-116T, CK-117T) using
the multifunctional connecting holes.
Use the 400 Leg Set (CK-112) for the
Bamboo Table Regular or Bamboo
Table Long. Insert the hooks on one end
of the Bamboo Table into the multifunc-
tional connecting holes, as shown in the
diagram to the left. Read the instruction
manual for each item before use.
If you try to carry the disassembled
table parts by holding on to the A and B
sides of the legs, the tabletop sections
may fall out. Be sure to place everything
inside the storage case, or carry the
stacked tabletops and the stacked legs
separately.
CAUTION
Set to a total height
of 38 to 42cm
●Assembly pattern 2 (combined with the GigaPower LI Stove (GS-1000))
How to connect the tabletop sections together
(1)Loosen the connecting wheels B until about 5 to 10mm of each screw is visible. Slide the notches
B into the knob portions of the connecting wheels.
(2)Adjust the positioning so that the connecting knobs are engaged with the indents on the side of the
tabletop sections.
(3)Turn the knobs on the connecting wheels B by running your finger along them from the notches B,
bringing the tabletop sections together. Be careful not to overtighten. careful not to overtighten.
Line up the 4 assembled tabletop and leg components as shown in the diagram below,
and connect the tabletop sections together gether.
●Install the GigaPower LI Stove (GS-1000)
Set the GigaPower LI Stove (GS-1000) to a total height of 38 to
42cm, and install it in the center of the opening, as shown in the
diagram below.


