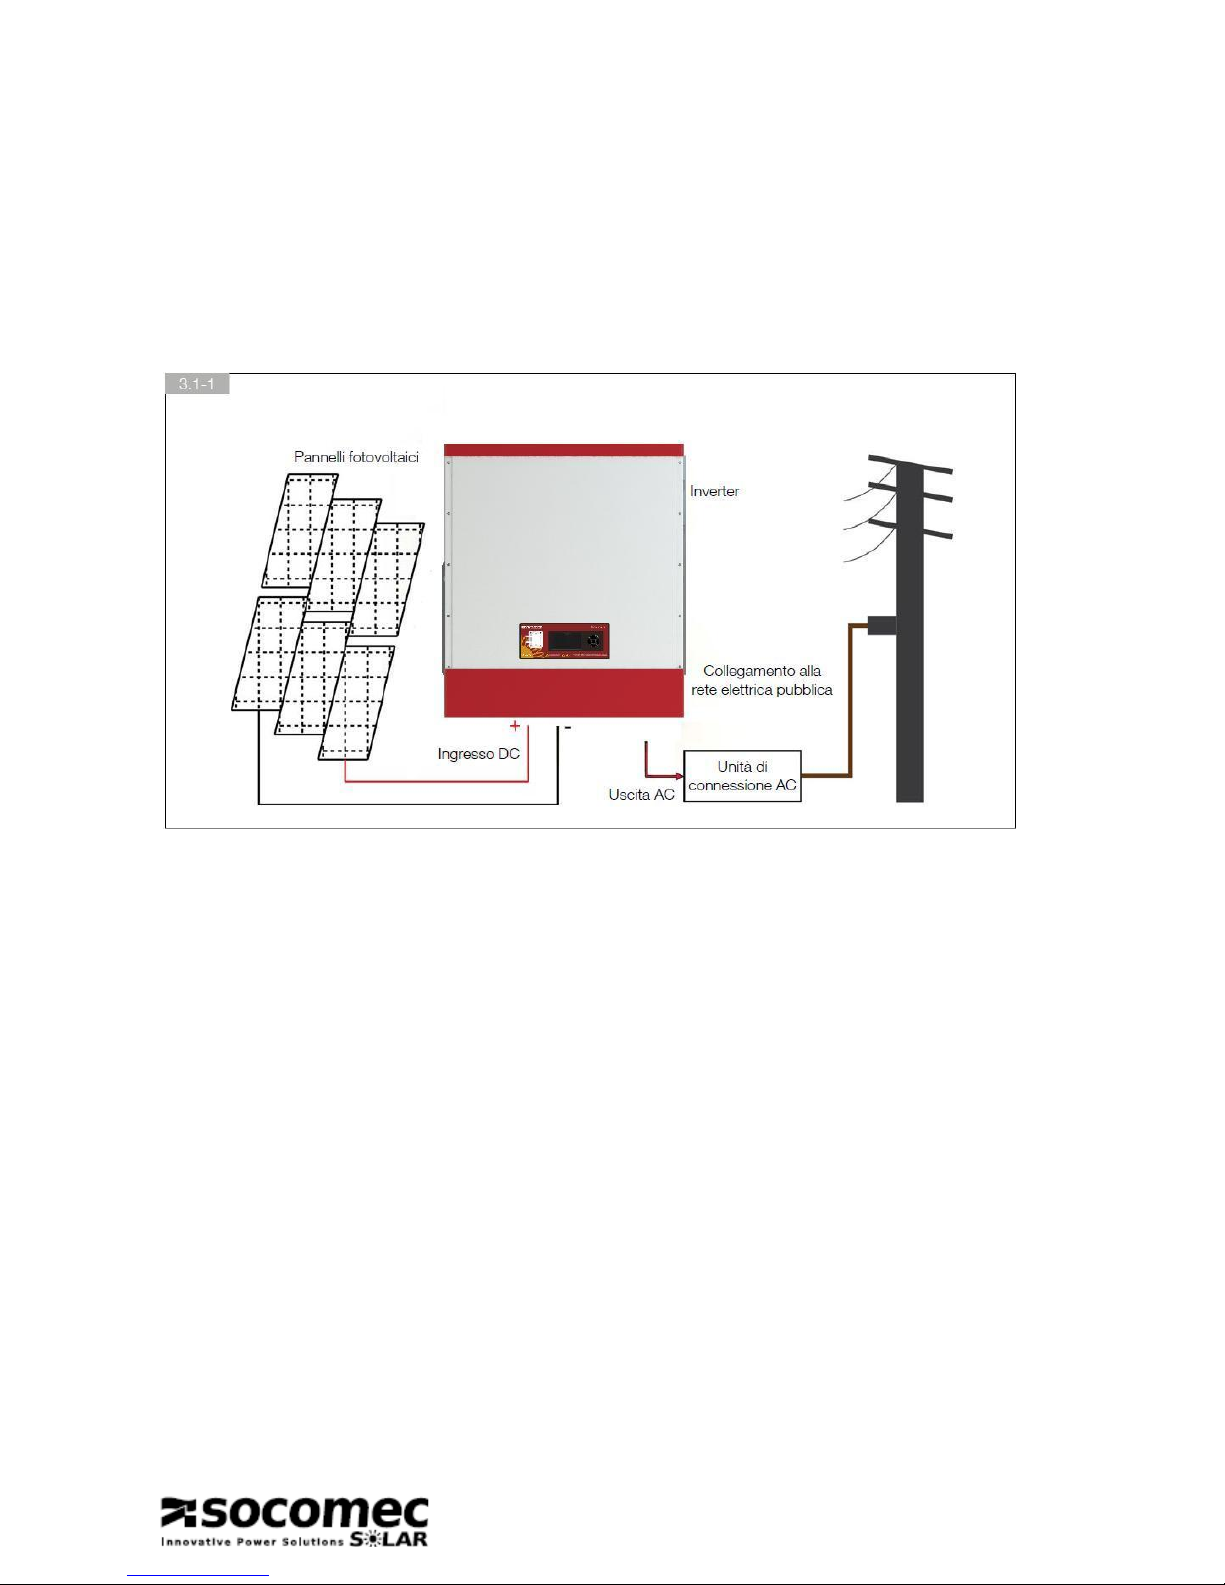
socomec SUNSYS - B10 User manual

SUNSYS –B10
Installation and Operation Manual

2
Before you start
Congratulations on your purchase of the photovoltaic inverter for grid connection SUNSYS –B10
(which will referencs herein as “PV inverter” or simply “the device”).
The PV inverter is a highly reliable, thanks to its innovative desing and excellent quality control, the
device has been designed to meet the high demand for PV system connected to a main phase.
Moreover, this product is IP 65 approved (dusty or humid), and especially suitable for outdoor use.
This manual contains important information about installation and safe use of this unit. Prior to use
the PV inverter to read this manual carefully.
In case you encounter any difficulties during installation or use of the device, consult the manual
before contacting your dealer or local representative. Thanks again for choosing our product.
Keep this manual handy for quick reference. Begin to enjoy Sunsys –B10 and pro life!
SOCOMEC owns the rights to full and exclusive ownership of this document.
The recipient of this document is granted only the personal right of use for the application indicated
by SOCOMEC. Any reproduction, modification or distribution of this document, in part or in its
entirety, or by any means is expressly prohibited without the express consent written Socomec.
This document is not contractual. SOCOMEC reserves the right to make any changes to these
data, without the prior communication.

3
Content
1. SAFETY INSTRUCTIONS ..................................................................................................................4
2. MANUFACTURER'S WARRANTY.....................................................................................................5
3 . GENERAL DESCRIPTION ......................................................................................................7
5. INTALLATION INSTRUCTION .......................................................................................................12
6. OPERATION OF PV INVERTER.....................................................................................................22
7. INVERTER OPERATING STATUS ..................................................................................................35
8. COMUNICATIONS............................................................................................................................43
9. TROUBLE SHOOTING.....................................................................................................................44
10. PREVENTIVE MANTENANCE .......................................................................................................48
11. SPECIFICATION...............................................................................................................................51

4
1. SAFETY INSTRUCTIONS
RISK OF ELECTRIC SHOCK
A
Al
lt
te
er
rn
na
at
ti
in
ng
g
C
Cu
ur
rr
re
en
nt
t
(
(A
AC
C)
)
a
an
nd
d
D
Di
ir
re
ec
ct
t
C
Cu
ur
rr
re
en
nt
t
(
(D
DC
C)
)
s
so
ou
ur
rc
ce
es
s
a
ar
re
e
t
te
er
rm
mi
in
na
at
te
ed
d
i
in
n
t
th
hi
is
s
d
de
ev
vi
ic
ce
e.
.
T
To
o
p
pr
re
ev
ve
en
nt
t
r
ri
is
sk
k
o
of
f
e
el
le
ec
ct
tr
ri
ic
c
s
sh
ho
oc
ck
k
d
du
ur
ri
in
ng
g
m
ma
ai
in
nt
te
en
na
an
nc
ce
e
o
or
r
i
in
ns
st
ta
al
ll
la
at
ti
io
on
n
p
pl
le
ea
as
se
e
e
en
ns
su
ur
re
e
t
th
ha
at
t
a
al
ll
l
A
AC
C
a
an
nd
d
D
DC
C
t
te
er
rm
mi
in
na
al
ls
s
a
ar
re
e
d
di
is
sc
co
on
nn
ne
ec
ct
te
ed
d.
.
B
Be
e
s
su
ur
re
e
t
to
o
s
se
ec
cu
ur
re
e
t
th
he
e
G
Gr
ro
ou
un
nd
d
l
li
in
ne
e
t
to
o
t
th
he
e
G
Gr
ri
id
d’
’s
s
G
Gr
ro
ou
un
nd
d,
,
a
an
nd
d
d
do
ou
ub
bl
le
e
c
ch
he
ec
ck
k
t
th
he
e
L
Li
in
ne
e
a
an
nd
d
N
Ne
eu
ut
tr
ra
al
l
a
ar
re
e
n
no
ot
t
c
co
on
nf
fu
us
se
ed
d
w
wi
it
th
h
G
Gr
ro
ou
un
nd
d.
.
HANDLING OF INVERTER
O
On
nl
ly
y
a
au
ut
th
ho
or
ri
iz
ze
ed
d
p
pe
er
rs
so
on
nn
ne
el
l
a
ar
re
e
a
al
ll
lo
ow
we
ed
d
t
to
o
h
ha
an
nd
dl
li
in
ng
g
t
th
he
e
P
PV
V
i
in
nv
ve
er
rt
te
er
r.
.
W
Wh
he
en
n
P
PV
V
m
mo
od
du
ul
le
e
o
or
r
p
pa
an
ne
el
l
i
is
s
e
ex
xp
po
os
se
ed
d
t
to
o
l
li
ig
gh
ht
t,
,
i
it
t
s
st
ta
ar
rt
ts
s
t
to
o
s
su
up
pp
pl
ly
y
h
hi
ig
gh
h
D
DC
C
v
vo
ol
lt
ta
ag
ge
e,
,
b
be
e
s
su
ur
re
e
t
to
o
t
tu
ur
rn
n
o
of
ff
f
D
DC
C
s
sw
wi
it
tc
ch
h
b
be
ef
fo
or
re
e
s
se
er
rv
vi
ic
ci
in
ng
g,
,
o
or
r
m
ma
ak
ke
e
s
su
ur
re
e
n
no
o
l
li
iv
ve
e
p
pa
ar
rt
t
w
wi
il
ll
l
b
be
e
t
to
ou
uc
ch
he
ed
d.
.
A
Af
ft
te
er
r
d
di
is
sc
co
on
nn
ne
ec
ct
ti
in
ng
g
t
th
he
e
P
PV
V
i
in
nv
ve
er
rt
te
er
r
f
fr
ro
om
m
t
th
he
e
p
po
ow
we
er
r
s
su
up
pp
pl
ly
y
a
an
nd
d
P
PV
V
m
mo
od
du
ul
le
es
s,
,
e
el
le
ec
ct
tr
ri
ic
ca
al
l
c
ch
ha
ar
rg
ge
e
c
ca
an
n
s
st
ti
il
ll
l
r
re
es
si
id
de
e
i
in
n
t
th
he
e
D
DC
C
l
li
in
nk
k
c
ca
ap
pa
ac
ci
it
to
or
rs
s.
.
B
Be
ef
fo
or
re
e
h
ha
an
nd
dl
li
in
ng
g
t
th
he
e
d
de
ev
vi
ic
ce
e,
,
p
pl
le
ea
as
se
e
a
al
ll
lo
ow
w
a
at
t
l
le
ea
as
st
t
1
10
0
m
mi
in
nu
ut
te
e
a
af
ft
te
er
r
t
th
he
e
p
po
ow
we
er
r
i
is
s
d
di
is
sc
co
on
nn
ne
ec
ct
te
ed
d.
.
PUBLIC UTILITY ONLY
T
Th
he
e
P
PV
V
i
in
nv
ve
er
rt
te
er
r
i
is
s
d
de
es
si
ig
gn
ne
ed
d
t
to
o
f
fe
ee
ed
d
A
AC
C
p
po
ow
we
er
r
d
di
ir
re
ec
ct
tl
ly
y
t
to
o
t
th
he
e
p
pu
ub
bl
li
ic
c
u
ut
ti
il
li
it
ty
y
p
po
ow
we
er
r
g
gr
ri
id
d.
.
D
Do
o
n
no
ot
t
c
co
on
nn
ne
ec
ct
t
t
th
he
e
A
AC
C-
-o
ou
ut
tp
pu
ut
t
o
of
f
t
th
hi
is
s
d
de
ev
vi
ic
ce
e
t
to
o
a
an
ny
y
p
pr
ri
iv
va
at
te
e
A
AC
C
e
eq
qu
ui
ip
pm
me
en
nt
t.
.
Hot Surfaces:
A
Al
lt
th
ho
ou
ug
gh
h
d
de
es
si
ig
gn
ne
ed
d
t
to
o
m
me
ee
et
t
i
in
nt
te
er
rn
na
at
ti
io
on
na
al
l
s
sa
af
fe
et
ty
y
s
st
ta
an
nd
da
ar
rd
ds
s,
,
t
th
he
e
P
PV
V
i
in
nv
ve
er
rt
te
er
r
c
ca
an
n
b
be
ec
co
om
me
e
h
ho
ot
t
d
du
ur
ri
in
ng
g
o
op
pe
er
ra
at
ti
io
on
n.
.
D
Do
o
n
no
ot
t
t
to
ou
uc
ch
h
t
th
he
e
h
he
ea
at
t
s
si
in
nk
k
o
or
r
p
pe
er
ri
ip
ph
he
er
ra
al
l
s
su
ur
rf
fa
ac
ce
es
s
d
du
ur
ri
in
ng
g
o
or
r
s
sh
ho
or
rt
tl
ly
y
a
af
ft
te
er
r
o
op
pe
er
ra
at
ti
io
on
n.
.
1.1.Maintenance and Technical Support PV inverter
O
On
nl
ly
y
a
au
ut
th
ho
or
ri
iz
ze
ed
d
p
pe
er
rs
so
on
nn
ne
el
l
a
ar
re
e
a
al
ll
lo
ow
we
ed
d
t
to
o
o
op
pe
en
n
t
th
he
e
I
In
nv
ve
er
rt
te
er
r
f
fo
or
r
s
se
er
rv
vi
ic
ce
e
p
pu
ur
rp
po
os
se
e.
.
CAUTION :
R
Ri
is
sk
k
o
of
f
e
el
le
ec
ct
tr
ri
ic
c
s
sh
ho
oc
ck
k
f
fr
ro
om
m
e
en
ne
er
rg
gy
y
s
st
to
or
re
ed
d
i
in
n
c
ca
ap
pa
ac
ci
it
to
or
r,
,
d
do
o
n
no
ot
t
r
re
em
mo
ov
ve
e
c
co
ov
ve
er
r
u
un
nt
ti
il
l
2
2
m
mi
in
nu
ut
te
es
s
a
af
ft
te
er
r
d
di
is
sc
co
on
nn
ne
ec
ct
ti
in
ng
g
a
al
ll
l
s
so
ou
ur
rc
ce
es
s
o
of
f
p
po
ow
we
er
r
s
su
up
pp
pl
ly
y.
.
1.2.Unpacking and Installation:
T
Th
he
e
S
SU
UN
NS
SY
YS
S
–
–
B
B1
10
0
g
gr
ri
id
d-
-t
ti
ie
ed
d
P
PV
V
i
in
nv
ve
er
rt
te
er
r
m
ma
ay
y
w
we
ei
ig
gh
hs
s
u
up
p
t
to
o
5
57
7k
kg
g.
.
T
To
o
a
av
vo
oi
id
d
i
in
nj
ju
ur
ry
y
a
an
nd
d
f
fo
or
r
s
sa
af
fe
et
ty
y
p
pu
ur
rp
po
os
se
e,
,
b
be
e
s
su
ur
re
e
t
to
o
u
us
se
e
p
pr
ro
op
pe
er
r
l
li
if
ft
ti
in
ng
g
t
te
ec
ch
hn
ni
iq
qu
ue
es
s
a
an
nd
d
s
se
ec
cu
ur
re
e
t
th
he
e
h
he
el
lp
p
o
of
f
s
so
om
me
eo
on
ne
e
t
to
o
a
as
ss
si
is
st
t
i
in
n
t
th
he
e
u
un
np
pa
ac
ck
ki
in
ng
g
a
an
nd
d
i
in
ns
st
ta
al
ll
la
at
ti
io
on
n
o
of
f
t
th
he
e
I
In
nv
ve
er
rt
te
er
r.
.

5
2. MANUFACTURER'S WARRANTY
WARRANTY ON PRODUCTS IN THE SERIES Sunsys pro
Sicon S.r.l., part of the group that deals with Socomec, control and security of electricity grids in low voltage, with registered
office in Silas 1/3 - Z I. Scovizze, Isola Vicentina 36033 Vicenza (VI), warrants its products in the series Sunsys pro are
new and meet both the specifications and such regulations as applicable.
Terms of warranty
Sicon S.r.l. warrants its products Sunsys pro series for a period of 5 years from their purchase only to defects in
manufacture or materials.
The period of validity of this guarantee is calculated from the date of purchase of the new product by the end user at a
official dealer (by the date stated on the purchase document). This warranty is valid only for products installed in Italy.
The warranty includes:
a) repair or replacement of the defective product or component, but with shipping and installation of the product or
component replacement by the customer or end user;
b) sending to Sicon S.r.l. (Or any authorized service centers) with removal of the defective product, transportation
and related fees customer or end user.
The decision to repair or replace the defective product or component will be responsible solely and exclusively to
Sicon S.r.l.
The replacement of parts, repair parts, modifications, or components of the product during the warranty period is
not prolong the duration of the warranty.The standard warranty is additional and not in lieu of any other rights
enjoyed by the consumer / purchaser of the product and, in particular, without prejudice to the rights that the
consumer is the holder pursuant to Legislative Decree 06.09.2005 n. 206 (cd.Consumer Code). Sicon S.r.l.
reserves the right to offer extensions of this warranty to be agreed in writing.
Procedure.
1. Defects must be reported to the Department of the Post-Sale of Sicon Photovoltaic Ltd (By Silas 1/3 - Industrial
Zone Scovizze –Isola Vicentina 36033 Vicenza - Vi -) 800.00.80.85 toll free or in writing by registered mail or
Department predicted a brief written report indicating the type of defect, product serial number and all data
contained in the same nameplate.
In the written report must be accompanied by a copy of proof of purchase (document - note, invoice, sales slip tax
- indicating the date of purchase and which should include the necessary data for identification of the product -
model, serial number -). In case you can not provide such proof of purchase, will use the serial number and date
production to calculate the expiration of the warranty. The defective product will be returned to Sicon Srl only after
obtaining the return authorization number which will be released from service centers after receipt of notice of
defect.
2. The defective product must be returned to Sicon Srl in the original or equivalent, attaching the authorization
number the return.
3. Where assets are recognized and pampered under warranty, Sicon Srl will send the product and / or the
component fixed to or in place end user at the address notified by them together with the reporting defects or,
failing that, at the place where / the good / s have been delivered as specified in the contract of sale.
4. The shipment of the product and / or component replacement is the responsibility of Sicon S.r.l.
5. The installation of the product and / or component replacement should be performed by qualified personnel or by
a service center authorized and the cost thereof shall be borne by the customer or end user.
6. All activities performed by Sicon S.r.l. of products and / or components not under warranty, shall be paid at Sicon
S.r.l. in accordance with the rates and conditions normally applied by itself.
7. Sicon S.r.l. reserves the right to provide a different model of product and / or component provided equivalent
performance in the case where the original model - spoiled and warranty - is out of production.
8. In case of request for on-site staff that Sicon Srl, the costs of intervention and the cost of moving the Staff will be
charged to the customer / end user at the rates Sicon Srl force.

6
Exclusions from Warranty
a. The guarantee referred to in this writing is excluded in case of product defects and / or components are made
and / or arising from:
I. accidental damage.
II. negligent use, improper or inadequate product or component (limited use out of tolerance: temperature,
humidity, poor ventilation).
III. Failure to follow instructions for installation, use and maintenance described in the Installation and User
Manuals.
IV. modifications or attempted repairs made by anyone not authorized by the Department of Post-Sale of Sicon
S.r.l.
V. failures due to lightning, floods, fires, earthquakes, riots, wars or other force majeure
or derived from any other reason different from the normal conditions of operation of the inverter and which
are outside the Control of Sicon S.r.l.
VI. damage caused by surges.
VII. corrosion damage.
VIII. inadequate transportation.
IX. failure to comply with standards set by the user.
X. he guarantee referred to in this writing is also included:
I. in the case in which the product and / or component is not vitiated returned to Sicon Srl in the original
packaging or equivalent.
II. in the case where the serial number identification of the products has been manipulated or not it is
uniquely identifiable.
III. in the case in which the defect relates to aspects relating to the aesthetics or construction of small
entities that do not compromise the normal functionality of the product.
IV.are not covered by the warranty provided for in this write requests that go beyond the rights established
by the warranty conditions and, in particular, claims for damages for loss of production, loss of
profit, or due to product defects or due to the cost of installation or uninstallation.
Option Premium
Sicon S.r.l. offers the guarantee premium (optional and against payment) to be requested in writing to Sicon Srl and
which provides for replacement of equipment within a maximum of 72 hours of the request on-site, made by a courier
authorized by Sicon Srl, which will bear the costs of collection and transport equipment foul of the new.
Disconnection and connection of defective equipment are not included in the new service and will be made by
authorized and competent.

7
3. GENERAL DESCRIPTION
PV System Diagram
AGrid-tied PV System is mainly composed of 5 parts: PV panel or PV array, DC Junction Unit, the PV inverter,
AC Junction Unit (connection Interface) and a connection to the Public Utility.
The typical connection diagram of the PV system is shown in the following figure.
.
2.1.SUNSYS –B10 presentation
SUNSYS-B10 grid-tied PV Inverters converts direct current (DC) power generated by PV modules into
alternating current (AC), which is compatible with the local electricitydistribution network;alsocalled the public
utility, or grid system.

8
2.1.1.SUNSYS –B10 dimensions
The dimensions are expressed in millimeters.
3.2.2. Identification
On the left side of SUNSYS-B10Grid-tied PV
inverter shows the rating label of the Inverter.
The rating label states the Type, Brand Name,
Model Name, Specifications, and the Serial
Number of the Inverter. When encounter any
difficulties during installation or operation,
please record the Serial Number (SN) before
contacting your local dealer or representative.

9
3.2.3.SUNSYS –B10 specific components
The descriptions of the major parts of SUNSYS-B10 Grid-tied PV Inverter are indicated below:
Part Name
Description
(1) DC-Input Terminals
Each input pair consists of positive and negative terminal
(2) Cooling Fan
External cooling fan for the inverter
(3) Optional Communication Slot
and Cover
Optional communication slot .
(4)Pressure Compensation Seal
A hardware device that used to dissipating heat into the
surrounding air
(5) USB Interface
Connect this port directly to your PC via an USB cable; users can
communicate with the Inverter through specific program tool.
(6) AC Output Cable Gland
For wiring AC output cable to the grid with a waterproof enclosure
(7)Ground (PE) Cable Gland
For wiring Ground (PE) output cable to the grid with a waterproof
enclosure
(8) Graphic Data Logger
Operation status display and system characteristic setting

10
3.3.Introduction of Graphic Data Logger
To show the information of Inverter, there is a graphic Data Logger in the unit. This Data Logger can show
various information of the Inverter such as operational status and warning message, its button allow user to
operate for display control or system characteristic setting
3.3.1.Graphic Data Logger Configuration
The following table indicates the main specification of the Data Logger:
LCD Display
Monochrome
Displayed Information
Each I/P power, O/P power, Operation mode and warning message
Storage Period
5 years
Storage Media
2GB SD card (support up to 32GB)
Data Download
Via B type USB
3.3.2.Features of Graphic Data Logger
Multicolored back light
The backlight of the LCD will be changed according to its status. There are 3 colors of backlight and their
indications are:
Green: Start-up and normal status
Red: Fault Status. In this status, Inverter disconnected from grid due to system fault or Inverter.
These faults and failures are defined in “error message table” later on.
Yellow: Warning Status. Inverter disconnected from grid due to system fault within the past 48 hours,
but Inverter reconnected.
Data Logger

11
4. FEATURES OF SUNSYS-B10
This Inverter mainly has following features:
Lead-free, RoHS GP2 compliant
Max conversion efficiency ≧97.7%
Euro efficiency ≧97%
IP65 enclosure
128x64 graphic display
3-phase 4 wire, 230/400V
Compact design
Embedded ENS and fully complying with the following Grid codes
CEI 0-21
Integrated RCMU (Residual Current Monitoring Unit)
Power Management forActive Power and Reactive Power Control
2 MPPT tracker
4.1.Maximum Power Point Tracking (MPPT)
A PV inverter must be able to convert the maximum power from any PV panel. Due to its advanced design, this
PV inverter can track the maximum power from the PV panel in any condition. When the displayed power on
the LCD output does not change dramatically, the Inverter is converting the maximum power from panels.
When the LCD power reading is significantly changes, the Inverter is tracking the power according to the varied
sunlight.
IPV (A)
UPV (V)
010 20 30 40 50
1
2
3
4
5
PPV (W)
25
50
75
100
125
1000W/m2
800W/m2
600W/m2
Maximumpower point
@1000W/m~ 120W
2
N
No
ot
te
e:
:
When the PV panel’s output is low, the feeding DC-power may drift slowly as does the AC power. It is
because PV inverter is tracking maximum DC-power constantly.

12
5.INTALLATION INSTRUCTION
5.1.Inside the Package
After opening the package, please check the contents of the box.
It contains the following items:
1. N°1 Photovoltaic Inverter;
2. N°1 User’s Manual;
3. N°6 Screw (M4 x 30L) with relative Nylon Drive Anchor;
4. N°2 Security Screw;
5. N°1 Mounting Bracket;
6. N°1 AC Cover;
7. N°2 Rubber Bushing.
5.2.Mounting SUNSYS –B10 PV inverter
Advice before Installation
To obtain optimal performance, please consider following guidelines before installation:
Do not expose the PV inverter to direct sunlight. Direct sunlight increases the internal
temperature that may reduce conversion efficiency.
Check the ambient temperature of installation is within specified range -20 ~ +60 C.
The grid voltage and frequency at installed site must be within the specific range defined by applicable
regulation type.
Electric utility company has approved the grid connection.
Only qualified personnel are performing the installation and maintenance.
Adequate convection space surrounds the Inverter.
Inverter is being installed away from explosive vapor or dust.
No flammable object is near the Inverter.
No mounting on wooden flammable surface.
SUNSYS –B10 grid-tied PV inverter can be installed and operated at locations where the
ambient temperature is up to 60 C. However, for optimal operation, it is recommended that
Inverter is installed where the ambient temperature is between 0 to 40 C.

13
Please be sure the installation rules listed below are followed.
1. Select a wall or solid vertical surface that can support the PV inverter in the long run.
2. PV inverter requires adequate cooling space. Allow at least 30cm space above and 90cm space below
the Inverter.
3. For maintenance purpose, please keep Inverter 30cm distance at least from each other.
Note: Don’t mount PV inverter on top of another one or other heat radiating sources unless it is inevitable, in
that case, 100cm spacing at minimum from each other is required to provide proper ventilation effect.
A. Fix the Bracket by using all of six mounting holes, the bracket should be fixed with M5*30mm screws
by 30kgf-cm (or 2.94 N-m ) torque force, as illustrated below:
*Notes: Diameter for the safety screw is at 10mm.
B. PV inverter will be able to lift up with the proper lifting tool in order to move PV inverter to the installed

14
location when the hanging irons installed on the PV inverter as illustrated:
*Notes: Proper lifting tool must be used for the lifting, please beware.
C. Mount the Inverter onto the bracket as illustrated:

15
D. Check and ensure the device is properly fixed to the bracket in the proper direction.

16
5.3.Connecting AC Output Cable
Connect PV inverter to the AC Junction Unit with AC output wires and ground wire as shown in the following
steps:
1. Do not use cables where losses will exceed 1%
L1(phase1), L2(phase 2), L3(phase3), N(neutron), PE(hearth ground): wires gauge 4/6 mm2
PE(hearth ground): wires gauge 10mm2
2. Remove the rubber plug from inside of the AC connector socket
3. Insert all AC wires through AC cover kit in following order before cramped with insulated
cord end terminal: cable gland rubber bushing AC cover cord end terminal
4. Connect the AC wires to the AC terminal block correspondingly and tighten it properly.
PE2 wire area must be of same gauge as PE1 does (or 10 mm2).
5. Add an insulated cord end terminal to each AC wire before connecting. The stripped length of AC wire is
about 10 mm to 12 mm.

17
6. Fix the AC output cover back with a screwdriver.
7. Twist the connector cable gland to lock the bushing and cable together firmly.
8. Check the installation condition again.
Do not install the PV inverter on a slanted surface
Check Inverter are securely hooked on bracket at both of upper and lower sides.

18
5.4.Connecting of the PV Modules
For connecting DC input of one single Inverter, connected strings must consist of modules of the same type.
Do not share the DC input connection with other Inverter. The number, orientation, and tilt of panels may differ
for different application.
The input terminals on the Inverter are Multicontact MC4 DC connectors. Appropriate cable couplers from the
same manufacturer should be used for DC input connection.
The following table lists those connector pairs:
Advice before connecting of PV module
To obtain optimal result from PV inverter, please consider the following guidelines before connecting the PV
modules to the device:
1. Firstly make sure the maximum open circuit voltage (Voc) of each PV string does not exceed the related
specification as below table listed in all condition.
2. Check short-circuited current of the PV string. The total short-circuits current (Isc) of the PV string should
not exceed the Inverter’s maximum DC current.
3. Always connect PV modules positive (+) terminal to PV inverter DC positive (+) terminal; negative (-)
terminal to PV inverter DC negative (-) terminal.
4. Each group of terminals of the DC 'inverter converts a DC current of maximum 24A.

19
How to Disconnect MC4 DC connectors
The following pictures illustrates how to disconnect MC4DC connector by using a connector extractor as
below figure shown, the connector extractor shall be found in accessories box shipped along with package of
Inverter.
1. Insert the tool through the connector in either way to cramp its clips. As below figure shown:
2. After cramping the clips, pull the connector slightly downward to disassemble the DC cable.
Warning:
D
Do
on
n’
’t
t
d
di
is
sc
co
on
nn
ne
ec
ct
t
D
DC
C
p
po
ow
we
er
r
o
or
r
c
ca
ab
bl
le
es
s
w
wh
hi
il
le
e
t
th
he
e
I
In
nv
ve
er
rt
te
er
r
i
is
s
s
st
ti
il
ll
l
f
fe
ee
ed
di
in
ng
g
A
AC
C
p
po
ow
we
er
r
t
to
o
t
th
he
e
g
gr
ri
id
d,
,
b
be
e
s
su
ur
re
e
t
to
o
s
sw
wi
it
tc
ch
h
o
of
ff
f
A
AC
C
p
po
ow
we
er
r
a
at
t
f
fi
ir
rs
st
t,
,
t
th
he
en
n
t
tu
ur
rn
n
o
of
ff
f
D
DC
C
s
sw
wi
it
tc
ch
h
(
(i
if
f
p
pr
re
es
se
en
nt
t)
),
,
a
an
nd
d
d
di
is
sc
co
on
nn
ne
ec
ct
t
D
DC
C
c
ca
ab
bl
le
es
s
a
at
t
l
la
as
st
t.
.

20
5.5.Switch grid connection
The AC power switch is an interface between the PV inverter and the public network.
The value of this switch (recommended 32 A,400V, 4 poles), must be designed by a qualified technician in
order to meet the local safety regulations.
Is also recommended the use of a differential switch type A / AC value of> 300mA.
Table of contents
Other socomec Inverter manuals
Popular Inverter manuals by other brands

SolaX Power
SolaX Power X1 Series user manual

Kohler
Kohler PRO 12.3 EFI Service manual

AIMS Power
AIMS Power PWRI300012S instruction manual

VOLTIMA
VOLTIMA VST Series Installation and operating instructions

Epever
Epever LS EPD Series quick start guide

Briggs & Stratton
Briggs & Stratton 30372 Wiring Diagram & Schematic

Eltek Valere
Eltek Valere UNV-F 3.3 user manual

Mitsubishi Electric
Mitsubishi Electric FR-A802-E instruction manual

Crown
Crown Xavier X-4KW-M user manual

Moultrie
Moultrie MFA-12602 instructions

Nord Drivesystems
Nord Drivesystems NORDAC PRO SK 500P Manual with installation instructions

Mitsubishi Heavy Industries
Mitsubishi Heavy Industries SRR25ZM-S Technical manual