Input over 3 letters !
The input password consists of less than 3 characters. Input a password
at least 3 characters in length.
Motor error EXXX
A problem has occurred with the motor drive and operation stops.
Power the instrument OFF then ON to correct the problem.
If this error message appears frequently, contact your local dealer.
Need base pt. obs
During REM measurement, the observation of the target was not
completed normally.
Reset and sight the prism and perform measurement again.
Need 1st obs
During missing line measurement, the observation of the starting position
was not completed normally.
Sight the starting position accurately and press [MEAS] to perform the
measurement again.
New password Diff.
During new password setting, the passwords input twice are different.
Input new password twice correctly.
No solution
The calculation of the instrument station coordinates during resection
does not converge.
Access the results and if necessary, perform the observations again.
Out of range
During gradient % display, the display range (less than ± 1000%) has
been exceeded.
During REM measurement, either the vertical angle has exceeded
horizontal ±89° or the measured distance is greater than 9999.999m.
Install the instrument station far from the target.
Please input an address consisting of 12 hexadecimal characters
(0 to 9, A to F)
The Bluetooth address is not input correctly for Bluetooth
communication. Input the Bluetooth address with 12 characters of 0 to 9
or A to F.
Reflectorless not supported !!
Auto Tracking cannot be performed in reflectorless mode.
Use the prism to carry out automatic sighting.
Remote Control communication err !!
Communication between the Remote controller for Remote Control
System and the instrument failed. Check the status (communications
setup, power supply, cable connections etc.) of the Remote controller,
wireless modem and cables.
Sheet not supported !!
Auto Tracking cannot be performed with the sheet.
Use the prism to carry out automatic sighting.
Signal off
The reflected light is not observed when distance measurement begins.
Or, during measurement, the reflected light has weakened or is blocked.
Either sight the target again or, when using a reflective prism, increase
the number of reflective prisms.
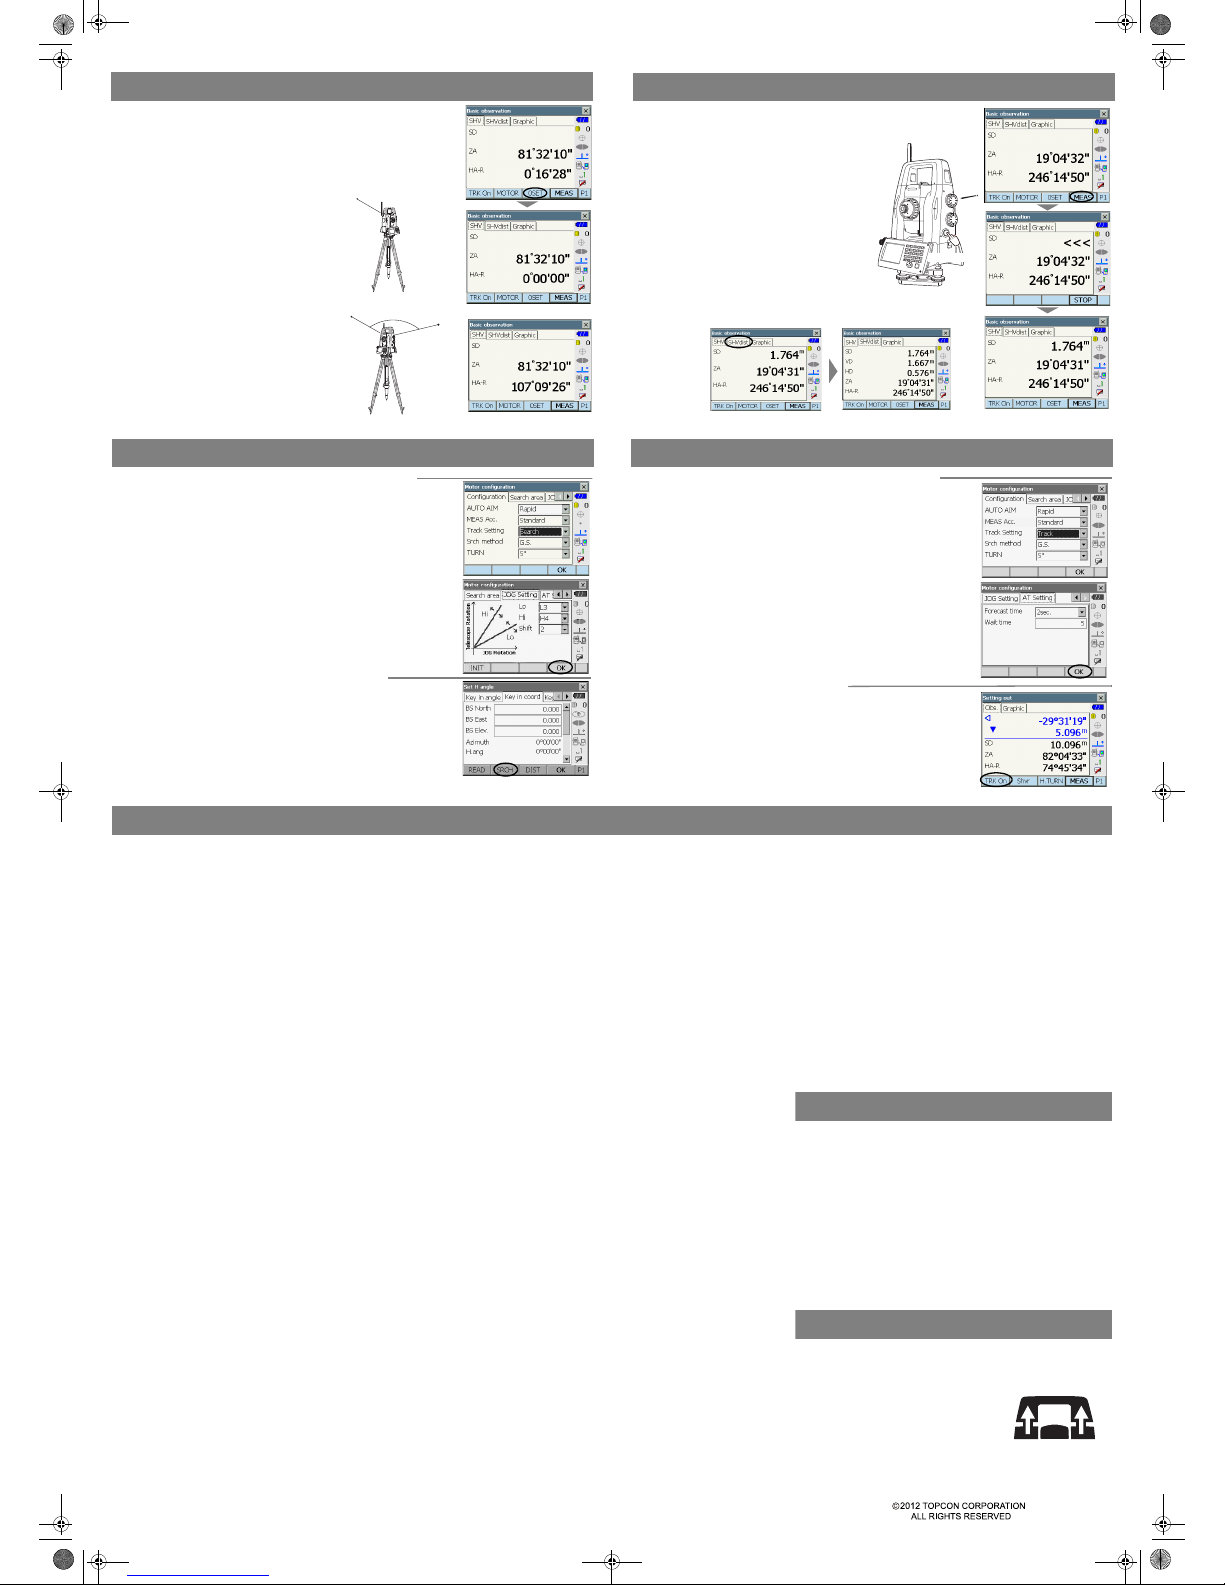
Auto Tracking Settings in <Motor configuration>
1.Set search conditions.
• Auto AIM : Fine/Rapid
• MEAS Acc. : Advanced/Standard
• Track Setting : Track
• Srch method : G.S./R.C. • TURN : 3"/5"/10"/20"/30"/60"
2.Set the search area.
• Search pattern : 1/2/3
• Vertical : 0 to 90°
• Horizontal : 0 to 180° (when "Search pattern" is set to “3” : 0 to 90°)
3.Set the Jog turning speed.
• Lo (1 to 4) / Hi (1 to 7) / Shift (1 to 6)
4.Set "Forecast time" and "Target lost".
• Forecast time : 0.5 sec. /1 sec. / 2 sec. / 3 sec. / 4 sec. / 5 sec. / Auto
• Wait time (sec.) : 0 to 3600
5.Press [OK].
Measurement with Auto Tracking
1.Aim the objective lens in the general direction of the
prism.
2.Press [TRK On].
When the target is found, the target is aligned in the field-of-view
and Auto Tracking starts.
To stop Auto Tracking, press [STOP].
Auto Tracking (Only for Auto Tracking model)
1. Collimate the first target "A".
2. Set the horizontal angle of target "A" to 0°00'00".
Press [0 SET], and it flashes.
Press [0 SET] again at once, and the
horizontal angle of target "A" is set to 0°.
3. Collimate the second target "B".
The horizontal angle and vertical angle
of target "B", which you want to know,
are displayed.
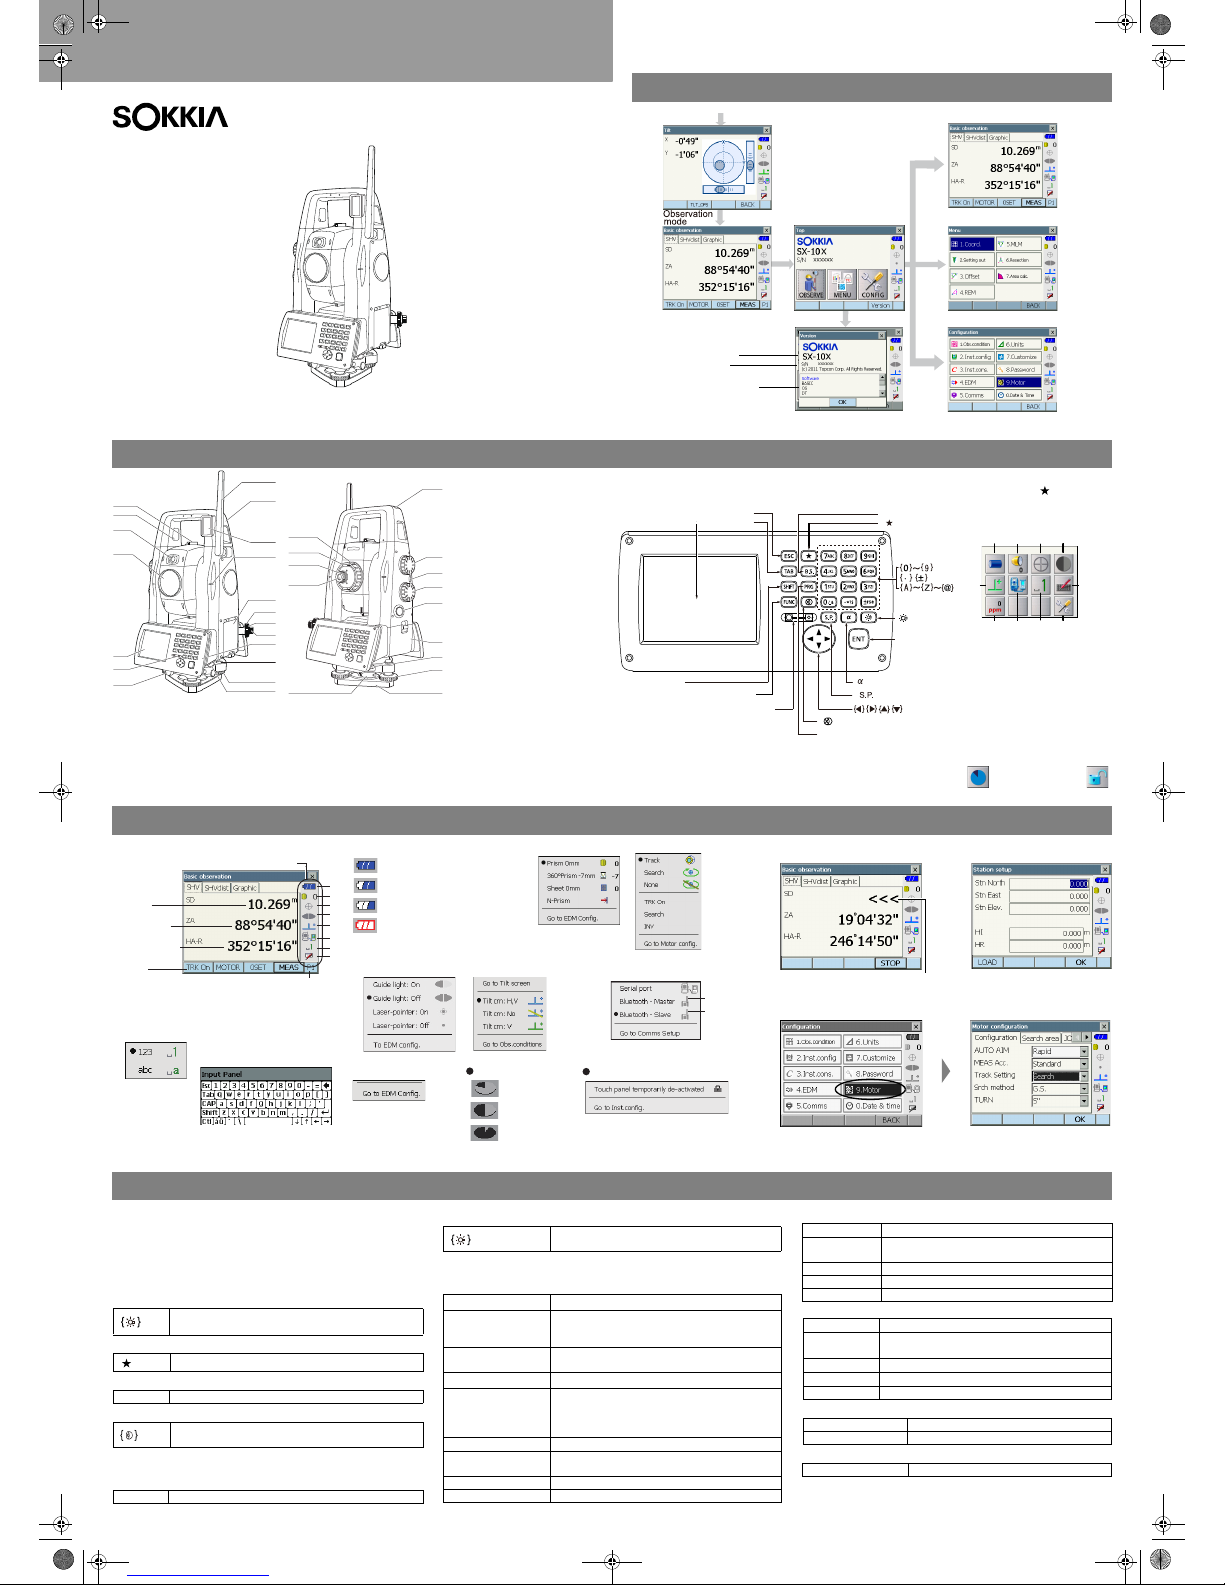
1. Collimate the target center.
Make sure that setting is applicable to the measurement conditions.
2. Press [MEAS].
Distance measurement starts.
$
Press the trigger key when [MEAS] and [STOP]
are indicated on the display unit.
You can start/stop measurement.
The results of the measurement are displayed.
Hereafter, the results are updated whenever
measurement is performed.
$
Press “SHVdist” tab, and the displayed contents
are changed.
(Slope distance / Height difference / Horizontal distance / Vertical angle /
Horizontal angle)
Trigger key
Target not found !!
The prism cannot be found within the Search area range.
Reset and sight the prism and perform measurement again.
Temp Rnge OU T
The instrument is outside useable temperature range and accurate
measurement cannot be performed.
Repeat measurement within the appropriate temperature range.
Tilt over range !!
The tilt angle exceeds the tilt angle compensation range of the sensor.
Level the instrument again.
Time out !!
Measurement is not carried out in the allotted time.
Reset and sight the prism and perform measurement again.
When designating the angle of rotation or automatically sighting the
prism, there is a problem with the positioning of the prism or the operation
of the instrument and measurement is not obtained within the fixed time.
Check the positioning of the instrument and prism and perform
measurement again. If observation is still not possible, sight the target
manually.
If you are experiencing problems with the instrument and sus-
pect a fault in the program, you should try a warm boot.
1. Power OFF the instrument.
2. Press the power key on the side of the instrument
while pressing {ENT}.
The instrument is reset and powers ON as normal.
If the problem is not resolved with a warm boot the next step is
to perform a cold boot.
For cold boot, refer to “Resolving Software Issues” of the
manual (PDF).
Listen for the click to ensure that the battery cover and external
interface hatch are properly closed.
Resolving Software Issues
General Handling Precautions
To remove the handle, hold both sides of
the handle and lift it straight above.
If you hold the handle by one hand or
incline it, the terminal attached on the
handle may be damaged.
Auto Pointing Settings in <Motor configuration>
1.Set search conditions.
• Auto AIM : Fine/Rapid
• MEAS Acc. : Advanced/Standard
• Track Setting : Search
• Srch method : G.S./R.C.
• TURN : 3"/5"/10"/20"/30"/60"
2.Set the search area.
• Search pattern : 1/2/3
• Vertical : 0 to 90°
• Horizontal : 0 to 180° (when "Search pattern" is set to “3” : 0 to 90°)
3.Set the Jog turning speed.
• Lo (1 to 4) / Hi (1 to 7) / Shift (1 to 6)
4.Press [OK].
Auto-Pointing Function for Target Sighting
1.Aim the objective lens in the general direction of
the target (Prism or Reflective sheet).
2.Press [SRCH] in any Observation mode screen.
The telescope and top half of the instrument rotate and target
auto-search begins.
When the target is found, the instrument sights the center of
the prism and stops.
The following is a list of the error messages displayed by the
instrument and the meaning of each message.
If the same error message is repeated or if any message not
shown below appears, the instrument has malfunctioned.
Contact your local dealer.
Backup battery dead. Clock display may no longer be correct.
The voltage supplied by the lithium battery either declines or is
completely discharged.
Ask your local dealer to replace the battery for you.
Bad condition
The air is shimmering a lot, etc., measuring conditions are poor.
The center of the target cannot be sighted.
Resight the target.
Unsuitable distance measurement conditions when reflectorless
measurement is set. When reflectorless measurement is set, distance
cannot be measured because the laser beam is striking at least two
surfaces at the same time.
Choose a single surface target for distance measurement.
Bad letter !!
A file name containing special characters such as "*" and "?" is invalid.
Calculation error
During resection measurement the same point is registered multiple
times. Set another known point so that the known point coordinates do
not coincide.
Coordinates identical to the known point coordinates observed during
resection exist.
During surface area calculation, conditions necessary for calculations
are not met. Check conditions and try again.
An error occurred during calculation.
Device list is full !!
No more Bluetooth devices can currently be registered. Delete
unnecessary devices from the list
and try again.
Error: Read Build Info.
Error: Read sysflg
Error: Self check
Error: Read OS Parameter
Error: Write sysflg
Press [OK] to cancel the message. If this error message appears
frequently, contact your local dealer.
Incorrect password.
Input password does not match set password. Input correct password.
Input device name !!
Bluetooth device name not input. Input device name and complete device
registration.
Message List
Target A
0°00'00"
107°09'26"
Horizontal angle Target B
Distance Measurement
Angular Measurement
Auto Pointing
SX_Quick_E.fm 2 ページ 2012年5月14日 月曜日 午後2時39分