SOL paragliders X-Light 2 User manual

V.1.2 06/2018
Manual

2 3
WELCOME TO SOL TEAM! ..................................................................................................................4
USER’S MANUAL ...............................................................................................................................5
THE x-light 2 ......................................................................................................................................6
TECHNICAL SPECIFICATIONS ..............................................................................................................8
ADJUSTMENTS AND INSTALLATIONS..................................................................................................10
BACK PROTECTOR INSTALLATION.......................................................................................................10
CARABINERS INSTALLATION...............................................................................................................11
ACCELERATOR INSTALLATION.............................................................................................................11
RESCUE PARACHUTE INSTALLATION...................................................................................................12
Rescue Parachute Compartment ........................................................................................................... 17
HARNESS ADJUSTMENT FOR FLIGHT.................................................................................................. 18
............................................................................................................................. 18
........................................................................................................................................ 18
............................................................................................................................... 19
............................................................................................................................. 20
Ventral Opening..................................................................................................................................... 20
.......................................................................... 21
SAFETY SYSTEM ................................................................................................................................. 21
LEG COVER ........................................................................................................................................22
............................................................................................................................ 22
Leg cover closing ................................................................................................................................... 23
Container for instruments .................................................................................................................23
POCKETS ...........................................................................................................................................24
Ballast compartment.........................................................................................................................24
RADIO AND CAMELBACK COMPARTMENT .........................................................................................25
TOWING ATTACK SYSTEM INSTTALATION ...........................................................................................25
FINAL CHECK .....................................................................................................................................26
TANDEM FLIGHT................................................................................................................................26
WATER LANDING ...............................................................................................................................26
SOL HARNESSES WITH OTHER BRANDS..............................................................................................26
MAINTENANCE, REPAIR AND CLEANING ............................................................................................27
Storing the equipment........................................................................................................................... 27
Maintenance.......................................................................................................................................... 27
Zíper....................................................................................................................................................... 27
Pulleys, CARABINERS AND BUCKLES...................................................................................................... 28
Cleaning ................................................................................................................................................. 28
RECOMENDATION FOR A LONG LIFE ..................................................................................................28
Storage................................................................................................................................................... 29
........................................................................................................................... 29
NATURE AND ENVIRONMENT............................................................................................................29
OUT OF USE.......................................................................................................................................29
WARRANTY ....................................................................................................................................... 30
SOL warranty - 1 years/100 hours.......................................................................................................... 30
Warranty Terms ..................................................................................................................................... 30
Warranty Pre-requisites......................................................................................................................... 30
This Warranty Does Not Cover............................................................................................................... 31
FINAL WORDS ...................................................................................................................................32
MEASURES ........................................................................................................................................33
REFERENCE TABLE: HEIGHT X WEIGHT ...............................................................................................33
MAINTENANCE MANUAL...................................................................................................................34

4 5
WELCOME TO SOL TEAM!
You have just acquired a high quality product, manufactured under one of the most demanding
industry standards worldwide, we belive this project will allow that you learn a lot in paraglider
flight.
We trust your harness X-Light 2 will bring you many great life memories you will cherish forever
and you could understand our work’s Philosophy, safety, performance, ease of operation and
innovation.
We would like you to read this manual carefully and thoroughly. In it, you will find important
information about using your new equipment.
In the event you should have any questions about its usage or should you wish to be updated
on the latest news at SOL, we remain at your disposal:
Thank you for selecting a SOL PARAGLIDERS.
SOL Team!
This manual offers information about your harness It is not a training manual. It is a assumption
that the pilot respects the law and order of aviation and that his skills are up to the challenge of
this particular equipment. It is a basic assumption that the pilot is certified to fly this paraglider.
This harness meets at the time of delivery the requirements of the LTF certification or of the
EN, so any equipment alteration will result in the cancellation of this respective certification,
we must remember that every pilot is responsible for the maintenance and assessment of
equipment usability and the manufacturer and its representatives are not liable and therefore
not responsible for any misusage nor mishandling of this equipment.
Harness to paraglider freeflight. For longer flights and aerodynamic design results in a harness
with easy handling and excellent performance.
Don’t forget that flying with this equipment shall be performed at the individual’s own risk. It’s
very import read this manual carefully.
Comes with the harness:
Along with your product, you are getting an accessory kit:
• Easy Check;
• User’s Manual;
• Keyring.
USER’S MANUAL

6 7
The X-Light 2 is a lightweight, fully anatomic shaped, high-performance harness with speedbag for experienced pilots and those who enter the XC Flying.
Thanks to a well-thought-out design and a meticulous material selection, the weight and mass are minimized without sacrificing the high quality requirements. Optimized in aerodynamic and comfort
and adjustable in flight, the X-Light 2 is certified LTF / EN in all requirements: structure (120 kg), back protector and handling.
Available in the sizes S-M-L-XL.

8 9
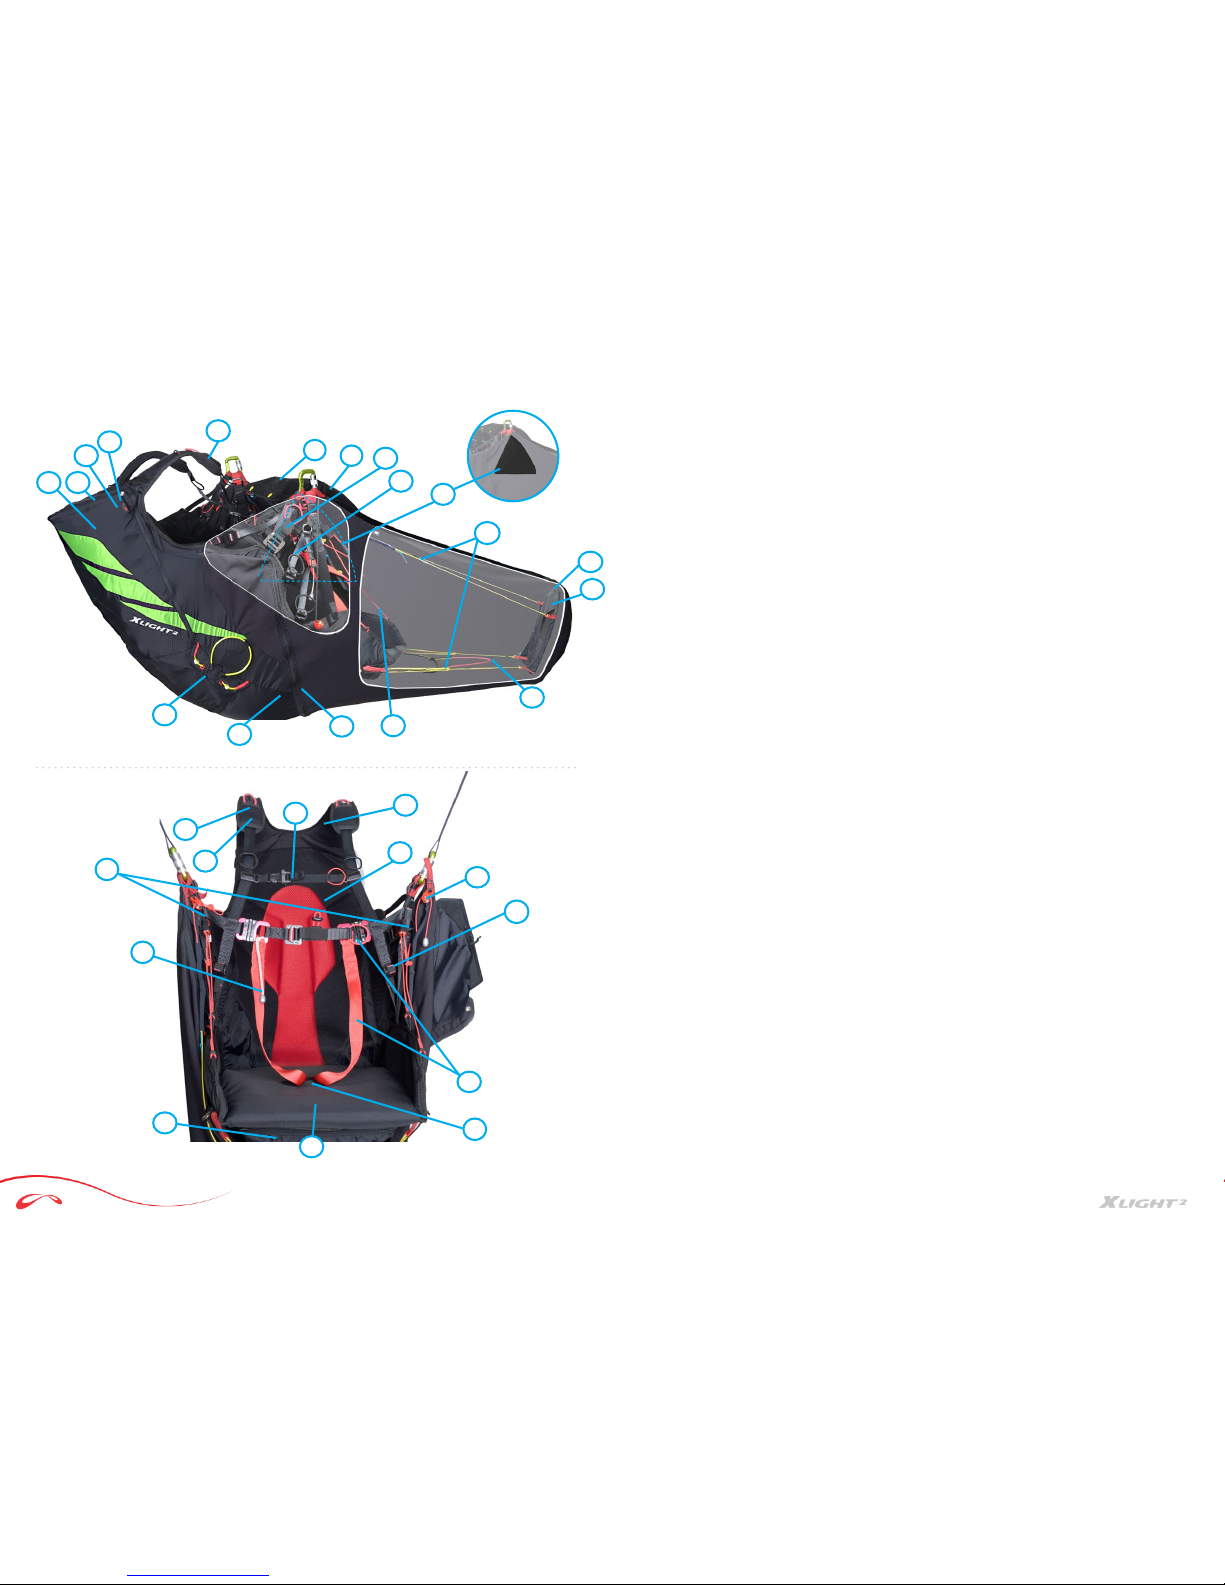
TECHNICAL SPECIFICATIONS 1. Huge back storage pocket
2. Identification view panel
3. Pocket for radio
4. Pocket for hydration system
5. Shoulder adjustments
6. Speedbag front pocket
7. Detachable Instrument panel
8. Side adjustments
9. Lumbar adjustments
10.2 side pockets
11.Inclination and length adjustment of the speedbag
12.Easy speedbag entry and exit
13.Composite Divinycell® lightweight footboard
14.Speed system
15.Seat plate inclination adjustment
16.Neoprene speedbag detachable by zipper
17.Comfort protector foam 36-38 G LTF / EN certified
18.Inbuilt rescue compartment (6000/11000cm³)
19.Chest strap adjustment
20.Anatomic shoulder shape
21.Anatomic back shape
22.Speedbag closure by pulley system
23.Independent and adjustable ABS
24.Adjustable Front-T-Quick-Lock 28mm
25.Leg strap adjustment in V
26.Composite Divinycell® lightweight seat plate
27.4L water ballast compartment with side opening for hose exit
28.Anti-forget closure system in V
29.Adjustable carabiner distance 35-55cm
30.Neoprene safety cover on reserve bridle connection
31.Independent bridles system according to LTF / EN norm
Illustrative Photo. The carabiners are not included in the harness.
78
19 20
21
1
4
3
2
31
30
26
27
18
17
5
9
10
15
24
28
25
29
6
16
14
22
23
13
12
11

10 11
ADJUSTMENTS AND INSTALLATIONS
BACK PROTECTOR INSTALLATION
The SOL-Harness provide a variety of adjustment possibilities, so that the pilot is able to find
his/her ideal flying position. The first adjustment must be done in a simulator where you can
be hanging in order to make the adjustments. It may be necessary to take a few testing flights
until the ideal setting is achieved, but the pilot will be rewarded with amazing comfortable
flights.
For your first flight, choose calm weather conditions. Should you need to make further
adjustments, it will be easier to find the ideal position after this first flight.
• Please install the back protector and the reserve/s before you make the adjustments of
the SOL-Harness.
• Your safety is assured by straps integrated in the harness, by tablet beneath the seat, to
avoid perforation and by the back protector.
• Never carry instruments that may perforate the harness backing in case of impact!
• You have to use the back protector from SOL for X-Light 2 With the use of other protectors
the harness loses his certification;
• It´s very important to fix the protector against movements;
• After a hard landing on the protector, the harness and the protector has to be examined
for damage.
• A damaged protector could not further be used, cause probably he doesn´t match any
more the test results. The certification expired. A change is necessary – it´s also in your
interest an safety. Please let all parts of the harness be examined. The activator for the
CARABINERS INSTALLATION
ACCELERATOR INSTALLATION
• Carabiners: Pay attention at each installed carabiner of the permission and/or other
references of the producer. You have to look out regularly for thin fissures and/or mal-
function. The carabiner has to close always 100%.
• If you choose to change the carabiners (even made of steel) at least each 5 years or after
250 flight hours you are making a wise decision.
Atention
Atention
Atenção
• All necessary buckles to adjust the speed system are found on the harness’ body. Follow
the instruction in the image. First you have to thread the line through the metal grommets
in front of the seat.
1
2
3
1
1
2
2
reserve has to function 100%, also the mechanism of the carabiners.
• If necessary, you should ask for professional help to make sure it is properly function.

12 13
RESCUE PARACHUTE INSTALLATION
It is possible to install two parachutes into the harness beneath the seat. For installation details
take a look at the drawings. The drawings should help you to understand the installation. In
case you are uncertain ask a professional for help, to be sure that the installation is correct.
12
34
566A
78
10
9
11 12

14 15
13 14
17 18
15 16
19 20
22
21
1
2
3
4
23 24
1
2

16 17
28
29 30
1
23
4
25 26
27
• Before every flight, inspect the activation handle and its pins,
to make sure they are at the correct setting position.
• After the installation you should make a test.
• The container’s size takes to account the reserve size which
would be normal for the pilot’s weight x harness size.
• There might be the case when large rescues parachute may
not fit adequately in the smaller size harness.
• Never throw the reserve in flight-direction.
Pay special attention to the fact in which direction you must pull your rescue parachute in
order to throw it out.
The SOL-Harness features a rescue parachute installation system with easy access at the
moment of grab and throw, by possessing an activator which has a shorter connection. Some
layers of fabric covers the entrance recipients destined to the reserve (Figure 24), protecting
the parachute from dust and humidity.
Atention
RESCUE PARACHUTE COMPARTMENT
The reserves parachutes compartments on your harness were designed for most of the
parachutes in the market. In any case, you must install, simulate and perform all testing, so
that you will not have any surprises in case you need to activate it. Any questions concerning
its operation must be dealt with during the installation and setting of the harness before the
first flight.
If you need a strong force to remove the rescue parachute, check the installation again. All
questions about operation should be discussed during installation and adjustments. If you
have doubts, please ask a SOL dealer or an authorized flight school.
• In case of a first combination between harness and reserve there has to be made a test of
compability. This test has to me made from an authorized person or workshop!
• Never sit down in your harness for tests or other activities when it is layed on the ground,
this can damage the harness, the rescue container and the whole rescue system.
• The reserve has to be packed and checked every year. This has to be done by an authorized
workshop. Pay attention to the references in the owner’s manual for your reserve. Each
check is to be marked in the check protocol of the reserve.
• Reserve installation: After the first and each following installation has to be made a test
Atention
In case the pilot lands on water and gets the reserve wet, the rescue parachute should be
removed from the harness, be dried and re-packed before it is placed back into the recipient
(see the rescue parachute manual).

18 19
POSITION ADJUSTMENTS
Before the first flight, we suggest the pilot simulate his/her flying position hanging the harness
on a harness tester, sitting on SOL Harness and trying to find the best position adjustment.
This simulation becomes more realistic if the back pocket is filled with objects the pilot would
normally carry during flight.
After adjusting the back, the pilot must choose the best body inclination, respecting a central
vertical line. We don’t advise a steep inclination, so that vision and access to commands are
not jeopardized.
The shoulder strap is adjustable, varying according to the pilots’ height. For better comfort, the
shoulder straps support part of the dorsal weight. The pectoral strap regulates the distance
between the two carabiners, which varies depending on the paraglider’s size.
Avoid a laying flying position, as this alters the paraglider’s commands:
• Your command is shortened;
• More vulnerable to a twist.
LATERAL ADJUSTMENTS
• Make sure the setting is symmetric for your safety and comfort.
Atention
1
4
2
3
5
AB
C
D
E
(for ex. 2-years-check) to secure that the applicated force to pull the
reserve lays between 2 and 5 daN.
• Follow the manufacturer instructions of rescue parachute (how to
use, maintenance, inspections and folding)

20 21
SHOULDER ADJUSTMENT
1. Make sure the shoulder adjustments setting are symmetric for your safety and comfort.
2. The adjustable chest strap is fixed on the shoulder strap. This is for your comfort and
safety. They better be aligned with the shoulders. In the lock is integrated an emergency
whistle.
The chest strap is responsible for the ventral opening, depending of the paragliders size. There
is a measurement of the carabiners opening to which the paraglider was designed and tested.
With SOL paragliders you must fly within these measurements. In case you are outside these
measurements, the paraglider’s behavior can not correspond to the certification:
S- 40cm / M- 42cm / L- 44cm / XL- 46cm / Tandem- 44cm.
12
We have included a tape with your harness to help you set the exact measurement of distance
between the carabiners. The measurement has to be made at the points indicated in above:
• The distance has to be within the limits to obey the characteristics of the certification.
Atention
• Make sure the legs adjustments setting is symmetric for your safety and comfort.
• Check the correct closing buckles before the flight.
1 2
SAFETY SYSTEM
This system has two functions:
1. Used for leg cover close (see at page 23, image 2);
2. Auxiliar safety system to avoid that pilot forget to close the legs and chest.
1 2

22 23
Your harness is composed by a leg cover and a main part which adjustment details must be
carefully observed. They are the ones that make your flight position been aerodynamic and
comfortable.
• The adjustments A and B must be always asymmetric to avoid discomfort.
• Its position gets altered when the reserve or baggage is placed. Put all these items at the
moment you are making the adjustments in your harness.
• Try to be always in a position that does not affect your paraglider performance.
Atenção
Composed by velcro which allows to extend or shorten the bellow part of the
leg cover (8cm).
A
B
Composed by strips that can extend or short the leg cover (8 cm). Find the best
position for your legs.
CONTAINER FOR INSTRUMENTS
• The container has a detachable platform for the instruments with zipper fixation.
1.Closing the bottom part of leg cover. Facilitates the run and entry into the leg cover at
takeoff.
2.Closing the superior part of leg cover. We advise you at the moment of taking off and
landing this one is open to make easy running, entrance and exit.
Your leg cover is composed by 2 closing points:
1
1
2
2
A
BA
B

24 25
The harness SOL feature a large rear, two lateral and bellow the seat pockets. These pockets
were designed in such way that they will keep its contents from falling accidentally during
flight.
Another option is the front container like picture bellow:
POCKETS
1 2
Ballast compartment 4 liters (1) with hose side exit (2 and 3).
BALLAST COMPARTMENT
1 2 3
RADIO AND CAMELBACK COMPARTMENT
Your harnesses has radio (A) and camelback compartment (B), located at the harness back. An
opening allows the camelback hose exit next to the pilot, according as indicated. (see picture
below).
Your SOL-Harness can be flown by tow, as long as it is attached to the towing flight system
(Towing Attack System).
In turn, this must be fitted on the same carabiners that link the harness to the paraglider, being
activated by an elastic band conveniently located, which when pulled, releases the equipment
for flight. Please refer to the instructions concerning flight by tow in your paraglider’s manual.
1 2
AB

26 27
FINAL CHECK
Before you begin flying with your new SOL Harness, make sure to perform the following
inspection in detail:
• All pockets are closed?
• The reserve parachute handle is in the correct position?
• Each hook (chest / leg) is connected and closed?
• The carabiner opening is correct?
• Using the harness AMX 2 make sure that all hooks are closed, pay attention to the audible
“click”. Also pay attention that no dirt or ice is getting in the mechanism. If necessary
lubrificate with se wing-oil.
• The cover could avoid to see the leg locks. Make sure that the locks are closed before you
close the cover.
SOL HARNESSES WITH OTHER BRANDS
Your harness is NOT designed for tandem flights.
Usually safety courses are taught over water, or a poorly calculated landing may force you to
land in the water. In this event, you must be careful since the protector at the first moment will
act as a floating device, therefore forcing your head into the water and you could be in danger
of drowning.
The foam, already saturated with water will get heavy and may naturally sink. In case of water
landing open as fast as you can the locks and get out off the harness. After a water landing you
must take the column protector off, seat board, reserve parachute, all lateral protectors and let
them all dry under shade in a breezy area.
SOL Harness has no restrictions for use with other paraglider brands, please consult your
paraglider’s manual.
MAINTENANCE
Your SOL Harness has to be sent regularly to the manufacturer or an authorized repair facility,
in order that a professional inspection be performed.
A new licensed harness has to be sent for inspection after two years. All other inspections have
to be made once a year.
Avoid dragging your SOL Harness on the ground, on rocks or on wet surfaces. Prolonged
exposure to UV light (sunlight), humidity and heat must be also avoided to prevent early and
unnecessary material deterioration.
ZÍPER
The zipper must open and close softly. If there is any difficulty
to move it you must apply paraffin or a spray lubricant to
diminish the attrition among the components. You will notice
the difference when you move it.
It is possible most of the times you fix by yourself the zipper. In case it
does not close any more just pull it until the beginning of the position
and with a pliers press both sides of the zipper.

28 29
PULLEYS, CARABINERS AND BUCKLES
It is important you keep pulleys lubricated because in case they do not work may consume the
speedy handle or axle, apply paraffin or lubricant spray, read carefully about the lubricant to
avoid spots and fabric consume. Do not apply on the sewing lines.
Cleaning must be performed only when it is absolutely necessary. We recommend the use
of water only with a smooth sponge or cloth. Do not use any chemical product, since it will
damage the material permanently.
The harness fabric is made mainly out of Nylon, which like any other synthetic material is
sensitive to UV light radiation, causing it to decompose and losing its mechanical resistance.
For this reason, the unnecessary exposure to sun light, which carries a high UV radiation level
in high altitudes must be avoided. It is highly recommended to leave the harness stored away
and well protected when it´s not being used.
Avoid storing the harness for long periods in areas with high humidity or heat, this
causes premature aging of the materials. Keep away sand, stones or snow from
entering the harness cells because any weight on the trailing edge slows the canopy
down, possibly creating a stall, furthermore, sharp corners may cut the fabric.
In case of salt-water contact, the harness must be soaked and washed with fresh water. Salt
water might decrease the sewing resistance even if soaked with fresh water. Never dry the
harness directly under the sun. This must be done in a shaded area. After drying send the
harness for inspection to the manufacturer or distributor. After an accident or long time
without using the paraglider must be checked. Avoid storing the glider near fire and/or sharp
objects. Any contact with acids should be avoided. In case of any doubts ask your distributor.
INSPECTION AND REPAIRS
Avoid storing the harness for a long time in the back of the car or under extreme sun. Heat
could jeopardize the materials and/or the proper function. UV radiation destroys the molecular
structure of the material.
Avoid storing the glider near fire and/or sharp objects. Any contact with acids should be
avoided. In case of any doubts ask your distributor.
The first inspection check is mandatory completing 24 months or 100 flights, whichever comes
first. After the first inspection any harness has to be checked yearly or at each 100 flights,
whichever comes first.
Independently from the pre-flight checks you must open andunfold your rescue parachute once
every 6 months. In case of excessive use (permanent spirals and other extreme maneuvers)
the period of inspection has to be shorter.
It is of utmost importance to follow these guidelines. Without performing the mandatory
inspections, the harness loses its certification and the respective SOL warranty becomes null
and void.
Always check your equipment after an incident or in case the harness has been stored for a
long time.
Repairs must be performed only by the manufacturer, distributor or authorized personnel.
Minor repairs could be handled by yourself, although we recommend that repairs should be
performed by the manufacturer or authorized personnel. They have the necessary materials
and tools to maintain your harness. Replace materials only with the originals. Using any other
the harness will lose his certification.
Please fly in accordance to preserve nature and environment.
If your glider gets out of use remember it cannot be recycled. Please give it to your distributor
or your flying-school, they should know how handle it.
NATURE AND ENVIRONMENT
OUT OF USE

30 31
WARRANTY TERMS
1.This warranty is valid for all harnesses with LTF, EN or AFNOR certification, rated for leisure
use only.
2.This warranty does not include harness rated for professional use (school, competitions,
aerobatics, etc).
3.This warranty is defined as repair or substitution of the defective harness parts determined
by the producer.
THIS WARRANTY DOES NOT COVER
1. A three-copied filled-out form: One copy to be sent to SOL Paragliders within 30 days
after purchase; one copy to the sales person and one copy to the purchaser.
2. All flights must be logged providing information on date, place and length of flight.
3. The equipment must be kept in accordance with the instructions provided in this
manual. All the storage, folding, cleaning and care instructions must be carefully taken.
4. Maintenance and inspections can only be performed by the manufacturer or authorized
shop and must be properly documented.
5. The owner is responsible for all shipping expenses to and from the manufacturer.
6. In order to make a plea for repair or equipment exchange, or equipment repair, which
shall be decided and performed only SOL Paragliders, the owner must send the
manufacturer the following:
a. The harness in question, and copies of all previous inspections and flight registry.
b. Original copy of the Warranty Registration Form SOL Paragliders.
1. Any alterations on original fabric colors, lines and risers.
2. Any damage caused by chemical products, sand, friction, cleaning products or salt water.
3. Any damage caused as a result of errors during operation of the harness, incidents or
emergency situations.
4. Any damage caused by inadequate operation of the harness.
5. A harness that may have been subjected of any alteration from the original design and
without proper permission from SOL Paragliders.
6. Damages caused by inappropriate transport, storage or settings of the harness.
7. Damages caused by the use of not compatible components with the harness.
8. Damages caused by the use of inappropriate packaging for the transport.
9. Harness without original identification label and serial number.
10. Handling inadequately to the instructions given in the owner´s manual.
WARRANTY
Every harness manufactured has a Warranty of 1 Years or 100 Hours of Flight, whichever comes
first.
Our development technology, through the utilization of quality materials and the adoption of
new manufacturing processes, allows us to offer you, our client this added bonus.
This warranty is defined as repair or substitution of the defective equipment parts determined
by the producer.

32 33
MEASURES
S M L XL
Seat Width 35 37 40 43 cm
Seat Length 38 40 43 46 cm
Ventral Height 41 41 42 43 cm
Weight 3,700 3,850 3,980 4,150
*Observation: protector and seat included.
Maximum pilot weight allowed: 120 kg/120dkN. The harness is a light flight equipment.
• This table is only a reference. Speak with your seller or flight shool to know your exactly
harness size.
Atention
FINAL WORDS
Safety is the major theme of our sport. In order to fly safely, pilots must train, study, practice
and be alert to the dangers around us.
In order to achieve excellent safety levels, we must fly regularly as much as possible, don’t go
beyond our limitations and avoid exposing ourselves to unnecessary dangers.
Learning to fly is a slow process and takes years, so don’t pressure yourself. If conditions are
not favorable, keep your equipment stored away.
Don’t overestimate your skills and be honest with yourself. Every year we see many accidents
which in most cases could be prevented with a minor adjustment.
We are a part of the community in which we live: friends, family and even people we don’t
necessarily know worry about us. Our obligation towards this community is to keep ourselves
healthy and that at each landing we will be one landing happier than before. We fly so that we
can feel more alive.
We wish you good and safe flights with your X-LIGHT 2

34 35
Owner:
Adress:
Fone:
Date:
Item O.K. Observation
Harnesses Seams
Straps Seams
Pulleys
Zipper
Carabiners
Buckles
Rescue Parachute Compartment
Bridles and connection
Straps
Fabrics
Rescue parachute handle
Dorsal protector
Speedbar
Chest buckle
Lateral adjustments
ABS System
Seat
Observations:
MAINTENANCE MANUAL

36 37
Sol Sports Ind. e Com. Ltda.
Rua Walter Marquardt, 1180 cp 370
89259-565 Jaraguá do Sul, SC BRAZIL
Telefone (+55) 47 3275 7753
E-mail: inf[email protected]
www.solparagliders.com.br
facebook: solparagliders
instagram @solparagliders
This manual suits for next models
1
Table of contents
Other SOL paragliders Accessories manuals

SOL paragliders
SOL paragliders CXC User manual

SOL paragliders
SOL paragliders VIRTUE 2 Manual

SOL paragliders
SOL paragliders CX MAX User manual

SOL paragliders
SOL paragliders CX 2 User manual

SOL paragliders
SOL paragliders Just Acro Manual

SOL paragliders
SOL paragliders X lIght User manual

SOL paragliders
SOL paragliders Calliplox Reverse User manual

SOL paragliders
SOL paragliders HORIZON User manual