Solar Bollard Lighting SBL User manual
© 2003 - 2020 Key Wholesalers Pty Ltd t/a Solar Bollard Lighting- All rights reserved
SOLAR BOLLARD INSTALLATION GUIDE
Congratulations on purchasing your
Solar Light Bollard
SBL
SBL2
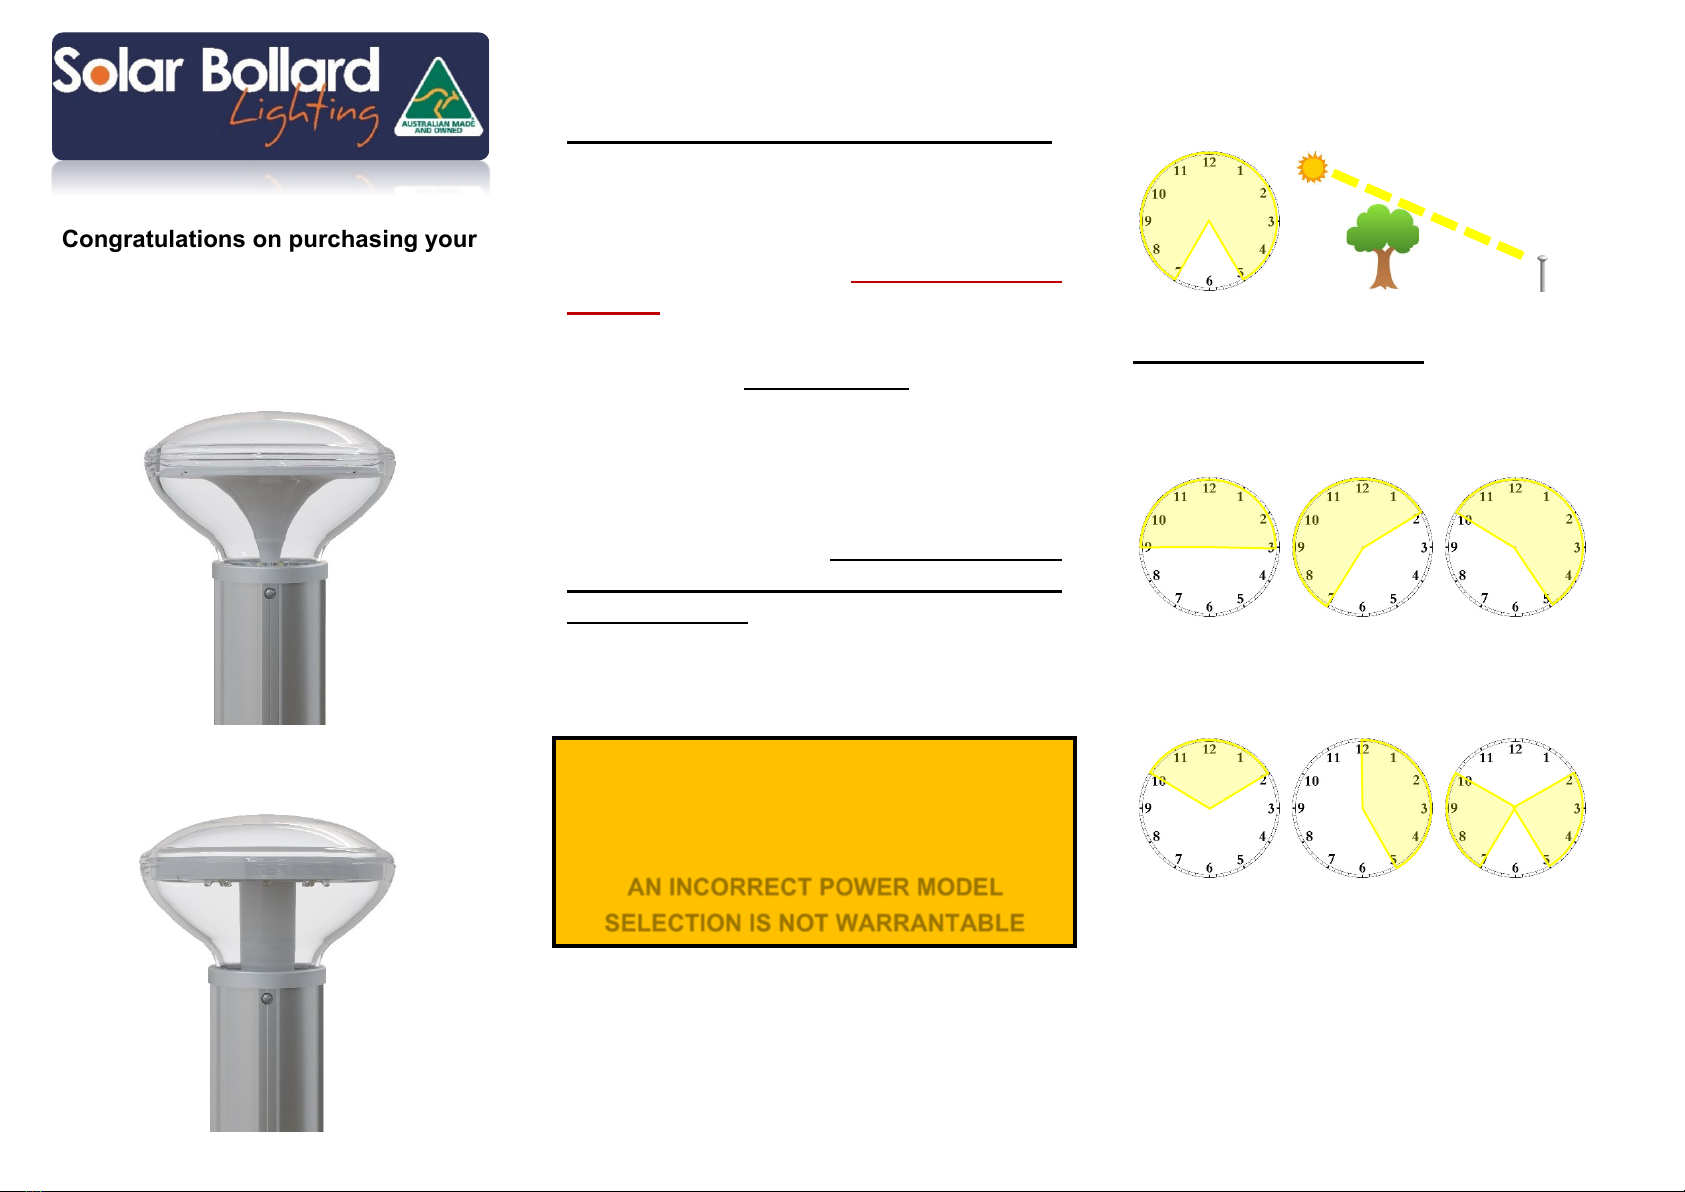
IMPORTANT BEFORE YOU INSTALL
The highest powered Solar Bollard Light for
your location shown in all our location specific
sales brochures and technical data sheets is
specified to be installed in direct undisrupted
sunlight from dawn until dusk based on your
locations winter month’s lowest sun trajectory.
Note: Battery is pre-connected for immediate
activation after pole/mounting installation.
Installation Site: If shading from trees or other
structures are found at the site of installation
not discussed prior to delivery of your order
Solar Light Bollard/s, please immediately
contact your supplier prior to commencing
the installation as a lower power model
maybe required to ensure dusk until dawn
operation at full power throughout the year and
as specified in our Warranty T&C’s.
Ensure your Solar Light Bollard power model
ordered allows for possible future shading
issues such trees growing and/or new buildings
being possibly erected near the installation site.
AN INCORRECT POWER MODEL
SELECTION IS NOT WARRANTABLE
Next are the time of day examples of amounts
of shading on the Solar Light Bollard to allow
for lower power model choice compensations.
FULL WINTER SUN (Lowest Sun Trajectory)
SHADING EXAMPLES
Partly in Shade
or Snow Covered Region in Full WINTER Sun
Drop down at least one (1-2) power levels
Mostly in Shade – SBL2 ONLY
Drop down to 40mA
Your supplier will have a relevant installation
guide specific for your actual location.
Contact them for a copy to ensure you have
chosen the correct power model for the
installation location if you have any concern

© 2003 - 2020 Key Wholesalers Pty Ltd t/a Solar Bollard Lighting- All rights reserved
BEFORE YOU INSTALL: DIAL BEFORE YOU DIG
Ensure Anchor Bolts are through pole base/s prior to burying into concrete.
STEP 1 – DIG HOLE WITH SHOVEL, POST HOLE DIGGER, AUGER.
In good soil we suggest:
Hole Size Required:
3 x pole diameter ᴓ115mm/4” = ᴓ345mm/13.5”
Hole Depth Required:
Model
Pole in Ground
Hole Depth
-1140DBA
300mm/11.8"
300mm/11.8" + 100mm/4" = 400mm/15.7"
-1790DBA
450mm/17.7"
450mm/17.7" + 100mm/4" = 550mm/21.6"
-2440DBA
600mm/23.6"
600mm/23.6" + 100mm/4" = 700mm/27.5"
-3040DBA
700mm/27.5
700mm/27.5" + 100mm/4" = 800mm/31.5"
-3640DBA
800mm/31.5"
800mm/31.5" + 100mm/4" = 900mm/35.4"
-4240DBA
900mm/35.4"
900mm/35.4" + 100mm/4" = 1000mm/39.3"
-5040DBA
1200mm/47.2"
1200mm/47.2" + 100mm/4" = 1300mm/47.2"
A much larger foundation may be required if soil is poor/sandy to prevent
bollards being pushed over or removed/stolen. Try and taper out towards the
bottom so the base section of concrete is larger than the top section as per this
image
STEP 2 - Pour concrete into the hole
STEP 3 - Insert pole into concrete ensuring the internal of the bottom of the pole
is also filled with concrete so it is secure and hard to remove.
STEP 4 - Use spirit level to ensure pole is set correctly and on taller poles use
braces to hold in place until concrete sets to ensure it stays plumb/vertical.
ASYMMETRICAL LIGHT ADDTIONAL INSTALLATION INFORMATION
This image shows the correct direction the pole must be facing for even
asymmetrical light distributions when light head is attached correctly with the
RED both being aligned on the same side. Remove RED once installed.
STEP 5 - Cure concrete and remove any bracing previously used.
FINAL STEP 6 - Remove the black shrink wrap from the light head to activate
the system. Your Solar Light Bollard is now installed and ready for operation.
Ensure you have removed all RED once installed.
DIRECT BURIED INSTALLATION
POOR SOIL
HOLE SIZE REQUIRED
3 x pole diameter ᴓ115mm/4”
ᴓ115mm/4” = 345mm/13.5”
100mm gap below pole to
create plug to seal base
GOOD SOIL
This manual suits for next models
1
Popular Lantern manuals by other brands

BEGA
BEGA 77 266 Instructions for use

AS LED Lighting
AS LED Lighting Matri-FleX 030030 MQ Mounting instructions

DS Produkte
DS Produkte K0521 instructions

Royal Sovereign
Royal Sovereign RSB-1770E owner's manual

Coleman
Coleman BG 800L Instructions for use

Lights
Lights Holiday Brilliant TY-T4 instruction manual


DS Produkte
DS Produkte D86014-1 instructions

Visual Comfort & Co.
Visual Comfort & Co. CHO2153 Assembly instructions

Vaughan
Vaughan Powis installation guide

Olimpia electronics
Olimpia electronics POWER LIGHT Series manual

BEGA
BEGA 84 433 Instructions for use

Nature Power
Nature Power Solar Security Light 1200 instruction manual