manuals.online logo
Brands
  1. Home
  2. •
  3. Brands
  4. •
  5. Solar Technology International
  6. •
  7. Solar Panel
  8. •
  9. Solar Technology International PV Logic User manual

Solar Technology International PV Logic User manual

40wp/60wp/90wp
Portable Fold-Up solar panel
User manual
PV Logic®
Important: please read before rst use. Technical helpline 01684 774 000
Contents
STFP40
40wp fold-up solar panel with integrated
stand and ready fitted charge controller
and 3m cable (A)
Extension cable with crocodile clips (B)
Extension cable with 12v Auto plug
Extension cable with female auto socket
Premium padded carry bag (C)
Instruction manual
STFP60
60wp fold-up solar panel with integrated
stand and ready fitted charge controller
and 3m cable (A)
Extension cable with crocodile clips (B)
Extension cable with 12v Auto plug
Extension cable with female auto socket
Premium padded carry bag (C)
Instruction manual
STFP90
90wp fold-up solar panel with integrated
stand and ready fitted charge controller
and 3m cable (A)
Extension cable with crocodile clips (B)
Extension cable with 12v Auto plug
Extension cable with female auto socket
Premium padded carry bag (C)
Instruction manual
Specifications
Part numbers: STFP40 /STFP60 /STFP90
Weight: STFP40 7Kg /STFP60 8.5Kg /STFP90 11.5Kg
Size (Closed): STFP40 353 x 500 x 76mm /STFP60 500 x 500 x 76mm /STFP90 700 x 500 x 76mm
B
A
C
STFP60 fold-up solar panel shown below
Opening and setting up the
fold-up solar panel
Unclip the two buckles either side of the carry
handle and carefully open both sides of the
fold-up solar panel taking care not to over stress
the hinges.
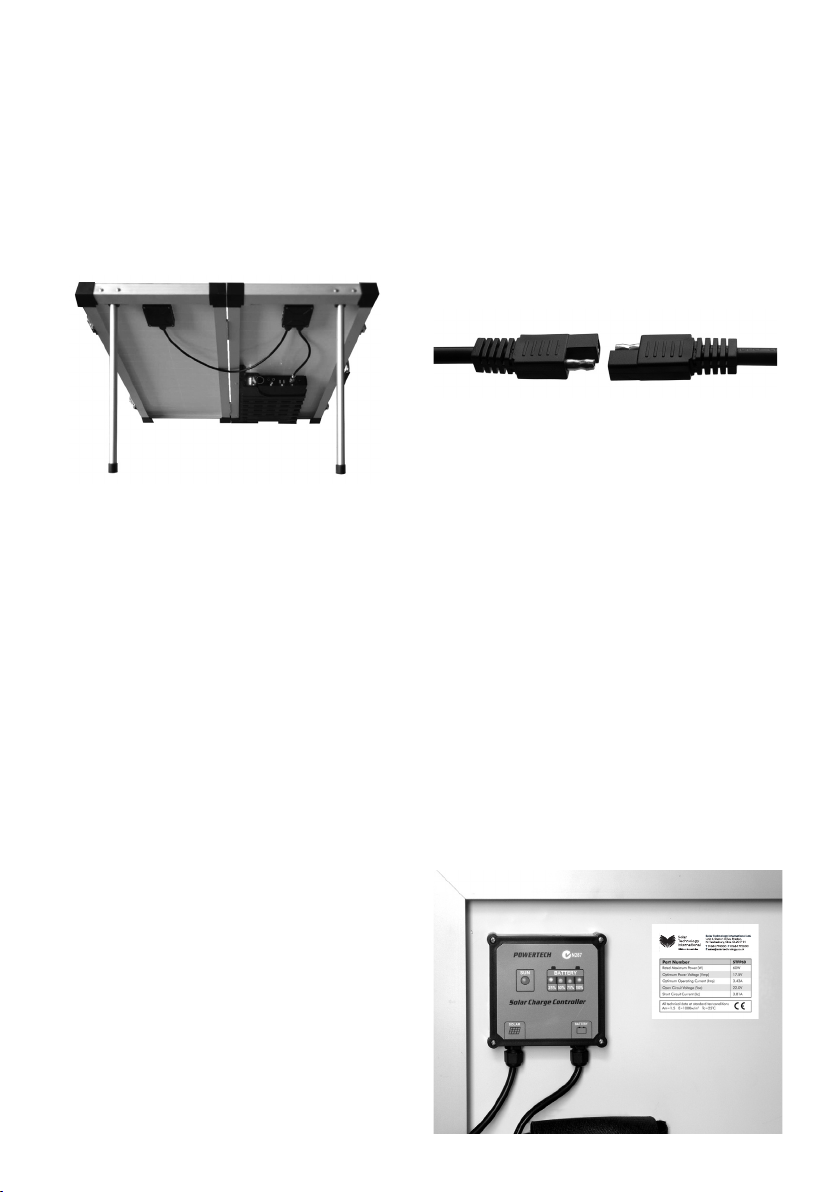
Depending on the ground you may wish to either
position the fold-up solar panel with its solar
cell facing down or on its edge so the charge
controller is uppermost.
On the top of each solar panels frame, you will
see the leg to support the solar panel. Pull the
base of the leg outward to its maximum position
and locate the solar panel in the desired location.
Tips on solar performance
If the legs are positioned at their maximum
adjustment the angle is ideal for UK / European
use for Spring, Summer and Autumn. If you
intend to use the fold-up solar panel in the
Winter the angle of the solar panel should be
steeper. What you are trying to achieve is a right
angle strike from where the sun is to the solar
cell surface.
Solar production will always be at its best during
the hours of 10am and 3pm so ensure the fold-up
solar panel is facing South during this period.
Connecting the fold-up solar panel
to a battery
Remove the cable bundle from the bag on the
back of the fold-up solar panel and run this to a
point close to the battery. Now connect either
the crocodile or 12v auto plug cable extension
direct to the battery or into a 12v auto socket.
Either extension can be left permanently fixed
to a battery or it may be preferred to cut the clips
from the cable and replace with ring terminals so
a more secure battery connection can be formed.
Ensure the correct battery polarity is observed.
We use DC cable which is colour coded Red for
Positive (+) and Black for Negative (–).
Once the extension cable is securely attached
to the battery connect it to the fold-up solar
panel cable, which is keyed ensuring it cannot be
connected in the wrong polarity. The connector
joining the fold-up solar panel cable to the
extension cable is fully water resistant so can be
positioned in wet grass etc – but do ensure it is
never submerged in liquid.
In addition to the afore mentioned extension
cables, the fold-up is also supplied with a female
12v auto socket cable extension, which is useful
should you wish to extent the length of cable
from the panel to the battery.
Charge controller
The fold-up solar panel has an integrated charge
controller and its job is to ensure the fold-up
solar panel does not overcharge the battery and
to prevent reverse current drain during heavily
over cast conditions or at night.
When the fold-up solar panel is connected to a
battery the red ‘Sun’ LED will start to flash. This
is indicating that the management system in the
fold-up solar panel is checking the battery status
before it starts to charge it. If the battery is ready
to receive a charge the ‘Sun’ LED will change to
a constant light after a short while and the green
LEDs in the ‘Battery’ illustration will indicate the
approximate level of charge in the battery. If the
battery is already fully charged the ‘Sun’ light will
continue to flash and so will all four of the green
LEDs in the ‘Battery’ illustration. In this instance
the solar panel can be safely left connected to
the battery as its output will be automatically
switched to trickle mode and thus cannot
overcharge the battery.
LED Notes
1. ‘Sun’ LED is off – the light is not sufficiently
strong enough to allow charging to
commence – ensure the fold-up solar panel
is outside and directed towards the sun.
2. ‘Battery’ illustration LED 1 has a slow flash –
indicates the battery is in a very discharged
condition – continue to leave the fold-up
solar panel connected until the battery is
fully charged.
Joining multiple fold-up
solar panel systems
It is possible to join multiple fold-up solar
panel systems to charge the same battery
or a bank of batteries. Please email
support@solartechnology.co.uk or call
(44) 01684 774000 for a free technical
information sheet called ‘Creating a Solar Array’
Care and Maintenance
The fold-up solar panel is designed for outside
use but some of the components used in the
manufacture of the support stand will deteriorate
if care is not taken. Therefore, after use please
ensure the fold-up solar panel is dried and
allowed to ‘air’ for a day or two. Once completely
dry, extend both legs of the stand and spray
WD40 or similar onto the legs. Close the fold-up
solar panel and store in its carry bag.
Warranty
This product is supplied with a 10 year warranty
against product defect. In addition the solar
cells have a performance warranty of 20 years,
that being that by year 20 the cell output will be
no less than 80% of its new value. In other words,
whilst we recognise that over time performance
from our solar cells will reduce, this product will
not reduce by any more than 20% over 20 years.
In the event of a warranty claim please contact
Solar Technology International Ltd,
Units 4–6 Station Drive, Bredon,
Gloucestershire GL20 7HH UK
Tel (44) 01684 774000
Email support@solartechnology.co.uk
All warranty claims will be fully repaired or
replaced at our expense including the cost or
return postage but the cost to ship the faulty
item to us must be borne by the customer. All
warranty work can only be completed with a
valid proof or purchase.
This warranty is transferable to new future
owners but only when the original proof of
purchase can be provided.
Solar Technology International Limited
Unit 6, Station drive, Bredon GL20 7HH
We want your photos and videos!
Here is your chance for you and your portable Fold-Up solar panel to be a star! Just
send in pics or videos of you and your Fold-Up in a great location and if selected we will not only give you
ever lasting recognition on our online favourite users wall of fame but we will send you a Freeloader Sixer,
6000mAH solar power bank worth £70 completely free!
Please send to hello@solartechnology.co.uk including your address details and best of luck!
Note – we cannot guarantee to publish every entry and only those selected by our marketing department
for publication will be awarded a Sixer. By providing your images you automatically grant us the right to use
these images or videos howsoever we see t.

This manual suits for next models

3

Other Solar Technology International Solar Panel manuals

Solar Technology International PV Logic Flexi User manual

Solar Technology International

Solar Technology International PV Logic Flexi User manual

Solar Technology International PV Logic Flexi User manual

Solar Technology International

Solar Technology International PV Logic Flexi User manual

Solar Technology International PV Logic STP005 User manual

Solar Technology International

Solar Technology International PV Logic STP005 User manual

Solar Technology International SolarMate Arena 2 Light User manual

Solar Technology International

Solar Technology International SolarMate Arena 2 Light User manual

Solar Technology International PV Logic MHD Flexi User manual

Solar Technology International

Solar Technology International PV Logic MHD Flexi User manual

Popular Solar Panel manuals by other brands

HydroLynx Systems 5033-XX instruction manual

HydroLynx Systems

HydroLynx Systems 5033-XX instruction manual

Eversola ES-M-Abcp Series Installation & maintenance

Eversola

Eversola ES-M-Abcp Series Installation & maintenance

Avidsen 114375 manual

Avidsen

Avidsen 114375 manual

McShine 1480029 instruction manual

McShine

McShine 1480029 instruction manual

Kyocera KC-120-1 installation manual

Kyocera

Kyocera KC-120-1 installation manual

Wasserstein R03 user manual

Wasserstein

Wasserstein R03 user manual

Nedap PowerRouter PR30S Application guideline

Nedap

Nedap PowerRouter PR30S Application guideline

Monzana 108891 instructions

Monzana

Monzana 108891 instructions

Nature Power 55120 user manual

Nature Power

Nature Power 55120 user manual

Ozroll SOLAR PRO II manual

Ozroll

Ozroll SOLAR PRO II manual

ACOPOWER HY-SPKP-400W40A user manual

ACOPOWER

ACOPOWER HY-SPKP-400W40A user manual

Sunflare PowerFit20 installation instructions

Sunflare

Sunflare PowerFit20 installation instructions

Kyocera KD200-54 P Series datasheet

Kyocera

Kyocera KD200-54 P Series datasheet

Bosch c-Si P 48 Installation and operation manual

Bosch

Bosch c-Si P 48 Installation and operation manual

COMFORTPOOL CP-80021 Installation & operation manual

COMFORTPOOL

COMFORTPOOL CP-80021 Installation & operation manual

sylber CFS-25/4 instruction manual

sylber

sylber CFS-25/4 instruction manual

Projecta SPP160K quick start guide

Projecta

Projecta SPP160K quick start guide

YOSHINO SP200 user manual

YOSHINO

YOSHINO SP200 user manual

manuals.online logo
manuals.online logoBrands
  • About & Mission
  • Contact us
  • Privacy Policy
  • Terms and Conditions

Copyright 2025 Manuals.Online. All Rights Reserved.