solarcentre FALMOUTH User manual
USER GUIDE
Thank you for choosing the Falmouth USB Solar Festoon Lights. Please read these instructions carefully
before you begin.
HOW THE LEAF WORKS
Leaf is one of the most advanced solar panel systems currently available for home solar light setups.
During the day the sun’s rays are absorbed by the Leaf’s solar panel which charges the 18650 Lithium-ion
battery. After dark, the battery provides power for the light. Leaf has been designed to work year-round
using solar power alone, but you can also fully charge Leaf’s battery (or batteries) quickly and easily by using
the supplied USB-C cable (see ‘USB charging’ below).
BEFORE YOU BEGIN
Although not essential, we thoroughly recommend fully charging your Leaf battery via USB before enjoying
LEAF LAYOUT
TROUBLESHOOTING
Solar lights won’t turn on when it is light!
light, but you are outside during the day or you are in a lit room, you will need to trick the solar panel into
thinking it is dark by covering the solar panel completely.
Reality check...
The Leaf has been designed to work year-round in the UK using solar power alone so long as it is in a good
enough location to charge and so long as the weather isn't too dull for too long. We use a simple formula
based on how much power the solar panel can produce each day versus how much power the LEDs
consume after dark. We then factor in the average amount of sun hours in the UK (not much) and an
average customer solar panel location. Sadly, there are two things we can’t control. 1. The weather. 2.
Where the customer decides to position their light. There will be dull periods in every year where even the
best positioned and best performing lights will struggle, so if you are looking for a product that will light up
all night, every night, no matter where the panel is placed and no matter what the weather does, then solar
lights are probably not for you. If you encounter any issues with a bulb not lighting up, please
double-check that it has been properly screwed into its holder.
Location, location, location!
Solar panels positioned in clear south-facing locations always perform best, but we know that is not always
desirable even if it is achievable which is why we have added USB charge, Powersaving and two extra battery
a textbook solar-friendly location. So long as the solar panel gets reasonable direct sunlight through-out
reasonably consistent winter performance then you will need an unshaded south-facing spot and/or be
prepared to USB charge.
The bottom line
We have been selling and designing solar lights for 16 years now and in our experience solar lights that work
are hardly ever faulty! That might seem like we’re stating the obvious, but it is so true. Lights that only work
for half an hour after dark or lights that only turn on occasionally are just struggling to get enough charge
and then turn it back on and see how long it works for that night - or USB charge if you can.
Another thing to look out for is nearby light. Light coming from another outdoor light or even light coming
from inside a house can be enough to stop a solar light from turning on automatically. You can test that by
completely covering the solar panel to see if it then turns on.
Ultimately, if your light doesn't work after a few sunny days in a completely unshaded spot, or after a full USB
charge and you have tested for nearby light interference, you may well have a very rare fault so please
contact your retailer or contact us on the details below.
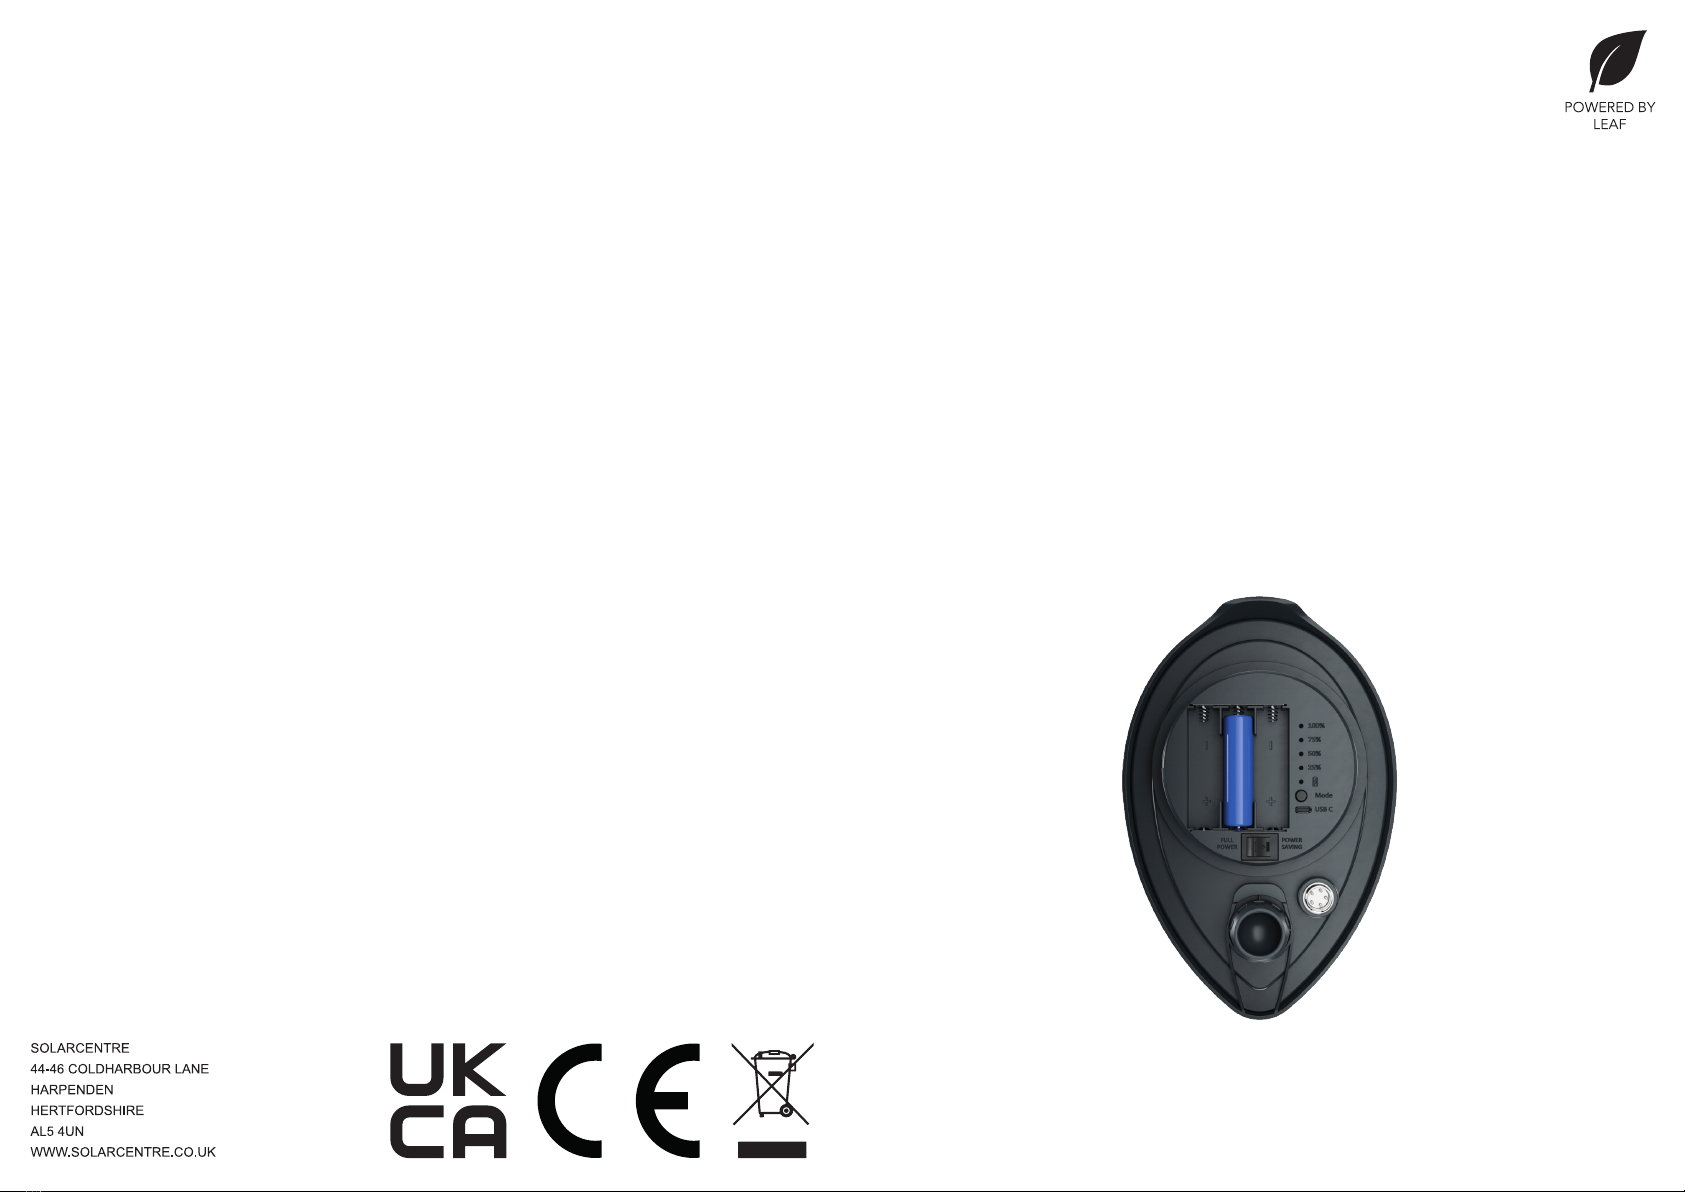
5. USB CHARGING PORT
Use the supplied USB-C lead to speed
charge your Leaf battery by plugging it
into the USB port on your computer, or
by using a USB wall plug adaptor. Do not
leave your Leaf unattended when it is
charging by USB.
2. POWER SWITCH
the lights at full brightness. Pressing the
half brightness which doubles runtime.
Centring the switch on O will turn the
charge.
3. LIGHT CONNECTOR
5-pin connector to connect your
Chester light to your Leaf solar panel.
1. BATTERY BAYS
Your Leaf comes supplied with a single
18650 battery, but you can add one or
two more batteries to either double or
triple your total charge capacity.
6. MODE BUTTON
This button does not have a function on
the Falmouth Festoons. Stay tuned for
future updates that will bring further
possibilities.
7. USB CHARGE INDICATORS
The charge indicator lights let you know
exactly how much charge your Leaf
battery has.
4. BALL JOINT SOCKET
Socket for ball joint which attaches to
your stake or wall/deck mount
FALMOUTH
SOLAR USB FESTOON LIGHTS
6
7
5
1
4
3
2

USB CHARGING
See diagram on previous page. To USB charge the battery simply unscrew the cap on the underside of the
Leaf, insert the smaller end of the supplied USB-C cable into the USB charging port and the large end into
a USB wall plug adapter or a USB port on your computer. Please note that your computer needs be
powered on during USB charging. The Leaf has 5 charge indicator lights which let you know how much
charge the Leaf battery has. Charging times vary, but typically takes around 4 hours with a single battery
installed. N.B Please do NOT leave your Leaf unattended while it is charging and disconnect the Leaf once
you reach 100% charge.
ADDITIONAL BATTERIES
available. These two spare bays give you the option to add one or two additional batteries which will double
or triple the total charge capacity of the unit. Please ensure that any additional batteries used match the
mAh rating of the battery supplied. You can upgrade all the batteries to a higher mAh so long as all the
batteries in use have the same mAh rating. We recommend fully charging the unit by USB when new
batteries are added.
SETTING UP YOUR LEAF SOLAR PANEL & FALMOUTH FESTOON LIGHTS
Before you begin, please remember that there is 3m of cable between your Leaf solar panel and the
festoon lights.
POSITIONING YOUR SOLAR PANEL
Before positioning your Leaf solar panel please think very carefully about the location you intend to put it in.
Your Leaf can be charged quickly via USB so it can work in locations that get little or no sunlight, but a good
solar panel location will mean you will hardly ever need to rely on USB charging. Leaf panels that are
mounted higher up in south, south-east or south-west facing locations always perform best. Always try to
avoid north facing or shaded areas that are obstructed by buildings, trees, fences, sheds, bushes or the
shadows that these create.
STAKE MOUNTING YOUR SOLAR PANEL
Before attempting to push the stake into the ground, please ensure that the Leaf panel is not attached and
that the ground is not too hard. Never try to install the stake by pushing down onto the Leaf solar panel. Any
damage caused to your Leaf as a result of attempting to drive it into hard ground will be obvious to your
soften the ground and make a hole using a strong metal object before driving your stake into that hole.
Once the stake is securely in place, gently slot the Leaf onto it and use the ball socket to tilt the solar panel.
WALL, FENCE OR DECK MOUNTING YOUR SOLAR PANEL
Attach the wall mount to your wall, fence or decking using the supplied screws and screw-plugs. Once your
wall mount is in place, attach the Leaf to the mount and use the ball socket to tilt the solar panel.
TILT
Your Leaf solar panel can be tilted vertically and horizontally to achieve the perfect angle to catch sun. To
make adjustments, loosen the ball socket, make your adjustments and then tighten the ball socket to
secure it in that position.
INSTALLING YOUR LIGHTS
During the installation of your festoon lights, make sure to securely fasten the cable in place using the
clips provided on the bulbs. Additionally, if you encounter any issues with a bulb not lighting up, please
double-check that it has been properly screwed into its holder. Please take extra caution when installing
your Falmouth Festoon lights as the bulbs are made of glass.
OPERATING INSTRUCTIONS
POWERSAVING MODE
Powersaving mode is a good option if you don’t have a great solar panel location available or you aren’t able
to USB charge. Some users might select Powersaving mode simply because they prefer a slightly dimmer
WATER INGRESS
protection is not unlimited. Once your Leaf is setup and you have adjusted any settings, always ensure that
the screw cap and cable connector have been fully tightened to avoid water ingress. Please ensure that
your Leaf solar panel is correctly installed using either the ground stake or wall mount and not left lying on
the ground or anywhere else where water can accumulate. Failure to follow this guidance will invalidate your
warranty.
REPLACING THE BATTERY
before it
replacing the battery will resolve the problem (please see troubleshooting). When it is time to replace your
battery remove the screw cap from the underside of the solar panel, locate the battery compartment and
remove the battery. Please dispose of the dead battery responsibly and in accordance with your local
waste disposal guidelines.
CONNECTING YOUR LED LIGHT STRING TO THE SOLAR PANEL
Once you Leaf is installed and your Festoons are in place, connect the Falmouth’s to the Leaf via the 5-pin
connector. Please take care to ensure the pins are correctly aligned before pushing in the connector. Once
the connector in place, fully tighten the valve to secure the connection.
Other solarcentre Outdoor Light manuals

solarcentre
solarcentre GUILDFORD User manual

solarcentre
solarcentre LANCASTER User manual

solarcentre
solarcentre MINI LONDON SC2326 User manual

solarcentre
solarcentre BERKELEY SC2347 User manual

solarcentre
solarcentre V-Light Pro User manual

solarcentre
solarcentre GUARD TWIN User manual

solarcentre
solarcentre Edinburgh User manual

solarcentre
solarcentre GRANTHAM XL User manual
Popular Outdoor Light manuals by other brands


Gama Sonic
Gama Sonic 301iST60822 instruction manual

Gama Sonic
Gama Sonic GS-97B-F instruction manual

LEGRAND
LEGRAND HPM ELLIPTICA LBL034KWE instruction sheet

kobi
kobi Solar LED MHCS 10W manual

shada
shada LED's light OUTDOOR Series quick start guide

Saxby Lighting
Saxby Lighting EL-40094 Instruction leaflet


