Solaris MINI DERBY 3 User manual

MINI DERBY 3 USER MANUAL
LCRT4KO
NAME
Mini Derby 3
Power Cord
User manual
Packing Case
QTY
1
1
1
1
Unpacking Instructions
1
Dear user,
Thanks for choosing our LED device, believing this brand new product will bring you unlimited marvel
and happiness. Before operating this device, please read this manual thoroughly, and retain it for
future reference.
Read Manual before Operation
Please note the warnings in bold which will ensure the safe and smooth operation. These
warnings are important to a certain extent.
Attention! Indicates a skill or other useful information for special situations.
Warning Data
As receiving a fixture, carefully unpacking the carton, checking contents to ensure that all parts
are in good condition. Informing the shipper immediately and retaining packing material for
inspection if any parts damaged from shipping or device damaged. Keeping packing materials
as evidence for shipper’s confirmation.
Unpacking Instructions
This unit is in perfect condition before delivery, please check all accessories when unpacking
the unit. User should follow this user manual to operate this unit, and make sure that you are
clear on all laser safety information and unit operation before power it on. Any wrong operation
will make this unit out of warranty.
Carefully moving after receiving it, checking whether there is any damage from shipping, and
all the accessories in it.
Attention!
Warning!
If the external flexible cable or cord of this luminaire is damaged, itshall be
replaced by a special cord or cord exclusively available from the manufactur
eror his service agent. Shields, lenses or ultraviolet screens shall be changed if they have
become visibly damaged to such an extent that their effectiveness is impaired, for example by
cracks or deep scratches.
The lamps shall be changed if it has become damaged or thermally deformed.
Important! Indicates important information to protect personnel from laser incident or injury.
Caution! Prevent damage or injury from incorrect operation.

Safety Instructions
2
Safety Instructions
0.2m
To protect the environment, please try to recycle the packing material as much as possible.
The projector is for indoor use only, IP20. Use only in dry locations. Keep this device away
from rain and moisture, excessive heat, humidity and dust. Do not allow contact with water
or any other fluids, or metallic objects
Don’t throw this product away just as general trash, please deal with the product follow the
abandon electronic product regulation in your country.
Locate the fixture in a well ventilated spot, away from any flammable materials and/or
liquids. The fixture must be fixed at least 20cm from surrounding walls
To avoid condensation to be formed inside, allow this unit to adapt to the surrounding
temperatures when bringing it into a warm room after transport. Condense sometimes
prevents the unit from working at full performance or may even cause damages
Don’t cover any ventilation openings as this may result in overheating.
Don’t install it on flammable object.
◆
◆
◆
◆
◆
◆
◆
Never expose the lens to direct sunlight, even for a short period, This may damage the light
effect or even cause fire!
Safety Warnings
Always connect the product to a grounded circuit to avoid the risk of electrocution.
Always disconnect the product from the power source before cleaning or replacing the fuse.
Avoid direct eye exposure to the light source while the product is on.
Make sure the power cord is not crimped or damaged.
Never disconnect the product from power by pulling or tugging on the cord.
If mounting the product overhead, always secure to a fastening device using a safety cable.
Make sure there are no flammable materials close to the product when operating.
Do not touch the product’s housing when operating because it may be very hot.
◆
◆
◆
◆
◆
◆
◆
◆
Keep this User Manual for future use. If you sell the product to another user, be sure to give
this document to the next owner.
Don not use it when maximum ambient temperature is higher than 40 degree,
Unplug the unit when it is not used for a longer time or before replacing the bulb.
Don’t open the top cover to avoid unit damage.
Please use the original packing when the device is to be transported.

Overhead Rigging
3
Attention! The installation must be carried out by qualified service personal only. Improper
installation can result in serious injuries and /or damage to property. Overhead rigging
required extensive experience! Working load limits should be respected, Certified
installation materials should be used, the installed device should be inspected regularly for
safety.
Make sure the area below the installation place is free from unwanted persons during
rigging, de-rigging and servicing.
Locate the fixture in a well ventilated spot, far away from any flammable materials and/or
liquids. The fixture must be fixed at least 20cm from surrounding walls
The device should be installed out of reach of people and outside areas where persons
may walk by or be seated.
The device should be well fixed; a free swinging mounting is dangerous and may not be
considered!
Do not cover any ventilation opening as this may result in overheating
Before the first time use, it must be inspected by professional staff to make sure safety,
inspection regularly every year.
Cable spec.:
Cable(EU)
Brown
Light blue
Yellow/Green
Cable(US)
Black
White
Yellow/Green
Pin
Live
Neutral
Earth
International
L
N
Please use the attached power, note that power
voltage and frequency are the same as the marked
voltage and frequency of device when connecting
power. Every device’s power should be connected
separately, so that device can be controlled
individually.
AC Power
L E N FUSE: 5×20mm
250V 1A slow
◆
◆
◆
◆
◆
◆
Before rigging make sure that installation area can hold the 10 times weight of device. Using
the steel rope which can hold 12 times weight of device, through the eye-bolt for assisting
hang installment.
Clamp
Safety-rope
Adjust Angle

Product Installation/Product Mess
4
Connection between laser lights and DMX must use the shied cable of diameter more than
0.5mm. Please use the attached 3 pin XLR plug/socket to connect the DMX output/input
interface. The connection between socket and cable as below( note the plug/socket’s 3
pin number and position).
Note, XLR plug/socket’s 3pin can not be touched by inner hull, connection between pins is
not allowed. Except above connection, XLR plug/socket can not be connected with XLR
control line. Device receives international standard DMX512(1990) control signal.
When using standard DMX512 control signal, the last device’s output
interface must be connected to a DMX plug. This plug is putting a 120 ohm
resistance between “canon” plug’s 2 pin and 3 pin. Showing as below pic.
Sticking this plug into the last device’s signal output interface, it will avoid the
interference during the process of signal transmission.
PIN3
PIN2
DMX-512 connection
DMX-output
XLR mounting-sockets(rear view):
DMX-input
XLR mounting-plugs(rear view):
1-Shield
2-Shield(-)
3-Shield(+) 12
3
1
2
3
◆
◆
◆
Product mess
261mm
141.6mm
186.8mm
186.5mm
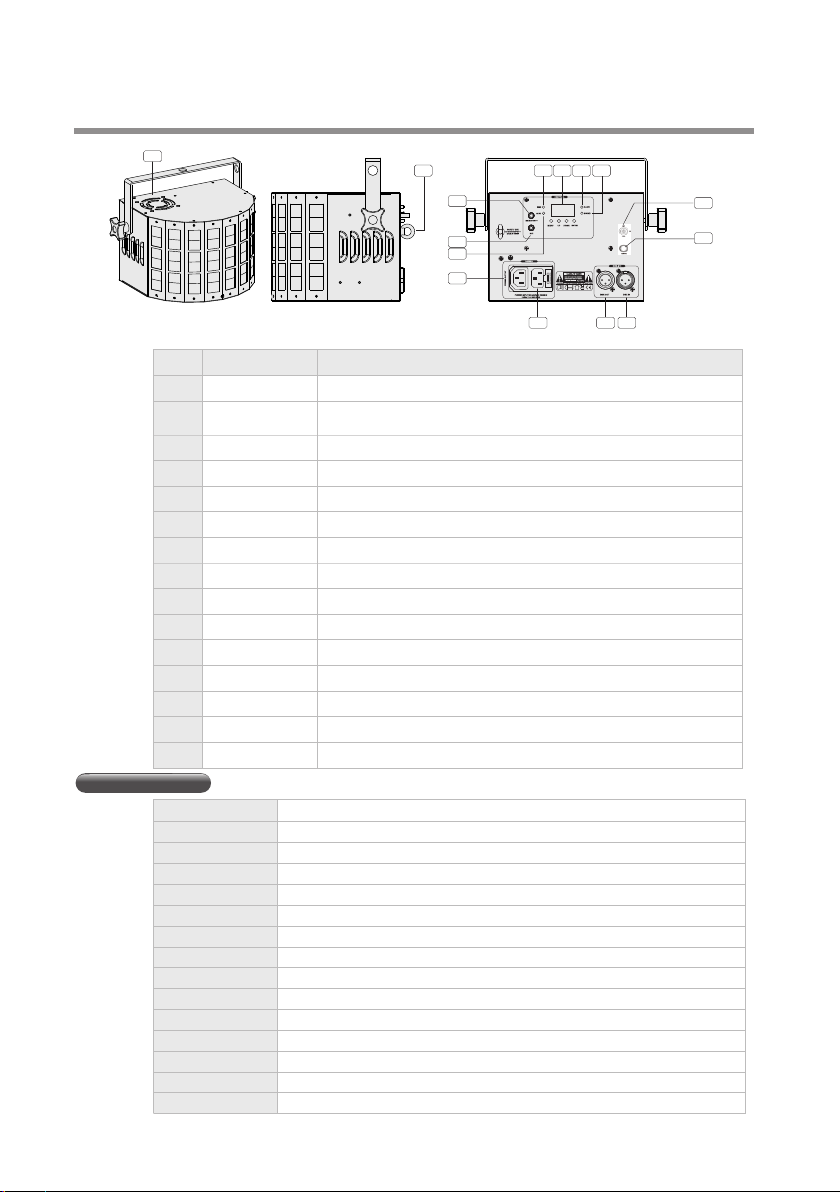
Operation instructions /Product Parameter
5
Name
Insurance rings
NO
1
FUNCTION
Connecting wire rope to prevent illegal operation and fall
1 4 5
6
78
10
9 11 12
3
2
13
Specifications
Model
Size
Weight
Power
Voltage
Laser Power
Laser Class
Red LED
Green LED
Blue LED
White LED
DMX channels
Auto
Sound
Packing Data
Mini Derby 3
190 x 258 x 182 mm
2 kg
25W
100-240V 50/60Hz
R 100mW 650nm G 30mW 532nm
Class 3R
3W*1pcs
3W*1pcs
3W*1pcs
3W*1pcs
2/8
1
1
4pcs/CTN
Changing sound sensitivity by potentiometer
In DMX model, red indicate light on after DMX connected,
In slave model, yellow indicate light on
In Auto model, blue indicate light on.
In sound model, green indicate light on.
For setting model
Power input socket, built-in protective tube and spare tube
Power output connect with next light
3PIN female XLR interface,for DMX communication
3PIN male XLR interface, for DMX communication
Cooling and never cover this fan outlet
Laser ON/OFF,only for professional staff
For connecting interlock button and emergency closing light
Receiving the audio signal through a microphone, and positive
response to the intensity by the potentiometer
Sound sensitivity
DMX indicator
SLAVE indicator
AUTO indicator
MUSIC indicator
LED display
Power input
Power connection
DMX output
DMX input
Cooling fan
Key Switch
remote connector
Microphones
3
4
5
6
7
8
9
10
11
12
13
14
15
2
14
15

Menu operating instruction
6
Once after every power on laser, the VERSION and MANUFACTURE INFORMATION will be shown in
LED monitor of rear panel. When laser is powered on, LED monitor on rear panel shows the current
operating standalone mode or DMX address of DMX mode. With help of LCD control panel, is very easy to
set and change the operating mode of laser. After every resetting and saved, the new mode information will
be shown on LED monitor at next power。
Model choice or back to the last function.
MENU
Confirm, enter into the deeper menu. Press it to save the chosen model or DMX initial add.
ENTER
For changing DMX initial add or function value
UP DOWN
Mini Derby 3
MENU
MENU/UP
DOWN
MENU ENTER
MENU ENTER
MENU ENTER
ENTER
MENU
MENU
MENU/UP
DOWN
MENU/UP
DOWN
MENU/UP
DOWN
MENU/UP
DOWN
MENU/UP
DOWN
MENU ENTER MENU ENTER MENU ENTER MENU ENTER MENU ENTER
MENU ENTER
ENTER
MENU ENTER
MENU ENTER
MENU ENTER
MENU ENTER
MENU ENTER
ENTER
MENU ENTER
MENU ENTER
ENTER
MENU

Menu operating instruction
8
AutM
AutP
AutL
S.01→S.99
SouM
SouP
SouL
CoLo
R/G/B/UXXX
S.00→S.99
2Ch/8Ch
dXXX
Slav
Auto mix show
Auto derby show
Auto laser show
Speed of effects, 01: the slowest, 99: the fastest
Sound mix show
Sound derby show
Sound laser show
Color manual adjustment
LED color setting
Strobe speed; S.00: all on, S.01: the slowest, S.99 : the fastest
Choosing DMX channel modes
Setting channel address
Enter into slave mode
Aut
Sou
CoL
DMX
SLA
SYS
Auto、AutP、AutF、AutM
Soud、SouP、SouF、SouM
ST01-ST18
Built-in
Programs
ENTER
UP DOWN
MENU
Press UP/DOWN to choose different effects,
press ENTER to confirm
LED displayer will play S00—S99,from S00 to
S99,speed becomes faster and faster
Press UP/DOWN to set different speeds,
press ENTER to confirm
R000-R255、G000-G255、
B000-B255、W000-W255
Press UP/DOWN to choose different colors,
press ENTER to confirm
2Ch、d001-d509/d512
8Ch、d001-d510/d512
Press UP/DOWN to choose channels and addresses,
press ENTER to confirm
When choosing the SLAVE mode, through the
DMX signal cable, the machine will follow the
master’s built-in program mode
If the letters are twinkling on the screen, that means
the signal is not connected well,
please check the cables.
LED power-saving operation mode
vers shows the program version
test is the aging test program
rest is restoring the factory initial setup
Press UP/DOWN to choose different modes,
press ENTER to confirm
Note: In sound model, device will close light in 5 seconds automatically, if there isn’t any sound signal.
Light on until sound signal received.
Initial Setting
Functional description
LED display
LEDS
vers
test
rest
LED power-saving operation mode. ON:turn on nixie tube power-saving
mode; OFF:turn off nixie tube power-saving mode
Showing the program version
Aging test program
Restore the factory initial setup
Speed
setting
COLOR
setting
DMX mode
SLAVE
mode
System
setting
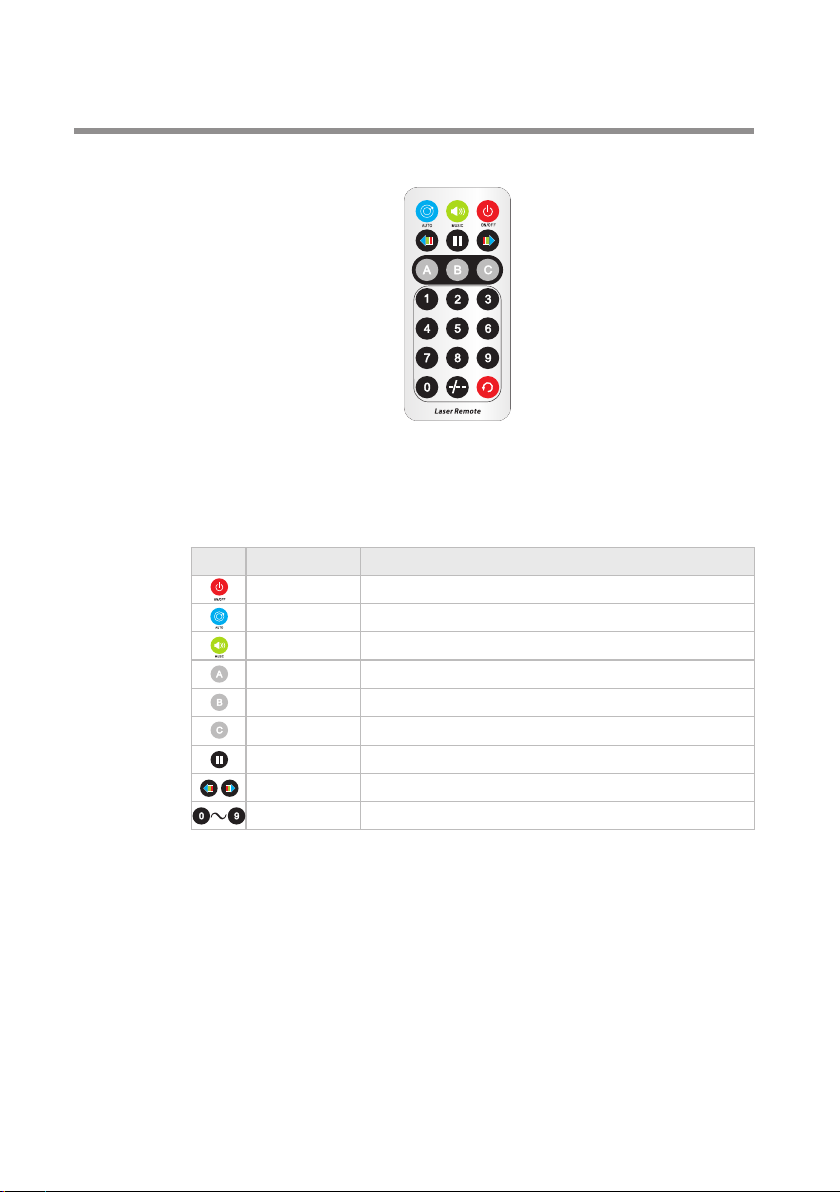
Remote Control Operation Instruction
9
Mini Derby 3
BUTTON
Power ON/OFF. When power on, press ON/OFF, light ON,
press again light OFF, circle as it.
ON/OFF
AUTO
MUSIC
no function
no function
no function
Pause
Color setting
Numeric keys
Press AUTO, enter into Auto mode, it will play Auto show randomly.
Press MUSIC enter into Sound mode, it will play Auto show randomly.
Program and color change will be paused, press again to continue play.
Press these two buttons to change color.
Program speed setting. 0 is the slowest, 9 is the fastest
BUTTON BUTTON
10

Mini Derby 3
11
This manual suits for next models
1
Table of contents
Other Solaris Lighting Equipment manuals


