Solax E-Traveller 180 Flex User manual

1
INTRODUCTION
Dear Users,
Thank you for choosing the E-Traveller 180 Flex or Ergo for your mobility needs. Please
ensure you read through this manual thoroughly before operating your E-Traveller so you can
become familiar with its features as well as its limitations and safety information.
If you still have some questions, please contact your reseller directly for further information and
guidance on the use and maintenance of your E-Traveller.
Contents
INTRODUCTION ..........................................................................................................................1
SPECIFICATIONS........................................................................................................................2
SPECIFICATION DIAGRAM ........................................................................................................3
SAFETY & OPERATION ..............................................................................................................4
General safety ........................................................................................................... 4
Getting into the Folding Electric Wheelchair .............................................................. 4
Driving your E-Traveller ............................................................................................. 4
Getting out of the E-Traveller..................................................................................... 5
Weight limited-Do not exceed or the warranty will be void ......................................... 5
When transporting the E-Traveller Flex or Ergo ......................................................... 5
PRECAUTIONS............................................................................................................................6
Batteries .................................................................................................................... 6
Fasteners .................................................................................................................. 6
Changes and Adjustments......................................................................................... 6
INSTALLATION & SETUP............................................................................................................7
CONTROLLER ...........................................................................................................................10
Controller and Driving Tips ...................................................................................... 10
BASIC OPERATIONS ................................................................................................................11
BATTERY CHARGING...............................................................................................................12
First charging method.............................................................................................. 12
Secondary charging method: ................................................................................... 13
More information...................................................................................................... 13
FREE-WHEEL MODE ................................................................................................................14
TRANSPORTING YOUR E-TRAVELLER ..................................................................................14
TROUBLESHOOTING................................................................................................................16
DIAGNOSTICS ...........................................................................................................................17
WARRANTY ...............................................................................................................................18
Disclaimer: Affiliates and partners cannot be held responsible for personal injury or property
damage resulting from the unsafe or improper operation or maintenance of the E-Traveller
electric wheelchair.
As part of our ongoing product improvement initiative, we reserve the right to change
specifications and design without notice. As a result, there may be minor differences
between your product and the photos, illustration, and instruction in this manual.

2
SPECIFICATIONS
Model
D11
Material
Aluminum alloy
Unfold Size 980*660*950 mm
Fold Size 330*660*810 mm
Loading Capacity 180 kgs
Motor 250W*2pcs brushless motors
Battery 24V 6AH*2 pcs lithium battery (1.5kg each)
Max Speed 6 KPH
Driving Range 22 km
Front Wheels 8" *1.25" PU solid wheels
Rear Wheels 12.5" *2.125" PU solid wheels
Climbing Slope
Max 8°
Charging Time
6-8 hours
Width of Armrest
510 mm
Seat Width
470 mm
Seat Depth
400 mm
Seat Height
Front 490 mm/ back 470 mm
Turning Radius
850 mm
Weight without Battery
Ergo: 27.3kg / Flex: 27.5
Weight with two Batteries
Ergo: 30.3kg / Flex: 30.5
Drive Model
Rear Drive
Braking System
Electromagnetic Brake
Locate serial number Seat back/
Armrests
Controller
Controller knob
Controller wire harness
seat cushion
Footrest
Front wheels
under push handle cushion
Controller
Push Handle
Backrest cushion
with storage bag
Shock absorption
springs
Fender
Rear wheels
Battery box CPU
Motors

3
51cm
47cm
66 cm
81cm
40cm
95 cm
SPECIFICATION DIAGRAM
98 cm

4
SAFETY & OPERATION
General safety
A.
Adjust the Electric Wheelchair to your personal comfort level as much as possible. This
can be done by adjusting the Tension Cords on the backrest and under the seat cushion.
B.
Take your time to learn how the E-Traveller works. We recommend doing this in an open
space without any obstacles or other people using the space. Once you feel comfortable
with the general operation of the E-Traveller, you can start using it in more confined spaces
and around other people.
C.
Practice transferring in and out of your chair. Determine what approach works best for you.
You may feel most comfortable during a front transfer or prefer to fold up an armrest and
slide in.
D.
Practice bending and reaching while seated in the E-Traveller. This will help you learn the
dimensions of your chair and in which situation you may have to ask for assistance.
E.
Always be aware of your surroundings.
F.
If you are faced with obstacles and are unsure if the E-Traveller can navigate these safely
try to find another way around.
G.
Make sure that electronic components such as the control panel and battery charger
remain dry and free of moisture. If these components happen to get wet, ensure they are
fully dry before attempting to use them.
H.
The E-Traveller seat is designed for comfort, and is not specifically made for pressure
relief; if you suffer from pressure sores, or if you are at risk that, please consult your
healthcare professional. The E-Traveller can be used with customized cushions.
I.
Before using your Portable Electric Wheelchair, make sure the Folding Electric Wheelchair
is operating smoothly. Check for any unusual noises, vibration, or a change in the ease of
use; if you detect a problem, get in touch with your retailer.
J.
Failing to maintain your Folding Electric Wheelchair could increase the risk of injury.
Getting into the Folding Electric Wheelchair
1. Before attempting to transfer, ensure the electric wheelchair is turned OFF, this will ensure
the electric wheelchair will not move upon touching the joystick.
2. You can transfer with the footrest up or down. However, it is NOT a step. If the footrest is
unfolded, ensure your place your feet next to it not onto it.
3. Ensure you don't place any weight on the joystick during transfer
4. Once onboard, make sure your feet are safely on the footrest.
Driving your E-Traveller
1. Be alert to the danger of motor vehicles on roads or in parking spaces.
2. At night or when it is hard to see, use reflective clothing and equipment.
3. The E-Traveller is designed for use on a firm and even surface such as concrete, asphalt or
indoor flooring. While you can use it on dirt roads and grassed areas, ensure the surface is
firm. Do not operate the electric wheelchair in sand, loose soil or over rough terrain, which
could damage wheels, bearings, axles or motors, or loosen fasteners.

5
SAFETY & OPERATIONS continued
Getting out of the E-Traveller
1. Make sure to bring your E-Traveller to a complete stop.
2. Turn off the power to avoid accidentally knocking the joystick and moving the wheelchair.
3. Raise the armrest so that you can conveniently exit your E-Traveller. Ensuring you put your
weight on the armrests, not the joystick.
4. Alternatively, you can choose to do a side transfer by fully lifting up one of the arms and
sliding onto another surface
Weight limited-Do not exceed or the warranty will be void
1. Never exceed a total weight of 180kg (total for the rider plus items carried).
2. Exceeding the weight limited is likely to damage the seat, frame or fasteners and may
cause severe injury to you or others.
When transporting the E-Traveller Flex or Ergo
1. Never sit in the E-Traveller while in a moving vehicle; an accident or sudden stop
may cause you to be thrown from the wheelchair.
2. Never transport the Folding Electric Wheelchair in the front seat of a vehicle as it
may move and interfere with the driver.
3. Always secure the Folding Electric Wheelchair so that it cannot roll or shift when
being transported in a vehicle.
4. The Folding Electric Wheelchair is NOT approved to be used with any tie-down
system, which is generally used to transport a seated user in a powered wheelchair
in a motor vehicle.
CAUTION: OPERATE SAFELY
Do not operate the E-Traveller in water of any kind.
Do not use the E-Traveller on staircase or escalators.
Do not use the E-Traveller for transport in a van or other vehicle that requires seatbelts
Do not over-reach while seated this could cause balance issue.
Do not exceed the weight limited total of 180kg for rider plus any items.
Always turn the E-Traveller OFF when entering or exiting the chair.
Practice operating your E-Traveller in a private and spacious area.

6
PRECAUTIONS
It is important to perform regular maintenance on your E-Traveller. This maintenance should
be carried out by a trained technician and will ensure longevity and safe operation of your
chair. Even a little cleaning now and again will go a long way to keep your device looking and
functioning like new.
Certified repair shops with trained professionals who specialize in electric wheelchairs and
scooters will be qualified to perform the service and maintenance on your Folding Electric
Wheelchair
We recommend you inspect your E-Traveller two or three times per year in the following
areas:
1. Frame: Tighten loose screws as necessary.
2. Wheels: Make sure they rotate easily. Significant resistance may require new bearings.
3. Armrest: Look for excessive wear or if they are loose.
Replacement parts and more major maintenance issues should be done by a professional.
Batteries
1. Batteries are special lithium batteries designed specifically for use in the E-Traveller
2. Read all battery instructions before attempting to change or charge batteries.
3. When you don' t use the E-Traveller for long periods of time, please charge the battery
every month to avoid the battery being damaged.
Fasteners
Many of the screws, bolts and nuts on the Folding Electric Wheelchair are special high-
strength fasteners. Replacing these fasteners with non-approved parts may result in
faulty operation and may cause harm to you or other people, therefore:
A.
Use fasteners that have been supplied by your local dealer.
B.
Using the correct tools, tighten any fasteners that become loose as soon as possible.
Changes and Adjustments
Never use 3rd party parts or make changes to your E-Traveller unless authorized in writing
by your retailer. Not doing so will void the warranty and may create a safety hazard.

7
Safe
INSTALLATION & SETUP
Your E-Traveller will arrive carefully packaged in a cardboard box.
1.
Open the top of the box then turn the box on the side for easier unpacking.
2.
The box will contain the below components
Chair, main assembly Charger with power cables Seat cushion
Lithium battery*2pcs
Safe belt
Battery direct charge
transfer cable
Battery serial
connection cable
3.
To unfold your E-Traveller, hold the push bar and use your other hand to pull the
bottom of the seat down towards the ground.
Grasp push bar Hold down seat to expand
8
INSTALLATION & SET-UP - continued
4.
Sit on the chair and Lean backwards. This ensures that the locking clip, located below the
seat to the rear of the chair, is locked in place. This step is very important!!!
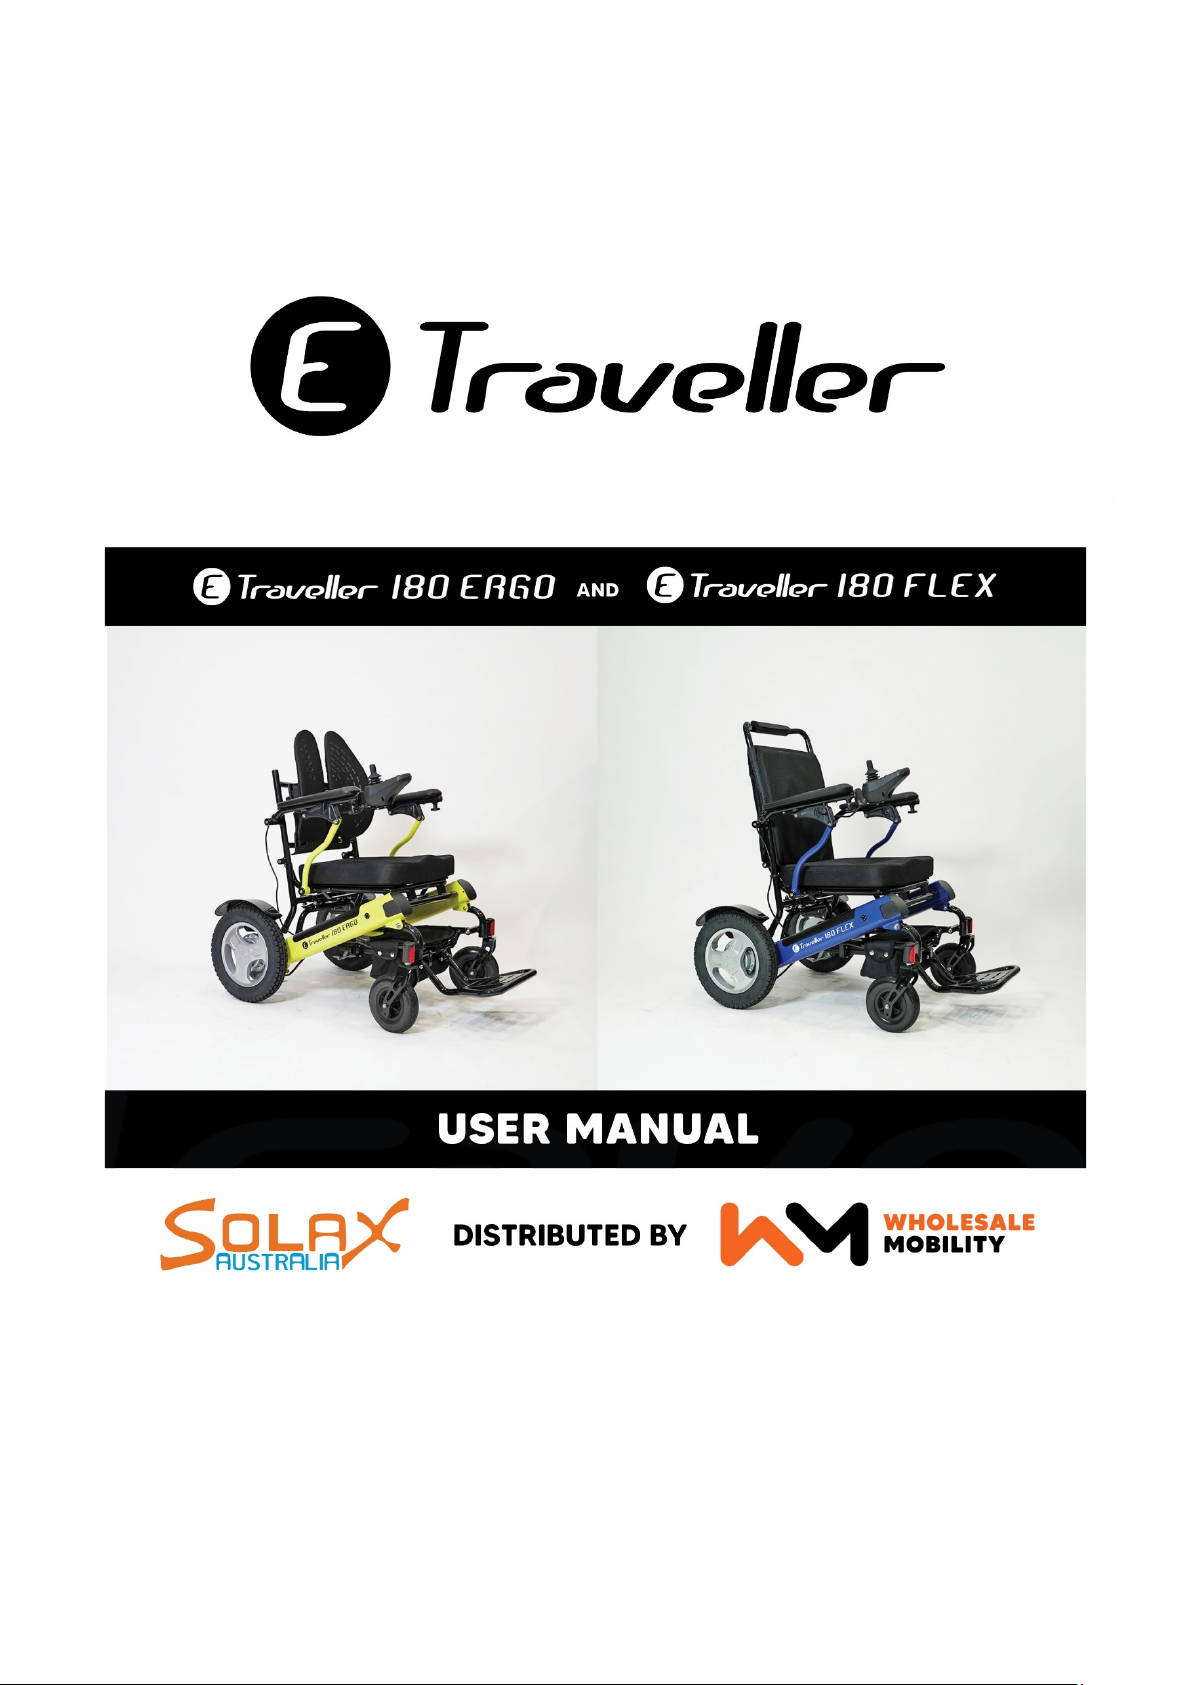
5.
Install the controller into the open slot on the armrest of the chair. This can be done on
either the right or left-hand side. Tighten knob located under the armrest to secure the
controller in place.
Slide Joystick Controller into armrest Secure joystick controller knob
6.
Connect the controller wire harness to the CPU wire harness. Take care to line up the
pins properly, follow the white error tips as a guide. Failing to follow this step carefully
can lead to bending or breaking the connectors and will cause damage to your E-
Traveller.
Note Make sure to line-up the white errors on the connector pins.
9
INSTALLATION & SET-UP – continued
7.
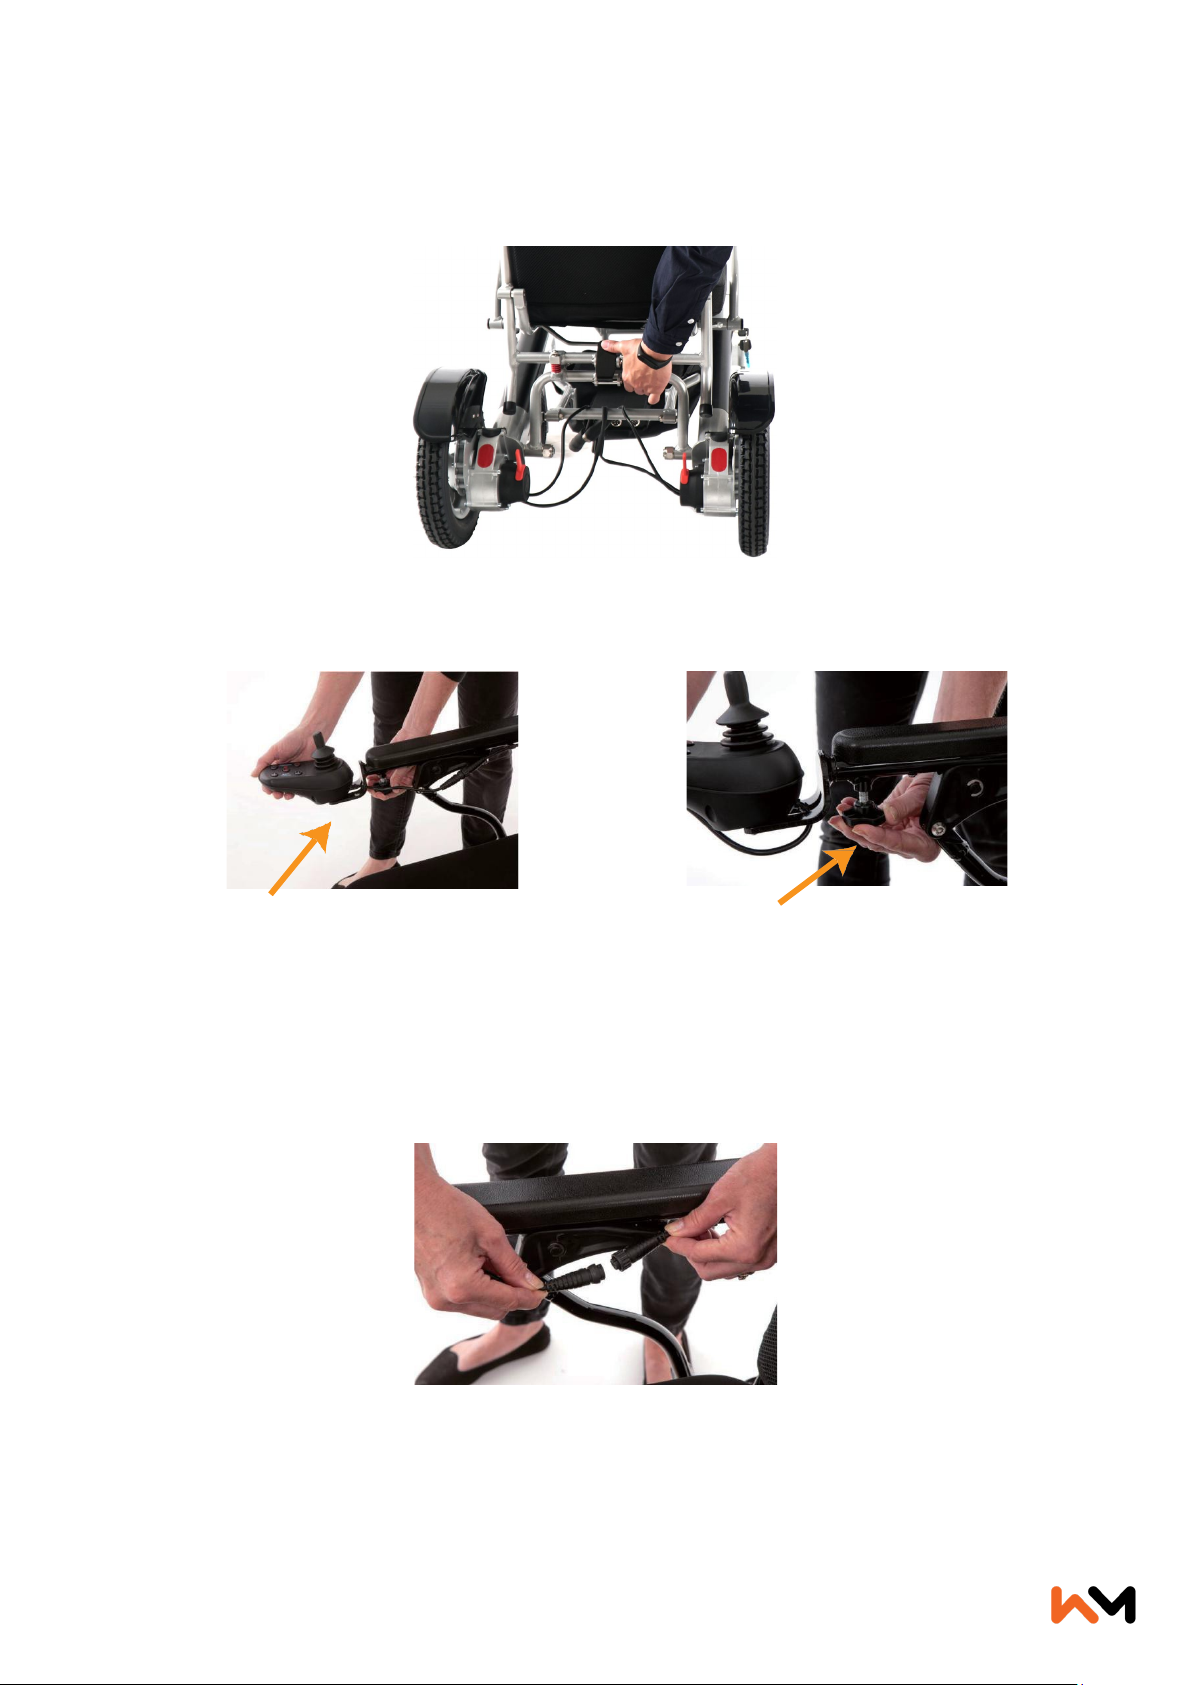
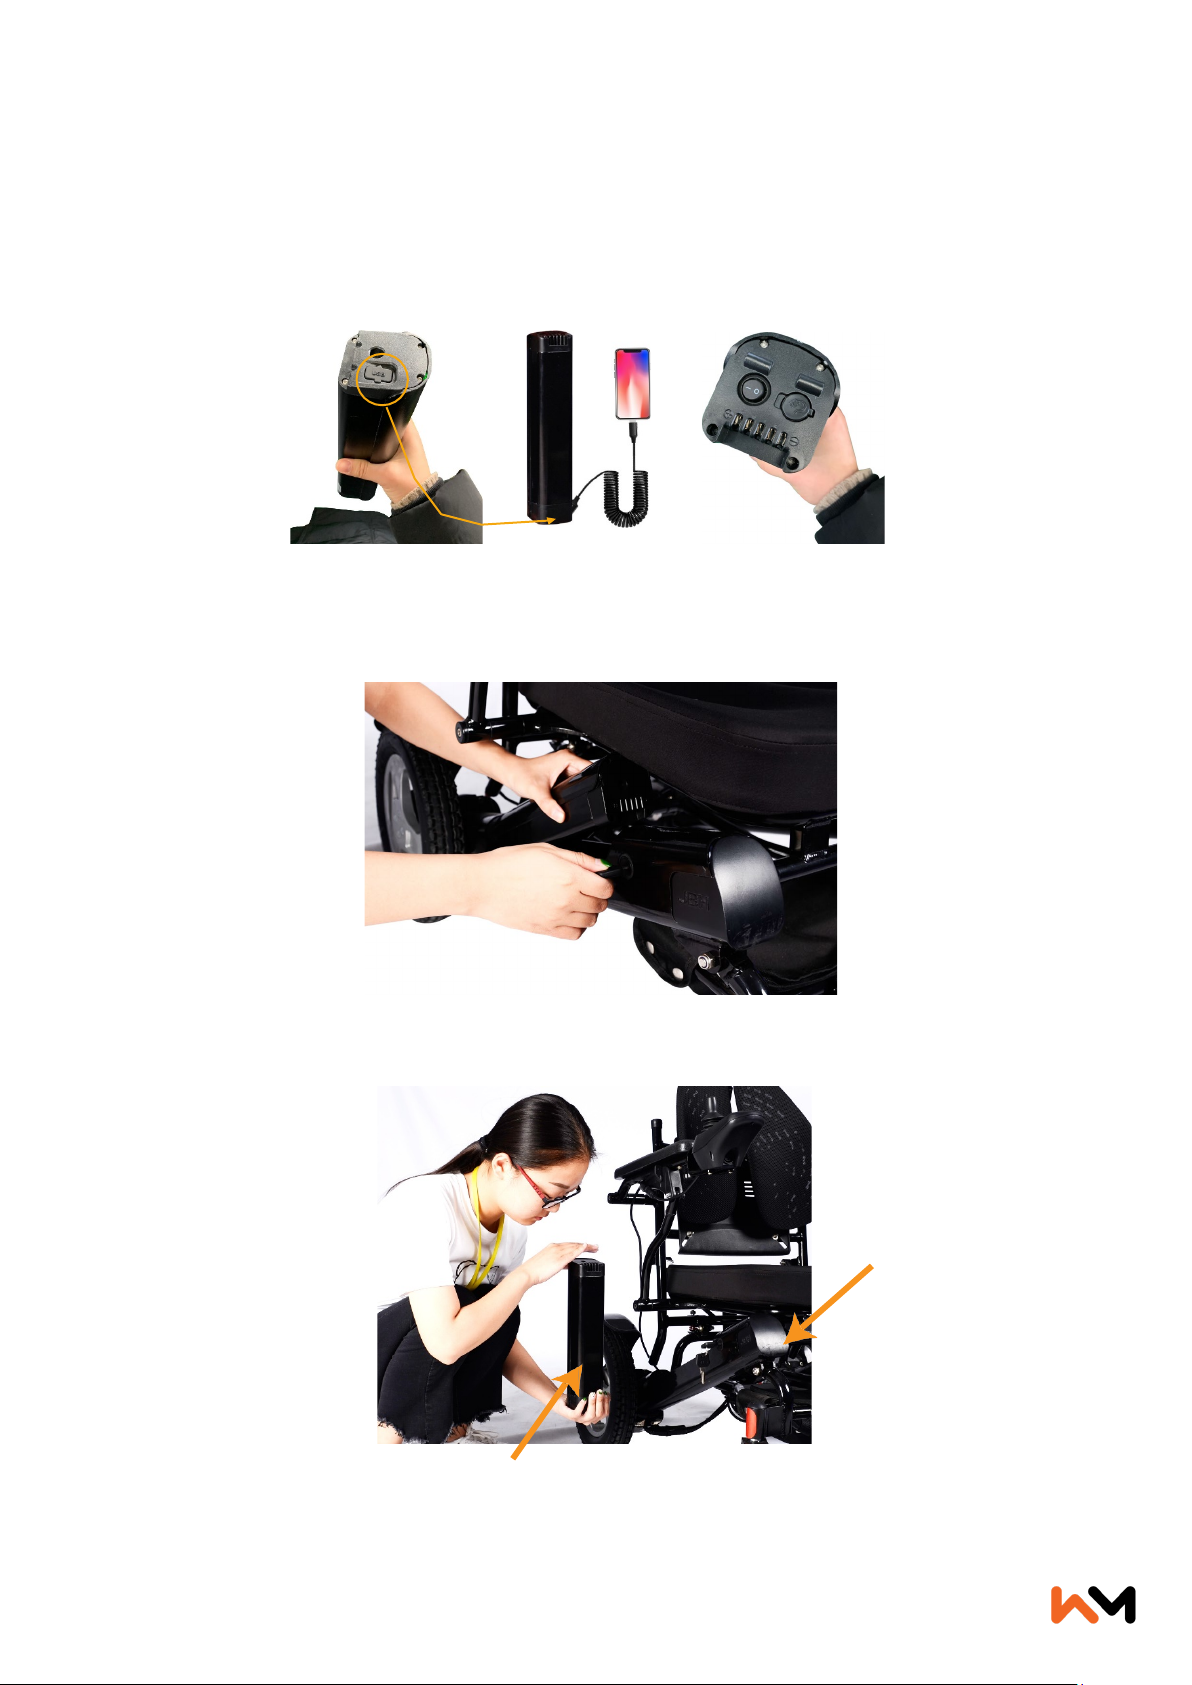
The Batteries of your E-Traveller can charge electronic products such as cell-phones and
tablets, using the USB socket located on the batteries. To access the USB socket, you
will have to remove the battery from your chair.
This is particularly handy during long aeroplane trips, as you will already have the
batteries in the cabin with you and can use these as power banks for your electronic
devices.
8.
The batteries come with an added key security feature protecting against battery theft and
ensuring the batteries are securely fastened to your chair at any given time. To remove the
batteries, use the key provided.
9.
Check your battery and located the connectors, once this has been done, place the battery in
the battery slot.
Battery box
Contact battery

10
CONTROLLER
The E-Traveller is equipped with programable joystick style controller.
Controller and Driving Tips
1.
Take some time in a safe, controlled environment to learn the operation of the
controller. You will find that it will take a little bit of time to get used to the joystick
operation.
2.
When turning, reduce your speed, which will help you avoid any potential tilting or
tipping of wheelchair.
3.
Be sure to adjust the speed depending on your environment.
4.
To slow down, slowly bring the joystick back toward the initial position.
5.
To stop, just bring the joystick back to the initial position.
6.
Use extra care when you drive E-Traveller in reverse.
A.
Operate the wheelchair slowly and at an even speed.
B.
Stop often and check to make sure your path is clear of obstacles.

11
BASIC OPERATIONS
Before operating E-Traveller, be sure to read all safety information and precautions included in
this manual. Operate only in the appropriate environment after you have practised operation
the wheelchair and know how to work the controller.
GET IN
Be certain that the power is OFF before attempting to
sit down. Don't put your weight on the controller.
Choose from a front or side transfer. Don't step on the
footplate.
POWER ON
Press the Power button; you will hear a beep and a
light will indicate that power is on.
TURING &STEERING Use the joystick controller to steer and maneuver.
STOPPING
Simply remove your hand from the joystick to stop.
POWER OFF
When stopping, it is advised that you power OFF the
wheelchair to prevent accidents. Press the power
button to turn off the wheelchair. All lights will turn off.
GET OUT Make sure there is no light on the controller before
getting off the wheelchair.

12
BATTERY CHARGING
Your Folding Electric Wheelchair will arrive with semi charged batteries, which should last
about 22km under normal operating conditions. We recommend that you run the Folding
Electric Wheelchair until the batteries are completely dead in order to get the most out of the
battery life.
First charging method
Charge both batteries at the same time via the charge port located on the underside of your
controller.
1.
Turn the power off.
2.
Plug the charger into the charging socket. Please ensure the charger is plugged into
the E-Traveller, before turning on the power or connecting it to a power source.
3.
Allow your wheelchair to charge for 6-8 hours or until the light on the charger turns
green, which means your batteries are fully charged.
4.
Further information about the light indicator is located on the back of your charger.
Front
Definition of what the light colour mean Charger light
The light should come on after plugging
in the charger.
GREEN – the battery is fully charged
RED--battery is empty/partially empty
Back

13
Secondary charging method:
You have the option of charging the batteries individually. This can be a great option if you
don't have space for your chair or don't want to remove it from your car for charging.
1.
Turn off your E-Traveller.
2.
Flip open the charging port protector
on the front of the battery.
3.
Use the secondary charger pigtail to
adapt the battery charger to plug into
the battery directly.
More information
1.
The E-Traveller comes with two semi-charged 24V 6AH lithium batteries.
2.
Charging of the batteries will take 3-4 hours per battery.
3.
Turn off your E-Traveller while charging.
4.
Do not leave children unsupervised near the power wheelchair while it is charging.
5.
Do not attempt to open the battery housing.
6.
Red means the power is on and the unit is charging; green means the unit is fully
charged.
Note: This information is also located on the back of the charger.
7.
When the battery is fully charged, unplug the power source and remove the charger.
8.
The average time taken to re-charge workable batteries will vary from 2 to 8 hours
depending on the level of usage.
9.
If you do not operate the Folding Electric Wheelchair for two months, we
recommend that you charge the battery for 6-8 hours before use.
10.
Over-current protection is included on the wheelchair and will shut off
the current from the batteries if triggered, thus shutting the motor down, which will
ensure that the motor and battery do not get damaged.
11.
The life cycle of a lithium battery is measured in charging cycles with an average of
500 charge cycles.
12.
Check the battery indicator light daily if you use the Electric Wheelchair frequently.
13.
Do not use any battery chargers that have not been certified by your local retailer.
14.
If damaged, do not handle the batterie, contact a local dealer or repair service.
15.
If the battery needs to be disposed of, locate the nearest hazardous materials
disposal facility, and call them for instructions.
16.
Before storing your Folding Electric Wheelchair for long periods of time, take these
steps to maintain the battery:
a.
Fully charge the battery before storing.
b.
Remove the battery from the wheelchair.
c.
Store the battery in a room-temperature environment that is kept dry.
d.
Avoid temperature extremes and do not allow the battery to freeze.
17.
Do not attempt to charge your battery if it is frozen from extreme weather conditions,
instead allow it to thaw for several hours.

14
FREE-WHEEL MODE
In order to move the chair manually, it must be put into Free Wheel Mode. This mode
disengages the drive mechanism to the wheels, allowing the chair to be pushed manually.
We recommend that you turn off the power of the wheelchair when using Freewheel mode.
1.
To put the E-Traveller in Free Wheel Mode, come to a full stop and turn OFF the
power on the controller.
2.
Push down on the two red levers located on each rear wheel as shown:
Push down two red levers on each wheel.
TRANSPORTING YOUR E-TRAVELLER
To transport your Folding Electric Wheelchair, it is advised that you fold it up following the
steps outlined below.
Note Never transport the E-Traveller in a tie-up system (electric mode), as it's not
compatible with them. Never sit in the wheelchair and be transported in a moving vehicle.
Do not place the folded power wheelchair in the front seat with the driver where it could move
and slide.
1.
Turn OFF the power using the Joystick Controller
2.
Remove the seat cushion.
3.
Press down the latch at the back of the chair and push down the backrest

15
Press down the backrest
Flip-up to unlock the frame
4.
Fold the wheelchair.
5.
Once folded, you can pull the footrest to move the wheelchair easily if it is in Freewheel
mode. The E-Traveller will stand balanced on its own, leaving your hands free for other
things.

16
TROUBLESHOOTING
The following represents the most common questions asked about the E-Traveller that may be
encountered during everyday use. If you experience any problems check the below list, in the
unlikely event that the problem can't be resolved, contact your local retailer for further
information.
Question Possible causes Answer
Why does my E-Traveller
not turn on?
1.
Controller system power
is not connected.
2.
Controller system CPU
and joystick are not
connected.
3.
Battery power is too low.
1.
Connect the battery.
2.
Ensure all connections
between joystick, CPU
and battery are securely
tightened.
3.
Charge the battery.
Why is the wheelchair
noisy or vibrating when
turning?
1.
Speed is set too low.
2.
The motor is damaged.
1.
Raise speed. At low
speeds, the motor may
sound or feel strained.
2.
Replace the motor.
Why can' t I charge the
battery?
1.
Charger light does not
turn on.
2.
Charger light is always
green.
3.
Charging time is stopped
before a full charge is
complete.
1.
Replace the charger.
2.
The battery is not
connected or may need
to be replaced.
3.
The capacity of the battery
has decreased over time.
This is normal.
Why can' t I connect the
controller?
1. Connector pins (male)
on the controller have
become bent and
misaligned with
connector holes
(female) on the CPU
connector.
1. Using a small tool,
carefully straighten the
connector pins (male) on
the controller to align
with holes (female) on
the CPU connector.

17
DIAGNOSTICS
Your controller has an indicator light that, during normal operation, is a steady GREEN. This
light also functions as a diagnostic tool by flashing in patterns that indicate problems. It is
important to pay attention to these diagnostics in case your E-Traveller needs maintenance or
repairs.
If the indicator light indicates a fault, turn off the power and then turn the power back on. If the
fault is not cleared after turning on the power again, the indicator repeats the error message.
Please refer to the fault information diagnosis table below to help you diagnose a possible
problem and find a solution.
If you are experiencing trouble with the above or have questions regarding this, please contact
your dealer. When communicating with the dealer, provide as many details as possible.
No. 1 red light flashes: indicates the pressure of the battery is not full.
No. 2 red light flashes: indicates no signal of the joystick.
No.3 red light flashes: indicates the wheelchair is charging.
No. 4 red light flashes: indicates moving the joystick when
turning on the power. Or do not connect the motor wires.
No. 5 red light flashes: indicates the brake solenoid is not
connected or damaged.

18
WARRANTY
The purchaser of this product is entitled to a limited warranty as offered by the local dealer, and its
affiliates on the following components and timeframes (Includes tires, seat and backrest, armrests, and
support straps):
Chair frame: 2 years Motors: 1 year
Controller and CPU system: 1 Year Battery: 1 Year
Wear parts: 3 months
This warranty is valid for the replacement of faulty parts only. Any parts under warranty will be replaced
and shipped to your door. For further information, refer to your dealers' warranty policy.
Due to the design of the E-Traveller, most parts can be easily exchanged by the end-user without a
professional service technician required. However, it is always recommended you seek professional help
for maintenance and service, to make sure the work is done properly.
The warranty does not cover:
1.
Product damages caused by user negligence.
2.
Product damages caused due to use above it's rated weight capacity
3.
Accidental or Intentional product damages.
4.
Products that have been subjected to negligence.
5.
Products that have been subjected to abuse.
6.
Products that have been improperly stored, handled or operated.
7.
Products that have experienced general misuse.
8.
Products that have been modified in an unauthorized, unapproved way.
Warranty is non-transferable and only valid for the original purchaser.
Please complete your Warranty registration card and email through a copy to
sales@wholesalemobility.com.au
Purchased by Contact Number
Email Address
Shipping Address
Model Flex or Ergo Serial Number
Purchasing Date D M Y
Warranty Period 12 Months
Importer
Name of reseller /
Purchasing Store

19
This manual suits for next models
2
Table of contents
Other Solax Wheelchair manuals


