8
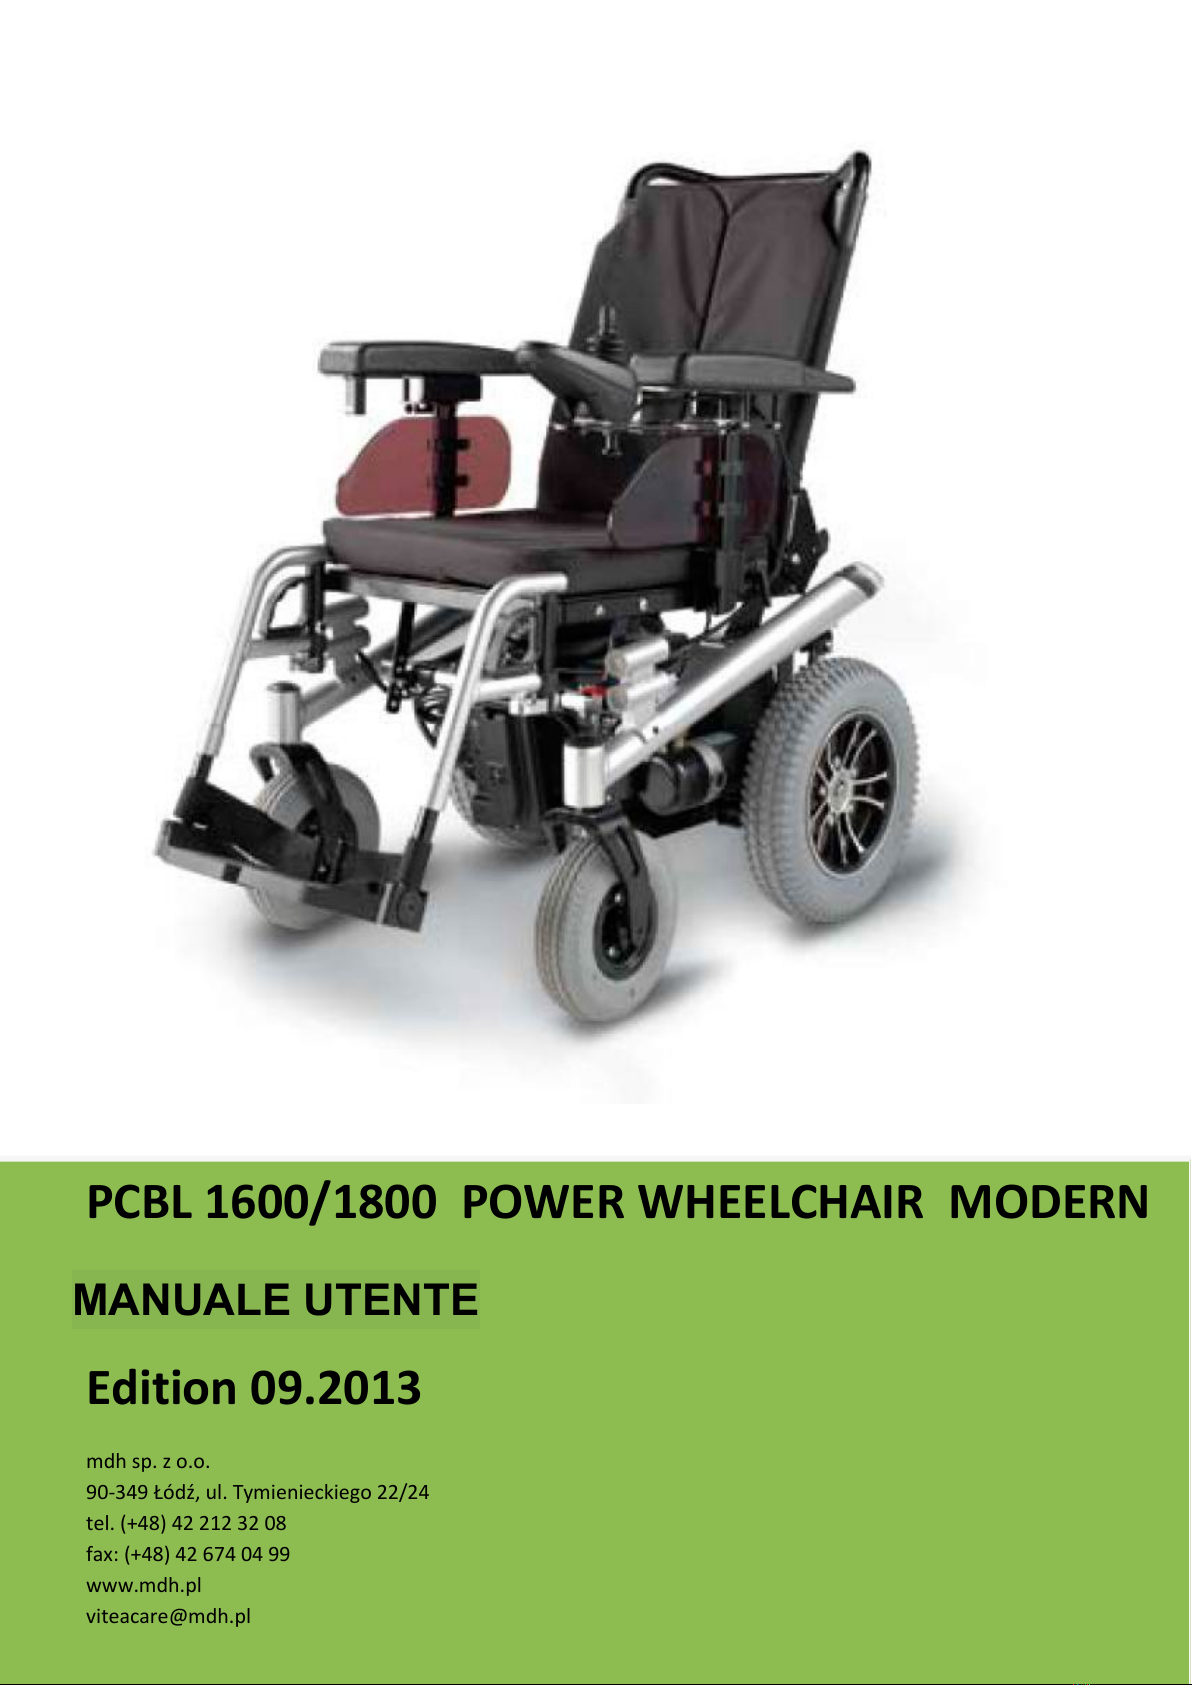
Electronic control panel
Electronic control panel allows to control power wheelchair, battery power status and general
condition of the whole electronic system.
Electronic control panel is usually placed on the armrest and joint to the battery and motor. The
panel can be attached to the left /right armrest or behind the wheelchair (when it is used by a
caregiver).
Joystick
The joystick allows to control direction and speed of movement. Push the joystick forward to release
the electromagnetic brake and set the wheelchair in motion. The more you push the joystick
forward, the faster the wheelchair will move. If you release the joystick, the wheelchair will slow
down and stop. If you move the joystick backwards, you will drive in reverse.
WARNING! If the wheelchair starts to move in an unexpected direction, release the joystick and
let it return to central, neutral position. If the joystick is not damaged, the brakes will be
activated and the wheelchair will stop.
9
Switch on button
NEVER, even in case of danger or other unpredictable situations, turn off the wheelchair by pressing
the switch on button –the wheelchair will abruptly stop which may cause falling down. Always turn
off the power if you do not intend to drive it –in this way you will avoid unpredictable wheelchair ‘s
movements.
Battery status bar
You can find the battery status bar at the top of controller. Using the color light indicator, the battery
status bar provides information on supply, approximate power of the batteries, electric systems of
the wheelchair using a color code.
Constant red, yellow and green light indicate that batteries are fully charged, electric systems and
electronic system of control panel are efficient.
Constant red and yellow light indicate that you should charge batteries, the electric systems and
electronic system of control panel are efficient.
Only constant red light or slowly blinking red light –you should charge the batteries as soon as
possible, the electric systems and electronic system of control panel are efficient.
If the lights blink, the electronic system or electric system does not work properly.
If the warning lights blink continuously, the joystick was not is neutral position when the power
wheelchair was switched off. Turn off the power, release the joystick and again turn on the power.
Speed adjustment buttons
There are two speed adjustment buttons –if you want to slow down, press deceleration button. The
actual speed is shown on the indicator placed below the battery status bar. The faster you move, the
more lights are on.
Horn button
Press the button to activate the horn.
Charger socket
The socket is used for battery charging –plug to the power outlet (max 12A).
WARNING! If you followed the user’s manual instructions but the warning lights are still
blinking, please, contact your dealer.
Pulsante di accensione
MAI, anche in caso di pericolo o altre situazioni imprevedibili, spegnere la carrozzina premendo il pul-
sante di accensione - la sedia a rotelle si fermerà bruscamente e potrebbe cadere. Spegnere sempre la
corrente se non si intende guidarla, in questo modo si eviteranno movimenti imprevedibili della sedia a
rotelle.
Barra di stato della batteria
È possibile trovare la barra di stato della batteria nella parte superiore del controller. Utilizzando l’indica-
tore luminoso a colori, la barra di stato della batteria fornisce informazioni sull’alimentazione, sulla po-
tenza approssimativa delle batterie e sui sistemi elettrici della sedia a rotelle utilizzando un codice colore.
La luce rossa, gialla e verde costante indica che le batterie sono completamente cariche, i sistemi elettrici
e il sistema elettronico del pannello di controllo sono ecienti.
La luce rossa e gialla costante indica che è necessario caricare le batterie, i sistemi elettrici e il sistema
elettronico del pannello di controllo sono ecienti.
Solo luce rossa costante o luce rossa lampeggiante lentamente: è necessario caricare le batterie il prima
possibile, i sistemi elettrici e il sistema elettronico del pannello di controllo sono ecienti.
Se le spie lampeggiano, il sistema elettronico o l’impianto elettrico non funziona correttamente.
Se le spie di avvertimento lampeggiano continuamente, il joystick non era in posizione neutra quando la
carrozzina elettronica è stata spenta. Spegnere l’alimentazione, rilasciare il joystick e accendere nuova-
mente l’alimentazione.
Pulsanti di regolazione della velocità
Sono disponibili due pulsanti di regolazione della velocità: se si desidera rallentare, premere il pulsante
di decelerazione. La velocità eettiva viene visualizzata sull’indicatore posizionato sotto la barra di stato
della batteria. Più veloce ti muovi, più luci sono accese.
Pulsante corno
Premere il pulsante per attivare il clacson.
Presa del caricatore
La presa viene utilizzata per la ricarica della batteria - collegare alla presa di corrente (max 12A).
AVVERTIMENTO! Se si seguono le istruzioni del manuale dell’utente ma le spie continuano a
lampeggiare, contattare il rivenditore.