SOLE 16608700200 User manual

Model: 16608700200
OWNER’S MANUAL
PLEASE CAREFULLY READ THIS ENTIRE MANUAL BEFORE
OPERATING YOUR NEW ELLIPTICAL!

TABLEOF
CONTENTS
ProductRegistration........................................................................................3
ImportantSafetyInstructions................................................................................5
ImportantElectricalInformations..........................................................................6
ImportantOperationInstructions..........................................................................6
E20AssemblyInstructions...................................................................................10
OperationofYourNewElliptical...........................................................................15
ProgrammableFeatures.......................................................................................18
GeneralMaintenance...........................................................................................24
ExplodedViewDiagram.....................................................................................25
PartsList............................................................................................................26
Troubleshooting...................................................................................................29
TrainingGuidelines...............................................................................................30
Stretching.............................................................................................................34
Manufacturer'sLimitedWarranty.....................................................................36
ATTENTION
THISELLIPTICALISINTENDEDFORRESIDENTIALUSEONLYANDISWARRANTEDFOR
THISAPPLICATION.ANYOTHERAPPLICATIONVOIDSTHISWARRANTYINITS
ENTIRETY.

3
CONGRATULATIONSONYOURNEWELLIPTICALANDWELCOMETOTHESOLEFAMILY!
ThankyouforyourpurchaseofthisqualitySOLEellipticalfromDyacoCanadaInc.Yournewelliptical
hasbeenmanufacturedbyoneoftheleadingfitnessmanufacturersintheworldandisbackedbyone
ofthemostcomprehensivewarrantiesavailable.DyacoCanadaInc.willdoallwecantomakeyour
ownershipexperienceaspleasantaspossibleformanyyearstocome.
IfyouhaveanyquestionsaboutyournewSOLEproductorquestionsaboutthewarrantycontactDyaco
CanadaInc.at1‐888‐707‐1880.
Pleasetakeamomentatthistimetorecordbelowthenameofthedealer,theirtelephonenumber,
andthedateofpurchaseforeasycontactinthefuture.Keepyourreceiptforproofofpurchase.We
appreciateyourconfidenceinSOLEandwewillalwaysrememberthatyouarethereasonthatweare
inbusiness.Pleasecompleteandmailyourregistrationcardtodayandenjoyyournewelliptical.
YoursinHealth,
DyacoCanadaInc.
NameofDealer
TelephoneNumberofDealer
PurchaseDate
PRODUCTREGISTRATION
RECORDYOURSERIALNUMBER
PleaserecordtheSerialNumberofthisfitnessproductinthespaceprovidedbelow.
Note:SerialNumbercanbefoundontheframeorthewarminglabel.
SerialNumber
Registeryourpurchase
Theself‐addressedproductregistrationcardmustbecompletedinfullandreturnedtoDyacoCanada
Inc.Youcanalsogotowww.solefitness.catoregisteronline.

4
BEFOREYOUBEGIN
ThankyouforchoosingtheSOLEE20Elliptical.Wetakegreatprideinproducingthisqualityproduct
andhopeitwillprovidemanyhoursofqualityexercisetomakeyoufeelbetter,lookbetter,andenjoy
lifetoitsfullest.It'saprovenfactthataregularexerciseprogramcanimproveyourphysicaland
mentalhealth.Toooften,ourbusylifestyleslimitourtimeandopportunitytoexercise.TheSOLEE20
Ellipticalprovidesaconvenientandsimplemethodtobeginyourassaultongettingyourbodyinshape
andachievingahappierandhealthierlifestyle.Beforereadingfurther,pleasereviewthedrawing
belowandfamiliarizeyourselfwiththepartsthatarelabeled.
ReadthismanualcarefullybeforeusingtheSOLEE20Elliptical.AlthoughDyacoCanadaInc.constructs
itsproductswiththefinestmaterialsandusesthehigheststandardsofmanufacturingandquality
control,therecansometimesbemissingpartsorincorrectlysizedparts.Ifyouhaveanyquestionsor
problemswiththepartsincludedwithyourSOLEE20Elliptical,pleasedonotreturntheproduct.
ContactusFIRST!Ifapartismissingordefectivecallustollfreeat1‐888‐707‐1880.OurCustomer
ServiceStaffareavailabletoassistyoufrom8:30A.M.to5:00P.M.(EasternTime)Mondaythrough
Friday.Besuretohavethenameandmodelnumberoftheproductavailablewhenyoucontactus.

5
IMPORTANT
SAFETY
INSTRUCTIONS
WARNING‐Readallinstructionsbeforeusingthisequipment.
DANGER‐ToreducetheriskofelectricshockdisconnectyourSOLEellipticalfromtheelectricaloutlet
priortocleaningand/orservicework.
WARNING‐Toreducetheriskofburns,fire,electricshock,orinjurytopersons,installtheellipticalon
aflatlevelsurfacewithaccesstoa120‐volt,15‐ampgroundedoutletwithonlytheellipticalplugged
intothecircuit.
DONOTUSEANEXTENSIONCORDUNLESSITISA14AWGORBETTER,WITHONLYONEOUTLETON
THEEND:DONOTATTEMPTTODISABLETHEGROUNDEDPLUGBYUSINGIMPROPERADAPTERS,OR
INANYWAYMODIFYTHECORDSET.
Aseriousshockorfirehazardmayresultalongwithcomputermalfunctions.
Donotoperateellipticalondeeplypadded,plushorshagcarpet.Damagetobothcarpetand
ellipticalmayresult.
Keepchildrenundertheageof13awayfromthismachine.Thereareobviouspinchpointsand
othercautionareasthatcancauseharm.
Keephandsawayfromallmovingparts.
Neveroperatetheellipticalifithasadamagedcordorplug.Iftheellipticalisnotworking
properly,callyourdealer.
Keepthecordawayfromheatedsurfaces.
Donotoperatewhereaerosolsprayproductsarebeingusedorwhereoxygenisbeing
administered.Sparksfromthemotormayigniteahighlygaseousenvironment.
Neverdroporinsertanyobjectintoanyopenings.
Donotuseoutdoors.
Todisconnect,turnallcontrolstotheoffpositionandthenremovetheplugfromtheoutlet.
Donotattempttouseyourellipticalforanypurposeotherthanforthepurposeitisintended.
Thehandpulsesensorsarenotmedicaldevices.Variousfactors,includingtheuser’smovement,
mayaffecttheaccuracyofheartratereadings.Thepulsesensorsareintendedonlyasexercise
aidsindeterminingheartratetrendsingeneral.
Wearpropershoes.Highheels,dressshoes,sandalsorbarefeetarenotsuitableforuseonyour
elliptical.Qualityathleticshoesarerecommendedtoavoidlegfatigue.
Thisequipmentisnotintendedforusebypersonswithreducedphysical,sensoryormental
capabilities,orlackofexperienceandknowledge,unlesstheyhavebeengivensupervisionor
instructionconcerninguseoftheequipmentbyapersonresponsiblefortheirsafety.
Userweightshouldnotexceed275lbs(125kg).
SAVETHESEINSTRUCTIONS‐THINKSAFETY!

6
IMPORTANT
ELECTRICAL
INFORMATIONS
WARNING!
NEVERremoveanycoverwithoutfirstdisconnectingACpower.
Ifvoltagevariesbytenpercent(10%)ormore,theperformanceofyourellipticalmaybeaffected.
Suchconditionsarenotcoveredunderyourwarranty.Ifyoususpectthevoltageislow,contactyour
localpowercompanyoralicensedelectricianforpropertesting.
NEVERexposethisellipticaltorainormoisture.ThisproductisNOTdesignedforuseoutdoors,neara
poolorspa,orinanyotherhighhumidityenvironment.Theoperatingtemperaturespecificationis40to
120degreesFahrenheit,andhumidityis95%non‐condensing(nowaterdropsformingonsurfaces).
IMPORTANT
OPERATION
INSTRUCTIONS
NEVERoperatethisellipticalwithoutreadingandcompletelyunderstandingtheresultsofany
operationalchangeyourequestfromthecomputer.
Understandthatchangesinresistancedonotoccurimmediately.Setyourdesiredresistancelevel
onthecomputerconsoleandreleasetheadjustmentkey.Thecomputerwillobeythecommand
gradually.
NEVERuseyourellipticalduringanelectricalstorm.Surgesmayoccurinyourhouseholdpower
supplythatcoulddamageellipticalcomponents.Unplugtheellipticalduringanelectricalstormas
aprecaution.
Usecautionwhileparticipatinginotheractivitieswhileusingyourelliptical;suchaswatching
television,reading,etc.Thesedistractionsmaycauseyoutolosebalance;whichmayresultin
seriousinjury.
Alwaysholdontoahandlebarwhilemakingcontrolchanges.
Donotuseexcessivepressureonconsolecontrolkeys.Theyareprecisionsettofunctionproperly
withlittlefingerpressure.Ifyoufeelthebuttonsarenotfunctioningproperlywithnormal
pressurecontactyourdealer.
Plug‐In

7
WARNINGDECAL
REPLACEMENT
Thedecalshownbelowhasbeenplacedontheelliptical.Ifthedecalismissingorillegible,pleasecall
ourCustomerServiceDepartmenttoll‐freeat1‐888‐707‐1880toorderareplacementdecal.Applythe
decalinthelocationshown.
8
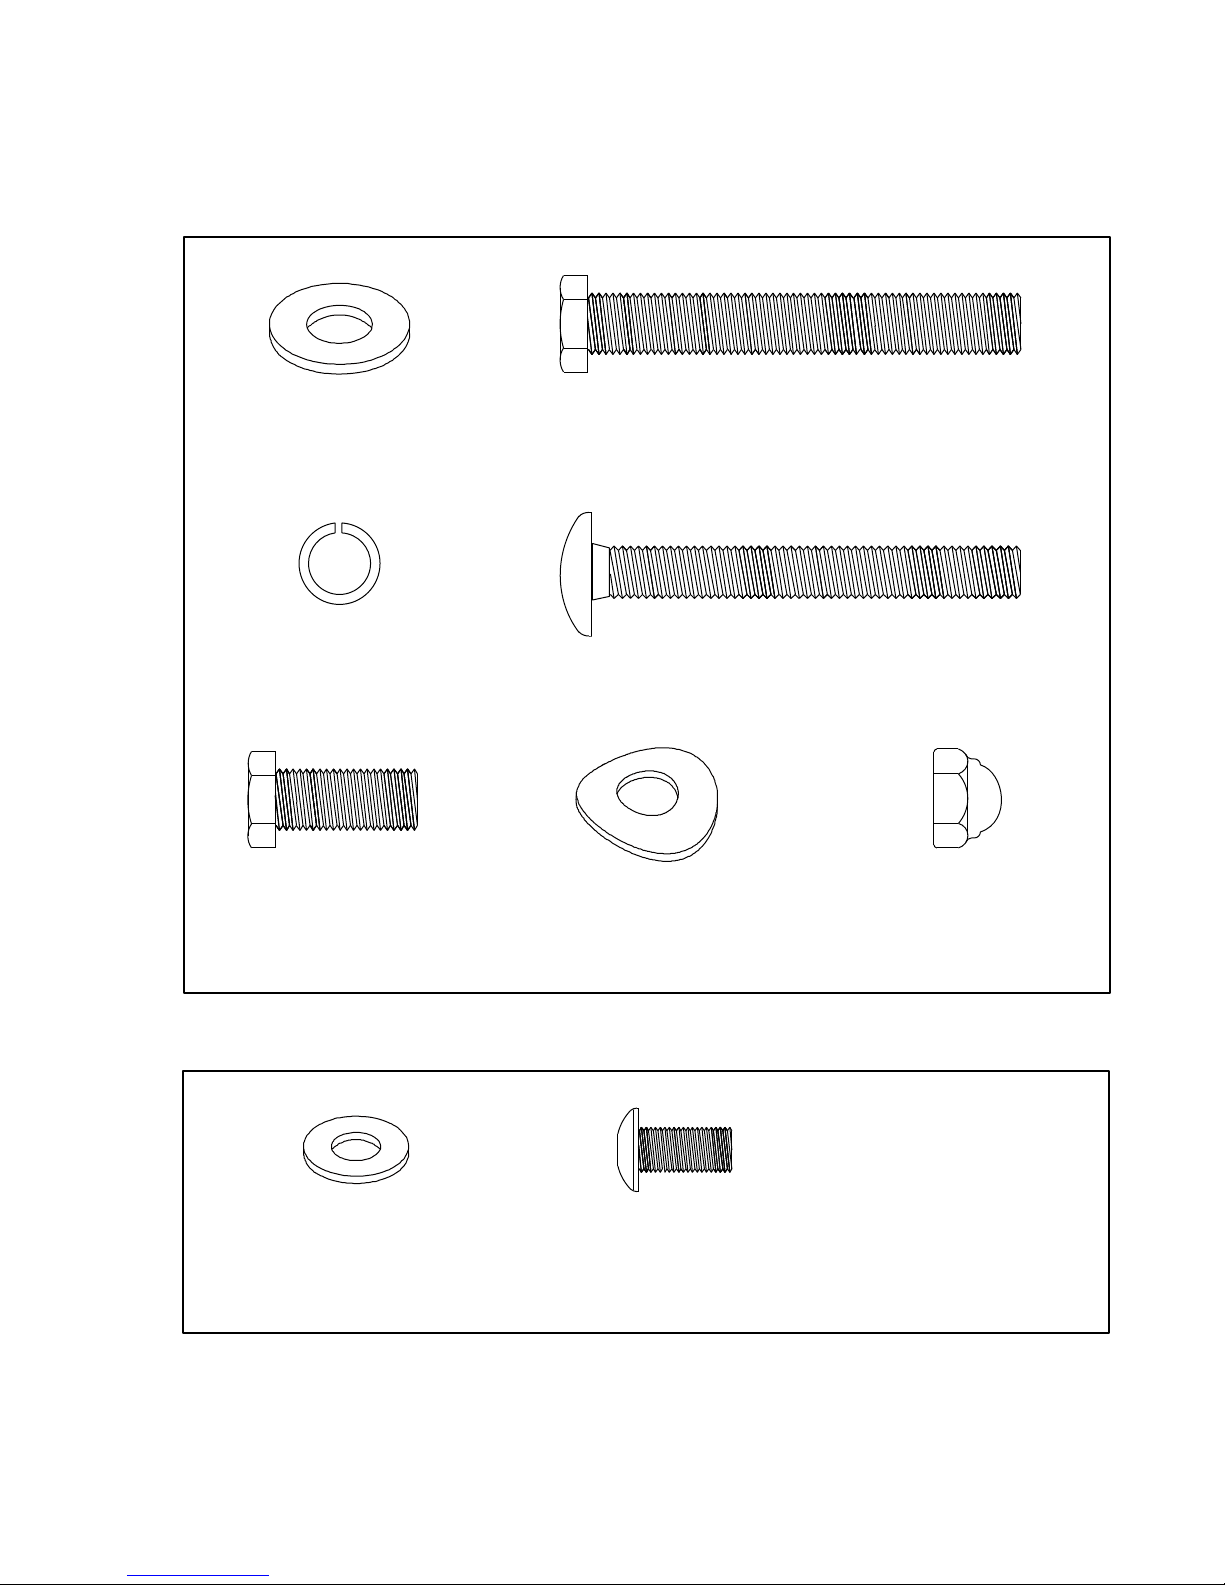
E20
ASSEMBLYPACKCHECKLIST
HARDWARE
STEP1
#94.3/8”Flat
Washer(2pcs)
#120.3/8”Split
Washer
(4pcs)
#119.3/8”x3”
HexHeadBolt(3pcs)
#148.3/8”x3”
CarriageBolt
(2pcs)
#121.3/8”x3/4”
HexHeadBolt
(1pc)
HARDWARE
STEP2
#149.3/8”Curved
Washer(4pcs)
#150.3/8”Cap
Nut(2pcs)
#147.5/16”Flat
Washer
(2pcs)
#151.5/16”
ButtonHeadSocketBolt
(2pcs)

9
HARDWARE
STEP3
#70.5/16”
HexHeadBolt
(6pcs)
HARDWARE
STEP4
#102.5/16”Curved
Washer(6pcs)
#78.M5x10mm
PhillipsHeadScrew
(4pcs)
ASSEMBLY
TOOLS
#79.M5x15mm
PhilipsHeadScrew
(8pcs)
#108.M5AllenWrench/
PhillipsHeadScrewdriver
#110.PhillipsHead
Screwdriver
#111.12.14mmWrench
#113.12mmWrench
#68‐3.M5x12mm
PhilipsHeadScrew(2pcs)

10
1
E20
ASSEMBLY
INSTRUCTIONS
PRE
‐ASSEMBLY
1.Usingarazorknife(BoxCutter)cuttheoutside,bottom,edgeofboxalongthedottedLine.LiftBox
overtheunitandunpack.
2.Carefullyremoveallpartsfromcartonandinspectforanydamageormissingparts.Ifdamaged
partsarefound,orpartsaremissing,contactyourdealerimmediately.
3.Locatethehardwarepackage.Removethetoolsfirst.Removethehardwareforeachstepasneeded
toavoidconfusion.Thenumbersintheinstructionsthatareinparenthesis(#)correspondtothe
itemnumberfromtheassemblydrawingforreference.
CONSOLEMAST&CONSOLE
1.LocatetheConsoleMast(10)andConsoleMastCover(41)and
slidetheCoverontotheMastasfarasitwillgo.Makesure
theConsoleMastCover(41)isfacingthecorrectway.
2.AtthetopopeningoftheMainFrame(1)oftheellipticalisa
ComputerCable(32).UnravelandstraightenouttheComputer
Cable(32)andfeeditintothebottomoftheConsoleMasttube
(10)andoutofthetopopening.
3.InstalltheConsoleMast(10)intothereceivingbracketinthetop
oftheMainFrame(1).PutthetwoSplitWashers(120)andtwo
CurvedWashers(149)ontotheoneHexHeadBolt(119)andone
HexHeadBolt(121)theninstallthescrewatthefrontofthe
ConsoleMast.PuttwoFlatWashers(94),twoSplitWashers(120)
ontothetwoHexHeadBolts(119).Installtightenbyusingthe
12.14m/mWrench(111).
4.NOTE:ThereisanelectricalwirerunningthroughtheConsole
MastTube(10).BecarefulnottodamageorpinchthisComputer
Cable(32)duringthisprocedure.
5.InstalltheFrontStabilizer(15)onthefrontstabilizerholding
plateatthebottomofthemainframewiththetransportation
wheelsfacingforwardandsecurethemwithtwoCarriageBolts
(148),twoCurvedWashers(149)andtwoCapNuts(150)by
using12.14m/mWrench(111).
HARDWARESTEP1
#94.3/8”Flat
Washer(2pcs)
#119.3/8”x3”
HexHeadBolt(3pcs)
#120.3/8”SplitWasher
(4pcs)
#121.3/8”x3/4”
HexHeadBolt(1pc)
#148.3/8”x3”
CarriageBolt(2pcs)
#149.3/8”Curved
Washer(4pcs)
#150.3/8”Cap
Nut(2pcs)


12
2
SWINGARMS
HARDWARESTEP2
#147.5/16”Flat
Washer(2pcs)
#151.5/16”ButtonHead
SocketBolt(2pcs)
1.SlidetheleftandrightLowerSwingArms(4&5)ontotheaxleof
theMastandsecurewithtwo5/16”ButtonHeadSocketBolts
(151)andtwoFlatWashers(147)byusingCombinationM5Allen
Wrench&PhillipsHeadScrewdriver(108).
2.RemovethePedalAxle(17)fromleftPedalArm(2)andinstallleft
ConnectingArm(7)ontoleftPedalArm.ReinstalltheAxleandthe
screwandtightenwith12mmand14mmwrench(111).Repeat
thesameprocedureagainfortherightConnectingArm(8)and
PedalArm(3).
3.Removetheaxles(16)whichareonleftandrightconnecting
arms(7&8).
Connecttheleftandrightconnectingarm(7&8)withleftandright
LowerSwingArms(4&5)andreinstalltheaxles(16)andthescrew
andtightenwiththeWrench(111).
151
147
5
8
16
17
147
151
16
17
72
3
32
37

13
3
CONNECTINGARMS&REARRAILS
HARDWARESTEP3
#70.5/16”HexHeadBolt
(6pcs)
#102.5/16”Curved
Washer(6pcs)
1.InstalltheLeftandRightSwingArms(13&14)intotheLeftand
RightLowerSwingArms(4&5)withsixHexHeadBolts(70)and
sixCurvedWashers(102)byusingthe12.14m/m_Wrench(111).
70
102
70
102
14
70
102
102
13
70
14
4
PLASTICCOVERS
Note:UsetheM5AllenWrench/PhillipsHeadScrewDriver(108)totightenhardwareinthisstep.
1.LocatetheConsoleAssembly(31)andthefourPhillipsHeadScrews(78).
Therewillbetwoelectricalwireconnectorsatthetopopeningofthe
ConsoleMast(10),twoHandpulsewires(37),oneComputerCable(32).
ConnectthesetothematingconnectorsonthebackoftheConsoleAssembly
(31).Theconnectorsarekeyedsoyoucannotplugtheminthewrongwayso
donotforcethem.
2.StoringtheexcesswirebackintotheConsoleMast(10),carefullyinstallthe
ConsoleAssembly(31)ontothemountingplateofConsoleMast(10)and
secureusingthefourPhillipsHeadScrews(78)
3.InstallthetwopcsofSlideWheelCovers(52)andthefourPhillipsHead
Screws(79)byusingthePhillipsHeadScrewdriver(110).
4.UseonePhillipsHeadScrew(79)tosecureRearStabilizerCover(L)(61)on
thePedalArm(L)andRailTubewithPhillipsHeadScrewdriver(110).Repeat
theprocedureforRearStabilizerCover(R)(62)fortheotherside.
5.UsetwoPhillipsHeadScrew(79)tosecureMiddleStabilizerCover(59)onthe
PedalArm(L.R)andRailTubewithPhillipsHeadScrewdriver(110).
6.UsePhillipsheadscrewdrivertotightenDrinkBottleHolder(68‐2)onConsole
MasttubewithtwoM5×12m/mPhillipsHeadScrews(68‐3).
HARDWARESTEP4
#78.M5x10mm
PhillipsHeadScrew
(4pcs)
#79.M5x15mm
PhillipsHeadScrew
(8pcs)
#68‐3.M5x12mm
PhilipsHeadScrew(2pcs)
79
52
62
79
61
79
52
79
79
79
78
32
37
31
59
59
68-3
68-2

15
OPERATIONOF
YOURELLIPTICAL
GETTINGFAMILIARWITHTHECONTROLPANEL
E20
CONSOLE
POWERUP
Powertheellipticalonbypluggingitintoanappropriatewalloutlet.
Whenitisfirstpoweredon,theconsolewillperformaninternalself‐test.Duringthistimeallthe
lightswillturnon,theMessageWindowdisplaywillshowasoftwareversion(i.e.:VER1.0),andthe
DistanceWindowwilldisplayanodometerreading.Theodometershowshowmanyvirtualmilesthe
ellipticalhasgone.TheTimeWindowshowshowmanytotalhourstheellipticalhasbeenused.
Theodometerandtimewillremaindisplayedforonlyafewsecondsthentheconsolewillgotothe
startupdisplay.Thedotmatrixdisplaywillbescrollingthroughthedifferentworkoutprofilesand
theMessageWindowwillbescrollingthestartupmessage.Usequickkeystoselectaprogramor
pressstarttobegin.
COOLINGFAN
FANPOWERSWITCH
AUDIOJACK(MP3,CD,
ORSMARTPHONE)
SPEAKER
PROGRAMBUTTONS(Manual,
Hill.FatBurn,Strength,
Interval,User1,USER2)

16
CONSOLEOPERATION
QUICKSTARTMODE
Thisisthequickestwaytostartaworkout.AftertheconsolepowersupyoujustpresstheStartkey
tobegin,thiswillinitiatetheQuickStartmode.InQuickStart,thetimewillcountupfromzero.The
resistancelevelcanbeadjustedmanuallybypressingtheLevelUP/DOWNbuttons.
BASICINFORMATION
MessageWindow:
EachtimetheEnterbuttonispressedthenextsetofinformationwillappear.InDataScanmode,
thedisplayedinformationwillchangeevery4secondsintheMessageWindow.TheMessage
WindowwillinitiallydisplaySegmentTimethenTotalLaps,LevelandDataScan.
TheStopbuttonactuallyhasseveralfunctions.PressingtheStopkeyonceduringaprogramwill
pausetheprogramfor5minutes.Ifyouneedtogetadrink,answerthephoneoranyofthemany
thingsthatcouldinterruptyourworkout,thisisagreatfeature.ToresumeyourworkoutduringPause
justpresstheStartkey.IftheStopbuttonispressedtwiceduringaworkouttheprogramwillendand
aWorkoutSummaryisdisplayed.
IftheStopkeyishelddownfor3secondstheconsolewillperformacompleteReset.Duringdata
entryforaprogramtheStopkeyperformsaPreviousScreenfunction.Thisallowsyoutogoback
onestepintheprogrammingeachtimeyoupresstheStopkey.
ThereisanAudioInJack()onthefrontoftheconsoleandbuilt‐inspeakers.Youmaypluganylow‐
levelaudiosourcesignalintothisport.AudiosourcesincludeMP3,iPod,portableradio,CDplayeror
evenaTVorcomputeraudiosignal.
Fans:
Theconsolehasabuiltinfan.Pressthefanbuttontoturnthefanonoroff.

17
PROGRAMMINGTHECONSOLE
Eachoftheprogramscanbecustomizedwithyourpersonalinformationandchangedtosuityour
needs.Someoftheinformationaskedforisnecessarytoensurethereadoutsarecorrect.Youwillbe
askedforyourAgeandWeight.EnteringyourWeightaidesincalculatingamorecorrectCalorie
reading.Althoughwecannotprovideanexactcaloriecountwedowanttobeascloseaspossible.
AmessageaboutCalories:Caloriereadingsoneverypieceofexerciseequipment,whetheritisina
gymorathome,arenotaccurateandtendtovarywidely.Theyaremeantonlyasaguidetomonitor
yourprogressfromworkouttoworkout.Theonlywaytomeasureyourcalorieburnaccuratelyasina
clinicalsettingconnectedtofittestmonitoringequipment.Thisisbecauseeverypersonisdifferent
andburnscaloriesatadifferentrate.
EXITINGDISPLAYMODE
ThisproductispresettoaDISPLAYMODEthatkeepstheconsolecontinuallypoweredon.Toturnthis
featureoffandallowyourdisplaytogointoDISPLAYMODEwhennotbeingused,pleaseusethe
followingprocedure:
1. Wheninstand‐bystatus,holdStart,StopandEnterkeysforfivesecondstoentertheEngineering
Mode.
2. Usethe▲/▼keystochooseSELECTFUNCTION,thenpresstheENTERkey.
3. Usethe▲/▼keystoselecttheDISPLAYMODE,thenpressEnterkey.
4. Usethe▲/▼keystoturnONorOFFtheDISPLAYMODEfunction.
5. HoldtheStopkeytosaveandexitEngineeringMode.
ENTERINGAPROGRAM/CHANGINGSETTINGS
Presseachprogrambuttontoscrollthroughtheprogramselections.Theprofileforeachprogram
willbedisplayedinthedotmatrixwindow.PresstheProgramkeytoselectaprogramandbegin
customizingthesettings.Ifyouwanttoworkoutwithoutenteringnewsettings,thenjustpressthe
Startkey.Thiswillbypasstheprogrammingofdataandtakeyoudirectlytothestartofyourworkout.
Ifyouwanttochangethepersonalsettings,thenjustfollowtheinstructionsintheMessageWindow.
Ifyoustartaprogramwithoutchangingthesettings,thedefaultsettingswillbeused.
Note:AgeandWeightdefaultsettingswillchangewhenyouenteranewnumber.SothelastAge
andWeightenteredwillbesavedasthenewdefaultsettings.IfyouenterAgeandWeightthefirst
timeusetheellipticalyouwillnothavetoenteriteverytimeyouworkoutunlesseitherAgeor
WeighthaschangedorsomeoneelseentersadifferentAgeandWeight.

18
PROGRAMMABLEFEATURES
MANUALPROGRAM
TheManualprogramworksasthenameimplies,manually.Thismeansthatyoucontroltheworkloadyour‐
selfandthecomputerwillnotmakeanyautomaticprogramchange.
1.PressManualkeythenpresstheEnterkey.
2.TheMessageWindowwillaskyoutoenteryourAge.YoumayadjusttheagesettingusingtheLevelUP/
DOWNkeys,thenpresstheEnterkeytoacceptthenewnumberandproceedontothenextscreen.
3.YouarenowaskedtoenteryourWeight.YoumayadjustyourweightsettingusingtheLevelUP/DOWN
keys,thenpressEntertocontinue.
4.NextistheTime.YoumayadjustthelengthofTimebypressingthekeys,andthenpressEntertocontinue.
5.NowyouarefinishededitingthesettingsandcanbeginyourworkoutbypressingtheStartkey.Youcan
alsogobackandmodifyyoursettingsbypressingtheStopkeytogobackoneleveloftheprogramming
screen.
6.Oncetheprogramstartstheellipticalwillbesettolevelone.Thisistheeasiestlevelanditisagoodidea
tostayatleveloneforawhiletowarmup.Ifyouwanttoincreasetheworkloadatanytimepressthe
LevelUPkey;theLevelDOWNkeywilldecreasetheworkload.
7.DuringtheManualprogramyouwillbeabletoscrollthroughthedataintheMessageWindowby
pressingtheEnterkey.
8.WhentheprogramendstheMessageWindowwillshowasummaryofyourworkout.Thesummarywill
bedisplayedforashorttimethentheconsolewillreturntothestartupdisplay.
PROGRAMMINGPRESETPROGRAMS
1.PressProgramkeythenpresstheEnterkey.
2.TheMessageWindowwillaskyoutoenteryourAge.Youmayadjusttheagesetting,usingthe
LevelUP/DOWNkeys,thenpresstheEnterkeytoacceptthenewnumberandproceedontothe
nextscreen.
3.YouarenowaskedtoenteryourWeight.YoumayadjusttheweightnumberusingtheLevel
UP/DOWNkeysthenpressEntertocontinue.
4.NextisTime.YoumayadjusttheTimeandpressEntertocontinue.
5.NowyouareaskedtoadjusttheMaxLevel.Thisisthepeakexertionlevelyouwillexperience
duringtheprogram(thehighestcoloredsegment/boxoftheprogramprofile).Adjusttheleveland
thenpressEnter.
6.NowyouarefinishededitingthesettingsandcanbeginyourworkoutbypressingtheStartkey.
YoucanalsogobackandmodifyyoursettingsbypressingtheStopkeytogobackonelevel,or
screen.
7.Ifyouwanttoincreaseordecreasetheresistanceatanytimeduringtheprogrampressthe
LevelUP/DOWNkeys.
8.DuringtheprogramyouwillbeabletoscrollthroughthedataintheMessageWindowbypressing
theEnterkey.
9.WhentheprogramendstheMessageWindowwillshowasummaryofyourworkout.The
summarywillbedisplayedforashorttimethentheconsolewillreturntothestart‐updisplay.

19
PRESETPROGRAMS
Theconsolehasfivedifferentprogramsthathavebeendesignedforavarietyofworkouts.These
fiveprogramshavefactorypresetworklevelprofilesforachievingdifferentgoals.
Hill
TheHillprogramsimulatesgoingupanddownahill.Theresistancein
Thepedalswillsteadilyincreaseandthendecreaseduringtheprogram.
FatBurn
TheFatBurnprogramisdesigned,asthenameimplies,tomaximizethe
burningoffat.Therearemanyschoolsofthoughtonthebestwayto
burnfatbutmostexpertsagreethatalowerexertionlevelthatstaysat
asteadyworkloadisthebest.Theabsolutebestwaytoburnfatisto
keepyourheartrateataround60%to70%ofitsmaximumpotential.
Thisprogramdoesnotuseheartratebutsimulatesalower,steady
exertionworkout.
Cardio
TheCardioprogramisdesignedtoincreaseyourcardiovascularfunction
Andendurance.Thisisexerciseforyourheartandlungs.Itwillbuildup
yourheartmuscleandincreasebloodflowandlungcapacity.Thisis
achievedbyincorporatingahigherlevelofexertionwithslight
fluctuationsinwork
Strength
TheStrengthprogramisdesignedtoincreasemuscularstrengthinyour
lowerbody.Thisprogramwillsteadilyincreaseinresistancetoahigh
levelandforcesyoutosustainit.Thisisdesignedtostrengthenandtone
yourlegsandglutes.
Interval
TheIntervalprogramtakesyouthroughhighlevelsofintensityfollowed
Byperiodsoflowintensity.Thisprogramincreasesyourenduranceby
depletingyouroxygenlevelfollowedbyperiodsofrecoverytoreplenish
oxygen.Yourcardiovascularsystemgetsprogrammedtouseoxygen
moreefficientlythisway.Thisprogramalsoforcesyourbodytobecome
moreefficientduetospikesinheartrate,betweenrecoveryperiods.
Thisaidsinheartraterecoveryfromintenseactivities.

20
USERPROGRAMS
ThecustomizableUserprogramsallowyoutobuildandsaveyourownworkout.Youcanbuild
yourowncustomprogrambyfollowingtheinstructionsbelow.
1. SelecttheUserprogram(U1orU2)byUSER1orUSER2programkeysthenpressEnter.Ifyou
havealreadysavedaprogramtoeitherU1orU2,itwillbedisplayedandyouarereadyto
begin.Ifnot,youwillhavetheoptionofinputtingausername.IntheMessageWindow,the
letter“A”willbeblinking.UsetheLevelUP/DOWNbuttonstoselecttheappropriatefirst
letterofyourname(PressingtheLevelbuttonwillswitchtotheletter“B”;pressingtheDown
buttonwillswitchtoletter“Z”).PressEnterwhenthedesiredletterisdisplayed.Repeatthis
processuntilallofthecharactersofyournamehavebeenprogrammed(maximum7
characters).WhenfinishedpressStop.
2.IfthereisaprogramalreadystoredinUserwhenyoupressthekey,youwillhaveanoptionto
runtheprogramasitisordeletetheprogramandbuildanewone.Atthewelcomemessage
screen,whenpressingStartorEnteryouwillbeprompted:RunProgram?UsetheLevel
UP/DOWNtoselectYesorNo.IfyouselectNo,youwillthenbeaskedifyouwanttodeletethe
currentlysavedprogram.Itisnecessarytodeletethecurrentprogramifyouwanttobuildanew
one.
3.TheMessageWindowwillaskyoutoenteryourAge.YoumayenteryourageusingtheLevel
UP/DOWNkeys,thenpresstheEnterkeytoacceptthenewnumberandproceedontothenext
screen.
4.YouarenowaskedtoenteryourWeight.YoumayadjusttheweightnumberusingtheLevel
UP/DOWNkeys,thenpressEntertocontinue.
5.NextisTime.YoumayadjusttheTimeusingtheLevelUP/DOWNkeysandpressEntertocontinue.
Nowthefirstcolumnwillbeblinkingandyouareaskedtoadjustthelevelforthefirstsegmentof
theworkout.Whenyoufinishadjustingthefirstsegment,orifyoudon’twanttochange,then
pressEntertocontinuetothenextsegment.Thenextsegmentwillshowthesamelevelasthe
previouslyadjustedsegment.RepeatthesameprocessasthelastsegmentthenpressEnter.
Continuethisprocessuntilalltensegmentshavebeenset.
6.TheMessageWindowwillthentellyoutostarttobegin(andsavetheprogram)orEnterto
modifytheprogram.PressingStopgobackonelevel.
7.IfyouwanttoincreaseordecreasetheworkloadatanytimeduringtheprogrampresstheLevel
UP/DOWNkey.
8.DuringtheUser1orUser2programyouwillbeabletoscrollthroughthedataintheMessage
WindowbypressingtheEnterkey.
9.WhentheprogramendstheMessageWindowwillshowasummaryofyourworkout.The
summarywillbedisplayedforashorttimethentheconsolewillreturntothestart‐updisplay.
Table of contents
Other SOLE Elliptical Trainer manuals


