Solera SL-SAL-OG-30W-50K-SF-BK-G1 User manual

STEP 2: SLIPFITTER MOUNTING
The slipfitter mounting fits a 2 3/8” O.D. tenon. Place the
slipfitter over the tenon and secure the fixture with the two
set screws on the side of the slipfitter.
OFF-GRID Area Light
STEP 1: REMOVE THE CONTENTS FROM ALL 3 BOXES
Please be sure to check that everything is in the box
1 x Remote (CU-ALL2)
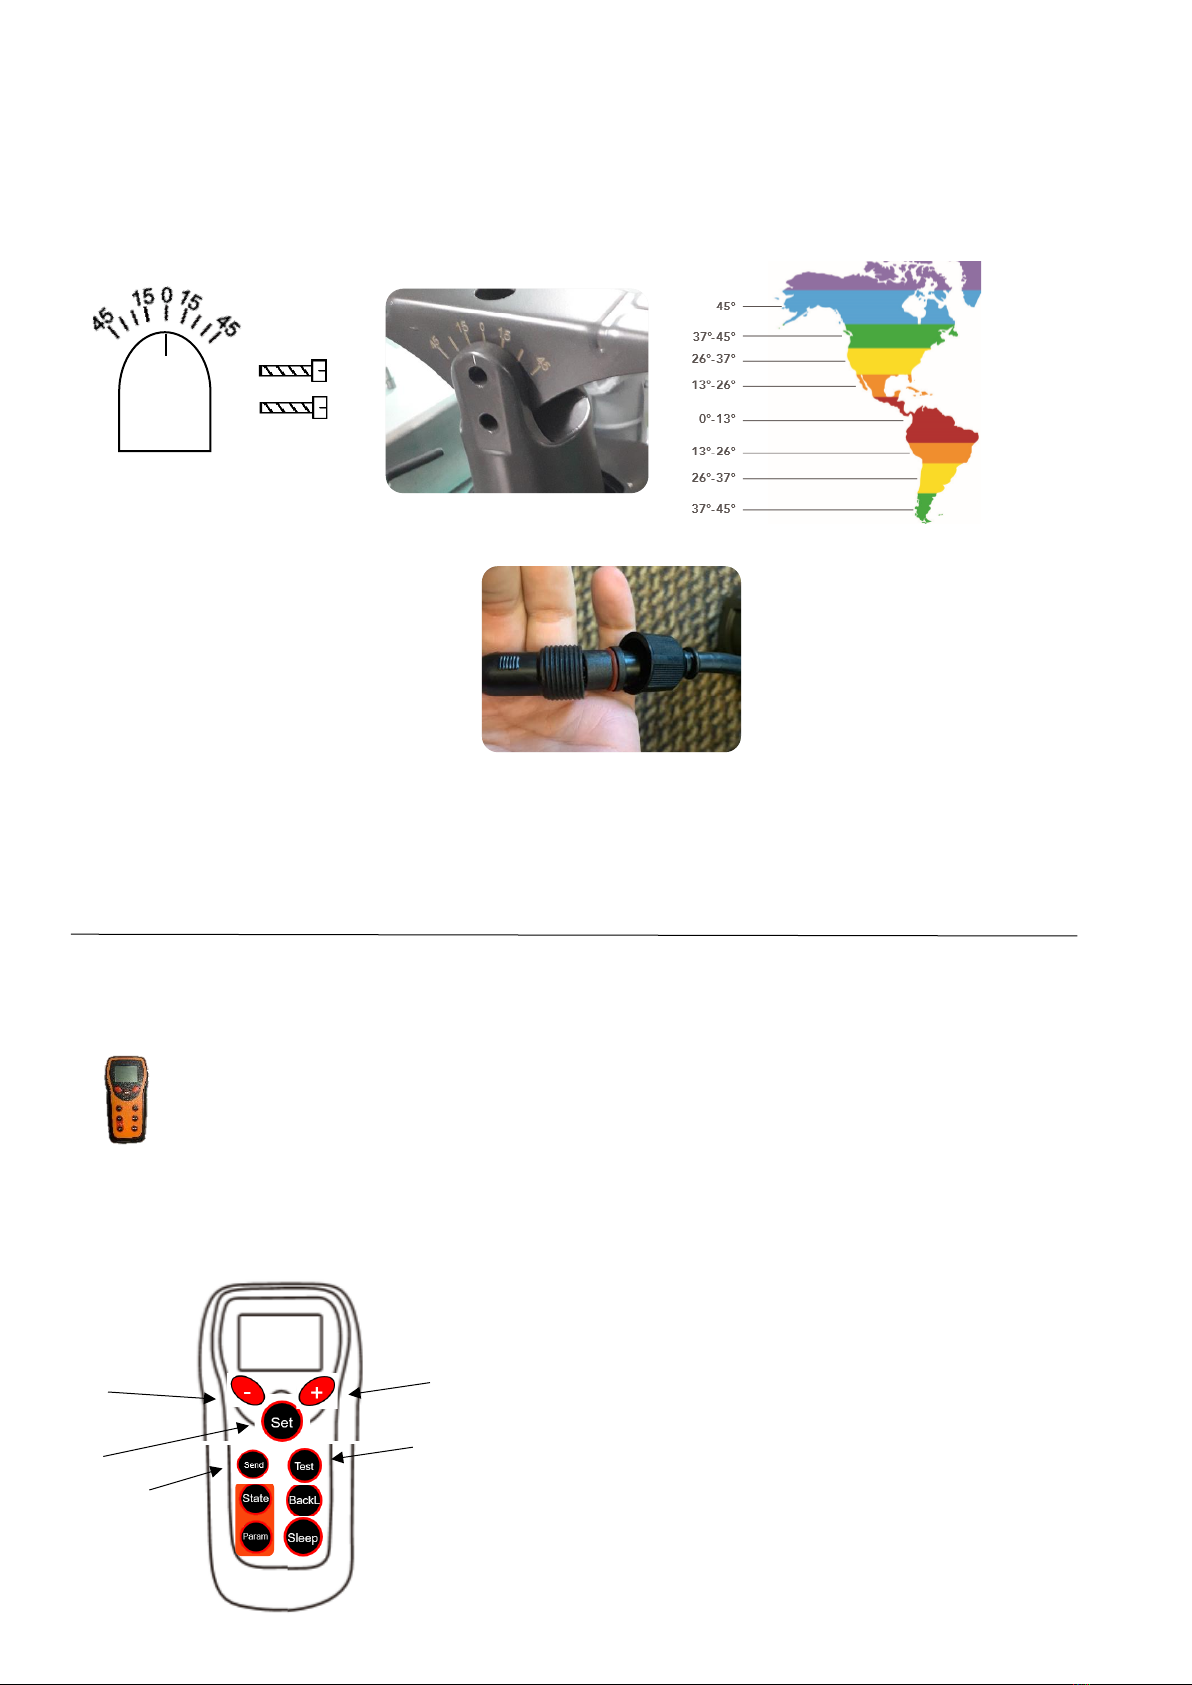
STEP 3:ADJUST SOLAR PANEL DIRECTION Adjust the solar panel base hinge.
Use the marking on the solar panel hinge base to line up with the number on the fixture that
best suits the installation. For optimal results, face the panel facing the equator. In the northern
hemisphere, solar panels charge most optimally when installed facing South. West & East
facing panels won’t get as much light as a southern facing panel but will still collect good
sunlight. A North facing panel will work, but it will take longer to charge than any other direction,
meaning solar charging may be less than optimal in installations facing this way.
1 x Solar Panel
a. Adjust the angle of the fixture. Align the white lines
w/ numbers and the arrows on the fixture. Loosen
the screws and swivel the fixture to the desired
angle, then re-tighten the screws.
b.
INSTALLATION INSTRUCTIONS
SL-SAL-OG-30W-50K-SF-G1
READ CAREFULLY BEFORE INSTALLING THE FIXTURE. RETAIN THESE INSTRUCTIONS FOR FUTURE REFERENCE.
Fixtures must be wired in accordance with the National Electrical Code and all applicable local codes. Proper grounding is
required for safety. This product must be installed in accordance with the applicable installation code by a person familiar with
the construction and operation of the product and the hazards involved.
1 x Fixture
1 x 6mm allen
wrench
2 x AA Batteries
1 x Manual
1 x Solar Panel
Base
1 x Slipfitter
*(4 set screws pre attached)
*(3 set screws pre attached to top of fixture, remove
*(2 set screws included in Box 1,
attaches to the solar panel hinge)
1 x 5mm allen wrench
& remove & reinstall once solar panel base is placed)
Introduction: Remote-Control
The default setting is Dusk ‘til Dawn @80% First 2 hours, 50% constant & 80% w/ motion for the
remainder of the night, *remote does not need to be connected or adjusted if your
lighting goals are met.
STEP 6: CONNECT SOLAR PANEL TO
FIXTURE
Once the fixture is completely installed, plug the cable from
the solar panel to the cable on the back of the fixture to
activate the fixture. The light will turn on approximately 15-
20 minutes after sunset.
STEP 5: ADJUST SOLAR PANEL TILT Adjust the solar panel to the optimal angle for your location.
For best results, use the same latitude angle of location that you are installing at. For example, Chicago is 45°
latitude. Please refer to the image below for more info. Place the 2 set screws & tighten with pre attached
washers. Use the line located on the top of the solar panel hinge to line up with the angle of your choosing.
Quick Start Guide
Main Features
a. Menu page down
b. Decrease the data
Set Parameters
Send Working Parameters
Test multiple light levels
Start up the remote by clicking any button
a. Menu page up
b. Increase the data
•The remote connects to the fixture via IR and has up to 24ft of distance
•The remote does not need to be connected to the fixture to operate! It is
automatically set to the default
•You may want to adjust the settings based off your geographical area to attain
more solar powered operation, rather than pulling from the grid. We can
change the settings by following the below:

1st Time: 2~15hrs
Controls the Dawn start up time: The fixture must be set at 2 hours minimum; the motion sensor is disabled during this time.
1st Power: 0-100%
Controls the power output setting of the LEDs brightness for the first-time selection.
If you would like to add motion sensing options, this can be done in the selections listed below, these time slots start to take effect after the 1st Time duration ends.
2nd Time: 0~15hrs
Time Duration begins after 1st Time Duration is complete, set hours and output you would like the light to behave when motion is sensed.
2nd Power:0~100%
Controls the power output setting of the LEDs brightness for the first-time selection.
3rd Time: X
Default, please ignore
3rd Power: 0~100%
Set the power output when motion is idle during the 2nd Time duration, no motion detected output
Add Dawn
Constant
*The motion sensor is disabled during this period
M Time: X
Set Pre-Dawn Time 0 ~15 hours
M Power: X
Set Pre-Dawn Power 0~100%
*The motion sensor will stay active for 30 seconds unless motion is still active
Operating Modes
Click the SET button to set any parameters that are changed
Once the parameters are set, click SEND. If successful you will hear a beep and see a face on the controller
in the top right area of the screen. Make sure you are within 24ft and underneath the fixture to set.
3rd Time: X (Default cannot be changed)
3rd Power: 50% (Applied to 2nd Time
Power when idle
2nd Time: 12
2nd Power: 80%
1st Time: 2
1st Power: 80%
M Time: 0
M Power: 0%
Time Control Mode w/ motion
Default
Runtime scheme below
For the first 2 hours the product runs at 80% output, the next 12 hours after
the first 2, it will run it at 50% idle & 80% when motion is sensed until dawn.
The motion sensor output stays on for 30 seconds unless motion is still
detected.
*How it displays in the remote settings below, can be adjusted.
Replace the data in the remote with the fields below to obtain alternate schemes
1st Time: 14
1st Power: 100%
2nd Time: 0
2nd Power: 0%
3rd Time: 0
3rd Power: 0%
M Time: 0
M Power: 0%
1st Time: 14
1st Power: 50%
2nd Time: 0
2nd Power: 0%
3rd Time: 0
3rd Power: 0%
M Time: 0
M Power: 0%
Constant Control Mode
100% Dusk 2 Dawn
50% Dusk 2 Dawn
BATTERY
Battery Type
LiFePO4
Battery Charging Temp
-4°F ~ 140°F
Battery Discharging Temp
-40°F ~ 140°F
Replaceable Battery
YES
Charges
2000+ Cycles
Charge Voltage
14.6V
mAh
23.4
W/h
300
Battery Weight
5.73 lbs.
Dimensions
8.27 x 4.72 x 3.15 in
SOLAR PANEL
Solar Panel Type
Monocrystalline
Solar Panel Watt
50W
Solar Panel Voltage
12V
Solar Panel Adjustable
YES
Charging Time
7-10 Hrs.
Solar Panel Dimensions
15.75 *31*1.75 in
Weight
10.58 lbs.
Bi-Pass Diodes
Single Cell, no cutoff
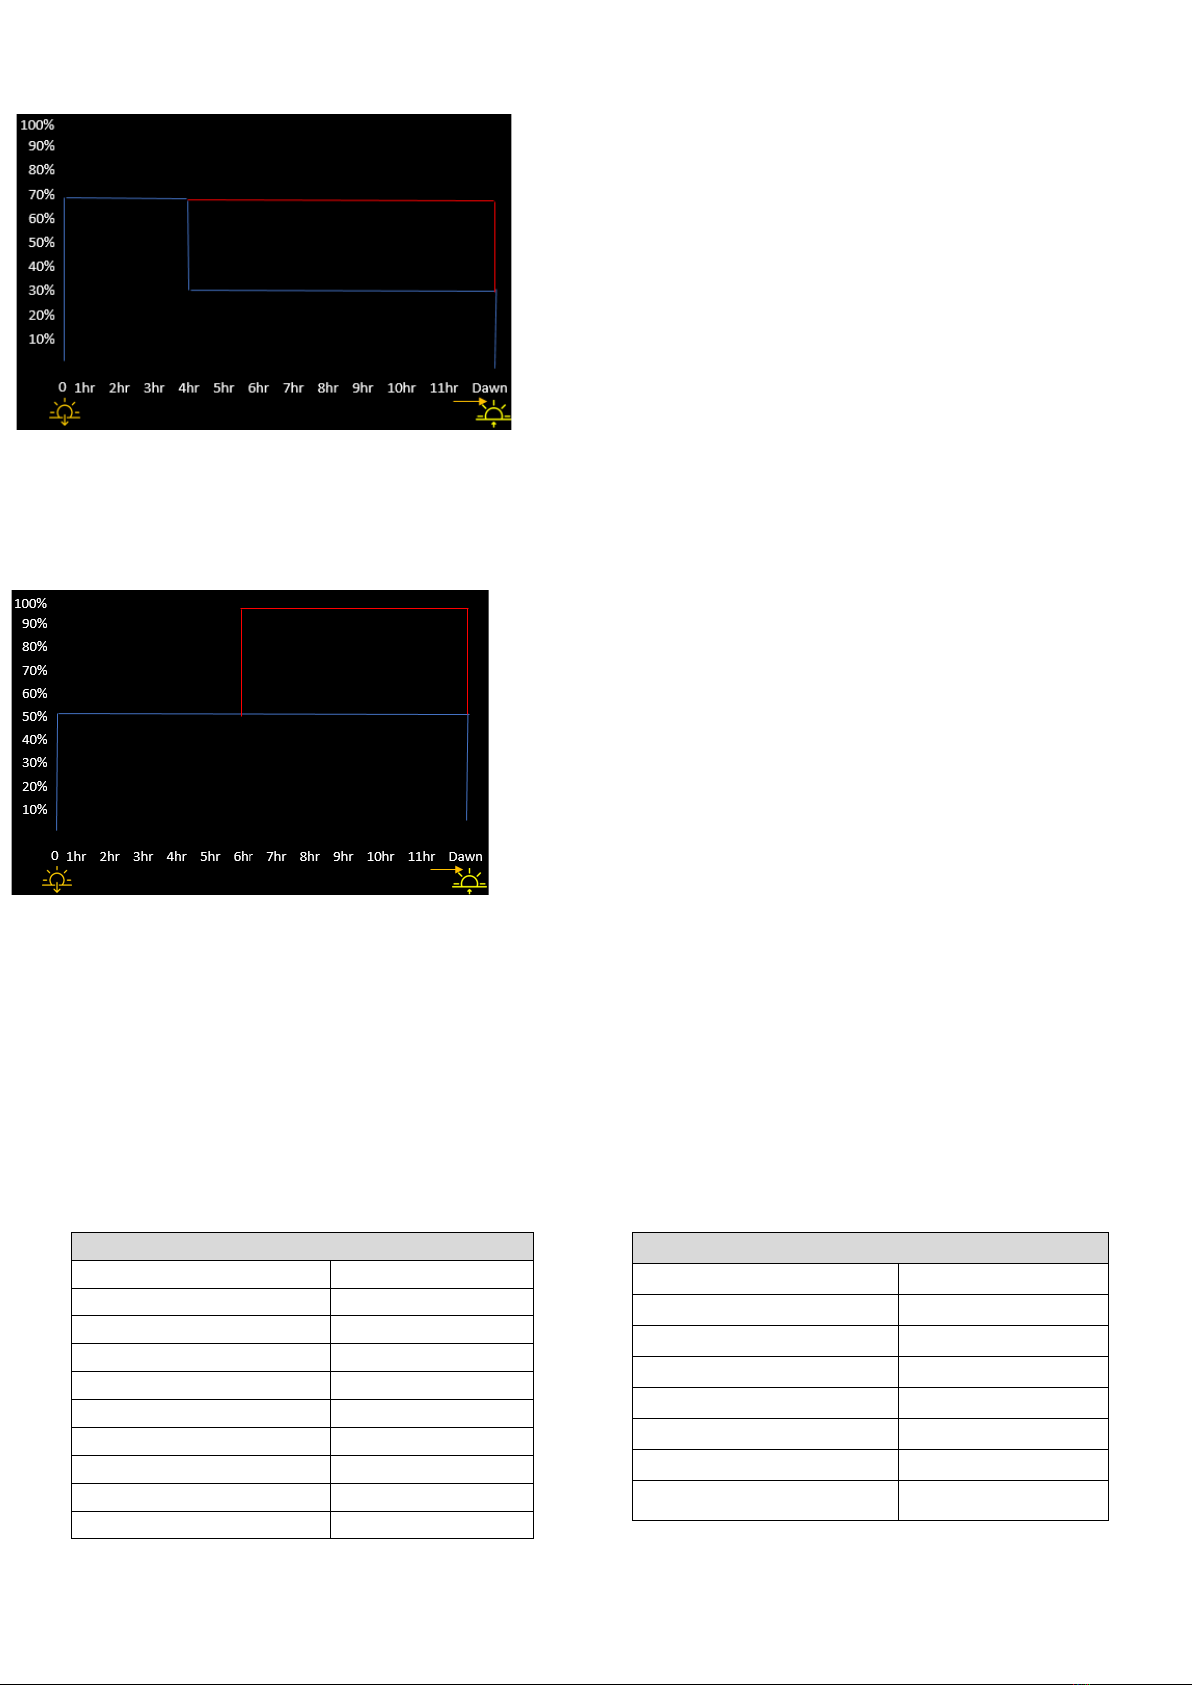
3rd Time: X
3rd Power: 30%
2nd Time: 10
2nd Power: 70%
1st Time: 4
1st Power: 70%
M Time: 0
M Power: 0%
Examples Custom Modes
Change the 1st Time: 4 hours. After 4 hours is selected, click SET. This will create a time slot
that runs for 4 hours.
Change the 1st Power: Adjust the output to be 70%, then click set
Change the 2nd Time: Put 10 hours here to insure a full night of coverage. The light
automatically turns off when the sun rises. After 10 is inputted click SET.
Change the 2nd Power: Remember this is the power that the light will be at during the 2nd Time
duration when motion is sensed. Set it here for 70%. Click SET after adjusting.
Change the 3rd Time: This is not changeable. Please disregard
Change the 3rd Power: This applies to the 2nd Time and is the power at which the light outputs
at as a constant during the 10-hour period set for 2nd Time. When the fixture is idle, I want it to
run at only 30%. Change to 30% and click SET
M Time and M Power we are leaving alone here because we do not need a constant output
scheme added at the end before it turns off in the morning automatically. This is 0 for both.
Once the parameters are all set click SEND to send new scheme to the HYBRID 365 Fixture
Change the 1st Time: 6 hours. After 6 hours is selected, click SET. This will create a time slot that runs
for 6 hours.
Change the 1st Power: Adjust the output to be 50%, then click SET.
Change the 2nd Time: We should put 8 hours here to insure a full night of coverage. The light
automatically turns off when the sun rises. After 8 is inputted click SET.
Change the 2nd Power: Remember this is the power that the light will be at during the 2nd Time
duration when motion is sensed. I set it here for 100%. Click SET after adjusting.
Change the 3rd Time: This is not changeable. Please disregard.
Change the 3rd Power: This applies to the 2nd Time and is the power at which the light outputs at as a
constant during the 8-hour period set for 2nd Time. When the fixture is idle, you want it to run at only
50%. Change to 50% and click SET.
M Time: and M Power: We are leaving this alone here because we do not need a constant output
scheme added at the end before it turns off in the morning automatically. This is 0 for both.
Once the parameters are all set click SEND to send new scheme to the HYBRID 365 Fixture.
3rd Time: X
3rd Power: 50%
2nd Time: 8
2nd Power: 100%
1st Time: 6
1st Power: 50%
M Time: 0
M Power: 0%
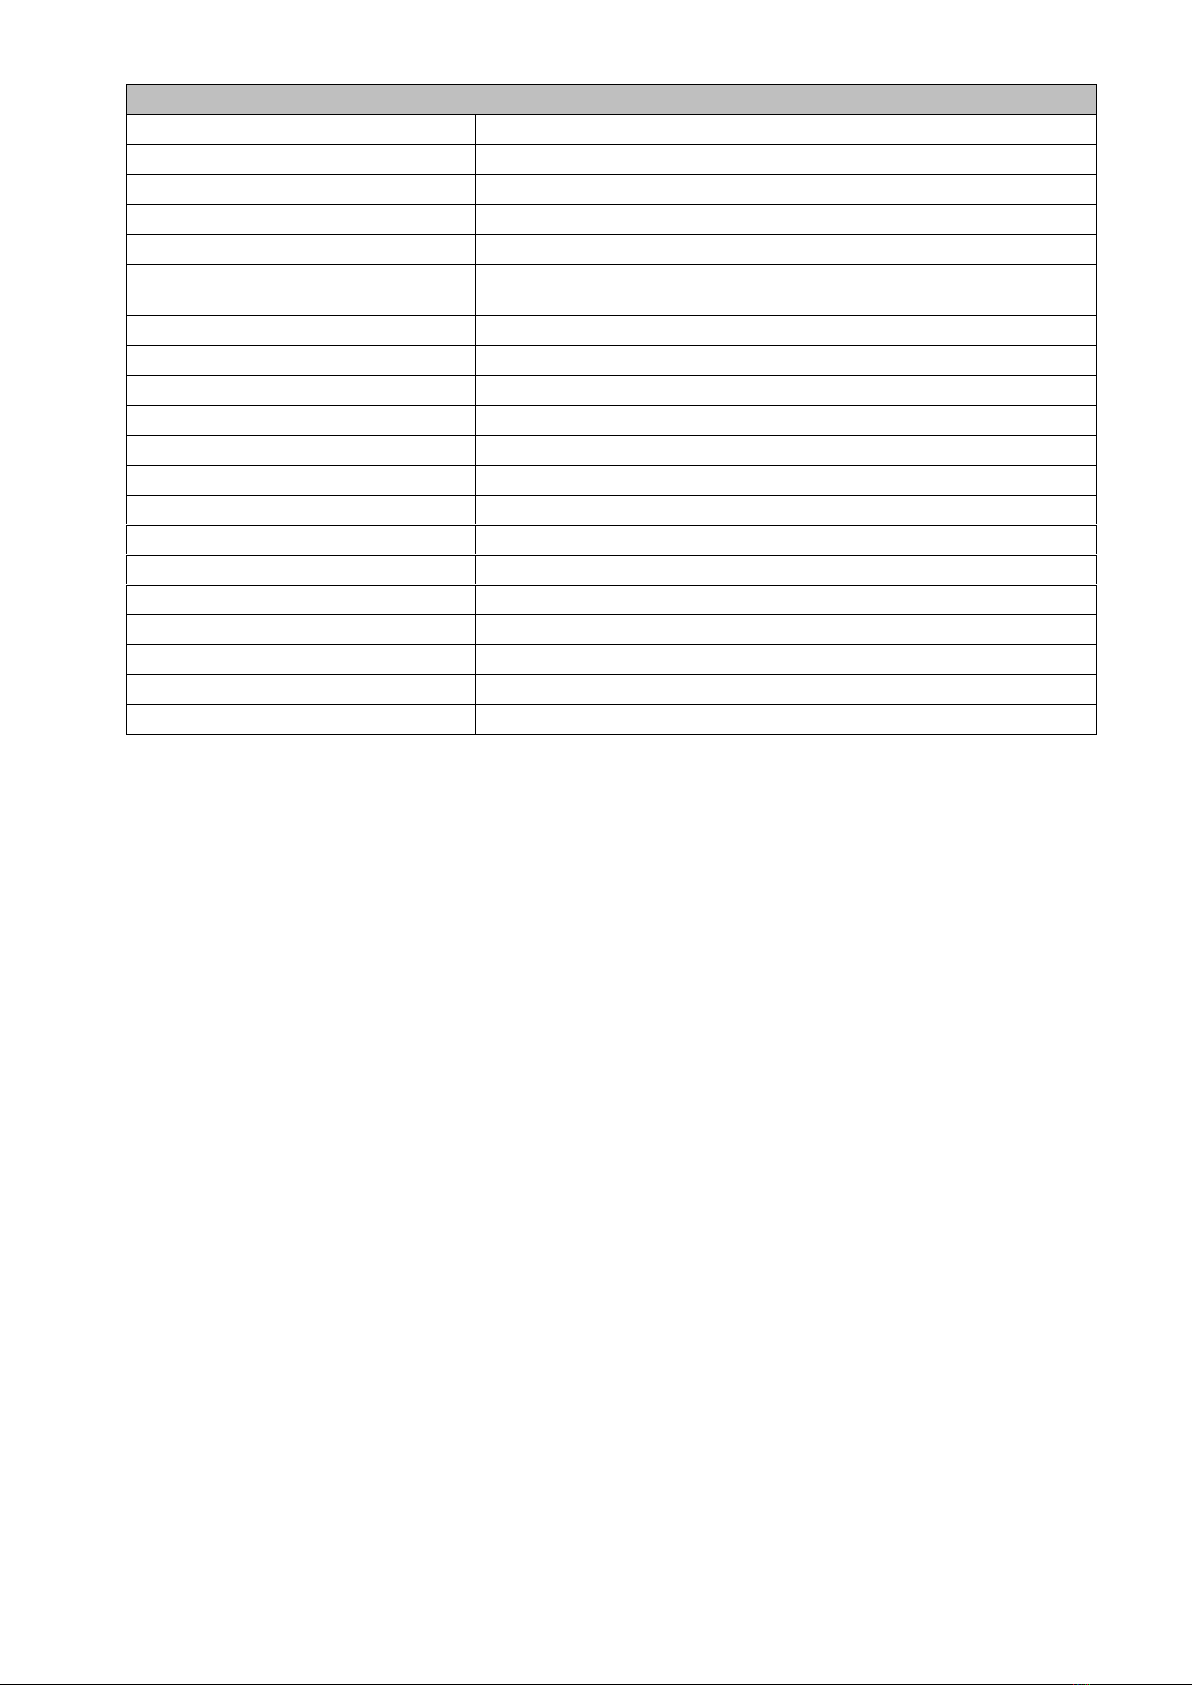
FIXTURE
Product Model
SL-SAL-OG-30W-50K-SF-BK-G1
Actual Power/ Lumen
30W / 5600LM
Dimension L x W x H
Main body: 16.33 x 10.5 X 3.15 in
LED rated life
>50,000 HRS
Mounting
Slip Fitter Φ2 3/8 in
Working Mode
Default- 80% on for first 2 hours, after 2 hours runs 50%
output, 80% when motion sensed until dawn
Color Temperature
4000K
Material
Aluminum Alloy + Polycarbonate
Charge Time
About 9-10 hours of good sunlight
Beam Angle/ Lens Type
140° Type 3 Optics
IP Rating
IP65
Recommended Install Height
10-25ft
Weight
30 lbs.
Warranty
5 YEARS
Packing
QTY/CTN: 1pc
Battery Charing Temp
Charging Temperature -4°F ~ 140°F
Discharging Temp
-40°F ~ 140°F
Fixture Operating Temp
-40°F ~ 140°F
Surge Protection
3kV
EPA Rating
4.45 ft2
Warning and Attention:
1. Before installation, please ensure the light pole foundation is solid enough to withstand the lighting fixture.
2. Position the lighting fixture to optimize its exposure to sunlight. Always face the equator if possible (solar panel to face south if
in northern hemisphere for example).
3. In order to allow self-cleaning, please have a minimum angle of 10 degrees.
4. For best results, install on a day with optimal sunshine.
5. Adjust the angle of the fixture to optimize its exposure to sunlight, avoid north facing panels in the USA
6. The fixture is on and active once the solar panel is connected to the fixture’s solar panel connector wire. 7. Please make sure
the panel is installed under direct sunlight. The red light should be flashing, indicating that it is charging.
8. The lighting fixture will automatically turn on at night and turn off during daylight. The solar panel is the photocell.
9. Please select an operating mode according to the local legislation needs and the local sunshine conditions.
10. The battery of the HYBRID 365 fixture will stop charging when the ambient temperature is below -4°F or above 140°F. The
working temperature of the solar fixture is -40°F (-40°C) to +140°F (+60°C). When operating in an environment with a
temperature lower than -40°F (-20°C), line voltage will kick in to operate the light.
Table of contents
Other Solera Outdoor Light manuals


