Soloshot SOLOSHOT2 User manual
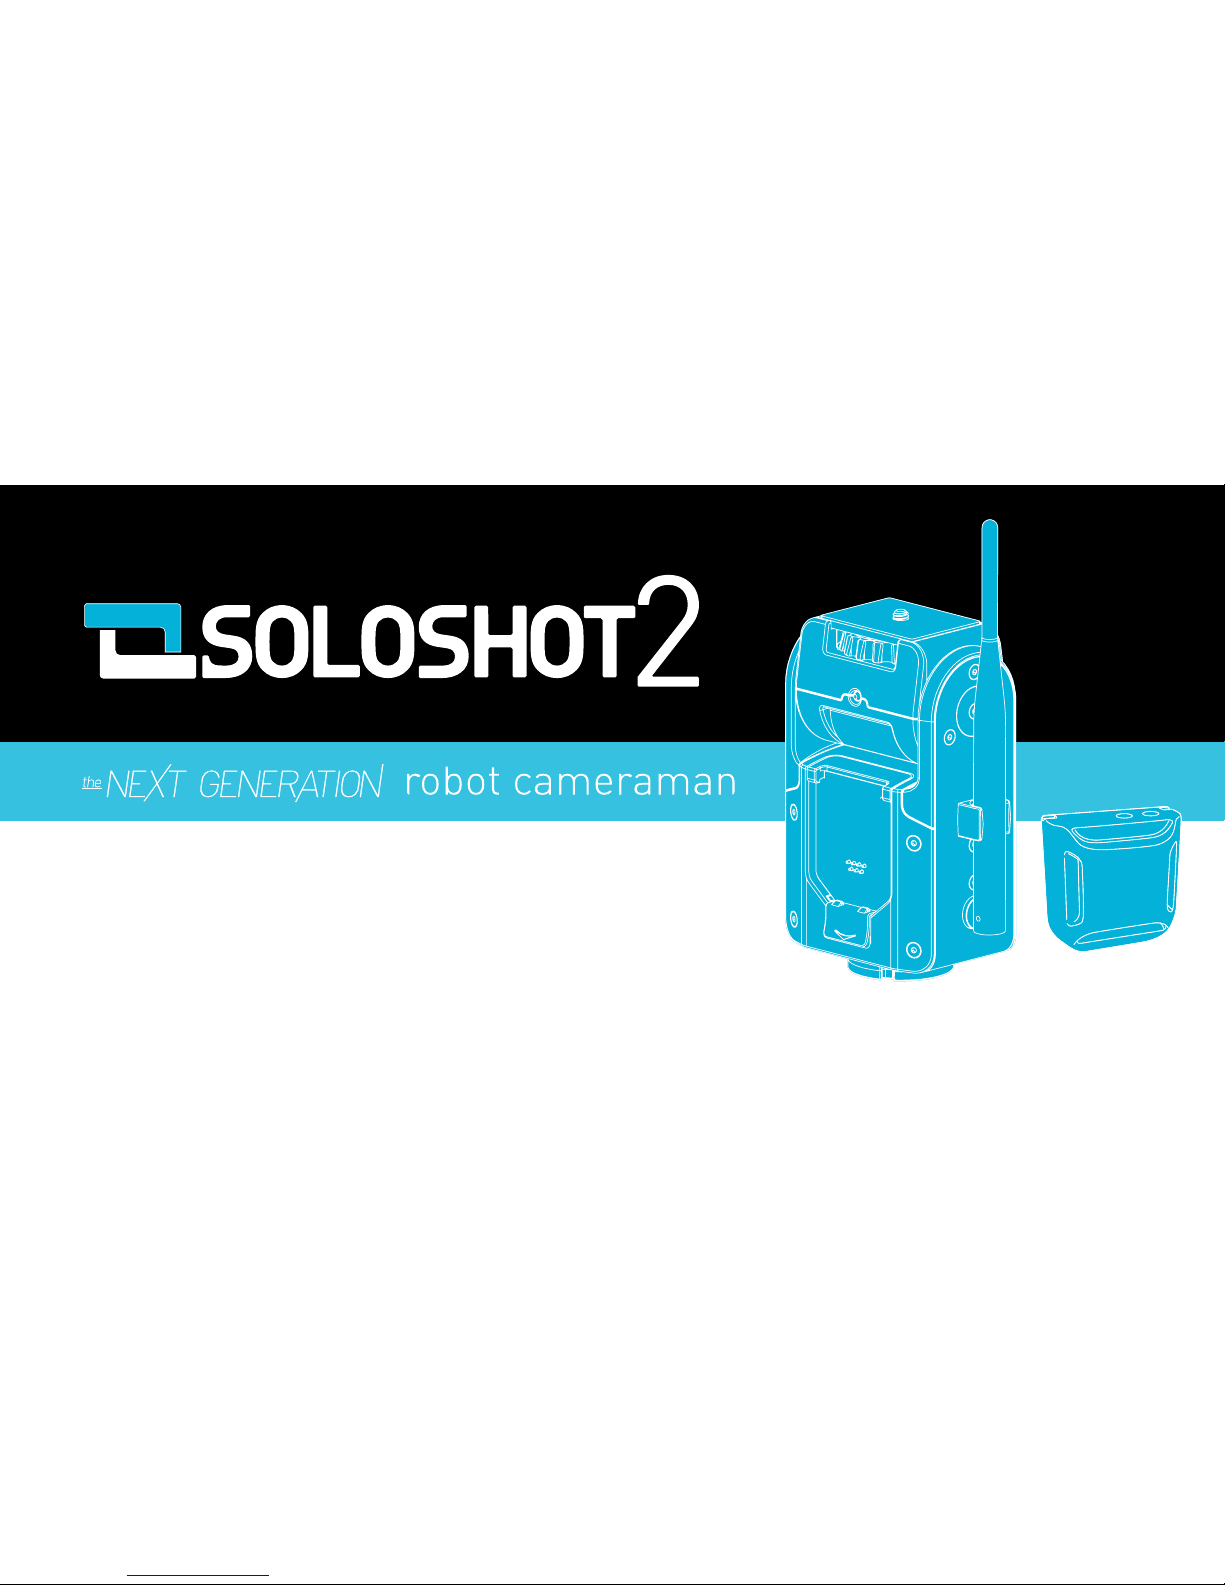
base & tag user guide
Important Usage Instructions
This device complies with Part 15 of the FCC Rules.
Operation is subject to the following two conditions:
(1) This device may not cause harmful interference, and (2) This device must accept any interference received, including interference that may cause undesired operation.
This device meets the requirements for RF exposure to humans when worn on the upper arm or against the body. In order to comply with FCC standards, this device should not be used in any other application
other than that described in this manual.
This device complies with Part 15 of the FCC rules. Changes or modifications to the device not expressly approved by the party responsible for compliance could void the user’s authority to operate the equipment.
When the transmitter is worn on the body, there may be increased risk of injury if the remote strikes a solid object or the ground. The transmitter has been designed to be worn as an armband for use in surfing,
but for other sporting activities, it may be preferable to be placed elsewhere (such as on the outside of a helmet or attached to a vehicle if used in motor sports). There is no one recommendation as it depends on
the activity, terrain, aggressiveness of the activity, and specific use. By using SOLOSHOT, user agrees to assume all risk and not hold Soloshot Inc. liable for injuries or damages in any way.
WARNING - CHOKING HAZARD - CONTAINS SMALL PARTS. KEEP OUT OF REACH OF CHILDREN.
WARNING - STRANGULATION HAZARD - CONTAINS A LONG POWER CORD THAT MAY CAUSE STRANGULATION IF USED IMPROPERLY. KEEP OUT OF REACH OF SMALL CHILDREN.
TO REDUCE THE RISK OF FIRE OR ELECTRIC SHOCK, DO NOT EXPOSE THIS PRODUCT TO RAIN OR MOISTURE. (SOLOSHOT BASE)
TO REDUCE THE RISK OF ELECTRICAL SHOCK AND TO PREVENT UNDESIRABLE INTERFERENCE, ONLY USE THE RECOMMENDED ACCESSORIES.
COPYRIGHT WARNING: Unauthorized recording of copyrighted materials may infringe on the rights of copyright owners and be contrary to copyright laws.
CAUTION: Do not expose this product to excessive heat such as the inside of a car under direct sunlight, fire etc. To reduce the risk of electrical shock, do not dis-assemble the base station. No user-serviceable
parts inside. Refer servicing to qualified service personnel. Warranty voided if unauthorized service is performed.
CAUTION: Do not place more than a well balanced 5 lb load on the SOLOSHOT base.
CAUTION: To prevent electric shock, fully insert plug while charging.
Contains li-polymer battery. Battery must be recycled or disposed of properly.

Important Safety Instructions
In these safety instructions the word “product” refers to SOLOSHOT2 including the BASE, TAG and all of it’s accessories.
1. Read Instructions - All safety and operating instructions should be read completely and understood completely before the product is operated.
2. Retain Instructions - These safety and operating instructions should be retained for future reference. The operator of this equipment should, from time to time, review the manufacturers website for any new or
revised instructions, warnings and safety information.
3. Heed Warnings - All warnings on the product and in the operating instructions should be read, understood and adhered to.
4. Follow all instructions.
5. Do not expose BASE directly to water.
6. Do not place any part of SOLOSHOT2 near any heat sources such as radiators, heat registers, ovens, stoves, or other apparatus (including amplifiers) that produce heat.
7. Only use attachments and accessories specified or approved by the manufacturer of SOLOSHOT2.
8. Unplug this apparatus during lightning storms or when unused for long periods of time.
9. Refer all servicing to qualified service personnel approved by the manufacturer. Servicing is required when the apparatus has been damaged in any way, including power-supply cord or plug damage, liquids have
been spilled into or around the BASE or CHARGER or objects have fallen into the apparatus, the BASE or CHARGER has been exposed to rain or moisture, does not operate normally, or has been dropped.
10. Follow Instructions - All operating and maintenance instructions should be followed.
11. Cleaning – Clean BASE and TAG separately. Clean BASE only with a dry cloth. Unplug BASE from the wall outlet and completely detach CHARGER from BASE before cleaning. Only use a clean dry cloth to clean
the external surfaces of BASE. Do no use liquid or aerosol cleaners on BASE. Clean the TAG only by rinsing in fresh water. The product should be cleaned only as recommended in this manual.
12. Accessories - Only use accessories recommended in this manual as all other accessories may be hazardous.
13. Avoid magnetic or electric fields - Do not use SOLOSHOT2 close to TV transmitters, portable communication devices or other sources of electric or magnetic radiation. They may cause interference or permanent
damage to your SOLOSHOT2.
14. Water and moisture - ELECTRIC SHOCK HAZARD - Do not expose BASE or CHARGER to wet environments. The TAG is waterproof up to 10 ft but BASE and CHARGER are NOT waterproof or water resistant.
15. The TYP60-0901500u Compact Power Adapter (CHARGER) should be operated only from the type of power source indicated on the marking label (AC100 to 240V). If you are not sure of the power supply in your
home, consult your local power company. ONLY USE CHARGER AS DESCRIBED IN THIS INSTRUCTION MANUAL.
16. Power Cord Protection - The power cord of the CHARGER should be routed such that it is NOT likely to be walked on or pinched by items placed upon or against it. Pay particular attention to plugs and the point
from which the cords exit the product.
17. Objects and Liquid Entry - Never push objects of any kind into or through openings of BASE or TAG as they may touch dangerous voltage points or short-out parts that could result in fire or electric shock or
damage to product. Be careful not to spill liquids of any kind on BASE or CHARGER.
18. Servicing - Do not attempt to service any part of SOLOSHOT2 yourself as opening or removing covers or otherwise removing or altering any component of SOLOSHOT2 may expose you to dangerous voltage or
other hazards. Refer all servicing to qualified service personnel. Any attempt to access internal components will void manufacturers warranty.
19. Rinse TAG, CLIP and ARMBAND in fresh water after use in salt water.
Safety and Handling Review full Safety and Handling information in the SOLOSHOT2 User Guide
Videos and Tutorials For SOLOSHOT videos and tutorials visit www.soloshot.com/videos

-------------
1. Equipment Overview .....................................................................................
2. Important Information .....................................................................................
3. Advanced Settings - Base ...............................................................................
6. Advanced Settings - Tag .................................................................................
7. Multi Systems ..................................................................................................
8. Batteries & Charging ......................................................................................
9. Firmware Updates ...........................................................................................
pgs 6 - 9
pgs 10 - 13
pgs 14 - 23
pgs 24 - 29
pgs 30 - 45
pgs 46 - 47
pgs 48 - 49
Table of Contents

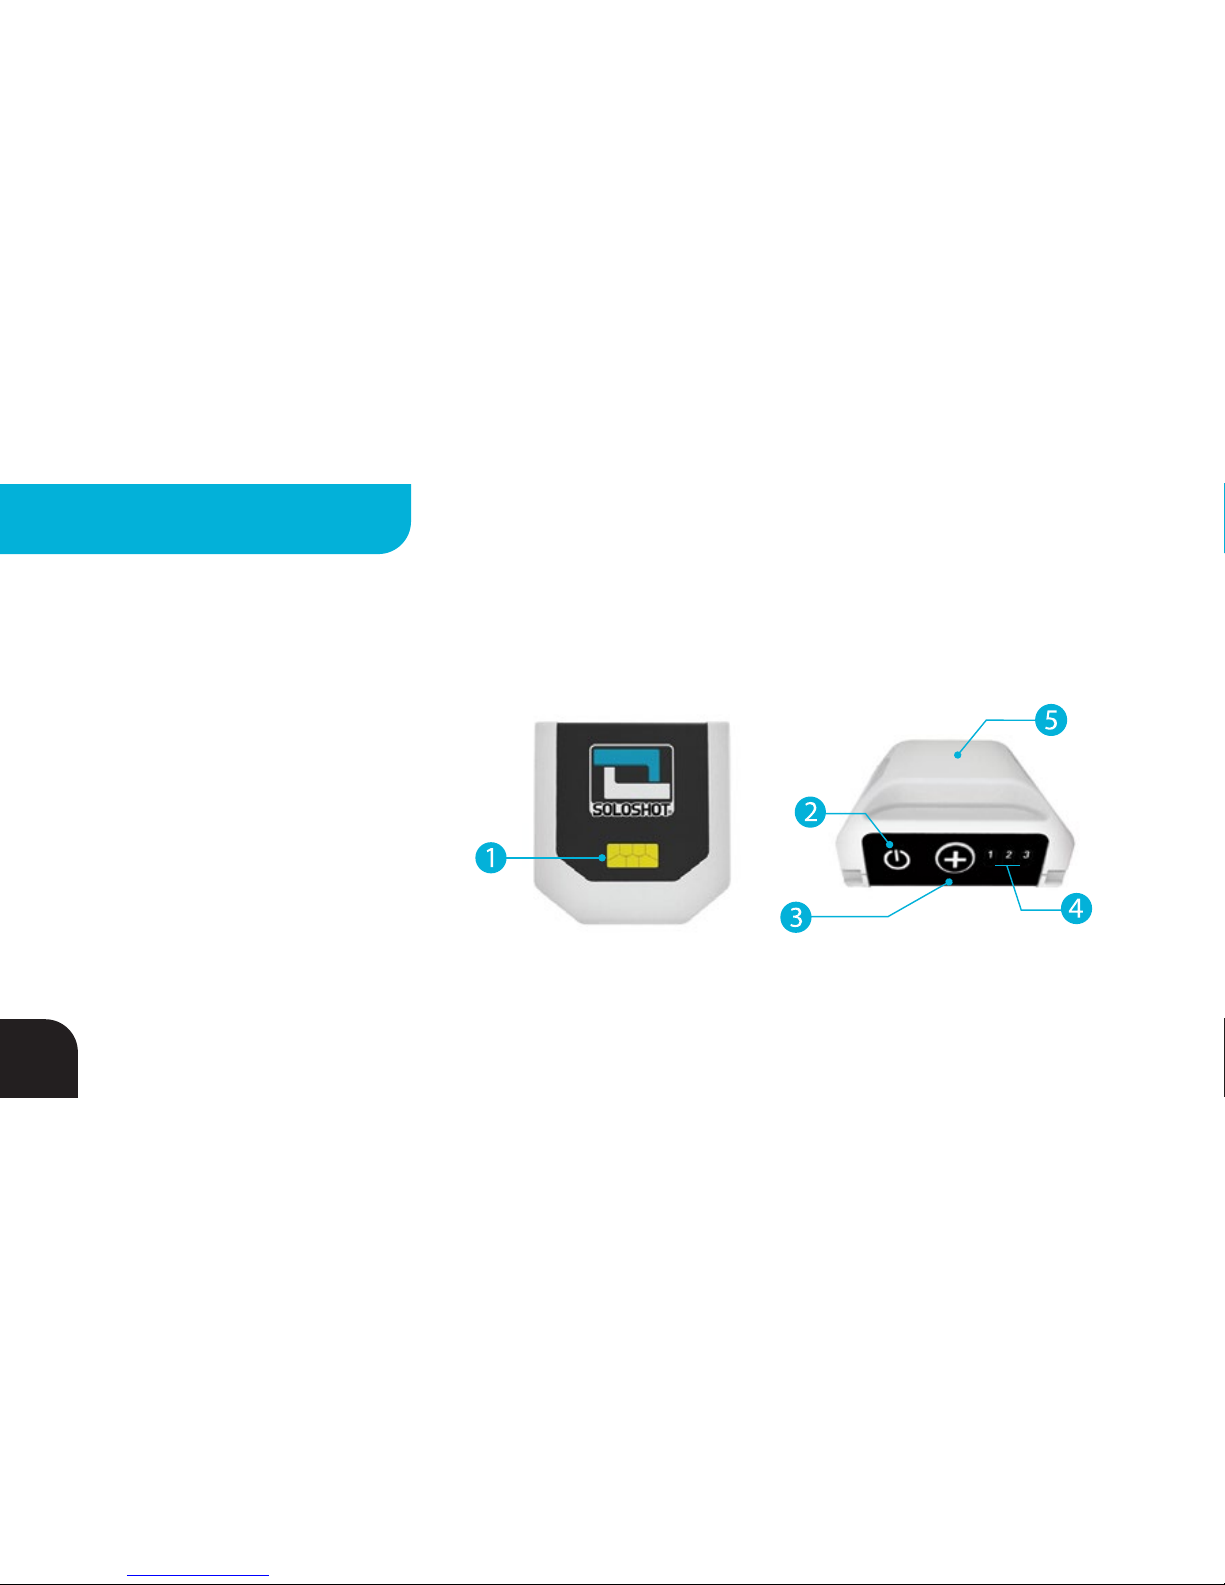
BASE
1. Tracking LED
2. Tilt Drum
3. Accessory Port
4. Mounting Screw
5. Accessory Release Button
6. K-Lock Port
7. USB Ports
(Mini & USB 2.0)
front side
7
6
EQUIPMENT OVERVIEW

BASE
7. Power Button
8. Mode Button
9. Pairing Button
10. Pan/Tilt Buttons
11. Mode LEDs
12. Antenna
13. Tripod Socket
back side
bottom
7
EQUIPMENT OVERVIEW
TAG
1. Charging/Docking
Contact
2. Power Button
3. Pairing Button
4. Status LEDs
5. Top Surface
8
EQUIPMENT OVERVIEW

CHARGING CABLETRIPOD TOOL ARM BANDCLIP
9
EQUIPMENT OVERVIEW

IMPORTANT!
You MUST read and understand the Cheat Sheet that
came with your product so you understand BASIC set up,
pairing and calibration before attempting the advanced
settings described in this manual.
SOLOSHOT is a robot! It assumes that you have
FOLLOWED THESE INSTRUCTIONS. While robots FREE us
from repetitive and time-consuming tasks, they do not
replace HUMAN CREATIVITY. So, please enjoy your
freedom and get creative!
10
LISTEN!

IMPORTANT
Automatic tracking only works
OUTDOORS in wide open spaces!
BASE MUST REMAIN STATIONARY
AFTER SETUP!
USING A CAMERA CONTROLLER
ACCESSORY? Refer to the Cheat Sheet and
Manual enclosed with that product.
11
LISTEN!

IMPORTANT
Tag is waterproof to 20 ft and
shockproof to a free-fall from 10 ft!
CARE INSTRUCTIONS!
Rinse your Tag in fresh water after
use (especially in SALT WATER)!
Wipe the Charging/Docking
Contacts on Tag before charging or
firmware upgrades.
12
LISTEN!

IMPORTANT
Base is NOT waterproof, weather resistant
or shock resistant! Treat with care!
CARE INSTRUCTIONS!
Do not use water to clean your
Base! Only wipe down with a clean
dry cloth and use compressed air to
clear debris or sand from the gold
pins and the Tilt Drum Area.
13
LISTEN!
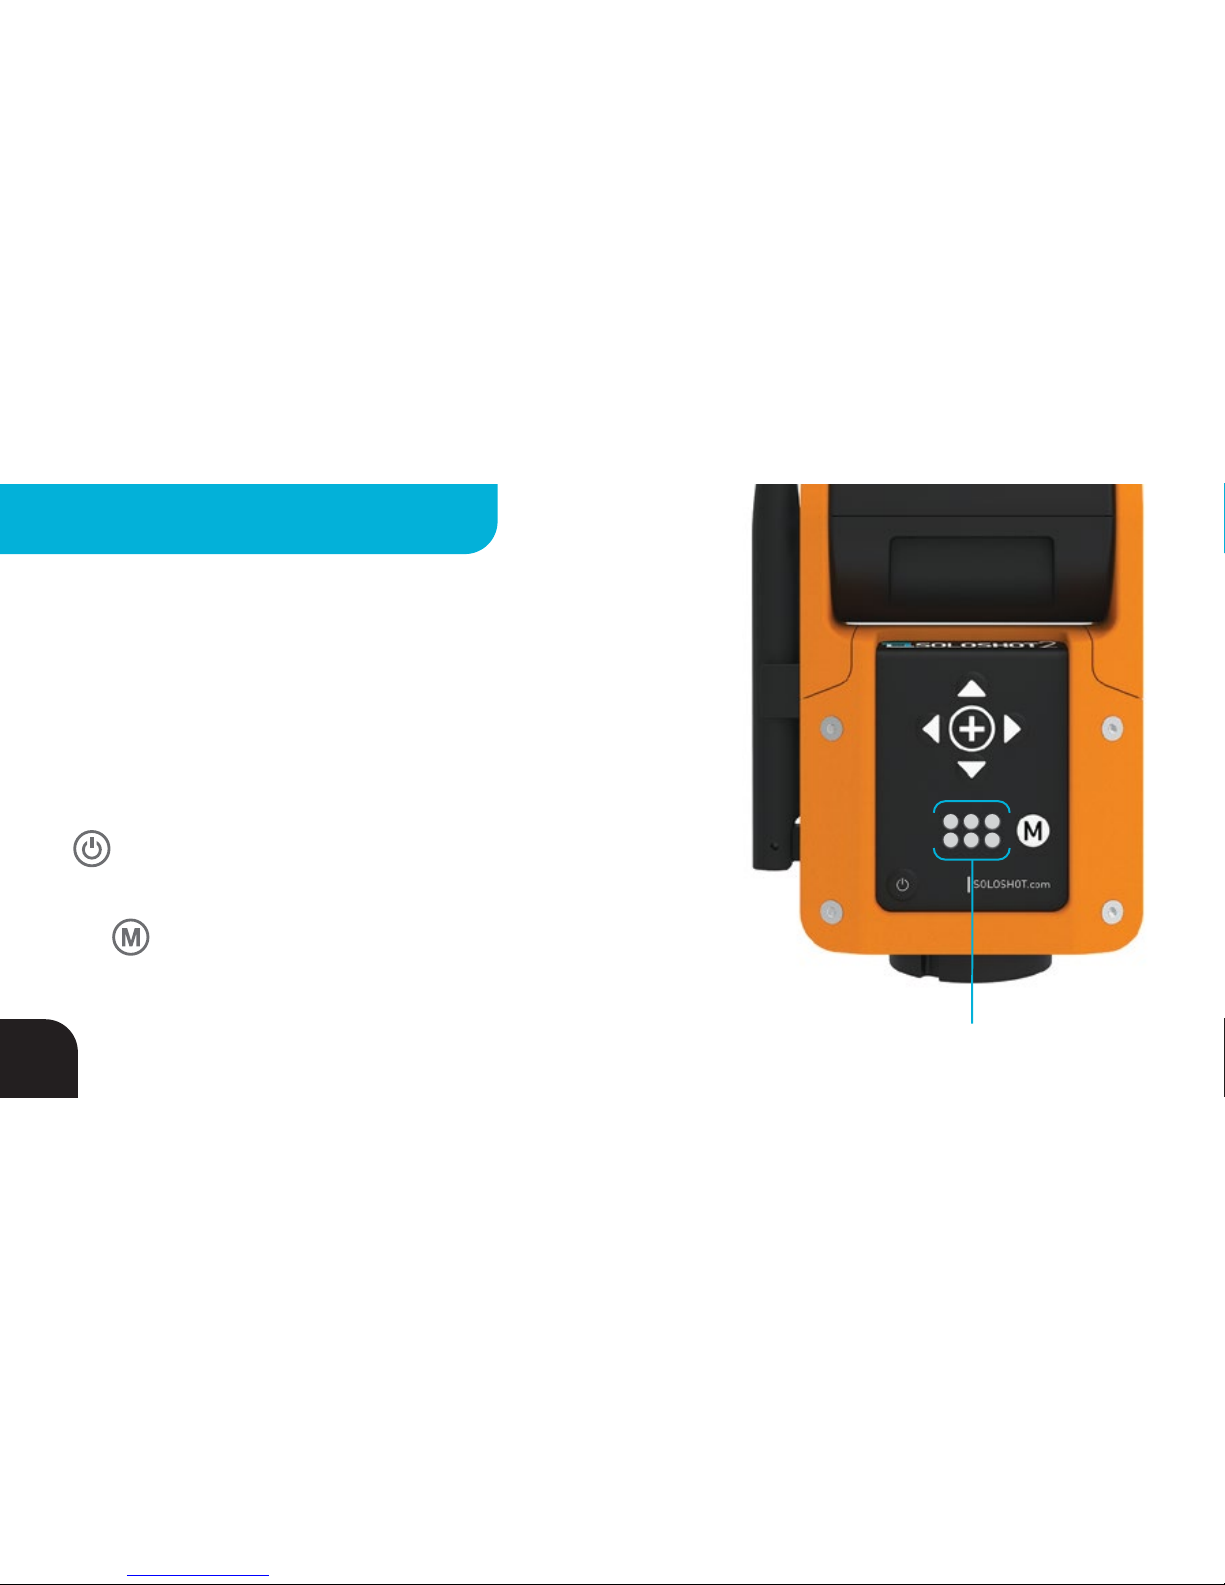
Using Advanced Settings
SOLOSHOT offers a variety of Modes designed for various sports,
shooting styles and situations. Each of the six LEDs on the back of the
Base represents a Setting (indicated by LED#) that can be toggled
between different Modes (indicated by LED color).
Cycle through the Setting LEDs by quickly pressing and releasing the
BUTTON. The active Setting LED will flash.
Cycle through the various Modes within the active Setting by pressing
the BUTTON. The flashing LED will change color as you cycle
through the available Modes.
Try different combinations of Modes to see what works best for you!
Setting & Mode Indicators
1 2 3
4 5 6
14
ADVANCED SETTINGS - BASE

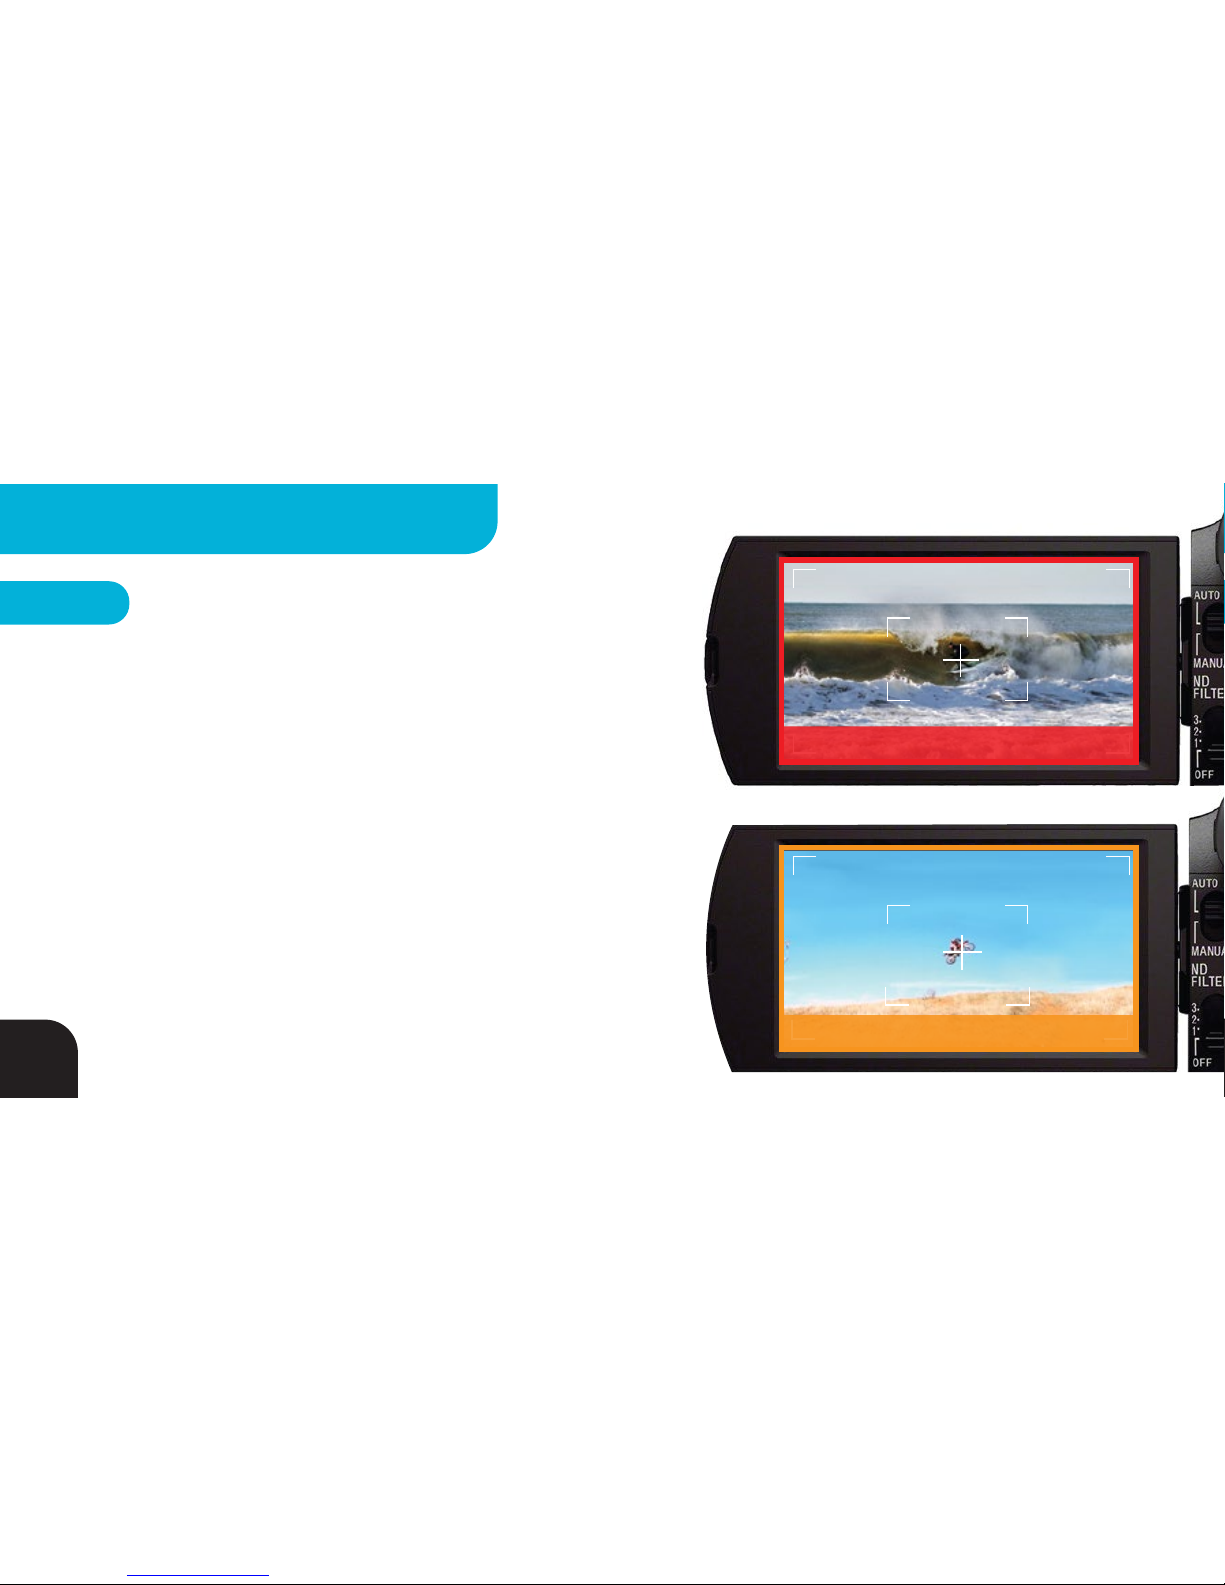
Tilt Settings
GREEN = Surf & Turf Mode – Ideal for sports involving a large,
generally level playing field like Surfing, Park Skating & Soccer.
RED = Big Altitude Mode – Great for sports with large altitude
changes like Skydiving & Snowboarding. NOTE – this mode is
less accurate and therefore requires a wider frame to ensure
most of the action is captured. (See page 18 to learn more.)
ORANGE = Pan Only Mode – Great for filmmaking where
panning alone has the desired cinematic effect. Set the tilt
manually and it will not change during use.
LED 1
Suggested framing for Big Altitude Mode
15
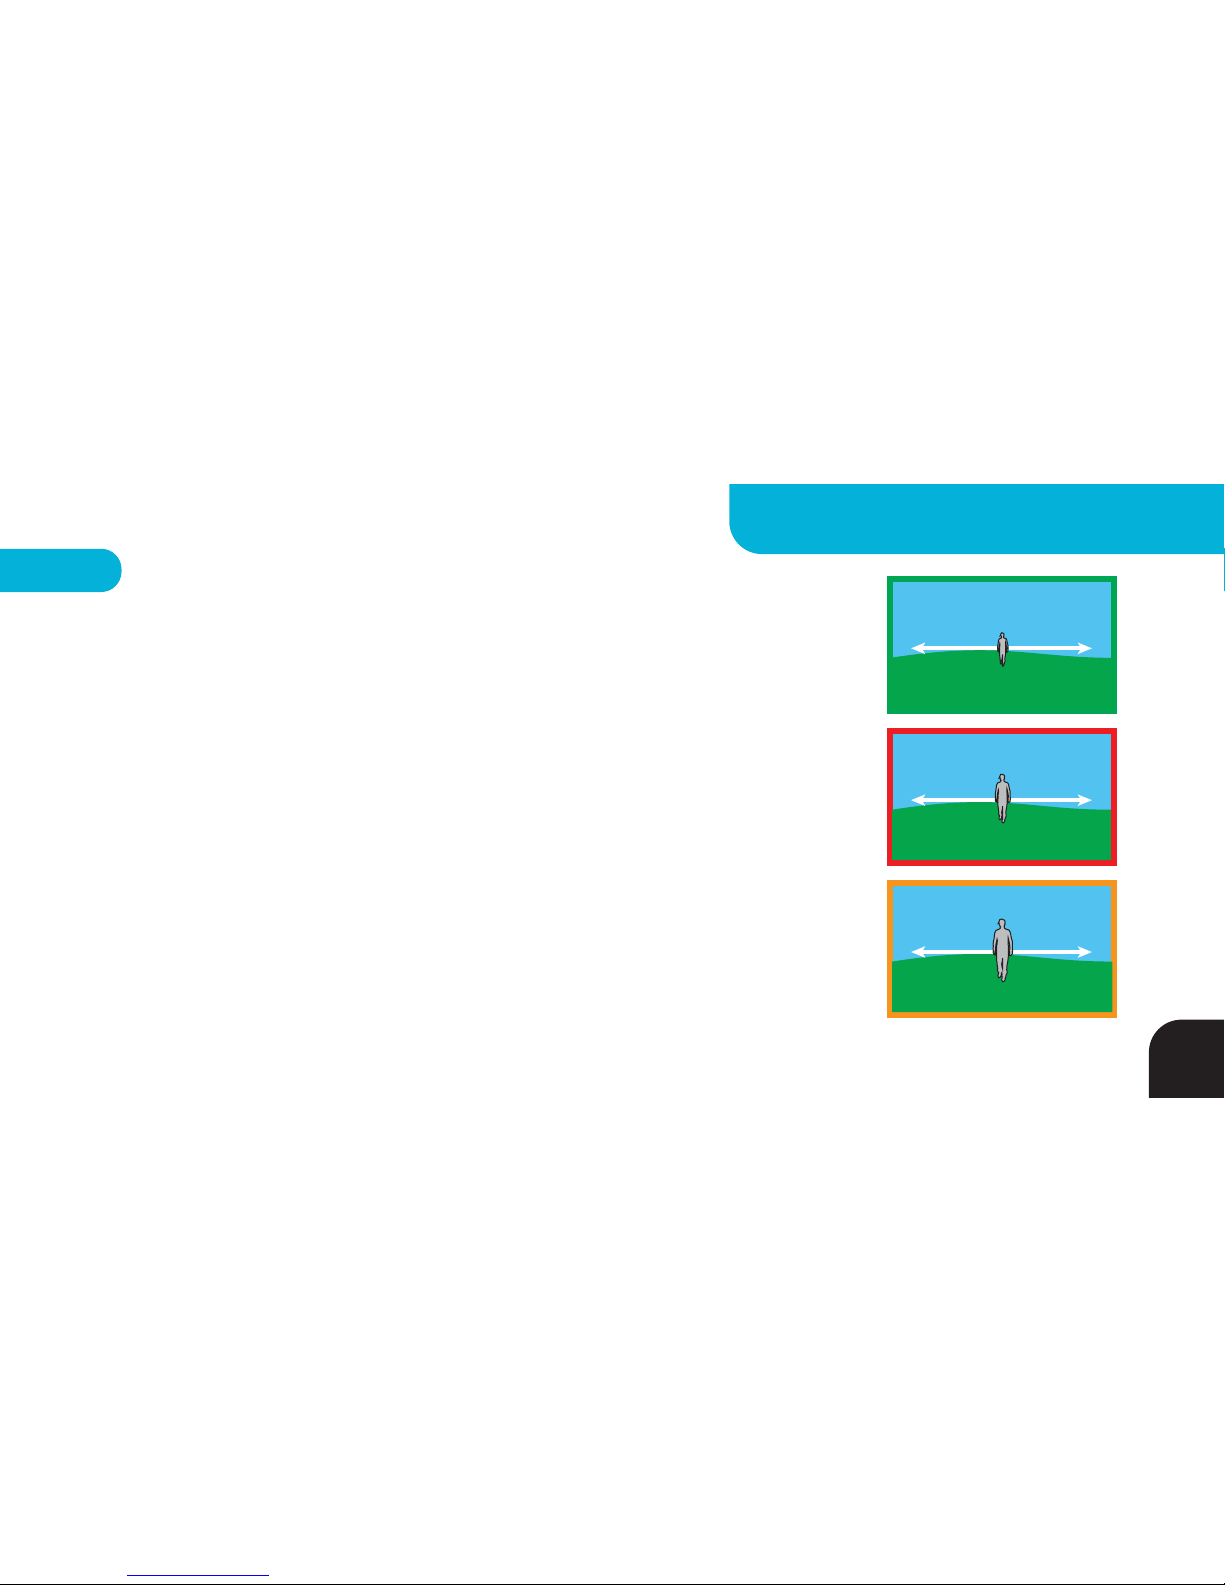
ADVANCED SETTINGS - BASE
LED 2
Specialty Settings
GREEN = Standard Mode (default) – Base tracks Tag based on
LED#1 setting.
RED = Barrel Mode – Base assumes lost communication with Tag
is due to getting barreled and continues to track for 8 seconds or
until communication with Tag is reestablished.
ORANGE = Jump Detection Mode – Designed for activities that
include large jumps on a mostly level surface, like kiteboarding,
BMX or motocross. Jump Detection adds jump-based tilt to Surf &
Turf mode so you can get tighter shots AND capture the jumps.
Suggested framing for Barrel Mode
Suggested framing for Jump Detection Mode
(NOT available in Big Altitude Mode)
16
ADVANCED SETTINGS - BASE
LED 3
Zoom Settings
*Only available when Camera Controller is connected.
GREEN = Wide Frame Mode – Camera Controller automatically adjusts zoom AND tilt
to maintain a wide shot as the Tag moves closer to or farther away from the Base
RED = Medium Frame – Camera Controller automatically adjusts zoom AND tilt to
maintain a medium width shot as the Tag moves closer to or farther away from the Base
ORANGE = Tight Frame Mode - Camera Controller automatically adjusts zoom AND
tilt to maintain a tight shot as the Tag moves closer to or farther away from the Base
NOTE: The subject is less likely to stay centered in the frame as the shots get tighter.
Over-aggressive zooming in some situations can cause the subject to periodically go
out of the frame. In Big Altitude Mode all of the zoom setting frame sizes are 50%
larger than in the Surf & Turf and Pan Only modes.
WIDE
MEDIUM
TIGHT
17
ADVANCED SETTINGS - BASE

Single/Multi Settings
Toggle to Multi Mode in order to track multiple Tags from the
same Base.
GREEN = Single Mode (default)
RED =Multi Mode
SEE PAGES 25 - 40 FOR DETAILED DESCRIPTION OF
CREATING & MANAGING MULTI SYSTEMS.
LED 4
B
Single Base - to - Multiple Tags*
T
T
T
B
Single Base - to - Single Tag
T
18
ADVANCED SETTINGS - BASE

Multi Mode Settings
only available in Multi Mode
Use this setting to tell the Base when to switch
between Tags.
GREEN = Closest Mode - Base will follow
the closest Tag
RED = Fastest Mode - Base will follow the
fastest Tag
ORANGE = Follow Me Mode - Allows a Tag to
“call” the Base by pressing its BUTTON or
by firmly tapping the white side of the Tag three
times in rapid succession.
LED 5
T
T
T
T
T
T
T
T
B
B
T
T
Single Base - to - Fastest Tag Single Base - to - Follow Me Tag
Single Base - to - Closest Tag
B
SEE PAGES 25 - 40 FOR DETAILED DESCRIPTION OF CREATING & MANAGING MULTI SYSTEMS.
19
ADVANCED SETTINGS - BASE

27
Multi Mode Record Settings
*Only available if Multi Mode is ON and Camera Controller is connected to a supported camera.
GREEN = Cut Mode - creates a new video file each time the Base switches between Tags
RED = Continuous Mode – continuous video recording when the Base switches between Tags
These Modes assume that all Tags being tracked are set to camera record. If the Base switches to a
Tag that is set to camera standby, the camera will stop recording regardless of the Multi Mode Record
Setting. See page 19 for detailed instructions on how to toggle a Tag between record and standby.
SEE PAGES 25 - 40 FOR DETAILED DESCRIPTION OF CREATING & MANAGING MULTI SYSTEMS.
LED 6
20
ADVANCED SETTINGS - BASE
Other manuals for SOLOSHOT2
1
Table of contents
Other Soloshot Camera Accessories manuals


