Sonardyne iWAND User manual
QUICK START GUIDE
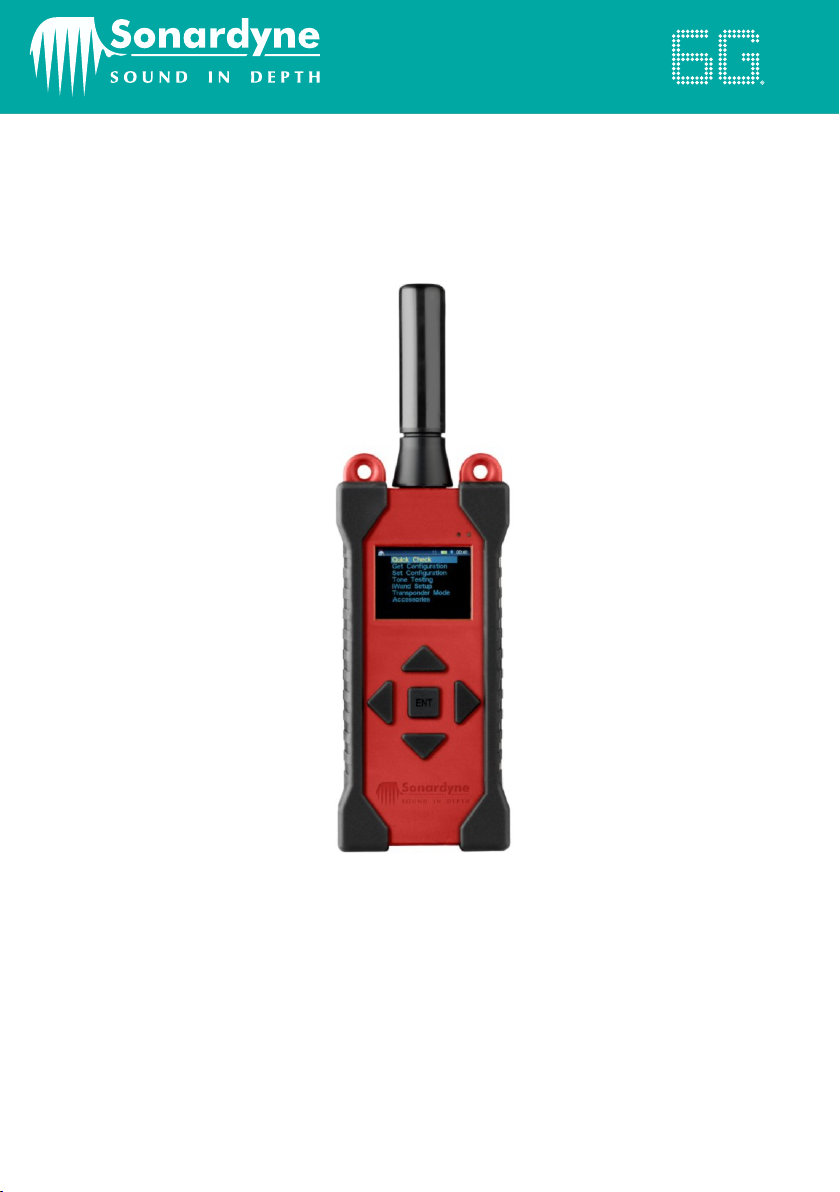
iWAND
OPERATION GUIDE
QSG-OG-8315-A1
05/2013
910-0006

SAFETY
STEP 1
PRODUCT SUPPORT
Email: [email protected]
Tel: +44 (0) 1252 872288
Should you require NON-EMERGENCY product support for your iWAND, email and
telephone product support is available during normal UK office hours (08:00-17:00
GMT). Alternatively, please contact your nearest Sonardyne Office. Visit
www.sonardyne.com for full details.
In emergency situations, the Sonardyne 24 hour helpline is answered during normal office
hours - 08:00-17:00 GMT. Outside these hours, your call is automatically transferred to
an agency who will log the details of your emergency and alert the appropriate
Sonardyne personnel. Our aim is to ensure that emergency requests are dealt with
immediately during office hours and are responded to within 30 minutes at all other times.
SONARDYNE 24HR EMERGENCY HELPLINE: UK +44 (0) 1252 877600
It is recommended the operator complies with the Health and Safety Regulations
applicable to the vessel and the region before operating this equipment.
If the equipment is used in a manner not specified by the manufacturer, the protection
provided by the equipment may be impaired.
Documentation must be consulted whenever the warning symbol is found on the
equipment, in order to find out the nature of the potential hazard and any actions which
must be taken.
The iWAND contains no user serviceable parts. Under no circumstances should the plastic
housing be opened - any repairs require the unit to be returned to Sonardyne.
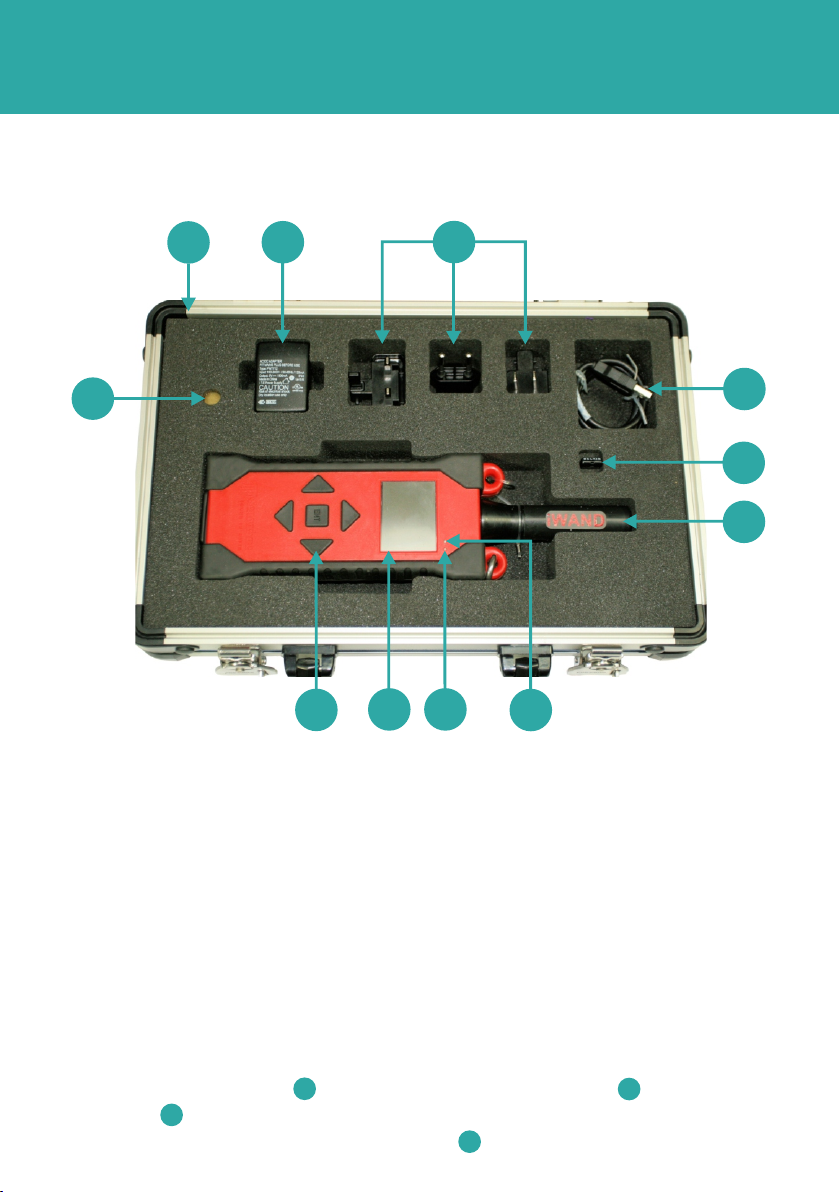
EQUIPMENT SUPPLIED
1 Transit Case
2 Power Adaptor
3 Universal Adaptors
4 USB Lead
5 Bluetooth Dongle
6 Acoustic Transducer
7 Bluetooth Connected LED
8 Fully Charged LED
9 Colour LCD Display
10 5 Button Keypad
11 Reset Magnetic Disc
STEP 2
1
23
4
5
6
7
8
9
1
0
11
1 On receipt of the equipment, open the transit case and visually inspect the
equipment for any signs of damage, e.g. cracking, dents or bent electrical pins.
2 Using the power adaptor with the correct universal adaptor and the
USB Lead , connect the iWAND to a mains power supply and fully charge. This
will be indicated by the green charging LED .
23
4
8
INSTALLING THE SOFTWARE
The iWAND is used in conjunction with the iWAND 6G Configurator software to allow all
6G instruments to be easily configured and acoustically tested. The iWAND 6G
Configurator software must be downloaded from the CD on to a PC.
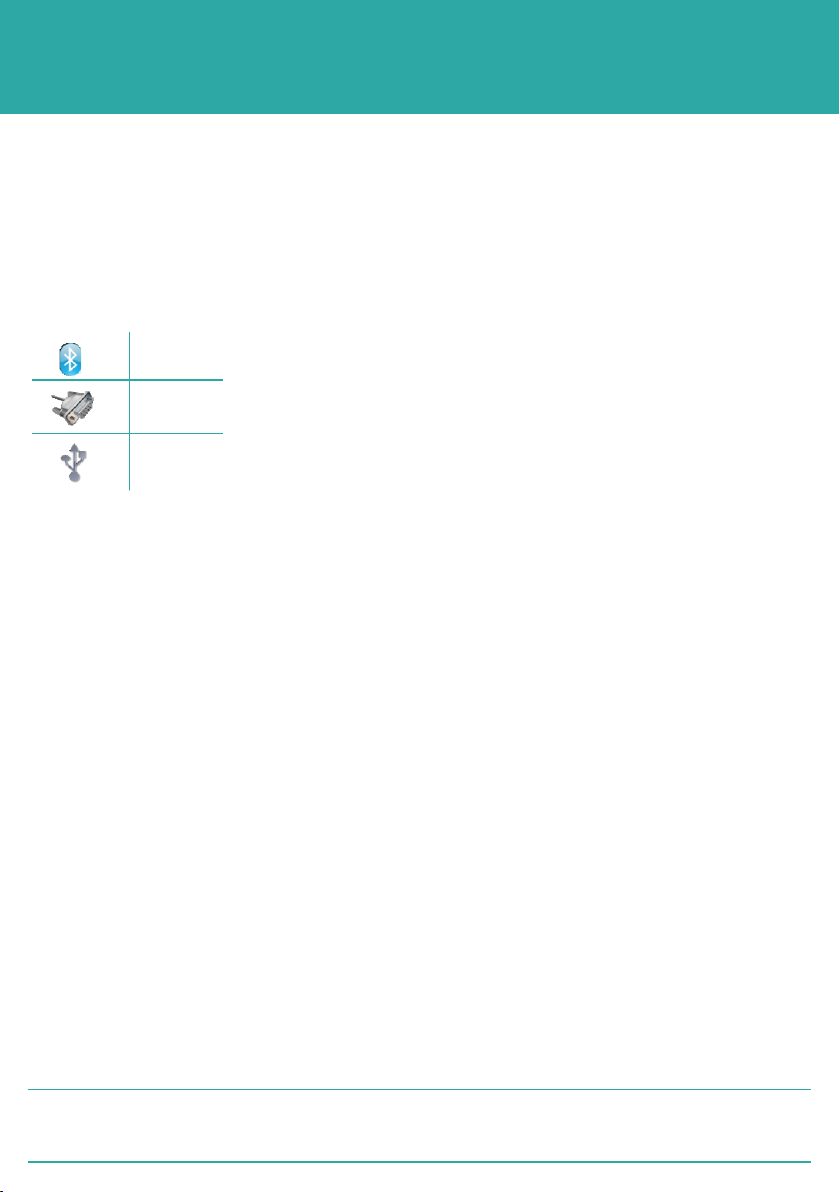
Once downloaded the iWAND has various connection methods:
STEP 3
The USB is also used to recharge the internal battery. The internal GPS receiver provides
UTC time tagging off communication to assets and can also be used to synchronise
multiple assets to GPS time for logging applications.
Bluetooth
(works with Windows 7 only)
Serial
USB
CHARGING THE iWAND
Before using the iWAND it will be necessary to charge it using the wall plug charger
connected to the USB connection point. Connect the iWAND to a mains power supply
and fully charge. This will be indicated by the green charging LED.
1 Before using the iWAND it will be necessary to set the UTC real time on the LCD
display.
2 Turn on the iWAND by pressing the ENT button in the middle of the keypad.
3 Make sure the GPS is enabled by scrolling to iWAND Setup > Power Saving >
GPS Enable.
4 With the GPS enabled, stand outside and hold the iWAND so it has a clear view of
the sky.
5 After a short period of time the iWAND time will appear on the screen.
SETTING THE iWAND TIME
The iWAND time shown is the UTC time and not local time.
2NOTE
STEP 4
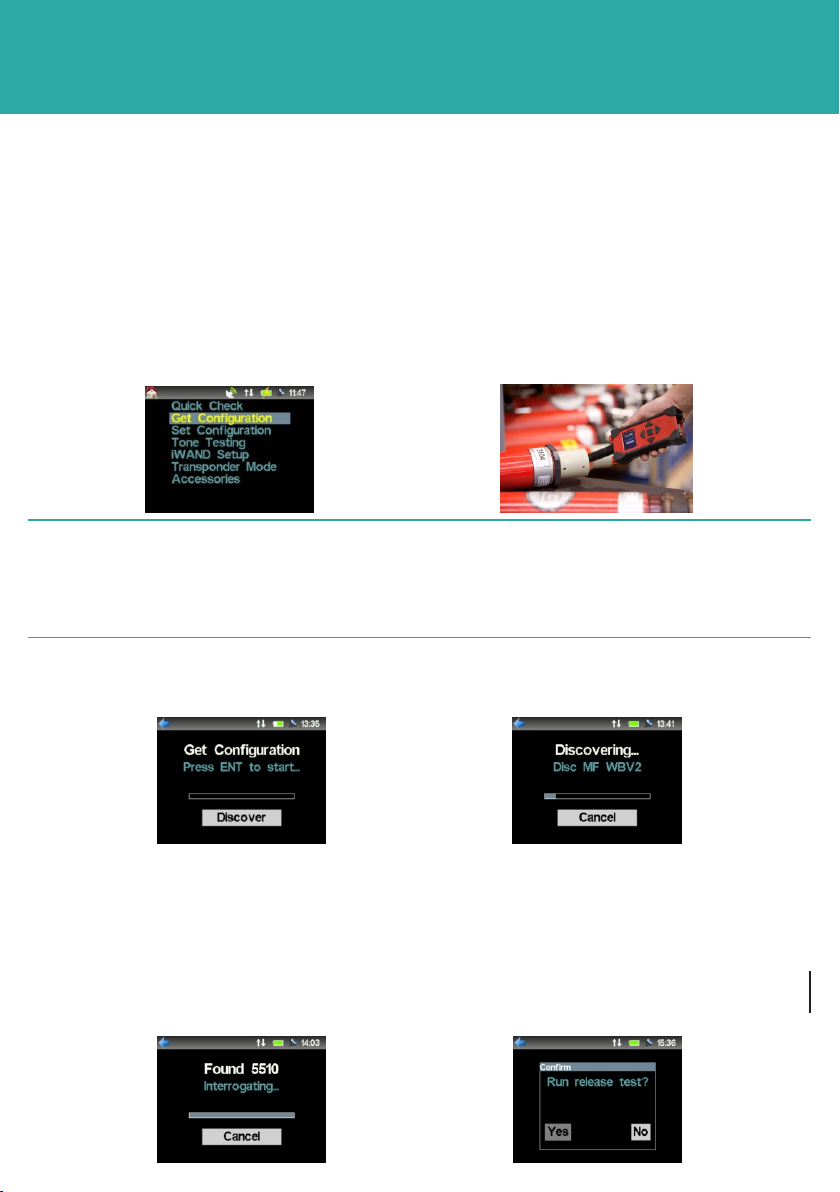
GET CONFIGURATION
The iWAND requires no pre-programming with information. It will automatically discover
the address and download the instrument status.
1 From the iWAND main menu select Get Configuration.
2 Hold the iWAND acoustic transducer against the transducer of the instrument.
OPERATING THE EQUIPMENT
The iWAND acoustic transducer must remain in contact with the
transducer of the instrument during any transferral of information. If
contact is not maintained the information transferral will be lost.
2NOTE
3 Press the ENT button on the iWAND to start the Get Configuration sequence.
4 The Discovering sequence will gather all the information from the instrument.
5 When the iWAND has found the instrument, the address will appear. If this fails,
refer to ‘Pre-requisites for Operation’ in Section 5 of the iWAND UM-8315
manual.
6 The iWAND will begin to interrogate the instrument for it’s configuration.
7 If the the iWAND detects a Release Mechanism is fitted to the instrument the Get
Configuration sequence will ask if a Release Test is required.
STEP 5
GET CONFIGURATION
OPERATING THE EQUIPMENT
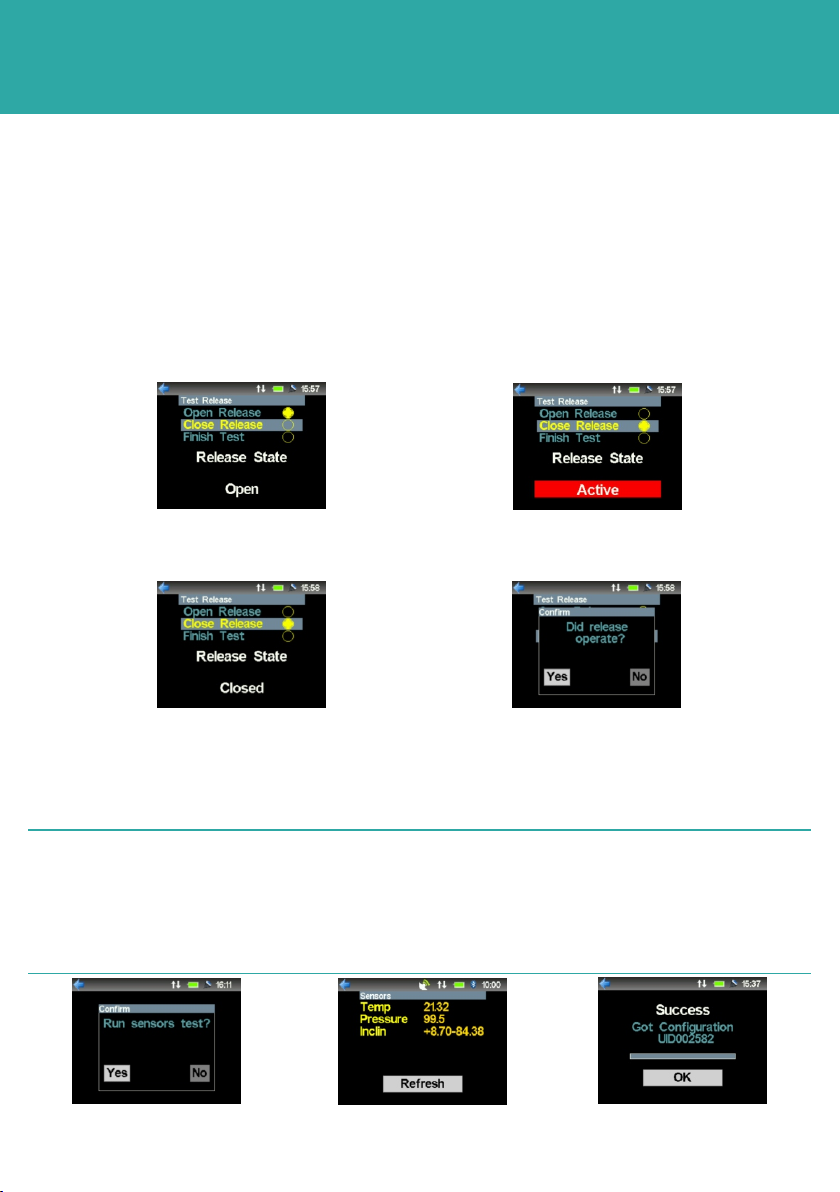
8 If a Release Mechanism test is selected the iWAND will display what state the
release is in.
9 Select a position to move the release mechanism to then press ENT.
10 The display will show the release mechanism is Active.
11 When the release has finished moving, the iWAND will display the new state.
12 Confirm the release mechanism has operated.
13
sequence will ask if a Sensor Test is required.
14 If Yes is selected the iWAND will display the current measurements of each sensor
available in the instrument.
If the iWAND detects sensors are fitted to the instrument the Get Configuration
The sensor value will change colour depending on the status of the
measurement. Green:- the measurement is valid and less than 10
seconds old; Orange:- the measurement is greater than 10 seconds old;
Red:- the measurement is reported in error (out of range).
2NOTE
15 Once all tests have been completed. The iWAND will display Success Got
Configuration and the instrument address.

STEP 6
OPERATING THE EQUIPMENT
4 On the iWAND 6G Configurator Software toolbar select Configuration.
5 From the drop down list menu select Find Port.
CONNECTING THE iWAND TO THE iWAND 6G CONFIGURATOR
SOFTWARE
Connection of the iWAND to the iWAND 6G Configurator software can be achieved
either by Bluetooth, a USB connection or Serial Port.
Connecting the iWAND using Bluetooth
1 To be able to connect to the iWAND using Bluetooth, make sure the Bluetooth on the
PC is enabled.
2 Make sure Bluetooth on the iWAND is enabled. Using the keys scroll to iWAND
Setup > Communications > Bluetooth. Press ENT.
3 Open the iWAND 6G Configurator Software by clicking on the icon.
When connecting using the Bluetooth make sure the supplied Bluetooth
dongle is used. Drivers for the dongle are supplied on the Belkin
Bluetooth CD. Refer to the iWAND manual UM-8315 for instructions on
connecting the Bluetooth drivers.
2NOTE
STEP 7
OPERATING THE EQUIPMENT
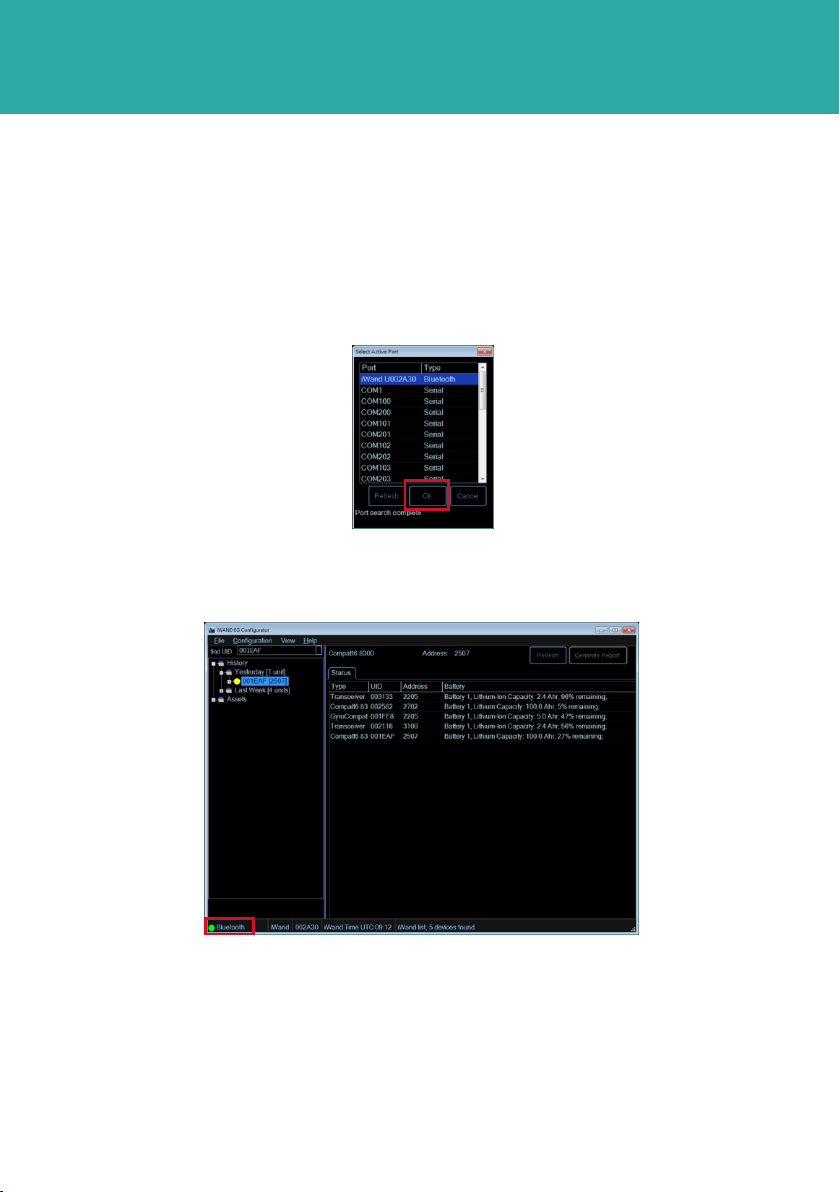
9 If a successful connection is made the iWAND 6G Configurator homepage will now
appear. A green indicator, at the bottom of the screen will show, the Bluetooth is
connected and all data stored in the iWAND will be displayed.
Connecting the iWAND using USB
1 To connect the iWAND using a USB port, make sure the iWAND is connected to the
PC using the supplied USB cable.
2 To connect to the iWAND 6G Configurator software follow the same procedure as
connecting using Bluetooth, but select the correct Coms port the USB is connected to.
The ‘Type’ field on the select active port window will show USB. Refer to the iWAND
manual UM-8315 for instructions on installing the USB drivers.
6 In the Select Active Port window, the software will seek a Bluetooth connection.
7 When the iWAND Bluetooth has been detected it will appear at the top of the list.
8 Confirm the UID of the iWAND listed is correct. Click OK to connect to the iWAND.
Connecting the iWAND using Bluetooth
STEP 8
OPERATING THE EQUIPMENT
OPERATING THE iWAND 6G CONFIGURATOR SOFTWARE
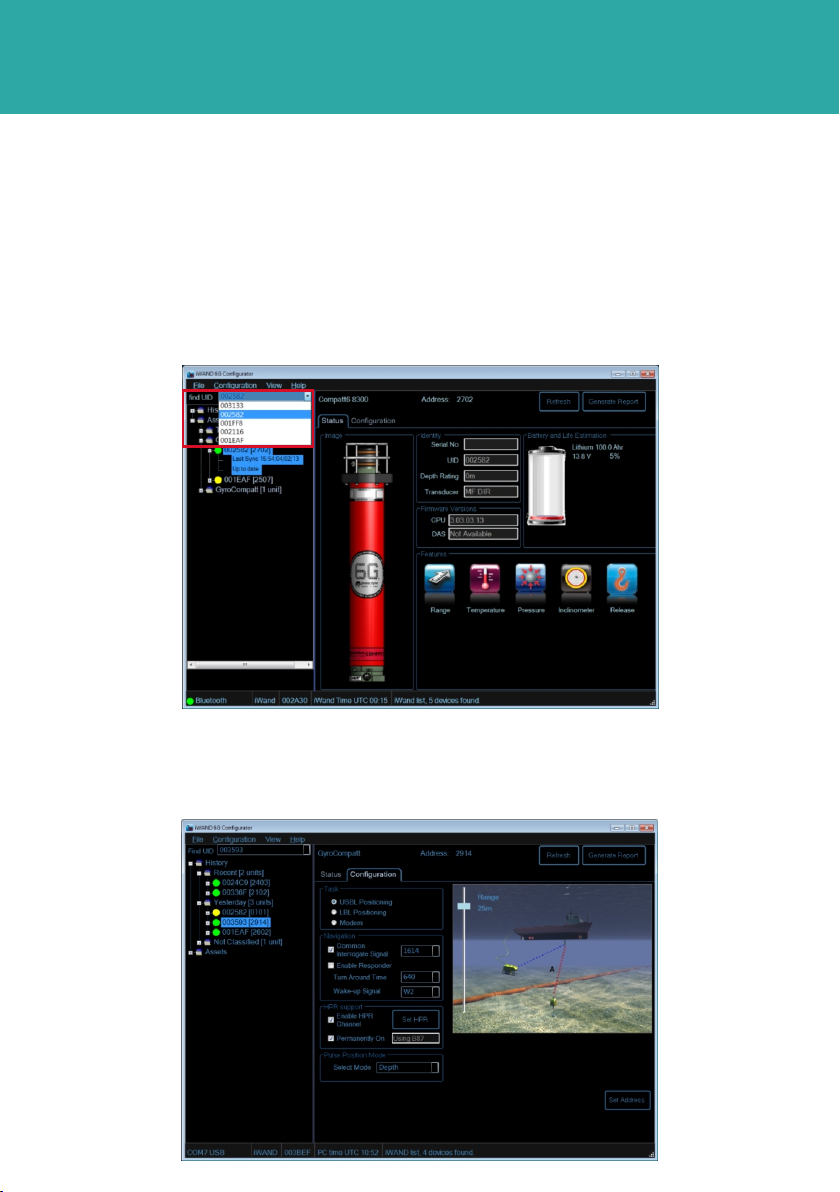
1 To view an instrument, select it either from the History list or the Asset List.
2 Alternatively, enter the UID of the instrument, if known, in the find UID drop down
box.
3 The Status tab will provide information about the selected instrument.
4 Configuration of an instrument can be changed by selecting the Configuration tab.
STEP 9
OPERATING THE EQUIPMENT
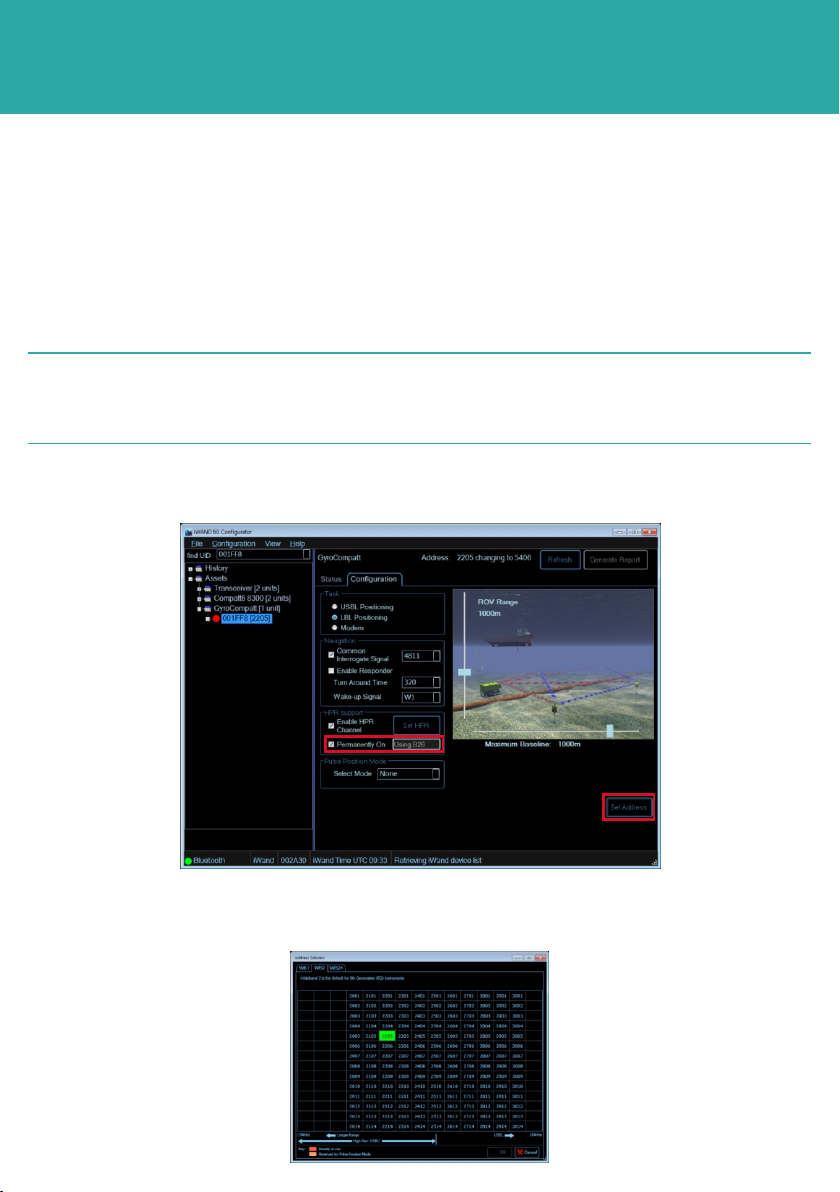
5 Slide bars down the side or across the bottom of the image allow Power and Gain
settings to be changed according to operational requirements.
6 The instrument Task can be changed by selecting a different positioning technique.
7 The Navigation settings of the instrument can be changed by enabling options and
then selecting values from drop down lists.
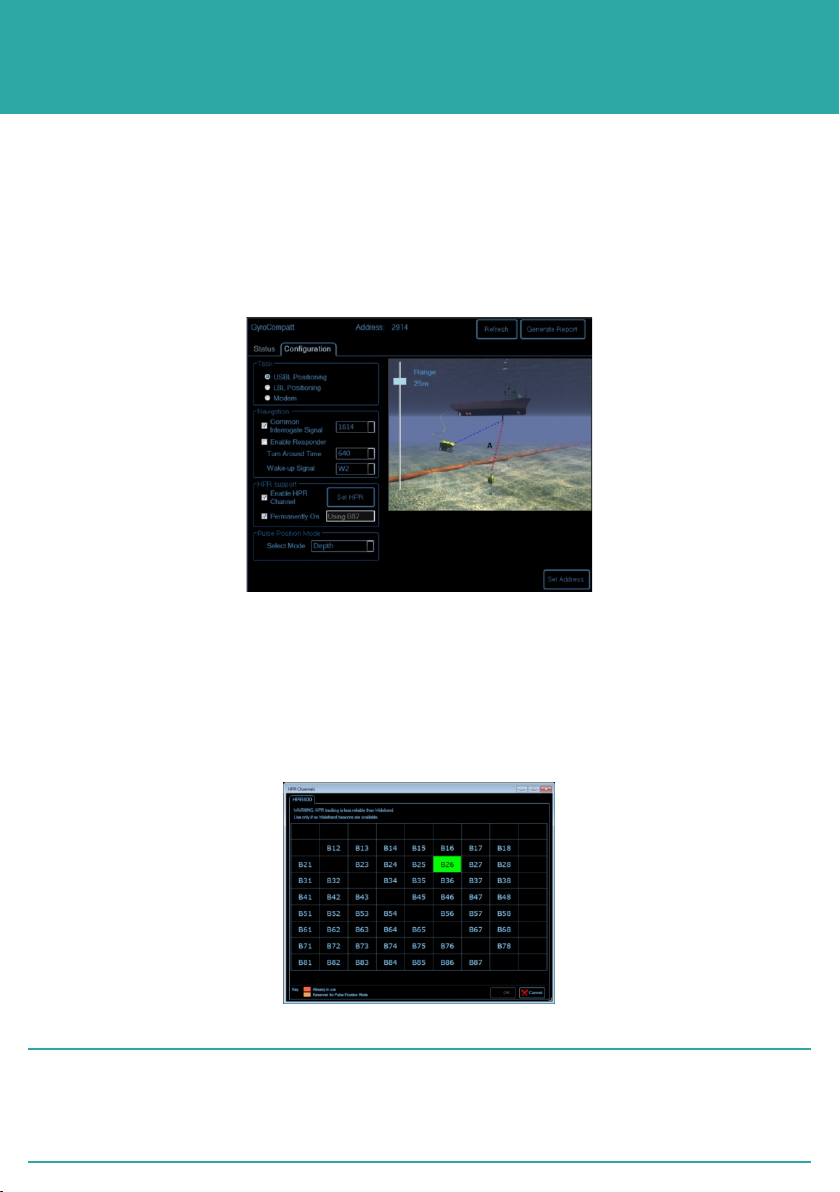
8 In the HPR Support section, the Enable HPR Channel can be enabled. If this is
selected the Set HPR button will appear. If the Set HPR button is pressed the HPR
channel screen will appear.
OPERATING THE iWAND 6G CONFIGURATOR SOFTWARE
9 Select the required HPR channel then click OK.
The HPR should only be enabled if integrated with a 3rd party system. To
obtain the performance benefits of Sonardyne 6G equipment, HPR
should be avoided.
2NOTE
STEP 10
OPERATING THE EQUIPMENT
10 In the HPR Support section, as soon as the Enable HPR channel is selected the
Permanently On option will default to on.
11 Select the required Pulse Position Mode from the drop down menu.
OPERATING THE iWAND 6G CONFIGURATOR SOFTWARE
13 Clicking Set Address will open the address window.
14 Choose the new address according to the Wideband being used. Click OK.
The Pulse Position Mode options will only be available if the relevant
sensors are fitted to the instrument.
2NOTE
12 If necessary it is possible to change the Address of the instrument by selecting the
Set Address button at the bottom of the Configuration tab.

STEP 11
OPERATING THE EQUIPMENT
16 The iWAND 6G Configurator software uses a traffic light system to indicate the
status of the equipment.
17 The traffic lights next to the unit indicate the following:
ŸGreen - indicates the instrument configuration is fully up to date.
ŸAmber - indicates that changes have been made to the configuration on the
iWAND 6G Configurator software and transferred to the iWAND but not yet
transferred to the instrument.
ŸRed - indicates when configuration changes have been made on the iWAND 6G
Configurator software but these have not yet been transferred to the iWAND.
OPERATING THE iWAND 6G CONFIGURATOR SOFTWARE
15 Notification of the address change and the new address will now appear at the top
of the iWAND 6G Configurator page.
STEP 12
OPERATING THE EQUIPMENT
USING THE iWAND TO SET CONFIGURATION
Once an instrument has been configured by the iWAND 6G Configurator software, the
settings will be automatically downloaded to the iWAND ready for a synchronisation
process to be performed.
Disconnect the iWAND from the PC and move to the location of the 6G equipment to be
configured.
Configurations for multiple instruments can be held by the iWAND at the same time.
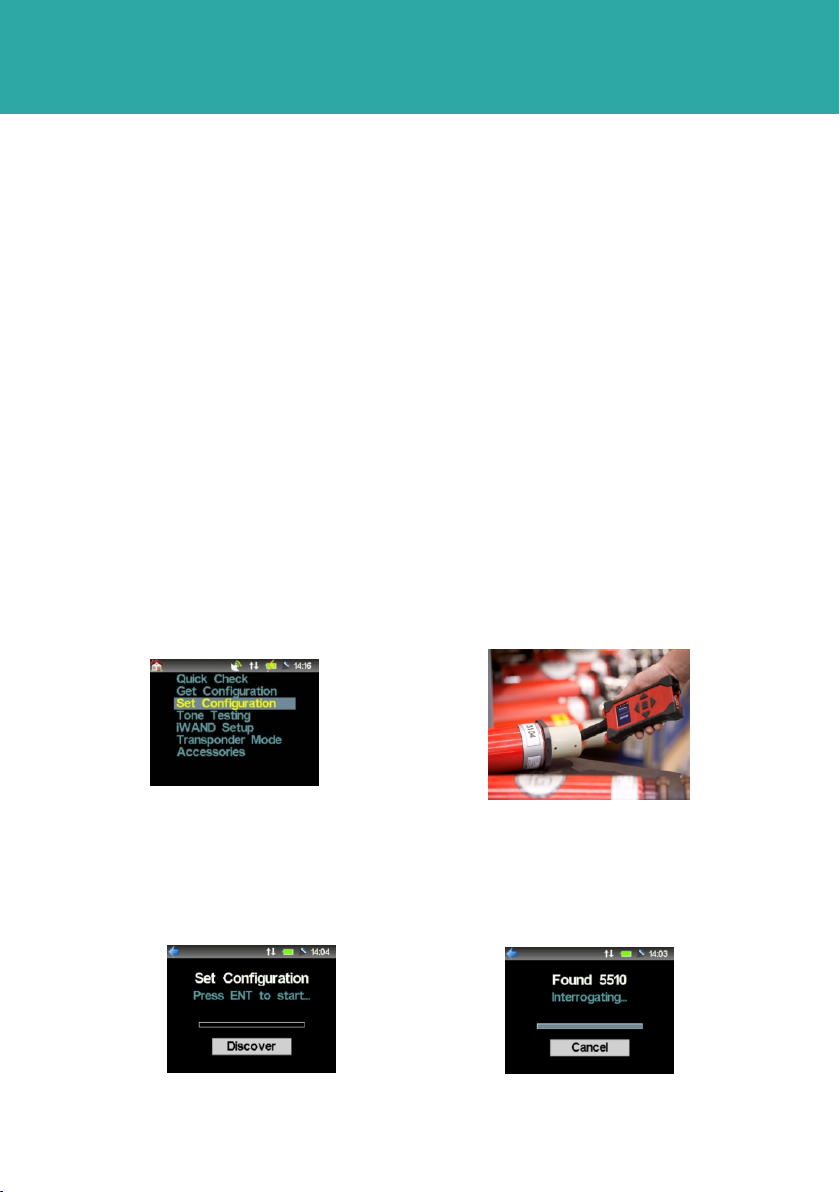
1 On the iWAND home screen select Set configuration from the main menu.
2 Hold the iWAND acoustic transducer firmly against the transducer of the instrument
and maintain contact throughout the configuration.
18 Configuration changes made to an instrument on the iWAND 6G Configurator
Software must now be transferred to the instrument.
OPERATING THE iWAND 6G CONFIGURATOR SOFTWARE
3 Press ENT to start the configuration process.
4 When the iWAND has found the instrument, the address will appear.
5 The iWAND will detect if a new configuration is pending based on the UID, and
sends the appropriate setting changes to that unit.
6 If the iWAND detects a Release Mechanism or Sensors are fitted to the
instrument, it will ask if a Release Test or Sensor test is required. Refer to Get
Configuration (Step 4) for the Release and Sensor Test procedure.

STEP 13
OPERATING THE EQUIPMENT
USING THE iWAND TO SET CONFIGURATION
9 On completion of the Set Configuration, connect the iWAND to a PC either by
Bluetooth, Serial Port or USB connection.
10 Check the traffic lights next to the instrument is green. This will confirm that the
configuration changes have successfully been transferred to the instrument.
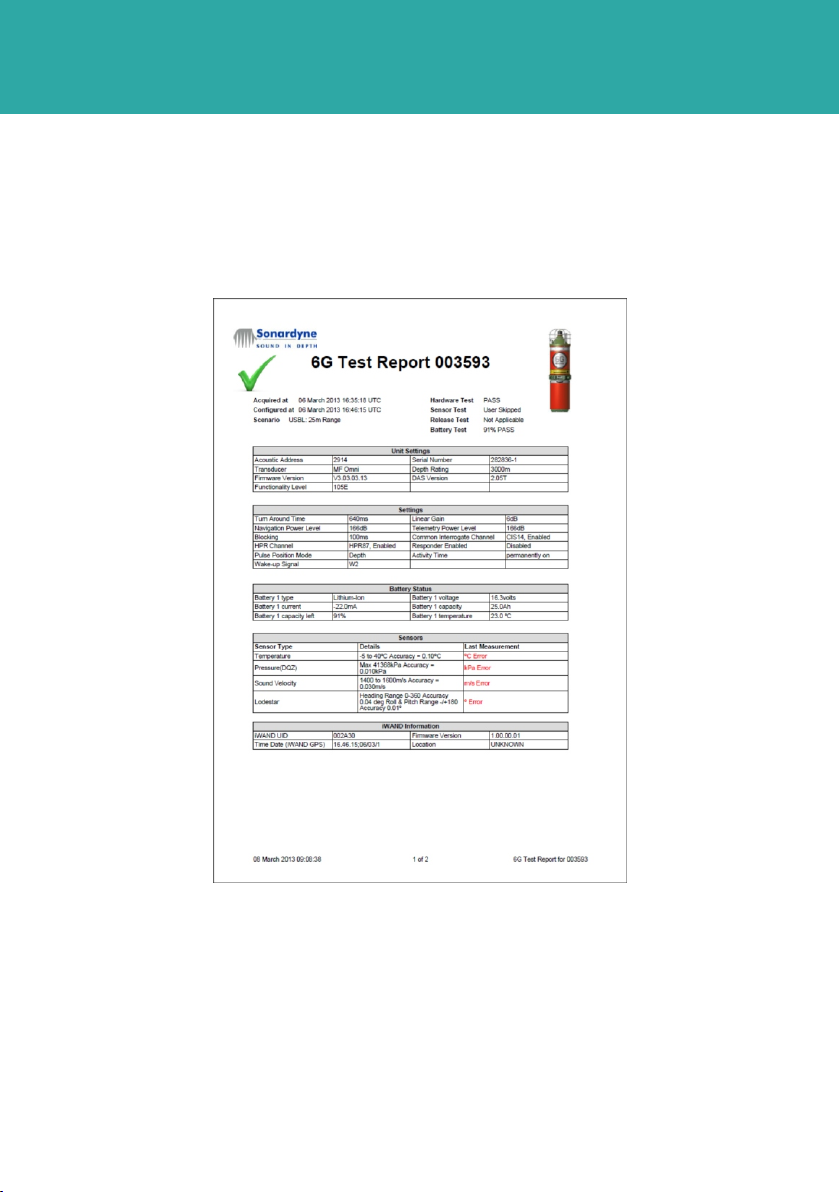
11 A system report can now be generated. This will provide a complete overview of the
configuration of the instrument for reference.
7 When the iWAND has completed configuring the instrument it will display Success
Configured and the instrument address.
8 If the iWAND detects the instrument does not require configuring it will display
Abort.
GENERATING A SYSTEM REPORT
To view the full configuration of an instrument a report can be generated.
1 To generate a report, press the Generate Report button at the top of the iWAND
6G Configurator page.
The Generate Report button is only available when the traffic light next
to the instrument UID is green.
2NOTE
STEP 14
STORAGE
The iWAND is supplied in a weatherproof purposely designed case. When not in use the
iWAND must be stored in the case to maintain serviceability.
Make sure the housing is clean and dry before returning to the case.
Avoid leaving the iWAND in a deeply discharged, or fully charged state for long periods
of time (40 - 60% charge for optimum battery life). Turn off the iWAND for storage and
shipping by selecting:
iWAND > Power Saving > Off for Shipping.
OPERATING THE EQUIPMENT
GENERATING A SYSTEM REPORT
2 A pdf test report will be generated.

Global Headquarters, UK
T. +44 (0) 1252 872288
F. +44 (0) 1252 876100
Houston, USA
T. +1 281 890 2120
F. +1 281 890 7047
24/7 Emergency Hotline
+44 (0) 1252 877600
Email Support
Website
www.sonardyne.com
Twitter
@sonardyne
Aberdeen, UK
T. +44 (0) 1224 707875
F. +44 (0) 1224 707876
Singapore, Asia
T. +65 6542 1911
F. +65 6542 6937
QSG-OG-8315-A1
05/2013
910-0006
ACOUSTIC POSITIONING INERTIAL NAVIGATION
llWIRELESS COMMUNICATION lSONAR IMAGING
Rio das Ostras, Brazil
T. +55 22 2123 4950
F. +55 22 2123 4951
Table of contents
Other Sonardyne Marine Radio manuals


